-
STM32基于HAL库RT-Thread Demo测试
STM32基于HAL库RT-Thread Demo测试
- 🎈源码地址:
https://github.com/RT-Thread/rt-thread/tree/master - 📌基于STM32CUBEMX中间件安装《基于 CubeMX 移植 RT-Thread Nano》
- 📍环境搭建《使用 Env 创建 RT-Thread 项目工程》
- 🔖《Env 用户手册》
- ✨在STM32上使用推荐使用RT-Thread Nano版本。
-
🌿如果仅仅是想使用此系统框架,那么就不需要按照官方介绍的复杂配置,只需拷贝一个工程模板来使用即可。
-
📍ARM.Keil官网提供的
rt-thread开发框架例程资源:https://www.keil.arm.com/boards/?q=&vendor=stmicroelectronics&core=Cortex-M3&sort_by= -
或者是Keil中直接下载:

-
🌿按照官方的学习路线:先利用现成的工程案例
模拟运行。可参考官方的教程《Keil 模拟器 STM32F103 上手指南》
- 🔖当然你如果手上有对应的STM32开发板,也是可以直接烧录和运行来的。测试方法和仿真模拟是一样的。
- 🔰Keil模拟器提供的例程资源可以直接编译、仿真或烧录测试的,(https://gitee.com/rtthread/docs-online/raw/master/rt-thread-version/rt-thread-standard/tutorial/quick-start/stm32f103-simulator/rtthread_simulator_v0.1.0.7z)在github下载的源码资源中的
bsp中的例程需要用过Env工具,对需要使用的工程,要提前配置一下才能通过编译的。 - 🔖bsp源码例程如果没有经过配置,会报缺少
RT_CPUS_NR宏定义,如果仅是拷贝模板,可以自己定义一下也可以解决报错问题。
🛠Env配置
- 🌿按照官方提供的ENv安装教程安装完成并设置好后,在项目文件夹内右键通过
ConEmu Here打开,输入menuconfig

- 🌿
bsp例程配置CPU核心数


-
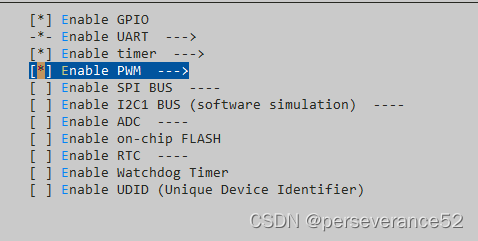
🌿其他外设功能开启设置,按个人需求配置,不同型号的项目例程外设有差异,目前官方所提供的芯片例程,外设配置内容并不是很完善。当然可以按照官方给出的教程创建《STM32 系列 BSP 制作教程》


-
🌿配置好待测试的外设功能后,记得保存配置选项。

-
🌿已完成项目的配置工作,可以通过Keil直接打开工程进行编译,也可以使用ENv自带的编译工具链,运行
scons命令即可使用默认的 ARM_GCC 工具链编译bsp例程。


- 🔖Keil中编译和下载代码就不介绍了。
- 📝测试例程:(
rt-thread\bsp\stm32\stm32f103-blue-pill)
/* * Copyright (c) 2006-2021, RT-Thread Development Team * * SPDX-License-Identifier: Apache-2.0 * * Change Logs: * Date Author Notes * 2019-03-08 obito0 first version */ #include#include #include /* defined the LED0 pin: PC13 */ #define LED0_PIN GET_PIN(E, 5) #define LED1_PIN GET_PIN(B, 5) #define PWM_DEV_NAME "pwm2" /* PWM设备名称 */ #define PWM_DEV_CHANNEL1 1 /* PWM通道 */ #define PWM_DEV_CHANNEL2 1 /* PWM通道 */ struct rt_device_pwm* pwm_dev; /* PWM设备句柄 */ rt_uint32_t period, pulse; //TIM_HandleTypeDef htim2; int main(void) { period = 5000; /* 周期为5ms,单位为纳秒ns */ pulse = 2000; /* PWM脉冲宽度值,单位为纳秒ns */ /* 查找设备 */ pwm_dev = (struct rt_device_pwm*)rt_device_find(PWM_DEV_NAME); /* 设置PWM周期和脉冲宽度 */ //如果想通过串口命令来开启,就不需要启用下面的注释代码 // rt_pwm_set(pwm_dev, PWM_DEV_CHANNEL1, period, pulse); // rt_pwm_set(pwm_dev, PWM_DEV_CHANNEL2, period, pulse); /* 使能设备 */ // rt_pwm_enable(pwm_dev, 1); //开启PWM输出通道:PA15 // rt_pwm_enable(pwm_dev, 2);//开启PWM输出通道:PB3 /* 关闭设备通道 */ // rt_pwm_disable(pwm_dev, PWM_DEV_CHANNEL); /* set LED0 pin mode to output */ rt_pin_mode(LED0_PIN, PIN_MODE_OUTPUT); rt_pin_mode(LED1_PIN, PIN_MODE_OUTPUT); // HAL_TIM_PWM_Start(&htim2, TIM_CHANNEL_1); //开启PWM输出通道:PA15 // HAL_TIM_PWM_Start(&htim2, TIM_CHANNEL_2); //开启PWM输出通道:PB3 while(1) { rt_pin_write(LED0_PIN, PIN_LOW); rt_pin_write(LED1_PIN, PIN_HIGH); rt_thread_mdelay(500); rt_pin_write(LED0_PIN, PIN_HIGH); rt_pin_write(LED1_PIN, PIN_LOW); rt_thread_mdelay(500); } } - 1
- 2
- 3
- 4
- 5
- 6
- 7
- 8
- 9
- 10
- 11
- 12
- 13
- 14
- 15
- 16
- 17
- 18
- 19
- 20
- 21
- 22
- 23
- 24
- 25
- 26
- 27
- 28
- 29
- 30
- 31
- 32
- 33
- 34
- 35
- 36
- 37
- 38
- 39
- 40
- 41
- 42
- 43
- 44
- 45
- 46
- 47
- 48
- 49
- 50
- 51
- 52
- 53
- 54

- 🌿通过串口命令配置对应PWM通道输出:
[21:36:06.342] O-9[32m[I/I2C] I2C bus [i2c1] regi [21:36:06.400] stered[0m [21:36:06.400] [21:36:06.400] \ | / [21:36:06.400] - RT - Thread Operating System [21:36:06.400] / | \ 5.1.0 build Oct 20 2023 20:37:06 [21:36:06.400] 2006 - 2022 Copyright by RT-Thread team [21:36:06.400] msh > [21:36:08.932] pwm probe pwm2 [21:36:08.943] pwm probe pwm2 [21:36:08.943] probe pwm2 success [21:36:08.943] msh > [21:36:08.943] msh > [21:36:31.093] pwm enable 2 [21:36:31.104] pwm enable 2 [21:36:31.104] pwm2 channel 2 is enabled success [21:36:31.104] msh > [21:36:31.104] msh > [21:36:38.840] pwm enable 1 [21:36:38.851] pwm enable 1 [21:36:38.851] pwm2 channel 1 is enabled success [21:36:38.851] msh > [21:36:38.851] msh > [21:37:26.475] pwm set 1 5000 2000 [21:37:26.487] pwm set 1 5000 2000 [21:37:26.487] pwm info set on pwm2 at channel 1 [21:37:26.487] msh > [21:37:26.487] msh > [21:37:32.232] pwm set 2 5000 2000 [21:37:32.243] pwm set 2 5000 2000 [21:37:32.243] pwm info set on pwm2 at channel 2 [21:37:32.243] msh > [21:37:32.243] msh > [21:37:52.630] pwm get 1 [21:37:52.640] pwm get 1 [21:37:52.640] Info of device [pwm2] channel [1]: [21:37:52.640] period : 5000 [21:37:52.647] pulse : 2000 [21:37:52.647] Duty cycle : 40% [21:37:52.647] msh > [21:37:52.647] msh > [21:37:58.043] pwm get 2 [21:37:58.053] pwm get 2 [21:37:58.053] Info of device [pwm2] channel [2]: [21:37:58.053] period : 5000 [21:37:58.060] pulse : 2000 [21:37:58.060] Duty cycle : 40% [21:37:58.060] msh > [21:37:58.060] msh >- 1
- 2
- 3
- 4
- 5
- 6
- 7
- 8
- 9
- 10
- 11
- 12
- 13
- 14
- 15
- 16
- 17
- 18
- 19
- 20
- 21
- 22
- 23
- 24
- 25
- 26
- 27
- 28
- 29
- 30
- 31
- 32
- 33
- 34
- 35
- 36
- 37
- 38
- 39
- 40
- 41
- 42
- 43
- 44
- 45
- 46
- 47
- 48
- 49
- 50
- 51
- 52
- 53
- 54
- 55
- 56
- 57

- 📚测试工程
链接:https://pan.baidu.com/s/1ujR9pf4UA7lqIidIk_BV9w 提取码:x014- 1
- 2
- 🎈源码地址:
-
相关阅读:
双字单字拆分/合并操作(博途SCL源代码)
C++基本语法【恩培学习笔记(一)】
IT入门知识第八部分《云计算》(8/10)
连接工具和idea能查询出数据库数据,项目中查不到数据库数据:解决办法
使用 Bitnami PostgreSQL Docker 镜像快速设置流复制集群
【ChatGLM2-6B】小白入门及Docker下部署
手机拍照技术
C++基础——友元函数和内部类讲解
vue中的常用指令
计算机组成原理-指令系统-机器级语言表示(汇编)
- 原文地址:https://blog.csdn.net/weixin_42880082/article/details/133954772
