-
论文阅读 | RAFT: Recurrent All-Pairs Field Transforms for Optical Flow
RAFT: Recurrent All-Pairs Field Transforms for Optical Flow
ECCV2020光流任务best paper
论文地址:【here】
代码地址:【here】介绍
光流是对两张相邻图像中的逐像素运动的一种估计。目前碰到的一些困难包括:物体的快速运动,遮挡、运动模糊和缺乏纹理信息的一些图案。
目前深度学习的方法在维持传统方法达到的性能的情况下,有着更快的推理速度。目前需要考虑的问题是:如何设计一个深度学习的光流估计网络,实现更好表现,更易训练和更好的泛化到不同场景。Recurrent All-Pairs Field Transforms (RAFT)框架有如下优势:
- SOTA精度
- 更强泛化
- 更高效率
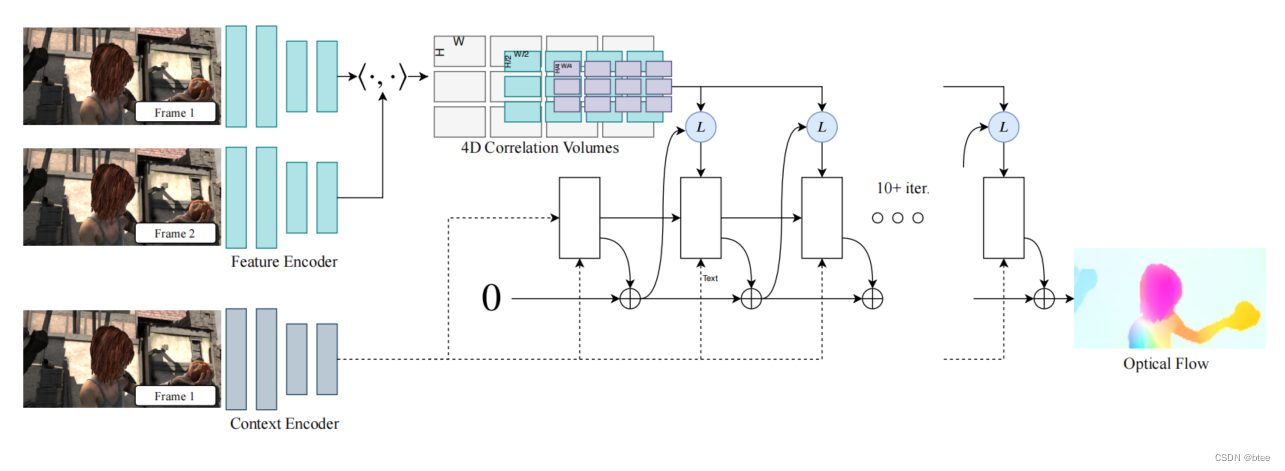
RAFT的主要结构:
- feature encoder(蓝色部分) +context encoder(灰色部分)
- 一个全像素区域的a correlation layer,同时带多尺度池化
- a recurrent GRU-based update operator

网络架构
- Feature encoder:
卷积网络,做了8倍下采样,两张图共享一个网络权重
- context encoder:
和feature encoder 一样的网络结构,只作用在左图,作为后续GRU的参数和左图特征
- correlation volume生成-相似度的计算
拿Feature encoder得到的两张8倍下采样图后的特征,通过逐像素间的特征相乘再求和可以得到一个逐像素间的相似度,利用的是余弦相似度的计算方式。

- Correlation Pyramid生成
由于correlation volume用于生成cost volume,即相邻像素区域之间的一个相似度(correlation volume是全局像素间的一个相似度),需要对correlation volume进行领域取值才能得到cost volume。
即correlation volume: H * W * H * W
cost volume: H * W * delta h * delta w
这样导致如果要搜寻更远空间(larger displacement)内的对应像素,delta h * delta w 会很大,导致占用很大的计算资源于是本文根据这样的缺点,提出一种相关性金字塔Correlation Pyramid:
即构建了四个不同大小的correlation volume,通过对原始大小的correlation volume 池化得到尺寸为H * W * H/2 * W/2, H * W * H/4 * W/4,以此类推的Correlation Pyramid

途中阐释的图correlation volume的构建过程,即C3的correlation volume得到的是image2右图中一个方格内所有的像素点与左图image1某一个像素点的匹配相似度。

构建这样一个金字塔的correlation volume,目的是为了实现不同范围的搜寻空间。在最小的 H * W * H/8 * W/8 correlation volume的上,同样的半径范围r,对应原图的搜寻半径范围是8r.构建Correlation Pyramid代码如下:
corr = CorrBlock.corr(fmap1, fmap2) batch, h1, w1, dim, h2, w2 = corr.shape corr = corr.reshape(batch*h1*w1, dim, h2, w2) self.corr_pyramid.append(corr) for i in range(self.num_levels-1): corr = F.avg_pool2d(corr, 2, stride=2) self.corr_pyramid.append(corr)- 1
- 2
- 3
- 4
- 5
- 6
- 7
- 8
- 9
- Correlation Lookup
这个步骤也就是上一个节,第3节中提到的correlation volume生成cost volume的过程。
具体操作为,在x维度上,生成一个索引图,H * W * (2r+1),存储每个对应的像素点的相邻坐标索引,用这个索引在Correlation Pyramid中取值,得到4个,尺寸为H * W * (2r+1)的cost volume,最后在特征层做特征连接合并不同范围位移的cost volume, 得到一个金字塔范围的cost volume。在y的维度上做同样的操作

代码如下
r = self.radius coords = coords.permute(0, 2, 3, 1) batch, h1, w1, _ = coords.shape out_pyramid = [] for i in range(self.num_levels): corr = self.corr_pyramid[i] dx = torch.linspace(-r, r, 2*r+1, device=coords.device) dy = torch.linspace(-r, r, 2*r+1, device=coords.device) delta = torch.stack(torch.meshgrid(dy, dx), axis=-1) centroid_lvl = coords.reshape(batch*h1*w1, 1, 1, 2) / 2**i delta_lvl = delta.view(1, 2*r+1, 2*r+1, 2) coords_lvl = centroid_lvl + delta_lvl corr = bilinear_sampler(corr, coords_lvl) corr = corr.view(batch, h1, w1, -1) out_pyramid.append(corr) out = torch.cat(out_pyramid, dim=-1)- 1
- 2
- 3
- 4
- 5
- 6
- 7
- 8
- 9
- 10
- 11
- 12
- 13
- 14
- 15
- 16
- 17
- 18
- 19
- 20
-
迭代更新过程
RAFT采用GRU不断迭代更新光流,先将光流初始化0,再不断通过计算的cost volume迭代更新光流,再用将新得到的光流与cost volume优化新的光流

这里的光流用于直接查找 cost volume,因此是绝对值,最后的值要与最初的光流相减 -
upsample过程
由于整个过程都是再8倍下采样分辨率下,因此最后做了一个upsample.
upsample用mask学习周围邻域的分布权重情况,做加权mask的upsample.

def upsample_flow(self, flow, mask): """ Upsample flow field [H/8, W/8, 2] -> [H, W, 2] using convex combination """ N, _, H, W = flow.shape mask = mask.view(N, 1, 9, 8, 8, H, W) mask = torch.softmax(mask, dim=2) up_flow = F.unfold(8 * flow, [3,3], padding=1) up_flow = up_flow.view(N, 2, 9, 1, 1, H, W) up_flow = torch.sum(mask * up_flow, dim=2) up_flow = up_flow.permute(0, 1, 4, 2, 5, 3) return up_flow.reshape(N, 2, 8*H, 8*W)- 1
- 2
- 3
- 4
- 5
- 6
- 7
- 8
- 9
- 10
- 11
- 12
- 损失函数直接用L1损失
实验
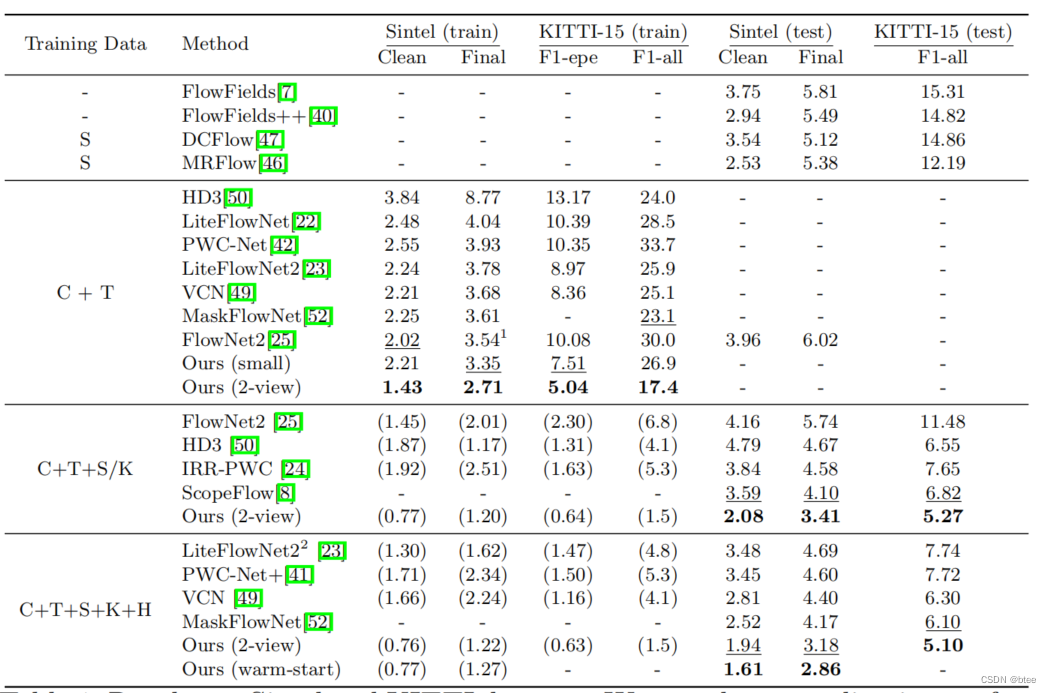
精度

效率

总结
本文的优势:精度好、效率高,在不同数据集上表现都好
-
相关阅读:
颜色也有距离?咋计算?一键找出上万个文件中的相近颜色并替换
设计模式——访问者模式
44、Flink之module模块介绍及使用示例和Flink SQL使用hive内置函数及自定义函数详细示例--网上有些说法好像是错误的
java计算机毕业设计计算机类专业考研交流学习平台MyBatis+系统+LW文档+源码+调试部署
C++继承详细解析+代码演示
【pulsar学习】kafka存在的问题与pulsar应用场景
js — 原生轮播图的制作
ffmpeg在fedora上的静态编译实战——筑梦之路
链表| leecode刷题笔记
AI日报:欧盟人工智能法案通过后行业面临合规障碍
- 原文地址:https://blog.csdn.net/bettii/article/details/133945302
