-
uniapp(uncloud) 使用生态开发接口详情5(云公共模块)
1.uniCloud官网 云对象中云公共模块: 网站:
https://uniapp.dcloud.net.cn/uniCloud/cf-common.html// 官网介绍 cloudfunctions ├─common // 云函数公用模块目录 | └─hello-common // 云函数公用模块 | ├─package.json | └─index.js // 公用模块代码,可以不使用index.js,修改 package.json 内的 main 字段可以指定此文件名 └─use-common // 使用公用模块的云函数 ├─package.json // 在 use-common 目录执行 npm init -y 生成 └─index.js // 云函数入口文件- 1
- 2
- 3
- 4
- 5
- 6
- 7
- 8
- 9
- 10
- 在 common 新建 demo 公共模块
// demo => index.js function getMessage(str) { let msg = { "success": "查询成功", "noSuccess": "查询失败", "requried": "缺少参数" } return msg[str] } function getCode(code) { let codeObj = { 200: 200, // "查询成功", 404: 404 // 找不到路径 } return codeObj[code] } function usrReslut(code, msg, data, total) { return { errCode: getCode(code), errMsg: getMessage(msg), data: data, total: total } } module.exports = { getMessage, getCode, usrReslut }- 1
- 2
- 3
- 4
- 5
- 6
- 7
- 8
- 9
- 10
- 11
- 12
- 13
- 14
- 15
- 16
- 17
- 18
- 19
- 20
- 21
- 22
- 23
- 24
- 25
- 26
- 27
- 28
- 29
- 30
- 31
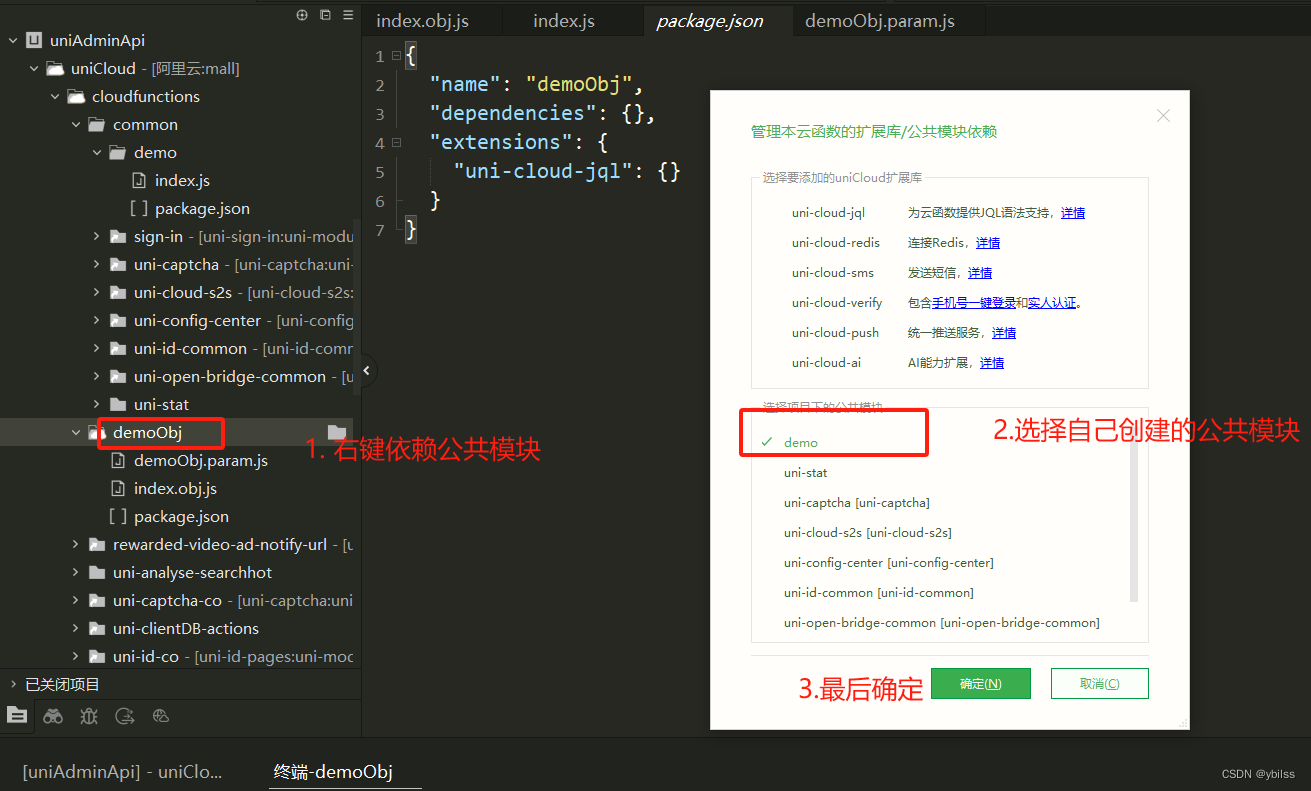
- 点击demo 目录, 上传公共模块
- 使用公共模块

const db = uniCloud.database() // 1. 引入 const { getMessage, getCode, usrReslut } = require("demo") module.exports = { _before: function() { // 通用预处理器 const body = this.getHttpInfo().body if (!body) { throw new usrReslut(400, "requried") } this.params = JSON.parse(this.getHttpInfo().body) this.startTime = Date.now() }, async get() { let { num } = this.params if (num == null) throw new usrReslut(400, "requried") const res = await db.collection("sy_product_nav").limit(num).get() // let result = { // errCode: getCode(0), // errMsg: getMessage("noSuccess"), // data: res.data // } // return result // 使用之后,保存文件,再上传部署 return usrReslut(200, "success", res.data, 0) }, _after(error, result) { if (error) { throw error } result.timeCode = Date.now() - this.startTime return result } }- 1
- 2
- 3
- 4
- 5
- 6
- 7
- 8
- 9
- 10
- 11
- 12
- 13
- 14
- 15
- 16
- 17
- 18
- 19
- 20
- 21
- 22
- 23
- 24
- 25
- 26
- 27
- 28
- 29
- 30
- 31
- 32
- 33
- 34
- 35
- 36
- 37
- 38
- 39
- 40
- 41
- 42
- 43
- 44
- 45
- 在postman中, 使用之前的接口请求, 结果返回ok, 最后是根据自己的需求制定接口
-
相关阅读:
问题随记 —— Cannot create directory /tmp/hive. Name node is in safe mode.
7、Spring之依赖注入源码解析(下)
SQL学习记录
(一)Multisim安装与入门
2022-30周 项目问题整理
一个月后,我们又从 MySQL 双主切换成了主 - 从!
leetcode Top100 (5) 盛最多水的容器
C++位图,布隆过滤器
为什么做数据质量
c刷题【五】
- 原文地址:https://blog.csdn.net/ybilss/article/details/133899240
