-
Springboot视图解析与模板引擎~
视图解析:
springboot默认不支持JSP,需要引入第三方模板引擎技术实现页面渲染
视图处理方式:
转发,重定向,自定义视图thymeleaf的使用:
1:引入starter
<dependency> <groupId>org.springframework.bootgroupId> <artifactId>spring-boot-starter-thymeleafartifactId> dependency>- 1
- 2
- 3
- 4
2:自动配置好了Thymeleaf,查看
ThymeleafAutoConfiguration源码如下所示:@AutoConfiguration( after = {WebMvcAutoConfiguration.class, WebFluxAutoConfiguration.class} ) @EnableConfigurationProperties({ThymeleafProperties.class}) @ConditionalOnClass({TemplateMode.class, SpringTemplateEngine.class}) @Import({TemplateEngineConfigurations.ReactiveTemplateEngineConfiguration.class, TemplateEngineConfigurations.DefaultTemplateEngineConfiguration.class}) public class ThymeleafAutoConfiguration {- 1
- 2
- 3
- 4
- 5
- 6
- 7
自动装配的策略:
1:所有thymeleaf的配置值都在ThymeleafProperties
2:配置好了SpringTemplateEngine
3:配置好了ThymeleafViewResolverpublic static final String DEFAULT_PREFIX = "classpath:/templates/"; public static final String DEFAULT_SUFFIX = ".html";- 1
- 2
开发:
package com.example.demo.Controller; import org.springframework.stereotype.Controller; import org.springframework.ui.Model; import org.springframework.web.bind.annotation.GetMapping; @Controller public class ViewControllerTest { @GetMapping("/hello") public String show(Model model){ model.addAttribute("msg","你好,springboot"); model.addAttribute("link","http://www.baidu.com"); return "success"; } }- 1
- 2
- 3
- 4
- 5
- 6
- 7
- 8
- 9
- 10
- 11
- 12
- 13
- 14
- 15
- 16
- 17
必须在html页面中引入thymeleaf取值空间
xmlns:th="http://www.thymeleaf.orgDOCTYPE html> <html lang="en" xmlns:th="http://www.thymeleaf.org"> <head> <meta charset="UTF-8"> <title>Titletitle> head> <body> <h1 th:text="${msg}" >哈哈h1> <h2> <a href="www.hello.com" th:href="${link}" >去百度1a> <a href="www.hello.com" th:href="@{/link}" >去百度1a> h2> body> html>- 1
- 2
- 3
- 4
- 5
- 6
- 7
- 8
- 9
- 10
- 11
- 12
- 13
- 14
- 15
- 16
springboot启动项目:
package com.example.demo; import org.springframework.boot.SpringApplication; import org.springframework.boot.autoconfigure.SpringBootApplication; @SpringBootApplication public class Demo3Application { public static void main(String[] args) { SpringApplication.run(Demo3Application.class, args); } }- 1
- 2
- 3
- 4
- 5
- 6
- 7
- 8
- 9
- 10
- 11
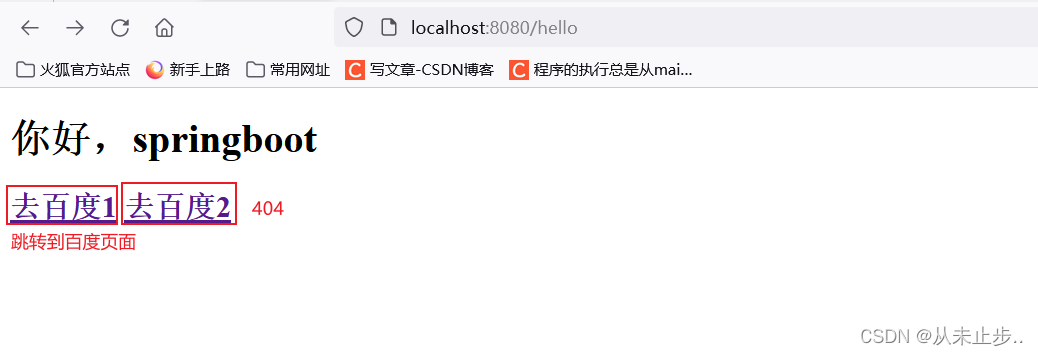
因此如果我们想通过第二种写法实现跳转到百度页面,那么正确写法如下所示:<a href="www.hello.com" th:href="@{/http://www.baidu.com}">去百度2a>- 1
并且这两种写法还有一个区别就是如果我们给当前项目设置了上文访问路径,那么第二种写法会自动的将将其补上,如下所示:
我们设置了项目的访问路径为demo
server: servlet: context-path: /demo- 1
- 2
- 3
通过重启项目后,检查页面源码如下所示:

-
相关阅读:
5种促进业务增长的软件测试策略,我敢打赌你一定不知道?
明天报名!!济宁教师招聘报名照片及常见问题
火山引擎ByteHouse:分析型数据库如何设计并发控制?
ajax,axios,fetch
Worthington酒精脱氢酶的特异性和五个应用
『Halcon与C#混合编程』009_利用PictureBox实现窗体
JAVA【设计模式】装饰器模式
植树节种树-第12届蓝桥杯Scratch选拔赛真题精选
QLayout 删除widget中的子控件,父控件大小不能自适应
【mq】从零开始实现 mq-03-引入 broker 中间人
- 原文地址:https://blog.csdn.net/m0_64365419/article/details/133844155