-
RabbitMQ快速入门
消息队列是目前最常见的微服务中间件之一,而RabbitMq在全球范围内的使用率也是名列前茅。
下面带大家快速入门RabbitMQ
了解 RabbitMQ

-
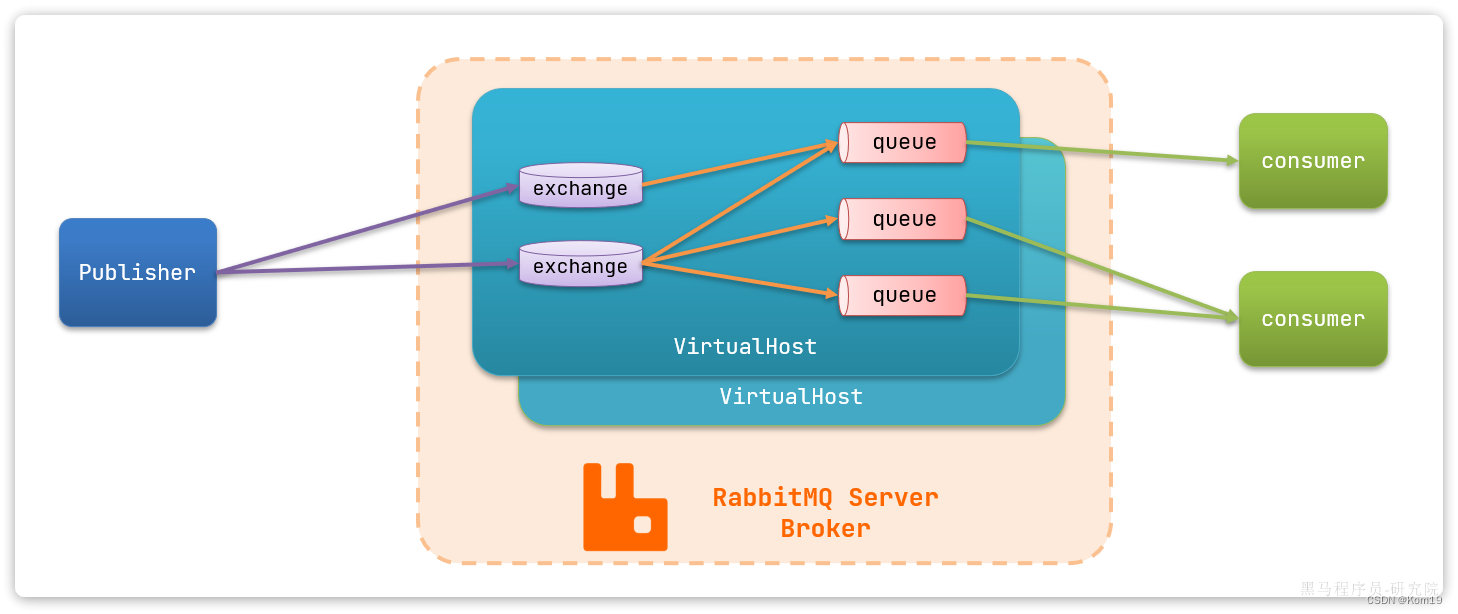
publisher:生产者,也就是发送消息的一方 -
consumer:消费者,也就是消费消息的一方 -
queue:队列,存储消息。生产者投递的消息会暂存在消息队列中,等待消费者处理 -
exchange:交换机,负责消息路由。生产者发送的消息由交换机决定投递到哪个队列。 -
virtual host:虚拟主机,起到数据隔离的作用。每个虚拟主机相互独立,有各自的exchange、queue
使用Java代码使用RabbitMQ
Spring的官方基于RabbitMQ提供了这样一套消息收发的模板工具:Spring AMQP。并且还基于SpringBoot对其实现了自动装配,使用起来非常方便。
首先我们要在pom.xml文件里面导入依赖
- <dependency>
- <groupId>org.springframework.bootgroupId>
- <artifactId>spring-boot-starter-amqpartifactId>
- dependency>
然后在配置文件里面配置好RabbitMQ的相关配置
- spring:
- rabbitmq:
- host: 127.0.0.1 # 你的IP
- port: 5672 # 端口 - 注意这里的端口一定要是5672
- virtual-host: /mall # 虚拟主机
- username: guest # 用户名
- password: guest # 密码
配置好相关配置以后就可以编写代码了
WorkQueues模型
实际上该模型就是让多个消费者绑定到一个队列,共同消费队列中的消息。从而提高消息处理的速度

Fanout交换机 - 广播
广播,将消息交给所有绑定到交换机的队列
只要我们向Fanout发送了消息,那么所有绑定了Fanout交换机的队列都会接收到消息
假如生产者推送了这么一条消息给交换机,那么所有的交换机都可以接收到这条消息
- @Test
- public void testFanoutExchange(){
- String fanoutExchange = "hmall.fanout";
- String message = "hello,everyone";
- rabbitTemplate.convertAndSend(fanoutExchange,"",message);
- }
同时消费者也可以获取到消息
- @RabbitListener(queues = "work.queue")
- public void listenWorkQueue1(String msg){
- System.out.println("消费者1....接收到消息:【" + msg + "】");
- }
- @RabbitListener(queues = "work.queue")
- public void listenWorkQueue2(String msg) throws InterruptedException {
- System.out.println("消费者2....接收到消息:【" + msg + "】");
- Thread.sleep(20);//模拟缓慢的处理
- }
为了更好的利用各个消费者的性能,我们可以设置”处理完一条数据才能获取数据“ 的设定
- spring:
- rabbitmq:
- host: 127.0.0.1
- port: 5672
- virtual-host: /hmall
- username: hmall
- password: 123
- listener:
- simple:
- prefetch: 1
Direct - 订阅
订阅,基于RoutingKey(路由key)发送给订阅了消息的队列
只要我们向direct发送了消息,那么所有绑定了direct交换机的且RoutingKey相同的队列才会接收消息
由于我这里的RoutingKey是red,所以只有RoutingKey是red的队列才能接收这条消息
- @Test
- public void testDirectExchange(){
- String directExchange = "hmall.direct";
- String message = "hello,red";
- rabbitTemplate.convertAndSend(directExchange,"red",message);
- }
- @RabbitListener(queues = "direct.queueRed")
- public void listenDirectQueue1(String msg) {
- System.out.println("消费者Red接收到direct.queueRed的消息:【" + msg + "】");
- }
Topic - 通配符匹配
通配符订阅,与Direct类似,只不过RoutingKey可以使用通配符
只要我们向topic发送了消息,那么所有绑定了topic交换机的且RoutingKey匹配成功的队列才会接收消息
假如说有两个队列 一个RoutingKey是 china. 一个RoutingKey是 .news
那么此时我发送一条消息
- @Test
- public void testSendTopicExchange() {
- // 交换机名称
- String exchangeName = "hmall.topic";
- // 消息
- String message = "hello china.news";
- // 发送消息
- rabbitTemplate.convertAndSend(exchangeName, "china.news", message);
- }
那么两个队列都可以接收到
但是如果我发送一条
- @Test
- public void testSendTopicExchange() {
- // 交换机名称
- String exchangeName = "hmall.topic";
- // 消息
- String message = "hello china.weather";
- // 发送消息
- rabbitTemplate.convertAndSend(exchangeName, "china.weather", message);
- }
那么就只有china.这个队列可以接受到了
利用Java代码生成交换机/队列并且完成绑定
首先我们要创建一个在Config包里面创一个类,这个类的作用是用来生成交换机/队列的,同时要加上@Configuartion注解,在生成交换机或者队列或者绑定的方法上一定要加@Bean注解
这里就直接贴上代码了
Fanout
- @Configuration
- public class DirectConfiguration {
- @Bean
- public DirectExchange directExchange(){
- return new DirectExchange("hmall.direct");
- }
- @Bean
- public Queue directQueue1(){
- return new Queue("direct.queue1");
- }
- @Bean
- public Binding directQueue1BindingRed(Queue directQueue1, DirectExchange directExchange){
- return BindingBuilder.bind(directQueue1).to(directExchange).with("red");
- }
- @Bean
- public Binding directQueue1BindingBlue(Queue directQueue1, DirectExchange directExchange){
- return BindingBuilder.bind(directQueue1).to(directExchange).with("blue");
- }
- @Bean
- public Queue directQueue2(){
- return new Queue("direct.queue2");
- }
- @Bean
- public Binding directQueue2BindingRed(Queue directQueue2, DirectExchange directExchange){
- return BindingBuilder.bind(directQueue2).to(directExchange).with("red");
- }
- @Bean
- public Binding directQueue2BindingBlue(Queue directQueue2, DirectExchange directExchange){
- return BindingBuilder.bind(directQueue2).to(directExchange).with("yellow");
- }
- }
Direct
- @Configuration
- public class DirectConfiguration {
- @Bean
- public DirectExchange directExchange(){
- return new DirectExchange("hmall.direct");
- }
- @Bean
- public Queue directQueue1(){
- return new Queue("direct.queue1");
- }
- @Bean
- public Binding directQueue1BindingRed(Queue directQueue1, DirectExchange directExchange){
- return BindingBuilder.bind(directQueue1).to(directExchange).with("red");
- }
- @Bean
- public Binding directQueue1BindingBlue(Queue directQueue1, DirectExchange directExchange){
- return BindingBuilder.bind(directQueue1).to(directExchange).with("blue");
- }
- @Bean
- public Queue directQueue2(){
- return new Queue("direct.queue2");
- }
- @Bean
- public Binding directQueue2BindingRed(Queue directQueue2, DirectExchange directExchange){
- return BindingBuilder.bind(directQueue2).to(directExchange).with("red");
- }
- @Bean
- public Binding directQueue2BindingBlue(Queue directQueue2, DirectExchange directExchange){
- return BindingBuilder.bind(directQueue2).to(directExchange).with("yellow");
- }
- }
Topic
- @Configuration
- public class TopicConfiguration {
- //创建Topic交换机
- @Bean
- public TopicExchange topicExchange(){
- return new TopicExchange("hmall.topic2");
- }
- //创建topic队列
- @Bean
- public Queue topicQueue3(){
- return new Queue("topic.queue3");
- }
- //绑定
- @Bean
- public Binding bindingQueue1(Queue topicQueue3, TopicExchange topicExchange){
- return BindingBuilder.bind(topicQueue3).to(topicExchange).with("china.");
- }
- //创建topic队列
- @Bean
- public Queue topicQueue4(){
- return new Queue("topic.queue4");
- }
- @Bean
- public Binding topicBinding(Queue topicQueue4,TopicExchange topicExchange){
- return BindingBuilder.bind(topicQueue4).to(topicExchange).with(".news");
- }
- }
处理JSON数据类型
如果我们想要处理JSON数据的话就要在启动类上添加
- @Bean
- public MessageConverter jacksonMessageConvertor(){
- return new Jackson2JsonMessageConverter();
- }
不管是生产者还是消费者都需要在启动类上添加这么一条代码
-
-
相关阅读:
BigDecimal在生产上怎么用?
ceph 1 pool(s) do not have an application enabled
《最新出炉》系列入门篇-Python+Playwright自动化测试-49-Route类拦截修改请求-下篇
网络安全(黑客技术)—小白自学
BaseDexClassLoader的正确使用方式
与六年测试工程师促膝长谈,他分享的这些让我对软件测试工作有了全新的认知~
第二站:分支与循环(第二幕)
[Qt开发]当我们在开发兼容高分辨率和高缩放比、高DPI屏幕的软件时,我们在谈论什么。
【面试题】—— 笔试题(4题)
Docker部署ActiveMq
- 原文地址:https://blog.csdn.net/Superkom666/article/details/133847864
