-
Variations-of-SFANet-for-Crowd-Counting记录
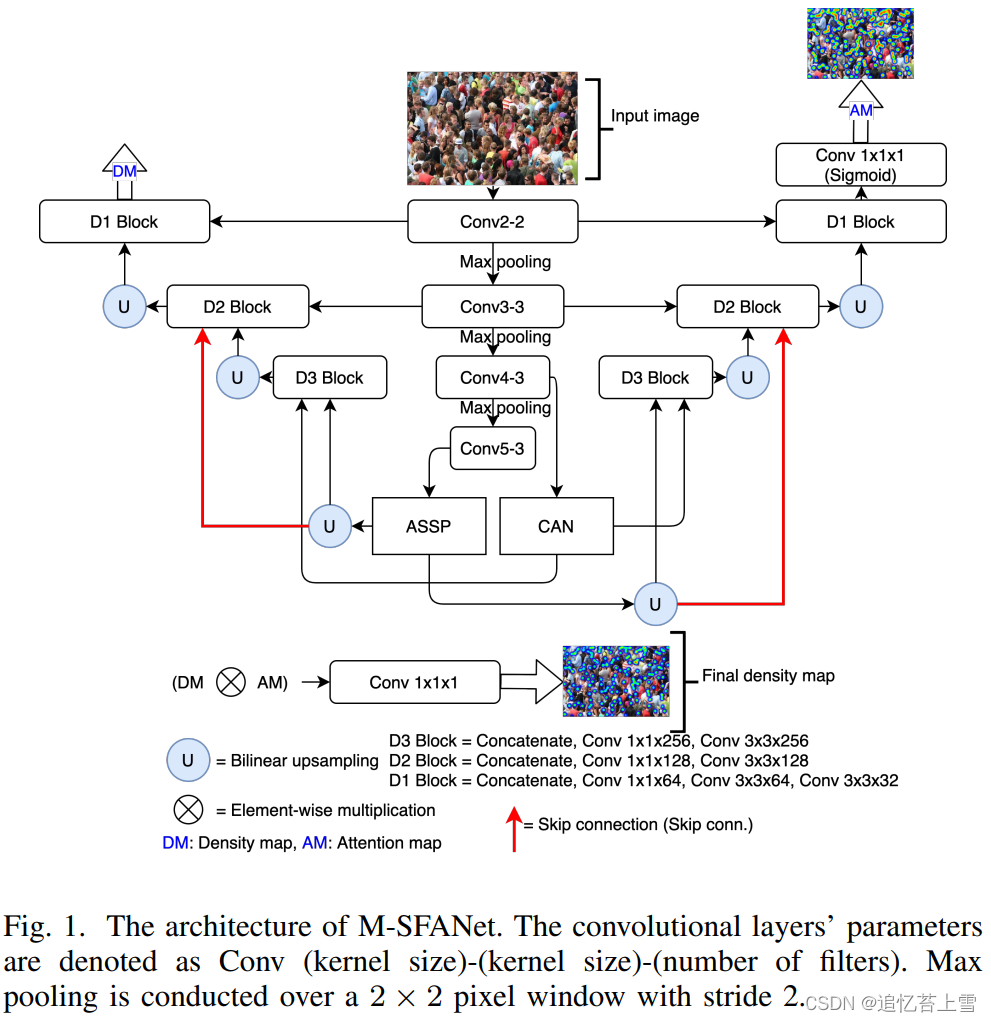
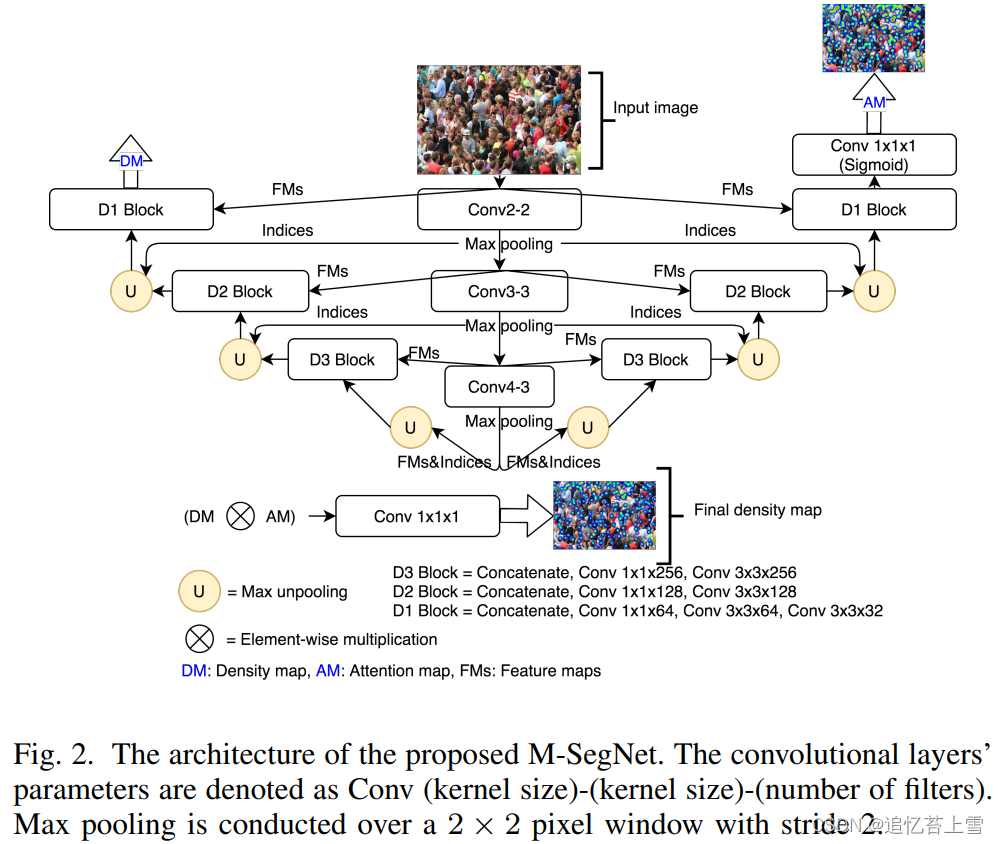
论文:Encoder-Decoder Based Convolutional Neural Networks with Multi-Scale-Aware Modules for Crowd Counting


论文链接:https://arxiv.org/abs/2003.05586
框架结构:基于点标签的目标检测与计数深度学习框架盘点-CSDN博客
本文中使用到的框架:
利用贝叶斯损失(Bayesian loss, BL)的人群计数: GitHub - ZhihengCV/Bayesian-Crowd-Counting: Official Implement of ICCV 2019 oral paper Bayesian Loss for Crowd Count Estimation with Point Supervision
上下文信息提取CAN: GitHub - weizheliu/Context-Aware-Crowd-Counting: Official Code for Context-Aware Crowd Counting. CVPR 2019
要完成UCF-QNRF数据集训练代码,参考:GitHub - ZhihengCV/Bayesian-Crowd-Counting: Official Implement of ICCV 2019 oral paper Bayesian Loss for Crowd Count Estimation with Point Supervision
要完成Shanghaitech数据集训练代码,参考:GitHub - pxq0312/SFANet-crowd-counting: This is an unofficial implement of the arXiv paper Dual Path Multi-Scale Fusion Networks with Attention for Crowd Counting by PyTorch.
M-SFANet和M-SegNet实现参考框架中的models部分:https://github.com/Pongpisit-Thanasutives/Variations-of-SFANet-for-Crowd-Counting/tree/master/models
数据集
来自工程readme文件,为了再现论文中报告的结果,可以使用这些预处理的数据集。尚未完成,并可能在未来更新。
使用高斯核处理过的Shanghaitech B 数据集:https://drive.google.com/file/d/1Jjmvp-BEa-_81rXgX1bvdqi5gzteRdJA/view

贝叶斯处理(处理方式和GitHub - ZhihengCV/Bayesian-Crowd-Counting: Official Implement of ICCV 2019 oral paper Bayesian Loss for Crowd Count Estimation with Point Supervision一样)过的Shanghaitech datasets (A&B):https://drive.google.com/file/d/1azoaoRGxfXI7EkSXGm4RrX18sBnDxUtP/view

Beijing-BRT dataset(源自GitHub - XMU-smartdsp/Beijing-BRT-dataset):https://drive.google.com/file/d/1JRjdMWtWiLxocHensFfJzqLoJEFksjVy/view

预训练权重
Shanghaitech A&B:https://drive.google.com/file/d/1MxGZjapIv6O-hzxEeHY7c93723mhGKrG/view

测试可视化代码应该使用UCF_QNRF数据集上的预训练M_SegNet*:https://drive.google.com/file/d/1fGuH4o0hKbgdP1kaj9rbjX2HUL1IH0oo/view(M_SFANet*预训练权重也包含在内)

案例demo
下面是一个测试案例,使用UCF-QNRF数据集上的预训练M-SFANet*去计数图片中的人。
测试图片是./images/img_0071.jpg(来自UCF-QNRF测试集)
- import cv2
- from PIL import Image
- import numpy as np
- import torch
- from torchvision import transforms
- from datasets.crowd import Crowd
- from models import M_SFANet_UCF_QNRF
- # Simple preprocessing.
- trans = transforms.Compose([transforms.ToTensor(),
- transforms.Normalize([0.485, 0.456, 0.406], [0.229, 0.224, 0.225])
- ])
- # An example image with the label = 1236.
- img = Image.open("./images/img_0071.jpg").convert('RGB')
- height, width = img.size[1], img.size[0]
- height = round(height / 16) * 16
- width = round(width / 16) * 16
- img = cv2.resize(np.array(img), (width,height), cv2.INTER_CUBIC)
- img = trans(Image.fromarray(img))[None, :]
- model = M_SFANet_UCF_QNRF.Model()
- # Weights are stored in the Google drive link.
- # The model are originally trained on a GPU but, we can also test it on a CPU.
- # For ShanghaitechWeights, use torch.load("./ShanghaitechWeights/...")["model"] with M_SFANet.Model() or M_SegNet.Model()
- model.load_state_dict(torch.load("./Paper's_weights_UCF_QNRF/best_M-SFANet*_UCF_QNRF.pth",
- map_location = torch.device('cpu')))
- # Evaluation mode
- model.eval()
- density_map = model(img)
- # Est. count = 1168.37 (67.63 deviates from the ground truth)
- print(torch.sum(density_map).item())
运行上述代码结果如下

-
相关阅读:
mac电脑解决无法打开软件
【Java八股文总结】之读写分离&分库分表
数据结构 | 单链表
HCIP-datacom
Android T(13)-- Looper 的使用(一)
跨语言调用C#代码的新方式-DllExport
华为再放大招“重新造车”,这次能否延续手机辉煌?
八种架构设计模式优缺点
python 性能优化实例练习二 —— 细节优化(ctypes等,未完)
图像格式导致halcon读取失败
- 原文地址:https://blog.csdn.net/m0_73832962/article/details/133811355