-
【深蓝学院】手写VIO第6章--视觉前端--作业(SVD分解部分复习)
0. 题目
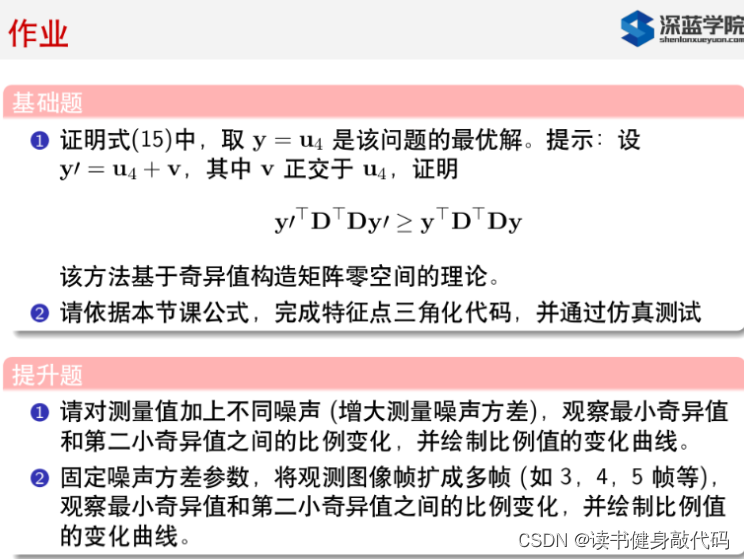
T1.
奇异值分解需要补,看这篇博客,讲的很好。
总结一下,关于奇异值分解(Singular Value Decomposition,SVD )有以下内容摘抄自该博客,关于SDV分解的部分应该是摘自李航《统计学习方法里面的》:1. 特征值分解
设 A 为 n 阶方阵,若存在数 λ 和非零向量 x,使得
A x = λ x ( x ≠ 0 ) Ax=\lambda x(x\neq 0) Ax=λx(x=0)
则称 λ \lambda λ是A的一个特征值。
求出了矩阵 A 的 n 个特征值 λ 1 ≤ λ 2 ≤ λ 3 . . . ≤ λ n \lambda_1 \leq \lambda_2 \leq \lambda_3 ...\leq\lambda_n λ1≤λ2≤λ3...≤λn,这n个特征值对应的特征向量分别为 p 1 , p 2 , p 3 . . . p n p_1,p_2,p_3...p_n p1,p2,p3...pn,如果这n个特征向量线性无关,则矩阵A即可以用下式的特征分解表示
A = P Λ P − 1 A=P\Lambda P^{-1} A=PΛP−1 其中 P = { p 1 , p 2 , p 3 . . . p n } P=\{p_1,p_2,p_3...p_n\} P={p1,p2,p3...pn}是这 n 个特征向量张开成的 n*n 矩阵, Λ \Lambda Λ是以这n个特征值为主对角线的n*n维对角阵。
一般我们会把 P P P的 n 个特征向量标准化,此时,这 n 个特征向量为标准正交基,满足 P ∗ P T = I P*P^T=I P∗PT=I ,即 P T = P − 1 P^T=P^{-1} PT=P−1,这样特征分解表达式可以写成: A = P Λ P T A=P\Lambda P^T A=PΛPT
注意,要进行特征分解,矩阵 A 必须为方阵。如果A不是方阵,即行和列不相同时,我们还可以对矩阵进行分解吗?答案是可以,此时我们的SVD登场了。2. SVD分解
SVD 定义:矩阵的奇异值分解是指,将一个非零的 m × n 实矩阵 A,表示为以下三个实矩阵乘积形式的运算 (SVD 可以更一般地定义在复数矩阵上,但本文不涉及),即进行矩阵的因子分解:
A = U Σ V T A=U\Sigma V^T A=UΣVT
其中 U 是 m 阶正交矩阵,V 是 n 阶正交矩阵,Σ 是由降序排列的非负的对角线元素组成的 m × n 矩形对角矩阵。满足:
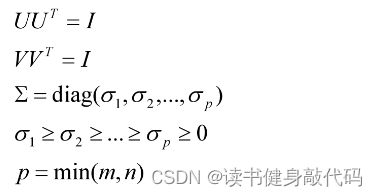
A = U Σ V T A=U\Sigma V^T A=UΣVT为矩阵 A A A的SVD分解, σ i \sigma_i σi为 A A A的奇异值, U U U的列项向量称为 A A A的左奇异向量,V的列向量称为 A A A的右奇异向量。
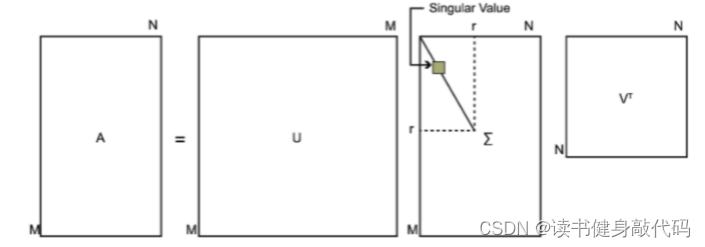
奇异值分解不要求矩阵 A 是方阵,事实上矩阵的奇异值分解可以看做是方阵的对角化的推广。
2.1 SVD 基本定理
若 A 为一 m × n 实矩阵 ,则 A 的奇异值分解存在
A = U Σ V T A=U\Sigma V^T A=UΣVT其中 U 是 m 阶正交矩阵,V 是 n 阶正交矩阵,Σ 是 m × n 矩形对角矩阵,其对角线元素非负,且按降序排列。
这个定理表达的意思就是矩阵的奇异值分解是一定存在的 (但不唯一),这里就不具体证明了。
2.2 主要性质
- 设矩阵A的AVD分解为
A
=
U
Σ
V
T
A=U\Sigma V^T
A=UΣVT,则以下关系成立:
A T A = ( U Σ V T ) T ( U Σ V T ) = V ( Σ T Σ ) V T A A T = ( U Σ V T ) ( U Σ V T ) T = U ( Σ T Σ ) U TATA=(UΣVT)T(UΣVT)=V(ΣTΣ)VTAAT=(UΣVT)(UΣVT)T=U(ΣTΣ)UTA T A = ( U Σ V T ) T ( U Σ V T ) = V ( Σ T Σ ) V T A A T = ( U Σ V T ) ( U Σ V T ) T = U ( Σ T Σ ) U T
也就是说,矩阵 A T A A^TA ATA 和 A A T AA^T AAT 的特征分解存在,且可以由矩阵 A A A 的奇异值分解的矩阵表示。 V V V 的列向量是 A T A A^TA ATA 的特征向量, U U U 的列向量是 A A T AA^T AAT 的特征向量, Σ \Sigma Σ 的奇异值是 A T A A^TA ATA 和 A A T AA^T AAT 的特征值的平方根。 - 在矩阵 A 的奇异值分解中,奇异值、左奇异向量和右奇异向量之间存在对应关系:
A V = U Σ A v j = σ j u j , j = 1 , 2 , . . . , n AV=U\Sigma\\ Av_j=\sigma_ju_j, j=1,2,...,n AV=UΣAvj=σjuj,j=1,2,...,n
类似的,奇异值、右奇异向量和左奇异向量之间存在对应关系:
A T U = V Σ T A T u j = σ j v j , j = 1 , 2 , . . . , n A T u j = 0 , j = n + 1 , n + 2 , . . . , m A^TU=V\Sigma^T\\ A^Tu_j=\sigma_jv_j, j=1,2,...,n\\ A^Tu_j=0, j=n+1,n+2,...,m ATU=VΣTATuj=σjvj,j=1,2,...,nATuj=0,j=n+1,n+2,...,m - 矩阵 A A A 的奇异值分解中,奇异值 σ 1 , σ 2 , . . . σ n \sigma_1,\sigma_2,... \sigma_n σ1,σ2,...σn是唯一的,而矩阵 U U U 和 V V V 不是唯一的。
- 矩阵 A A A 和 Σ \Sigma Σ 的秩相等,等于正奇异值 σ i \sigma_i σi 的个数 r r r (包含重复的奇异值)。
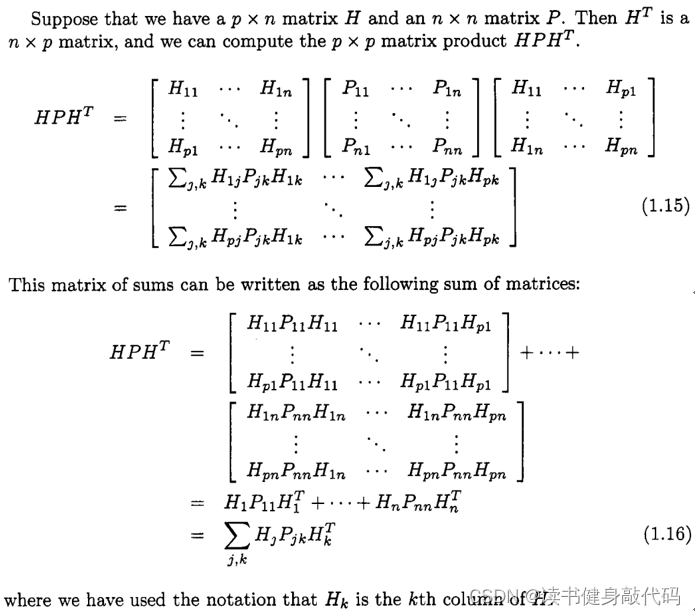
上述的公式 A T A A^TA ATA与Dan Simon的《Optimal State Estimation Kalman, H∞, and Nonlinear Approaches》P6—P7中的内容(公式(1.16))相结合,非常容易得出课件中的公式(15)。
3. 解题
用上面的知识铺垫可以来解决T1
助教答案
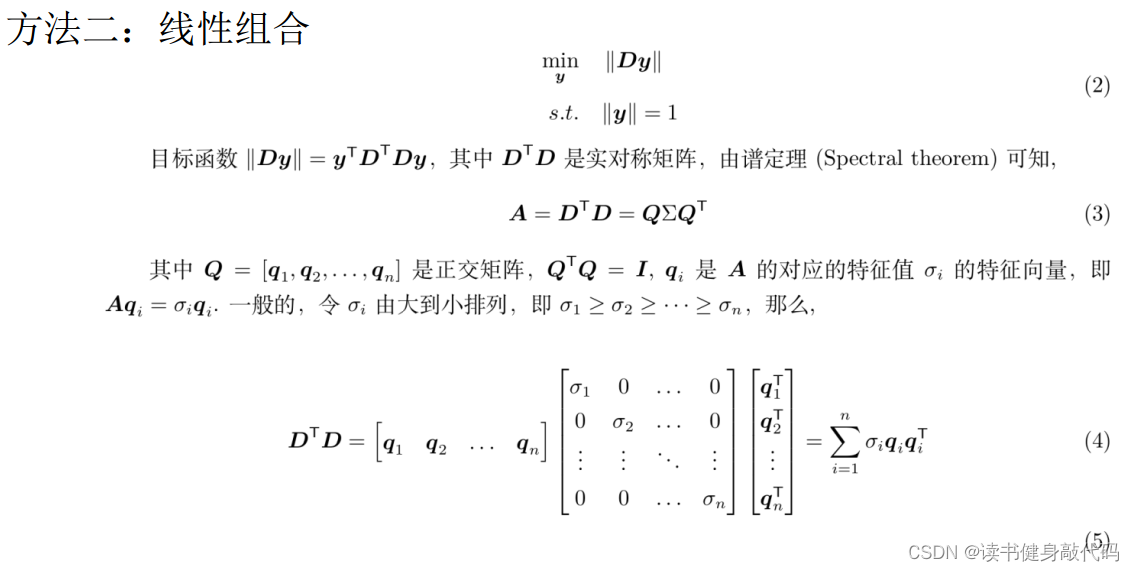
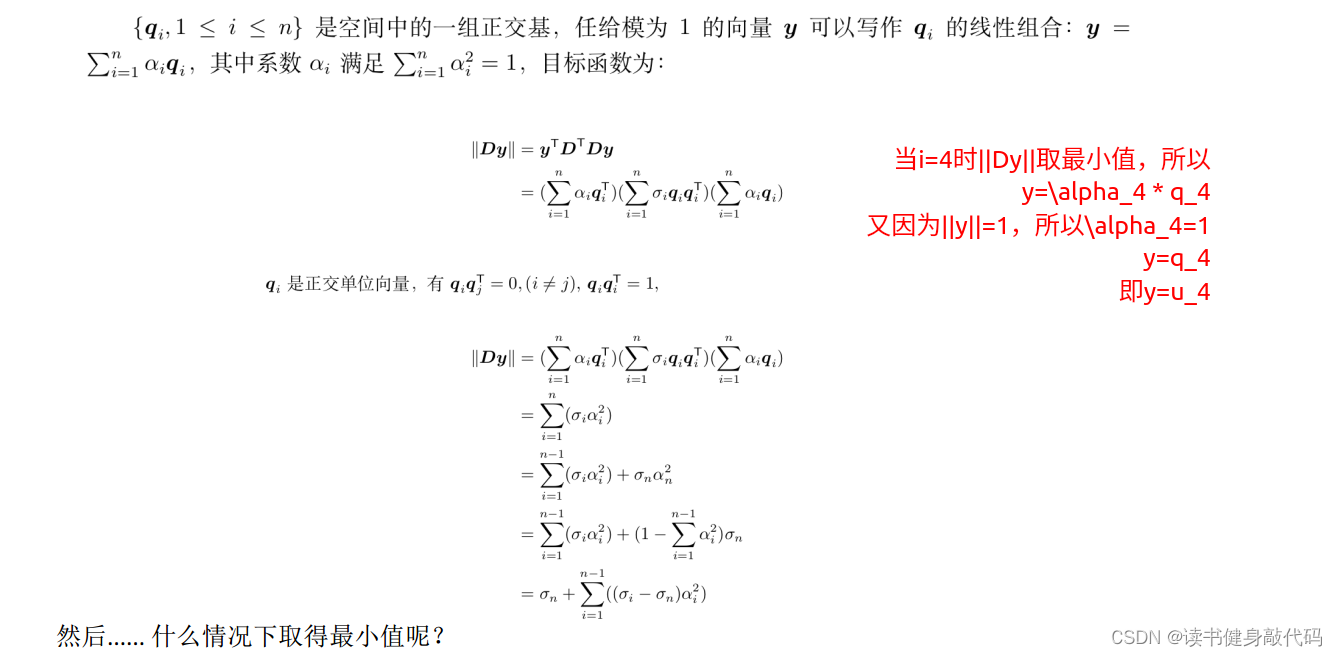
同时参考了博客,但是其证明过程感觉有问题,所以主要参考了助教的方法。方法3的拉格朗日算子方法需要了解拉格朗日对偶,作为拓展:
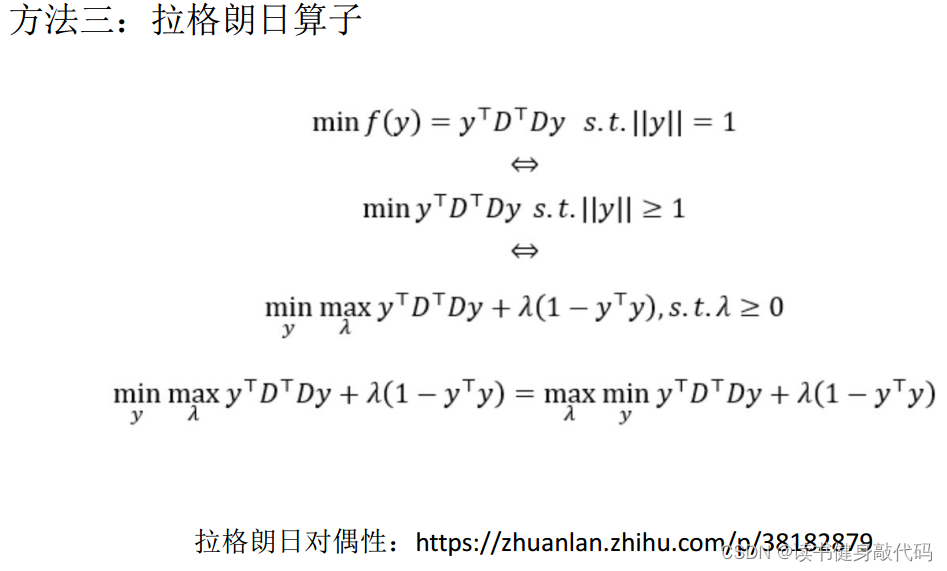
可以参考这篇博客里面使用的Langrange算子法来证明的,我觉得更易理解,目标函数实际上就是特征值大小,故取最小特征值能够使目标函数最小。
由于SVD分解出来的 V T V^T VT右正交于 A T A A^TA ATA,所以其特征向量是 A T A A^TA ATA的特征向量,由于特征值降序排列,特征值越小,目标函数越小,所以最小的特征值是 Λ \Lambda Λ的最右列的,对应的特征向量就是 V T V^T VT最右列的向量使得目标函数最小,即为我们所求的解。
以上就是求 m i n ∣ ∣ D y ∣ ∣ 2 2 min ||Dy||_2^2 min∣∣Dy∣∣22的最小二乘解的方法,求出y之后就可以求出观测点的深度值,即完成三角化。
T2.

代码:
typedef Eigen::Matrix<double, Eigen::Dynamic, Eigen::Dynamic> MatXX; int main() { int poseNums = 10; double radius = 8; double fx = 1.; double fy = 1.; std::vector<Pose> camera_pose; for(int n = 0; n < poseNums; ++n ) { double theta = n * 2 * M_PI / ( poseNums * 4); // 1/4 圆弧 // 绕 z轴 旋转 Eigen::Matrix3d R; R = Eigen::AngleAxisd(theta, Eigen::Vector3d::UnitZ()); Eigen::Vector3d t = Eigen::Vector3d(radius * cos(theta) - radius, radius * sin(theta), 1 * sin(2 * theta)); camera_pose.push_back(Pose(R,t)); } // 随机数生成 1 个 三维特征点 std::default_random_engine generator; std::uniform_real_distribution<double> xy_rand(-4, 4.0); std::uniform_real_distribution<double> z_rand(8., 10.); double tx = xy_rand(generator); double ty = xy_rand(generator); double tz = z_rand(generator); Eigen::Vector3d Pw(tx, ty, tz); // 这个特征从第三帧相机开始被观测,i=3 int start_frame_id = 3; int end_frame_id = poseNums; for (int i = start_frame_id; i < end_frame_id; ++i) { Eigen::Matrix3d Rcw = camera_pose[i].Rwc.transpose(); Eigen::Vector3d Pc = Rcw * (Pw - camera_pose[i].twc);//实际上是Rp+t,拆开来看就是Rwc^T * Pw +(-Rwc * twc)= Rcw * Pw + tcw double x = Pc.x(); double y = Pc.y(); double z = Pc.z(); camera_pose[i].uv = Eigen::Vector2d(x/z,y/z);//因为camera内参为1,1,所以内参可以忽略 } /// TODO::homework; 请完成三角化估计深度的代码 // 遍历所有的观测数据,并三角化 Eigen::Vector3d P_est; // 结果保存到这个变量 P_est.setZero(); /* your code begin */ //1.构建D int D_size = end_frame_id - start_frame_id; MatXX D(MatXX::Zero( 2 * D_size, 4));//D维度为2n*4 for(int i=start_frame_id; i<end_frame_id; ++i) { //构建投影矩阵Pk MatXX Pi(MatXX::Zero(3,4)); Eigen::Matrix3d Rcw = camera_pose[i].Rwc.transpose(); Pi.block(0,0,3,3) = Rcw; Pi.block(0,3,3,1) = -Rcw * camera_pose[i].twc;//tcw,变换矩阵求逆 cout << "i = " <<i <<", Pi_block: \n" << Pi <<endl; //构建2*4的矩阵快 MatXX tmp_mat = camera_pose[i].uv * Pi.block(2,0,1,4) - Pi.block(0,0,2,4); D.block((i-start_frame_id) * 2, 0, 2, 4) = camera_pose[i].uv * Pi.block(2,0,1,4) - Pi.block(0,0,2,4); } cout << "the whole D mat, size: " << D.size() << "\nMat is:\n" << D <<endl; //2.对D进行rescale MatrixXd::Index maxRow, maxCol; double max = D.maxCoeff(&maxRow,&maxCol); // max = 1;//取消scale cout << "max element of D is: " << max <<endl; printf("maxRow: %ld, maxCol: %ld\n", maxRow, maxCol); D /= max; //3.对D^TD进行SVD(参数有ComputeThinU | ComputeThinV 和 ComputeFullU | ComputeFullV 这个位置不传参就代表你只想计算特征值,不关注左右特征向量(UV矩阵), // 传参就代表你想计算出左右特征向量,而full就是告诉函数计算出来的UV方阵,也就是Matrix3d,计算出来的就是3*3的方阵,thin只在矩阵维度不知道时使用,即n*p的矩阵D,不知道n和p谁更小,假设m=min(n,p), // 那么计算结果: U:n*m, V:p*m, 其所代表的特征向量均不是对应实际的\sigma中的特征值的) JacobiSVD<MatrixXd> svd(D.transpose() * D, ComputeThinU | ComputeThinV);//D^T*D 进行SVD分解 cout << "Its singular values are:\n" << svd.singularValues() << endl; cout << "Its left singular vectors are the columns of the thin U matrix:\n" << svd.matrixU() << endl; cout << "Its right singular vectors are the columns of the thin V matrix:\n" << svd.matrixV() << endl; //4.判断解的有效性(\sigma_4 / \sigma_3 < 1e-2 ?) double judge_value = std::abs(svd.singularValues()(3) / svd.singularValues()(2)); if(judge_value < 1e-2) { Eigen::Vector4d u4 = max * svd.matrixU().rightCols(1); cout << "this Triangulation is valid, judge_value:" << judge_value << endl << "u4 is: \n" << u4 << endl;//最后一列(为什么是U不是V?) //5.对triangulation的结果(4维)进行归一化(最后一维变为1) P_est = (u4/u4(3)).head(3); } /* your code end */ std::cout <<"ground truth: \n"<< Pw.transpose() <<std::endl; std::cout <<"your result: \n"<< P_est.transpose() <<std::endl; // TODO:: 请如课程讲解中提到的判断三角化结果好坏的方式,绘制奇异值比值变化曲线 return 0; }- 1
- 2
- 3
- 4
- 5
- 6
- 7
- 8
- 9
- 10
- 11
- 12
- 13
- 14
- 15
- 16
- 17
- 18
- 19
- 20
- 21
- 22
- 23
- 24
- 25
- 26
- 27
- 28
- 29
- 30
- 31
- 32
- 33
- 34
- 35
- 36
- 37
- 38
- 39
- 40
- 41
- 42
- 43
- 44
- 45
- 46
- 47
- 48
- 49
- 50
- 51
- 52
- 53
- 54
- 55
- 56
- 57
- 58
- 59
- 60
- 61
- 62
- 63
- 64
- 65
- 66
- 67
- 68
- 69
- 70
- 71
- 72
- 73
- 74
- 75
- 76
- 77
- 78
- 79
- 80
- 81
- 82
- 83
- 84
- 85
- 86
- 87
- 88
- 89
- 90
- 91
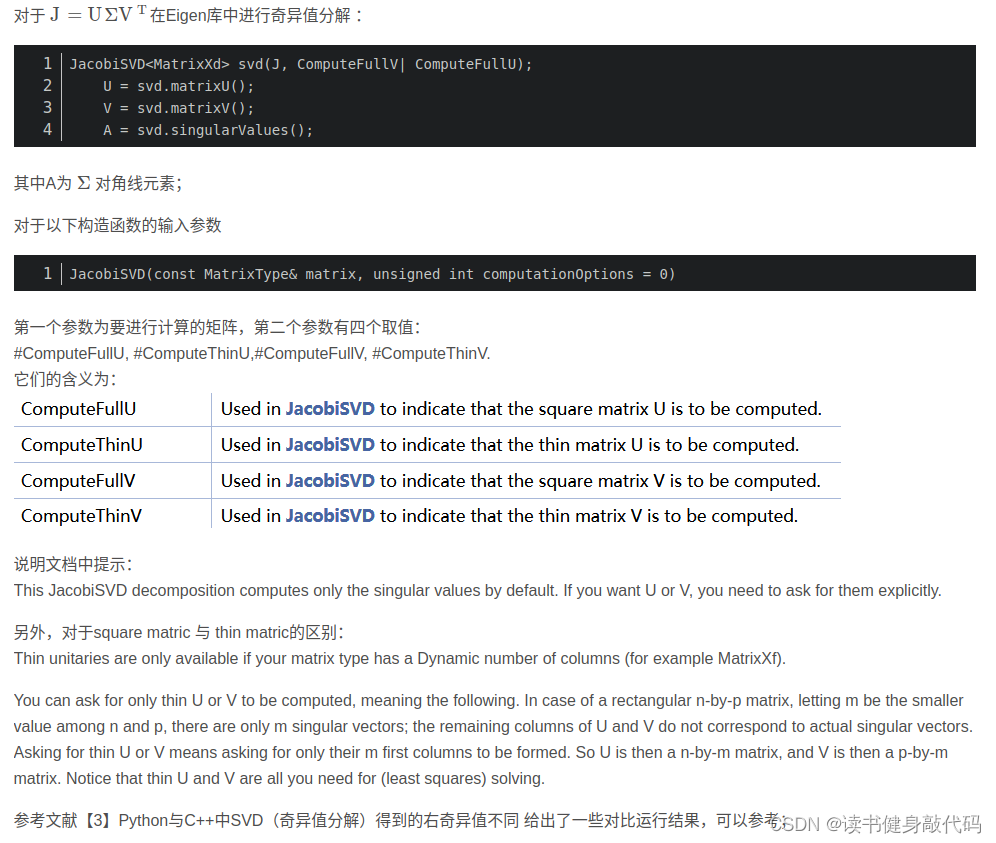
其中对svd的参数进行稍微解释:
- 构造参数:MatrixXd: 计算的特征向量的维度(n维方阵就是Matrixnd,n*m非方阵就填MatrixXd,不确定)
- 传参:ComputeThinU | ComputeThinV 和 ComputeFullU | ComputeFullV 这个位置不传参就代表你只想计算特征值,不关注左右特征向量(UV矩阵),传参就代表你想计算出左右特征向量,而full就是告诉函数计算出来的UV方阵,也就是Matrixnd,计算出来的就是nn的方阵,thin只在矩阵维度不知道时使用,即np的矩阵D,不知道n和p谁更小,假设m=min(n,p), 那么计算结果: U:n*m, V: p*m, 其所代表的特征向量均不是对应实际的 Σ \Sigma Σ中的特征值的
参考博客:
最终的结果,- σ 4 σ 3 < < 1 e − 2 \frac{\sigma_4}{\sigma_3}<<1e-2 σ3σ4<<1e−2,满足有效性阈值,所以triangulation有效,
- 进而改变max=1取消scale,发现结果仍然正确,说明D的数值偏小(按照课上来说几十万算是大的)时,对SVD的结果没太大影响。
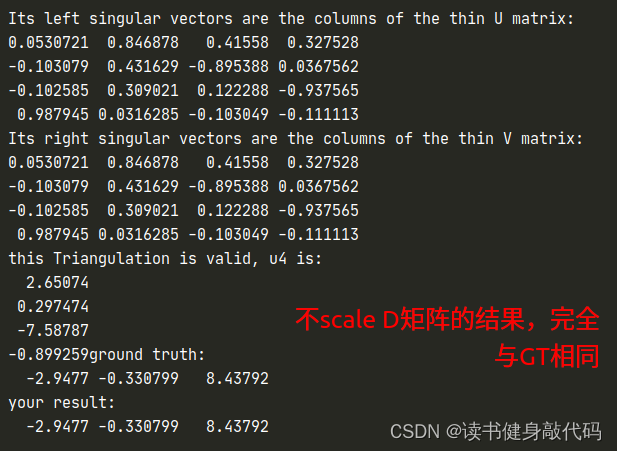
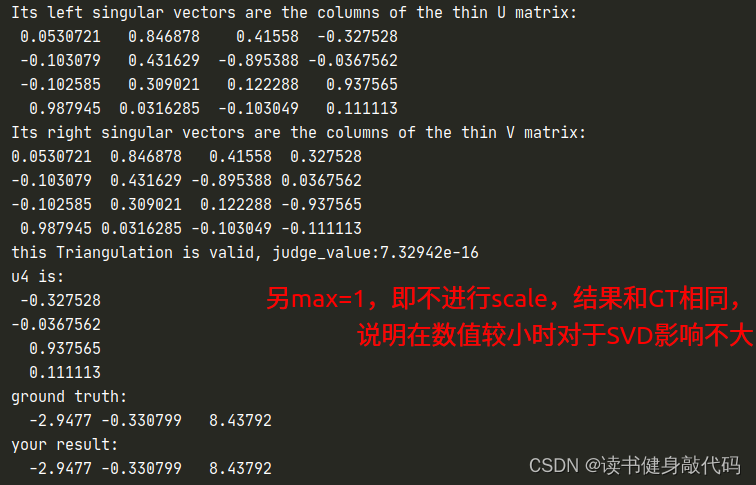
2023.10.22补充
发现解出来的U和V是相同的,n*p的D矩阵,无论是n
p,这个后面再看。 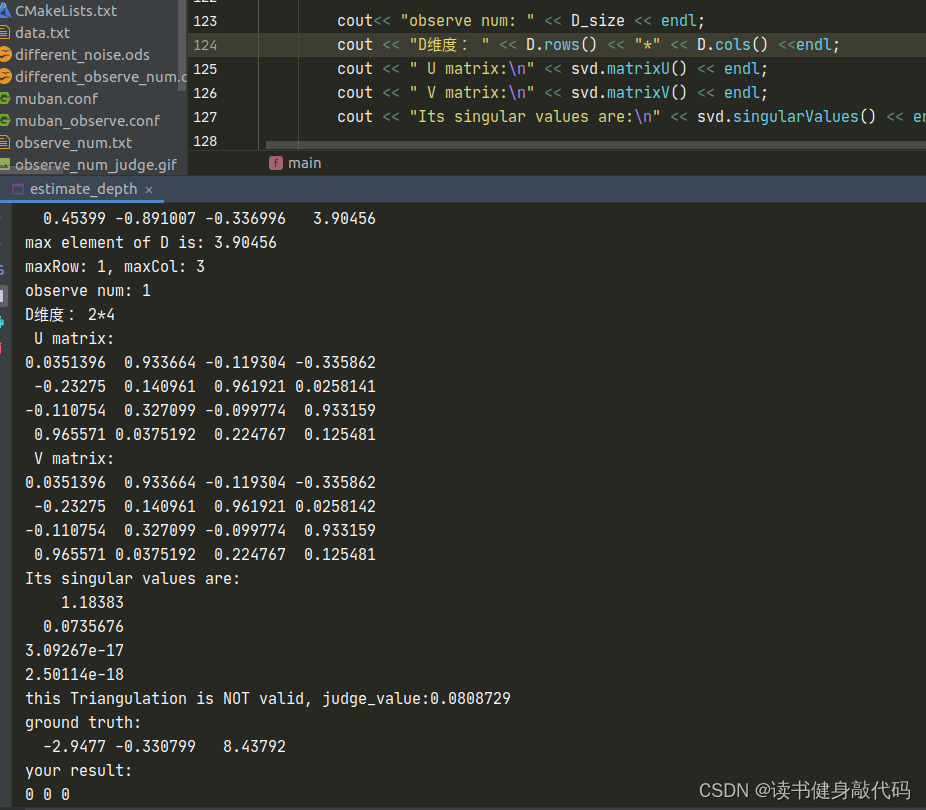
提升T1.
Ch5作业中TestMonoBA.cpp给的观测添加噪声的方法
// 随机数生成三维特征点 std::default_random_engine generator; std::normal_distribution<double> noise_pdf(0., 1. / 1000.); // 2pixel / focal for (int j = 0; j < featureNums; ++j) { std::uniform_real_distribution<double> xy_rand(-4, 4.0); std::uniform_real_distribution<double> z_rand(4., 8.); Eigen::Vector3d Pw(xy_rand(generator), xy_rand(generator), z_rand(generator)); points.push_back(Pw); // 在每一帧上的观测量 for (int i = 0; i < poseNums; ++i) { Eigen::Vector3d Pc = cameraPoses[i].Rwc.transpose() * (Pw - cameraPoses[i].twc); Pc = Pc / Pc.z(); // 归一化图像平面 Pc[0] += noise_pdf(generator); Pc[1] += noise_pdf(generator); cameraPoses[i].featurePerId.insert(make_pair(j, Pc)); } }- 1
- 2
- 3
- 4
- 5
- 6
- 7
- 8
- 9
- 10
- 11
- 12
- 13
- 14
- 15
- 16
- 17
- 18
- 19
如下添加观测noise
for(int j=1; j<50; ++j) { std::normal_distribution<double> noise_pdf(0., (double)j / 1000.); // 2pixel / focal,修改var可改变噪声大小 for (int i = start_frame_id; i < end_frame_id; ++i) { Eigen::Matrix3d Rcw = camera_pose[i].Rwc.transpose(); Eigen::Vector3d Pc = Rcw * (Pw - camera_pose[i].twc);//实际上是Rp+t,拆开来看就是Rwc^T * Pw +(-Rwc * twc)= Rcw * Pw + tcw double x = Pc.x(); double y = Pc.y(); double z = Pc.z(); camera_pose[i].uv = Eigen::Vector2d(x/z + noise_pdf(generator),y/z + noise_pdf(generator));//因为camera内参为1,1,所以内参可以忽略 } //else balabala }- 1
- 2
- 3
- 4
- 5
- 6
- 7
- 8
- 9
- 10
- 11
- 12
- 13
- 14
Gaussian distribution的参数1 / 1000表示2个pixel对应到归一化平面的误差参数,也是cov
不同参数对应的结果如下:
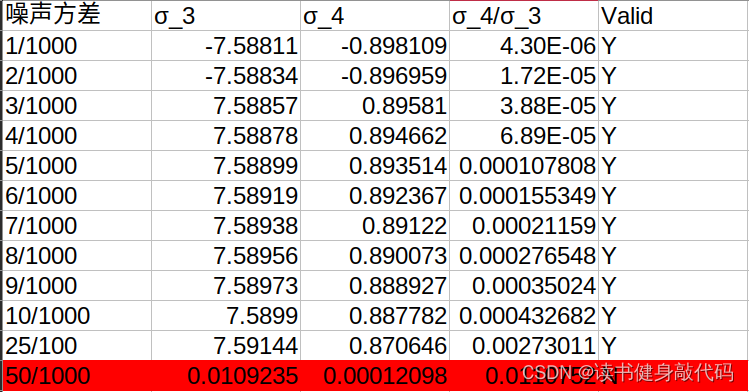
曲线如下,使用gnuplot绘制,执行以下指令生成绘制曲线图:cat muban.conf | gnuplot- 1
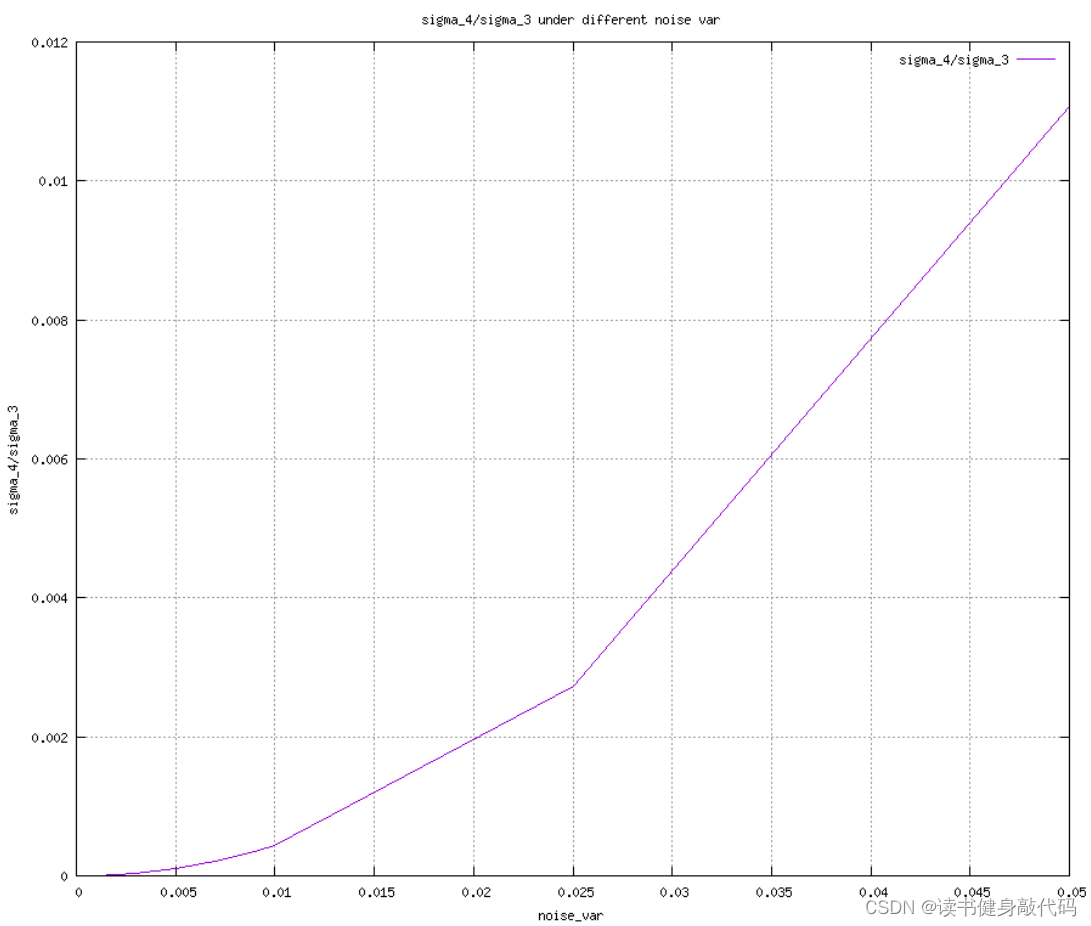
gnuplot配置文件muban.confset terminal gif small size 900,780 set output "var_judge.gif" #指定输出gif图片的文件名 set autoscale #set xdata time #set timefmt "%s" #set format x "%S" set title "sigma_4/sigma_3 under different noise var" #图片标题 set style data lines #显示网格 set xlabel "noise_var" #X轴标题 set ylabel "sigma_4/sigma_3" #Y轴标题 set grid #显示网格 plot "data.txt" using 1:4 title "sigma_4/sigma_3"- 1
- 2
- 3
- 4
- 5
- 6
- 7
- 8
- 9
- 10
- 11
- 12
随着噪声varince的上升,比值逐渐增大,到5e-2时已经不valid了,证明噪声越大,Triangulation误差越大。
提升T2.
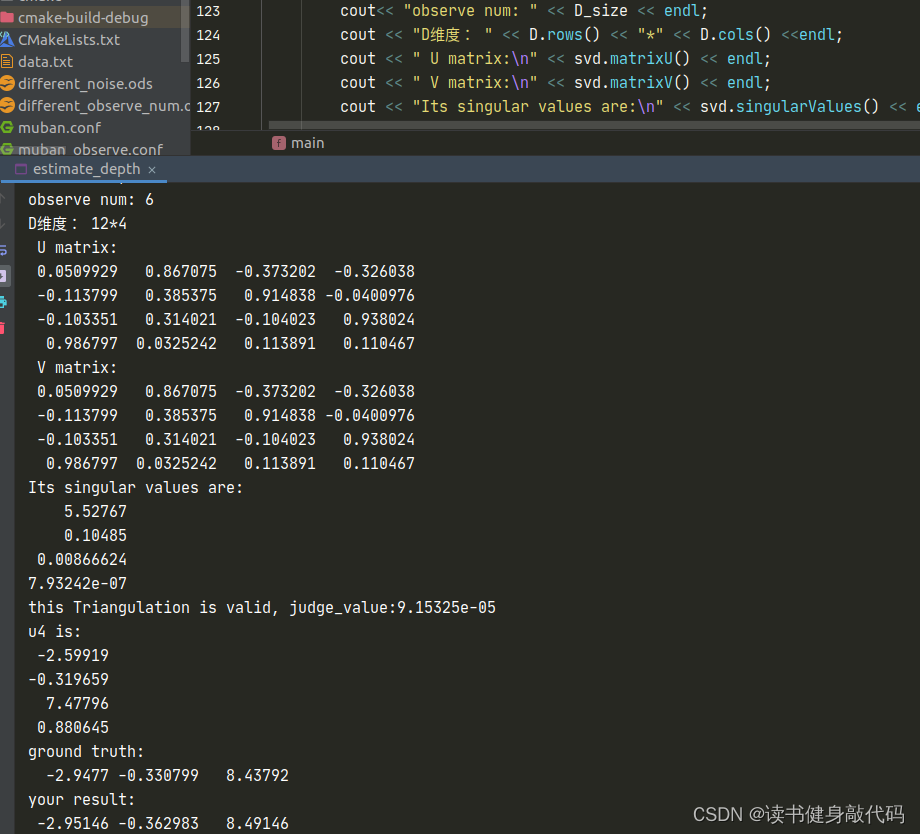
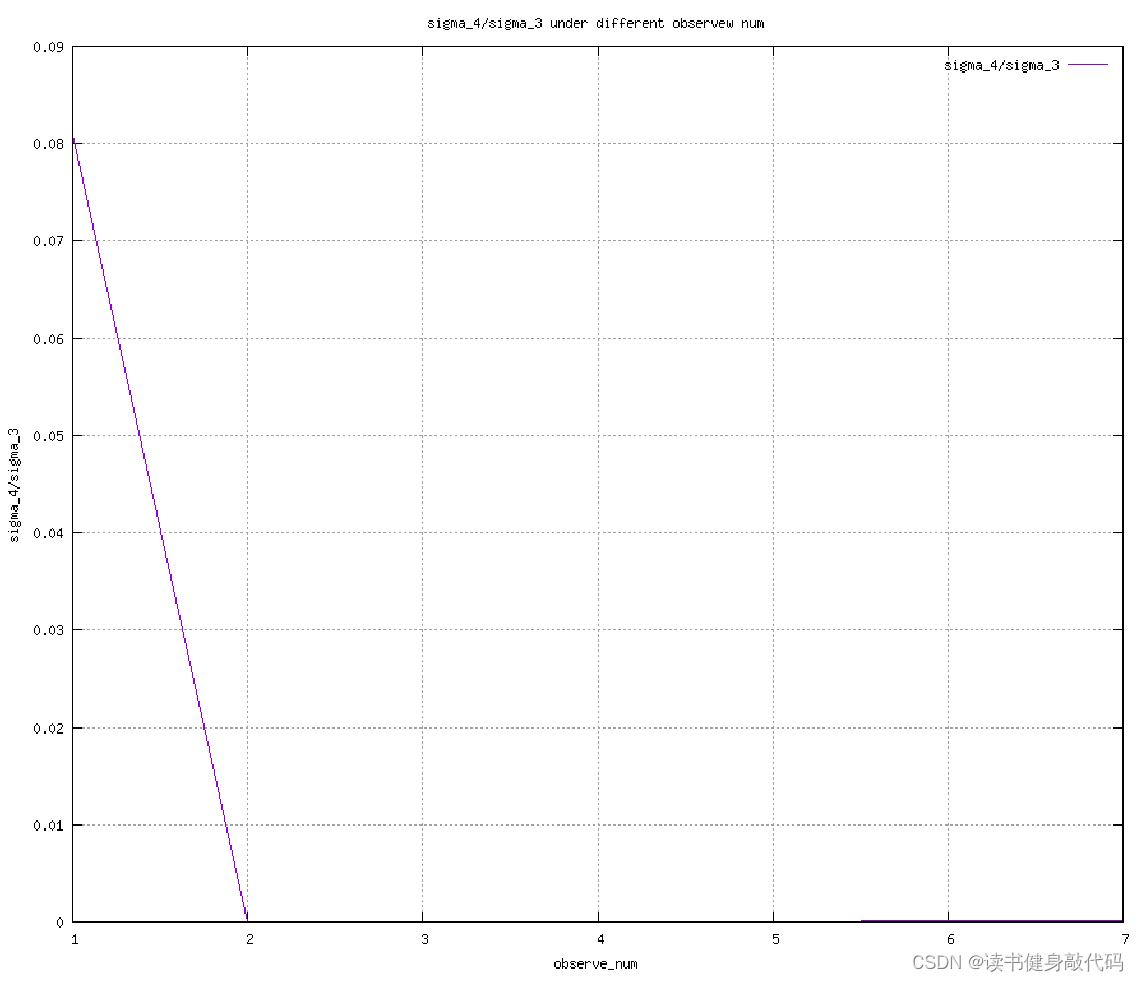
固定noise var为5/1000,改变end_point,从1帧到7帧,随着观测数量的增多,三角化的误差越来越小。

本章完。 - 设矩阵A的AVD分解为
A
=
U
Σ
V
T
A=U\Sigma V^T
A=UΣVT,则以下关系成立:
-
相关阅读:
【LeetCode-中等】33.搜索旋转排序数组 - 二分法
The sorting algorithm including selection, bubble, and insertion
微服务框架 SpringCloud微服务架构 20 RestClient 操作索引库 20.4 创建索引库
关于用switch函数实现二叉树的问题
Django channel 使用说明 -- 以聊天室为例
python趣味编程-5分钟实现一个蛇梯游戏(含源码、步骤讲解)
【吴恩达机器学习-笔记整理】k-means(k-均值聚类算法)
封装了一个简单的C++ HDF5工具库,实现常用数据类型的读写
矩阵转置python的实现
7-5 最大子矩阵和问题
- 原文地址:https://blog.csdn.net/qq_37746927/article/details/133759997
