-
Nginx 重新编译添加新的模块
编译安装Nginx的时候,有些模块默认并不会安装,比如http_ssl_module,那么为了让Nginx支持HTTPS,必须添加这个模块。
下面讲解如何在已经安装过后再次添加新的模块。
1、找到安装nginx的源码根目录(即安装包存放目录),如果没有的话下载新的源码并解压
cd software
ls
nginx-1.10.2 nginx-1.10.2.tar.gz2、查看nginx版本极其编译参数
/usr/local/nginx/sbin/nginx -V
3、进入nginx源码目录
cd nginx-1.10.2
4、重新编译的代码和模块
./configure --prefix=/usr/local/nginx --with-http_stub_status_module --with-http_ssl_module --with-http_v2_module --with-http_ssl_module --with-http_realip_module --with-http_addition_module --with-http_sub_module --with-http_dav_module --with-http_flv_module --with-http_mp4_module --with-http_gunzip_module --with-http_gzip_static_module --with-http_random_index_module --with-http_secure_link_module --with-http_stub_status_module --with-http_auth_request_module --add-module=/usr/local/ngx_devel_kit-0.3.0 --add-module=/usr/local/lua-nginx-module-0.10.8- 1
5、执行make(注意:千万别make install,否则就覆盖安装了), make完之后在/software/nginx-1.10.2/objs目录下就多了个nginx,这个就是新版本的程序了。
6、备份旧的nginx程序
cd /usr/local/nginx/sbin/
mv nginx nginx_bak7、把新的nginx程序复制到/usr/local/nginx/sbin/下
cp /software/nginx-1.10.2/objs/nginx /usr/local/nginx/sbin/
8、测试新的nginx程序是否正确
/usr/local/nginx/sbin/nginx -t
nginx: the configuration file /usr/local/nginx/conf/nginx.conf syntax is ok
nginx: configuration file /usr/local/nginx/conf/nginx.conf test is successful9、平滑启动服务
/usr/local/nginx/sbin/nginx -s reload
10、查看模块是否已安装
查看ngixn版本极其编译参数
/usr/local/nginx/sbin/nginx -V
nginx version: nginx/1.10.2
built by gcc 4.8.5 20150623 (Red Hat 4.8.5-4) (GCC)
built with OpenSSL 1.0.1e-fips 11 Feb 2013
TLS SNI support enabled
configure arguments: --prefix=/usr/local/nginx --with-http_ssl_module11、重启Nginx
实践

server { listen 9002; server_name 219.148.59.62 localhost api.ltkj.com; # root /www/wwwroot/static.ltkj.com/project/front/dist; root /data/wwwroot/static.ltkj.com/personnel; #禁止访问的文件或目录 location ~ ^/(\.user.ini|\.htaccess|\.git|\.svn|\.project|LICENSE|README.md) { return 404; } location ^~ /(pic|file|avatar) { expires 30d; set $auth_request_uri "http://$server_name:8090/system/user/auth?$args"; auth_request /auth; auth_request_set $user $upstream_http_x_forwarded_user; proxy_set_header X-Forwarded-User $user; error_page 401 500 = /error401; root /data/wwwroot/static.ltkj.com/personnel; ## 20230417 # 源服务器 # proxy_pass http://localhost:8888; # 指定上面设置的缓存区域 # proxy_cache imgcache; # 缓存过期管理 # proxy_cache_valid 1d; # proxy_cache_valid 10m; # proxy_cache_valid any 1h; # proxy_cache_use_stale error timeout invalid_header updating http_500 http_502 http_503 http_504; } location ~* \.(jpg|jpeg|gif|png|ico|css|js)$ { expires 30d; # add_header Cache-Control "public"; auth_request /auth; error_page 401 500 = /error401; auth_request_set $user $upstream_http_x_forwarded_user; proxy_set_header X-Forwarded-User $user; set $auth_request_uri "http://$server_name:8100/sstem/user/auth?$args"; root /data/wwwroot/static.ltkj.com/personnel; } #location ~ .*\.(gif|jpg|jpeg|png|bmp|swf)$ { # root /data/wwwroot/static.ltkj.com/personnel; #} location /auth { # 表示该路径仅仅为nginx内部访问,一旦出了这个配置文件,则失效 internal; # 自己系统的认证路径 # proxy_pass http://localhost:8090/system/user/auth; proxy_pass $auth_request_uri ; proxy_set_header Host $host; proxy_set_header X-Real-IP $remote_addr; proxy_set_header X-Original-URI $request_uri; proxy_set_header X-Original-METHOD $request_method; error_page 401 500 = /error401; } # 认证失败后的处理 location = /error401 { # 强制浏览器不使用缓存,防止缓存带来的还能访问系统 # 如果认证失败,跳转到自己系统的登录页面 return 302 http://http://219.148.59.62:9001/index; } access_log /data/logs/nginx/personnel_manager/access.log; error_log /data/logs/nginx/personnel_manager/error.log; }- 1
- 2
- 3
- 4
- 5
- 6
- 7
- 8
- 9
- 10
- 11
- 12
- 13
- 14
- 15
- 16
- 17
- 18
- 19
- 20
- 21
- 22
- 23
- 24
- 25
- 26
- 27
- 28
- 29
- 30
- 31
- 32
- 33
- 34
- 35
- 36
- 37
- 38
- 39
- 40
- 41
- 42
- 43
- 44
- 45
- 46
- 47
- 48
- 49
- 50
- 51
- 52
- 53
- 54
- 55
- 56
- 57
- 58
- 59
- 60
- 61
- 62
- 63
- 64
- 65
- 66
- 67
- 68
- 69
- 70
- 71
- 72
- 73
- 74
- 75
- 76
- 77
- 78
- 79
- 80
- 81
生产环境安装 http_auth_request_module 模块 使用 auth_request 功能
./configure --prefix=/usr/local/nginx --with-http_stub_status_module --with-http_ssl_module --with-http_v2_module --with-http_ssl_module --with-http_realip_module --with-http_addition_module --with-http_sub_module --with-http_dav_module --with-http_flv_module --with-http_mp4_module --with-http_gunzip_module --with-http_gzip_static_module --with-http_random_index_module --with-http_secure_link_module --with-http_stub_status_module --with-http_auth_request_module- 1
- 2
- 3


记录由客户端http请求原因引起的5xx响应问题排查过程
看到 http 状态码 5xx,很多开发者第一感觉就是服务端的问题,其实并不全是。下面我遇到的问题就是一个例外。
问题描述
最近在为反向代理 nginx 配置 auth_request 后,出现了请求504错误。
504状态码是HTTP协议中的一种服务器错误状态码。当客户端向服务器发送请求并在一段时间内未收到服务器的有效响应时,就会返回504状态码。它表示服务器作为网关或代理,正在等待上游服务器返回响应,但在超时时间内未收到响应。- 1
- 2
问题排查
1 排查nginx日志
查看 nginx 的错误日志,确实记录了504的错误记录,一起的还有另外一条 subrequest 的110 connection time out。
2024/02/06 09:12:07 [error] 28322#0: *155 upstream timed out (110: Connection timed out) while connecting to upstream, client: 106.113.73.120, server: 219.148.59.62, request: "GET /file/user/9209134103/%E5%AE%89%E6%99%93%E9%93%AD_ZP_531127144600660.jpg HTTP/1.1", subrequest: "/auth", upstream: "http://219.148.59.62:8100/sstem/user/auth?", host: "219.148.59.62:9002", referrer: "http://localhost:9001/" 2024/02/06 09:12:07 [error] 28322#0: *155 auth request unexpected status: 504 while sending to client, client: 106.113.73.120, server: 219.148.59.62, request: "GET /file/user/9209134103/%E5%AE%89%E6%99%93%E9%93%AD_ZP_531127144600660.jpg HTTP/1.1", host: "219.148.59.62:9002", referrer: "http://localhost:9001/"- 1
- 2
- 3

直觉看来就是subrequest请求的服务,没有正常工作造成请求没有响应。然而当直接使用 curl 请求subrequest 请求的地址时,服务却是正常相应的。
2 排查subrequest请求的服务的日志
排查subrequest请求的服务的日志时候,发现了408的状态码。
"GET /nginx/?route=/ 408- 1
408状态码是HTTP协议中的一个客户端错误状态码。它表示请求超时,即客户端发送的请求在服务器预设的等待时间内没有得到响应。服务器可以在响应中包含一个Retry-After头字段,指示客户端在多长时间之后可以重试请求。- 1
这里可以肯定的是,subrequest,请求有问题。但是错误信息就这么多,仅通过日志无法排查出问题的原因。
3 既然日志无法定位问题,就tcpdump + wireshark来看看这个subrequest
日志中无法看出具体问题,就通过网络抓包工具,看看这次subrequest到底请求了什么 ?
tcpdump 抓取网络包
tcpdump -i interfacename port xxx -w capture.pcap- 1
将上面的包使用wireshark导入,定位到有问题的stream,然后follow stream.
分析这次网络请求的过程如下:- 11~13帧是tcp的三次握手
- 14号帧是客户端发送了请求
- 15号帧服务端响应了内容长度为0的确认信息
- 然后等待了10秒
- 16~18号帧就是tcp的四次挥手过程
————————————————
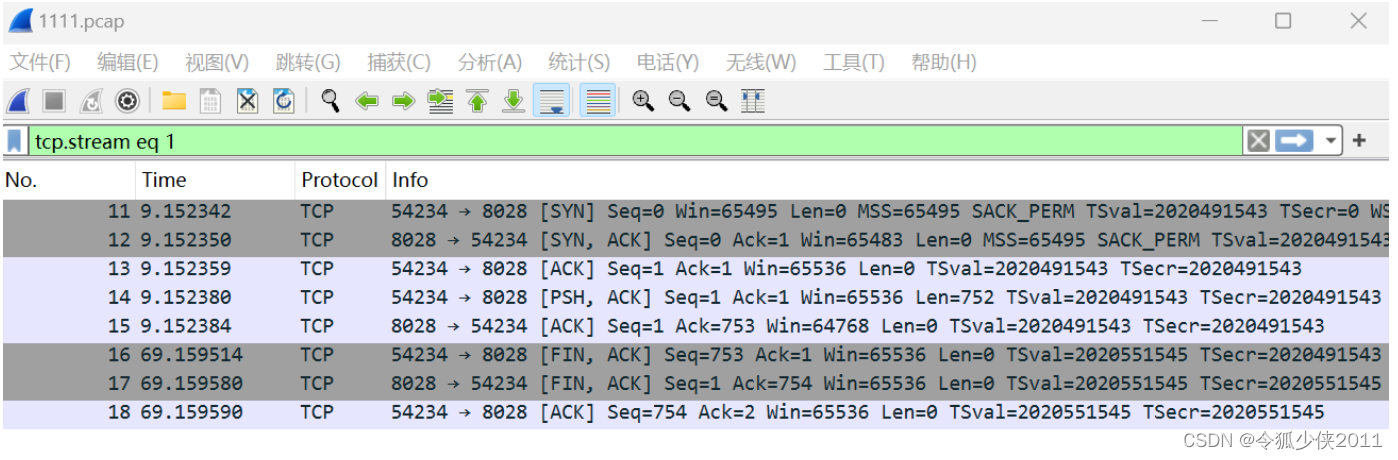
问题出在哪里?为什么中间等待了10秒?
10秒是客户端请求的超时配置,超过10秒后,客户端自己断开,从上面的挥手过程,和 408的状态码可以看出来。
在查看请求的具体信息时,见下图,发现了请求头Content-length: 153,这个有点意外,因为这个通常是在响应头中的数据。

既然怀疑这里,就将这个请求生成curl命令,直接在命令行中请求,确实会卡住,直到请求超时。curl -XGET -vvv -H 'Content-length:153' 'http://127.0.0.1:8028/auth/' Note: Unnecessary use of -X or --request, GET is already inferred. * Expire in 0 ms for 6 (transfer 0x55e12cc5b110) * Trying 127.0.0.1... * TCP_NODELAY set * Expire in 200 ms for 4 (transfer 0x55e12cc5b110) * Connected to 127.0.0.1 (127.0.0.1) port 8028 (#0) > GET /auth/ HTTP/1.1 > Host: 127.0.0.1:8028 > Accept: */* > Content-length:153 > * Empty reply from server * Connection #0 to host 127.0.0.1 left intact- 1
- 2
- 3
- 4
- 5
- 6
- 7
- 8
- 9
- 10
- 11
- 12
- 13
- 14
- 15
- 16
移除上面的Content-length后,重新请求,直接就返回了结果。
看来问题就是请求头中的:Content-length引起的。4 问题分析
上面的请求中,并没带请求体,理论上请求体长度(Content-length)理应为0, 但是却发送了非0的 Content-length请求,也就是告诉服务端请求体长度为153, 然后服务端并没有收到请求体,就一直等待(一些服务会等待,有些服务直接返回错误)。
5 解决方案
问题分析出来,解决问题就比较容易了,在subrequest时,直接重置请求头中的Content-length, 比如设置为Content-length:‘’.
———————————————— -
相关阅读:
nodejs+express设置和获取cookie,session
IDE常用快捷键整理及使用指南
Unity 游戏开发、03 基础篇 | C#初级编程
PyTorch会在每次.backward()调用时会累积梯度的问题
Django实现音乐网站 ⒆
智工教育:每年必考!教师编制这些考点必背!
栈和队列 - C语言实现
轻松省钱赚佣金:微信返利机器人的制作教程
SpringBootConfiguration注解的简介说明
JS(第二十六)ES6语法中function
- 原文地址:https://blog.csdn.net/nalanxiaoxiao2011/article/details/133753090