-
前端页面布局之【Flex布局】详解

🌟前言
布局的传统解决方案,基于盒状模型,依赖 display属性 + position属性 + float属性。它对于那些特殊布局非常不方便,比如,垂直居中就不容易实现。2009年,W3C提出了一种新的方案—-Flex布局,可以简便、完整、响应式地实现各种页面布局。目前,它已经得到了所有浏览器的支持,这意味着,现在就能很安全地使用这项功能。
🌟浏览器支持

🌟Flex简介
Flex是Flexible Box的缩写,意为”弹性布局”,用来为盒状模型提供最大的灵活性。任何一个容器都可以指定为Flex布局。
.box{ display: flex; //(新版) display:-webkit-box; (旧版) }- 1
- 2
- 3
- 4
注意,设为Flex布局以后,子元素的float、clear和vertical-align属性将失效。
🌟Flex基本概念
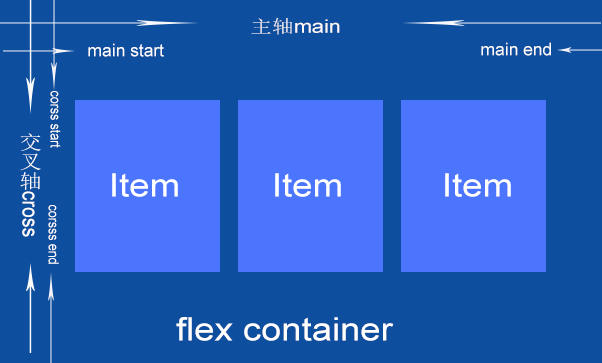
- 采用Flex布局的元素,称为Flex容器(flex container),简称”容器”。
- 它的所有子元素自动成为容器成员,称为Flex项目(flex item),简称”项目”
- 主轴:容器默认存在两根轴:水平的主轴(main axis)和垂直的交叉轴(cross axis)。主轴的开始位置(与边框的交叉点)叫做main start,结束位置叫做main end; 交叉轴的开始位置叫做cross start,结束位置叫做cross end。
- 交叉轴:项目默认沿主轴排列。单个项目占据的主轴空间叫做main size,占据的交叉轴空间叫做cross size。
🌟容器属性
🌟项目排列方向
flex-direction 属性决定主轴的方向
属性 表现 表现图示 row(默认值) 从左到右 
row-reverse 从右到左 
column 从上到下 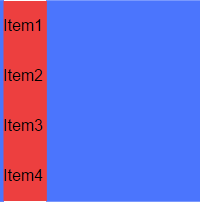
column–reverse 从下到上 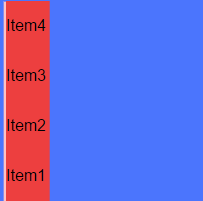
flex-direction: row | row-reverse | column | column-reverse- 1
兼容写法
-webkit-box-orient:horizontal | vertical -webkit-box-direction:normal |reverse- 1
- 2
属性 表现 horizontal 水平方向 vertical 垂直方向 normal 顺序正常 reverse 反向 🌟项目包裹方式
flex-wrap 默认情况下,项目都排在一条线(又称”轴线”)上。flex-wrap属性定义,如果一条轴线排不下,如何换行。
属性 表现 表现图示 nowrap(默认) 不换行 
wrap 换行 
wrap-reverse: 换行,第一行在下方 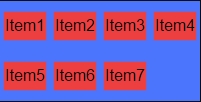
flex-wrap:nowrap | wrap | wrap-reverse- 1
🌟项目水平对齐方式
justify-content属性定义了项目在主轴上的对齐方式。它可能取5个值,具体对齐方式与轴的方向有关。下面假设主轴为从左到右。
属性 表现 表现图示 flex-start(默认值) 左对齐 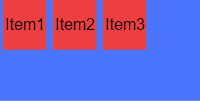
flex-end 右对齐 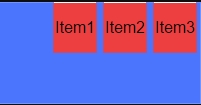
center 居中 
space-between 两端对齐,项目之间的间隔都相等。 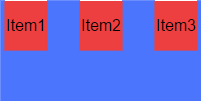
space-around 每个项目两侧的间隔相等。所以,项目之间的间隔比项目与边框的间隔大一倍。 
justify-content:flex-start | flex-end | center | space-between | space-around- 1
兼容写法
-webkit-box-pack: start | end |center |justify- 1
属性 表现 start 左对齐 end 右对齐 center 居中 justiry 两端对齐 🌟项目的垂直对齐方式
align-items属性定义项目在交叉轴上如何对齐。它可能取5个值。具体的对齐方式与交叉轴的方向有关,下面假设交叉轴从上到下。
align-items:flex-start | flex-end | center | baseline | stretch- 1
属性 表现 表现图示 stretch(默认值) 如果项目未设置高度或设为auto,将占满整个容器的高度。 
flex-start 交叉轴的起点对齐 
flex-end 交叉轴的终点对齐 
center 交叉轴的中点对齐。 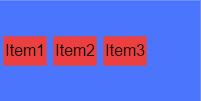
baseline 项目的第一行文字的基线对齐。 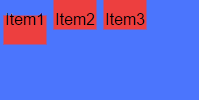
兼容写法
属性 描述 start 顶对齐 end 底对齐 center 居中对齐 -webkit-box-align:start | end |center- 1
🌟多行对齐方式
align-content属性定义了多根轴线的对齐方式。如果项目只有一根轴线,该属性不起作用。
属性 表现 表现图示 flex-start 交叉轴的起点对齐 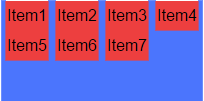
flex-end 交叉轴的终点对齐 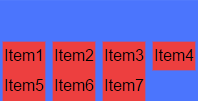
center 交叉轴的中点对齐。 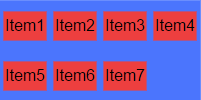
space-between 与交叉轴两端对齐,轴线之间的间隔平均分布。 
space-around 每根轴线两侧的间隔都相等。轴线之间的间隔比轴线与边框的间隔大一倍 
stretch(默认值) 轴线占满整个交叉轴。 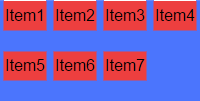
align-content: flex-start | flex-end | center | space-between | space-around | stretch- 1
🌟项目的属性
🌟项目的顺序
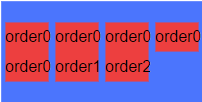
order属性定义项目的排列顺序。数值越小,排列越靠前,默认为0。
order:- 1
兼容写法
-webkit-box-ordinal-group:- 1
🌟项目占比(放大)
- flex-grow
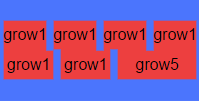
flex-grow属性定义项目的放大比例,默认为0,即如果存在剩余空间,也不放大。
如果所有项目的flex-grow属性都为1,则它们将等分剩余空间(如果有的话)。如果一个项目的flex-grow属性为2,其他项目都为1,则前者占据的剩余空间将比其他项多一倍flex-grow:- 1

- 兼容写法
-webkit-box-flex :- 1
🌟项目占比(缩小)
- flex-shrink
flex-shrink属性定义了项目的缩小比例,默认为1,即如果空间不足,该项目将缩小。如果所有项目的flex-shrink属性都为1,当空间不足时,都将等比例缩小。如果一个项目的flex-shrink属性为0,其他项目都为1,则空间不足时,前者不缩小。负值对该属性无效
flex--shrink:- 1

🌟项目所占空间大小
- flex-basis
flex-basis属性定义了在分配多余空间之前,项目占据的主轴空间(main
size)。浏览器根据这个属性,计算主轴是否有多余空间。它的默认值为auto,即项目的本来大小。它可以设为跟width或height属性一样的值(比如350px),则项目将占据固定空间。flex-basis:| auto - 1
🌟项目自己的对齐方式
优先级高于容器的 align-items
- align-self
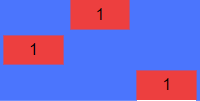
align-self属性允许单个项目有与其他项目不一样的对齐方式,可覆盖align-items属性。默认值为auto,表示继承父元素的align-items属性,如果没有父元素,则等同于stretch。该属性可能取6个值,除了auto,其他都与align-items属性完全一致。
align-self: auto | flex-start | flex-end | center | baseline | stretch;- 1
🌟案例
<div class="rows"> <div><a href="javascript:;">天猫a>div> <div><a href="javascript:;">聚划算a>div> <div><a href="javascript:;">天猫国际a>div> <div><a href="javascript:;">外卖a>div> <div><a href="javascript:;">天猫超市a>div> div> <div class="rows"> <div><a href="javascript:;">天猫a>div> <div><a href="javascript:;">聚划算a>div> <div><a href="javascript:;">天猫国际a>div> <div><a href="javascript:;">外卖a>div> <div><a href="javascript:;">天猫超市a>div> div>- 1
- 2
- 3
- 4
- 5
- 6
- 7
- 8
- 9
- 10
- 11
- 12
- 13
- 14
- 15
/* 去掉默认样式*/ body,body *{ -webkit-text-size-adjust: 100%; } body,h1{ margin: 0; } a,input,button{ /*-webkit-tap-highlight-color:none;*/ -webkit-tap-highlight-color: rgba(0, 0, 0, 0); } a{ text-decoration: none; } button{ -webkit-appearance: none; } /*正式布局*/ .rows{ display: -webkit-box; display: flex; } .rows div{ /* 所有的盒子就一样大 */ width: 0px; -webkit-box-flex: 1; flex-grow: 1; } .rows div a{ font-size: 0.44rem; color: #666; text-align: center; line-height: 1.04rem; display: block; } .rows div a:before{ content: ''; display: block; margin: 0 auto; width: 1.72rem; height: 1.7rem; background: red; background-size: 1.72rem 1.7rem; } .rows:nth-of-type(1) div:nth-of-type(1) a:before{ background-image: url(img/1.webp); } .rows:nth-of-type(1) div:nth-of-type(2) a:before{ background-image: url(img/2.webp); } .rows:nth-of-type(1) div:nth-of-type(3) a:before{ background-image: url(img/3.webp); } .rows:nth-of-type(1) div:nth-of-type(4) a:before{ background-image: url(img/4.webp); } .rows:nth-of-type(1) div:nth-of-type(5) a:before{ background-image: url(img/5.webp); } .rows:nth-of-type(2) div:nth-of-type(1) a:before{ background-image: url(img/6.webp); } .rows:nth-of-type(2) div:nth-of-type(2) a:before{ background-image: url(img/7.webp); } .rows:nth-of-type(2) div:nth-of-type(3) a:before{ background-image: url(img/8.webp); } .rows:nth-of-type(2) div:nth-of-type(4) a:before{ background-image: url(img/9.webp); } .rows:nth-of-type(2) div:nth-of-type(5) a:before{ background-image: url(img/10.webp); }- 1
- 2
- 3
- 4
- 5
- 6
- 7
- 8
- 9
- 10
- 11
- 12
- 13
- 14
- 15
- 16
- 17
- 18
- 19
- 20
- 21
- 22
- 23
- 24
- 25
- 26
- 27
- 28
- 29
- 30
- 31
- 32
- 33
- 34
- 35
- 36
- 37
- 38
- 39
- 40
- 41
- 42
- 43
- 44
- 45
- 46
- 47
- 48
- 49
- 50
- 51
- 52
- 53
- 54
- 55
- 56
- 57
- 58
- 59
- 60
- 61
- 62
- 63
- 64
- 65
- 66
- 67
- 68
- 69
- 70
- 71
- 72
- 73
- 74
- 75
🌟推荐
最后推荐大家看看阮一峰老师的Flex实例教程
🌟写在最后
更多前端知识请大家持续关注,尽请期待。各位小伙伴让我们 let’s be prepared at all times!
✨原创不易,还希望各位大佬支持一下!
👍 点赞,你的认可是我创作的动力!
⭐️ 收藏,你的青睐是我努力的方向!
✏️ 评论,你的意见是我进步的财富! -
相关阅读:
主题配置和 消息发送(一)KafkaTemplate 的使用
对亚马逊云科技云原生课程容器的基本学习笔记
java-net-php-python-jsp小家蔬菜展示平台计算机毕业设计程序
【封装UI组件库系列】全局样式的定义与重置
二叉树的层序遍历
reuseaddr和reuseport
大文件断点续传工具类
学习笔记-.net安全
【FNN回归预测】基于matlab蝙蝠算法优化前馈神经网络数据回归预测【含Matlab源码 2070期】
spring学习之@ModelAttribute注解的简介说明
- 原文地址:https://blog.csdn.net/JingDuo0909/article/details/133694061