-
Unity AI Sentis 基础教程
Unity AI Sentis基础教程
Sentis 是 AI 模型的本地推理引擎,它利用最终用户设备上的计算,而不是云服务器。它可以在可以部署 Unity 运行时的任何位置运行。它取代了 Barracuda 并解决了我们在 Barracuda 处于早期原型阶段时收到的许多反馈。最重要的是,Sentis 可以以游戏速度运行许多神经网络。Sentis 目前处于开放测试阶段,公开发布时可用于商业用途。届时Sentis 将对所有 Unity 用户免费开放,并可用于无限制的本地推理。Unity AI Sentis基础教程
Sentis 允许您在ONNX 格式 进入 Unity 编辑器,然后在所有 Unity 的用户设备上实时优化和运行推理支持的平台。
可应用示例:
1.图像放大:放大低分辨率图像、模型、纹理等
2.风格迁移:将场景的外观或图像效果转换为新风格
3.不可玩角色 (NPC):自动对话
4.语音识别 (NLP):解释实时语音
5.身体/物体检测:使用相机
6.深度估计:使用相机(检测物体)
7.图像、视频和 3D 模型分类:检测屏幕上的对象(检测深度)
8.手写分类:检测手写字母、符号或数字
9.创造独一无二的玩家体验:生成无限独特的游戏场景
10.动画:将自动姿势绑定应用于刚体
11.模拟助手:用神经网络近似一个复杂的函数来驱动游戏逻辑
12.时间序列:异常检测、预测/预测版本需求:Unity 2021.3 LTS(或更高版本)
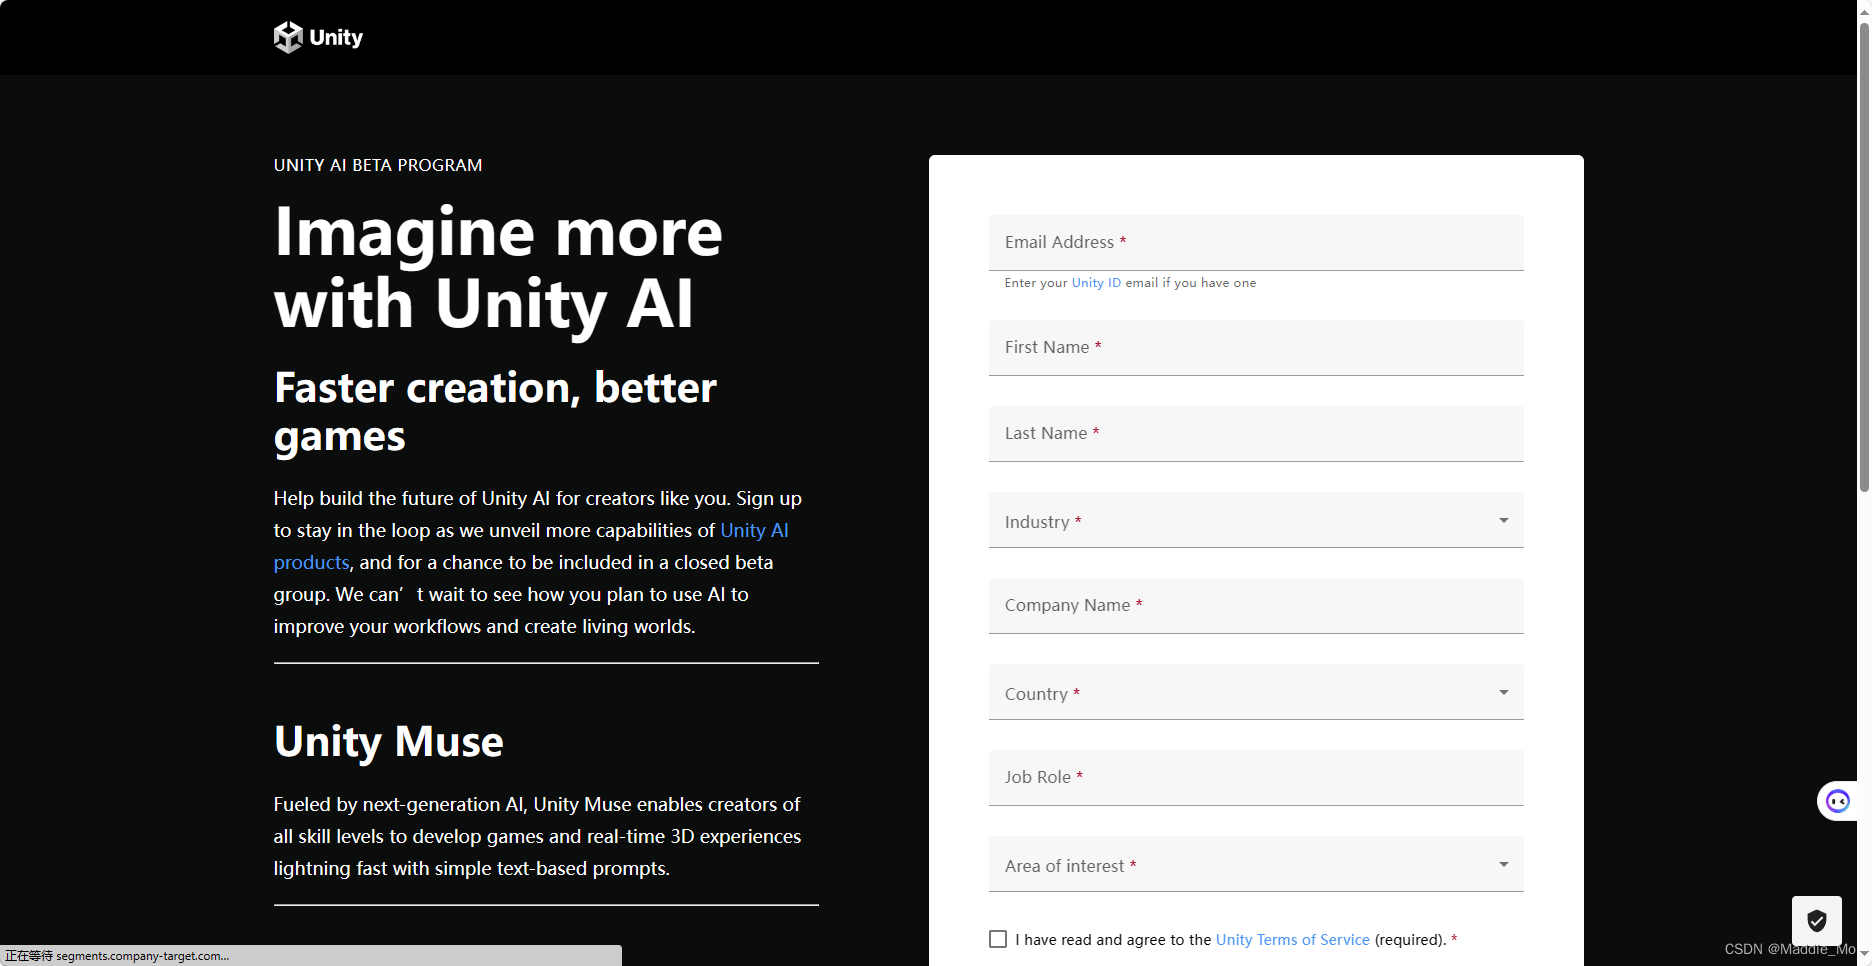
Unity AI 内测资格申请
Unity AI 内测资格申请链接: Unity AI
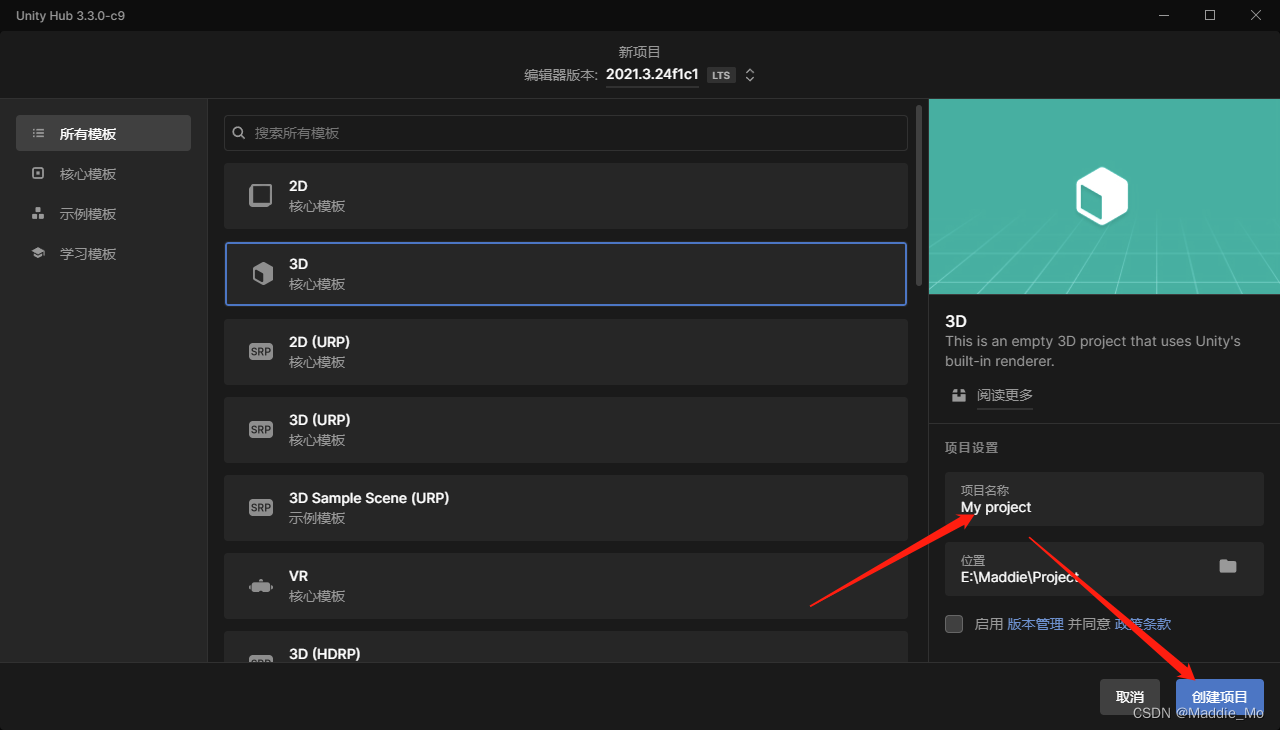
Unity 项目
项目创建- 1
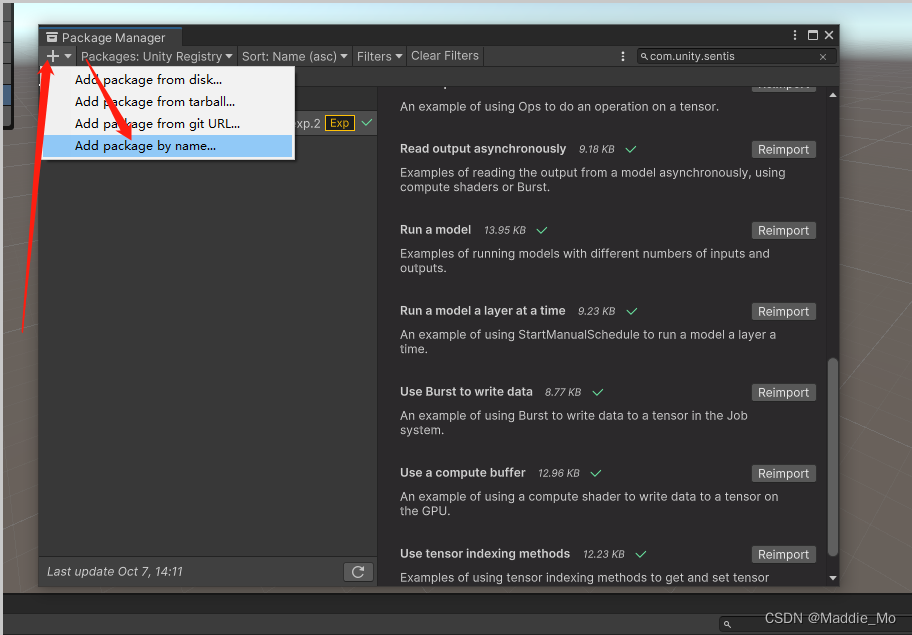
Package Manager
1. 打开 Window -> Package Manager 2. 点击 加号 3. 选择 Add package by name- 1
- 2
- 3
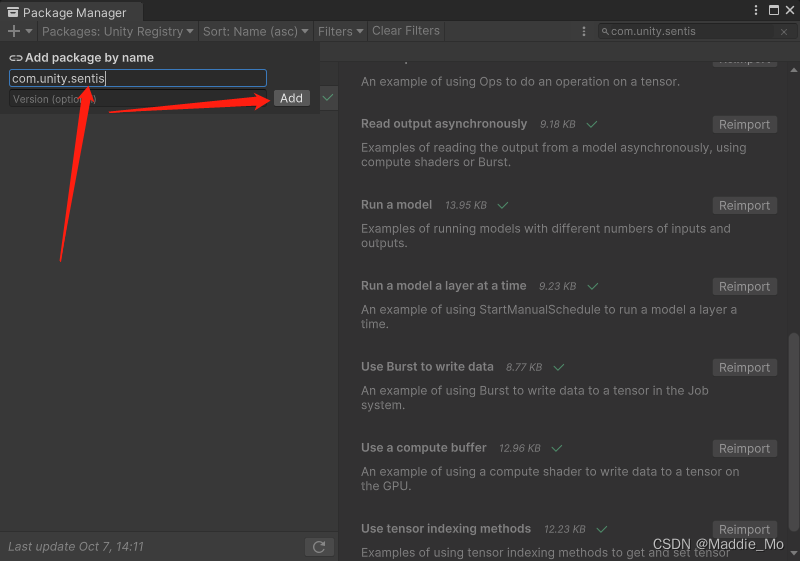
在输入框 键入 com.unity.sentis 并点击添加- 1
在搜索框搜索 Sentis 如果有那就证明下载正确 如果没有就可能是 Unity AI 内测资格 暂时还未通过- 1
- 2
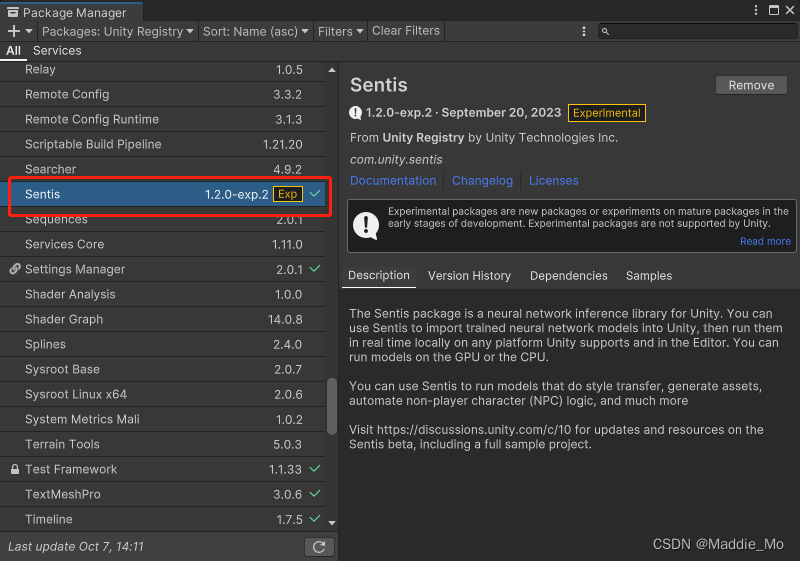
开始尝试
层级创建- 1

代码搭载- 1

模型下载
随便下载一个就行 我下载的是 MNIST-12- 1
手写数字识别: 模型下载地址

只在放在 Assets 之下都行- 1

识别图片
在这下载我不知道会不会有问题 要是下载完之后有问题的话 大家就在PS 中随便画一下就行 我这里的长宽是 28*28 需要注意的是图片越大越消耗性能- 1
- 2
- 3
- 4
- 5


完整代码
using UnityEngine; using Unity.Sentis; using Unity.Sentis.Layers; ////// 手写体数字 识别 /// public class ClassifyHandwrittenDigit_ZH : MonoBehaviour { [Header("需要辨别的 输入")] public Texture2D _InputTexture; [Header("使用模型")] public ModelAsset _ModelAsset; //加载模型 Model _RuntimeModel; //工作流 IWorker _Worker; [Header("返回 概率列表")] public float[] _Results; void Start() { } private void Update() { if (Input.GetKeyDown(KeyCode.Q)) { DiscernAndJudge(_InputTexture); } } /// /// 识别于判断 /// public void DiscernAndJudge(Texture2D _Texture2D) { // 创建运行时模型 _RuntimeModel = ModelLoader.Load(_ModelAsset); // 将 softmax 层添加到模型的末尾,而不是非 softmax 输出 string _SoftmaxOutputName = "Softmax_Output"; _RuntimeModel.AddLayer(new Softmax(_SoftmaxOutputName, _RuntimeModel.outputs[0])); _RuntimeModel.outputs[0] = _SoftmaxOutputName; // 将输入数据创建为张量 using Tensor _InputTensor = TextureConverter.ToTensor(_Texture2D, width: 28, height: 28, channels: 1); // 创建引擎 //在 Sentis 中,工作线程是推理引擎。您可以创建一个工作线程以将模型分解为可执行任务,在 GPU 或 CPU 上运行任务,然后输出结果。 //例如,创建一个使用 Sentis 计算着色器在 GPU 上运行的工作线程: _Worker = WorkerFactory.CreateWorker(BackendType.GPUCompute, _RuntimeModel); // 使用输入数据运行模型 _Worker.Execute(_InputTensor); // 获得结果 using TensorFloat _OutputTensor = _Worker.PeekOutput() as TensorFloat; // 在读取张量数据之前将其移动到CPU _OutputTensor.MakeReadable(); //返回数据填充 _Results = _OutputTensor.ToReadOnlyArray(); } /// /// 当前脚本处于 禁用或非活动时执行 /// void OnDisable() { // 告诉GPU我们已经处理完引擎使用的内存了 _Worker.Dispose(); } } - 1
- 2
- 3
- 4
- 5
- 6
- 7
- 8
- 9
- 10
- 11
- 12
- 13
- 14
- 15
- 16
- 17
- 18
- 19
- 20
- 21
- 22
- 23
- 24
- 25
- 26
- 27
- 28
- 29
- 30
- 31
- 32
- 33
- 34
- 35
- 36
- 37
- 38
- 39
- 40
- 41
- 42
- 43
- 44
- 45
- 46
- 47
- 48
- 49
- 50
- 51
- 52
- 53
- 54
- 55
- 56
- 57
- 58
- 59
- 60
- 61
- 62
- 63
- 64
- 65
- 66
- 67
- 68
- 69
- 70
- 71
- 72
- 73
- 74
- 75
- 76
- 77
- 78
- 79
代码搭载运行
总体来说 只要大于 0.90 就证明是该的数字 下列 Results 返回数组 第几位就是 数字几- 1
- 2
1- 1

5- 1
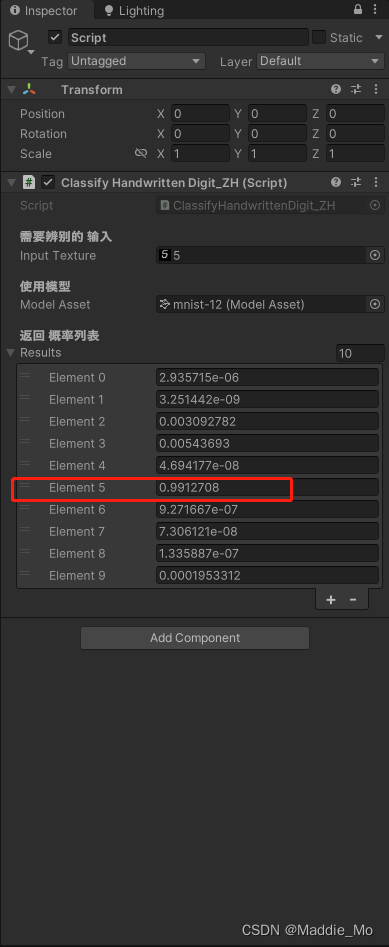
2- 1

射线绘画 URP(扩展)
射线绘画: 连连看 Shader Graph- 1
- 2
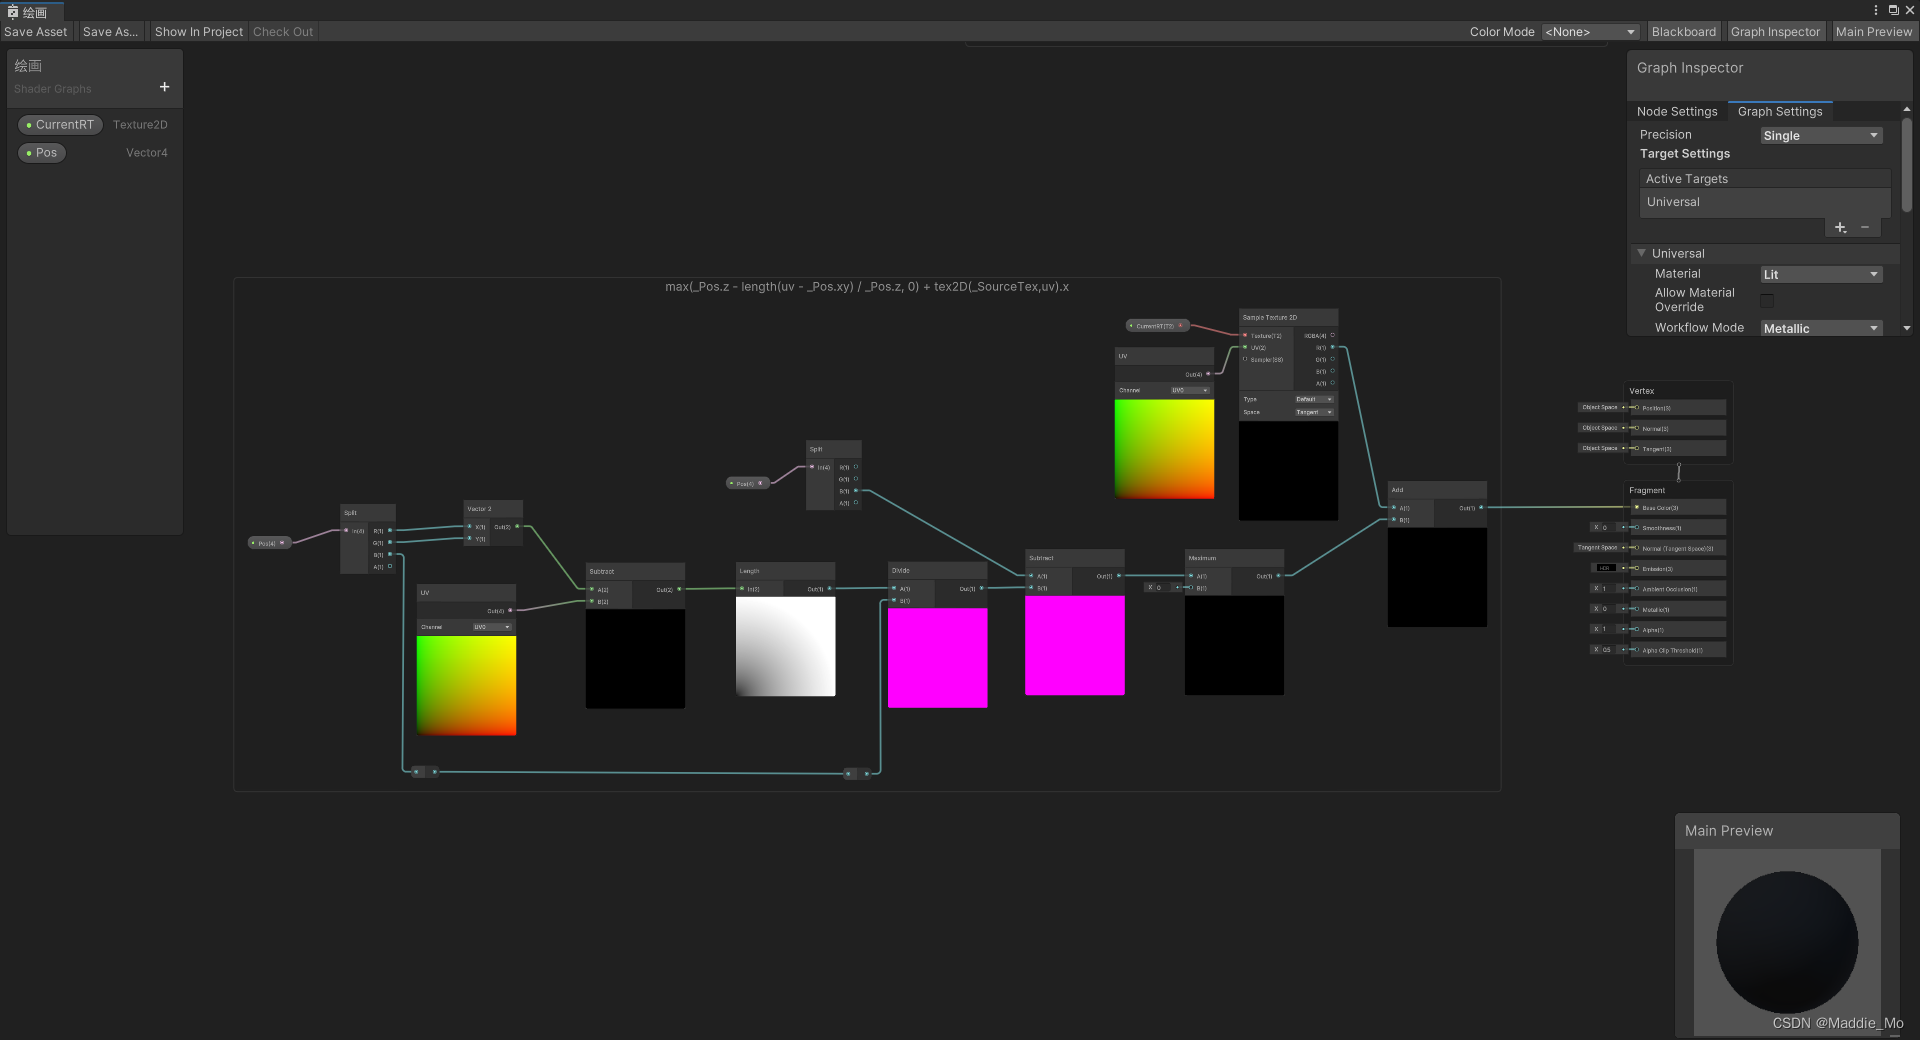
局部 1- 1
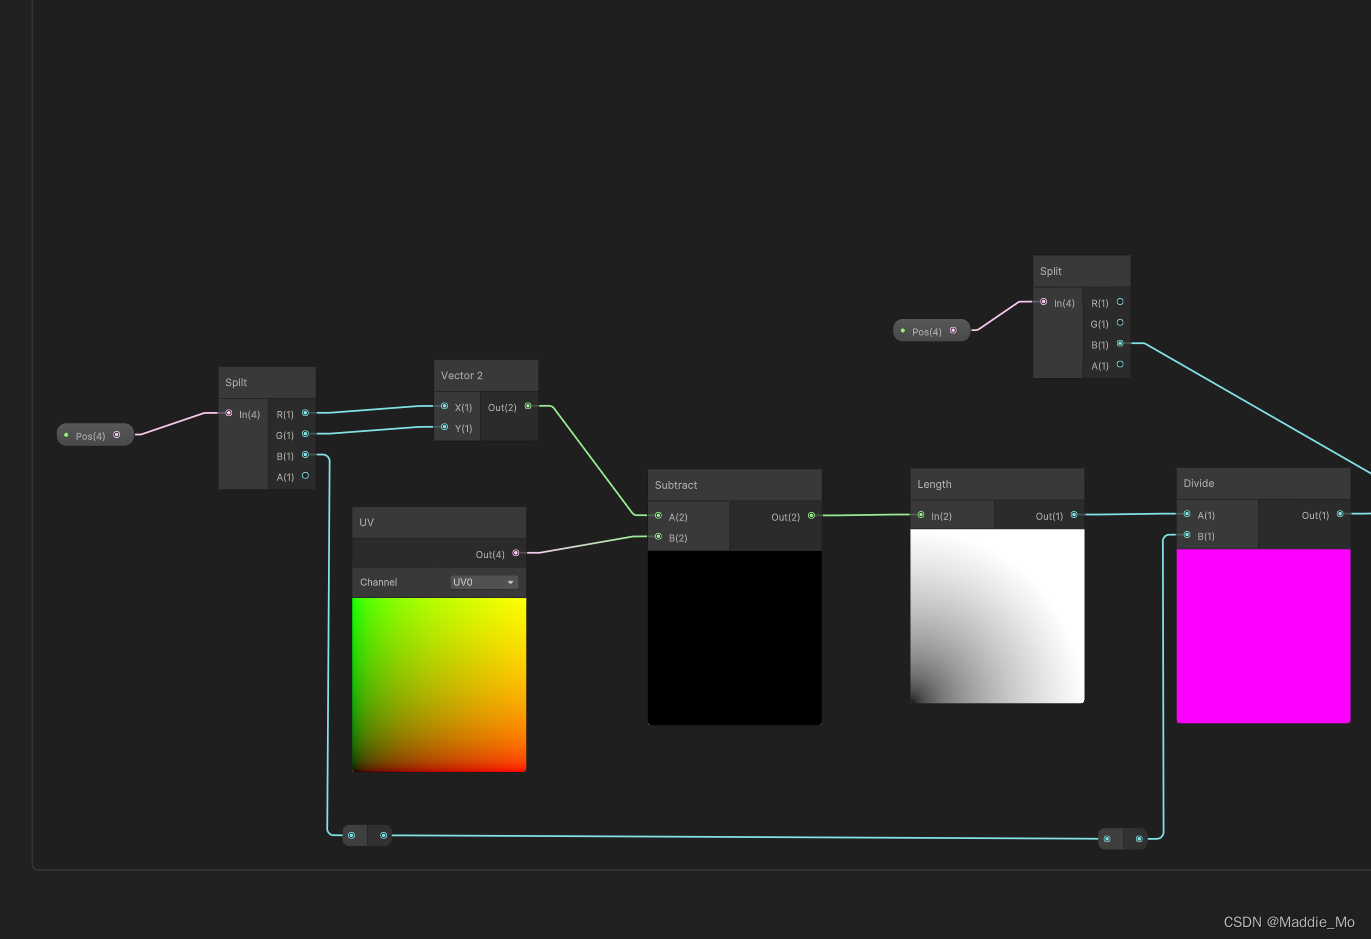
局部 2- 1
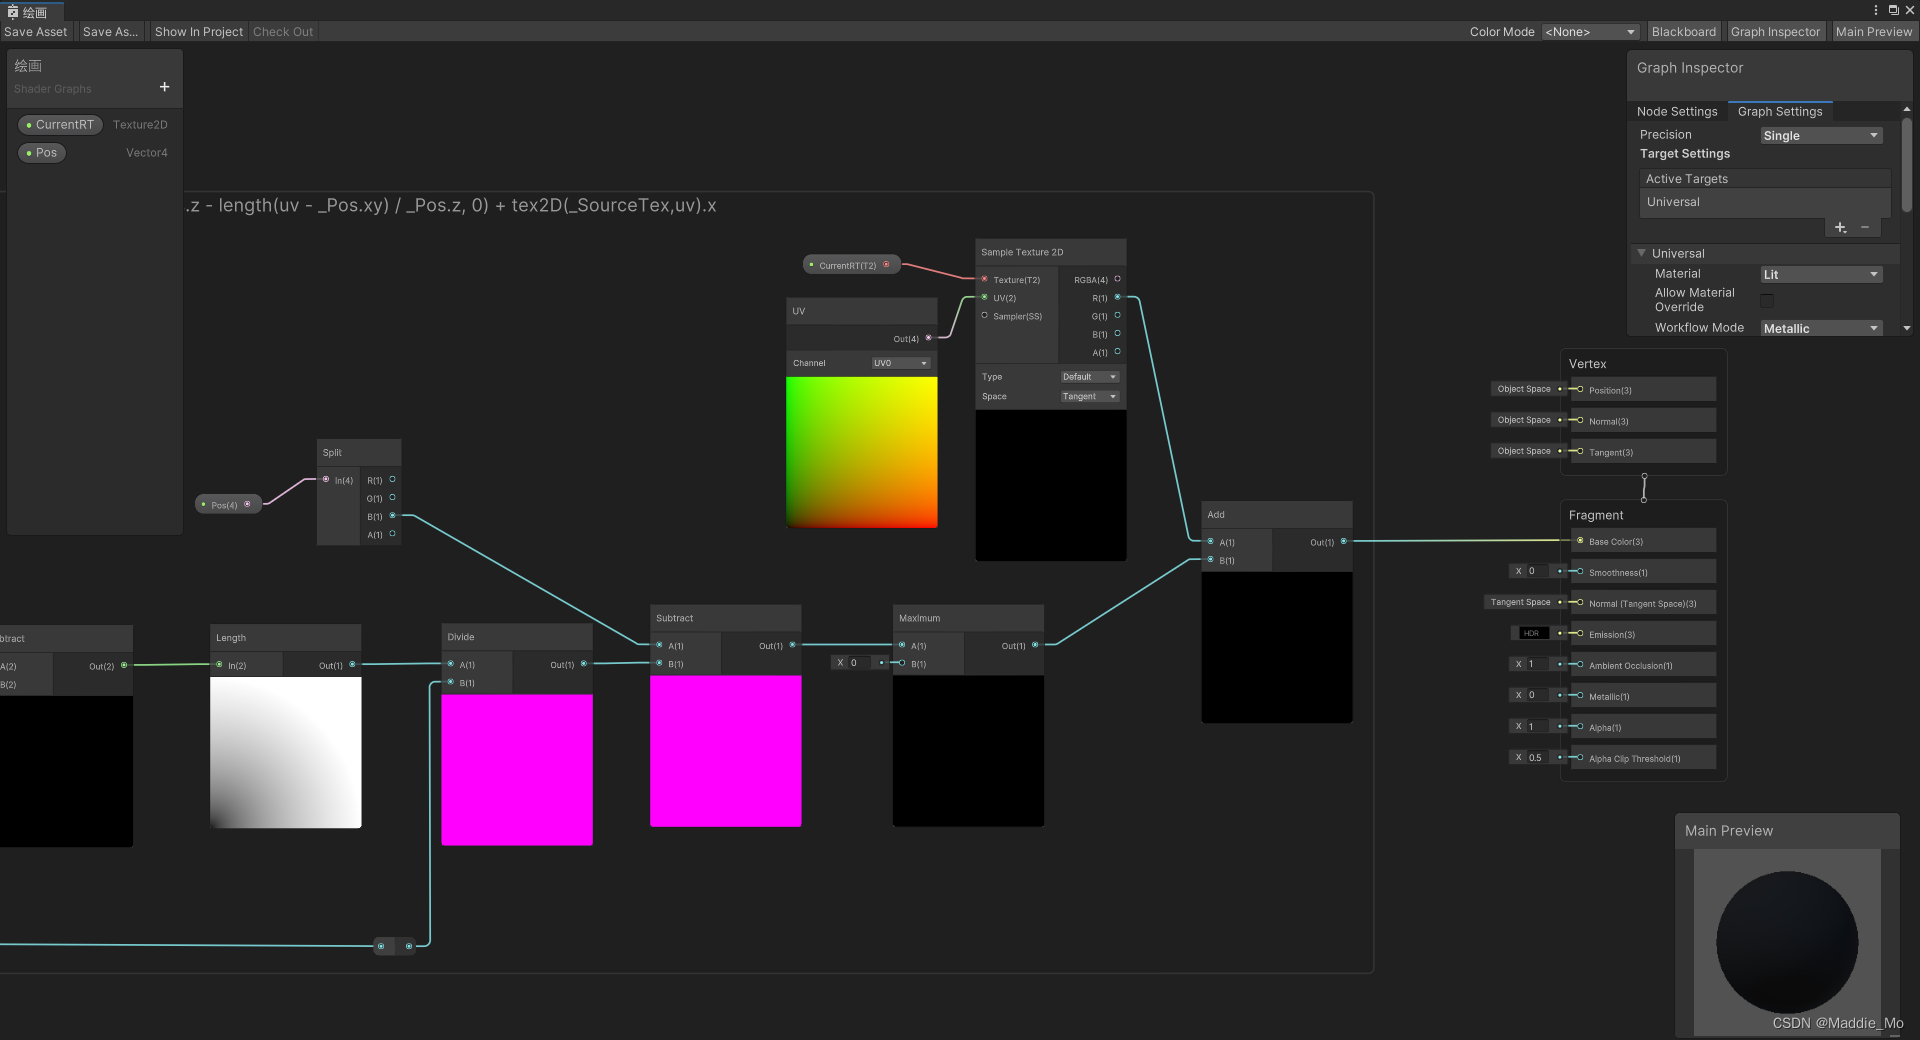
为什么要这样连接- 1

Graph 基础设置- 1
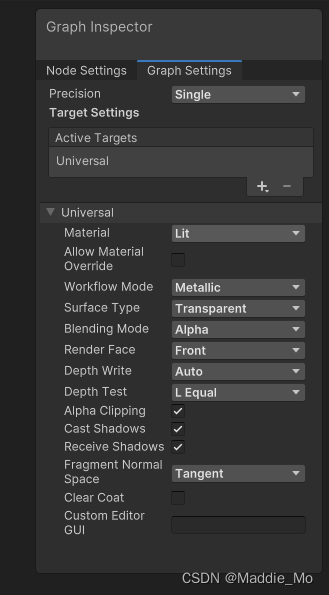
射线绘画脚本
using System.Collections; using System.Collections.Generic; using UnityEngine; ////// 绘画 /// public class Drawing_ZH : MonoBehaviour { [Header("Camera")] public Camera _MainCamera; [Header("画布贴图")] public RenderTexture _CurrentRT; [Header("临时贴图")] public RenderTexture _TempRT; [Header("绘画 材质球")] private Material _DrawMat; [Header("画布贴图 大小")] public int _TextureSize = 512; [Header("绘画 笔刷大小")] [Range(0, 1)] public float _DrawRadius = 0.2f; void Start() { _MainCamera = Camera.main; _CurrentRT = CreateRT(); _TempRT = CreateRT(); _DrawMat = GetComponent<MeshRenderer>().material; } void Update() { //鼠标左键 射线检测 if (Input.GetMouseButton(1)) { //射线生成 Ray _Ray = _MainCamera.ScreenPointToRay(Input.mousePosition); //返回结构体 RaycastHit _Hit; //触发 if (Physics.Raycast(_Ray, out _Hit)) { //图案绘制 DrawAt(_Hit.textureCoord.x, _Hit.textureCoord.y, _DrawRadius); print("射线绘画"); } } } /// /// 图像绘制 /// /// /// /// private void DrawAt(float x, float y, float _Radius) { //原本绘制贴图 _DrawMat.SetTexture("_SourceTex", _CurrentRT); //绘制的位置和大小 _DrawMat.SetVector("_Pos", new Vector4(x, y, _Radius, 0)); //绘制 提交 Graphics.Blit(null, _TempRT, _DrawMat); //贴图交换 RenderTexture _Rt = _TempRT; _TempRT = _CurrentRT; _CurrentRT = _Rt; } /// /// 新建 RenderTexture 画布 /// /// public RenderTexture CreateRT() { RenderTexture _Rt = new RenderTexture(_TextureSize, _TextureSize, 0, RenderTextureFormat.RFloat); _Rt.Create(); return _Rt; } } - 1
- 2
- 3
- 4
- 5
- 6
- 7
- 8
- 9
- 10
- 11
- 12
- 13
- 14
- 15
- 16
- 17
- 18
- 19
- 20
- 21
- 22
- 23
- 24
- 25
- 26
- 27
- 28
- 29
- 30
- 31
- 32
- 33
- 34
- 35
- 36
- 37
- 38
- 39
- 40
- 41
- 42
- 43
- 44
- 45
- 46
- 47
- 48
- 49
- 50
- 51
- 52
- 53
- 54
- 55
- 56
- 57
- 58
- 59
- 60
- 61
- 62
- 63
- 64
- 65
- 66
- 67
- 68
- 69
- 70
- 71
- 72
- 73
- 74
- 75
- 76
- 77
- 78
- 79
- 80
- 81
- 82
- 83
- 84
- 85
- 86
- 87
- 88
- 89
- 90
- 91
- 92
- 93
- 94
- 95
脚本搭载

效果
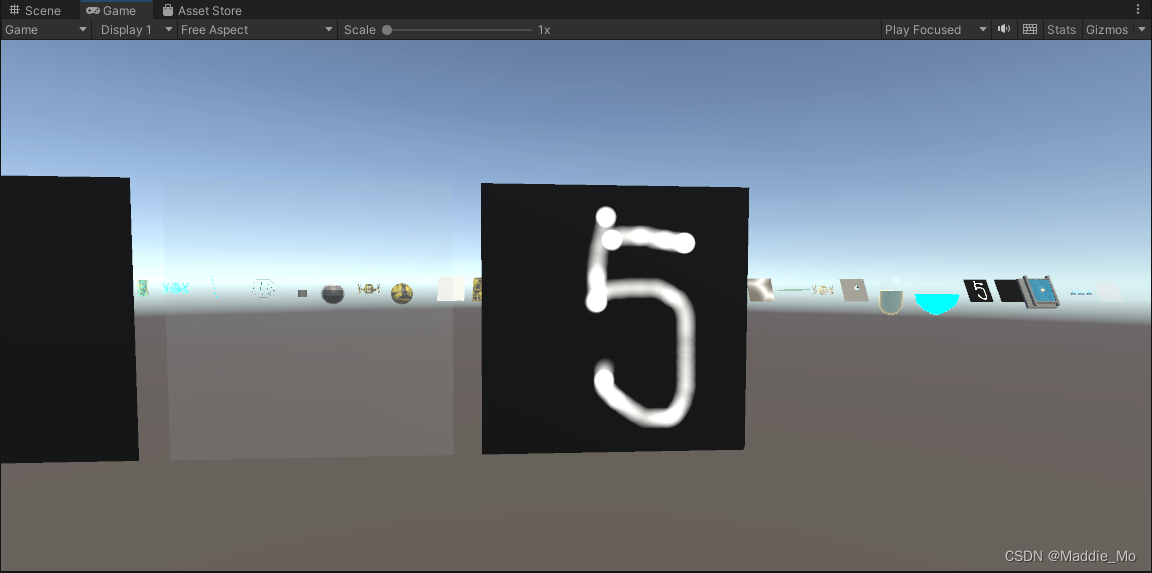
暂时先这样吧,如果有时间的话就会更新 Muse 精灵 AI,实在看不明白就留言,看到我会回复的。
路漫漫其修远兮,与君共勉。 -
相关阅读:
需求变化频繁的情况下,如何实施自动化测试
gflg学习笔记
神经网络模型的基本原理,神经网络模型原理图
3D技术在数字藏品中的应用
浏览器访问Nginx系统界面,除了主页 index.html 可以正常访问,其他的页面地址栏中访问都是404
服务号迁移到订阅号流程步骤
【LINUX】Linux最常用的20个基本指令 介绍~分析
WPF InkCanvas 截图功能
C++中为何需要函数
使用requests 请求https 报403
- 原文地址:https://blog.csdn.net/weixin_43925843/article/details/133644148
