-
C++设计模式-装饰器(Decorator)
目录
C++设计模式-装饰器(Decorator)
一、意图
动态地给一个对象添加一些额外的职责。就增加功能来说,Decorator模式相比生成子类更为灵活。
二、适用性
- 在不影响其他对象的情况下,以动态、透明的方式给单个对象添加职责。
- 处理那些可以撤消的职责。
- 当不能采用生成子类的方法进行扩充时。一种情况是,可能有大量独立的扩展,为支持每一种组合将产生大量的子类,使得子类数目呈爆炸性增长。另一种情况可能是因为类定义被隐藏,或类定义不能用于生成子类。
三、结构
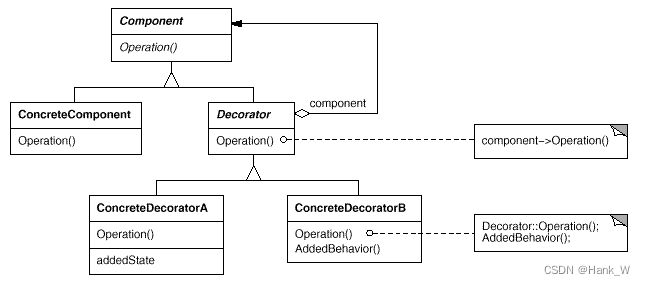
四、参与者
- Component
定义一个对象接口,可以给这些对象动态地添加职责。
- ConcreteDecorator
定义一个对象,可以给这个对象添加一些职责。
- Decorator
维持一个指向Component对象的指针,并定义一个与Component接口一致的接口。
- ConcreteComponent
向组件添加职责。
五、代码
- #include
- using namespace std;
- class Component {
- public:
- virtual void Operation() = 0;
- };
- class ConcreteComponent : public Component{
- public:
- virtual void Operation() {
- cout << "ConcreteComponent" << endl;
- }
- };
- class Decorator : public Component {
- public:
- Decorator(Component* tempComponent) :component(tempComponent) {}
- virtual void Operation() {
- component->Operation();
- }
- private:
- Component* component;
- };
- class ConcreteDecoratorA : public Decorator {
- public:
- ConcreteDecoratorA(Component* tempComponent) :Decorator(tempComponent) {}
- virtual void Operation() {
- Decorator::Operation();
- cout << "ConcreteDecoratorA" << endl;
- }
- };
- class ConcreteDecoratorB : public Decorator {
- public:
- ConcreteDecoratorB(Component* tempComponent) :Decorator(tempComponent) {}
- virtual void Operation() {
- Decorator::Operation();
- cout << "ConcreteDecoratorB" << endl;
- }
- };
- int main() {
- Component* component = new ConcreteComponent;
- component->Operation();
- Component* componentA = new ConcreteDecoratorA(component);
- componentA->Operation();
- Component* componentB = new ConcreteDecoratorB(component);
- componentB->Operation();
- return 0;
- }
-
相关阅读:
♥Redis教程 - Redis知识体系详解♥
ESP8266-Arduino编程实例-BH1745NUC亮度和颜色传感器驱动
数据结构——线性表:栈、队列
LPC/LSP/LSF辨析
【数据库】SQL 检索数据
如何在 SOLIDWORKS中创建零件模板 硕迪科技
使用 request 和 cheerio 库来发送 HTTP 请求
MySQL优化not in和不等于
Redis哨兵模式
Vscode远程调试
- 原文地址:https://blog.csdn.net/qq_40660998/article/details/133628183
