-
OpenGLES:绘制一个混色旋转的3D球体
效果展示
本博文会实现一个混色旋转的3D球体

一.球体解析
前几篇博文讲解了如何使用OpenGLES实现不同的3D图形
这一篇讲解怎样绘制3D世界的代表图形:一个混色旋转的3D球体
1.1 极限正多面体
如果看过我前几篇3D图形绘制的博文,就知道要绘制一个3D图形,首先要将3D图形拆解成可以使用单位图元——三角形进行绘制的各种子图形
然而懂点微积分的都知道,球体本身就可以看作是一个被极限分解的正多面体

所以球面可以直接使用三角形进行绘制,并不需要拆解成其他子图形
那么,现在要做的就是如何求解球体的顶点坐标。
1.2 求解球体顶点坐标
众所周知,地球上任何一个地方都能用经纬度进行标识
以此类推,先给球体设置一个经纬度
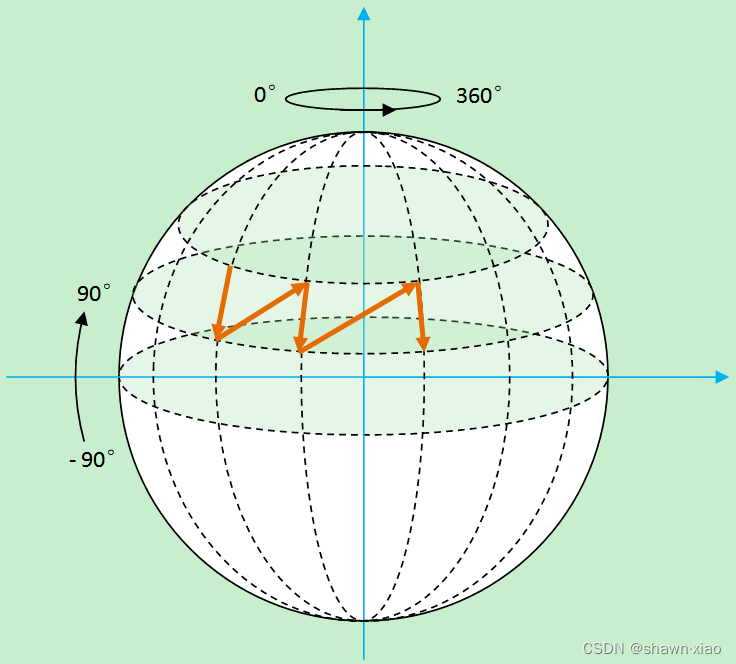
根据经纬度就将球体分解成四边形,再将四边形分解成三角形。
那么求解球体的坐标,就只需要求出四边形的坐标即可。

1.3 球体顶点坐标公式
根据上述讲解和图示,很容易就能得出球体顶点坐标公式:
- x0 = R * cos(a) * sin(b)
- y0 = R * sin(a))
- z0 = R * cos(a) * cos(b)
二.GLRender:变量定义
2.1 常规变量定义
还是常见的几个变量,跟其他3D图形的常规变量并无差别
- //MVP矩阵
- private float[] mMVPMatrix = new float[16];
- //着色器程序/渲染器
- private int shaderProgram;
- //返回属性变量的位置
- //MVP变换矩阵属性
- private int mvpMatrixLoc;
- //位置属性
- private int aPositionLocation;
- //颜色属性
- private int aColorLocation;
- //surface宽高比
- private float ratio;
2.2 定义顶点坐标数组和缓冲
前文中已经讲解,对于球体,并不需要拆解出子图形,而且颜色混合我会在着色器代码中实现,并不会在Render代码中动态加载实现,因此只需要定义一个数组和缓冲,就是顶点坐标。
- //球体顶点坐标数组
- private float vertexData[];
- //顶点缓冲
- private FloatBuffer vertexBuffer;
2.3 定义MVP矩阵
- //MVP矩阵
- private float[] mMVPMatrix = new float[16];
三.GLRender:着色器、内存分配等
3.1 着色器创建、链接、使用
3.2 着色器属性获取、赋值
3.3 缓冲内存分配
这几个部分的代码实现2D图形绘制基本一致
可参考以前2D绘制的相关博文,里面都有详细的代码实现
不再重复展示代码
四.GLRender:动态创建顶点
创建顶点时需要传入半径:0.85f
createBallPositions(0.85f);球体渲染的关键函数:
createBallPositions(float r):
- private void createBallPositions(float r) {
- // 存放顶点坐标的ArrayList
- ArrayList
alVertix = new ArrayList (); - // 将球进行单位切分的角度
- final int angleSpan = 5;
- // 纬度angleSpan度一份
- for (int wAngle = -90; wAngle < 90; wAngle = wAngle + angleSpan) {
- // 经度angleSpan度一份
- for (int jAngle = 0; jAngle <= 360; jAngle = jAngle + angleSpan) {
- // 纵向横向各到一个角度后计算对应的此点在球面上的坐标
- float x0 = (float) (r * Math.cos(Math.toRadians(wAngle)) * Math.sin(Math.toRadians(jAngle)));
- float y0 = (float) (r * Math.sin(Math.toRadians(wAngle)));
- float z0 = (float) (r * Math.cos(Math.toRadians(wAngle)) * Math.cos(Math.toRadians(jAngle)));
- float x1 = (float) (r * Math.cos(Math.toRadians(wAngle)) * Math.sin(Math.toRadians(jAngle + angleSpan)));
- float y1 = (float) (r * Math.sin(Math.toRadians(wAngle)));
- float z1 = (float) (r * Math.cos(Math.toRadians(wAngle)) * Math.cos(Math.toRadians(jAngle + angleSpan)));
- float x2 = (float) (r * Math.cos(Math.toRadians(wAngle + angleSpan)) * Math.sin(Math.toRadians(jAngle + angleSpan)));
- float y2 = (float) (r * Math.sin(Math.toRadians(wAngle + angleSpan)));
- float z2 = (float) (r * Math.cos(Math.toRadians(wAngle + angleSpan)) * Math.cos(Math.toRadians(jAngle + angleSpan)));
- float x3 = (float) (r * Math.cos(Math.toRadians(wAngle + angleSpan)) * Math.sin(Math.toRadians(jAngle)));
- float y3 = (float) (r * Math.sin(Math.toRadians(wAngle + angleSpan)));
- float z3 = (float) (r * Math.cos(Math.toRadians(wAngle + angleSpan)) * Math.cos(Math.toRadians(jAngle)));
- // 将计算出来的XYZ坐标加入存放顶点坐标的ArrayList
- alVertix.add(x1);
- alVertix.add(y1);
- alVertix.add(z1);
- alVertix.add(x0);
- alVertix.add(y0);
- alVertix.add(z0);
- alVertix.add(x2);
- alVertix.add(y2);
- alVertix.add(z2);
- alVertix.add(x3);
- alVertix.add(y3);
- alVertix.add(z3);
- /*
- 2---------------3
- | / |
- | / |
- | / |
- | / |
- | / |
- 1---------------0
- */
- }
- }
- float f[] = new float[alVertix.size()];
- for (int i = 0; i < f.length; i++) {
- f[i] = alVertix.get(i);
- }
- vertexData = f;
- }
五.GLRender:绘制
5.1 MVP矩阵
- //MVP矩阵赋值
- mMVPMatrix = TransformUtils.getBallMVPMatrix(ratio);
- //将变换矩阵传入顶点渲染器
- glUniformMatrix4fv(mvpMatrixLoc, 1, false, mMVPMatrix, 0);
getBallMVPMatrix(float ratio)
依然采用的是视椎体透视投影:
- public static float[] getBallMVPMatrix(float ratio) {
- float[] modelMatrix = getIdentityMatrix(16, 0); //模型变换矩阵
- float[] modelMatrix0 = getIdentityMatrix(16, 0); //模型变换矩阵
- float[] viewMatrix = getIdentityMatrix(16, 0); //观测变换矩阵/相机矩阵
- float[] projectionMatrix = getIdentityMatrix(16, 0); //投影变换矩阵
- mBallRotateAgree = (mBallRotateAgree + 1.0f) % 360;
- Matrix.setRotateM(modelMatrix, 0, mBallRotateAgree, 1, 0, 1);
- Matrix.translateM(modelMatrix0,0,0.0f,0.3f,0.3f);
- Matrix.multiplyMM(modelMatrix, 0, modelMatrix, 0, modelMatrix0, 0);
- Matrix.setLookAtM(viewMatrix, 0, 0, 0, 3, 0f, 0f, 0f, 0f, 1.0f, 0.0f);
- Matrix.frustumM(projectionMatrix, 0, -ratio, ratio, -1, 1, 1, 10);
- float[] tmpMatrix = new float[16];
- float[] mvpMatrix = new float[16];
- Matrix.multiplyMM(tmpMatrix, 0, viewMatrix, 0, modelMatrix, 0);
- Matrix.multiplyMM(mvpMatrix, 0, projectionMatrix, 0, tmpMatrix, 0);
- return mvpMatrix;
- }
5.2 绘制球体
- //准备顶点坐标内存
- glVertexAttribPointer(aPositionLocation, 3, GL_FLOAT, false, 0, vertexBuffer);
- //绘制
- glDrawArrays(GL_TRIANGLE_STRIP, 0, vertexData.length / 3);
六.着色器代码
(1).ball_vertex_shader.glsl
- #version 300 es
- layout (location = 0) in vec4 vPosition;
- layout (location = 1) in vec4 aColor;
- uniform mat4 u_Matrix;
- out vec4 vColor;
- void main() {
- gl_Position = u_Matrix*vPosition;
- float x = vPosition.x;
- float y = vPosition.y;
- float z = vPosition.z;
- //效果较真实
- vColor = vec4(x, y, z, 0.0);
- }
(2).ball_fragtment_shader.glsl
- #version 300 es
- #extension GL_OES_EGL_image_external_essl3 : require
- precision mediump float;
- in vec4 vColor;
- out vec4 outColor;
- void main(){
- outColor = vColor;
- }
八.结束语
混色旋转3D球体的绘制过程到此讲解结束了
最终实现出来的效果如同开头效果展示
-
相关阅读:
云原生中间件RocketMQ-核心原理之同步_异步刷盘,同步_异步复制解析
C语言与内存息息相关的重要概念有哪些?
Unity ILRuntime热更新开发原则与接口如何绑定
Java POI 读取 大数据量的Excel 实操
Yii实现RabbitMQ队列
如何与ChatGPT愉快地聊天
蓝桥杯实战应用【算法代码篇】-小朋友崇拜圈(附Java、Python和C++代码)
【shell】限制任务并发
指针和数组试题解析(5)二维数组部分
RabbitMQ---Spring AMQP
- 原文地址:https://blog.csdn.net/geyichongchujianghu/article/details/133530327