-
基于SpringBoot+MyBatis实现的个人博客系统(一)
这篇主要讲解一下如何基于SpringBoot和MyBatis技术实现一个简易的博客系统(前端页面主要是利用CSS,HTML进行布局书写),前端的静态页面代码可以直接复制粘贴,后端的接口以及前端发送的Ajax请求需要自己书写.
博客系统需要完成的接口:
- 注册
- 登录
- 博客列表页展示
- 博客详情页展示
- 发布博客
- 修改博客
- .......
完整版代码详见Gitee:blogsystem · 徐明园/SSM配置信息 - 码云 - 开源中国 (gitee.com)
项目亮点:
- 密码实现加盐处理,确保安全性;
- Session升级,由原来的内存存储改为通过Redis存储,不会丢失,并且支持分布式部署;
- 功能升级,对于博客列表的展示添加了分页功能;
- 登录验证升级,添加了拦截器的功能对用于的登录进行校验;
- ......
一, 项目的搭建
1,导入依赖坐标(创建SpringBoot项目)
在书写任何一个项目的同时,需要先将项目的基础给搭建好,搭建项目需要提前考虑好项目的一些功能需要哪些依赖,从而进行添加,如何创建SpringBoot项目可以看我的另一篇博客:SpringBoot项目的创建和使用_蜡笔小心眼子!的博客-CSDN博客
博客系统需要添加的依赖如下:
- "1.0" encoding="UTF-8"?>
"http://maven.apache.org/POM/4.0.0" xmlns:xsi="http://www.w3.org/2001/XMLSchema-instance" - xsi:schemaLocation="http://maven.apache.org/POM/4.0.0 https://maven.apache.org/xsd/maven-4.0.0.xsd">
4.0.0 org.springframework.boot spring-boot-starter-parent 2.7.16 com.example blogsystem 0.0.1-SNAPSHOT blogsystem blogsystem 1.8 org.springframework.boot spring-boot-starter-web org.mybatis.spring.boot mybatis-spring-boot-starter 2.3.1 org.springframework.boot spring-boot-devtools runtime true com.mysql mysql-connector-j runtime org.projectlombok lombok true org.springframework.boot spring-boot-starter-test test org.mybatis.spring.boot mybatis-spring-boot-starter-test 2.3.1 test org.springframework.boot spring-boot-maven-plugin org.projectlombok lombok
2,书写配置文件
需要使用MyBatis技术的项目需要配置你的数据库相关的信息以及Mapper的xml文件存储的位置,同时也可以在配置文件中定义一下日志的打印级别,从而方便查看数据库操作的完整信息:
- #配置数据库连接信息
- spring:
- datasource:
- url: "你自己的数据库"
- username: root
- password: "数据库对应的密码"
- driver-class-name: com.mysql.cj.jdbc.Driver
- #配置Mapper的xml文件存储信息
- mybatis:
- # xml的存储位置
- mapper-locations: classpath:mapper/*Mapper.xml
- configuration:
- log-impl: org.apache.ibatis.logging.stdout.StdOutImpl
- #配置日志打印级别
- logging:
- level:
- com:
- example:
- demo: debug
二, 将前端页面部署到项目中(resource文件下的static目录中)
对于后端程序员来说可以不用特别注重前端样式的书写,但是需要看得懂前端的代码以及和后端交互的请求即可(学有余力的情况下可以适当学习从而优化自己项目中的前端页面),这里的静态页面信息可以直接在我的码云中进行下载:SSM配置信息: 存放SSM项目中的一些配置信息 (gitee.com)博客系统(静态页面).zip · 徐明园/SSM配置信息 - 码云 - 开源中国 (gitee.com)SSM配置信息: 存放SSM项目中的一些配置信息 (gitee.com)
将下载好的前端页面全选之后直接复制到static目录下即可:

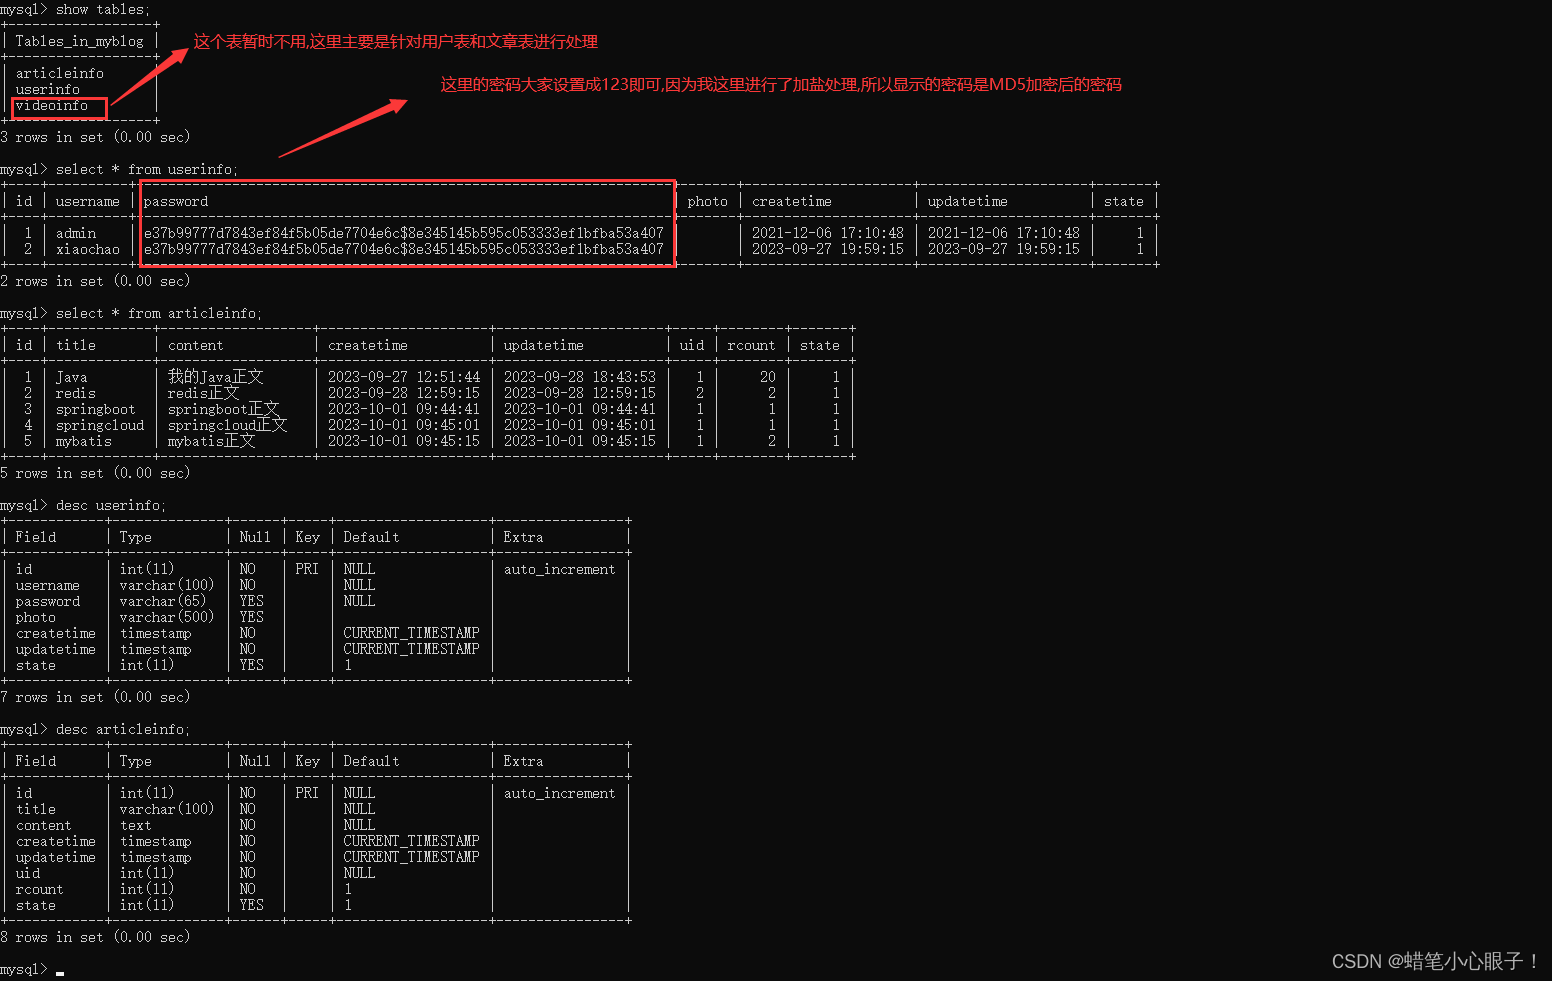
三, 初始化数据库
在配置文件中我们已经配置了数据库的连接信息,但是此时在数据库中还没有初始化一些数据,所以我们需要初始化数据,方便写项目的时候进行测试,初始化数据库的SQL代码也可以在我们的码云中进行下载:博客系统初始化数据库-ssm.sql · 徐明园/SSM配置信息 - 码云 - 开源中国 (gitee.com)
查看数据库中的表即相应表结构:

四, 对项目的整体架构进行分层
一个企业级的SM项目都需要对其进行合理的分层,每一层处理每一层的业务逻辑,我在项目中的分层如下:
- common:一些工具类
- config:配置信息类
- controller:处理前端请求的类
- entity:实体类(也可以写成model)
- mapper:用来和Mapper.xml文件交互的接口类
- service:处于controller和mapper之间的类

五, 书写前后端交互的功能
从这里开始就是项目的核心了,这里开始可以对前后端的接口和相应功能进行书写了!
1, 统一返回对象的封装
为了给前端返回统一的对象,后端需要定义一个类对返回的数据进行封装,该类包含code,msg和data三个属性,该类定义在common包下:
- package com.example.blogsystem.common;
- import lombok.Data;
- import java.io.Serializable;
- /**
- * 统一返回对象
- * 返回成功的话 code 设置成 200
- * 反悔失败的话 code 设置成本身的 code
- */
- @Data
- public class AjaxResult implements Serializable {
- private int code;
- private String msg;
- private Object data;
- /**
- * 返回成功
- *
- * @param data
- * @return
- */
- public static AjaxResult success(Object data) {
- AjaxResult ajaxResult = new AjaxResult();
- ajaxResult.setCode(200);
- ajaxResult.setMsg("");
- ajaxResult.setData(data);
- return ajaxResult;
- }
- public static AjaxResult success(Object data, String msg) {
- AjaxResult ajaxResult = new AjaxResult();
- ajaxResult.setCode(200);
- ajaxResult.setMsg(msg);
- ajaxResult.setData(data);
- return ajaxResult;
- }
- /**
- * 返回失败
- *
- * @param code
- * @param msg
- * @return
- */
- public static AjaxResult fail(Integer code, String msg) {
- AjaxResult ajaxResult = new AjaxResult();
- ajaxResult.setCode(code);
- ajaxResult.setMsg(msg);
- ajaxResult.setData("");
- return ajaxResult;
- }
- public static AjaxResult fail(Integer code, String msg, String data) {
- AjaxResult ajaxResult = new AjaxResult();
- ajaxResult.setCode(code);
- ajaxResult.setMsg(msg);
- ajaxResult.setData(data);
- return ajaxResult;
- }
- }
2, 注册功能
注册功能就是用户给后端发送一次请求之后,后端就会在数据中新增一条用户记录!
前端
- "en">
- "UTF-8">
- "X-UA-Compatible" content="IE=edge">
- "viewport" content="width=device-width, initial-scale=1.0">
注册页面 - "stylesheet" href="css/conmmon.css">
- "stylesheet" href="css/login.css">
- "login-container">"login-dialog">
注册
"row">用户名"text" id="username">"row">密码"password" id="password">"row">确认密码"password" id="password2">"row">
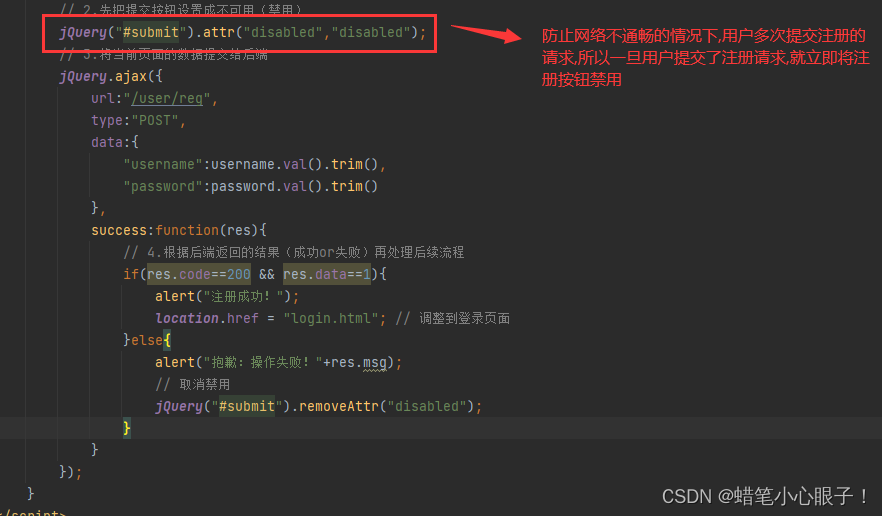
前端给后端发送请求都是通过Ajax来实现的,所以对于任何需要发送Ajax请求的页面都需要导入js的依赖(后面就不再赘述)


后端(这里的后端只展示controller包中的代码)
- @RequestMapping("/reg")
- public AjaxResult reg(UserInfo userInfo) {
- //1.对前端传递来的参数进行校验
- if (userInfo == null || !StringUtils.hasLength(userInfo.getUsername()) || !StringUtils.hasLength(userInfo.getPassword())) {
- return AjaxResult.fail(-1, "参数有误!");
- }
- //2.与数据库进行交互实现注册的功能
- //将密码进行加盐加密
- userInfo.setPassword(PasswordTools.encrypt(userInfo.getPassword()));
- int result = userService.reg(userInfo);
- //3.对于查询结果给前端进行反馈
- return AjaxResult.success(result);
- }

3, 登录功能
登录就是前端给后端传递用户名和密码,后端从数据库中查询是否存在这样的用户!
前端
- "en">
- "UTF-8">
- "X-UA-Compatible" content="IE=edge">
- "viewport" content="width=device-width, initial-scale=1.0">
登陆页面 - "stylesheet" href="css/conmmon.css">
- "stylesheet" href="css/login.css">
- "login-container">"login-dialog">
登陆
"row">用户名"text" id="username">"row">密码"password" id="password">"row">
登录功能的前端代码和注册功能前端代码几乎一模一样
后端
- @RequestMapping("/login")
- public AjaxResult login(String username, String password, HttpServletRequest request) {
- //1.对前端传递来的参数进行校验
- if (!StringUtils.hasLength(username) || !StringUtils.hasLength(password)) {
- return AjaxResult.fail(-1, "参数有误!");
- }
- //2.根据用户名去数据库中进行查询
- UserInfo userInfo = userService.login(username);
- if (userInfo == null || userInfo.getId() <= 0) {
- return AjaxResult.fail(-2, "用户名或者密码错误!");
- }
- //对数据库中查找的密码进行解密
- // if (!PasswordTools.check(password,userInfo.getPassword())) {
- // return AjaxResult.fail(-2, "用户名或者密码错误!");
- // }
- if (!userInfo.getPassword().equals(password)) {
- return AjaxResult.fail(-2, "用户名或者密码错误!");
- }
- //当前表示登陆成功 需要存储session
- HttpSession session = request.getSession();
- session.setAttribute(ApplicationVariable.USERINFO_SESSION_KEY, userInfo);
- return AjaxResult.success(1);
- }
登录的时候需要存储用户的session(会话)信息,因为session的Key需要在多个地方使用,我们将该属性抽象出来放在了common这个公共包下了:
- package com.example.blogsystem.common;
- public class ApplicationVariable {
- public static final String USERINFO_SESSION_KEY = "USERINFO_SESSION_KEY";
- }
对于取出session()会话)中的的用户信息也可以将其封装公共的类,放在common包下:
- package com.example.blogsystem.common;
- import com.example.blogsystem.entity.UserInfo;
- import javax.servlet.http.HttpServletRequest;
- import javax.servlet.http.HttpSession;
- public class UserSessionTools {
- public static UserInfo getLoginUser(HttpServletRequest request) {
- HttpSession session = request.getSession(false);
- if (session != null && session.getAttribute(ApplicationVariable.USERINFO_SESSION_KEY) != null) {
- return (UserInfo) session.getAttribute(ApplicationVariable.USERINFO_SESSION_KEY);
- }
- return null;
- }
- }
4, 实现拦截器
对于一些博客信息的操作需要用户进行登录,所以可以通过拦截器判断用户具有相应的权限,只有通过拦截器的用户才可以操作,可以将拦截的配置信息放在config包下.
实现HandlerInterceptor接口:
- package com.example.blogsystem.config;
- import com.example.blogsystem.common.ApplicationVariable;
- import org.springframework.context.annotation.Configuration;
- import org.springframework.web.servlet.HandlerInterceptor;
- import javax.servlet.http.HttpServletRequest;
- import javax.servlet.http.HttpServletResponse;
- import javax.servlet.http.HttpSession;
- @Configuration
- public class LoginInterceptor implements HandlerInterceptor {
- @Override
- public boolean preHandle(HttpServletRequest request, HttpServletResponse response, Object handler) throws Exception {
- HttpSession session = request.getSession(false);
- if (session != null && session.getAttribute(ApplicationVariable.USERINFO_SESSION_KEY) != null) {
- return true;
- }
- response.sendRedirect("/login.html");//没有通过拦截器的请求需要跳转到登录页面先登录
- return false;
- }
- }
实现WebMvcConfigurer进行配置接口:
- package com.example.blogsystem.config;
- import org.springframework.context.annotation.Configuration;
- import org.springframework.web.servlet.config.annotation.InterceptorRegistry;
- import org.springframework.web.servlet.config.annotation.WebMvcConfigurer;
- import javax.annotation.Resource;
- @Configuration
- public class MyConfig implements WebMvcConfigurer {
- @Resource
- private LoginInterceptor loginInterceptor;
- @Override
- public void addInterceptors(InterceptorRegistry registry) {
- registry.addInterceptor(loginInterceptor)
- .addPathPatterns("/**") //拦截所有的url
- .excludePathPatterns("/login.html")
- .excludePathPatterns("/reg.html")
- .excludePathPatterns("/blog_list.html")
- .excludePathPatterns("/blog_content.html")
- .excludePathPatterns("/css/**")
- .excludePathPatterns("/editor.md/**")
- .excludePathPatterns("/img/**")
- .excludePathPatterns("/js/**")
- .excludePathPatterns("/user/reg")
- .excludePathPatterns("/user/login");
- }
- }
这里需要先放开所有的静态页面,图片以及登录和注册接口.
5, 博客添加功能
博客添加功能就是前端向后端提交博客的一些信息,后端在文章表中插入一条文章记录即可!
前端
- "en">
- "UTF-8">
- "X-UA-Compatible" content="IE=edge">
- "viewport" content="width=device-width, initial-scale=1.0">
文章添加 - "stylesheet" href="css/conmmon.css">
- "stylesheet" href="css/blog_edit.css">
- "stylesheet" href="editor.md/css/editormd.min.css" />
- "blog-edit-container">"title">"title" type="text" placeholder="在这里写下文章标题">"editorDiv">
这里的前端页面引入了MarkDown编辑器,所以添加博客的时候相较于其他官方博客系统更加真实,而且该编辑器提供了一些Api让我们进行格式转换的时候更加方便.
- //相关API
- alert(editor.getValue()); // 获取值
- editor.setValue("#123") // 设置值
后端
- @RequestMapping("/add")
- public AjaxResult add(ArticleInfo articleInfo, HttpServletRequest request) {
- //1.对前端传递来的参数进行判空操作
- if (articleInfo == null || !StringUtils.hasLength(articleInfo.getTitle()) || !StringUtils.hasLength(articleInfo.getContent())) {
- return AjaxResult.fail(-1, "参数错误!");
- }
- //2.获取当前的uid进行校验
- UserInfo userInfo = UserSessionTools.getLoginUser(request);
- if (userInfo == null || userInfo.getId() <= 0) {
- return AjaxResult.fail(-1, "参数错误!");
- }
- //3.封装uid进行持久化
- articleInfo.setUid(userInfo.getId());
- int result = articleService.add(articleInfo);
- //4.给前端进行数据反馈
- return AjaxResult.success(result);
- }
这里数据库存储的是MarkDown格式的数据,是为了方便进行修改的时候直接进行修改省去了一次从Html转换成MarkDown格式的操作.
6, 博客编辑功能
博客编辑功能需要实现两个操作:
1.先去查询当前文章的信息进行展示(页面加载的时候进行调用)
2.提交修改操作(触发提交按钮的时候进行调用)
前端
- "en">
- "UTF-8">
- "X-UA-Compatible" content="IE=edge">
- "viewport" content="width=device-width, initial-scale=1.0">
文章修改 - "stylesheet" href="css/conmmon.css">
- "stylesheet" href="css/blog_edit.css">
- "stylesheet" href="editor.md/css/editormd.min.css"/>
- "nav">
"img/logo2.jpg" alt="">
"title">我的博客系统"spacer"> - "blog-edit-container">"title">"title" type="text" placeholder="在这里写下文章标题">"editorDiv">
后端
- /**
- * 对文章进行修改的时候也需要对拿到文章进行权限验证 拿到的文章的uid必须和登录的用户的id一致
- * 防止登录的用户对其他人的文章进行篡改
- */
- @RequestMapping("/getdetailbyid")
- public AjaxResult getdetailbyid(Integer id, HttpServletRequest request) {
- //1.对id进行判空操作
- if (id == null || id <= 0) {
- return AjaxResult.fail(-1, "参数错误!");
- }
- //2.获取到登录用户的id
- UserInfo userInfo = UserSessionTools.getLoginUser(request);
- if (userInfo == null || userInfo.getId() <= 0) {
- return AjaxResult.fail(-1, "参数错误!");
- }
- //3.封装id和uid进行持久化操作
- return AjaxResult.success(articleService.getDetailByIdAndUid(id, userInfo.getId()));
- }
- @RequestMapping("/update")
- public AjaxResult update(ArticleInfo articleInfo, HttpServletRequest request) {
- //1.对前端传递的参数进行判空
- if (articleInfo == null || articleInfo.getId() <= 0
- || !StringUtils.hasLength(articleInfo.getTitle()) || !StringUtils.hasLength(articleInfo.getContent())) {
- return AjaxResult.fail(-1, "参数错误!");
- }
- //2.获取uid进行封装并进行持久化
- UserInfo userInfo = UserSessionTools.getLoginUser(request);
- if (userInfo == null || userInfo.getId() <= 0) {
- return AjaxResult.fail(-1, "参数错误!");
- }
- articleInfo.setUid(userInfo.getId());
- articleInfo.setUpdatetime(LocalDateTime.now());
- //3.给前端返回数据
- int result = articleService.update(articleInfo);
- return AjaxResult.success(result);
- }
根据文章id进行查找文章时,必须要进行校验,确保查询到的文章时该登录用户的文章,即文章表中的uid = 用户表中的id.
-
相关阅读:
想了一个月都不知道如何开始做自媒体
【MySQL开发手册(基础篇)】
laravel生命周期超细腻
CSAPP Bomb Lab
二分法之旋转数组
处理器ChannelHandler的线程安全问题
MATLAB程序设计课后作业一
金仓数据库KingbaseES安全指南--6.2. 身份验证相关的配置文件
JS的预解析
解密Prompt系列11. 小模型也能COT-先天不足后天来补
- 原文地址:https://blog.csdn.net/qq_47908816/article/details/133483972
