-
pytorch第一天(tensor数据和csv数据的预处理)lm老师版
tensor数据:
- import torch
- import numpy
- x = torch.arange(12)
- print(x)
- print(x.shape)
- print(x.numel())
- X = x.reshape(3, 4)
- print(X)
- zeros = torch.zeros((2, 3, 4))
- print(zeros)
- ones = torch.ones((2,3,4))
- print(ones)
- randon = torch.randn(3,4)
- print(randon)
- a = torch.tensor([[2, 1, 4, 3], [1, 2, 3, 4], [4, 3, 2, 1]])
- print(a)
- exp = torch.exp(a)
- print(exp)
- X = torch.arange(12, dtype=torch.float32).reshape((3, 4))
- print(X)
- Y = torch.tensor([[2.0, 1, 4, 3], [1, 2, 3, 4], [4, 3, 2, 1]])
- print(Y)
- print(torch.cat((X, Y), dim=0))#第一个括号 从外往里数第一个
- print(torch.cat((X, Y), dim=1))#第二个括号 从外往里数第二个
- print(X == Y)#这也是个张量
- tosum = torch.tensor([1.0,2,3,4])
- print(tosum.sum())#加起来也是tensor
- print(tosum.sum().item())#这样就是取里面的数 就是一个数了
- print(type(tosum.sum().item()))#打印一下类型 是float的类型
- a1 = torch.arange(3).reshape(3,1)
- b1 = torch.arange(2).reshape(1,2)
- print(a1+b1)#相加的时候 会自己填充相同的 boardcasting mechanism
- print(X[-1])
- print(X[1:3])
- X[1, 2] = 9 #修改(1,2)为9
- print(X[1])#打印出那一行
- X[0:2] = 12 #这样的效果和X[0:2,:]=12是一样的 都是修改前两行为12
- print(X)
- #id相当于地址一样的东西
- #直接对Y操作改变了地址 增加了内存
- before = id(Y)
- Y = Y + X
- print(id(Y) == before)
- #对其元素修改操作 不增加内存 地址一样
- Z = torch.zeros_like(Y)
- print('id(Z):', id(Z))
- Z[:] = X + Y
- print('id(Z):', id(Z))
- #或者用+=连续操作 地址也不会变
- before = id(X)
- X += Y
- print(id(X) == before)
- A = X.numpy()
- print(A)
- print("A现在的类型是:{}".format(type(A)))
- B = torch.tensor(A)
- print(B)
- print("B现在的类型是:{}".format(type(B)))
运行结果自己对照学习了:
- F:\python3\python.exe C:\study\project_1\main.py
- tensor([ 0, 1, 2, 3, 4, 5, 6, 7, 8, 9, 10, 11])
- torch.Size([12])
- 12
- tensor([[ 0, 1, 2, 3],
- [ 4, 5, 6, 7],
- [ 8, 9, 10, 11]])
- tensor([[[0., 0., 0., 0.],
- [0., 0., 0., 0.],
- [0., 0., 0., 0.]],
- [[0., 0., 0., 0.],
- [0., 0., 0., 0.],
- [0., 0., 0., 0.]]])
- tensor([[[1., 1., 1., 1.],
- [1., 1., 1., 1.],
- [1., 1., 1., 1.]],
- [[1., 1., 1., 1.],
- [1., 1., 1., 1.],
- [1., 1., 1., 1.]]])
- tensor([[-0.8680, 1.4825, -0.1070, -1.9015],
- [-0.7380, -0.3838, -0.2670, -0.2649],
- [ 0.9945, -1.5293, 0.0398, 0.1669]])
- tensor([[2, 1, 4, 3],
- [1, 2, 3, 4],
- [4, 3, 2, 1]])
- tensor([[ 7.3891, 2.7183, 54.5981, 20.0855],
- [ 2.7183, 7.3891, 20.0855, 54.5981],
- [54.5981, 20.0855, 7.3891, 2.7183]])
- tensor([[ 0., 1., 2., 3.],
- [ 4., 5., 6., 7.],
- [ 8., 9., 10., 11.]])
- tensor([[2., 1., 4., 3.],
- [1., 2., 3., 4.],
- [4., 3., 2., 1.]])
- tensor([[ 0., 1., 2., 3.],
- [ 4., 5., 6., 7.],
- [ 8., 9., 10., 11.],
- [ 2., 1., 4., 3.],
- [ 1., 2., 3., 4.],
- [ 4., 3., 2., 1.]])
- tensor([[ 0., 1., 2., 3., 2., 1., 4., 3.],
- [ 4., 5., 6., 7., 1., 2., 3., 4.],
- [ 8., 9., 10., 11., 4., 3., 2., 1.]])
- tensor([[False, True, False, True],
- [False, False, False, False],
- [False, False, False, False]])
- tensor(10.)
- 10.0
- <class 'float'>
- tensor([[0, 1],
- [1, 2],
- [2, 3]])
- tensor([ 8., 9., 10., 11.])
- tensor([[ 4., 5., 6., 7.],
- [ 8., 9., 10., 11.]])
- tensor([4., 5., 9., 7.])
- tensor([[12., 12., 12., 12.],
- [12., 12., 12., 12.],
- [ 8., 9., 10., 11.]])
- False
- id(Z): 1801869019800
- id(Z): 1801869019800
- True
- [[26. 25. 28. 27.]
- [25. 26. 27. 28.]
- [20. 21. 22. 23.]]
- A现在的类型是:<class 'numpy.ndarray'>
- tensor([[26., 25., 28., 27.],
- [25., 26., 27., 28.],
- [20., 21., 22., 23.]])
- B现在的类型是:<class 'torch.Tensor'>
- 进程已结束,退出代码0
csv一般的数据预处理:
- import os
- import pandas as pd
- import torch
- #创造文件夹 和excel csv文件
- os.makedirs(os.path.join('..', 'data'), exist_ok=True)
- data_file = os.path.join('..', 'data', 'house_tiny.csv')#因为没有 所有会自己创建一个
- #打开文件 用写的方式打开
- with open(data_file, 'w') as f:
- f.write('NumRooms,Alley,Price\n')
- f.write('NA,Pave,127500\n')
- f.write('2,NA,106000\n')
- f.write('4,NA,178100\n')
- f.write('NA,NA,140000\n')
- #打开csv文件
- data = pd.read_csv(data_file)
- print(data) # 0,1,2,3会从第二行开始 因为第一行一般是标题和标签
- inputs, outputs = data.iloc[:, 0:2], data.iloc[:, 2]#裁剪0,1行 第2行舍去给input
- print(inputs)
- print(outputs)#name就会在下面
- inputs = inputs.fillna(inputs.mean())#把string的类型变成其他的均值
- print(inputs)
- inputs = pd.get_dummies(inputs, dummy_na=True)#alley里面全是英文 应该把其编码 这就是编码的方式 是1就会为1
- print(inputs)
- #都是数字后 就开始转换成tensor类型了
- X, y = torch.tensor(inputs.values), torch.tensor(outputs.values)
- print(X)
- print(y)
运行结果:
- F:\python3\python.exe C:\study\project_1\data_preprocess.py
- NumRooms Alley Price
- 0 NaN Pave 127500
- 1 2.0 NaN 106000
- 2 4.0 NaN 178100
- 3 NaN NaN 140000
- NumRooms Alley
- 0 NaN Pave
- 1 2.0 NaN
- 2 4.0 NaN
- 3 NaN NaN
- 0 127500
- 1 106000
- 2 178100
- 3 140000
- Name: Price, dtype: int64
- NumRooms Alley
- 0 3.0 Pave
- 1 2.0 NaN
- 2 4.0 NaN
- 3 3.0 NaN
- NumRooms Alley_Pave Alley_nan
- 0 3.0 1 0
- 1 2.0 0 1
- 2 4.0 0 1
- 3 3.0 0 1
- tensor([[3., 1., 0.],
- [2., 0., 1.],
- [4., 0., 1.],
- [3., 0., 1.]], dtype=torch.float64)
- tensor([127500, 106000, 178100, 140000])
- 进程已结束,退出代码0
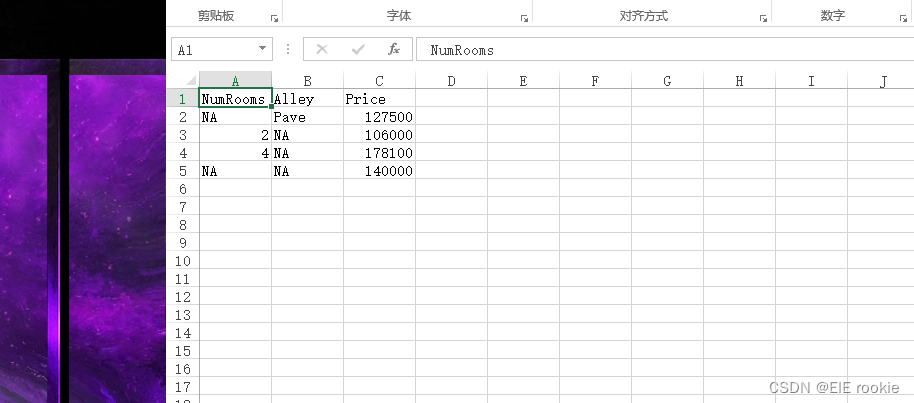
第一行代码 创造文件夹的操作和csv操作结果:

他是跑到上一个级创建的dir

ok 结束
-
相关阅读:
LeetCode - 547 省份数量
vue考试系统后台管理项目-接口封装调用
基于SpringBoot+Vue的点餐管理系统
gradle android 配置 build 变体
Java Utils工具类大全
centerOS 安装mangodb
JetBrains问题汇总
USACO Training 1.4 Mixing Milk
玩转“产业生态”,长城汽车森林生态很“未来”
计算机毕业设计Java个性化穿搭推荐系统(源码+系统+mysql数据库+Lw文档)
- 原文地址:https://blog.csdn.net/weixin_63163242/article/details/133441802