-
5、Linux驱动开发:设备-设备注册
目录
随着自己工作的进行,接触到的技术栈也越来越多。给我一个很直观的感受就是,某一项技术/经验在刚开始接触的时候都记得很清楚。往往过了几个月都会忘记的差不多了,只有经常会用到的东西才有可能真正记下来。存在很多在特殊情况下有一点用处的技巧,用的不多的技巧可能一个星期就忘了。
想了很久想通过一些手段把这些事情记录下来。也尝试过在书上记笔记,这也只是一时的,书不在手边的时候那些笔记就和没记一样,不是很方便。
很多时候我们遇到了问题,一般情况下都是选择在搜索引擎检索相关内容,这样来的也更快一点,除非真的找不到才会去选择翻书。后来就想到了写博客,博客作为自己的一个笔记平台倒是挺合适的。随时可以查阅,不用随身携带。
同时由于写博客是对外的,既然是对外的就不能随便写,任何人都可以看到。经验对于我来说那就只是经验而已,公布出来说不一定我的一些经验可以帮助到其他的人。遇到和我相同问题时可以少走一些弯路。
既然决定了要写博客,那就只能认真去写。不管写的好不好,尽力就行。
千里之行始于足下,一步一个脚印,慢慢来,写的多了慢慢也会变好的。权当是记录自己的成长的一个过程,等到以后再往回看时,就会发现自己以前原来这么菜😂。本系列博客所述资料
均来自互联网资料,并不是本人原创(只有博客是自己写的)。出于热心,本人将自己的所学笔记整理并推出相对应的使用教程,方面其他人学习。为国内的物联网事业发展尽自己的一份绵薄之力,没有为自己谋取私利的想法。若出现侵权现象,请告知本人,本人会立即停止更新,并删除相应的文章和代码。字符设备架构
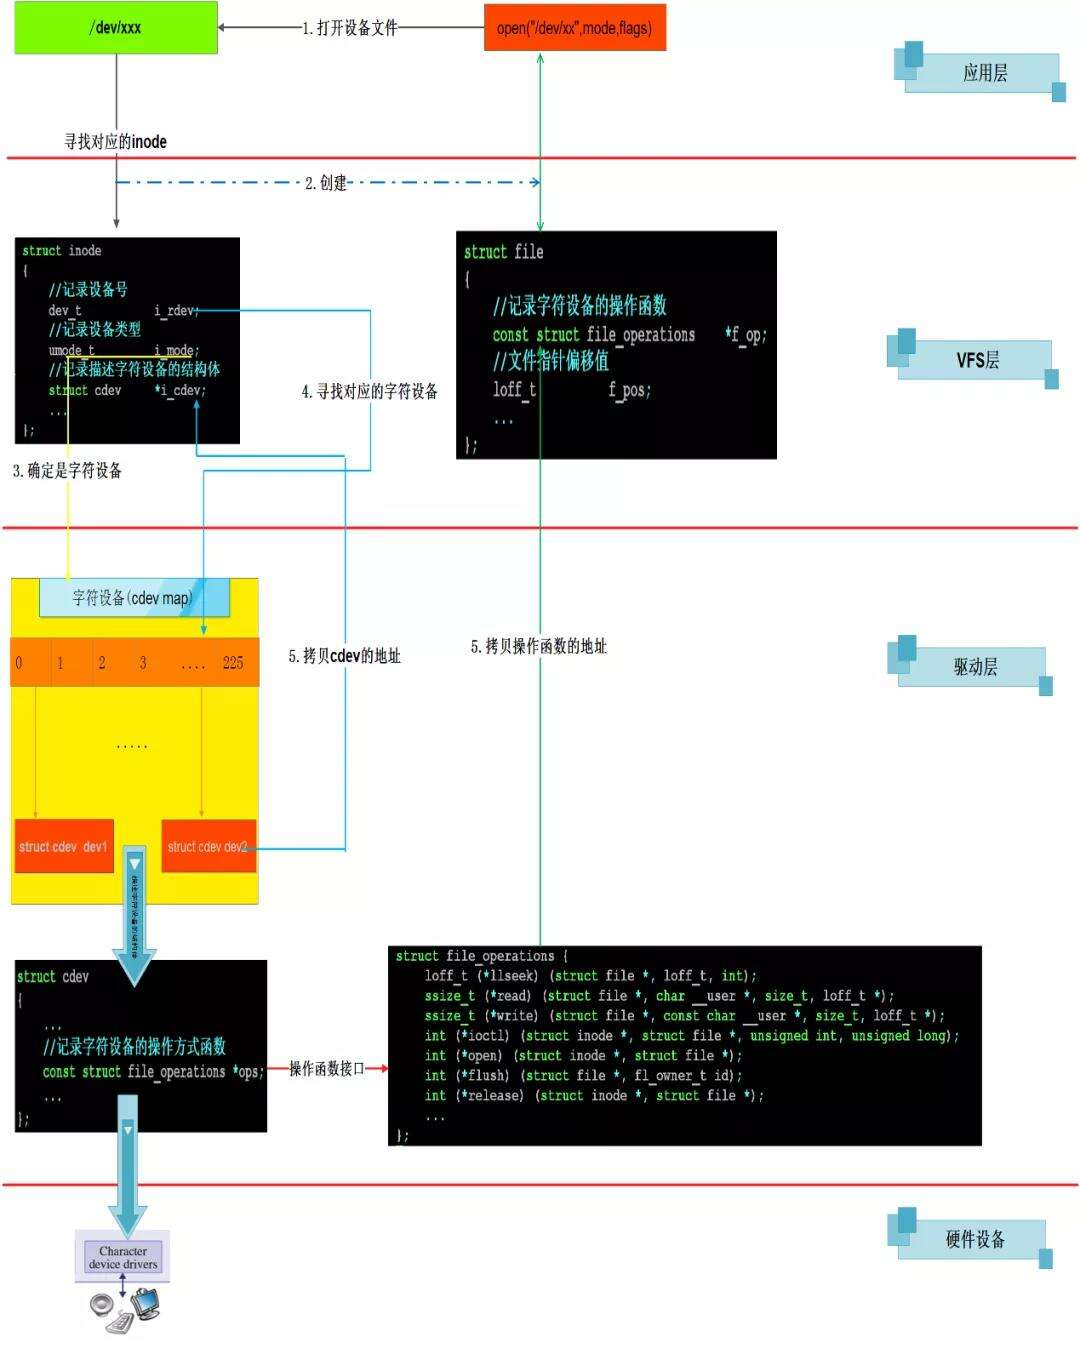
字符设备的驱动架构,我们可将其分为四个部分,分别是用户层、VFS层、驱动层、物理层。
用户层
在Linux的设计理念中,一切皆是文件,所有的硬件设备操作到应用层都会被抽象成文件的操作。
字符设备也不例外,在Linux操作系统中,每个驱动程序在应用层的/dev目录下都会有一个设备文件和它对应。
root@ubuntu:/home/peng/Desktop/driver/Learning/5_cdev# ll /dev/ttyS* crw-rw---- 1 root dialout 4, 64 Jul 25 06:30 /dev/ttyUSB0 crw-rw---- 1 root dialout 4, 65 Jul 25 06:30 /dev/ttyUSB1- 1
- 2
- 3
以ttyUSB设备举例,我们可以通过标准文件操作的的方式,也就是open、read、write等方式直接访问该设备。
#include#include #include #include void main(void) { int fd; fd = open("/dev/ttyUSB0",O_RDWR); if(fd<0) { perror("open fail \n"); return; } printf("open ok \n "); } - 1
- 2
- 3
- 4
- 5
- 6
- 7
- 8
- 9
- 10
- 11
- 12
- 13
- 14
- 15
除文件接口之外,还可以通过shell的方式,也就是echo、cat等命令对其进行读写操作。这里不做演示。
VFS层
在Linux文件系统中,每个文件都用一个struct inode结构体来描述,这个结构体里面记录了这个文件的所有信息。这里操作的是字符设备驱动,需要注意的信息有设备号、设备类型、设备的结构体。
struct inode { // 记录设备的类型 umode_t i_mode; xxxxxxxxxxxxx // 记录文件所对应的设备号 dev_t i_rdev; xxxxxxxxxxxxx union { xxxxxxxxxxxxx // 记录描述字符设备的结构体 struct cdev *i_cdev; }; };- 1
- 2
- 3
- 4
- 5
- 6
- 7
- 8
- 9
- 10
- 11
- 12
- 13
当用户层打开设备文件时,可以根据设备文件对应的struct inode结构体描述的信息,知道接下来要操作的设备类型(字符设备还是块设备)。
在Linux操作系统中,每个驱动程序都要分配一个主设备号。在设备号注册章节中提到了怎么注册设备到
/proc/devices中,其中就可以通过自动或者手动的方式去申请设备号。根据struct inode结构体里面记录的设备号,就可以找到对应的驱动程序。
前面的操作主要是在打开文件时能找到驱动设备,在文件被打开后。VFS层会给应用层返回一个文件描述符(fd)。
这个fd是和struct file结构体对应的。上层的应用程序就可以通过fd来找到strut file,然后在由struct file找到操作字符设备的函数接口(file_operations)了。struct file是在打开文件找到驱动设备后,才被赋值的,驱动层部分会讲到。
struct file { xxxxxxxxxxxxx //记录字符设备的操作函数 const struct file_operations *f_op; xxxxxxxxxxxxx //文件指针偏移值 loff_t f_pos; xxxxxxxxxxxxx };- 1
- 2
- 3
- 4
- 5
- 6
- 7
- 8
- 9
驱动层
以字符设备为例,在Linux操作系统中每个字符设备都对应一个char_device_struct 结构体,该结构体和主设备号相关联。该结构体中struct cdev成员描述了字符设备所有的信息。
/*fs/char_dev.c*/ static struct char_device_struct { struct char_device_struct *next; unsigned int major; unsigned int baseminor; int minorct; char name[64]; struct cdev *cdev; /* will die */ } *chrdevs[CHRDEV_MAJOR_HASH_SIZE]; /* fs.h */ #define CHRDEV_MAJOR_HASH_SIZE 255- 1
- 2
- 3
- 4
- 5
- 6
- 7
- 8
- 9
- 10
- 11
- 12
struct cdev结构体所记录的就是设备驱动相关的数据。其中file_operations就是用户层中用户调用接口的具体实现。其他的数据设备号(完整的设备号),以及次设备的个数了解即可。
struct cdev { struct kobject kobj; struct module *owner; const struct file_operations *ops; //接口函数集合 struct list_head list;//内核链表 dev_t dev;//设备号 unsigned int count;//次设备号个数 };- 1
- 2
- 3
- 4
- 5
- 6
- 7
- 8
找到struct cdev结构体后,Linux内核就会将struct cdev结构体所在的内存空间首地记录在struct inode结构体的i_cdev成员中。将struct cdev结构体的中记录的函数操作接口file_operations 地址记录在struct file结构体的f_op成员中。
物理层
skip
驱动实现
模块挂载
在注册设备号之后(register_chrdev_region)。我们需要将devno保存到cdev结构体中(cdev_add)。在保存之前还需要对cdev结构体进行初始化(cdev_init)。
static dev_t devno; static struct cdev cdev; static int hello_init(void) { int result; int error; printk("hello_init \n"); devno = MKDEV(237,0); result = register_chrdev_region(devno, 1, "hello"); if(result<0) { printk("register_chrdev_region fail \n"); return result; } cdev_init(&cdev,&hello_ops); error = cdev_add(&cdev,devno,1); if(error < 0) { printk("cdev_add fail \n"); unregister_chrdev_region(devno,1); return error; } return 0; } module_init(hello_init);- 1
- 2
- 3
- 4
- 5
- 6
- 7
- 8
- 9
- 10
- 11
- 12
- 13
- 14
- 15
- 16
- 17
- 18
- 19
- 20
- 21
- 22
- 23
- 24
- 25
驱动操作函数
cdev初始化时,传入的就是设备文件的操作函数。这里就简单实现了一个open和close函数。
在file_operations结构体的成员中,release 函数指针对应的就是文件的close函数。
当用户层app调用该设备文件的open函数时,经过内核处理,理应调用到hello_open函数往dmesg中打印
"hello_open()\n"。同理,app中调用到close函数时,内核驱动中会调用到hello_release 函数往dmesg中打印"hello_release()\n"static int hello_open(struct inode *inode, struct file *filep) { printk("hello_open()\n"); return 0; } int hello_release (struct inode *inode, struct file *file) { printk("hello_release()\n"); return 0; } static struct file_operations hello_ops = { .open = hello_open, .release = hello_release, };- 1
- 2
- 3
- 4
- 5
- 6
- 7
- 8
- 9
- 10
- 11
- 12
- 13
- 14
- 15
模块注销
模块注销时,需要按照挂载的相反顺序去执行。先删除cdev,后对chrdev进行解注册。
static void hello_exit(void) { printk("hello_exit \n"); cdev_del(&cdev); unregister_chrdev_region(devno,1); return; } module_exit(hello_exit);- 1
- 2
- 3
- 4
- 5
- 6
- 7
- 8
代码验证
文中编写的驱动模块,由于没有配套的自动关联程序,并不会将设备号自动关联到/dev/目录中的具体设备中。
我们只需要手动运行下面的命令,即可创建设备驱动文件绑定到主设备号为237,从设备号为0的字符设备中(命令中c代表字符设备)。
root@ubuntu:# mknod /dev/hello_test0 c 237 0- 1
在用户层编写app(test.c),仅调用open函数打开我们注册的**/dev/hello_test0**文件即可。其他的函数暂时未实现,直接使用则会报错。
#include#include #include #include void main(void) { int fd; fd = open("/dev/hello_test0",O_RDWR); if(fd<0) { perror("open fail \n"); return; } printf("open ok \n"); close(fd); printf("close ok \n"); } - 1
- 2
- 3
- 4
- 5
- 6
- 7
- 8
- 9
- 10
- 11
- 12
- 13
- 14
- 15
- 16
- 17
调用gcc编译app,从app的日志中可以看到打开设备文件是正确的。查看dmesg中驱动的日志,也能看到驱动中的hello_open函数被正常调用。
root@ubuntu:/# gcc ./test.c -o test root@ubuntu:# ./test open ok close ok root@ubuntu:# dmesg [ 5964.438242] hello_open() [ 5964.438331] hello_release()- 1
- 2
- 3
- 4
- 5
- 6
- 7
注意:若前面没有执行mknod函数去创建设备文件。或者mknod时填入的主设备号,次设备号错误。那么这里的open函数调用也是会报错的。
root@ubuntu:# rm -rf /dev/hello root@ubuntu:# ./test open fail : No such file or directory root@ubuntu:# mknod /dev/hello c 238 0 root@ubuntu:# ./test open fail : No such device or address- 1
- 2
- 3
- 4
- 5
- 6
- 7
- 8
那么本篇博客就到此结束了,这里只是记录了一些我个人的学习笔记,其中存在大量我自己的理解。文中所述不一定是完全正确的,可能有的地方我自己也理解错了。如果有些错的地方,欢迎大家批评指正。如有问题直接在对应的博客评论区指出即可,不需要私聊我。我们交流的内容留下来也有助于其他人查看,说不一定也有其他人遇到了同样的问题呢😂。
-
相关阅读:
C++入门04—数组与函数
索尼 toio™ 应用创意开发征文|探索创新的玩乐世界——索尼 toio™
Facebook软体机器人与机器人框架:创新社交互动的未来
对接新浪股票交易接口api需要注意哪些细节 ?
Spring 事务和事务传播机制
求最大公约数、最小公倍数、
Flink系列之Flink中State设计详解与企业案例实践
selenium frame切换
17.Oauth2-微服务认证
信息学奥赛一本通 1357:车厢调度(train)
- 原文地址:https://blog.csdn.net/weixin_44570083/article/details/133418481

- 最新文章
-
【FHE】我们如何实现同态加密推理(八):SiLU 的密文化——两条路径,和一个 8 字节的开关
SQLcl 中 c/old/new 替换变量为何失效?先定位再替换
不让模型写作文,直接从它脑子里读答案:Jev 决策在 .NET 的两条路线
Halo插件:支持GitHub的图床附件策略
电视投屏界的“一股清流”!SimpleTVCast 6.0.0-beta 抢先体验:无需TV端App,界面大换血!✨
华三VXLAN集中式网关实战指南:Spine多活网关 + 双活接入(M-LAG)
软件更好写之后口碑会更重要
大 O、大 Omega、大 Theta 的区别,O(n) 复杂度是什么意思
Java标签跳转:一个鲜为人知但却很实用的小技巧
多智能体系统论文速读