-
Linux:进程的本质和fork初识
回顾进程
前面对进程进行了一些初步的认知,比如进程=可执行程序+内核数据结构PCB,再比如可以通过
ps命令搭配管道寻找进程,通过/proc系统文件夹查看进程的信息,这些都是前面对进程建立起来的一些初步的认知查看进程的方式
下面引入在函数中使用进程的函数,
getpid()和gitppid#include#include int main() { while(1) { printf("process id:%d,parent process id:%d\n",getpid(),getppid()); sleep(1); } return 0; } - 1
- 2
- 3
- 4
- 5
- 6
- 7
- 8
- 9
- 10
- 11
- 12
这两个函数的功能,就是得到进程的
id和父进程的id实现
Makefilecc=gcc src=process.c target=process $(target):$(src) gcc -o $@ $^ .PHONY:clean clean: rm -f $(target)- 1
- 2
- 3
- 4
- 5
- 6
- 7
- 8
- 9
在启动程序前,为了便于观察进程的变化情况,我们可以借助
ps命令来观察,但是ps命令不能做到实时观察目前我们的进程变换情况,因此使用一个脚本来自动的观察进程的情况# 打印ps指令的题头和利用ps指令寻找关于process的进程信息,打印一次暂停1s,再使用####进行分割每次打印的信息 while :; do ps ajx |head -1 && ps ajx | grep process; sleep 1;echo "###################################"; done- 1
- 2
执行程序和脚本
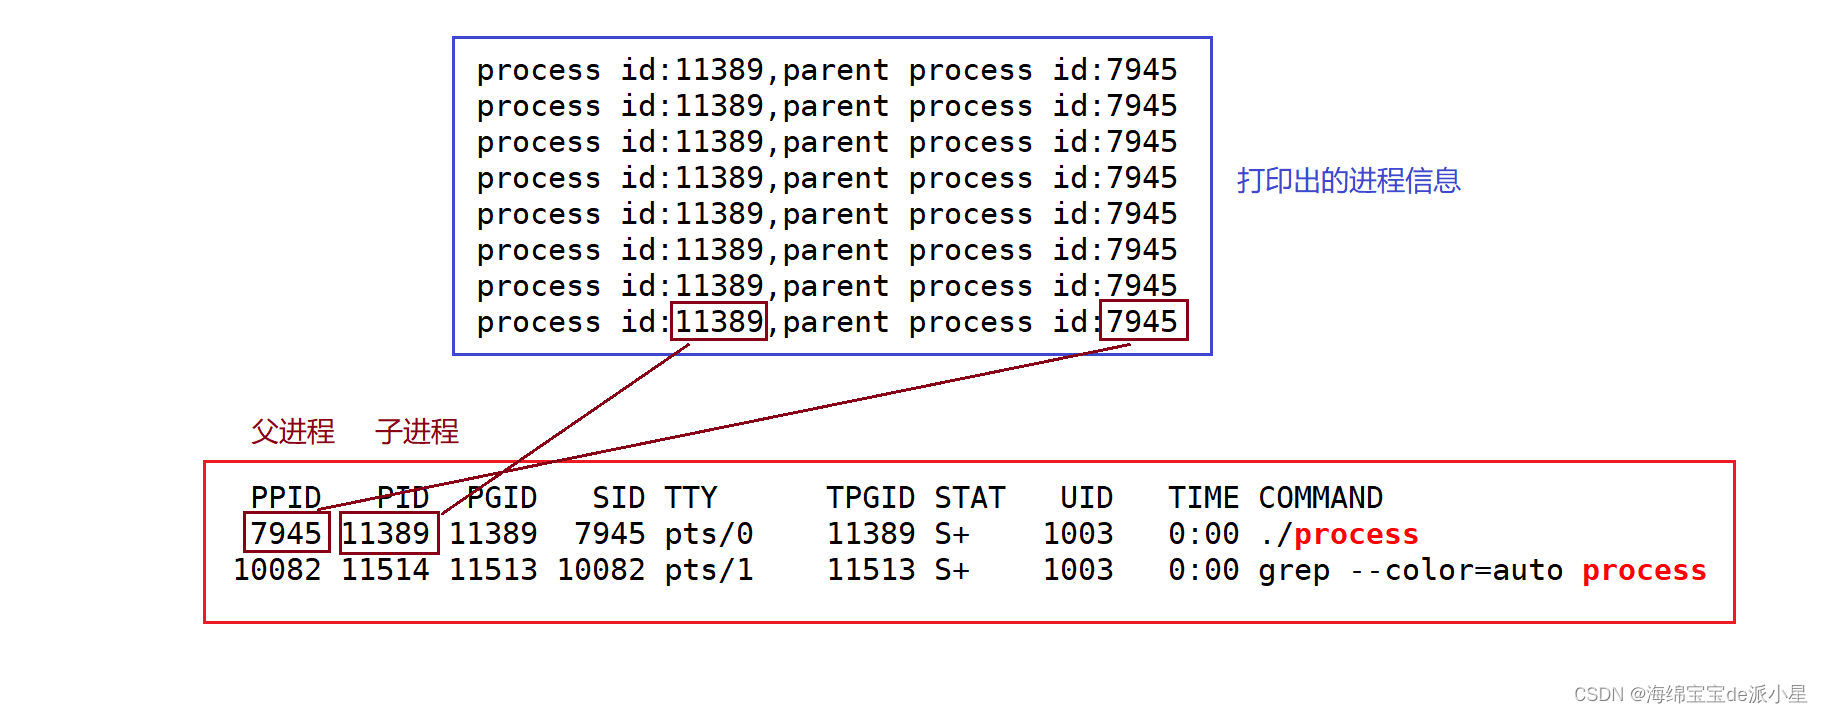
下面对这个程序进行多次执行# 第一次可执行程序运行的结果 process id:11389,parent process id:7945 # 进程监视的结果 PPID PID PGID SID TTY TPGID STAT UID TIME COMMAND 7945 11389 11389 7945 pts/0 11389 S+ 1003 0:00 ./process- 1
- 2
- 3
- 4
- 5
- 6
# 第二次可执行程序运行的结果 process id:14823,parent process id:7945 # 进程监视的结果 PPID PID PGID SID TTY TPGID STAT UID TIME COMMAND 7945 14823 14823 7945 pts/0 14823 S+ 1003 0:00 ./process- 1
- 2
- 3
- 4
- 5
- 6
# 第三次可执行程序运行的结果 process id:15279,parent process id:7945 # 进程监视的结果 PPID PID PGID SID TTY TPGID STAT UID TIME COMMAND 7945 15279 15279 7945 pts/0 15279 S+ 1003 0:00 ./process- 1
- 2
- 3
- 4
- 5
- 6
输出结果如上,从中可以看出这个函数是可以打印出进程的信息的,和实际的信息也确实对应,但是有一个现象,父进程一直都是
7945,为什么不变呢?理解系统接口调用
从这里其实可以更深层次的理解下图中关于系统调用接口的概念,我们使用的不管是
getpid还是getppid,实际上都是要调用系统的接口,操作系统再帮我们进行一个搜索后把结果返还给用户,逻辑上是很简单的一个过程

那么现在有了函数的调用,用户也可以直接去得到进程的id信息,下面进行第二种查看进程的方式,使用/proc文件来查看proc文件夹,是一个动态的目录结构,里面存放的是所有存在的进程,而目录的名称就是以这个进程的id来命名的下面展示了
/proc文件夹下的各种进程内容,每一个文件夹其实都对应了一个进程,每一个进程文件夹下的内容其实就是每个进程的PCB,那么下面就要进入进程内,看这些进程内到底包含什么东西[test@VM-16-11-centos process]$ ls /proc -l total 0 dr-xr-xr-x 9 root root 0 Jul 15 22:07 1 dr-xr-xr-x 9 root root 0 Sep 11 17:49 10 dr-xr-xr-x 9 root root 0 Jul 15 22:07 1005 dr-xr-xr-x 9 test test 0 Sep 23 19:42 10082 dr-xr-xr-x 9 root root 0 Sep 11 17:49 106 dr-xr-xr-x 9 root root 0 Jul 15 22:07 1070 dr-xr-xr-x 9 root root 0 Jul 15 22:07 1072 dr-xr-xr-x 9 root root 0 Jul 15 22:07 1075 dr-xr-xr-x 9 root root 0 Sep 23 19:45 10935 dr-xr-xr-x 9 root root 0 Sep 11 17:49 11 dr-xr-xr-x 9 root root 0 Jul 15 22:07 1180 dr-xr-xr-x 9 root root 0 Sep 11 17:49 1188 dr-xr-xr-x 9 root root 0 Jul 15 22:07 1195 dr-xr-xr-x 9 root root 0 Sep 11 17:49 12 dr-xr-xr-x 9 root root 0 Sep 11 17:49 1205 dr-xr-xr-x 9 root root 0 Sep 11 17:49 1206 dr-xr-xr-x 9 root root 0 Sep 11 17:49 13 dr-xr-xr-x 9 root root 0 Jul 15 22:07 1318 dr-xr-xr-x 9 postfix postfix 0 Jul 15 22:07 1328 dr-xr-xr-x 9 root root 0 Jul 15 22:07 1370 dr-xr-xr-x 9 root root 0 Sep 11 17:49 14 dr-xr-xr-x 9 postfix postfix 0 Sep 23 19:55 14576 dr-xr-xr-x 9 root root 0 Sep 11 17:53 14808 dr-xr-xr-x 9 root root 0 Sep 11 17:53 14911 dr-xr-xr-x 9 root root 0 Aug 30 10:08 15264 dr-xr-xr-x 9 root root 0 Sep 11 17:49 1565 dr-xr-xr-x 9 root root 0 Sep 11 17:49 16 dr-xr-xr-x 9 root root 0 Sep 23 20:03 17216 dr-xr-xr-x 9 root root 0 Sep 23 20:05 17758 dr-xr-xr-x 9 root root 0 Sep 11 17:49 18 dr-xr-xr-x 9 ntp ntp 0 Jul 15 22:07 1800 dr-xr-xr-x 9 test test 0 Sep 23 20:09 18814 dr-xr-xr-x 9 root root 0 Sep 11 17:49 19 dr-xr-xr-x 9 root root 0 Sep 23 20:10 19001 dr-xr-xr-x 9 root root 0 Sep 23 20:12 19441 dr-xr-xr-x 9 root root 0 Sep 11 17:49 2 dr-xr-xr-x 9 root root 0 Sep 11 17:49 20 dr-xr-xr-x 9 root root 0 Aug 31 20:02 20043 dr-xr-xr-x 9 root root 0 Aug 31 20:02 20051 dr-xr-xr-x 9 root root 0 Aug 31 20:02 20052 dr-xr-xr-x 9 root root 0 Sep 23 20:15 20184 dr-xr-xr-x 9 test test 0 Sep 23 20:15 20221 dr-xr-xr-x 9 root root 0 Sep 11 17:49 203 dr-xr-xr-x 9 test test 0 Sep 12 12:11 20530 dr-xr-xr-x 9 test test 0 Sep 12 12:11 20543 dr-xr-xr-x 9 root root 0 Sep 11 17:49 21 dr-xr-xr-x 9 root root 0 Sep 11 17:49 22 dr-xr-xr-x 9 root root 0 Sep 11 17:49 23 dr-xr-xr-x 9 root root 0 Sep 11 17:49 24 dr-xr-xr-x 9 root root 0 Sep 11 17:49 25 dr-xr-xr-x 9 root root 0 Sep 11 17:49 253 dr-xr-xr-x 9 root root 0 Sep 11 17:49 26 dr-xr-xr-x 9 root root 0 Sep 11 17:49 262 dr-xr-xr-x 9 root root 0 Sep 11 17:49 267 dr-xr-xr-x 9 root root 0 Sep 11 17:49 268 dr-xr-xr-x 9 root root 0 Sep 11 17:49 269 dr-xr-xr-x 9 root root 0 Sep 11 17:49 27 dr-xr-xr-x 9 root root 0 Sep 11 17:49 272 dr-xr-xr-x 9 root root 0 Sep 11 17:49 277 dr-xr-xr-x 9 root root 0 Sep 11 17:49 28 dr-xr-xr-x 9 root root 0 Sep 11 17:49 29 dr-xr-xr-x 9 root root 0 Sep 11 17:49 292 dr-xr-xr-x 9 root root 0 Sep 11 17:49 293 dr-xr-xr-x 9 root root 0 Sep 22 18:22 29767 dr-xr-xr-x 9 root root 0 Sep 11 17:49 300 dr-xr-xr-x 9 root root 0 Sep 23 19:15 3061 dr-xr-xr-x 9 root root 0 Sep 21 20:36 3243 dr-xr-xr-x 9 root root 0 Sep 11 17:49 35 dr-xr-xr-x 9 root root 0 Sep 11 17:49 36 dr-xr-xr-x 9 root root 0 Sep 11 17:49 37 dr-xr-xr-x 9 root root 0 Sep 11 17:49 38 dr-xr-xr-x 9 root root 0 Jul 15 22:07 381 dr-xr-xr-x 9 root root 0 Sep 11 17:49 4 dr-xr-xr-x 9 root root 0 Jul 15 22:07 404 dr-xr-xr-x 9 root root 0 Jul 15 22:07 409 dr-xr-xr-x 9 root root 0 Sep 11 17:49 46 dr-xr-xr-x 9 root root 0 Sep 11 17:49 48 dr-xr-xr-x 9 root root 0 Sep 11 17:49 49 dr-xr-xr-x 9 root root 0 Sep 11 17:49 501 dr-xr-xr-x 9 root root 0 Sep 11 17:49 51 dr-xr-xr-x 9 root root 0 Jul 15 22:07 515 dr-xr-xr-x 9 root root 0 Sep 11 17:49 52 dr-xr-xr-x 9 root root 0 Jul 15 22:16 5449 dr-xr-xr-x 9 libstoragemgmt libstoragemgmt 0 Jul 15 22:07 556 dr-xr-xr-x 9 dbus dbus 0 Jul 15 22:07 561 dr-xr-xr-x 9 root root 0 Jul 15 22:07 566 dr-xr-xr-x 9 root root 0 Jul 15 22:07 567 dr-xr-xr-x 9 polkitd polkitd 0 Jul 15 22:07 568 dr-xr-xr-x 9 root root 0 Sep 11 17:49 6 dr-xr-xr-x 9 root root 0 Sep 11 17:49 612 dr-xr-xr-x 9 root root 0 Sep 11 17:49 613 dr-xr-xr-x 9 root root 0 Sep 11 17:49 614 dr-xr-xr-x 9 root root 0 Sep 11 17:49 615 dr-xr-xr-x 9 root root 0 Sep 11 17:49 616 dr-xr-xr-x 9 root root 0 Sep 11 17:49 621 dr-xr-xr-x 9 root root 0 Sep 11 17:49 65 dr-xr-xr-x 9 root root 0 Sep 11 17:49 7 dr-xr-xr-x 9 root root 0 Sep 23 19:34 7937 dr-xr-xr-x 9 test test 0 Sep 23 19:34 7944 dr-xr-xr-x 9 test test 0 Sep 23 19:34 7945 dr-xr-xr-x 9 root root 0 Sep 11 17:49 8 dr-xr-xr-x 9 root root 0 Sep 11 17:49 9 dr-xr-xr-x 2 root root 0 Sep 23 20:15 acpi -r--r--r-- 1 root root 0 Sep 23 20:15 buddyinfo dr-xr-xr-x 4 root root 0 Sep 23 20:15 bus -r--r--r-- 1 root root 0 Sep 23 20:15 cgroups -r--r--r-- 1 root root 0 Sep 23 20:15 cmdline -r--r--r-- 1 root root 0 Sep 23 20:15 consoles -r--r--r-- 1 root root 0 Sep 23 20:15 cpuinfo -r--r--r-- 1 root root 0 Sep 23 20:15 crypto -r--r--r-- 1 root root 0 Sep 23 20:15 devices -r--r--r-- 1 root root 0 Sep 23 20:15 diskstats -r--r--r-- 1 root root 0 Sep 23 20:15 dma dr-xr-xr-x 3 root root 0 Sep 23 20:15 driver -r--r--r-- 1 root root 0 Sep 23 20:15 execdomains -r--r--r-- 1 root root 0 Sep 23 20:15 fb -r--r--r-- 1 root root 0 Sep 23 20:15 filesystems dr-xr-xr-x 5 root root 0 Sep 23 20:15 fs -r--r--r-- 1 root root 0 Sep 23 20:15 interrupts -r--r--r-- 1 root root 0 Sep 23 20:15 iomem -r--r--r-- 1 root root 0 Sep 23 20:15 ioports dr-xr-xr-x 25 root root 0 Sep 23 20:15 irq -r--r--r-- 1 root root 0 Sep 23 20:15 kallsyms -r-------- 1 root root 140737486266368 Sep 23 20:15 kcore -r--r--r-- 1 root root 0 Sep 23 20:15 keys -r--r--r-- 1 root root 0 Sep 23 20:15 key-users -r-------- 1 root root 0 Sep 23 20:15 kmsg -r-------- 1 root root 0 Sep 23 20:15 kpagecount -r-------- 1 root root 0 Sep 23 20:15 kpageflags -r--r--r-- 1 root root 0 Sep 23 20:15 loadavg -r--r--r-- 1 root root 0 Sep 23 20:15 locks -r--r--r-- 1 root root 0 Sep 23 20:15 mdstat -r--r--r-- 1 root root 0 Sep 23 20:15 meminfo -r--r--r-- 1 root root 0 Sep 23 20:15 misc -r--r--r-- 1 root root 0 Sep 23 20:15 modules lrwxrwxrwx 1 root root 11 Sep 23 20:15 mounts -> self/mounts -rw-r--r-- 1 root root 0 Sep 23 20:15 mtrr lrwxrwxrwx 1 root root 8 Sep 23 20:15 net -> self/net -r-------- 1 root root 0 Sep 23 20:15 pagetypeinfo -r--r--r-- 1 root root 0 Sep 23 20:15 partitions -r--r--r-- 1 root root 0 Sep 23 20:15 sched_debug -r--r--r-- 1 root root 0 Sep 23 20:15 schedstat dr-xr-xr-x 3 root root 0 Sep 23 20:15 scsi lrwxrwxrwx 1 root root 0 Jul 15 22:07 self -> 20221 -r-------- 1 root root 0 Sep 23 20:15 slabinfo -r--r--r-- 1 root root 0 Sep 23 20:15 softirqs -r--r--r-- 1 root root 0 Sep 23 20:15 stat -r--r--r-- 1 root root 0 Jul 15 22:07 swaps dr-xr-xr-x 1 root root 0 Jul 15 22:07 sys --w------- 1 root root 0 Sep 23 20:15 sysrq-trigger dr-xr-xr-x 2 root root 0 Sep 23 20:15 sysvipc -r--r--r-- 1 root root 0 Sep 23 20:15 timer_list -rw-r--r-- 1 root root 0 Sep 23 20:15 timer_stats dr-xr-xr-x 4 root root 0 Sep 23 20:15 tty -r--r--r-- 1 root root 0 Sep 23 20:15 uptime -r--r--r-- 1 root root 0 Sep 23 20:15 version -r-------- 1 root root 0 Sep 23 20:15 vmallocinfo -r--r--r-- 1 root root 0 Sep 23 20:15 vmstat dr-xr-xr-x 2 root root 0 Sep 23 20:15 xpmem -r--r--r-- 1 root root 0 Sep 23 20:15 zoneinfo- 1
- 2
- 3
- 4
- 5
- 6
- 7
- 8
- 9
- 10
- 11
- 12
- 13
- 14
- 15
- 16
- 17
- 18
- 19
- 20
- 21
- 22
- 23
- 24
- 25
- 26
- 27
- 28
- 29
- 30
- 31
- 32
- 33
- 34
- 35
- 36
- 37
- 38
- 39
- 40
- 41
- 42
- 43
- 44
- 45
- 46
- 47
- 48
- 49
- 50
- 51
- 52
- 53
- 54
- 55
- 56
- 57
- 58
- 59
- 60
- 61
- 62
- 63
- 64
- 65
- 66
- 67
- 68
- 69
- 70
- 71
- 72
- 73
- 74
- 75
- 76
- 77
- 78
- 79
- 80
- 81
- 82
- 83
- 84
- 85
- 86
- 87
- 88
- 89
- 90
- 91
- 92
- 93
- 94
- 95
- 96
- 97
- 98
- 99
- 100
- 101
- 102
- 103
- 104
- 105
- 106
- 107
- 108
- 109
- 110
- 111
- 112
- 113
- 114
- 115
- 116
- 117
- 118
- 119
- 120
- 121
- 122
- 123
- 124
- 125
- 126
- 127
- 128
- 129
- 130
- 131
- 132
- 133
- 134
- 135
- 136
- 137
- 138
- 139
- 140
- 141
- 142
- 143
- 144
- 145
- 146
- 147
- 148
- 149
- 150
- 151
- 152
- 153
- 154
- 155
- 156
- 157
- 158
- 159
- 160
- 161
- 162
- 163
对于产生的结果过多,不太好观察,因此这里将前面的程序启动,看进程中到底有什么文件和信息可以进行获取
# 启动程序 process id:18814,parent process id:7945 # 查看进程内容 [test@VM-16-11-centos process]$ ls /proc/18814 -l total 0 dr-xr-xr-x 2 test test 0 Sep 23 20:10 attr -rw-r--r-- 1 test test 0 Sep 23 20:10 autogroup -r-------- 1 test test 0 Sep 23 20:10 auxv -r--r--r-- 1 test test 0 Sep 23 20:10 cgroup --w------- 1 test test 0 Sep 23 20:10 clear_refs -r--r--r-- 1 test test 0 Sep 23 20:09 cmdline -rw-r--r-- 1 test test 0 Sep 23 20:10 comm -rw-r--r-- 1 test test 0 Sep 23 20:10 coredump_filter -r--r--r-- 1 test test 0 Sep 23 20:10 cpuset lrwxrwxrwx 1 test test 0 Sep 23 20:09 cwd -> /home/test/process -r-------- 1 test test 0 Sep 23 20:09 environ lrwxrwxrwx 1 test test 0 Sep 23 20:09 exe -> /home/test/process/process dr-x------ 2 test test 0 Sep 23 20:09 fd dr-x------ 2 test test 0 Sep 23 20:10 fdinfo -rw-r--r-- 1 test test 0 Sep 23 20:10 gid_map -r-------- 1 test test 0 Sep 23 20:10 io -r--r--r-- 1 test test 0 Sep 23 20:10 limits -rw-r--r-- 1 test test 0 Sep 23 20:10 loginuid dr-x------ 2 test test 0 Sep 23 20:10 map_files -r--r--r-- 1 test test 0 Sep 23 20:10 maps -rw------- 1 test test 0 Sep 23 20:10 mem -r--r--r-- 1 test test 0 Sep 23 20:10 mountinfo -r--r--r-- 1 test test 0 Sep 23 20:10 mounts -r-------- 1 test test 0 Sep 23 20:10 mountstats dr-xr-xr-x 5 test test 0 Sep 23 20:10 net dr-x--x--x 2 test test 0 Sep 23 20:10 ns -r--r--r-- 1 test test 0 Sep 23 20:10 numa_maps -rw-r--r-- 1 test test 0 Sep 23 20:10 oom_adj -r--r--r-- 1 test test 0 Sep 23 20:10 oom_score -rw-r--r-- 1 test test 0 Sep 23 20:10 oom_score_adj -r--r--r-- 1 test test 0 Sep 23 20:10 pagemap -r-------- 1 test test 0 Sep 23 20:10 patch_state -r--r--r-- 1 test test 0 Sep 23 20:10 personality -rw-r--r-- 1 test test 0 Sep 23 20:10 projid_map lrwxrwxrwx 1 test test 0 Sep 23 20:09 root -> / -rw-r--r-- 1 test test 0 Sep 23 20:10 sched -r--r--r-- 1 test test 0 Sep 23 20:10 schedstat -r--r--r-- 1 test test 0 Sep 23 20:10 sessionid -rw-r--r-- 1 test test 0 Sep 23 20:10 setgroups -r--r--r-- 1 test test 0 Sep 23 20:10 smaps -r--r--r-- 1 test test 0 Sep 23 20:10 stack -r--r--r-- 1 test test 0 Sep 23 20:09 stat -r--r--r-- 1 test test 0 Sep 23 20:10 statm -r--r--r-- 1 test test 0 Sep 23 20:09 status -r--r--r-- 1 test test 0 Sep 23 20:10 syscall dr-xr-xr-x 3 test test 0 Sep 23 20:10 task -r--r--r-- 1 test test 0 Sep 23 20:10 timers -rw-r--r-- 1 test test 0 Sep 23 20:10 uid_map -r--r--r-- 1 test test 0 Sep 23 20:10 wchan- 1
- 2
- 3
- 4
- 5
- 6
- 7
- 8
- 9
- 10
- 11
- 12
- 13
- 14
- 15
- 16
- 17
- 18
- 19
- 20
- 21
- 22
- 23
- 24
- 25
- 26
- 27
- 28
- 29
- 30
- 31
- 32
- 33
- 34
- 35
- 36
- 37
- 38
- 39
- 40
- 41
- 42
- 43
- 44
- 45
- 46
- 47
- 48
- 49
- 50
- 51
- 52
- 53
- 54
- 55
上面演示了查看进程中文件的信息的方法,针对上面的信息,选两个来进行总结
lrwxrwxrwx 1 test test 0 Sep 23 20:09 cwd -> /home/test/process lrwxrwxrwx 1 test test 0 Sep 23 20:09 exe -> /home/test/process/process- 1
- 2
这里挑选出了两个内容,一个是
cwd,一个是exe,选这两个也是有原因的,这两个可以挖掘出可值得学习的点cwd
在解决问题前要先知道什么是
cwd,它的全程叫做current working directory,也就是所谓的当前工作目录,一般叫它叫当前目录,对于当前目录这个概念并不陌生,但什么是当前目录?前面对于进程的定义中讲到,操作系统会创建出一个
PCB来管理进入内存中的可执行程序,那么可执行程序是如何被管理的?该如何理解管理的概念?一个进程,要能找到自己的可执行程序,这样才能被称为管理起来,因此,这就意味着每一个进程都要有自己的工作目录,而默认情况下,进程启动的时候所处的路径就是当前路径既然这是默认,那么当前路径也是可以更改的,有一个函数叫做
chdir()函数,它的功能就是用以更变工作路径的,在Linux下使用man指令查看:SYNOPSIS #includeint chdir(const char *path); int fchdir(int fd); - 1
- 2
- 3
- 4
- 5
因此用实验来证明它的存在
对程序略做修改,让程序可以在工作目录下创建文件,可以使用
C语言的文件操作来实现#include#include int main() { FILE* pf=fopen("test.txt","w"); if(pf==NULL) { perror("fopen fail!\n"); return 1; } fclose(pf); return 0; } - 1
- 2
- 3
- 4
- 5
- 6
- 7
- 8
- 9
- 10
- 11
- 12
- 13
- 14
- 15
- 16
编译运行结果,此时在
process路径下就产生了一个test.txt文件,这也说明默认的工作路径就是进程启动的时候所处的环境,此时再看proc文件下的信息[test@VM-16-11-centos process]$ ls /proc/3466 -l total 0 lrwxrwxrwx 1 test test 0 Sep 23 21:17 cwd -> /home/test lrwxrwxrwx 1 test test 0 Sep 23 21:17 exe -> /home/test/process/process- 1
- 2
- 3
- 4
此时确实是被改变了,说明和前面是一样的
[test@VM-16-11-centos process]$ make gcc -o process process.c [test@VM-16-11-centos process]$ ./process [test@VM-16-11-centos process]$ ll total 20 -rw-rw-r-- 1 test test 106 Sep 23 19:39 Makefile -rwxrwxr-x 1 test test 8464 Sep 23 20:47 process -rw-rw-r-- 1 test test 203 Sep 23 20:45 process.c -rw-rw-r-- 1 test test 0 Sep 23 20:47 test.txt- 1
- 2
- 3
- 4
- 5
- 6
- 7
- 8
- 9
那么对于程序再略做修改
#include#include int main() { chdir("/home/test"); FILE* pf=fopen("test.txt","w"); if(pf==NULL) { perror("fopen fail!\n"); return 1; } fclose(pf); return 0; } - 1
- 2
- 3
- 4
- 5
- 6
- 7
- 8
- 9
- 10
- 11
- 12
- 13
- 14
- 15
- 16
- 17
此时将工作目录改到了家目录的一个文件夹下,此时再看
test.txt的位置[test@VM-16-11-centos ~]$ pwd /home/test [test@VM-16-11-centos ~]$ ll -rw-rw-r-- 1 test test 0 Sep 23 20:50 test.txt- 1
- 2
- 3
- 4
此时程序生成的文件就默认创建到了这个文件夹内,此时打开
/proc文件,再看进程的描述exe
exe表示的就是当前正在执行的可执行程序,如果把可执行程序从磁盘中删除[test@VM-16-11-centos process]$ ll total 20 -rw-rw-r-- 1 test test 106 Sep 23 19:39 Makefile -rwxrwxr-x 1 test test 8520 Sep 23 19:46 process -rw-rw-r-- 1 test test 187 Sep 23 19:46 process.c [test@VM-16-11-centos process]$ rm process [test@VM-16-11-centos process]$ ll total 8 -rw-rw-r-- 1 test test 106 Sep 23 19:39 Makefile -rw-rw-r-- 1 test test 187 Sep 23 19:46 process.c- 1
- 2
- 3
- 4
- 5
- 6
- 7
- 8
- 9
- 10
但是程序依旧在运行,这是为什么?
这是因为,磁盘中的文件被删除了,其实和进程关系并不大,进程被运行前就已经被加载到内存中了,因此磁盘上文件的删除对于内存并不会造成决定性的影响,但是如果程序终止想要重新运行,可能就并不可以了,但是在
proc文件内,会为用户标出错误提示,说明在磁盘中的可执行程序已经被删掉了lrwxrwxrwx 1 test test 0 Sep 23 20:09 cwd -> /home/test/process lrwxrwxrwx 1 test test 0 Sep 23 20:09 exe -> /home/test/process/process (deleted)- 1
- 2
那么有几个问题就随之产生了:
- 这个父进程是谁,为什么一直不变?
对于这个问题,可以使用
ps命令来查看,而结果是bash,也就是命令行解释器[test@VM-16-11-centos process]$ ps ajx |head -1 && ps ajx | grep 7945 PPID PID PGID SID TTY TPGID STAT UID TIME COMMAND 7944 7945 7945 7945 pts/0 16488 Ss 1003 0:00 -bash- 1
- 2
- 3
- 父进程的概念如何理解?
关于这个问题,后续和
fork一起总结Linux中创建进程的方式通常有两种:- 命令行中直接启动进程
- 通过代码来创建进程
对于第一种很好理解,执行程序
./process其实就是启动进程,那第二种是什么?如何理解这个概念?就引出了本篇的核心,系统调用fork启动进程,本质就是创建进程,一般都是通过父进程创建的
关于如何创建进程,下面用
fork来讲述fork
首先要对
fork有一个初步认知,它可以给当前的进程添加一个子进程,它可以使用代码来创建进程,它是属于系统级别的调用:- 当用户启动一个进程的时候,如何理解在行为?其实就是在系统重多增加一个进程,操作系统要管理的进程就多了一个
- 创建一个进程,就是要向系统中申请一些内存,保存当前进程的可执行程序并且要创建这个进程的
PCB,也就是task_struct对象,并且将这个对象添加到进程列表中
那么如何来观察现象?
对程序进行改变
#include#include int main() { printf("Before fork:the pid is %d,the ppid is %d\n",getpid(),getppid()); fork(); printf("After fork:the pid is %d,the ppid is %d\n",getpid(),getppid()); return 0; } - 1
- 2
- 3
- 4
- 5
- 6
- 7
- 8
- 9
- 10
- 11
- 12
- 13
运行程序
# 运行程序 [test@VM-16-11-centos process]$ ./process # 运行结果 Before fork:the pid is 7810,the ppid is 6523 After fork:the pid is 7810,the ppid is 6523 After fork:the pid is 7811,the ppid is 7810- 1
- 2
- 3
- 4
- 5
- 6
现象很神奇,程序中只打印了一次
After fork...,但却输出了两次,并且第二次输出的结果的ppid就是第一次输出的pid,这是不是证明第二次输出的这个7811就是7810的子进程?答案是肯定的,并且
fork之后这两个进程都会执行它们自己的程序,由此展开关于fork的理解fork的具体描述
使用man指令查看
fork的帮助文档内的信息NAME fork - create a child process SYNOPSIS #includepid_t fork(void); - 1
- 2
- 3
- 4
- 5
- 6
- 7
从上面的表述中,可以获取到一些信息,
fork的功能就是创建一个子进程,fork函数有两个返回值,给子进程返回0,给父进程返回子进程的pid为什么要使用fork?
在
C语言中,写的代码的执行逻辑都是从上向下执行(默认情况下),但是事实上在一些情况下这样的需求满足不了用户的需求,例如要边下载一个电影边播放它,那么这个时候就需要创建一个子进程来帮助实现这个功能,这是单进程所解决不了的,因此级有了fork函数,有了这个函数可以让父进程和子进程做不一样的事,执行不一样的代码,通过fork的返回值就能判断谁是子进程谁是父进程,就可以让它们实现不同的代码片段,执行不同的功能fork做了些什么?
从表面上看,
fork函数在执行后,增加了一个进程,这个进程和原来的父进程会一起执行下去,分别在自己的进程下输出内容(以这个代码为例子),但是这都是表象,从深层次的角度来看,fork的实现过程并不简单既然是子进程,也属于进程,是进程就要创建程序的
PCB,那现在有了关于task_struct,里面的信息在哪里?拷贝的内容是什么?答案是以父进程为模板,为子进程创建PCB,而创建的PCB指向的可执行文件并没有创建,因此这里实现的子进程没有它自己的代码和数据,只是和父进程共享代码和数据,用下图来描述上面的这一系列过程如下: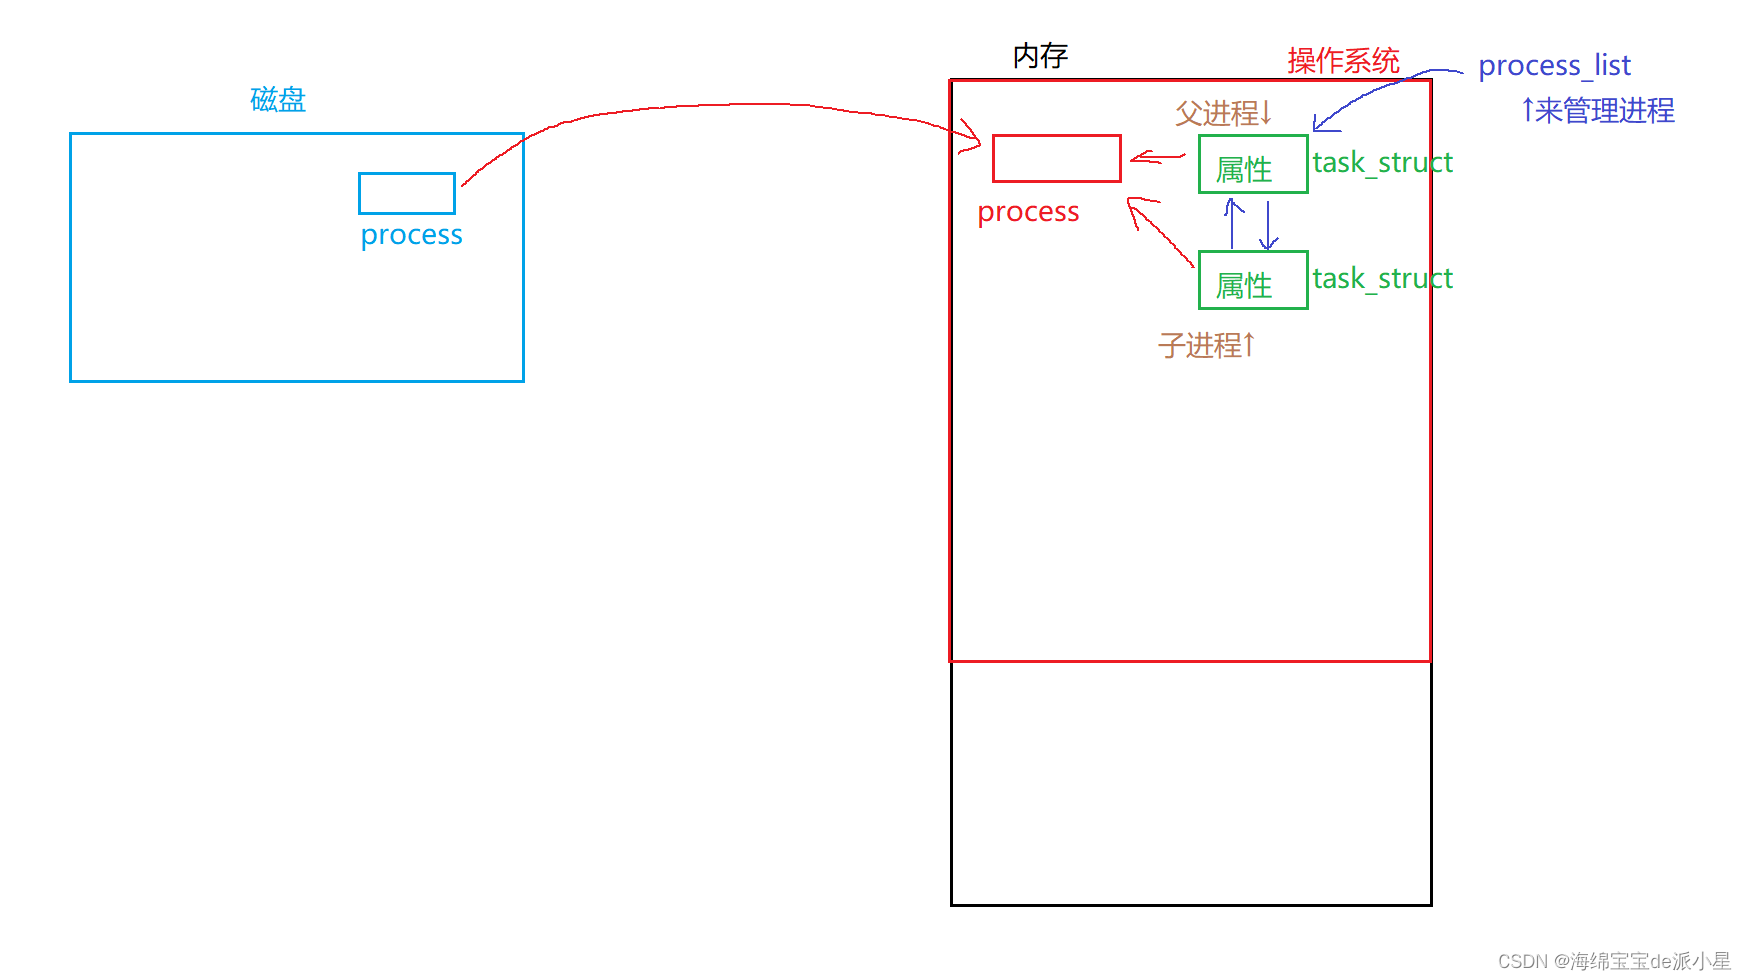
上图清晰的把前文进行了图示化,创建出的子进程也有自己的PCB,内容来自于父进程的PCB,直接拷贝而来,而它的可执行文件是共享的父进程的可执行文件fork之后,父子进程会执行同样的代码,fork之前的代码父子进程也都有记录fork之后会执行同样的代码
-
fork之前的代码可以看到吗?可以看到,父子进程都有前面代码的数据 -
子进程为什么不从头开始执行?这是由于
pc/eip执行fork完毕后,eip指向的是fork后续的代码,eip也会被子进程继承,因此直接执行的是fork之后的代码
进程的独立性如何理解?
关于进程的独立性,可以从下面的角度入手,首先,进程独立性可以从每一个进程都有它自己的
PCB来看出,进程之间是不会被相互影响的,但是数据父子是会被修改的,那么可以采用写实拷贝的方法来将这个过程执行下去,进程的代码可以共享,但是进程的数据不可以,数据每一个进程只能拥有一份,不然对于一些全局变量来说,一个进程对于全局变量的改变会使得另外一个进程受到严重的影响,因此上面的图其实并不完全正确,应该这样改良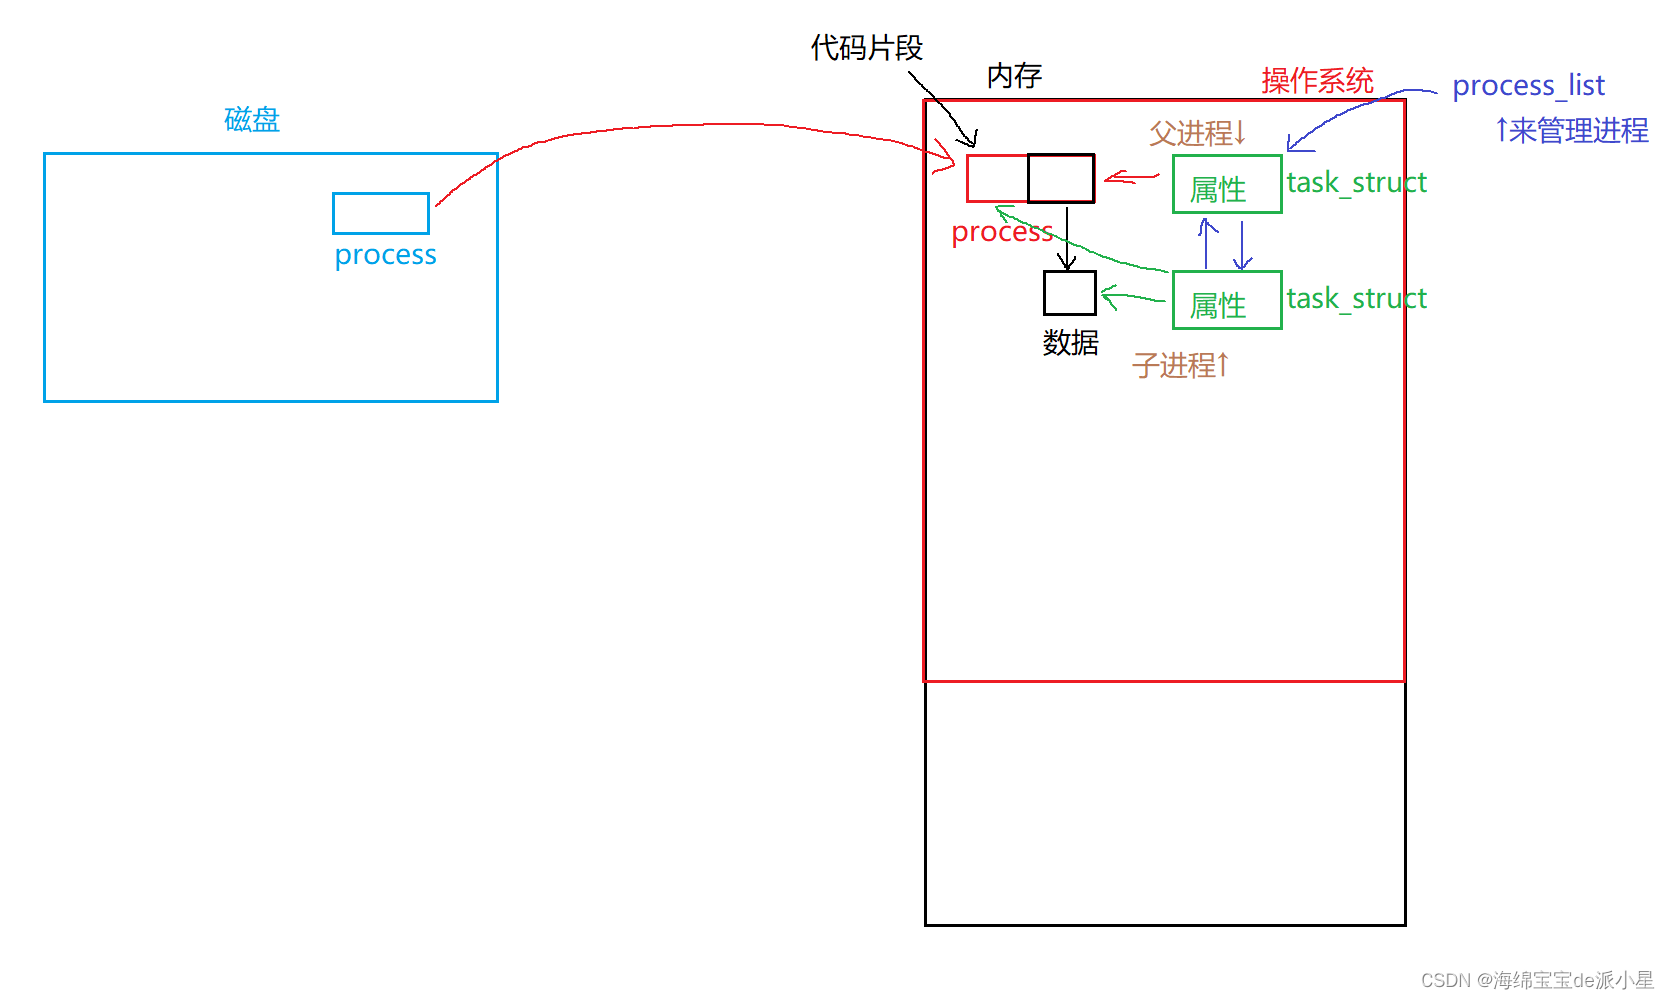
新创建的子进程的PCB中,对于可执行文件的拥有应该分为两部分,代码片段和数据片段,对于代码片段可以进行共享,但是对于数据片段一定是每一个进程拥有一份独立的数据,这样才能保证进程的独立性fork之后,父子进程谁先运行?
创建完成子进程,只是开始,系统中有其他进程,父进程和子进程,接下来谁先被执行要看谁先被调度,先被调度的就要先运行,那么有具体的规则吗?没有,这是由操作系统自己来决定的,由每个进程
PCB中的调度信息,比如说时间片优先级等等,和调度器算法共同决定谁优先被调用如何理解fork?
从本质上来讲,
fork其实就是一个函数,那么它函数中的内容会有哪些?- 找到父进程的
PCB对象 malloc一个PCB用来放子进程- 用父进程的
PCB来初始化子进程 - 让子进程的
PCB指向父进程的代码和数据 - 子进程和父进程都加入调度队列开始排队
- …
简单来说,就是创建子进程,将子进程放到调度队列中运行
以上为对
fork的初步理解,后续会继续用它实现系统级别的代码 -
相关阅读:
某堡垒机SQL注入漏洞
JS-重绘与回流
Tomcat部署项目出现404
C++单例模式
CMake | 编辑规范
猿创征文|多模态图像合成和编辑(MISE):Multimodal Image Synthesis and Editing: A Survey
Logo制作方法大公开:初学者也能学会的Logo设计教程
Linux:磁盘情况查询+磁盘情况的工作使用指令(内含使用实例)
四川竹哲电子商务有限公司培训服务引领你走向成功
正则表达式
- 原文地址:https://blog.csdn.net/qq_73899585/article/details/133215312
