-
Laravel Swagger 使用完整教程
Swagger 使用
一、Swagger 基础
1、 什么是Swagger
Swagger 是一个基于 Open Api 规范的 API 管理工具,通过项目注解的形式自动构建 API 文档,拥有在线调试的功能。提供了多语言的客户端,laravel 中也有相应的扩展包。
darkaonline/l5-swagger是一款针对 laravel 集成开发的扩展包,可以直接使用 laravel 命令行模式进行操作。

我是正巧用的是laravel框架,所以选了darkaonline/l5-swagger扩展,而zircote/swagger-php扩展是适用于所有php语言的框架(使用方法可以参考这里,点击前往。这里只介绍darkaonline/l5-swagger扩展的使用2、 安装过程
这是它的安装环境和依赖:

1 、composer安装
composer require darkaonline/l5-swagger- 1
2、添加服务提供者,引导框架运行时加载,在 app 配置文件,providers 选项中添加(laravel 5以上忽略此步骤)
L5Swagger\L5SwaggerServiceProvider::class- 1
3、配置完成后,通过输入命令 php artisan 查看已经发现该扩展已经加入 laravel 命令列表
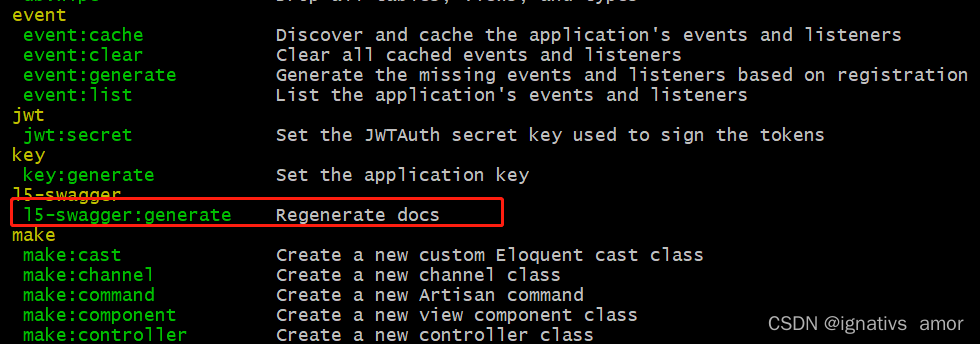
4、生成命令
在没有在任何控制器方法中添加注释的时候,不要执行该命令,否则会报致命性错误
php artisan l5-swagger:generate- 1
5、打开 API 文档页面
访问网址: http://yourdomain/api/documentation,就能看到了

3、 注解介绍
由于 Swagger 是采用注解的形式进行文档生成,需要按照既定的规则去编写注解,这里只提供一些重要的信息
API 基础信息
title:API 名称
version:API 版本
description:API 描述
@OA\Contact:联系方式
@OA\License:许可协议
接口服务器地址
url:接口地址
description:描述备注:设置url项时,url与您在接口中设置的path项拼在一起是完整的接口地址,且url的协议与您访问API文档页域名协议需要一致,否则会报致命错误


请求
@OA\Get | @OA\Post:请求类型
path:请求URI
tag:归纳相同标签的接口
summary:接口概要
description:接口描述
operationId:接口ID,全局唯一
@OA\Parameter:接收的参数是来自requestHeader中,即请求头。GET、\POST都适用
@OA\RequestBody:接收的参数是来自requestBody中,即请求体。主要用来接收前端传递给后端的json字符串中的数据的,所以只能发送POST请求注意:匹配path中的数值则 in path 查询 in query
/** * @OA\Post( * path="/api/resource/detail/{id}", * operationId="getProjectById", * tags={"Resource相关"}, * summary="资源详情", * description="获取资源的详细信息的接口", * security={{"Bearer":{} }}, * @OA\Parameter( * name="from", * description="引流的来源", * required=false, * in="query", * ), * @OA\Parameter( * name="id", * description="Resource id", * required=true, * in="path", * @OA\Schema( * type="integer" * ) * ), * ) */- 1
- 2
- 3
- 4
- 5
- 6
- 7
- 8
- 9
- 10
- 11
- 12
- 13
- 14
- 15
- 16
- 17
- 18
- 19
- 20
- 21
- 22
- 23
- 24
- 25
响应
@OA\Response:响应信息
response:响应的 http 状态码
description:响应描述
@OA\MediaType:响应体
mediaType:返回格式
@OA\Schema:定义响应体内的数据
@OA\Property:定义属性字段(id),数据类型(string),字段描述(description)
@OA\JsonContent:因为现在接口通常采用 json 通讯,所以可以直接定义 json 响应格式
ref:指定可复用的注解模块,TestApi 为模块ID,全局唯一
@OA\Schema:可复用注解模块,内部可嵌套 Schema/** * @OA\Post( * path="/api/resource/list", * tags={"Resource相关"}, * summary="资源列表", * description="获取项目列表的接口,调用接口需要传递token令牌", * security={{"Bearer":{} }}, * @OA\Parameter( * name="page", * description="页码,默认为1", * required=false, * in="query", * ), * @OA\Parameter( * name="pagesize", * description="每页的数量,默认5条", * required=false, * in="query", * ), * * @OA\Response( * response=200, * description="successful", * @OA\MediaType( * mediaType="application/json", * @OA\Schema( * @OA\Property(property="id", type="integer", description="资源ID"), * @OA\Property(property="type", type="integer", description="资源类型,1=>病例,2=>文章"), * @OA\Property(property="title", type="string", description="资源名称"), * @OA\Property(property="cover", type="string", description="资源封面图"), * @OA\Property(property="view_count", type="integer", description="浏览量"), * @OA\Property(property="created_at", type="string", description="发布时间"), * ), * ) * ), * @OA\Response(response=400, description="Bad request"), * @OA\Response(response=404, description="Resource Not Found"), * ) */- 1
- 2
- 3
- 4
- 5
- 6
- 7
- 8
- 9
- 10
- 11
- 12
- 13
- 14
- 15
- 16
- 17
- 18
- 19
- 20
- 21
- 22
- 23
- 24
- 25
- 26
- 27
- 28
- 29
- 30
- 31
- 32
- 33
- 34
- 35
- 36
- 37
- 38
- 39

二、Swagger 实战
1、修改配置
根据以上流程,已经安装了扩展,并对注释的使用也有了一定的了解,那就来具体实战吧(本人项目用到了JWT,未用到的可自行跳过)。
- 如果不想每次修改后都手动执行生成命令,可以通过修改 env 文件,添加配置项
L5_SWAGGER_GENERATE_ALWAYS=true- 1
- 因为我的token令牌是以Authorization bearer XXXXX传递的,所以要增加securitySchemes,在配置文件l5-swagger.php中,修改如下:
/* * API security definitions. Will be generated into documentation file. */ 'securityDefinitions' => [ 'securitySchemes' => [ 'Bearer' => [ // 这是我要用到的Schemes 'type' => 'apiKey', // Valid values are "basic", "apiKey" or "oauth2". 'description' => 'Enter token in format (Bearer <token>)', 'name' => 'Authorization', // The name of the header or query parameter to be used. 'in' => 'header', // The location of the API key. Valid values are "query" or "header". ], /* * Examples of Security schemes */ /* 'api_key_security_example' => [ // Unique name of security 'type' => 'apiKey', // The type of the security scheme. Valid values are "basic", "apiKey" or "oauth2". 'description' => 'A short description for security scheme', 'name' => 'api_key', // The name of the header or query parameter to be used. 'in' => 'header', // The location of the API key. Valid values are "query" or "header". ], 'oauth2_security_example' => [ // Unique name of security 'type' => 'oauth2', // The type of the security scheme. Valid values are "basic", "apiKey" or "oauth2". 'description' => 'A short description for oauth2 security scheme.', 'flow' => 'implicit', // The flow used by the OAuth2 security scheme. Valid values are "implicit", "password", "application" or "accessCode". 'authorizationUrl' => 'http://example.com/auth', // The authorization URL to be used for (implicit/accessCode) //'tokenUrl' => 'http://example.com/auth' // The authorization URL to be used for (password/application/accessCode) 'scopes' => [ 'read:projects' => 'read your projects', 'write:projects' => 'modify projects in your account', ] ], */ /* Open API 3.0 support 'passport' => [ // Unique name of security 'type' => 'oauth2', // The type of the security scheme. Valid values are "basic", "apiKey" or "oauth2". 'description' => 'Laravel passport oauth2 security.', 'in' => 'header', 'scheme' => 'https', 'flows' => [ "password" => [ "authorizationUrl" => config('app.url') . '/oauth/authorize', "tokenUrl" => config('app.url') . '/oauth/token', "refreshUrl" => config('app.url') . '/token/refresh', "scopes" => [] ], ], ],*/ ], ],- 1
- 2
- 3
- 4
- 5
- 6
- 7
- 8
- 9
- 10
- 11
- 12
- 13
- 14
- 15
- 16
- 17
- 18
- 19
- 20
- 21
- 22
- 23
- 24
- 25
- 26
- 27
- 28
- 29
- 30
- 31
- 32
- 33
- 34
- 35
- 36
- 37
- 38
- 39
- 40
- 41
- 42
- 43
- 44
- 45
- 46
- 47
- 48
- 49
- 50
- 51
- 52
- 53
2、使用示例
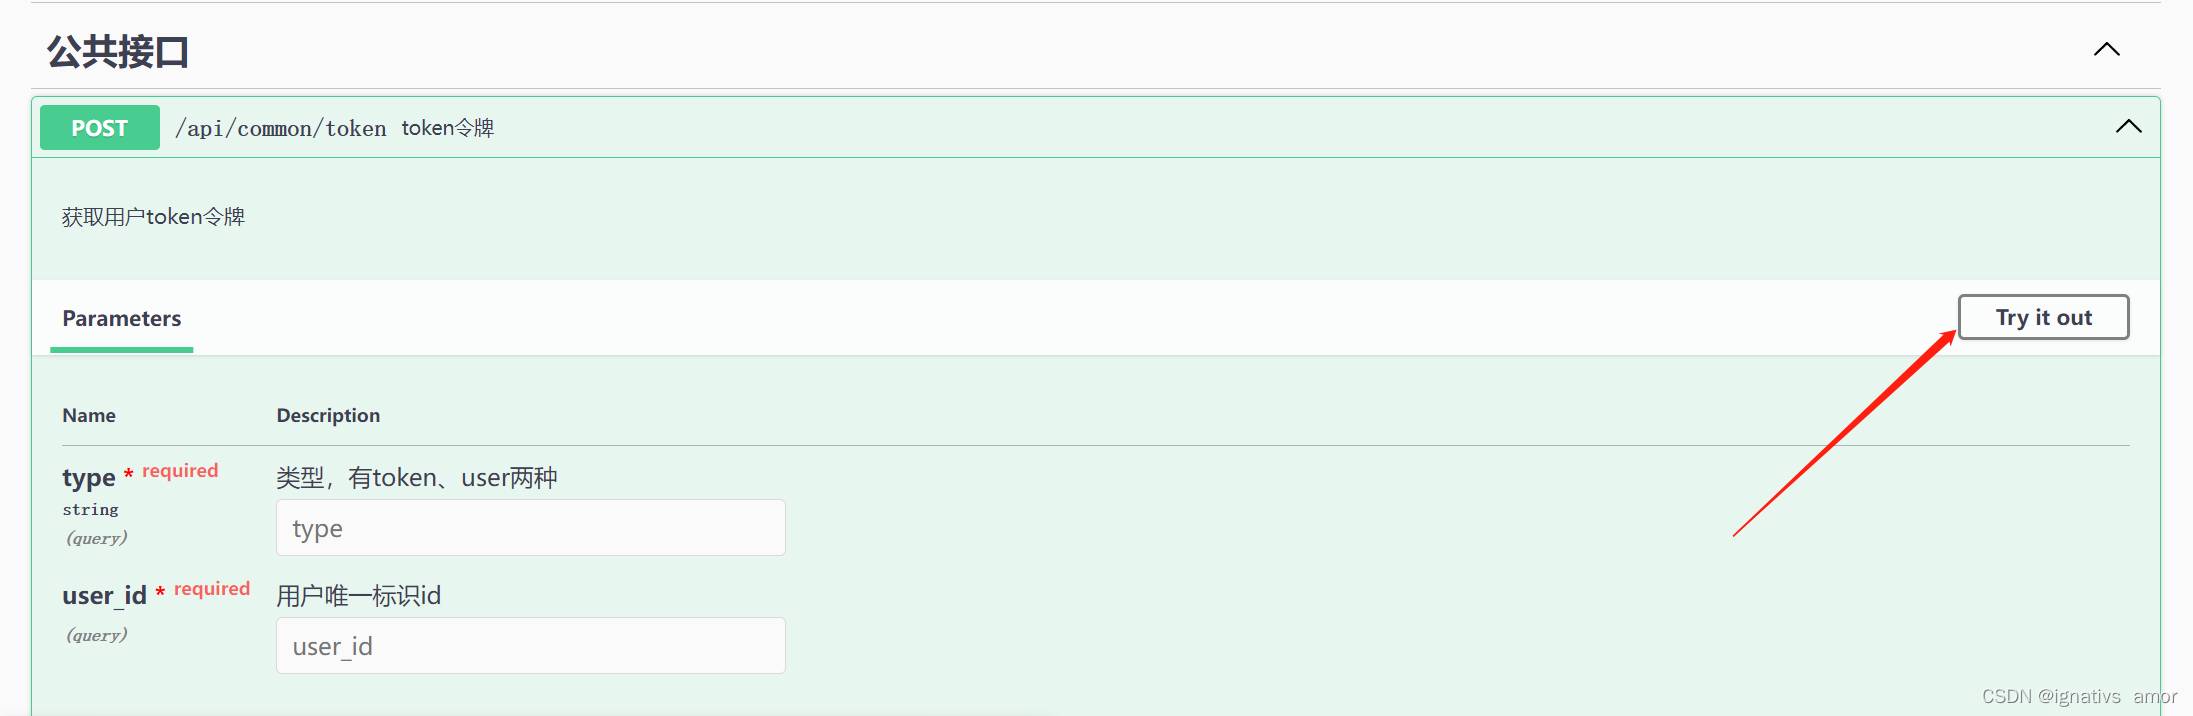
Swagger的使用就是在你的控制器里的方法前面加上注释,示例如下:
<?php namespace App\Http\Controllers\Api; class TokenController extends Controller { /** * @OA\Post( * path="/api/common/token", * tags={"公共接口"}, * summary="token令牌", * description="获取用户token令牌", * @OA\Parameter( * name="type", * description="类型,有token、user两种", * required=true, * in="query", * @OA\Schema( * type="string" * ) * ), * @OA\Parameter( * name="user_id", * description="用户唯一标识id", * required=true, * in="query", * ), * @OA\Response( * response=200, * description="successful operation" * ), * ) */ public function postToken(){ //逻辑 return $this->success( [ 'access_token' => $token, 'token_type' => 'bearer', ]); } }- 1
- 2
- 3
- 4
- 5
- 6
- 7
- 8
- 9
- 10
- 11
- 12
- 13
- 14
- 15
- 16
- 17
- 18
- 19
- 20
- 21
- 22
- 23
- 24
- 25
- 26
- 27
- 28
- 29
- 30
- 31
- 32
- 33
- 34
- 35
- 36
- 37
- 38
- 39
- 40
- 41
- 42
- 43
1、验证提供outh2 或和apikey 两种方式,在存放全局配置中写入(也可以任意目录中)。我是放在了最基础的controller中
备注:具体的可以点击这里去了解
<?php namespace App\Http\Controllers\Api; use App\Traits\JsonResponse; use Illuminate\Http\Request; use Illuminate\Routing\Controller as BaseController; /** * @SWG\SecurityScheme( * securityDefinition="Bearer", * in="header", * name="Authorization", * type="apiKey", * ), */ class Controller extends BaseController { public $request; public function __construct(Request $request){ $this->request = $request; } }- 1
- 2
- 3
- 4
- 5
- 6
- 7
- 8
- 9
- 10
- 11
- 12
- 13
- 14
- 15
- 16
- 17
- 18
- 19
- 20
- 21
- 22
- 23
- 24
- 25
在接口中添加:
security={{"Bearer": {}}},- 1
这时,swagger Ui 会出现一个锁一样的东西,
在这里,可以输入自己的token,请求的时候会带上token。
当token输入以后点击认证,这时候需要验证token的接口,都会被锁上,就是出现这个锁的样式,如图:

然后你try 接口的时候,就会带上你刚刚输入的token,这时可以在你的接口中间件中去接收并验证token的有效性了。2、post请求
备注:配置项security={{“Bearer”:{} }},:该项就是说明该接口需要安全验证,且用到的是Bearer方式
/** * @OA\Post( * path="/api/resource/list", * tags={"Resource相关"}, * summary="资源列表", * description="获取项目列表的接口,调用接口需要传递token令牌", * security={{"Bearer":{} }}, * @OA\Parameter( * name="page", * description="页码,默认为1", * required=false, * in="query", * ), * @OA\Parameter( * name="pagesize", * description="每页的数量,默认5条", * required=false, * in="query", * ), * * @OA\Response( * response=200, * description="successful", * @OA\MediaType( * mediaType="application/json", * @OA\Schema( * @OA\Property(property="id", type="integer", description="资源ID"), * @OA\Property(property="type", type="integer", description="资源类型,1=>病例,2=>文章"), * @OA\Property(property="title", type="string", description="资源名称"), * @OA\Property(property="cover", type="string", description="资源封面图"), * @OA\Property(property="view_count", type="integer", description="浏览量"), * @OA\Property(property="created_at", type="string", description="发布时间"), * ), * ) * ), * @OA\Response(response=400, description="Bad request"), * @OA\Response(response=404, description="Resource Not Found"), * ) */ public function postList(){ $params = $this->request->all(); $params['page'] = $params['page'] ?? 1; $params['pagesize'] = $params['pagesize'] ?? 5; //逻辑 }- 1
- 2
- 3
- 4
- 5
- 6
- 7
- 8
- 9
- 10
- 11
- 12
- 13
- 14
- 15
- 16
- 17
- 18
- 19
- 20
- 21
- 22
- 23
- 24
- 25
- 26
- 27
- 28
- 29
- 30
- 31
- 32
- 33
- 34
- 35
- 36
- 37
- 38
- 39
- 40
- 41
- 42
- 43
- 44
- 45
3、Get请求
/** * @OA\Get( * path="/projects/{id}", * operationId="getProjectById", * tags={"Projects"}, * summary="Get project information", * description="Returns project data", * @OA\Parameter( * name="id", * description="Project id", * required=true, * in="path", * @OA\Schema( * type="integer" * ) * ), * @OA\Response( * response=200, * description="successful operation" * ), * @OA\Response(response=400, description="Bad request"), * @OA\Response(response=404, description="Resource Not Found"), * }, * ) */- 1
- 2
- 3
- 4
- 5
- 6
- 7
- 8
- 9
- 10
- 11
- 12
- 13
- 14
- 15
- 16
- 17
- 18
- 19
- 20
- 21
- 22
- 23
- 24
- 25
- 26
- 27
4、Body 为Json 方式
/** * @OA\Post(summary="统计答题时长",path="/api/behavior/count_answer_time",tags={"行为埋点"},description="统计用户答题时长", * security={{"Bearer":{} }}, * @OA\Parameter(name="resource_id",in="query",required=true,description="资源id", * @OA\Schema( * type="integer" * )), * @OA\Parameter(name="log_id",in="query",required=true,description="当下访问记录的唯一标识id", * @OA\Schema( * type="integer" * )), * @OA\RequestBody( * @OA\MediaType(mediaType="application/json", * @OA\Schema( * @OA\Property(property="ques_id",type="int",description="问题id"), * @OA\Property(property="type",type="string",description="行为的类型:start和end两种"), * example={"ques_id": 10, "type": "start"} * ) * ) * ), * @OA\Response(response="200",description="获取成功"), * ) */ public function countAnswerTime(){ info(json_encode($this->request->all())); $resource_id = $this->request->get('resource_id'); $log_id = $this->request->get('log_id'); $all_params = $this->request->only(['resource_id', 'log_id']); $current_type = $this->request->get('type'); //逻辑 }- 1
- 2
- 3
- 4
- 5
- 6
- 7
- 8
- 9
- 10
- 11
- 12
- 13
- 14
- 15
- 16
- 17
- 18
- 19
- 20
- 21
- 22
- 23
- 24
- 25
- 26
- 27
- 28
- 29
- 30
- 31
- 32
- 33

5、文件上传
备注:这里是支持多文件上传,删除一个就是单文件上传
/** * @OA\Post(summary="上传文件",path="/api/upload/file/{type}",tags={"Upload"},description="上传文件", * security={{"Bearer":{} }}, * @OA\Parameter(name="type",in="path",required=true,description="类型"), * @OA\RequestBody( * @OA\MediaType( * mediaType="multipart/form-data", * @OA\Schema( * @OA\Property(property="file",type="file",description="文件"), * @OA\Property(property="file2",type="file",description="文件2") * ) * ) * ), * @OA\Response(response="200",description="获取成功", * @OA\MediaType(mediaType="application/json", * @OA\Schema( * @OA\Property(property="img_url",description="路径",type="string"), * @OA\Property(property="original_name",description="原始名称",type="string"), * ) * ) * ) * ) */ public function postUploadFile($case){ $file = $this->request->file('file'); //逻辑 }- 1
- 2
- 3
- 4
- 5
- 6
- 7
- 8
- 9
- 10
- 11
- 12
- 13
- 14
- 15
- 16
- 17
- 18
- 19
- 20
- 21
- 22
- 23
- 24
- 25
- 26
- 27

更多的使用方法可以参考官网例子:https://github.com/zircote/swagger-php/tree/master/Examples/petstore-3.0
三、可能遇到的问题
1、线上环境无法正常访问
可能是你nginx 配置的问题,因为,laravel-swagger 是通过file_content_get() 的方式 echo 输出js 的。而你的nginx 配置判断,如果是 .js 或者css 是静态文件,所以到不了index.php ,更执行不了 file_content_get 函数了。
这时候去掉js的缓存
2、ErrorException : Required @OA\Info() not found
在终端输入命令
php artisan l5-swagger:generate
提示异常:
这是因为在运行之前,您必须在控制器中至少有一个方法,并带有描述路由的注释<?php namespace App\Http\Controllers; use Illuminate\Foundation\Auth\Access\AuthorizesRequests; use Illuminate\Foundation\Bus\DispatchesJobs; use Illuminate\Foundation\Validation\ValidatesRequests; use Illuminate\Routing\Controller as BaseController; /** * @OA\Info(title="Swagger使用测试", version="1.0") */ class Controller extends BaseController { use AuthorizesRequests, DispatchesJobs, ValidatesRequests; }- 1
- 2
- 3
- 4
- 5
- 6
- 7
- 8
- 9
- 10
- 11
- 12
- 13
- 14
- 15
- 16
然后使用命令php artisan make:controller ProjectsController生成一个控制器,随便写个方法,然后在方法前添加注释即可:
/** * @OA\Get( * path="/projects", * @OA\Response(response="200", description="Display a listing of projects.") * ) */ public function index(){ }- 1
- 2
- 3
- 4
- 5
- 6
- 7
- 8
- 9
然后再执行php artisan l5-swagger:generate命令,就正常了

3、异常 Failed to load API definition
当您访问API网址http://dcat.kydev.net/api/documentation时,提示致命错误:

这是因为您在注解-Server中,指定了服务器域名为https的,但是访问的却是http的网址,要么更改Server中的url项为http协议;要么访问域名https的即可
-
相关阅读:
华为云云耀云服务器L实例评测 | 搭建docker环境
面试官:Kafka是什么,它有什么特性与使用场景?
在Windows 10上安装单机版的Spark
【毕业季】青春散场,我们期待下一场的开幕
为什么电容两端电压不能突变
JDBC常见面试题
内置指令、自定义指令(详细)、全局指令与局部指令
Java实现单链表
python毕业设计作品基于django框架新闻信息管理系统毕设成品(4)开题报告
嵌入式软件组件经典架构与存储器分类
- 原文地址:https://blog.csdn.net/snow_love_xia/article/details/133016295
