-
【开发者工具】git --代码管理 详细介绍
目录
Git基本操作
创建 Git 本地仓库
要提前说的是,仓库是进⾏版本控制的⼀个⽂件⽬录。我们要想对⽂件进⾏版本控制,就必须先创建⼀个仓库出来。
创建⼀个 Git 本地仓库对应的命令为 git init ,注意命令要在⽂件⽬录下执⾏,例如:
- hyb@139-159-150-152:~/gitcode$ pwd
- /home/hyb/gitcode
- hyb@139-159-150-152:~/gitcode$ git init
- Initialized empty Git repository in /home/hyb/gitcode/.git/
- hyb@139-159-150-152:~/gitcode$ ll -a
- total 12
- drwxrwxr-x 3 hyb hyb 4096 May 5 15:49 ./
- drwxr-xr-x 13 hyb hyb 4096 May 5 15:47 ../
- drwxrwxr-x 7 hyb hyb 4096 May 5 15:49 .git/
我们发现,当前⽬录下多了⼀个 .git 的隐藏⽂件, .git ⽬录是 Git 来跟踪管理仓库的,不要⼿动 修改这个⽬录⾥⾯的⽂件,不然改乱了,就把 Git 仓库给破坏了。
- hyb@139-159-150-152:~/gitcode$ tree .git/
- .git/
- ├── branches
- ├── config
- ├── description
- ├── HEAD
- ├── hooks
- │ ├── applypatch-msg.sample
- │ ├── commit-msg.sample
- │ ├── fsmonitor-watchman.sample
- │ ├── post-update.sample
- │ ├── pre-applypatch.sample
- │ ├── pre-commit.sample
- │ ├── pre-merge-commit.sample
- │ ├── prepare-commit-msg.sample
- │ ├── pre-push.sample
- │ ├── pre-rebase.sample
- │ ├── pre-receive.sample
- │ └── update.sample
- ├── info
- │ └── exclude
- ├── objects
- │ ├── info
- │ └── pack
- └── refs
- ├── heads
- └── tags
- 9 directories, 16 files
配置 Git
当安装 Git 后⾸先要做的事情是设置你的 ⽤⼾名称 和 e-mail 地址,这是⾮常重要的。配置命令为:
- git config [--global] user.name "Your Name"
- git config [--global] user.email "email@example.com"
- # 把 Your Name 改成你的昵称
- # 把 email@example.com 改成邮箱的格式,只要格式正确即可。
说明:
- 其中 --global 是⼀个可选项。如果使⽤了该选项,表⽰这台机器上所有的 Git 仓库都会使⽤这个 配置。如果你希望在不同仓库中使⽤不同的 name 或 e-mail ,可以不要 --global 选项,但要 注意的是,执⾏命令时必须要在仓库⾥。
查看配置命令为:
git config -l删除对应的配置命令为:
- git config [--global] --unset user.name
- git config [--global] --unset user.email
认识⼯作区、暂存区、版本库
- ⼯作区:是在电脑上你要写代码或⽂件的⽬录。
- 暂存区:英⽂叫 stage 或 index。⼀般存放在 .git ⽬录下的 index ⽂件(.git/index)中,我们 把暂存区有时也叫作索引(index)。
- 版本库:⼜名仓库,英⽂名 repository 。⼯作区有⼀个隐藏⽬录 .git ,它不算⼯作区,⽽ 是 Git 的版本库。这个版本库⾥⾯的所有⽂件都可以被 Git 管理起来,每个⽂件的修改、删除,Git 都能跟踪,以便任何时刻都可以追踪历史,或者在将来某个时刻可以“还原”。
下⾯这个图展⽰了⼯作区、暂存区和版本库之间的关系:
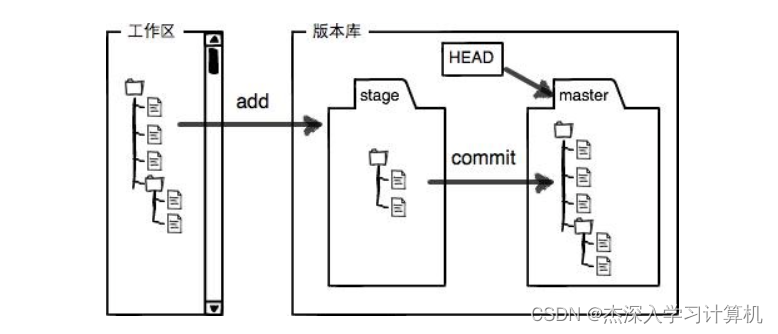
图片分析:
- 图中左侧为⼯作区,右侧为版本库。Git 的版本库⾥存了很多东西,其中最重要的就是暂存区。
- 在创建 Git 版本库时,Git 会为我们⾃动创建⼀个唯⼀的 master 分⽀,以及指向 master 的⼀个指 针叫 HEAD。(分⽀和HEAD的概念后⾯再说)
- 当对⼯作区修改(或新增)的⽂件执⾏ git add 命令时,暂存区⽬录树的⽂件索引会被更新。
- 当执⾏提交操作 git commit 时,master 分⽀会做相应的更新,可以简单理解为暂存区的⽬录 树才会被真正写到版本库中。
由上述描述我们便能得知:通过新建或粘贴进⽬录的⽂件,并不能称之为向仓库中新增⽂件,⽽只是 在⼯作区新增了⽂件。必须要通过使⽤ git add 和 git commit 命令才能将⽂件添加到仓库中 进⾏管理!!!
添加⽂件--场景⼀
在包含 .git 的⽬录下新建⼀个 ReadMe ⽂件,我们可以使⽤ git add 命令可以将⽂件添加到暂存 区:
- 添加⼀个或多个⽂件到暂存区: git add [file1] [file2] ...
- 添加指定⽬录到暂存区,包括⼦⽬录: git add [dir]
- 添加当前⽬录下的所有⽂件改动到暂存区: git add .
再使⽤ git commit 命令将暂存区内容添加到本地仓库中:
- 提交暂存区全部内容到本地仓库中: git commit -m "message"
- 提交暂存区的指定⽂件到仓库区: git commit [file1] [file2] ... -m "message"
注意: git commit 后⾯的 -m 选项,要跟上描述本次提交的 message,由⽤⼾⾃⼰完成,这部分内 容绝对不能省略,并要好好描述,是⽤来记录你的提交细节,是给我们⼈看的。
例如:
- hyb@139-159-150-152:~/gitcode$ vim ReadMe
- hyb@139-159-150-152:~/gitcode$ cat ReadMe
- hello bit
- hello bit
- hyb@139-159-150-152:~/gitcode$ git add ReadMe
- hyb@139-159-150-152:~/gitcode$ git commit -m "commit my first file"
- [master (root-commit) c614289] commit my first file
- 1 file changed, 2 insertions(+)
- create mode 100644 ReadMe
git commit 命令执⾏成功后会告诉我们,1个⽂件被改动(就是我们新添加的ReadMe⽂件),插 ⼊了两⾏内容(ReadMe有两⾏内容)。
我们还可以多次 add 不同的⽂件,⽽只 commit ⼀次便可以提交所有⽂件,是因为需要提交的⽂件是 通通被 add 到暂存区中,然后⼀次性 commit 暂存区的所有修改。如:
- hyb@139-159-150-152:~/gitcode$ touch file1 file2 file3
- hyb@139-159-150-152:~/gitcode$ git add file1
- hyb@139-159-150-152:~/gitcode$ git add file2
- hyb@139-159-150-152:~/gitcode$ git add file3
- hyb@139-159-150-152:~/gitcode$ git commit -m "add 3 files"
- [master 23807c5] add 3 files
- 3 files changed, 0 insertions(+), 0 deletions(-)
- create mode 100644 file1
- create mode 100644 file2
- create mode 100644 file3
截⾄⽬前为⽌,我们已经更够将代码直接提交⾄本地仓库了。我们可以使⽤ git log 命令,来查看 下历史提交记录:
- hyb@139-159-150-152:~/gitcode$ git log
- commit 23807c536969cd886c4fb624b997ca575756eed6 (HEAD -> master)
- Author: hyb91 <2689241679@qq.com>
- Date: Sat May 6 11:27:32 2023 +0800
- add 3 files
- commit c61428926f3853d4ec6dde904415b0e6c1dabcc6
- Author: hyb91 <2689241679@qq.com>
- Date: Sat May 6 11:25:50 2023 +0800
- commit my first file
该命令显⽰从最近到最远的提交⽇志,并且可以看到我们 commit 时的⽇志消息。 如果嫌输出信息太多,看得眼花缭乱的,可以试试加上 --pretty=oneline 参数:
- hyb@139-159-150-152:~/gitcode$ git log --pretty=oneline
- 23807c536969cd886c4fb624b997ca575756eed6 (HEAD -> master) add 3 files
- c61428926f3853d4ec6dde904415b0e6c1dabcc6 commit my first file
说明:
- 我们看到的⼀⼤串类似 23807c5...56eed6 的是每次提交的 commit id (版本 号),Git 的 commit id 不是1,2,3……递增的数字,⽽是⼀个 SHA1 计算出来的⼀个⾮常⼤的数 字,⽤⼗六进制表⽰(你看到的 commit id 和我的肯定不⼀样,以你⾃⼰的为准)。
查看 .git ⽂件
先来看看我们的 .git 的⽬录结构:
- hyb@139-159-150-152:~/gitcode$ tree .git/
- .git/
- ├── branches
- ├── COMMIT_EDITMSG
- ├── config
- ├── description
- ├── HEAD
- ├── hooks
- │ ├── applypatch-msg.sample
- │ ├── commit-msg.sample
- │ ├── fsmonitor-watchman.sample
- │ ├── post-update.sample
- │ ├── pre-applypatch.sample
- │ ├── pre-commit.sample
- │ ├── pre-merge-commit.sample
- │ ├── prepare-commit-msg.sample
- │ ├── pre-push.sample
- │ ├── pre-rebase.sample
- │ ├── pre-receive.sample
- │ └── update.sample
- ├── index
- ├── info
- │ └── exclude
- ├── logs
- │ ├── HEAD
- │ └── refs
- │ └── heads
- │ └── master
- ├── objects
- │ ├── 23
- │ │ └── 807c536969cd886c4fb624b997ca575756eed6
- │ ├── 83
- │ │ └── 0a8c9feefbdc098bbae2cdc25e5034ce1920d7
- │ ├── 8f
- │ │ └── add50161b6fafa53ce7e79d278dc490240c946
- │ ├── 9c
- │ │ └── 9e1f0f6bff3015df71a0963004476f5e6cfd54
- │ ├── c6
- │ │ └── 1428926f3853d4ec6dde904415b0e6c1dabcc6
- │ ├── e6
- │ │ └── 9de29bb2d1d6434b8b29ae775ad8c2e48c5391
- │ ├── info
- │ └── pack
- └── refs
- ├── heads
- │ └── master
- └── tags
- 18 directories, 27 files
- index 就是我们的暂存区,add 后的内容都是添加到这⾥的。
- HEAD 就是我们的默认指向 master 分⽀的指针:
- hyb@139-159-150-152:~/gitcode$ cat .git/HEAD
- ref: refs/heads/master
⽽默认的 master 分⽀,其实就是:
- hyb@139-159-150-152:~/gitcode$ cat .git/refs/heads/master
- 23807c536969cd886c4fb624b997ca575756eed6
打印的 23807c536969cd886c4fb624b997ca575756eed6 是什么东西呢?保存的就是当前最新 的 commit id 。
objects 为 Git 的对象库
- objects 为 Git 的对象库,⾥⾯包含了创建的各种版本库对象及内容。当执⾏ git add 命令 时,暂存区的⽬录树被更新,同时⼯作区修改(或新增)的⽂件内容被写⼊到对象库中的⼀个新的 对象中,就位于 ".git/objects" ⽬录下,让我们来看看这些对象有何⽤处:
- hyb@139-159-150-152:~/gitcode$ ls .git/objects/
- 23 83 8f 9c c6 e6 info pack
查找 object 时要将 commit id 分成2部分,其前2位是⽂件夹名称,后38位是⽂件名称。
找到这个⽂件之后,⼀般不能直接看到⾥⾯是什么,该类⽂件是经过 sha (安全哈希算法)加密过的 ⽂件,好在我们可以使⽤ git cat-file 命令来查看版本库对象的内容:
- hyb@139-159-150-152:~/gitcode$ git cat-file -p 23807c536969cd886c4fb624b997ca575
- tree 830a8c9feefbdc098bbae2cdc25e5034ce1920d7
- parent c61428926f3853d4ec6dde904415b0e6c1dabcc6
- author hyb91 <2689241679@qq.com> 1683343652 +0800
- committer hyb91 <2689241679@qq.com> 1683343652 +0800
- add 3 files
- # 这就是我们最近⼀次的提交!
其中,还有⼀⾏ tree 830a8c9feefbdc098bbae2cdc25e5034ce1920d7 ,我们使⽤同样的⽅ 法,看看结果:
- hyb@139-159-150-152:~/gitcode$ git cat-file -p 830a8c9feefbdc098bbae2cdc25e5034c
- 100644 blob 9c9e1f0f6bff3015df71a0963004476f5e6cfd54 ReadMe
- 100644 blob e69de29bb2d1d6434b8b29ae775ad8c2e48c5391 file1
- 100644 blob e69de29bb2d1d6434b8b29ae775ad8c2e48c5391 file2
- 100644 blob e69de29bb2d1d6434b8b29ae775ad8c2e48c5391 file3
在看 ReadMe 对应的 9c9e1f0f6bff3015df71a0963004476f5e6cfd54 :
- hyb@139-159-150-152:~/gitcode$ git cat-file -p 9c9e1f0f6bff3015df71a0963004476f5
- hello bit
- hello bit
- # 这是我们对ReadMe做的修改!!被git记录了下来!!
总结⼀下,在本地的 git 仓库中,有⼏个⽂件或者⽬录很特殊
- index: 暂存区, git add 后会更新该内容。
- HEAD: 默认指向 master 分⽀的⼀个指针。
- refs/heads/master: ⽂件⾥保存当前 master 分⽀的最新 commit id 。
- objects: 包含了创建的各种版本库对象及内容,可以简单理解为放了 git 维护的所有修改。
添加⽂件 -- 场景⼆
学习到这⾥,我们已经清楚了如何向仓库中添加⽂件,并且对于⼯作区、暂存区、版本库也有了⼀定 的认识。那么我们再展⽰⼀种添加⽂件的场景,能加深对⼯作区、暂存区、版本库的理解,⽰例如 下:
- hyb@139-159-150-152:~/gitcode$ touch file4 #1. 新增file4⽂件
- hyb@139-159-150-152:~/gitcode$ git add file4 #2. 将file4添加到暂存区
- hyb@139-159-150-152:~/gitcode$ touch file5 #3. 新增file5⽂件
- hyb@139-159-150-152:~/gitcode$ git commit -m"add file" #4. 提交修改
- [master 3d406c0] add file
- 1 file changed, 0 insertions(+), 0 deletions(-)
- create mode 100644 file4
现象+问题:提交后发现打印了 1 file changed, 0 insertions(+), 0 deletions(-) ,意思是只 有⼀个⽂件改变了,这时我们提出了疑问,不是新增了两个⽂件吗?
问题分析与解决:再来回忆下, git add 是将⽂件添加到暂存区, git commit 是将暂存区的内容添加到本地仓库 中。由于我们并没有使⽤ git add file5 ,file5 就不在暂存区中维护,所以我们 commit 的时候 其实只是把已经在暂存区的 file4 提交了,⽽遗漏了⼯作区的 file5。如何提交 file5 呢?很简单,再次 add , commit 即可。
修改⽂件
Git ⽐其他版本控制系统设计得优秀,因为 Git 跟踪并管理的是修改,⽽⾮⽂件。
什么是修改?⽐如你新增了⼀⾏,这就是⼀个修改,删除了⼀⾏,也是⼀个修改,更改了某些字符, 也是⼀个修改,删了⼀些⼜加了⼀些,也是⼀个修改,甚⾄创建⼀个新⽂件,也算⼀个修改。
让我们将 ReadMe ⽂件进⾏⼀次修改:
- hyb@139-159-150-152:~/gitcode$ cat ReadMe
- hello bit
- hello git
- hello world
此时,仓库中的 ReadMe 和我们⼯作区的 ReadMe 是不同的,如何查看当前仓库的状态呢? git status 命令⽤于查看在你上次提交之后是否有对⽂件进⾏再次修改。
- hyb@139-159-150-152:~/gitcode$ git status
- On branch master
- Changes not staged for commit:
- (use "git add
..." to update what will be committed) - (use "git restore
..." to discard changes in working directory) - modified: ReadMe
- no changes added to commit (use "git add" and/or "git commit -a")
上⾯的结果告诉我们,ReadMe 被修改过了,但还没有完成添加与提交。
git diff [file] 命令
⽬前,我们只知道⽂件被修改了,如果能知道具体哪些地⽅被修改了,就更好了。
- hyb@139-159-150-152:~/gitcode$ git diff ReadMe
- diff --git a/ReadMe b/ReadMe
- index 9c9e1f0..4a97140 100644
- --- a/ReadMe
- +++ b/ReadMe
- @@ -1,2 +1,3 @@
- hello bit
- -hello bit
- +hello git
- +hello world
git diff [file] 命令⽤来显⽰暂存区和⼯作区⽂件的差异,显⽰的格式正是Unix通⽤的diff格 式。也可以使⽤ git diff HEAD -- [file] 命令来查看版本库和⼯作区⽂件的区别。 知道了对 ReadMe 做了什么修改后,再把它提交到本地仓库就放⼼多了。
- hyb@139-159-150-152:~/gitcode$ git add ReadMe
- hyb@139-159-150-152:~/gitcode$ git status
- On branch master
- Changes to be committed:
- (use "git restore --staged
..." to unstage) - modified: ReadMe
git add 之后,就没有看到上⾯ no changes added to commit (use "git add" and/or "git commit -a") 的消息了。接下来让我们继续 git commit 即可:
- hyb@139-159-150-152:~/gitcode$ git commit -m "add modify ReadMe file"
- [master 94da695] add modify ReadMe file
- 1 file changed, 2 insertions(+), 1 deletion(-)
- hyb@139-159-150-152:~/gitcode$ git status
- On branch master
- nothing to commit, working tree clean
版本回退
之前我们也提到过,Git 能够管理⽂件的历史版本,这也是版本控制器重要的能⼒。如果有⼀天你发现 之前前的⼯作做的出现了很⼤的问题,需要在某个特定的历史版本重新开始,这个时候,就需要版本 回退的功能了。
执⾏ git reset 命令⽤于回退版本,可以指定退回某⼀次提交的版本。要解释⼀下“回退”本质是 要将版本库中的内容进⾏回退,⼯作区或暂存区是否回退由命令参数决定:
git reset 命令语法格式为: git reset [--soft | --mixed | --hard] [HEAD]
说明:
- --mixed 为默认选项,使⽤时可以不⽤带该参数。该参数将暂存区的内容退回为指定提交版本内 容,⼯作区⽂件保持不变。
- --soft 参数对于⼯作区和暂存区的内容都不变,只是将版本库回退到某个指定版本。
- --hard 参数将暂存区与⼯作区都退回到指定版本。切记⼯作区有未提交的代码时不要⽤这个命 令,因为⼯作区会回滚,你没有提交的代码就再也找不回了,所以使⽤该参数前⼀定要慎重。
- HEAD 说明:
- 可直接写成 commit id,表⽰指定退回的版本
- HEAD 表⽰当前版本
- HEAD^ 上⼀个版本
- HEAD^^ 上上⼀个版本
- 以此类推...
- 可以使⽤ 〜数字表⽰:
- HEAD~0 表⽰当前版本
- HEAD~1 上⼀个版本
- HEAD~2 上上⼀个版本
- 以此类推...
为了便于表述,⽅便测试回退功能,我们先做⼀些准备⼯作:更新3个版本的 ReadMe,并分别进⾏3 次提交,如下所⽰:
- # 第⼀次修改提交
- hyb@139-159-150-152:~/gitcode$ cat ReadMe
- hello bit
- hello git
- hello world
- hello version1
- hyb@139-159-150-152:~/gitcode$ git add ReadMe
- hyb@139-159-150-152:~/gitcode$ git commit -m"add version1"
- [master cff9d1e] add version1
- 1 file changed, 1 insertion(+)
- # 第⼆次修改提交
- hyb@139-159-150-152:~/gitcode$ cat ReadMe
- hello bit
- hello git
- hello world
- hello version1
- hello version2
- hyb@139-159-150-152:~/gitcode$ git add ReadMe
- hyb@139-159-150-152:~/gitcode$ git commit -m"add version2"
- 1 file changed, 1 insertion(+)
- # 第三次修改提交
- hyb@139-159-150-152:~/gitcode$ cat ReadMe
- hello bit
- hello git
- hello world
- hello version1
- hello version2
- hello version3
- hyb@139-159-150-152:~/gitcode$ git add ReadMe
- hyb@139-159-150-152:~/gitcode$ git commit -m"add version3"
- [master d95c13f] add version3
- 1 file changed, 1 insertion(+)
- # 查看历史提交记录
- hyb@139-159-150-152:~/gitcode$ git log --pretty=oneline
- d95c13ffc878a55a25a3d04e22abfc7d2e3e1383 (HEAD -> master) add version3
- 14c12c32464d6ead7159f5c24e786ce450c899dd add version2
- cff9d1e019333318156f8c7d356a78c9e49a6e7b add version1
- ...
现在,如果我们在提交完 version3 后, 发现 version 3 编写错误,想回退到 version2,重新基于 version 2 开始编写。由于我们在这⾥希望的是将⼯作区的内容也回退到 version 2 版本,所以需 要⽤到 --hard 参数,⽰例如下:
- hyb@139-159-150-152:~/gitcode$ git log --pretty=oneline
- d95c13ffc878a55a25a3d04e22abfc7d2e3e1383 (HEAD -> master) add version3
- 14c12c32464d6ead7159f5c24e786ce450c899dd add version2
- cff9d1e019333318156f8c7d356a78c9e49a6e7b add version1
- ...
- hyb@139-159-150-152:~/gitcode$ git reset --hard 14c12c32464d6ead7159f5c24e786ce4
- HEAD is now at 14c12c3 add version2
- hyb@139-159-150-152:~/gitcode$ cat ReadMe
- hello bit
- hello git
- hello world
- hello version1
- hello version2
我们惊奇的发现,此时 ReadMe ⽂件的内容,已经回退到 version2 了!,当前,我们再次⽤ git log 查看⼀下提交⽇志,发现 HEAD 指向了version2,如下所⽰:
- hyb@139-159-150-152:~/gitcode$ git log --pretty=oneline
- 14c12c32464d6ead7159f5c24e786ce450c899dd (HEAD -> master) add version2
- cff9d1e019333318156f8c7d356a78c9e49a6e7b add version1
- ...
到这⾥⼀般回退功能就演⽰完了,但现在如果我后悔了,想再回到 version 3 怎么办?我们可以继续使 ⽤ git reset 命令,回退到 version 3 版本,但我们必须要拿到 version 3 的 commit id 去指定回退的版本。
但我们看到了 git log 并不能打印出 version 3 的 commit id ,运⽓好的话我们可以从终端 上去找找之前的记录,运⽓不好的话 commit id 已经被我们搞丢了=_=
Git 还提供了⼀个 git reflog 命令能补救⼀下,该命令⽤来记录本地的每⼀次命令。
- hyb@139-159-150-152:~/gitcode$ git reflog
- 14c12c3 (HEAD -> master) HEAD@{0}: reset: moving to 14c12c32464d6ead7159f5c24e78
- d95c13f HEAD@{1}: commit: add version3
- 14c12c3 (HEAD -> master) HEAD@{2}: commit: add version2
- cff9d1e HEAD@{3}: commit: add version1
- 94da695 HEAD@{4}: commit: add modify ReadMe file
- 23807c5 HEAD@{5}: commit: add 3 files
- c614289 HEAD@{6}: commit (initial): commit my first file
这样,你就可以很⽅便的找到你的所有操作记录了,但 d95c13f 这个是啥东西?这个是 version 3 的 commit id 的部分。没错,Git 版本回退的时候,也可以使⽤部分 commit id 来代表⽬标版 本。⽰例如下:
- # 回退到v3
- hyb@139-159-150-152:~/gitcode$ git reset --hard d95c13f
- HEAD is now at d95c13f add version3
- # 查看⼯作区
- hyb@139-159-150-152:~/gitcode$ cat ReadMe
- hello bit
- hello git
- hello world
- hello version1
- hello version2
- hello version3
- # 查看log
- hyb@139-159-150-152:~/gitcode$ git log --pretty=oneline
- d95c13ffc878a55a25a3d04e22abfc7d2e3e1383 (HEAD -> master) add version3
- 14c12c32464d6ead7159f5c24e786ce450c899dd add version2
- cff9d1e019333318156f8c7d356a78c9e49a6e7b add version1
- 94da6950d27e623c0368b22f1ffc4bff761b5b00 add modify ReadMe file
- 23807c536969cd886c4fb624b997ca575756eed6 add 3 files
- c61428926f3853d4ec6dde904415b0e6c1dabcc6 commit my first file
可往往是理想很丰满,现实很⻣感。在实际开发中,由于⻓时间的开发了,导致 commit id 早就找 不到了,可突然某⼀天,我⼜想回退到 version3,那该如何操作呢?貌似现在不可能了。。。
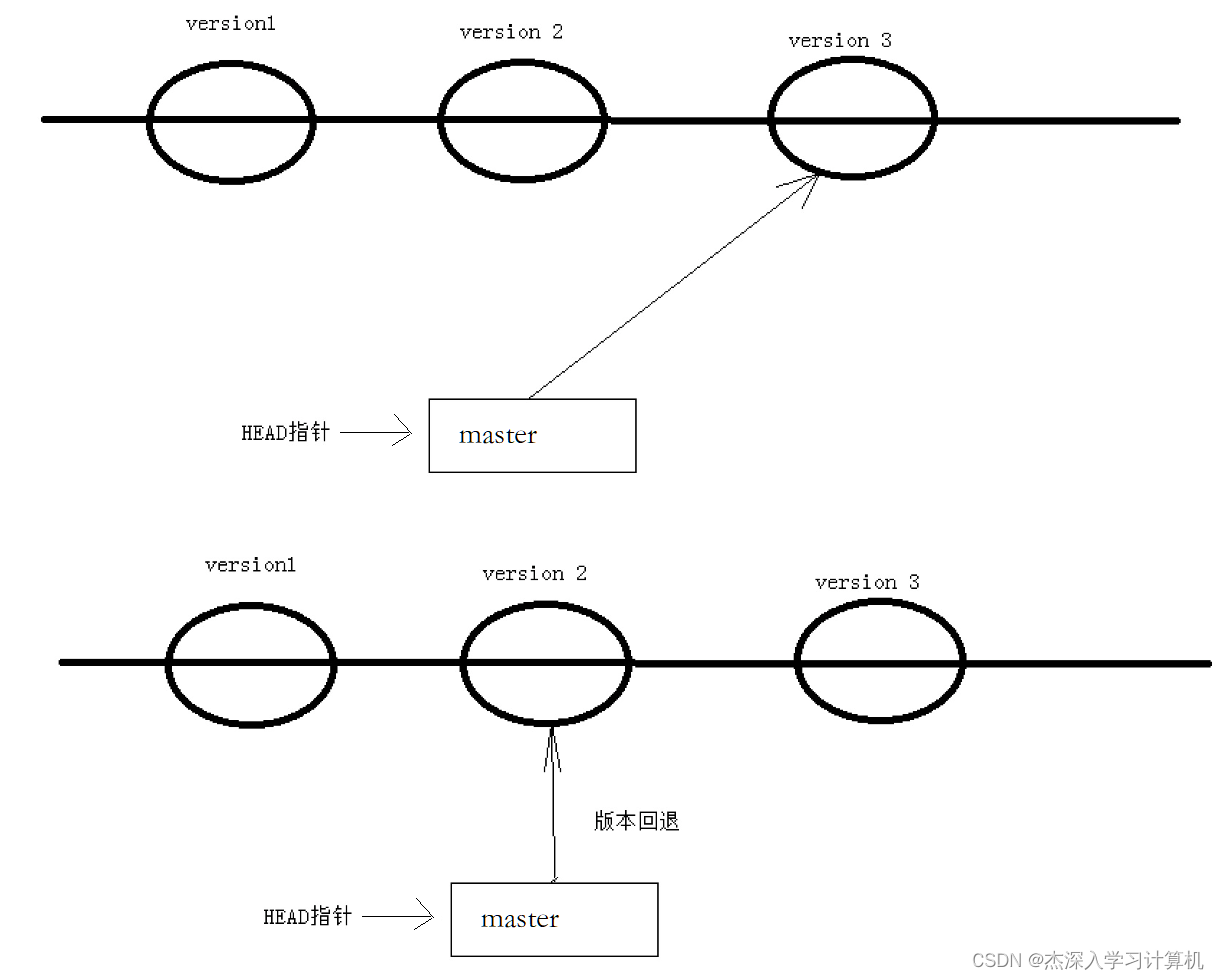
值得说的是,Git 的版本回退速度⾮常快,因为 Git 在内部有个指向当前分⽀(此处是master)的 HEAD 指针, refs/heads/master ⽂件⾥保存当前 master 分⽀的最新 commit id 。当我们 在回退版本的时候,Git 仅仅是给 refs/heads/master 中存储⼀个特定的version,可以简单理解 成如下⽰意图:
撤销修改
如果我们在我们的⼯作区写了很⻓时间代码,越写越写不下去,觉得⾃⼰写的实在是垃圾,想恢复到 上⼀个版本。
情况⼀:对于⼯作区的代码,还没有 add
你当然可以直接删掉你⽬前在⼯作区新增的代码,像这样:
- # 向ReadMe中新增⼀⾏代码
- hyb@139-159-150-152:~/gitcode$ git status
- On branch master
- nothing to commit, working tree clean
- hyb@139-159-150-152:~/gitcode$ vim ReadMe
- hyb@139-159-150-152:~/gitcode$ cat ReadMe
- hello bit
- hello git
- hello world
- hello version1
- hello version2
- hello version3
- This piece of code is like shit #新增代码
- hyb@139-159-150-152:~/gitcode$ git status
- On branch master
- Changes not staged for commit:
- (use "git add
..." to update what will be committed) - (use "git restore
..." to discard changes in working directory) - modified: ReadMe
- no changes added to commit (use "git add" and/or "git commit -a")
- # 直接删除代码
- hyb@139-159-150-152:~/gitcode$ vim ReadMe
- hyb@139-159-150-152:~/gitcode$ cat ReadMe
- hello bit
- hello git
- hello world
- hello version1
- hello version2
- hello version3
- hyb@139-159-150-152:~/gitcode$ git status
- On branch master
- nothing to commit, working tree clean
⾟亏我们⼯作效率不⾼,才写了⼀⾏代码就发现不⾏了,要是你写了3天,⼀直都没有提交,该怎么删 掉呢?你⾃⼰都忘了⾃⼰新增过哪些,有同学说,我可以 git diff xxx ⼀下,看看差别在删啊, 那你肯定⼜要花3天时间删代码了,并且很⼤的概率还会改出bug。⼀周过去了,你怎么向你的⽼板交 代呢?
Git 其实还为我们提供了更好的⽅式,我们可以使⽤ git checkout -- [file] 命令让⼯作区的 ⽂件回到最近⼀次 add 或 commit 时的状态。 要注意 git checkout -- [file] 命令中的 -- 很重要,切记不要省略,⼀旦省略,该命令就变为其他意思了,后⾯我们再说。⽰例如下:
- # 向ReadMe中新增⼀⾏代码
- hyb@139-159-150-152:~/gitcode$ vim ReadMe
- hyb@139-159-150-152:~/gitcode$ cat ReadMe
- hello bit
- hello git
- hello world
- hello version1
- hello version2
- hello version3
- This piece of code is like shit #新增代码
- # 恢复到上⼀次 add 或 commit
- hyb@139-159-150-152:~/gitcode$ git checkout -- ReadMe
- hyb@139-159-150-152:~/gitcode$ cat ReadMe
- hello bit
- hello git
- hello world
- hello version1
- hello version2
- hello version3
情况⼆:已经 add ,但没有 commit
add 后还是保存到了暂存区呢?怎么撤销呢?
- # 向ReadMe中新增⼀⾏代码
- hyb@139-159-150-152:~/gitcode$ vim ReadMe
- hyb@139-159-150-152:~/gitcode$ cat ReadMe
- hello bit
- hello git
- hello world
- hello version1
- hello version2
- hello version3
- This piece of code is like shit #新增代码
- # add 存⼊暂存区
- hyb@139-159-150-152:~/gitcode$ git add ReadMe
- hyb@139-159-150-152:~/gitcode$ git status
- On branch master
- Changes to be committed:
- (use "git restore --staged
..." to unstage) - modified: ReadMe
让我们来回忆⼀下学过的 git reset 回退命令,该命令如果使⽤ --mixed 参数,可以将暂存区 的内容退回为指定的版本内容,但⼯作区⽂件保持不变。那我们就可以回退下暂存区的内容了!!!
⽰例如下:
- # --mixed 是默认参数,使⽤时可以省略
- hyb@139-159-150-152:~/gitcode$ git reset HEAD ReadMe
- Unstaged changes after reset:
- M ReadMe
⽤ git status 查看⼀下,发现现在暂存区是⼲净的,⼯作区有修改。
- hyb@139-159-150-152:~/gitcode$ git status
- On branch master
- Changes not staged for commit:
- (use "git add
..." to update what will be committed) - (use "git restore
..." to discard changes in working directory) - modified: ReadMe
- no changes added to commit (use "git add" and/or "git commit -a")
还记得如何丢弃⼯作区的修改吗?
- hyb@139-159-150-152:~/gitcode$ git checkout -- ReadMe
- hyb@139-159-150-152:~/gitcode$ git status
- On branch master
- nothing to commit, working tree clean
- hyb@139-159-150-152:~/gitcode$ cat ReadMe
- hello bit
- hello git
- hello world
- hello version1
- hello version2
- hello version3
恢复了!
情况三:已经 add ,并且也 commit 了
不要担⼼,我们可以 git reset --hard HEAD^ 回退到上⼀个版本!不过,这是有条件的,就是 你还没有把⾃⼰的本地版本库推送到远程。还记得Git是分布式版本控制系统吗?我们后⾯会讲到远程 版本库,⼀旦你推送到远程版本库,你就真的惨了……
- # 向ReadMe中新增⼀⾏代码
- hyb@139-159-150-152:~/gitcode$ vim ReadMe
- hyb@139-159-150-152:~/gitcode$ cat ReadMe
- hello bit
- hello git
- hello world
- hello version1
- hello version2
- hello version3
- This piece of code is like shit #新增代码
- # 提交
- hyb@139-159-150-152:~/gitcode$ git add ReadMe
- hyb@139-159-150-152:~/gitcode$ git commit -m"test quash"
- [master 5f71ae1] test quash
- 1 file changed, 1 insertion(+)
- # 回退
- hyb@139-159-150-152:~/gitcode$ git reset --hard HEAD^
- HEAD is now at 144a3f8 add file
- hyb@139-159-150-152:~/gitcode$ cat ReadMe
- hello bit
- hello git
- hello world
- hello version1
- hello version2
- hello version3
删除⽂件
在 Git 中,删除也是⼀个修改操作,我们实战⼀下, 如果要删除 file5 ⽂件,怎么搞呢?如果你这样 做了
- hyb@139-159-150-152:~/gitcode$ ls
- file1 file2 file3 file4 file5 ReadMe
- hyb@139-159-150-152:~/gitcode$ rm file5
但这样直接删除是没有⽤的,反⽽徒增烦恼, git status 命令会⽴刻告诉你哪些⽂件被删除了:
- hyb@139-159-150-152:~/gitcode$ git status
- On branch master
- Changes not staged for commit:
- (use "git add/rm
..." to update what will be committed) - (use "git restore
..." to discard changes in working directory) - deleted: file5
- no changes added to commit (use "git add" and/or "git commit -a")
此时,⼯作区和版本库就不⼀致了,要删⽂件,⽬前除了要删⼯作区的⽂件,还要清除版本库的⽂ 件。
⼀般⾛到这⾥,有两种可能:
- 确实要从版本库中删除该⽂件
- 不⼩⼼删错了
对第⼆种情况,很明显误删,需要使⽤ git 来进⾏恢复,很简单,我们刚学过(删除也是修改):
- hyb@139-159-150-152:~/gitcode$ git checkout -- file5
- hyb@139-159-150-152:~/gitcode$ ls
- file1 file2 file3 file4 file5 ReadMe
对于第⼀种情况,很明显是没有删完,我们只删除了⼯作区的⽂件。这时就需要使⽤ git rm 将⽂ 件从暂存区和⼯作区中删除,并且 commit :
- hyb@139-159-150-152:~/gitcode$ git rm file5
- rm 'file5'
- hyb@139-159-150-152:~/gitcode$ git status
- On branch master
- Changes to be committed:
- (use "git restore --staged
..." to unstage) - deleted: file5
- hyb@139-159-150-152:~/gitcode$ git commit -m"deleted file5"
- [master 5476bde] deleted file5
- 1 file changed, 0 insertions(+), 0 deletions(-)
- delete mode 100644 file5
- hyb@139-159-150-152:~/gitcode$ git status
- On branch master
- nothing to commit, working tree clean
现在,⽂件就从版本库中被删除了。
分⽀管理
理解分⽀
本章开始介绍 Git 的杀⼿级功能之⼀(注意是之⼀,也就是后⾯还有之⼆,之三……):分⽀。分⽀就 是科幻电影⾥⾯的平⾏宇宙,当你正在电脑前努⼒学习 C++ 的时候,另⼀个你正在另⼀个平⾏宇宙⾥ 努⼒学习 JAVA。
如果两个平⾏宇宙互不⼲扰,那对现在的你也没啥影响。不过,在某个时间点,两个平⾏宇宙合并 了,结果,你既学会了 C++ ⼜学会了 JAVA!

在版本回退⾥,你已经知道,每次提交,Git都把它们串成⼀条时间线,这条时间线就可以理解为是⼀ 个分⽀。截⽌到⽬前,只有⼀条时间线,在Git⾥,这个分⽀叫主分⽀,即 master 分⽀。
再来理解⼀下HEAD,HEAD 严格来说不是指向提交,⽽是指向master,master才是指向提交的,所 以,HEAD 指向的就是当前分⽀。

每次提交,master分⽀都会向前移动⼀步,这样,随着你不断提交,master分⽀的线也越来越⻓,⽽ HEAD只要⼀直指向master分⽀即可指向当前分⽀。
通过查看当前的版本库,我们也能清晰的理出思路:
- hyb@139-159-150-152:~/gitcode$ cat .git/HEAD
- ref: refs/heads/master
- hyb@139-159-150-152:~/gitcode$ cat .git/refs/heads/master
- 5476bdeb12510f7cd72ac4766db7988925ebd302
创建分⽀
Git ⽀持我们查看或创建其他分⽀,在这⾥我们来创建第⼀个⾃⼰的分⽀ dev ,对应的命令为:
- hyb@139-159-150-152:~/gitcode$ git branch #查看当前本地所有分⽀
- * master
- hyb@139-159-150-152:~/gitcode$ git branch dev #新建分⽀dev
- hyb@139-159-150-152:~/gitcode$ git branch
- dev
- * master
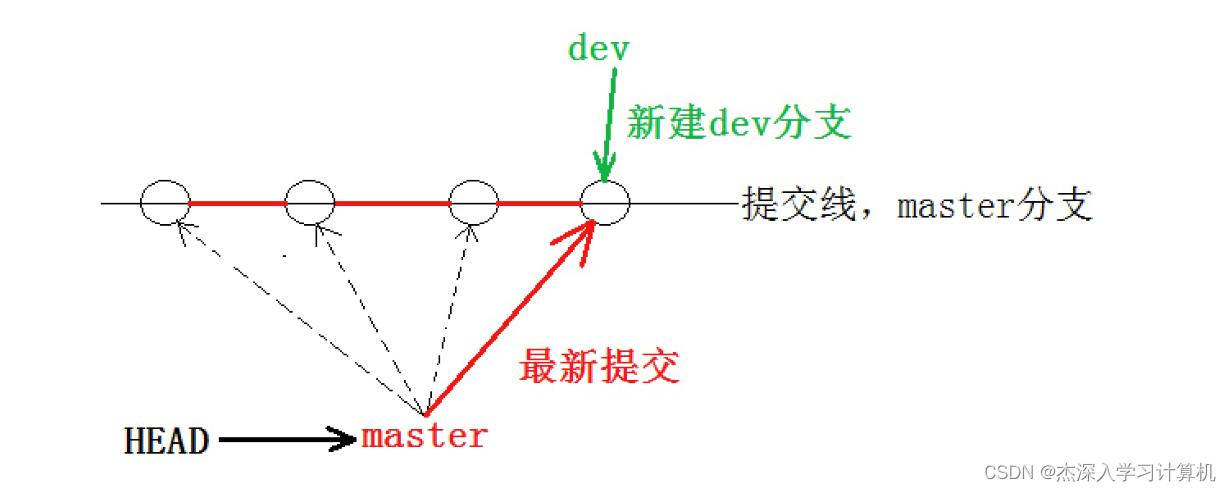
当我们创建新的分⽀后,Git 新建了⼀个指针叫 dev, * 表⽰当前 HEAD 指向的分⽀是 master 分 ⽀。另外,可以通过⽬录结构发现,新的 dev 分⽀:
- hyb@139-159-150-152:~/gitcode$ ls .git/refs/heads/
- dev master
- hyb@139-159-150-152:~/gitcode$ cat .git/refs/heads/*
- 5476bdeb12510f7cd72ac4766db7988925ebd302
- 5476bdeb12510f7cd72ac4766db7988925ebd302
发现⽬前 dev 和 master 指向同⼀个修改。并且也可以验证下 HEAD ⽬前是指向 master 的。
- hyb@139-159-150-152:~/gitcode$ cat .git/HEAD
- ref: refs/heads/master
⼀张图总结:
切换分⽀
那如何切换到 dev 分⽀下进⾏开发呢?使⽤ git checkout 命令即可完成切换,⽰例如下:
- hyb@139-159-150-152:~/gitcode$ git checkout dev
- Switched to branch 'dev'
- hyb@139-159-150-152:~/gitcode$ git branch
- * dev
- master
- hyb@139-159-150-152:~/gitcode$ cat .git/HEAD
- ref: refs/heads/dev

我们发现 HEAD 已经指向了 dev,就表⽰我们已经成功的切换到了 dev 上!
接下来,在 dev 分⽀下修改 ReadMe ⽂件,新增⼀⾏内容,并进⾏⼀次提交操作:
- hyb@139-159-150-152:~/gitcode$ vim ReadMe
- hyb@139-159-150-152:~/gitcode$ cat ReadMe
- hello bit
- hello git
- hello world
- hello version1
- hello version2
- hello version3
- write aaa for new branch
- hyb@139-159-150-152:~/gitcode$ git add .
- hyb@139-159-150-152:~/gitcode$ git commit -m"modify ReadMe"
- [dev 3740dce] modify ReadMe
- 1 file changed, 1 insertion(+)
现在,dev 分⽀的⼯作完成,我们就可以切换回 master 分⽀:
- hyb@139-159-150-152:~/gitcode$ git checkout master
- Switched to branch 'master'
- hyb@139-159-150-152:~/gitcode$ cat ReadMe
- hello bit
- hello git
- hello world
- hello version1
- hello version2
- hello version3
切换回 master 分⽀后,发现ReadMe⽂件中新增的内容不⻅了!!!赶紧再切回 dev 看看:
- hyb@139-159-150-152:~/gitcode$ git checkout dev
- Switched to branch 'dev'
- hyb@139-159-150-152:~/gitcode$ cat ReadMe
- hello bit
- hello git
- hello world
- hello version1
- hello version2
- hello version3
- write aaa for new branch
在 dev 分⽀上,内容还在。为什么会出现这个现象呢?我们来看看 dev 分⽀和 master 分⽀指向,发 现两者指向的提交是不⼀样的:
- hyb@139-159-150-152:~/gitcode$ cat .git/refs/heads/dev
- bdaf528ffbb8e05aee34d37685408f0e315e31a4
- hyb@139-159-150-152:~/gitcode$ cat .git/refs/heads/master
- 5476bdeb12510f7cd72ac4766db7988925ebd302
看到这⾥就能明⽩了,因为我们是在dev分⽀上提交的,⽽master分⽀此刻的提交点并没有变,此时 的状态如图如下所⽰。
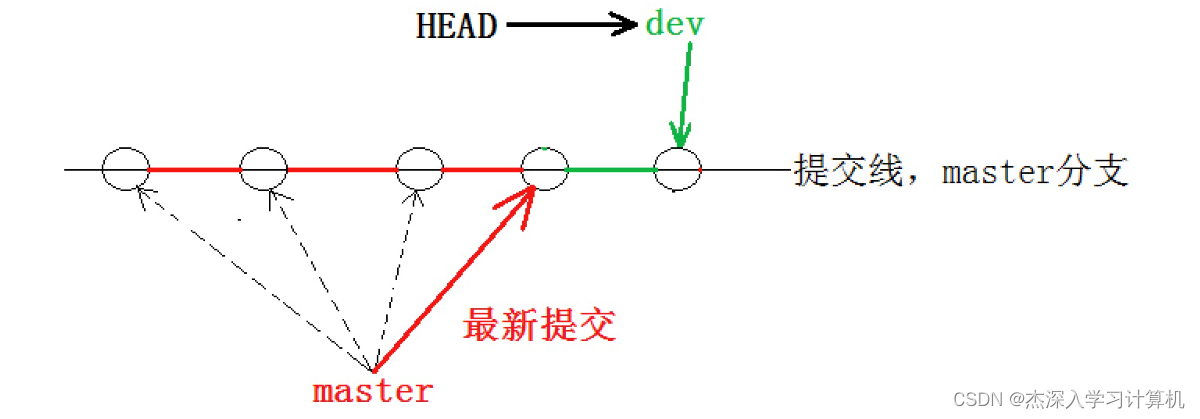
当切换到 master 分⽀之时,HEAD 就指向了 master,当然看不到提交了!
合并分⽀
为了在 master 主分⽀上能看到新的提交,就需要将 dev 分⽀合并到 master 分⽀,⽰例如下:
- hyb@139-159-150-152:~/gitcode$ git branch
- * dev
- master
- hyb@139-159-150-152:~/gitcode$ git checkout master # 切换到 master 上进⾏合并
- Switched to branch 'master'
- hyb@139-159-150-152:~/gitcode$ git merge dev # 合并 dev 分⽀
- Updating 16623e1..3740dce
- Fast-forward
- ReadMe | 1 +
- 1 file changed, 1 insertion(+)
- hyb@139-159-150-152:~/gitcode$ cat ReadMe
- hello bit
- hello git
- hello world
- hello version1
- hello version2
- hello version3
- write aaa for new branch
git merge 命令⽤于合并指定分⽀到当前分⽀。合并后,master 就能看到 dev 分⽀提交的内容 了。此时的状态如图如下所⽰
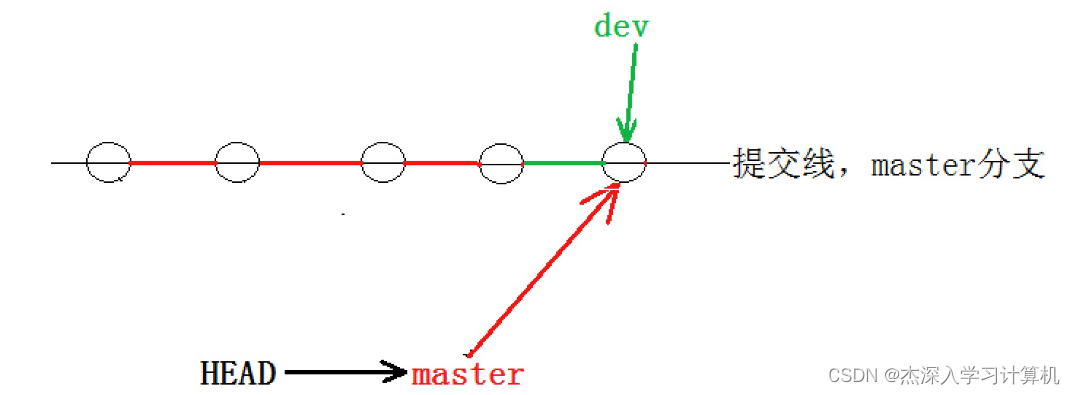
Fast-forward 代表“快进模式”,也就是直接把master指向dev的当前提交,所以合并速度⾮常快。 当然,也不是每次合并都能 Fast-forward,我们后⾯会讲其他⽅式的合并。
删除分⽀
合并完成后, dev 分⽀对于我们来说就没⽤了, 那么dev分⽀就可以被删除掉,注意如果当前正处于某 分⽀下,就不能删除当前分⽀,如:
- hyb@139-159-150-152:~/gitcode$ git branch
- * dev
- master
- hyb@139-159-150-152:~/gitcode$ git branch -d dev
- error: Cannot delete branch 'dev' checked out at '/home/hyb/gitcode'
⽽可以在其他分⽀下删除当前分⽀,如:
- hyb@139-159-150-152:~/gitcode$ git checkout master
- Switched to branch 'master'
- hyb@139-159-150-152:~/gitcode$ git branch -d dev
- Deleted branch dev (was bdaf528).
- hyb@139-159-150-152:~/gitcode$ git branch
- * master
此时的状态如图如下所⽰。
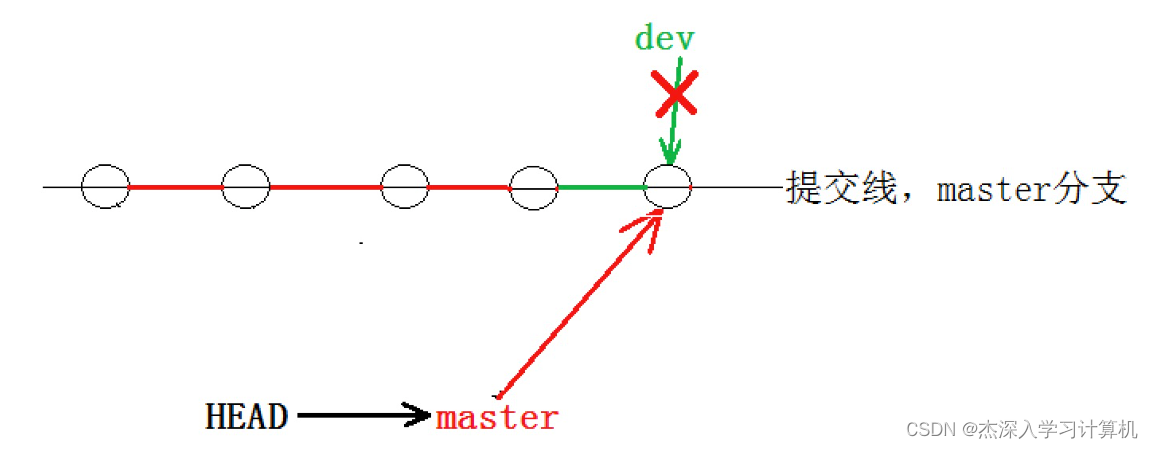
因为创建、合并和删除分⽀⾮常快,所以Git⿎励你使⽤分⽀完成某个任务,合并后再删掉分⽀,这和 直接在master分⽀上⼯作效果是⼀样的,但过程更安全。
合并冲突
可是,在实际分⽀合并的时候,并不是想合并就能合并成功的,有时候可能会遇到代码冲突的问题。 为了演⽰这问题,创建⼀个新的分⽀ dev1 ,并切换⾄⽬标分⽀,我们可以使⽤ git checkout - b dev1 ⼀步完成创建并切换的动作,⽰例如下:
- hyb@139-159-150-152:~/gitcode$ git checkout -b dev1
- Switched to a new branch 'dev1'
- hyb@139-159-150-152:~/gitcode$ git branch
- * dev1
- master
在 dev1 分⽀下修改 ReadMe ⽂件,更改⽂件内容如下,并进⾏⼀次提交,如:
- hyb@139-159-150-152:~/gitcode$ cat ReadMe
- hello bit
- hello git
- hello world
- hello version1
- hello version2
- hello version3
- write bbb for new branch # 将 aaa 该为 bbb
- hyb@139-159-150-152:~/gitcode$ git add .
- hyb@139-159-150-152:~/gitcode$ git commit -m"modify ReadMe"
- [dev1 0854245] modify ReadMe
- 1 file changed, 1 insertion(+), 1 deletion(-)
切换⾄ master 分⽀,观察 ReadMe ⽂件内容:
- hyb@139-159-150-152:~/gitcode$ git checkout master
- Switched to branch 'master'
- hyb@139-159-150-152:~/gitcode$ cat ReadMe
- hello bit
- hello git
- hello world
- hello version1
- hello version2
- hello version3
- write aaa for new branch
我们发现,切回来之后,⽂件内容由变成了⽼的版本,这种现象很正常,我们现在也完全能理解。 此时在 master 分⽀上,我们对 ReadMe ⽂件再进⾏⼀次修改,并进⾏提交,如下:
- hyb@139-159-150-152:~/gitcode$ git branch
- dev1
- * master
- hyb@139-159-150-152:~/gitcode$ vim ReadMe
- hyb@139-159-150-152:~/gitcode$ cat ReadMe
- hello bit
- hello git
- hello world
- hello version1
- hello version2
- hello version3
- write ccc for new branch
- hyb@139-159-150-152:~/gitcode$ git add .
- hyb@139-159-150-152:~/gitcode$ git commit -m"modify ReadMe"
- [master c10f6d0] modify ReadMe
- 1 file changed, 1 insertion(+), 1 deletion(-)
现在, master 分⽀和 dev1 分⽀各⾃都分别有新的提交,变成了这样:

这种情况下,Git 只能试图把各⾃的修改合并起来,但这种合并就可能会有冲突,如下所⽰:
- hyb@139-159-150-152:~/gitcode$ git merge dev1
- Auto-merging ReadMe
- CONFLICT (content): Merge conflict in ReadMe
- Automatic merge failed; fix conflicts and then commit the result.
- hyb@139-159-150-152:~/gitcode$ git status
- On branch master
- You have unmerged paths.
- (fix conflicts and run "git commit")
- (use "git merge --abort" to abort the merge)
- Unmerged paths:
- (use "git add
..." to mark resolution) - both modified: ReadMe
- no changes added to commit (use "git add" and/or "git commit -a")
发现 ReadMe ⽂件有冲突后,可以直接查看⽂件内容,要说的是 Git 会⽤ >>>>>> 来标记出不同分⽀的冲突内容,如下所⽰:
- hyb@139-159-150-152:~/gitcode$ cat ReadMe
- hello bit
- hello git
- hello world
- hello version1
- hello version2
- hello version3
- <<<<<<< HEAD
- write ccc for new branch
- =======
- write bbb for new branch
- >>>>>>> dev1
此时我们必须要⼿动调整冲突代码,并需要再次提交修正后的结果!!(再次提交很重要,切勿忘 记)
- hyb@139-159-150-152:~/gitcode$ cat ReadMe
- hello bit
- hello git
- hello world
- hello version1
- hello version2
- hello version3
- write bbb for new branch
- hyb@139-159-150-152:~/gitcode$ git add .
- hyb@139-159-150-152:~/gitcode$ git commit -m"merge ReadMe"
- [master 2976afc] merge ReadMe
到这⾥冲突就解决完成,此时的状态变成了

⽤带参数的 git log也可以看到分⽀的合并情况,具体⼤家可以⾃⾏搜索 git log 的⽤法:
- hyb@139-159-150-152:~/gitcode$ git log --graph --pretty=oneline --abbrev-commit
- * 2976afc (HEAD -> master) merge ReadMe
- |\
- | * c594fd1 (dev1) modify ReadMe
- * | c10f6d0 modify ReadMe
- |/
最后,不要忘记 dev1 分⽀使⽤完毕后就可以删除了:
- hyb@139-159-150-152:~/gitcode$ git branch
- * master
- hyb@139-159-150-152:~/gitcode$ git branch -d dev1
- Deleted branch dev1 (was c594fd1).
分⽀管理策略
通常合并分⽀时,如果可能,Git 会采⽤ Fast forward 模式。还记得如果我们采⽤ Fast forward 模式之后,形成的合并结果是什么呢?回顾⼀下
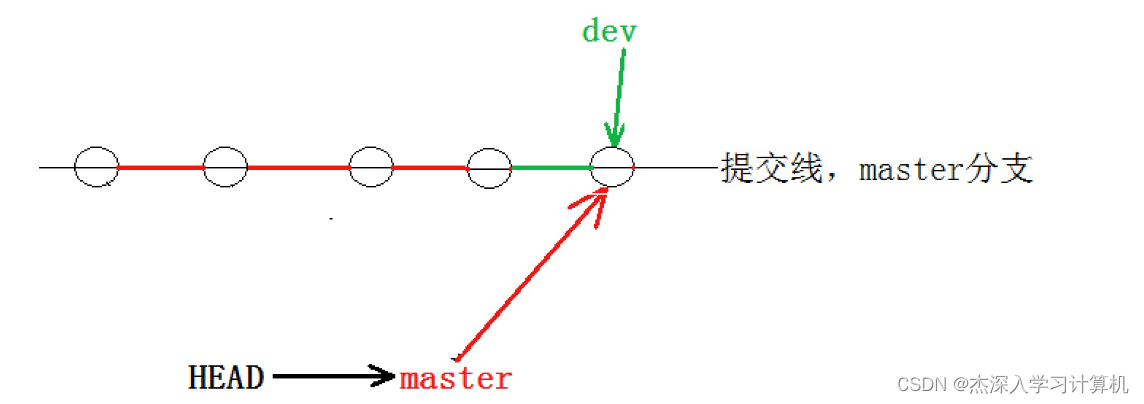
在这种 Fast forward 模式下,删除分⽀后,查看分⽀历史时,会丢掉分⽀信息,看不出来最新提 交到底是 merge 进来的还是正常提交的。
但在合并冲突部分,我们也看到通过解决冲突问题,会再进⾏⼀次新的提交,得到的最终状态为:

那么这就不是 Fast forward 模式了,这样的好处是,从分⽀历史上就可以看出分⽀信息。例如我 们现在已经删除了在合并冲突部分创建的 dev1 分⽀,但依旧能看到 master 其实是由其他分⽀合并 得到:
- hyb@139-159-150-152:~/gitcode$ git log --graph --pretty=oneline --abbrev-commit
- * 2976afc (HEAD -> master) merge ReadMe
- |\
- | * c594fd1 modify ReadMe
- * | c10f6d0 modify ReadMe
- |/
Git ⽀持我们强制禁⽤ Fast forward 模式,那么就会在 merge 时⽣成⼀个新的 commit ,这样, 从分⽀历史上就可以看出分⽀信息。
下⾯我们实战⼀下 --no-ff ⽅式的 git merge 。⾸先,创建新的分⽀ dev2 ,并切换⾄新的分⽀
- hyb@139-159-150-152:~/gitcode$ git checkout -b dev2
- Switched to a new branch 'dev2'
修改 ReadMe ⽂件,并提交⼀个新的 commit :
- hyb@139-159-150-152:~/gitcode$ cat ReadMe
- hello bit
- hello git
- hello world
- hello version1
- hello version2
- hello version3
- write bbb for new branch
- a,b,c,d
- hyb@139-159-150-152:~/gitcode$ git add .
- hyb@139-159-150-152:~/gitcode$ git commit -m"modify ReadMe"
- [dev2 41b082f] modify ReadMe
- 1 file changed, 1 insertion(+)
切回 master 分⽀,开始合并:
- hyb@139-159-150-152:~/gitcode$ git checkout master
- Switched to branch 'master'
- hyb@139-159-150-152:~/gitcode$ git merge --no-ff -m "merge with no-ff" dev2
- Merge made by the 'recursive' strategy.
- ReadMe | 1 +
- 1 file changed, 1 insertion(+)
- hyb@139-159-150-152:~/gitcode$ cat ReadMe
- hello bit
- hello git
- hello world
- hello version1
- hello version2
- hello version3
- write bbb for new branch
- a,b,c,d
请注意 --no-ff 参数,表⽰禁⽤ Fast forward 模式。禁⽤ Fast forward 模式后合并会创建 ⼀个新的 commit ,所以加上 -m 参数,把描述写进去。
合并后,查看分⽀历史:
- hyb@139-159-150-152:~/gitcode$ git log --graph --pretty=oneline --abbrev-commit
- * 5bd16b4 (HEAD -> master) merge with no-ff
- |\
- | * 41b082f (dev2) modify ReadMe
- |/
可以看到,不使⽤ Fast forward 模式,merge后就像这样:
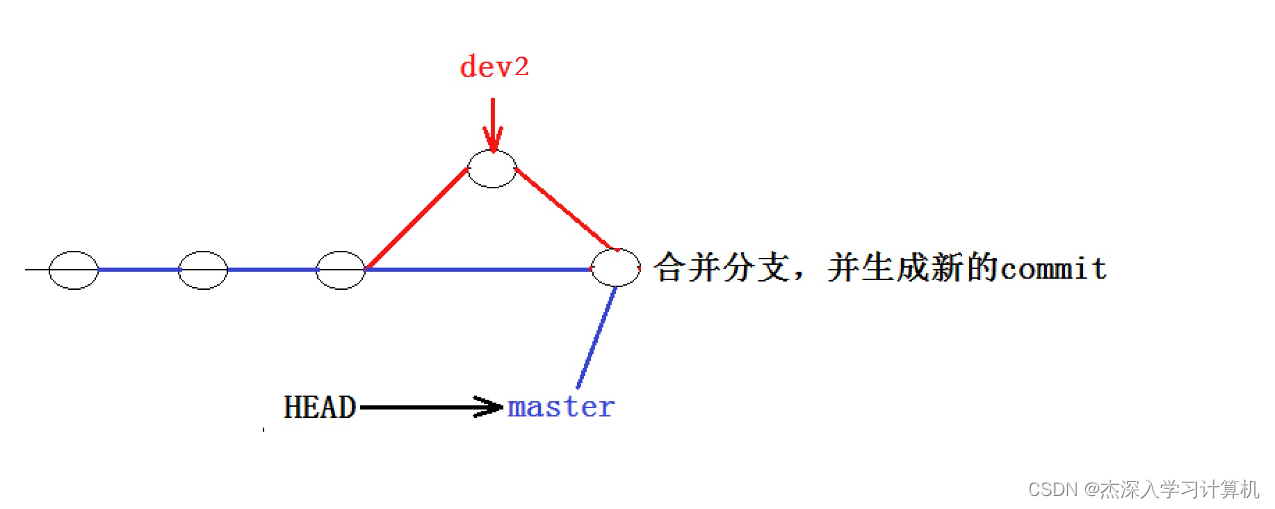
所以在合并分⽀时,加上 --no-ff 参数就可以⽤普通模式合并,合并后的历史有分⽀,能看出来曾 经做过合并,⽽ fast forward 合并就看不出来曾经做过合并。
分⽀策略
在实际开发中,我们应该按照⼏个基本原则进⾏分⽀管理:
⾸先,master分⽀应该是⾮常稳定的,也就是仅⽤来发布新版本,平时不能在上⾯⼲活;
那在哪⼲活呢?⼲活都在dev分⽀上,也就是说,dev分⽀是不稳定的,到某个时候,⽐如1.0版本发布 时,再把dev分⽀合并到master上,在master分⽀发布1.0版本;
你和你的⼩伙伴们每个⼈都在dev分⽀上⼲活,每个⼈都有⾃⼰的分⽀,时不时地往dev分⽀上合并就 可以了。
所以,团队合作的分⽀看起来就像这样:

bug 分⽀
假如我们现在正在 dev2 分⽀上进⾏开发,开发到⼀半,突然发现 master 分⽀上⾯有 bug,需要 解决。在Git中,每个 bug 都可以通过⼀个新的临时分⽀来修复,修复后,合并分⽀,然后将临时分⽀ 删除。
可现在 dev2 的代码在⼯作区中开发了⼀半,还⽆法提交,怎么办?例如:
- hyb@139-159-150-152:~/gitcode$ git branch
- * dev2
- master
- hyb@139-159-150-152:~/gitcode$ cat ReadMe
- hello bit
- hello git
- hello world
- hello version1
- hello version2
- hello version3
- write bbb for new branch
- a,b,c,d
- i am coding ...
- hyb@139-159-150-152:~/gitcode$ git status
- On branch dev2
- Changes not staged for commit:
- (use "git add
..." to update what will be committed) - (use "git restore
..." to discard changes in working directory) - modified: ReadMe
- no changes added to commit (use "git add" and/or "git commit -a")
Git 提供了 git stash 命令,可以将当前的⼯作区信息进⾏储藏,被储藏的内容可以在将来某个时 间恢复出来。
- hyb@139-159-150-152:~/gitcode$ git stash
- Saved working directory and index state WIP on dev2: 41b082f modify ReadMe
- hyb@139-159-150-152:~/gitcode$ git status
- On branch dev2
- nothing to commit, working tree clean
⽤ git status 查看⼯作区,就是⼲净的(除⾮有没有被 Git 管理的⽂件),因此可以放⼼地创建分 ⽀来修复bug。
储藏 dev2 ⼯作区之后,由于我们要基于master分⽀修复 bug,所以需要切回 master 分⽀,再新 建临时分⽀来修复 bug,⽰例如下:
- hyb@139-159-150-152:~/gitcode$ git checkout master # 切回master
- Switched to branch 'master'
- hyb@139-159-150-152:~/gitcode$ git checkout -b fix_bug # 新建并切换到 fix_bug 分⽀
- Switched to a new branch 'fix_bug'
- hyb@139-159-150-152:~/gitcode$ vim ReadMe
- hyb@139-159-150-152:~/gitcode$ cat ReadMe
- hello bit
- hello git
- hello world
- hello version1
- hello version2
- hello version3
- write bbb for new branch
- a,b,c,d,e # 修复bug--忘记写e
- hyb@139-159-150-152:~/gitcode$ git add ReadMe # 重新add,commit
- hyb@139-159-150-152:~/gitcode$ git commit -m"fix bug"
- [fix_bug 4bbc0c4] fix bug
- 1 file changed, 1 insertion(+), 1 deletion(-)
修复完成后,切换到 master 分⽀,并完成合并,最后删除 fix_bug 分⽀:
- hyb@139-159-150-152:~/gitcode$ git checkout master
- Switched to branch 'master'
- hyb@139-159-150-152:~/gitcode$ git merge --no-ff -m"merge fix_bug branch" fix_bu
- Merge made by the 'recursive' strategy.
- ReadMe | 2 +-
- 1 file changed, 1 insertion(+), 1 deletion(-)
- hyb@139-159-150-152:~/gitcode$ cat ReadMe
- hello bit
- hello git
- hello world
- hello version1
- hello version2
- hello version3
- write bbb for new branch
- a,b,c,d,e
- hyb@139-159-150-152:~/gitcode$ git branch -d fix_bug
- Deleted branch fix_bug (was 4bbc0c4).
⾄此,bug 的修复⼯作已经做完了,我们还要继续回到 dev2 分⽀进⾏开发。切换回 dev2 分⽀:
- hyb@139-159-150-152:~/gitcode$ git checkout dev2
- Switched to branch 'dev2'
- hyb@139-159-150-152:~/gitcode$ git status
- On branch dev2
- nothing to commit, working tree clean
⼯作区是⼲净的,刚才的⼯作现场存到哪去了?⽤ git stash list 命令看看:
- hyb@139-159-150-152:~/gitcode$ git stash list
- stash@{0}: WIP on dev2: 41b082f modify ReadMe
⼯作现场还在,Git 把 stash 内容存在某个地⽅了,但是需要恢复⼀下,如何恢复现场呢?我们可以使 ⽤ git stash pop 命令,恢复的同时会把 stash 也删了,⽰例如下:
- hyb@139-159-150-152:~/gitcode$ git stash pop
- On branch dev2
- Changes not staged for commit:
- (use "git add
..." to update what will be committed) - (use "git restore
..." to discard changes in working directory) - modified: ReadMe
- no changes added to commit (use "git add" and/or "git commit -a")
- Dropped refs/stash@{0} (4f873250b3503687b5efd26196776aee7e3724c2)
再次查看的时候,我们已经发现已经没有现场可以恢复了
- hyb@139-159-150-152:~/gitcode$ git stash list
- hyb@139-159-150-152:~/gitcode$
另外,恢复现场也可以采⽤ git stash apply 恢复,但是恢复后,stash内容并不删除,你需要 ⽤ git stash drop 来删除;
你可以多次stash,恢复的时候,先⽤ git stash list 查看,然后恢复指定的stash,⽤命令 git stash apply stash@{0}
恢复完代码之后我们便可以继续完成开发,开发完成后便可以进⾏提交,例如:
- hyb@139-159-150-152:~/gitcode$ cat ReadMe
- hello bit
- hello git
- hello world
- hello version1
- hello version2
- hello version3
- write bbb for new branch
- a,b,c,d
- i am coding ... Done!
- hyb@139-159-150-152:~/gitcode$ git add .
- hyb@139-159-150-152:~/gitcode$ git commit -m"modify ReadMe"
- [dev2 ed0916d] modify ReadMe
- 1 file changed, 1 insertion(+)
但我们注意到了,修复 bug 的内容,并没有在 dev2 上显⽰。此时的状态图为:
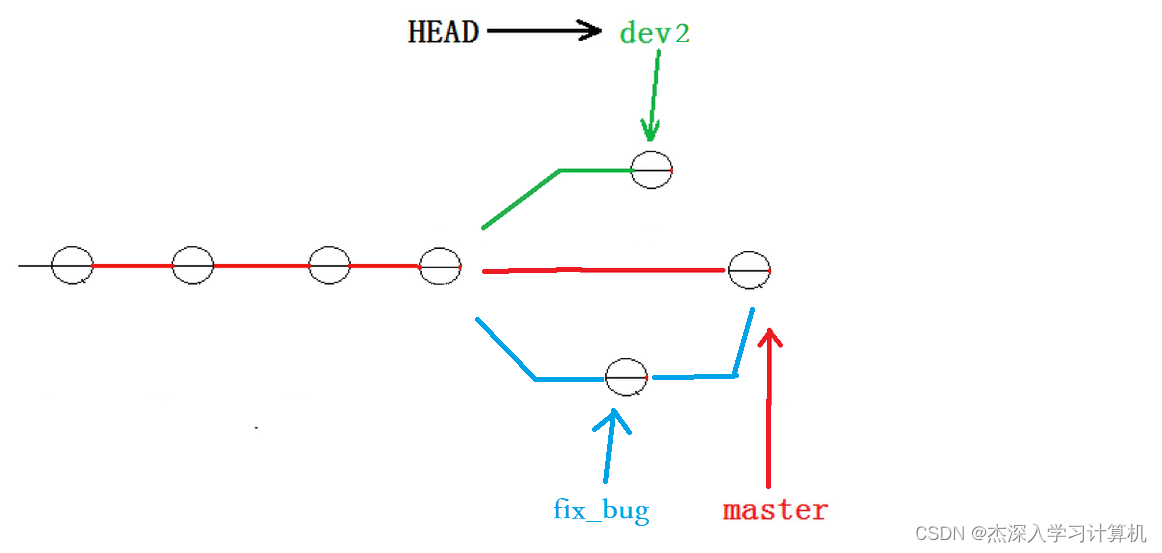
Master 分⽀⽬前最新的提交,是要领先于新建 dev2 时基于的 master 分⽀的提交的,所以我们 在 dev2 中当然看不⻅修复 bug 的相关代码。
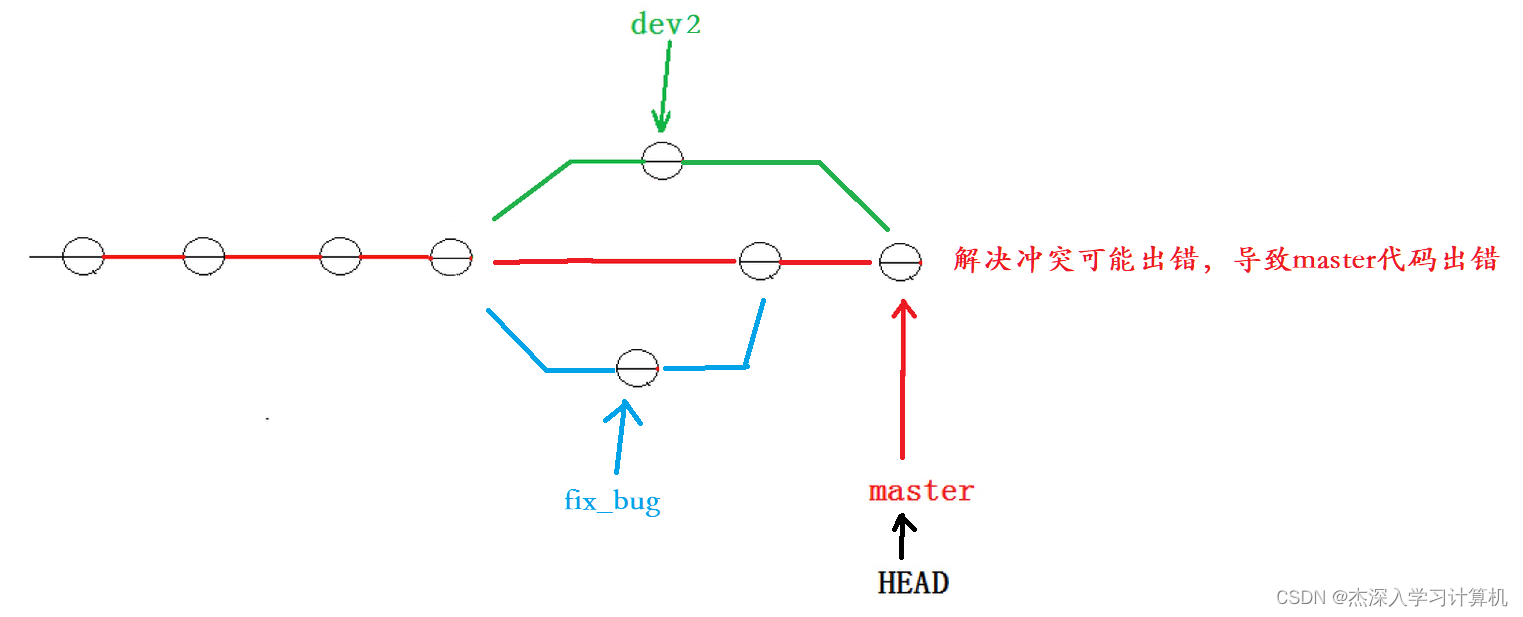
我们的最终⽬的是要让 master 合并 dev2 分⽀的,那么正常情况下我们切回 master 分⽀直接合 并即可,但这样其实是有⼀定⻛险的。
是因为在合并分⽀时可能会有冲突,⽽代码冲突需要我们⼿动解决(在 master 上解决)。我们⽆法 保证对于冲突问题可以正确地⼀次性解决掉,因为在实际的项⽬中,代码冲突不只⼀两⾏那么简单, 有可能⼏⼗上百⾏,甚⾄更多,解决的过程中难免⼿误出错,导致错误的代码被合并到 master 上。 此时的状态为:
解决这个问题的⼀个好的建议就是:最好在⾃⼰的分⽀上合并下 master ,再让 master 去合并 dev ,这样做的⽬的是有冲突可以在本地分⽀解决并进⾏测试,⽽不影响 master 。此时的状态 为:
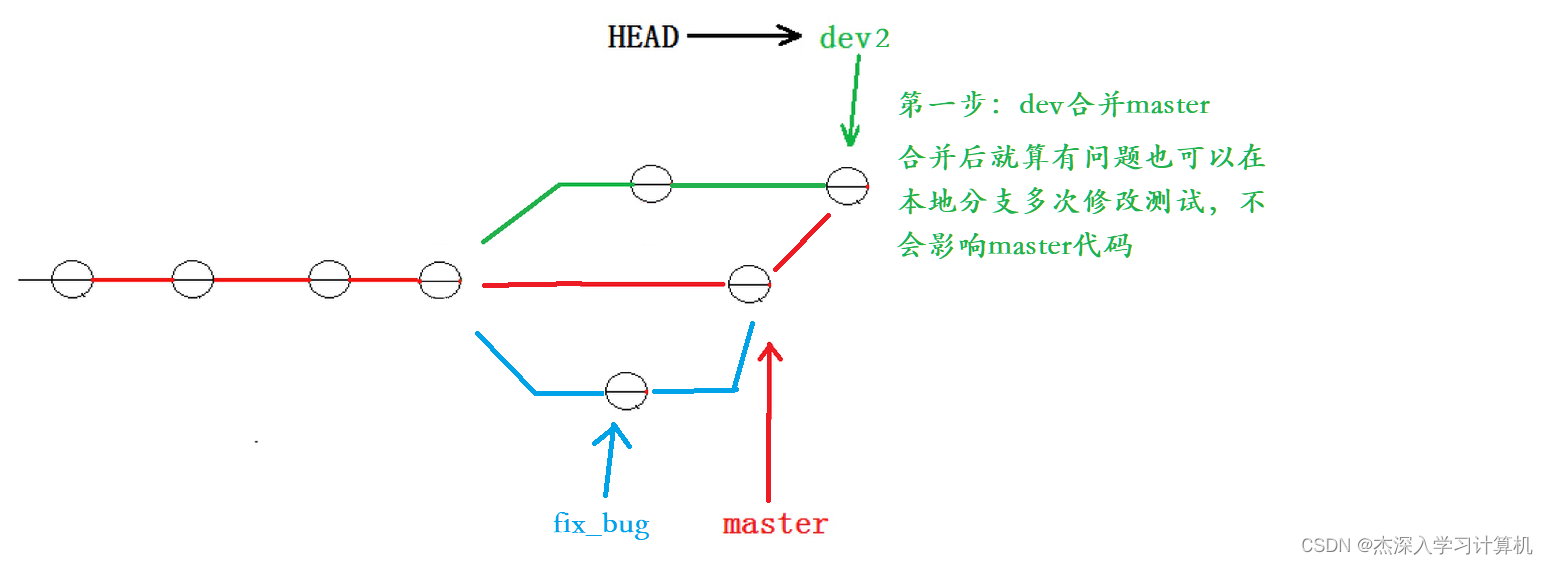

对应的实操演⽰如下,要说明的是,以下演⽰的merge操作,没有使⽤ --no-ff ,但上述的图⽰是 禁⽤ Fast forward 了模式后得出的,主要是为了⽅便解释问题。
# dev 合并 master
- hyb@139-159-150-152:~/gitcode$ git branch
- * dev2
- master
- hyb@139-159-150-152:~/gitcode$ git merge master
- Auto-merging ReadMe
- CONFLICT (content): Merge conflict in ReadMe
- Automatic merge failed; fix conflicts and then commit the result.
# 发⽣冲突
- hyb@139-159-150-152:~/gitcode$ cat ReadMe
- hello bit
- hello git
- hello world
- hello version1
- hello version2
- hello version3
- write bbb for new branch
- <<<<<<< HEAD
- a,b,c,d
- i am coding ... Done!
- =======
- a,b,c,d,e
- >>>>>>> master
# 解决冲突并重新提交
- hyb@139-159-150-152:~/gitcode$ vim ReadMe
- hyb@139-159-150-152:~/gitcode$ cat ReadMe
- hello bit
- hello git
- hello world
- hello version1
- hello version2
- hello version3
- write bbb for new branch
- a,b,c,d,e
- i am coding ... Done!
- hyb@139-159-150-152:~/gitcode$ git add .
- hyb@139-159-150-152:~/gitcode$ git commit -m"merge master"
- [dev2 447d29f] merge master
- hyb@139-159-150-152:~/gitcode$ git status
- On branch dev2
- nothing to commit, working tree clean
# 切回master
- hyb@139-159-150-152:~/gitcode$ git checkout master
- Switched to branch 'master'
# master 合并 dev2---⽆需解决冲突!!
- hyb@139-159-150-152:~/gitcode$ git merge dev2
- Updating 193421f..447d29f
- Fast-forward
- ReadMe | 1 +
- 1 file changed, 1 insertion(+)
- hyb@139-159-150-152:~/gitcode$ git status
- On branch master
- nothing to commit, working tree clean
# 删除 dev2 分⽀
- hyb@139-159-150-152:~/gitcode$ git branch -d dev2
- Deleted branch dev2 (was 447d29f).
删除临时分⽀
软件开发中,总有⽆穷⽆尽的新的功能要不断添加进来。
添加⼀个新功能时,你肯定不希望因为⼀些实验性质的代码,把主分⽀搞乱了,所以,每添加⼀个新 功能,最好新建⼀个分⽀,我们可以将其称之为 feature 分⽀,在上⾯开发,完成后,合并,最 后,删除该 feature 分⽀。
可是,如果我们今天正在某个 feature 分⽀上开发了⼀半,被产品经理突然叫停,说是要停⽌新功 能的开发。虽然⽩⼲了,但是这个 feature 分⽀还是必须就地销毁,留着⽆⽤了。这时使⽤传统 的 git branch -d 命令删除分⽀的⽅法是不⾏的。演⽰如下:
- # 新增并切换到 dev3 分⽀
- hyb@139-159-150-152:~/gitcode$ git checkout -b dev3
- Switched to a new branch 'dev3'
- # 开始开发新功能并提交
- hyb@139-159-150-152:~/gitcode$ vim ReadMe
- hyb@139-159-150-152:~/gitcode$ cat ReadMe
- hello bit
- hello git
- hello world
- hello version1
- hello version2
- hello version3
- write bbb for new branch
- a,b,c,d,e
- i am coding ... Done!
- i am writing new features ...
- hyb@139-159-150-152:~/gitcode$ git add .
- hyb@139-159-150-152:~/gitcode$ git commit -m"modify ReadMe for new features"
- [dev3 cd2f149] modify ReadMe for new features
- 1 file changed, 1 insertion(+)
- # 此时新功能叫停
- # 切回master准备删除dev3
- hyb@139-159-150-152:~/gitcode$ git checkout master
- Switched to branch 'master'
- # 常规删除dev3分⽀时失败
- hyb@139-159-150-152:~/gitcode$ git branch -d dev3
- error: The branch 'dev3' is not fully merged.
- If you are sure you want to delete it, run 'git branch -D dev3'.
直接使⽤传统的删除分⽀的⽅法不⾏,按照提⽰,有了如下⽅式:
- hyb@139-159-150-152:~/gitcode$ git branch -D dev3
- Deleted branch dev3 (was cd2f149).
- hyb@139-159-150-152:~/gitcode$ git branch
- * master
小结
分⽀在实际中有什么⽤呢?假设你准备开发⼀个新功能,但是需要两周才能完成,第⼀周你写了50% 的代码,如果⽴刻提交,由于代码还没写完,不完整的代码库会导致别⼈不能⼲活了。如果等代码全 部写完再⼀次提交,⼜存在丢失每天进度的巨⼤⻛险。
现在有了分⽀,就不⽤怕了。你创建了⼀个属于你⾃⼰的分⽀,别⼈看不到,还继续在原来的分⽀上 正常⼯作,⽽你在⾃⼰的分⽀上⼲活,想提交就提交,直到开发完毕后,再⼀次性合并到原来的分⽀ 上,这样,既安全,⼜不影响别⼈⼯作。
并且 Git ⽆论创建、切换和删除分⽀,Git在1秒钟之内就能完成!⽆论你的版本库是1个⽂件还是1万个 ⽂件。
-
相关阅读:
IOday7
Windows10/11开启文件系统对大小写敏感
Android 11适配
Flink+Flink CDC版本升级的依赖问题总结
ViewConfiguration
线程纵横:C++并发编程的深度解析与实践
轻量级消息队列 Django-Q 轻度体验
网站自动翻译-网站批量自动翻译-网站免费翻译导出
c++八股文:c++面向对象
C语言小游戏之扫雷(万字详解)
- 原文地址:https://blog.csdn.net/zxj20041003/article/details/132947661
