-
竞赛 基于机器视觉的银行卡识别系统 - opencv python
1 前言
🔥 优质竞赛项目系列,今天要分享的是
基于深度学习的银行卡识别算法设计
该项目较为新颖,适合作为竞赛课题方向,学长非常推荐!
🧿 更多资料, 项目分享:
https://gitee.com/dancheng-senior/postgraduate
2 算法设计流程
银行卡卡号识别技术原理是先对银行卡图像定位,保障获取图像绝对位置后,对图像进行字符分割,然后将分割完成的信息与模型进行比较,从而匹配出与其最相似的数字。主要流程图如图

1.银行卡号图像
由于银行卡卡号信息涉及个人隐私,作者很难在短时间内获取大量的银行卡进行测试和试验,本文即采用作者个人及模拟银行卡进行卡号识别测试。2.图像预处理
图像预处理是在获取图像后必须优先进行的技术性处理工作,先对银行卡卡号图像进行色彩处理,具体做法与流程是先将图像灰度化,去掉图像识别上无用的信息,然后利用归一化只保留有效的卡号信息区域。3.字符分割
字符分割是在对图像进行预处理后,在获取有效图像后对有效区域进行进一步细化处理,将图像分割为最小识别字符单元。4.字符识别
字符识别是在对银行卡卡号进行字符分割后,利用图像识别技术来对字符进行分析和匹配,本文作者利用的模板匹配方法。2.1 颜色空间转换
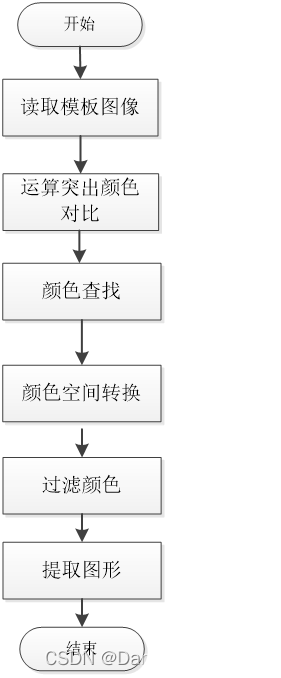
由于银行卡卡号识别与颜色无关,所以银行卡颜色是一个无用因素,我们在图像预处理环节要先将其过滤掉。另外,图像处理中还含有颜色信息,不仅会造成空间浪费,增加运算量,降低系统的整体效率,还会给以后的图像分析和处理带来干扰。因此,有必要利用灰度处理来滤除颜色信息。
灰度处理的实质是将颜色信息转化为亮度信息,即将原始的三维颜色信息还原为一维亮度信息。灰度化的思想是用灰度值g来表示原始彩色图像的R(绿色)、g(红色)和B(蓝色)分量的值,具体的流程设计如图

2.2 边缘切割
对于采集到的银行卡号图像,由于背景图案的多样性和卡号字体的不同,无法直接对卡号图像进行分割。分割前要准确定位卡号,才能得到有效区域。数字字符所在的区域有许多像素。根据该特征,通过设置阈值来确定原始图像中卡号图像的区域。银行卡图像的切边处理设计如图

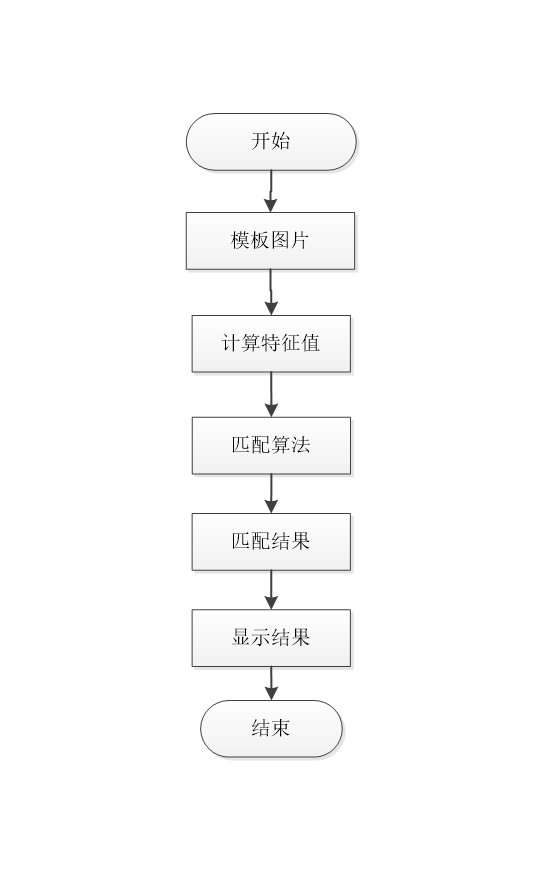
2.3 模板匹配
模板匹配是一种将需要识别的字符与已有固定模板进行匹配的算法技术,该技术是将已经切割好的字符图像逐个与模板数字图像进行对比分析,其原理就是通过数字相似度来衡量两个字符元素,将目标字符元素逐个与模板数字图像进行匹配,找到最接近的数字元素即可。匹配计算量随特征级别的增加而减少。根据第一步得到的特征,选择第二种相关计算方法来解决图像匹配问题。银行卡模板匹配流程设计如图

2.4 卡号识别
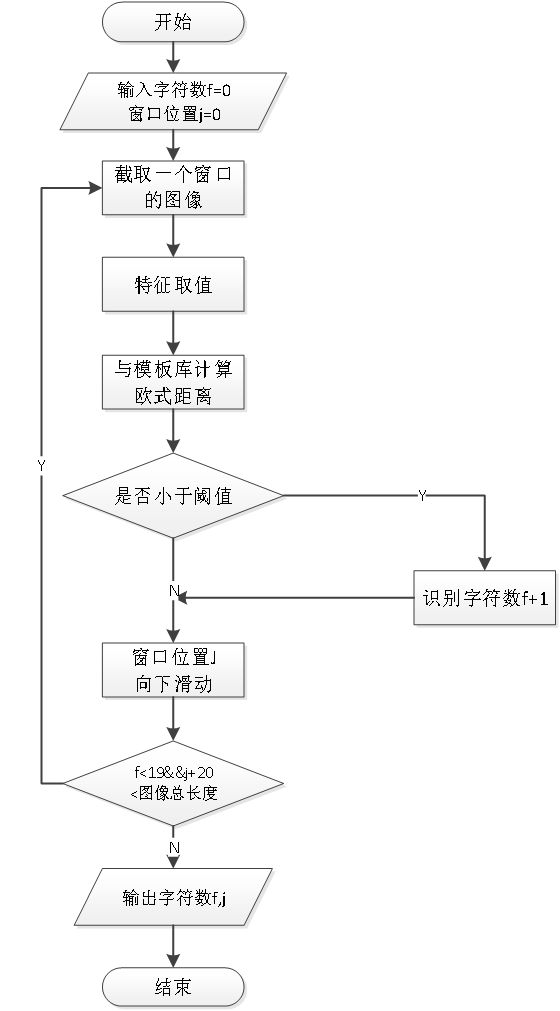
银行卡卡号识别有其独有的特性,因为目前市面上大多数银行卡卡号是凹凸不平的数字形式,如果使用传统的计算机字符识别技术已显然不适用,本文针对银行卡此类特点,研究了解决此类问题的识别方案。从银行卡待识别的凸凹字符进行预处理,然后根据滑块算法逐个窗口对银行卡字符进行匹配识别,卡号识别一般从切割后的图像最左端开始,设定截图选定框大小为64*48像素,因为银行卡所需要识别的字符一般为45像素左右。故而以此方式循环对卡片上所有数字进行匹配、识别,如果最小值大于设置的阈值,我们将认为这里没有字符,这是一个空白区域,并且不输出字符。同时,窗口位置J向下滑动,输出f<19&&j;+20<图像总长度并判断,最后循环得到字符数f、j。

3 银行卡字符定位 - 算法实现
首先就是将整张银行卡号里面的银行卡号部分进行识别,且分出来,这一个环节学长用的技术就是faster-rcnn的方法
将目标识别部分的银行卡号部门且分出来,进行保存
主程序的代码如下(非完整代码):
#!/usr/bin/env python from __future__ import absolute_import from __future__ import division from __future__ import print_function import argparse import os import cv2 import matplotlib.pyplot as plt import numpy as np import tensorflow as tf from lib.config import config as cfg from lib.utils.nms_wrapper import nms from lib.utils.test import im_detect from lib.nets.vgg16 import vgg16 from lib.utils.timer import Timer os.environ["CUDA_VISIBLE_DEVICES"] = '0' #指定第一块GPU可用 config = tf.ConfigProto() config.gpu_options.per_process_gpu_memory_fraction = 0.8 # 程序最多只能占用指定gpu50%的显存 config.gpu_options.allow_growth = True #程序按需申请内存 sess = tf.Session(config = config) CLASSES = ('__background__','lb') NETS = {'vgg16': ('vgg16_faster_rcnn_iter_70000.ckpt',), 'res101': ('res101_faster_rcnn_iter_110000.ckpt',)} DATASETS = {'pascal_voc': ('voc_2007_trainval',), 'pascal_voc_0712': ('voc_2007_trainval+voc_2012_trainval',)} def vis_detections(im, class_name, dets, thresh=0.5): """Draw detected bounding boxes.""" inds = np.where(dets[:, -1] >= thresh)[0] if len(inds) == 0: return im = im[:, :, (2, 1, 0)] fig, ax = plt.subplots(figsize=(12, 12)) ax.imshow(im, aspect='equal') sco=[] for i in inds: score = dets[i, -1] sco.append(score) maxscore=max(sco) # print(maxscore)成绩最大值 for i in inds: # print(i) score = dets[i, -1] if score==maxscore: bbox = dets[i, :4] # print(bbox)#目标框的4个坐标 img = cv2.imread("data/demo/"+filename) # img = cv2.imread('data/demo/000002.jpg') sp=img.shape width = sp[1] if bbox[0]>20 and bbox[2]+20<width: cropped = img[int(bbox[1]):int(bbox[3]), int(bbox[0]-20):int(bbox[2])+20] # 裁剪坐标为[y0:y1, x0:x1] if bbox[0]<20 and bbox[2]+20<width: cropped = img[int(bbox[1]):int(bbox[3]), int(bbox[0]):int(bbox[2])+20] # 裁剪坐标为[y0:y1, x0:x1] if bbox[0] > 20 and bbox[2] + 20 > width: cropped = img[int(bbox[1]):int(bbox[3]), int(bbox[0] - 20):int(bbox[2])] # 裁剪坐标为[y0:y1, x0:x1] path = 'cut1/' # 重定义图片的大小 res = cv2.resize(cropped, (1000, 100), interpolation=cv2.INTER_CUBIC) # dsize=(2*width,2*height) cv2.imwrite(path+str(i)+filename, res) ax.add_patch(plt.Rectangle((bbox[0], bbox[1]), bbox[2] - bbox[0], bbox[3] - bbox[1], fill=False, edgecolor='red', linewidth=3.5) ) ax.text(bbox[0], bbox[1] - 2, '{:s} {:.3f}'.format(class_name, score), bbox=dict(facecolor='blue', alpha=0.5), fontsize=14, color='white') ax.set_title(('{} detections with ' 'p({} | box) >= {:.1f}').format(class_name, class_name,thresh), fontsize=14) plt.axis('off') plt.tight_layout() plt.draw() def demo(sess, net, image_name): """Detect object classes in an image using pre-computed object proposals.""" # Load the demo image im_file = os.path.join(cfg.FLAGS2["data_dir"], 'demo', image_name) im = cv2.imread(im_file) # Detect all object classes and regress object bounds timer = Timer() timer.tic() scores, boxes = im_detect(sess, net, im) timer.toc() print('Detection took {:.3f}s for {:d} object proposals'.format(timer.total_time, boxes.shape[0])) # Visualize detections for each class CONF_THRESH = 0.1 NMS_THRESH = 0.1 for cls_ind, cls in enumerate(CLASSES[1:]): cls_ind += 1 # because we skipped background cls_boxes = boxes[:, 4 * cls_ind:4 * (cls_ind + 1)] cls_scores = scores[:, cls_ind] # print(cls_scores)#一个300个数的数组 #np.newaxis增加维度 np.hstack将数组拼接在一起 dets = np.hstack((cls_boxes,cls_scores[:, np.newaxis])).astype(np.float32) keep = nms(dets, NMS_THRESH) dets = dets[keep, :] vis_detections(im, cls, dets, thresh=CONF_THRESH) def parse_args(): """Parse input arguments.""" parser = argparse.ArgumentParser(description='Tensorflow Faster R-CNN demo') parser.add_argument('--net', dest='demo_net', help='Network to use [vgg16 res101]', choices=NETS.keys(), default='vgg16') parser.add_argument('--dataset', dest='dataset', help='Trained dataset [pascal_voc pascal_voc_0712]', choices=DATASETS.keys(), default='pascal_voc') args = parser.parse_args() return args if __name__ == '__main__': args = parse_args() # model path demonet = args.demo_net dataset = args.dataset #tfmodel = os.path.join('output', demonet, DATASETS[dataset][0], 'default', NETS[demonet][0]) tfmodel = r'./default/voc_2007_trainval/cut1/vgg16_faster_rcnn_iter_8000.ckpt' # 路径异常提醒 if not os.path.isfile(tfmodel + '.meta'): print(tfmodel) raise IOError(('{:s} not found.\nDid you download the proper networks from ' 'our server and place them properly?').format(tfmodel + '.meta')) # set config tfconfig = tf.ConfigProto(allow_soft_placement=True) tfconfig.gpu_options.allow_growth = True # init session sess = tf.Session(config=tfconfig) # load network if demonet == 'vgg16': net = vgg16(batch_size=1) # elif demonet == 'res101': # net = resnetv1(batch_size=1, num_layers=101) else: raise NotImplementedError net.create_architecture(sess, "TEST", 2, tag='default', anchor_scales=[8, 16, 32]) saver = tf.train.Saver() saver.restore(sess, tfmodel) print('Loaded network {:s}'.format(tfmodel)) # # 文件夹下所有图片进行识别 # for filename in os.listdir(r'data/demo/'): # im_names = [filename] # for im_name in im_names: # print('~~~~~~~~~~~~~~~~~~~~~~~~~~~~~~~~~~~') # print('Demo for data/demo/{}'.format(im_name)) # demo(sess, net, im_name) # # plt.show() # 单一图片进行识别 filename = '0001.jpg' im_names = [filename] for im_name in im_names: print('~~~~~~~~~~~~~~~~~~~~~~~~~~~~~~~~~~~') print('Demo for data/demo/{}'.format(im_name)) demo(sess, net, im_name) plt.show()- 1
- 2
- 3
- 4
- 5
- 6
- 7
- 8
- 9
- 10
- 11
- 12
- 13
- 14
- 15
- 16
- 17
- 18
- 19
- 20
- 21
- 22
- 23
- 24
- 25
- 26
- 27
- 28
- 29
- 30
- 31
- 32
- 33
- 34
- 35
- 36
- 37
- 38
- 39
- 40
- 41
- 42
- 43
- 44
- 45
- 46
- 47
- 48
- 49
- 50
- 51
- 52
- 53
- 54
- 55
- 56
- 57
- 58
- 59
- 60
- 61
- 62
- 63
- 64
- 65
- 66
- 67
- 68
- 69
- 70
- 71
- 72
- 73
- 74
- 75
- 76
- 77
- 78
- 79
- 80
- 81
- 82
- 83
- 84
- 85
- 86
- 87
- 88
- 89
- 90
- 91
- 92
- 93
- 94
- 95
- 96
- 97
- 98
- 99
- 100
- 101
- 102
- 103
- 104
- 105
- 106
- 107
- 108
- 109
- 110
- 111
- 112
- 113
- 114
- 115
- 116
- 117
- 118
- 119
- 120
- 121
- 122
- 123
- 124
- 125
- 126
- 127
- 128
- 129
- 130
- 131
- 132
- 133
- 134
- 135
- 136
- 137
- 138
- 139
- 140
- 141
- 142
- 143
- 144
- 145
- 146
- 147
- 148
- 149
- 150
- 151
- 152
- 153
- 154
- 155
- 156
- 157
- 158
- 159
- 160
- 161
- 162
- 163
- 164
- 165
- 166
- 167
- 168
- 169
- 170
- 171
- 172
- 173
- 174
- 175
- 176
- 177
效果如下:


4 字符分割
将切分出来的图片进行保存,然后就是将其进行切分:
主程序的代码和上面第一步的步骤原理是相同的,不同的就是训练集的不同设置
效果图如下:

5 银行卡数字识别
仅部分代码:
import os import tensorflow as tf from PIL import Image from nets2 import nets_factory import numpy as np import matplotlib.pyplot as plt # 不同字符数量 CHAR_SET_LEN = 10 # 图片高度 IMAGE_HEIGHT = 60 # 图片宽度 IMAGE_WIDTH = 160 # 批次 BATCH_SIZE = 1 # tfrecord文件存放路径 TFRECORD_FILE = r"C:\workspace\Python\Bank_Card_OCR\demo\test_result\tfrecords/1.tfrecords" # placeholder x = tf.placeholder(tf.float32, [None, 224, 224]) os.environ["CUDA_VISIBLE_DEVICES"] = '0' #指定第一块GPU可用 config = tf.ConfigProto() config.gpu_options.per_process_gpu_memory_fraction = 0.5 # 程序最多只能占用指定gpu50%的显存 config.gpu_options.allow_growth = True #程序按需申请内存 sess = tf.Session(config = config) # 从tfrecord读出数据 def read_and_decode(filename): # 根据文件名生成一个队列 filename_queue = tf.train.string_input_producer([filename]) reader = tf.TFRecordReader() # 返回文件名和文件 _, serialized_example = reader.read(filename_queue) features = tf.parse_single_example(serialized_example, features={ 'image' : tf.FixedLenFeature([], tf.string), 'label0': tf.FixedLenFeature([], tf.int64), }) # 获取图片数据 image = tf.decode_raw(features['image'], tf.uint8) # 没有经过预处理的灰度图 image_raw = tf.reshape(image, [224, 224]) # tf.train.shuffle_batch必须确定shape image = tf.reshape(image, [224, 224]) # 图片预处理 image = tf.cast(image, tf.float32) / 255.0 image = tf.subtract(image, 0.5) image = tf.multiply(image, 2.0) # 获取label label0 = tf.cast(features['label0'], tf.int32) return image, image_raw, label0 # 获取图片数据和标签 image, image_raw, label0 = read_and_decode(TFRECORD_FILE) # 使用shuffle_batch可以随机打乱 image_batch, image_raw_batch, label_batch0 = tf.train.shuffle_batch( [image, image_raw, label0], batch_size=BATCH_SIZE, capacity=50000, min_after_dequeue=10000, num_threads=1) # 定义网络结构 train_network_fn = nets_factory.get_network_fn( 'alexnet_v2', num_classes=CHAR_SET_LEN * 1, weight_decay=0.0005, is_training=False) with tf.Session() as sess: # inputs: a tensor of size [batch_size, height, width, channels] X = tf.reshape(x, [BATCH_SIZE, 224, 224, 1]) # 数据输入网络得到输出值 logits, end_points = train_network_fn(X) # 预测值 logits0 = tf.slice(logits, [0, 0], [-1, 10]) predict0 = tf.argmax(logits0, 1) # 初始化 sess.run(tf.global_variables_initializer()) # 载入训练好的模型 saver = tf.train.Saver() saver.restore(sess, '../Cmodels/model/crack_captcha1.model-6000') # saver.restore(sess, '../1/crack_captcha1.model-2500') # 创建一个协调器,管理线程 coord = tf.train.Coordinator() # 启动QueueRunner, 此时文件名队列已经进队 threads = tf.train.start_queue_runners(sess=sess, coord=coord) for i in range(6): # 获取一个批次的数据和标签 b_image, b_image_raw, b_label0 = sess.run([image_batch,image_raw_batch,label_batch0]) # 显示图片 img = Image.fromarray(b_image_raw[0], 'L') plt.imshow(img) plt.axis('off') plt.show() # 打印标签 print('label:', b_label0) # 预测 label0 = sess.run([predict0], feed_dict={x: b_image}) # 打印预测值 print('predict:', label0[0]) # 通知其他线程关闭 coord.request_stop() # 其他所有线程关闭之后,这一函数才能返回 coord.join(threads)- 1
- 2
- 3
- 4
- 5
- 6
- 7
- 8
- 9
- 10
- 11
- 12
- 13
- 14
- 15
- 16
- 17
- 18
- 19
- 20
- 21
- 22
- 23
- 24
- 25
- 26
- 27
- 28
- 29
- 30
- 31
- 32
- 33
- 34
- 35
- 36
- 37
- 38
- 39
- 40
- 41
- 42
- 43
- 44
- 45
- 46
- 47
- 48
- 49
- 50
- 51
- 52
- 53
- 54
- 55
- 56
- 57
- 58
- 59
- 60
- 61
- 62
- 63
- 64
- 65
- 66
- 67
- 68
- 69
- 70
- 71
- 72
- 73
- 74
- 75
- 76
- 77
- 78
- 79
- 80
- 81
- 82
- 83
- 84
- 85
- 86
- 87
- 88
- 89
- 90
- 91
- 92
- 93
- 94
- 95
- 96
- 97
- 98
- 99
- 100
- 101
- 102
- 103
- 104
- 105
- 106
- 107
- 108
- 109
- 110
- 111
- 112
- 113
- 114
- 115
- 116
最终实现效果:

最后
🧿 更多资料, 项目分享:
-
相关阅读:
回归预测 | MATLAB实现基于RF随机森林的工业增加值预测(多因素、多指标)
文心大模型写——网课点播系统(项目需求)
【机器学习】欠拟合及过拟合与学习曲线、误差来源
105份墨天轮“国产化迁移”精品文档汇总(含TiDB、openGauss、上云等)
Java程序设计-韩建平-读书笔记
Java之TreeSet和TreeMap
【腾讯云 HAI域探秘】高性能服务器引领AI革新浪潮:从AI绘画、知识问答到PyTorch图像分类、视频检测的全方位探索
获得1688商品详情 API
耗时半天,我使用 Python 构建电影推荐系统
leetcode 136. 只出现一次的数字
- 原文地址:https://blog.csdn.net/iuerfee/article/details/132920084
