-
Spring整合RabbitMQ
一、步骤
生产者
① 创建生产者工程② 添加依赖③ 配置整合④ 编写代码发送消息消费者
① 创建消费者工程② 添加依赖③ 配置整合④ 编写消息监听器二、代码
生产者工程
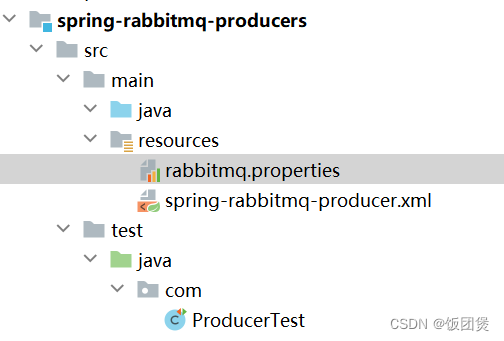
1.在生产者工程和消费者工程中都导入如下依赖
org.springframework spring-context 5.1.7.RELEASE org.springframework.amqp spring-rabbit 2.1.8.RELEASE junit junit 4.12 org.springframework spring-test 5.1.7.RELEASE org.apache.maven.plugins maven-compiler-plugin 3.8.0 1.8 1.8
2.生产者和消费者 导入配置文件 rabbitmq.properties
- rabbitmq.host=43.143.246.208
- rabbitmq.port=5672
- rabbitmq.username=root
- rabbitmq.password=root
- rabbitmq.virtual-host=/itcast
3.生产者核心配置文件 spring-rabbitmq-producer.xml
- "1.0" encoding="UTF-8"?>
"http://www.springframework.org/schema/beans" - xmlns:xsi="http://www.w3.org/2001/XMLSchema-instance"
- xmlns:context="http://www.springframework.org/schema/context"
- xmlns:rabbit="http://www.springframework.org/schema/rabbit"
- xsi:schemaLocation="http://www.springframework.org/schema/beans
- http://www.springframework.org/schema/beans/spring-beans.xsd
- http://www.springframework.org/schema/context
- https://www.springframework.org/schema/context/spring-context.xsd
- http://www.springframework.org/schema/rabbit
- http://www.springframework.org/schema/rabbit/spring-rabbit.xsd">
- port="${rabbitmq.port}"
- username="${rabbitmq.username}"
- password="${rabbitmq.password}"
- virtual-host="${rabbitmq.virtual-host}"/>
4.测试类 ProducerTest
- @RunWith(SpringJUnit4ClassRunner.class)
- @ContextConfiguration(locations = "classpath:spring-rabbitmq-producer.xml")
- public class ProducerTest {
- //1.注入 RabbitTemplate
- @Autowired
- private RabbitTemplate rabbitTemplate;
- @Test
- public void testHelloWorld(){
- //2.发送消息
- rabbitTemplate.convertAndSend("spring_queue","hello world spring....");
- }
- /**
- * 发送fanout消息
- */
- @Test
- public void testFanout(){
- //2.发送消息
- rabbitTemplate.convertAndSend("spring_fanout_exchange","","spring fanout....");
- }
- /**
- * 发送topic消息
- */
- @Test
- public void testTopic(){
- //2.发送消息
- rabbitTemplate.convertAndSend("spring_topic_exchange","root.hehe.haha","spring topic....");
- }
- }
5.运行结果

消费者工程
1、2同上述1、2
3、消费者核心配置文件
- "1.0" encoding="UTF-8"?>
"http://www.springframework.org/schema/beans" - xmlns:xsi="http://www.w3.org/2001/XMLSchema-instance"
- xmlns:context="http://www.springframework.org/schema/context"
- xmlns:rabbit="http://www.springframework.org/schema/rabbit"
- xsi:schemaLocation="http://www.springframework.org/schema/beans
- http://www.springframework.org/schema/beans/spring-beans.xsd
- http://www.springframework.org/schema/context
- https://www.springframework.org/schema/context/spring-context.xsd
- http://www.springframework.org/schema/rabbit
- http://www.springframework.org/schema/rabbit/spring-rabbit.xsd">
- port="${rabbitmq.port}"
- username="${rabbitmq.username}"
- password="${rabbitmq.password}"
- virtual-host="${rabbitmq.virtual-host}"/>
"springQueueListener" class="com.rabbitmq.listener.SpringQueueListener"/>
4.类 SpringQueueListener
- public class SpringQueueListener implements MessageListener {
- @Override
- public void onMessage(Message message) {
- //打印消息
- System.out.println(new String(message.getBody()));
- }
- }
5.测试
- @RunWith(SpringJUnit4ClassRunner.class)
- @ContextConfiguration(locations = "classpath:spring-rabbitmq-comsumer.xml")
- public class ConsumerTest {
- @Test
- public void test1(){
- boolean flag = true;
- while (true){
- }
- }
- }

-
相关阅读:
ORA-12560:TNS:协议适配器错误
vscode在windows环境不能使用终端安装依赖
130. 如何使 SAP UI5 SmartField 在运行时渲染成超链接的形式并支持跳转
RAID5的配置流程及模拟硬盘损坏
亚马逊鲲鹏测评系统:全自动注册下单及留评
Flask 上下文是什么 ?
水果店圈子:水果店月收入大概是多少,我想开水果店不知道利润有百分之几
spring 中的资源文件加载
AIGC笔记--基于DDPM实现图片生成
Python入门自学进阶-Web框架——25、DjangoAdmin项目应用-分页与过滤
- 原文地址:https://blog.csdn.net/m0_62639288/article/details/132902356
