-
docker搭建redis哨兵集群和分片集群
搭建哨兵集群
环境准备拉取镜像
搭建目标 : 一主而从三哨兵集群
docker pull redis:6.2.6
创建文件夹及配置文件
我这里在/usr/local/docker/redis目录下

在 redis-master、redis-slave1、redis-slave2 下分别建立data、 redis.conf、 sentinel.conf

redis配置文件
在从节点上配置所属于哪个父集群(找爹行动)
- replicaof 39.106.53.30 6379(redis5.0之后)
- slaveof 39.106.53.30 6379(5.0之前的命令)
- # master redis.conf
- save 3600 1
- save 300 100
- save 60 10000
- appendonly no
- protected-mode no
- port 6379
- # redis-slave1 redis.conf
- save 3600 1
- save 300 100
- save 60 10000
- appendonly no
- bind 0.0.0.0
- port 6380
- protected-mode no
- replicaof 39.106.53.30 6379
- # redis-slave2 redis.conf
- save 3600 1
- save 300 100
- save 60 10000
- appendonly no
- bind 0.0.0.0
- port 6381
- protected-mode no
- replicaof 39.106.53.30 6379
sentinel配置
- # master 配置
- port 26379
- dir /tmp
- sentinel monitor mymaster 39.106.53.30 6379 2
- sentinel down-after-milliseconds mymaster 30000
- sentinel failover-timeout mymaster 60000
- # slave1 配置
- port 26380
- dir /tmp
- sentinel monitor mymaster 39.106.53.30 6379 2
- sentinel down-after-milliseconds mymaster 30000
- sentinel failover-timeout mymaster 60000
- # slave2 配置
- port 26381
- dir /tmp
- sentinel monitor mymaster 39.106.53.30 6379 2
- sentinel down-after-milliseconds mymaster 30000
- sentinel failover-timeout mymaster 60000
编写docker-compose.yml
- version: '3'
- services:
- master:
- image: redis:6.2.6
- container_name: redis-master
- command: redis-server /etc/redis/redis.conf
- ports:
- - 6379:6379
- volumes:
- - /usr/local/docker/redis/redis-master/data:/data
- - /usr/local/docker/redis/redis-master/redis.conf:/etc/redis/redis.conf
- slave1:
- image: redis:6.2.6
- container_name: redis-slave1
- volumes:
- - /usr/local/docker/redis/redis-slave1/data:/data
- - /usr/local/docker/redis/redis-slave1/redis.conf:/etc/redis/redis.conf
- command: redis-server /etc/redis/redis.conf
- ports:
- - 6380:6380
- depends_on:
- - master
- slave2:
- image: redis:6.2.6
- container_name: redis-slave2
- volumes:
- - /usr/local/docker/redis/redis-slave2/data:/data
- - /usr/local/docker/redis/redis-slave2/redis.conf:/etc/redis/redis.conf
- command: redis-server /etc/redis/redis.conf
- ports:
- - 6381:6381
- depends_on:
- - master
- sentinel1:
- image: redis:6.2.6
- container_name: redis-sentinel1
- command: redis-sentinel /usr/local/etc/redis/sentinel.conf
- ports:
- - 26379:26379
- volumes:
- - /usr/local/docker/redis/redis-master/sentinel.conf:/usr/local/etc/redis/sentinel.conf
- depends_on:
- - master
- - slave1
- - slave2
- sentinel2:
- image: redis:6.2.6
- container_name: redis-sentinel2
- command: redis-sentinel /usr/local/etc/redis/sentinel.conf
- ports:
- - 26380:26380
- volumes:
- - /usr/local/docker/redis/redis-slave1/sentinel.conf:/usr/local/etc/redis/sentinel.conf
- depends_on:
- - master
- - slave1
- - slave2
- sentinel3:
- image: redis:6.2.6
- container_name: redis-sentinel3
- command: redis-sentinel /usr/local/etc/redis/sentinel.conf
- ports:
- - 26381:26381
- volumes:
- - /usr/local/docker/redis/redis-slave1/sentinel.conf:/usr/local/etc/redis/sentinel.conf
- depends_on:
- - master
- - slave1
- - slave2
执行docker-compose
docker-compose up -d 查看集群信息
 查看集群信息 info replication
 测试数据同步
本次搭建的集群,在从节点是只读形式,只有主节点才能够写,在主节点写入 set test test
set k v,查看所有从节点信息,在从节点中写,会提示只读副本

在主节点中写,发现在所有从节点中都存在数据,数据同步成功
 主从集群同步原理
主从同步第一次同步是全量同步:
master如何判断slave是不是第一次来同步数据:
Replication ld: 简称replid,是数据集的标记,id一致则说明是同一数据集。每一个master都有唯一的replid,slave则会继承master节点的replid
ofset:偏移量,随着记录在repl_bak_log中的数据增多而逐渐增大。slave完成同步时也会记录当前同步的ofset如果slave的offset小于master的offset,说明slave数据落后于master,需要更新
因此slave做数据同步,必须向master声明自己的replication id 和offset,master才可以判断到底需要同步哪些数据
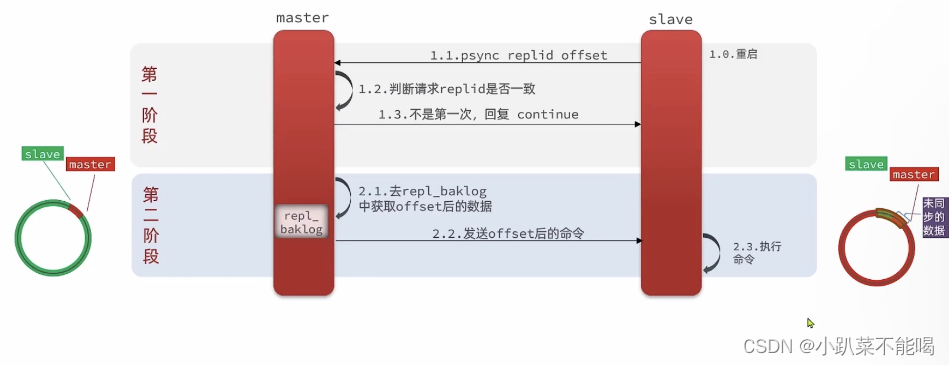
但如果slave重启后同步,则执行增量同步
repl_bak_log大小有上限,写满后会覆盖最早的数据。如果slave断开时间过久,导致尚未备份的数据被覆盖,则无法基于log做增量同步,只能再次全量同步
全量同步流程

增量同步流程
spring boot整合集群并配置读写分离
引入依赖
- <dependency>
- <groupId>org.springframework.bootgroupId>
- <artifactId>spring-boot-starter-data-redisartifactId>
- dependency>
配置集群
由于哨兵模式的节点不固定,所以配置哨兵集群,监听的redis集群由哨兵去找
- server:
- port: 9000
- spring:
- redis:
- sentinel:
- master: mymaster
- nodes:
- - 39.106.53.30:26379
- - 39.106.53.30:26380
- - 39.106.53.30:26381
测试集群同步
这里的ReadFrom是配置Redis的读取策略:
- MASTER:从主节点读取.
- MASTER PREFERRED:优先从master节点读取,master不可用才读取replica
- REPLICA: 从slave (replica)节点读取
- REPLICA PREFERRED: 优先从slave (replica)节点读取,所有的slave都不可用才读取master
- package com.test.cluster.rediscluster;
- import io.lettuce.core.ReadFrom;
- import org.springframework.boot.SpringApplication;
- import org.springframework.boot.autoconfigure.SpringBootApplication;
- import org.springframework.boot.autoconfigure.data.redis.LettuceClientConfigurationBuilderCustomizer;
- import org.springframework.context.annotation.Bean;
- @SpringBootApplication
- public class RedisClusterApplication {
- public static void main(String[] args) {
- SpringApplication.run(RedisClusterApplication.class, args);
- }
- @Bean
- public LettuceClientConfigurationBuilderCustomizer clientConfigurationBuilderCustomizer(){
- return clientConfigurationBuilder -> clientConfigurationBuilder.readFrom(ReadFrom.REPLICA_PREFERRED);
- }
- }
编写controller
- package com.test.cluster.rediscluster.controller;
- import org.springframework.beans.factory.annotation.Autowired;
- import org.springframework.data.redis.core.StringRedisTemplate;
- import org.springframework.web.bind.annotation.PathVariable;
- import org.springframework.web.bind.annotation.RequestMapping;
- import org.springframework.web.bind.annotation.RestController;
- /**
- * @Author sl
- */
- @RestController
- public class TestRedisSentinelController {
- @Autowired
- private StringRedisTemplate redisTemplate;
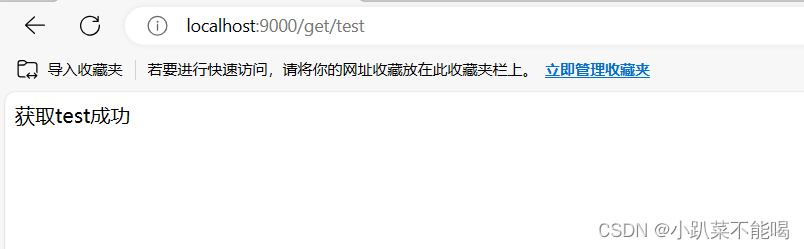
- @RequestMapping("/get/{key}")
- public String getKey(@PathVariable("key") String key){
- String s = redisTemplate.opsForValue().get(key);
- if(s!= null){
- return "获取"+ s + "成功";
- }
- return "获取"+ key + "失败";
- }
- @RequestMapping("set/{key}/{value}")
- public String setValue(@PathVariable("key")String key,@PathVariable("value") String value){
- redisTemplate.opsForValue().set(key,value);
- return "set" + key + "success";
- }
- }
设置key http://localhost:9000/set/china/yyds ,在80和81中,可以查到china的值
 搭建分片集群
redis 哨兵模式虽然提供了 redis⾼可⽤、高并发读的解决方案,但是在海量数据应用场景下,仍然存在海量数据存储问题和高并发写的问题。当只有⼀个 Master 对外提供服务时,如果数据量特别⼤,内存占⽤问题严重,数据的高并发写、数据备份和恢复都会⼤⼤降低效率,针对这些问题,redis 推出 Cluster 集群架构,该结构具有如下特点:
Redis Cluster 采用的去中心化的网络拓扑架构,没有中心节点,所有节点既是数据存储节点,也是控制节点
引入槽(slot)的概念,通过 CRC+hashslot 算法支持多个主节点(分片),每个主节点分别负责存储一部分数据,这样理论上可以支持无限主节点的水平扩容以便支持海量吞吐量
在 Cluster 集群里设置了 16384 个哈希槽(hash slot),在 master 节点上写键值对数据时,redis 先对每个键(key),用CRC16 算法对 key 进行运算,然后用 16384 对运算结果取模,余数作为插槽,每个槽在不同的节点下,形成了分片
内置类似哨兵的高可用机制,能够实现自动故障转移,保证每个主节点的高可用
创建文件和映射
创建6379-6384的文件夹,目录为data ,redis.conf

编写redis.conf
- port 6379
- daemonize no
- cluster-enabled yes
- # reids维护
- cluster-config-file nodes_6379.conf
- tcp-keepalive 300
- timeout 0
- appendonly yes
- logfile "redis_6379.log"
- bind 0.0.0.0
- cluster-node-timeout 5000
- protected-mode no
- cluster-announce-ip 39.106.53.30
- cluster-announce-bus-port 16379
编写docker-compose
- version: '3'
- services:
- node1:
- image: redis:6.2.6
- container_name: redis-node1
- restart: always
- ports:
- - 6379:6379
- - 16379:16379
- volumes:
- - /usr/local/docker/redis/6379/data:/data
- - /usr/local/docker/redis/6379/redis.conf:/etc/redis/redis.conf
- command:
- redis-server /etc/redis/redis.conf
- node2:
- image: redis:6.2.6
- container_name: redis-node2
- restart: always
- ports:
- - 6380:6380
- - 16380:16380
- volumes:
- - /usr/local/docker/redis/6380/data:/data
- - /usr/local/docker/redis/6380/redis.conf:/etc/redis/redis.conf
- command:
- redis-server /etc/redis/redis.conf
- node3:
- image: redis:6.2.6
- container_name: redis-node3
- restart: always
- ports:
- - 6381:6381
- - 16381:16381
- volumes:
- - /usr/local/docker/redis/6381/data:/data
- - /usr/local/docker/redis/6381/redis.conf:/etc/redis/redis.conf
- command:
- redis-server /etc/redis/redis.conf
- node4:
- image: redis:6.2.6
- container_name: redis-node4
- restart: always
- ports:
- - 6382:6382
- - 16382:16382
- volumes:
- - /usr/local/docker/redis/6382/data:/data
- - /usr/local/docker/redis/6382/redis.conf:/etc/redis/redis.conf
- command:
- redis-server /etc/redis/redis.conf
- node5:
- image: redis:6.2.6
- container_name: redis-node5
- restart: always
- ports:
- - 6383:6383
- - 16383:16383
- volumes:
- - /usr/local/docker/redis/6383/data:/data
- - /usr/local/docker/redis/6383/redis.conf:/etc/redis/redis.conf
- command:
- redis-server /etc/redis/redis.conf
- node6:
- image: redis:6.2.6
- container_name: redis-node6
- restart: always
- ports:
- - 6384:6384
- - 16384:16384
- volumes:
- - /usr/local/docker/redis/6384/data:/data
- - /usr/local/docker/redis/6384/redis.conf:/etc/redis/redis.conf
- command:
- redis-server /etc/redis/redis.conf
执行docker-compose
docker-compose up -d
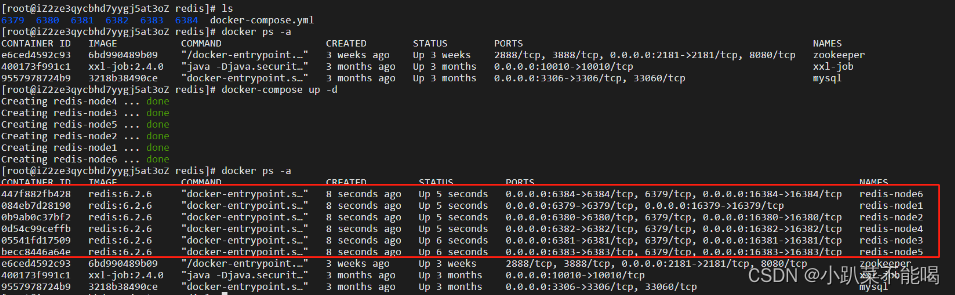
集群启动
进入任意节点 docker exec -it redis-node1 /bin/bash
redis-cli --cluster create 39.106.53.30:6379 39.106.53.30:6380 39.106.53.30:6381 39.106.53.30:6382 39.106.53.30:6383 39.106.53.30:6384 --cluster-replicas 1--cluster-replicas 或者 --replicas 1 表示集群中每个master的副本数为1,此时 节点总数/(replicas+1)得到的就是master的数量,因此节点中前n个是master节点
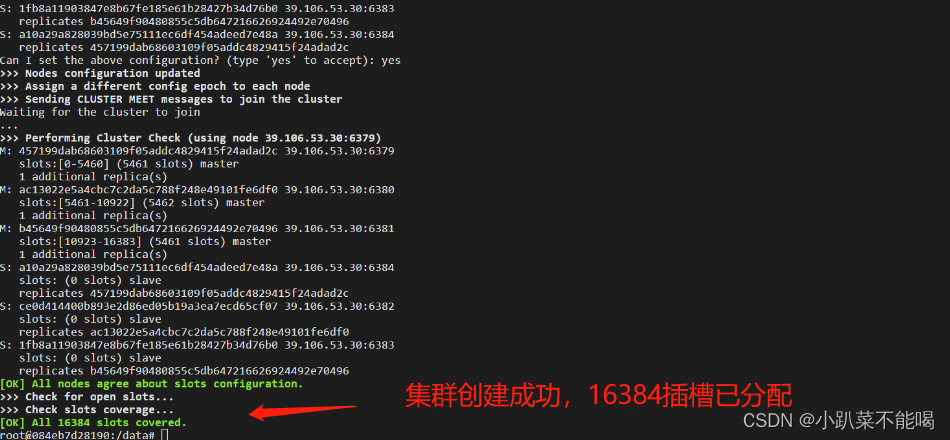
查看集群信息
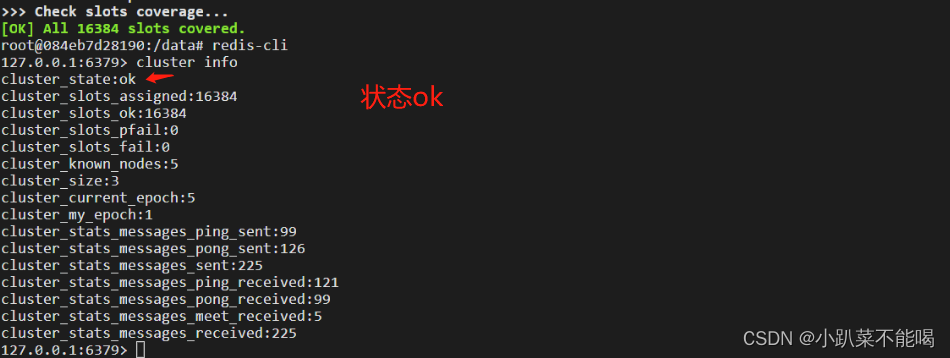
连接集群
以cluster方式连接集群,并set test test 值 ,在其他节点中有相同的值
 spring boot 整合分片集群
更改配置
- server:
- port: 9000
- # 哨兵集群
- #spring:
- # redis:
- # sentinel:
- # master: mymaster
- # nodes:
- # - 39.106.53.30:26379
- # - 39.106.53.30:26380
- # - 39.106.53.30:26381
- # 分片集群
- spring:
- redis:
- cluster:
- nodes:
- - 39.106.53.30:6379
- - 39.106.53.30:6380
- - 39.106.53.30:6381
- - 39.106.53.30:6382
- - 39.106.53.30:6383
- - 39.106.53.30:6384
测试controller
- package com.test.cluster.rediscluster.controller;
- import org.springframework.beans.factory.annotation.Autowired;
- import org.springframework.data.redis.core.StringRedisTemplate;
- import org.springframework.web.bind.annotation.PathVariable;
- import org.springframework.web.bind.annotation.RequestMapping;
- import org.springframework.web.bind.annotation.RestController;
- /**
- * @Author sl
- */
- @RestController
- public class TestRedisClusterController {
- @Autowired
- private StringRedisTemplate redisTemplate;
- @RequestMapping("/get/{key}")
- public String getKey(@PathVariable("key") String key){
- String s = redisTemplate.opsForValue().get(key);
- if(s!= null){
- return "获取"+ s + "成功";
- }
- return "获取"+ key + "失败";
- }
- @RequestMapping("set/{key}/{value}")
- public String setValue(@PathVariable("key")String key,@PathVariable("value") String value){
- redisTemplate.opsForValue().set(key,value);
- return "set" + key + "success";
- }
- }
测试集群
-
相关阅读:
OWASP-TOP10漏洞-注入漏洞
【C语言】——三道基础程序练习
微信小程序:选择器标签摘要
判断token失效解决方案
不买后悔的阿里云服务器租用价格表_优惠活动整理_2024新版
unity的ui跟随鼠标移动
如何选择图像标注工具?
06_JavaScript数组
《计算机图形学编程(使用OpenGL和C++)》笔记(2)-图形管线和矩阵变换
Scala核心-编译解释
- 原文地址:https://blog.csdn.net/m0_65775063/article/details/132742878
