-
three.js 入门 初识
基本步骤:
安装
npm install three引入
import * as THREE from "three";一、three三要素:场景、相机、渲染
1.场景:
- //创建场景
- const scene=new THREE.Scene()
2.相机:OrthographicCamera正交投影(不会改变实际物体的大小)和PerspectiveCamera透视投影(和人的观感感觉一样会有近大远小的效果)我们这里是使用的透视投影
- //创建相机
- const camera = new THREE.PerspectiveCamera(
- 75,
- window.innerWidth / window.innerHeight,
- 0.1,
- 1000
- );
- // 设置相机位置
- camera.position.set(0, 0, 10);
75 视野:相机的视野有多宽,以度为单位;
window.innerWidth / window.innerHeight 纵横比:场景的宽度与高度的比率;
0.1 近剪裁平面:任何比这更靠近相机的东西都是不可见的;
1000 远剪裁平面:任何比这更远离相机的东西都是不可见的;
3.渲染
- // 初始化渲染器
- const renderer = new THREE.WebGLRenderer();
- //设置渲染器为全屏
- renderer.setSize(window.innerWidth, window.innerHeight);
- // 将webgl渲染的canvas内容添加到body
- document.body.appendChild(renderer.domElement);
以上完成后就是创建一些物体或者是导入模型加载到场景中进行渲染
二、创建可见对象
1.Geometries(几何图形)
举例:长方体(BoxGeometry)
- // 创建几何体
- const geometry = new THREE.BoxGeometry(1, 1, 1);
球体(SphereGeometry)
const sphereTexture = new THREE.SphereGeometry(1, 20, 20);平面(PlaneGeometry)
const planeGeometry = new THREE.PlaneGeometry(1, 1, 200, 200);2.Lights(灯光)
环境光AmbientLight(它的颜色会添加到整个场景和所有对象的当前颜色上)
- const light = new THREE.AmbientLight(0x404040);
- scene.add(light);
点光源PointLight(这种光源放出的光线来自同一点,且辐射方向四面八方,如蜡烛发出的光)
方向光DirectionalLight(也称作无限光,从这种光源发出的光线可以看做是平行的,如太阳光)
- const directionalLight = new THREE.DirectionalLight(0xffffff, 0.5);
- // 设置直线光源的照射位置
- directionalLight.position.set(10, 10, 10);
- scene.add(directionalLight);
聚光灯SpotLight(这种光源的光线从一个椎体中射出,在被照射的物体上产生聚光的效果,如手电筒发出的光)
能形成阴影的光源只有DirectionalLight和SpotLight;而相对地,能表现阴影效果的材质只有LambertMaterial和PhongMaterial。
three.js中渲染阴影的开销比较大,所以默认物体是没有阴影的,需要单独开启。开启阴影的方法:
- 将渲染器的shadowMapEnabled属性设置为true(告诉渲染器可以渲染阴影)
- 将物体及光源的castShadow属性设置为true(告诉物体及光源可以透射阴影 物体投射阴影)
- 将接收该阴影的物体的receiveShadow属性设置为true(告诉物体可以接收其他物体的阴影 物体接收阴影)
3.Controls(控制器)
轨道控制插件OrbitControls.js可以实现场景用鼠标交互,让场景动起来,控制场景的旋转、平移和缩放。
- // 导入控制器
- import { OrbitControls } from "three/examples/jsm/controls/OrbitControls";
- const controls = new OrbitControls(camera, renderer.domElement);
- controls.enableDamping = true;
配置该插件之后实现的效果:
操控 效果 按住鼠标左键并移动 摄像机围绕场景中心旋转 转动鼠标滑轮或按住中键并移动 放大或缩小 按住鼠标右键并移动 在场景中平移 上、下、左、右方向键 在场景中平移 4.Loaders(加载器)
5.Textures(纹理)
- const textureLoader = new THREE.TextureLoader();
- const floorColor = textureLoader.load(require("../assets/img/door/color.jpg"));
6.Materials(材质)
- // 材质
- const material = new THREE.MeshBasicMaterial({
- map: floorColor
- });
MeshBasicMaterial(对光照无感,无光源可以显示,给几何体一种简单的颜色或显示线框)
MeshLambertMaterial(对光照有反应,无光源则不会显示,用于创建暗淡的不发光的物体)MeshPhongMaterial(对光照有反应,无光源不会显示,用于创建金属类米昂凉的物体)
物体之所以能被人眼看见,一种是它自身的材料就能发光,不需要借助外界光源;另一种是自身材料不发光,需要反射环境中的光。对于自身不发光的物体,需要个场景添加光源从而达到可视的效果。
- const geometry = new THREE.BoxGeometry(1,1,1); // 创建一个长宽高都为1个单位的立方体
- const textureLoader = new THREE.TextureLoader();//初始化纹理
- const floorColor = textureLoader.load(require("../assets/img/door/color.jpg"));//导入纹理为一张图片
- const material = new THREE.MeshBasicMaterial({color: 0x00ff00,map: floorColor}); // 创建材质,对光照无感
- const cube = new THREE.Mesh(geometry, material); // 创建一个立方体网格(mesh),将材质包裹在立方体上
- scene.add(cube); // 将立方体网格添加到场景中
- camera.position.z = 5; // 指定相机位置
- function animate() {
- // 照相机转动时,必须更新该控制器
- controls.update();
- // 结合场景和相机进行渲染,即用摄像机拍下此刻的场景
- renderer.render(scene, camera);
- // 渲染下一帧的时候就调用animate
- requestAnimationFrame(animate);
- }
- animate();
7.坐标轴辅助器
- const axesHelper = new THREE.AxesHelper(5);
- scene.add(axesHelper);
红色代表 X 轴. 绿色代表 Y 轴. 蓝色代表 Z 轴.5表示轴的线段长度
8.监听画面变化
- // 监听画面变化
- window.addEventListener("resize", () => {
- const iwidth = window.innerWidth;
- const iheigt = window.innerHeight;
- //更新摄像头
- camera.aspect = iwidth / iheigt;
- // 更新摄像机投影矩阵
- camera.updateProjectionMatrix();
- // 更新渲染器
- renderer.setSize(iwidth, iheigt);
- // 设置渲染器像素比 防止在HiDPI显示器模糊(视网膜显示器)
- renderer.setPixelRatio(window.devicePixelRatio);
- });
三、dat.gui控件(可以对渲染出来的物体进行变化操作)
1.安装并引入gui
- npm install --save dat.gui
- import * as dat from "dat.gui";
2.实例代码
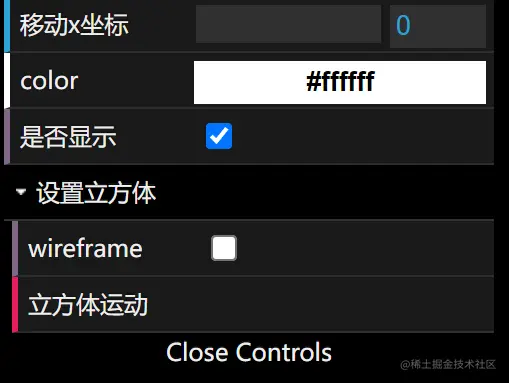
- const gui = new dat.GUI();
- gui
- .add(cube.position, "x")
- .min(0)
- .max(5)
- .step(0.05)
- .name("移动x坐标")
- .onChange((value) => {
- console.log("值被修改了:", value);
- });
- // 修改物体的颜色
- const params = {
- color: "#fff",
- fn: () => {
- gsap.to(cube.position, {
- x: 5,
- ease: "power1.out",
- duration: 5,
- repeat: -1,
- yoyo: true,
- });
- },
- };
- gui.addColor(params, "color").onChange((value) => {
- cube.material.color.set(value);
- });
- // 设置是否显示
- gui.add(cube, "visible").name("是否显示");
- // 设置按钮点击触发某个事件
- var folder = gui.addFolder("设置立方体");
- folder.add(cube.material, "wireframe");
- folder.add(params, "fn").name("立方体运动");
3.效果
四、环境贴图
- // 设置cube纹理加载器
- const cubeTextureLoader = new THREE.CubeTextureLoader();
- const envMapTexture = cubeTextureLoader.load([
- require("../assets/img/environmentMaps/1/px.jpg"),
- require("../assets/img/environmentMaps/1/nx.jpg"),
- require("../assets/img/environmentMaps/1/py.jpg"),
- require("../assets/img/environmentMaps/1/ny.jpg"),
- require("../assets/img/environmentMaps/1/pz.jpg"),
- require("../assets/img/environmentMaps/1/nz.jpg"),
- ]);// p-正方向,n-负方向
- // 创建球体
- const sphereTexture = new THREE.SphereGeometry(1, 20, 20);
- // 材质
- const material = new THREE.MeshStandardMaterial({
- metalness: 0.7,
- roughness: 0,
- });
- // 关联几何体和材质
- const spher = new THREE.Mesh(sphereTexture, material);
- // 添加几何体到场景
- scene.add(spher);
- // 给场景添加背景
- scene.background = envMapTexture;
- // 给场景所有的物体添加默认的环境贴图
- scene.environment = envMapTexture;
五、HRD加载
- // 导入hdr加载器
- import { RGBELoader } from 'three/examples/jsm/loaders/RGBELoader'
- // 加载hdr环境图
- const rgbeLoader = new RGBELoader();
- rgbeLoader.loadAsync(require("../assets/img/hdr/012.hdr")).then((texture) => {
- texture.mapping = THREE.EquirectangularReflectionMapping; // 经纬线映射贴图
- scene.background = texture;
- scene.environment = texture;
- })
六、加载3D模型
- import * as THREE from 'three'
- import { GLTFLoader } from 'three/examples/jsm/loaders/GLTFLoader'
- import { DRACOLoader } from 'three/examples/jsm/loaders/DRACOLoader'
- import { OrbitControls } from 'three/examples/jsm/controls/OrbitControls'
- import robot from '../../public/robotglb.glb'
- const scene = new THREE.Scene()
- const camera = new THREE.PerspectiveCamera(
- 75,
- window.innerWidth / window.innerHeight,
- 0.1,
- 1000
- )
- camera.position.set(0, 0, 10)
- scene.add(camera)
- const light = new THREE.AmbientLight(0xffffff)
- scene.add(light)
- //初始化模型加载器
- const loader = new GLTFLoader()
- //解压模型
- const dracoLoader = new DRACOLoader()
- //引入文件
- dracoLoader.setDecoderPath('/draco/')
- loader.setDRACOLoader(dracoLoader)
- loader.load(
- robot,//模型
- gltf => {
- console.log(gltf, 'gltf')
- scene.add(gltf.scene)
- },
- xhr => {
- console.log(xhr)
- },
- err => {
- console.log(err)
- }
- )
- let mesh = new THREE.Mesh()
- mesh.scale.set(6,6,6)
- const renderer = new THREE.WebGLRenderer()
- renderer.setSize(window.innerWidth, window.innerHeight)
- document.body.appendChild(renderer.domElement)
- const controls = new OrbitControls(camera, renderer.domElement)
- function animate () {
- controls.update()
- renderer.render(scene, camera)
- requestAnimationFrame(animate)
- }
- animate()
注意:
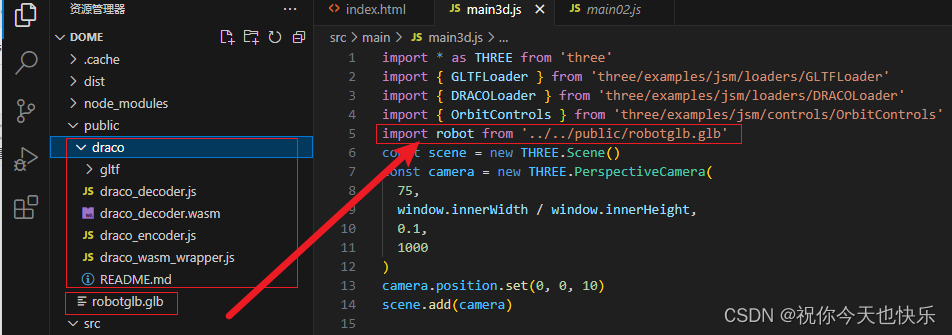
这里的3d模型一定要放在public文件夹下不能放在src中 会报错
-
相关阅读:
交叉熵与对数似然分析
西门子V20变频器调试基本步骤示例
python爬虫(Selenium案列)第二十四
HTML网页设计【足球科普】学生DW静态网页设计
电池使用时间报告
Centos下编译ffmpeg动态库
格式化DataFrame中的时间数据DataFrame.to_datetime()方法
Spring之@Repository @Service @Component @Controller的区别和使用场景
QT第三方库加载pro解读
Pichome欧奥图文档系统代码审计—路由分析
- 原文地址:https://blog.csdn.net/killerdoubie/article/details/132894876