-
SpringBoot-AOP-Logback用切面拦截操作日志
在 Spring Boot 中使用切面来拦截操作日志,以及配合使用 MyBatis-Plus 框架进行操作,并使用 Thymeleaf 视图显示商品列表,同时配置 Logback 日志输出到文件。
CREATE TABLE product ( id BIGINT AUTO_INCREMENT PRIMARY KEY, name VARCHAR(255) NOT NULL, price DECIMAL(10, 2) NOT NULL, description TEXT ); INSERT INTO product (name, price, description) VALUES ('商品 1', 100.00, '商品描述 1'), ('商品 2', 150.00, '商品描述 2'), ('商品 3', 200.00, '商品描述 3'), ('商品 4', 50.00, '商品描述 4'), ('商品 5', 300.00, '商品描述 5'), ('商品 6', 120.00, '商品描述 6'), ('商品 7', 80.00, '商品描述 7'), ('商品 8', 250.00, '商品描述 8'), ('商品 9', 180.00, '商品描述 9'), ('商品 10', 90.00, '商品描述 10');- 1
- 2
- 3
- 4
- 5
- 6
- 7
- 8
- 9
- 10
- 11
- 12
- 13
- 14
- 15
- 16
- 17
- 18
<dependencies> <dependency> <groupId>org.springframework.bootgroupId> <artifactId>spring-boot-starter-webartifactId> dependency> <dependency> <groupId>com.baomidougroupId> <artifactId>mybatis-plus-boot-starterartifactId> <version>最新版本version> dependency> <dependency> <groupId>mysqlgroupId> <artifactId>mysql-connector-javaartifactId> <version>最新版本version> dependency> <dependency> <groupId>org.springframework.bootgroupId> <artifactId>spring-boot-starter-thymeleafartifactId> dependency> <dependency> <groupId>com.fasterxml.jackson.coregroupId> <artifactId>jackson-databindartifactId> dependency> <dependency> <groupId>ch.qos.logbackgroupId> <artifactId>logback-classicartifactId> dependency> dependencies>- 1
- 2
- 3
- 4
- 5
- 6
- 7
- 8
- 9
- 10
- 11
- 12
- 13
- 14
- 15
- 16
- 17
- 18
- 19
- 20
- 21
- 22
- 23
- 24
- 25
- 26
- 27
- 28
- 29
- 30
- 31
- 32
- 33
- 34
- 35
- 36
- 37
- 38
- 39
application.properties配置文件
# 数据源配置 spring.datasource.url=jdbc:mysql://localhost:3306/your_database_name spring.datasource.username=your_database_username spring.datasource.password=your_database_password spring.datasource.driver-class-name=com.mysql.cj.jdbc.Driver # MyBatis-Plus 配置 mybatis-plus.mapper-locations=classpath:mapper/*.xml mybatis-plus.global-config.id-type=auto # Thymeleaf 配置 spring.thymeleaf.mode=HTML spring.thymeleaf.cache=false # 日志配置 logging.level.root=INFO logging.level.com.icoderoad.example=DEBUG logging.file=logs/application.log logging.pattern.console=%msg%n- 1
- 2
- 3
- 4
- 5
- 6
- 7
- 8
- 9
- 10
- 11
- 12
- 13
- 14
- 15
- 16
- 17
- 18
- 19
实体类Product
@Data @TableName("product") public class Product { @TableId(type = IdType.AUTO) private Long id; private String name; private double price; private String description; }- 1
- 2
- 3
- 4
- 5
- 6
- 7
- 8
- 9
商品Mapper
@Repository public interface ProductMapper extends BaseMapper<Product> { }- 1
- 2
- 3
Controller
@Controller public class ProductController{ @Autowired private final ProductService productService; @GetMapping("/products") public String listProducts(Model model){ model.Addtttribute("product",productService.list()); return "product/list"; } }- 1
- 2
- 3
- 4
- 5
- 6
- 7
- 8
- 9
- 10
- 11
- 12
Service
public interface ProductService extends IService<Product> { } @Service public class ProductServiceImpl extends ServiceImpl<ProductMapper, Product> implements ProductService { }- 1
- 2
- 3
- 4
- 5
- 6
日志配置信息
DOCTYPE configuration> <configuration> <appender name="CONSOLE" class="ch.qos.logback.core.ConsoleAppender"> <encoder> <pattern>%d{yyyy-mm-dd HH:mm:ss} [%thread] %-5level %logger{36} - %msg%npattern> encoder> appender> <appender name="FILE" class="ch.qos.logback.core.FileAppender"> <file>logs/application.logfile> <encoder class="ch.qos.logback.classic.encoder.PatternLayoutEncoder"> <pattern>%d{yyyy-mm-dd HH:mm:ss} [%thread] %-5level %logger{36} - %msg%npattern> encoder> appender> <root level="INFO"> <appender-ref ref="CONSOLE"/> <appender-ref ref="FILE" /> root> configuration>- 1
- 2
- 3
- 4
- 5
- 6
- 7
- 8
- 9
- 10
- 11
- 12
- 13
- 14
- 15
- 16
- 17
- 18
- 19
- 20
WebLog类
/** * Controller层的日志封装类 */ @Data @EqualsAndHashCode public class WebLog { /** * 操作描述 */ private String description; /** * 操作用户 */ private String username; /** * 操作时间 */ private Long startTime; /** * 消耗时间 */ private Integer spendTime; /** * 根路径 */ private String basePath; /** * URI */ private String uri; /** * URL */ private String url; /** * 请求类型 */ private String method; /** * IP地址 */ private String ip; /** * 请求参数 */ private Object parameter; /** * 返回结果 */ private Object result; }- 1
- 2
- 3
- 4
- 5
- 6
- 7
- 8
- 9
- 10
- 11
- 12
- 13
- 14
- 15
- 16
- 17
- 18
- 19
- 20
- 21
- 22
- 23
- 24
- 25
- 26
- 27
- 28
- 29
- 30
- 31
- 32
- 33
- 34
- 35
- 36
- 37
- 38
- 39
- 40
- 41
- 42
- 43
- 44
- 45
- 46
- 47
- 48
- 49
- 50
- 51
- 52
- 53
- 54
- 55
- 56
- 57
- 58
- 59
- 60
- 61
- 62
创建切面类
拦截操作日志并将其转化为 JSON 格式,输出转换后的 JSON 数据。
@Aspect @Component public class LogAspect{ private static final Logger LOGGER = LoggerFactory.getLogger(LogAspect.class); @Autowired public final ObjectMapper objectMapper; //切入点定义:拦截所有Controller方法 @Pointcut("execution(* com.icoderoad.example.product.controller.*.*(..))") public void webLog(){ } //在方法返回后执行 @AfterReturning(returning="result",pointcut="webLog()") public void doAfterReturning(JoinPoint joinPoint,Object result) throws Throwable { //获取当前请求的属性 ServletRequestAttributes attributes = (ServletRequestAttributes)RequestContextHolder.getRequestAttributes(); HttpServletRequest request = attributes.getRequest(); //创建weblog对象,并填充信息 WebLog webLog = new WebLog(); webLog.setStartTime(System.currentTimeMillis()); webLog.setBasePath(request.getScheme() + "://" + request.getServerName() + ":" + request.getServerPort()); webLog.setUri(request.getRequestURI()); webLog.setUrl(request.getRequestURL().toString()); webLog.setMethod(request.getMethod()); webLog.setIp(getClientIp(request)); // 获取客户端真实 IP 地址 webLog.setParameter(Arrays.toString(joinPoint.getArgs())); webLog.setResult(result); //将WebLog对象转换为JSON格式,并输出到控制台(实际应该输出到日志文件) String logJson = objectMapper.writeValueAsString(webLog); LOGGER.info(logJson); } // 获取客户端真实 IP 地址 private String getClientIp(HttpServletRequest request) { String ipAddress = request.getHeader("X-Forwarded-For"); if (ipAddress == null || ipAddress.length() == 0 || "unknown".equalsIgnoreCase(ipAddress)) { ipAddress = request.getHeader("Proxy-Client-IP"); } if (ipAddress == null || ipAddress.length() == 0 || "unknown".equalsIgnoreCase(ipAddress)) { ipAddress = request.getHeader("WL-Proxy-Client-IP"); } if (ipAddress == null || ipAddress.length() == 0 || "unknown".equalsIgnoreCase(ipAddress)) { ipAddress = request.getRemoteAddr(); } if (ipAddress != null && ipAddress.contains(",")) { ipAddress = ipAddress.split(",")[0].trim(); } return ipAddress; } }- 1
- 2
- 3
- 4
- 5
- 6
- 7
- 8
- 9
- 10
- 11
- 12
- 13
- 14
- 15
- 16
- 17
- 18
- 19
- 20
- 21
- 22
- 23
- 24
- 25
- 26
- 27
- 28
- 29
- 30
- 31
- 32
- 33
- 34
- 35
- 36
- 37
- 38
- 39
- 40
- 41
- 42
- 43
- 44
- 45
- 46
- 47
- 48
- 49
- 50
- 51
- 52
- 53
- 54
- 55
- 56
- 57
项目启动类,启动的时候扫描mapper所在的包
@SpringBootApplication @MapperScan("com.icoderoad.example.product.mapper") public class AopLogbackProductApplication { public static void main(String[] args) { SpringApplication.run(AopLogbackProductApplication.class, args); } }- 1
- 2
- 3
- 4
- 5
- 6
- 7
- 8
- 9
视图展示层Thymeleaf
DOCTYPE html> <html xmlns:th="http://www.thymeleaf.org"> <head> <meta charset="UTF-8"> <title>商品列表title> <link href="https://cdn.jsdelivr.net/npm/bootstrap/dist/css/bootstrap.min.css" rel="stylesheet"> head> <body> <div class="container"> <h1>商品列表h1> <table class="table table-striped"> <thead> <tr> <th>IDth> <th>名称th> <th>价格th> <th>描述th> tr> thead> <tbody> <tr th:each="product : ${products}"> <td th:text="${product.id}">td> <td th:text="${product.name}">td> <td th:text="${product.price}">td> <td th:text="${product.description}">td> tr> tbody> table> div> body> html>- 1
- 2
- 3
- 4
- 5
- 6
- 7
- 8
- 9
- 10
- 11
- 12
- 13
- 14
- 15
- 16
- 17
- 18
- 19
- 20
- 21
- 22
- 23
- 24
- 25
- 26
- 27
- 28
- 29
- 30
- 31
- 32
=====================================================
Filter和HandlerInterceptor
Filter和HandlerInterceptor自身的一些局限性:
过滤器(Filter)是与servlet相关联的一个接口,主要适用于java web项目中,依赖于Servlet容器,是利用java的回调机制来实现过滤拦截来自浏览器端的http请求,可以拦截到访问URL对应的方法的请求和响应(ServletRequest request, ServletResponse response),但是不能对请求和响应信息中的值进行修改;一般用于设置字符编码、鉴权操作等;
如果想要做到更细一点的类和方法或者是在非servlet环境中使用,则是做不到的;所以凡是依赖Servlet容器的环境,过滤器都可以使用,如Struts2、SpringMVC;

拦截器的(HandlerInterceptor)使用范围以及功能和过滤器很类似,但是也是有区别的。首先,拦截器(HandlerInterceptor)适用于SpringMVC中,因为HandlerInterceptor接口是SpringMVC相关的一个接口,而实现java Web项目,SpringMVC是目前的首选选项,但不是唯一选项,还有struts2等;因此,如果是非SpingMVC的项目,HandlerInterceptor无法使用的;
其次,和过滤器一样,拦截器可以拦截到访问URL对应的方法的请求和响应(ServletRequest request, ServletResponse response),但是不能对请求和响应信息中的值进行修改;一般用于设置字符编码、鉴权操作等;如果想要做到更细一点的类和方法或者是在非servlet环境中使用,则也是是做不到的;
拦截器和过滤器的区别:
- 运行顺序不同,过滤器是在Servlet容器收到请求之后,但是在Servlet容器调用之前执行。而拦截器是在Servlet容器被调用之后,响应发送给客户之前执行
- 配置方式不同,过滤器是在web.xml文件中配置。而拦截器是在Spring配置文件中实现或者通过注解的方式来实现。
- Filter依赖于Servlet容器,Interceptor不依赖于Servlet容器
- Filter过滤只能对response和request进行操作,而interceptor能对response/request/handle/modleAndview/exception进行操作
总之,过滤器和拦截器的功能很类似,但是拦截器的适用范围比过滤器更小

三者对比:
优先级:过滤器>拦截器>SpringAOP
- 作用域不同
过滤器依赖sservlet容器,只能在servlet,web环境下使用,对请求-响应入口进行过滤拦截
拦截器依赖于springMVC,可以在SpringMVC项目中使用,SpringMVC的核心是DispatcherServlet,
而DispatcherServlet又属于Servlet的子类,因此作用域和过滤器类似SpringAOP对作用域没有限制,只要定义好切点,可以在请求-想用的入口层(controller)拦截处理,也可以在请求的业务处理层(service)拦截处理
- 颗粒度不同
过滤器的控制颗粒度比较粗,只能在doFilter中的请求和响应进行过滤和拦截处理
拦截器提供了preHandle()/postHandle()/afterCompletion()可以在controller对请求处理之前、请求处理之后、请求响应完毕织入业务操作
SpringAOP提供了前置通知、后置通知、返回后通知、异常通知、环绕通知,比拦截器更加精细化的颗粒度控制,甚至可以修改返回值;
案例:
<dependency> <groupId>org.springframework.bootgroupId> <artifactId>spring-boot-starter-aopartifactId> dependency>- 1
- 2
- 3
- 4
create table if not exists bus_log ( id bigint auto_increment comment '自增id' primary key, bus_name varchar(100) null comment '业务名称', bus_descrip varchar(255) null comment '业务操作描述', oper_person varchar(100) null comment '操作人', oper_time datetime null comment '操作时间', ip_from varchar(50) null comment '操作来源ip', param_file varchar(255) null comment '操作参数报文文件' ) comment '业务操作日志' default charset ='utf8';- 1
- 2
- 3
- 4
- 5
- 6
- 7
- 8
- 9
- 10
- 11
- 12
/** 定义业务日志注解@BusLog */ @Target({ElementType.METHOD,ElementType.TYPE}) @Retention(RetentionPolicy.RUNTIME) public @interface BusLog{ /** * 功能名称 * @return */ String name() default ""; /** * 功能描述 * @return */ String descrip() default ""; }- 1
- 2
- 3
- 4
- 5
- 6
- 7
- 8
- 9
- 10
- 11
- 12
- 13
- 14
- 15
- 16
- 17
- 18
- 19
/** 把业务操作日志注解BusLog标记在PersonController类和方法上 */ @RestController @Slf4j @BusLog(name="人员管理") @RequestMapping("/person") public class PersonController{ @Autowired private IPersonService personService; private Integer maxCount = 100; @PostMapping @NeedEncrypt @BusLog(descrip = "添加单挑人员信息") public Person add(@RequestBody Person person){ Person result = this.personService.registe(person); log.info("增加person执行完成"); return result; } @PostMapping("/batch") @BusLog(descrip = "批量添加人员信息") public String addBatch(@RequestBody List<Person> personList){ this.personService.addBatch(personList); return String.valueOf(System.currentTimeMillis()); } @GetMapping @NeedDecrypt @BusLog(descrip = "人员信息列表查询") public PageInfo<Person> list(Integer page, Integer limit, String searchValue) { PageInfo<Person> pageInfo = this.personService.getPersonList(page,limit,searchValue); log.info("//查询person列表执行完成"); return pageInfo; } @GetMappping("/{loginNo}") @NeedDecrypt @BusLog(descip = "人员信息详情查询") public Person info(@PathVariable String loginNo,String phoneVal){ Person person = this.personService.get(loginNo); log.info("查询person详情执行完成"); return person; } @PutMapping @NeedEncrypt @BusLog(descrip = "修改人员信息") public String edit(@RequestBody Person person) { this.personService.update(person); log.info("//查询person详情执行完成"); return String.valueOf(System.currentTimeMillis()); } @DeleteMapping @BusLog(descrip = "删除人员信息") public String edit(@PathVariable(name = "id") Integer id) { this.personService.delete(id); log.info("//查询person详情执行完成"); return String.valueOf(System.currentTimeMillis()); } }- 1
- 2
- 3
- 4
- 5
- 6
- 7
- 8
- 9
- 10
- 11
- 12
- 13
- 14
- 15
- 16
- 17
- 18
- 19
- 20
- 21
- 22
- 23
- 24
- 25
- 26
- 27
- 28
- 29
- 30
- 31
- 32
- 33
- 34
- 35
- 36
- 37
- 38
- 39
- 40
- 41
- 42
- 43
- 44
- 45
- 46
- 47
- 48
- 49
- 50
- 51
- 52
- 53
- 54
- 55
- 56
- 57
- 58
- 59
- 60
- 61
- 62
- 63
- 64
切面类
使用@BusLog定义切入点,在环绕通知内执行过目标方法后,获取目标类、目标方法上的业务日志注解上的功能名称和功能描述, 把方法的参数报文写入到文件中,最后保存业务操作日志信息;@Component @Aspect @Slf4j public class BusLogAop implements Ordered { @Autowired private BusLogDao busLogDao; /** * 定义BusLogAop的切入点为标记@BusLog注解的方法 */ @Pointcut(value = "@annotation(com.fanfu.anno.BusLog)") public void pointcut() { } /** * 业务操作环绕通知 * * @param proceedingJoinPoint * @retur */ @Around("pointcut()") public Object around(ProceedingJoinPoint proceedingJoinPoint) { log.info("----BusAop 环绕通知 start"); //执行目标方法 Object result = null; try { result = proceedingJoinPoint.proceed(); } catch (Throwable throwable) { throwable.printStackTrace(); } //目标方法执行完成后,获取目标类、目标方法上的业务日志注解上的功能名称和功能描述 Object target = proceedingJoinPoint.getTarget(); Object[] args = proceedingJoinPoint.getArgs(); MethodSignature signature = (MethodSignature) proceedingJoinPoint.getSignature(); BusLog anno1 = target.getClass().getAnnotation(BusLog.class); BusLog anno2 = signature.getMethod().getAnnotation(BusLog.class); BusLogBean busLogBean = new BusLogBean(); String logName = anno1.name(); String logDescrip = anno2.descrip(); busLogBean.setBusName(logName); busLogBean.setBusDescrip(logDescrip); busLogBean.setOperPerson("fanfu"); busLogBean.setOperTime(new Date()); JsonMapper jsonMapper = new JsonMapper(); String json = null; try { json = jsonMapper.writeValueAsString(args); } catch (JsonProcessingException e) { e.printStackTrace(); } //把参数报文写入到文件中 OutputStream outputStream = null; try { String paramFilePath = System.getProperty("user.dir") + File.separator + DateUtil.format(new Date(), DatePattern.PURE_DATETIME_MS_PATTERN) + ".log"; outputStream = new FileOutputStream(paramFilePath); outputStream.write(json.getBytes(StandardCharsets.UTF_8)); busLogBean.setParamFile(paramFilePath); } catch (FileNotFoundException e) { e.printStackTrace(); } catch (IOException e) { e.printStackTrace(); } finally { if (outputStream != null) { try { outputStream.flush(); outputStream.close(); } catch (IOException e) { e.printStackTrace(); } } } //保存业务操作日志信息 this.busLogDao.insert(busLogBean); log.info("----BusAop 环绕通知 end"); return result; } @Override public int getOrder() { return 1; } }- 1
- 2
- 3
- 4
- 5
- 6
- 7
- 8
- 9
- 10
- 11
- 12
- 13
- 14
- 15
- 16
- 17
- 18
- 19
- 20
- 21
- 22
- 23
- 24
- 25
- 26
- 27
- 28
- 29
- 30
- 31
- 32
- 33
- 34
- 35
- 36
- 37
- 38
- 39
- 40
- 41
- 42
- 43
- 44
- 45
- 46
- 47
- 48
- 49
- 50
- 51
- 52
- 53
- 54
- 55
- 56
- 57
- 58
- 59
- 60
- 61
- 62
- 63
- 64
- 65
- 66
- 67
- 68
- 69
- 70
- 71
- 72
- 73
- 74
- 75
- 76
- 77
- 78
- 79
- 80
- 81
- 82
- 83
调试
平时后端调试接口,一般都是使用postman,这里给大家安利一款工具,即Intellij IDEA的Test RESTful web service,功能和使用和postman差不多,唯一的好处就是不用在电脑上再额外装个postman,功能入口:工具栏的Tools–>http client–>Test RESTful web

简单几句就可以发起一个http请求,还可以一次批量执行;


结果如下:

拦截器实现数据脱敏

hutool工具包提供的脱敏工具类DesensitizedUtil,它提供了常见的手机号、身份证号、银行卡、邮箱等脱敏的方法,将敏感数据部分加*处理。1、依赖
<dependency> <groupId>cn.hutoolgroupId> <artifactId>hutool-coreartifactId> <version>5.8.4version> dependency>- 1
- 2
- 3
- 4
- 5
- 6
hutool工具类
利用hutool工具包,对常见的手机号、身份证号、银行卡号、邮箱进行脱敏处理。还给了一个默认的DEFAULT枚举类型按原数据返回,同时自定义了一个CUSTOM枚举,可根据实现CustomMaskService这个接口去自定义脱敏逻辑public class SensitiveHutoolTest{ public static void main(){ System.out.println(DesensitizedUtils.mobilePhone("13812345678")); System.out.println(DesensitizedUtil.idCardNum("110101200007283706", 3, 4)); System.out.println(DesensitizedUtil.bankCard("6225809637392380845")); System.out.println(DesensitizedUtil.email("zhangsanfeng@test.com")); } }- 1
- 2
- 3
- 4
- 5
- 6
- 7
- 8
- 9

代码实现:
一、定义脱敏类型枚举
上述对对常见的手机号、身份证号、银行卡号、邮箱进行脱敏处理。还给了一个默认的DEFAULT枚举类型按原数据返回,同时自定义了一个CUSTOM枚举,可根据实现CustomMaskService这个接口去自定义脱敏逻辑
实际情况可根据实际需求进行输入输出参数的扩展
public enum SensitiveTypeEnum{ MOBILE("mobile","手机号"){ //手机号前3位后4位脱敏,中间部分加*处理 @Override return DesensitizedUtil.mobilePhone(data); }, IDENTIFY("identify","身份证号"){ @Override public String maskSensitiveData(String data){ return DesensitizedUtil.idCardNum(data,3,4); } }, BANKCARD("bankcard","银行卡号"){ @Override public String maskSensitiveData(String data){ return DesensitizedUtil.bankCard(data); } }, EMAIL("email","邮箱"){ //邮箱@符号后明文显示,@符号前的字符串,只显示第一个字符,其余加*处理,比如:z***********@test.com @Override public String maskSensitiveData(String data){ return DesensitizedUtil.email(data); } }, DEFAULT("default","默认"){ // 默认原值返回,其他这个也没啥意义^_^ @Override public String maskSensitiveData(String data){ return data; } }, CUSTOM("custom","自定义"){ @Override public String maskSensitiveData(String data, CustomMaskService customMaskService) { // 可以自定义处理的service,根据实际使用情况可能需要添加参数,调整一下即可 return customMaskService.maskData(data); } }; @Getter private String type; @Getter private String desc; SensitiveTypeEnum(String type,String desc){ this.type = type; this.desc = desc; } /** 遮挡敏感数据 */ public String maskSensitiveData(String data){ return data; } public String maskSensitiveData(String data,CustomMaskService customMaskService){ return null; } }- 1
- 2
- 3
- 4
- 5
- 6
- 7
- 8
- 9
- 10
- 11
- 12
- 13
- 14
- 15
- 16
- 17
- 18
- 19
- 20
- 21
- 22
- 23
- 24
- 25
- 26
- 27
- 28
- 29
- 30
- 31
- 32
- 33
- 34
- 35
- 36
- 37
- 38
- 39
- 40
- 41
- 42
- 43
- 44
- 45
- 46
- 47
- 48
- 49
- 50
- 51
- 52
- 53
- 54
- 55
- 56
- 57
- 58
- 59
- 60
- 61
- 62
- 63
- 64
- 65
- 66
- 67
- 68
- 69
二、定义一个脱敏注解
@Documented @Retention(RetentionPolicy.RUNTIME) @Target(ElementType,FIELD) public @interface SensitiveData{ SensitiveTypeEnum type() default SensitiveTypeEnum.DEFAULT; }- 1
- 2
- 3
- 4
- 5
- 6
三、定义mybatis拦截器
拦截器注解里写明要拦截的对象和方法
类:ResultSetHandler,方法:handleResultSets
在sql执行完成后拿出结果集并对结果集进行处理返回@Intercepts({ @Signature(type=ResultSetHandler.class,method="handleResultSets",args = {Statement.class}) }) @Slf4j public class SensitiveDataInterceptor implements Interceptor{ @Autowired private CustomMaskService customMaskService; @Override public Object intercept(Invocation invocation) throws Throwable{ Object result = invocation.proceed(); log.debug("进入数据脱敏拦截器……"); if(result instanceof List){ List<?> resultList = (List<?>)result; for(Object obj : resultList){ doSensitiveFields(obj); } }else if(result instanceof Map){ Map<?,?> resultMap = (Map<?,?>)result; for(Object obj:resultMap.values()){ doSensitiveFields(obj); } }else{ doSensitiveFields(result); } return result; } private void doSensitiveFields(Object obj) throws IllegalAccessException{ Field[] fields = obj.getClass().getDeclaredFields();//获取其所有属性 for(Field field:fields){ if(field.isAnnotationPresent(SensitiveData.class)){ field.setAccessible(true);//包括private属性 Object value = field.get(obj); if(value == null){ return; } SensitiveData sensitiveData = field.getAnnotation(SensitiveData.class); SensitiveTypeEnum type = sensitiveData.type(); String result; if(type == SensitiveTypeEnum.CUSTOM){ result = type.maskSensitiveData(value.toString(), customMaskService); }else{ result = type.maskSensitiveData(value.toString()); } field.set(obj,result); } } } }- 1
- 2
- 3
- 4
- 5
- 6
- 7
- 8
- 9
- 10
- 11
- 12
- 13
- 14
- 15
- 16
- 17
- 18
- 19
- 20
- 21
- 22
- 23
- 24
- 25
- 26
- 27
- 28
- 29
- 30
- 31
- 32
- 33
- 34
- 35
- 36
- 37
- 38
- 39
- 40
- 41
- 42
- 43
- 44
- 45
- 46
- 47
- 48
- 49
- 50
- 51
- 52
- 53
- 54
- 55
四、配置拦截器
@Confituration @MapperScan("com.xxx.mybatisplus.mapper") public class MyBatisPlusConfig{ @Bean public SensitiveDataInterceptor sensitiveDataInterceptor(){ return new SensitiveDataInterceptor(); } }- 1
- 2
- 3
- 4
- 5
- 6
- 7
- 8
- 9
五、测试
@Data public class UserDto { /** * id */ private Long id; /** * 姓名 */ @SensitiveData(type = CUSTOM) private String name; /** * 年龄 */ private Integer age; /** * 邮箱 */ @SensitiveData(type = EMAIL) private String email; /** * 手机号 */ @SensitiveData(type = MOBILE) private String mobile; /** * 身份证号 */ @SensitiveData(type = IDENTIFY) private String identify; /** * 银行卡号 */ @SensitiveData(type = BANKCARD) private String bankcard; }- 1
- 2
- 3
- 4
- 5
- 6
- 7
- 8
- 9
- 10
- 11
- 12
- 13
- 14
- 15
- 16
- 17
- 18
- 19
- 20
- 21
- 22
- 23
- 24
- 25
- 26
- 27
- 28
- 29
- 30
- 31
- 32
- 33
- 34
- 35
- 36
- 37
- 38
- 39
- 40
Service接口及其实现类
public interface CustomMaskService{ String maskData(String data); } @Service public class CustomMaskServiceImpl implements CustomMaskService{ @Override public String maskData(){ //第一个字符明文,其他都加*处理 return CharSequenceUtil.hide(data,1,data.length()); } }- 1
- 2
- 3
- 4
- 5
- 6
- 7
- 8
- 9
- 10
- 11
- 12
- 13
Mapper
@Mapper public interface UserMapper extends BaseMapper<User>{ @Select({"select * from user where id=#{id}"}) UserDto getSpecialUser(String id); @Select({"select * from user"}) List<UserDto> queryAll(); }- 1
- 2
- 3
- 4
- 5
- 6
- 7
- 8
Controller
@RestController @RequestMapping("/sensitive") public class SensitiveMyBatisInterceptorTestController{ @Resource private UserMapper userMapper; @GetMapping("/user/{id}") public Result<UserDto> queryUserInfo(@PathVariable String id){ return Result.success(userMapper.getSpecialUser(id)); } @GetMapping("/userlist") public Result<List<UserDto>> queryUserList(){ return Result.success(userMapper.queryAll()); } }- 1
- 2
- 3
- 4
- 5
- 6
- 7
- 8
- 9
- 10
- 11
- 12
- 13
- 14
- 15
- 16
- 17


Spring Boot 实现热插拔 AOP
一、动态管理advice端点实现
@RestControllerEndpoint(id="proxy") @RequireArgsConstructor public class ProxyMetaDefinitionControllerEndPoint{ private final ProxyMetaDefinitionRespository proxyMetaDefinitionRepository; @GetMapping("listMeta") public List<ProxyMetaDefinition> getProxyMetaDefinitions(){ return proxyMetaDefinitionRepository.getProxyMetaDefinitions(); } @GetMapping("{id}") public ProxyMetaDefinition getProxyMetaDefinition(@PathVariable("id") String proxyMetaDefinitionId){ return proxyMetaDefinitionRepository.getProxyMetaDefinition(proxyMetaDefinitionId); } @PostMapping("save") public String save(@RequestBody ProxyMetaDefinition definition){ try{ proxyMetaDefinitionRepository.save(definition); return "success"; }catch(Exception e){ } return "fail"; } @PostMapping("delete/{id}") public String delete(@PathVariable("id") String proxyMetaDefinitionId){ try{ proxyMetaDefinitionRepository.delete(proxyMetaDefinitionId); return "success"; }catch(Exception e){ } return "fail"; } }- 1
- 2
- 3
- 4
- 5
- 6
- 7
- 8
- 9
- 10
- 11
- 12
- 13
- 14
- 15
- 16
- 17
- 18
- 19
- 20
- 21
- 22
- 23
- 24
- 25
- 26
- 27
- 28
- 29
- 30
- 31
- 32
- 33
- 34
- 35
- 36
- 37
- 38
- 39
二、利用事件监听机制捕获安装或者卸载插件
@RequiredArgsConstructor public class ProxyMetaDefinitionChangeListener{ private final AopPluginFactory aopPluginFactory; @EventListener public void listener(ProxyMetaDefinitionChangeEvent proxyMetaDefinitionChangeEvent){ ProxyMetaInfo proxyMetaInfo = aopPluginFactory.getProxyMetaInfo(proxyMetaDefinitionChangeEvent.getProxyMetaDefinition()); switch (proxyMetaDefinitionChangeEvent.getOperateEventEnum()){ case ADD: aopPluginFactory.installPlugin(proxyMetaInfo); break; case DEL: aopPluginFactory.uninstallPlugin(proxyMetaInfo.getId()); break; } } }- 1
- 2
- 3
- 4
- 5
- 6
- 7
- 8
- 9
- 10
- 11
- 12
- 13
- 14
- 15
- 16
- 17
- 18
- 19
三、安装插件
public void installPlugin(ProxyMetaInfo proxyMetaInfo){ if(StringUtils.isEmpty(proxyMetaInfo.getId())){ proxyMetaInfo.setId(proxyMetaInfo.getProxyUrl() + SPIILT + proxyMetaInfo.getProxyClassName()); } AopUtil.registerProxy(defaultListableBeanFactory,proxyMetaInfo); }- 1
- 2
- 3
- 4
- 5
- 6
四、安装插件核心实现
public static void registerProxy(DefaultListableBeanFactory beanFactory,ProxyMetaInfo proxyMetaInfo){ AspectJExpressionPointcutAdvisor advisor = getAspectJExpressionPointcutAdvisor(beanFactory, proxyMetaInfo); addOrDelAdvice(beanFactory,OperateEventEnum.ADD,advisor); } private static AspectJExpressionPointcutAdvisor getAspectJExpressionPointcutAdvisor(DefaultListableBeanFactory beanFactory, ProxyMetaInfo proxyMetaInfo) { BeanDefinitionBuilder builder = BeanDefinitionBuilder.genericBeanDefinition(); GenericBeanDefinition beanDefinition = (GenericBeanDefinition) builder.getBeanDefinition(); beanDefinition.setBeanClass(AspectJExpressionPointcutAdvisor.class); AspectJExpressionPointcutAdvisor advisor = new AspectJExpressionPointcutAdvisor(); advisor.setExpression(proxyMetaInfo.getPointcut()); advisor.setAdvice(Objects.requireNonNull(getMethodInterceptor(proxyMetaInfo.getProxyUrl(), proxyMetaInfo.getProxyClassName()))); beanDefinition.setInstanceSupplier((Supplier<AspectJExpressionPointcutAdvisor>) () -> advisor); beanFactory.registerBeanDefinition(PROXY_PLUGIN_PREFIX + proxyMetaInfo.getId(),beanDefinition); return advisor; }- 1
- 2
- 3
- 4
- 5
- 6
- 7
- 8
- 9
- 10
- 11
- 12
- 13
- 14
- 15
- 16
- 17
- 18
- 19
五、卸载插件
public void uninstallPlugin(String id){ String beanName = PROXY_PLUGIN_PREFIX + id; if(defaultListableBeanFactory.containsBean(beanName)){ AopUtil.destoryProxy(defaultListableBeanFactory,id); }else{ throw new NoSuchElementException("Plugin not found: " + id); } }- 1
- 2
- 3
- 4
- 5
- 6
- 7
- 8
六、卸载插件核心
public static void destoryProxy(DefaultListableBeanFactory beanFactory,String id){ String beanName = PROXY_PLUGIN_PREFIX + id; if(beanFactory.containsBean(beanName)){ AspectJExpressionPointcutAdvisor advisor = beanFactory.getBean(beanName,AspectJExpressionPointcutAdvisor.class); addOrDelAdvice(beanFactory,OperateEventEnum.DEL,advisor); beanFactory.destroyBean(beanFactory.getBean(beanName)); } }- 1
- 2
- 3
- 4
- 5
- 6
- 7
- 8
七、操作advice
public static void addOrDelAdvice(DefaultListableBeanFactory beanFactory, OperateEventEnum operateEventEnum, AspectJExpressionPointcutAdvisor advisor){ AspectJExpressionPointcut pointcut = (AspectJExpressionPointcut) advisor.getPointcut(); for (String beanDefinitionName : beanFactory.getBeanDefinitionNames()) { Object bean = beanFactory.getBean(beanDefinitionName); if(!(bean instanceof Advised)){ if(operateEventEnum == OperateEventEnum.ADD){ buildCandidateAdvised(beanFactory,advisor,bean,beanDefinitionName); } continue; } Advised advisedBean = (Advised) bean; boolean isFindMatchAdvised = findMatchAdvised(advisedBean.getClass(),pointcut); if(operateEventEnum == OperateEventEnum.DEL){ if(isFindMatchAdvised){ advisedBean.removeAdvice(advisor.getAdvice()); log.info("########################################## Remove Advice -->【{}】 For Bean -->【{}】 SUCCESS !",advisor.getAdvice().getClass().getName(),bean.getClass().getName()); } }else if(operateEventEnum == OperateEventEnum.ADD){ if(isFindMatchAdvised){ advisedBean.addAdvice(advisor.getAdvice()); log.info("########################################## Add Advice -->【{}】 For Bean -->【{}】 SUCCESS !",advisor.getAdvice().getClass().getName(),bean.getClass().getName()); } } } }- 1
- 2
- 3
- 4
- 5
- 6
- 7
- 8
- 9
- 10
- 11
- 12
- 13
- 14
- 15
- 16
- 17
- 18
- 19
- 20
- 21
- 22
- 23
- 24
- 25
- 26
- 27
- 28
- 29
- 30
热插拔AOP演示实例
一、创建一个service
@Service @Slf4j public class HelloService implements BeanNameAware, BeanFactoryAware { private BeanFactory beanFactory; private String beanName; @SneakyThrows public String sayHello(String message) { Object bean = beanFactory.getBean(beanName); log.info("============================ {} is Advised : {}",bean, bean instanceof Advised); TimeUnit.SECONDS.sleep(new Random().nextInt(3)); log.info("============================ hello:{}",message); return "hello:" + message; } @Override public void setBeanFactory(BeanFactory beanFactory) throws BeansException { this.beanFactory = beanFactory; } @Override public void setBeanName(String name) { this.beanName = name; } }- 1
- 2
- 3
- 4
- 5
- 6
- 7
- 8
- 9
- 10
- 11
- 12
- 13
- 14
- 15
- 16
- 17
- 18
- 19
- 20
- 21
- 22
- 23
- 24
- 25
- 26
- 27
- 28
二、创建一个controller
@RestController @RequestMapping("hello") @RequiredArgsConstructor public class HelloController { private final HelloService helloService; @GetMapping("{message}") public String sayHello(@PathVariable("message")String message){ return helloService.sayHello(message); } }- 1
- 2
- 3
- 4
- 5
- 6
- 7
- 8
- 9
- 10
- 11
- 12
============================
SpringBoot AOP+Redis延时双删功能
业务场景:
在多线程并发情况下,假设有两个数据库修改请求,为保证数据库与redis的数据一致性,修改请求的实现中需要修改数据库后,级联修改Redis中的数据。
- 请求一:A修改数据库数据 B修改Redis数据
- 请求二:C修改数据库数据 D修改Redis数据
并发情况下就会存在A —> C —> D —> B的情况(线程并发执行多组原子操作执行顺序是可能存在交叉现象的)
问题复现:
- A修改数据库的数据最终保存到了Redis中,C在A之后也修改了数据库数据
- 此时出现了Redis中数据和数据库数据不一致的情况,在后面的查询过程中就会长时间去先查Redis, 从而出现查询到的数据并不是数据库中的真实数据的严重问题。
解决方案:
在使用Redis时,需要保持Redis和数据库数据的一致性,最流行的解决方案之一就是延时双删策略。
要知道经常修改的数据表不适合使用Redis,因为双删策略执行的结果是把Redis中保存的那条数据删除了,以后的查询就都会去查询数据库。所以Redis使用的是读远远大于改的数据缓存。
步骤:
- 删除缓存
- 更新数据库
- 延时500毫秒 (根据具体业务设置延时执行的时间)
- 删除缓存
为何要延时500毫秒?
在第二次删除Redis之前能完成数据库的更新操作。假象一下,如果没有第三步操作时,有很大概率,在两次删除Redis操作执行完毕之后,数据库的数据还没有更新,此时若有请求访问数据,便会出现我们一开始提到的那个问题。
为何要两次删除缓存?
如果我们没有第二次删除操作,此时有请求访问数据,有可能是访问的之前未做修改的Redis数据,删除操作执行后,Redis为空,有请求进来时,便会去访问数据库,此时数据库中的数据已是更新后的数据,保证了数据的一致性。
一、引入Redis和SpringBoot AOP依赖
<dependency> <groupId>org.springframework.bootgroupId> <artifactId>spring-boot-starter-data-redisartifactId> dependency> <dependency> <groupId>org.springframework.bootgroupId> <artifactId>spring-boot-starter-aopartifactId> dependency>- 1
- 2
- 3
- 4
- 5
- 6
- 7
- 8
- 9
- 10
二、编写自定义aop注解和切面
@Retention(RetentionPolicy.RUNTIME) @Dodumented @Target(ElementType.METHOD) public @interface ClearAndReloadCache{ String name() default ""; }- 1
- 2
- 3
- 4
- 5
- 6
- 7
@Aspect @Component public class ClearAndReloadCacheAspect{ @Autowired private String RedisTemplate stringRedisTemplate; @Pointcut("@annotation(com.michael.ClearAndReloadCache)") public void pointCut(){} @Around("pointCut()") public Object aroundAdvice(ProceedingJoinPoint proceedingJoinPoint){ System.out.println("----------- 环绕通知 -----------"); System.out.println("环绕通知的目标方法名:" + proceedingJoinPoint.getSignature().getName()); Signature signature1 = proceedingJoinPoint.getSignature(); MethodSignature methodSignature = (MethodSignature)signature1; Method targetMethod = methodSignature.getMethod();//获取目标方法 //获取目标方法的注解 ClearAndReloadCache annotation = targetMethod.getAnnotation(ClearAndReloadCache.class); String name = annotation.name(); Set<String> keys = stringRedisTemplate.keys("*" + name + "*");//模糊定义key stringRedisTemplate.delete(keys);//模糊删除redis的key值 //执行加入双删注解的改动数据库的业务 即controller中的方法业务 Object proceed = null; try{ proceed = proceedingJoinPoint.proceed(); }catch(Throwable throwable){ throwable.printStackTrace(); } //开一个线程 延迟1秒(此处是1秒举例,可以改成自己的业务) // 在线程中延迟删除 同时将业务代码的结果返回 这样不影响业务代码的执行 new Thread(() -> { try { Thread.sleep(1000); Set<String> keys1 = stringRedisTemplate.keys("*" + name + "*");//模糊删除 stringRedisTemplate.delete(keys1); System.out.println("-----------1秒钟后,在线程中延迟删除完毕 -----------"); } catch (InterruptedException e) { e.printStackTrace(); } }).start(); return proceed;//返回业务代码的值 } }- 1
- 2
- 3
- 4
- 5
- 6
- 7
- 8
- 9
- 10
- 11
- 12
- 13
- 14
- 15
- 16
- 17
- 18
- 19
- 20
- 21
- 22
- 23
- 24
- 25
- 26
- 27
- 28
- 29
- 30
- 31
- 32
- 33
- 34
- 35
- 36
- 37
- 38
- 39
- 40
- 41
- 42
- 43
- 44
- 45
- 46
- 47
- 48
- 49
- 50
- 51
三、application.yml和user_db.sql
server: port: 8082 spring: # redis setting redis: host: localhost port: 6379 # cache setting cache: redis: time-to-live: 60000 # 60s datasource: driver-class-name: com.mysql.cj.jdbc.Driver url: jdbc:mysql://localhost:3306/test username: root password: 1234 # mp setting mybatis-plus: mapper-locations: classpath*:com/pdh/mapper/*.xml global-config: db-config: table-prefix: configuration: # log of sql log-impl: org.apache.ibatis.logging.stdout.StdOutImpl # hump map-underscore-to-camel-case: true- 1
- 2
- 3
- 4
- 5
- 6
- 7
- 8
- 9
- 10
- 11
- 12
- 13
- 14
- 15
- 16
- 17
- 18
- 19
- 20
- 21
- 22
- 23
- 24
- 25
- 26
- 27
- 28
- 29
- 30
- 31
DROP TABLE IF EXISTS `user_db`; CREATE TABLE `user_db` ( `id` int(4) NOT NULL AUTO_INCREMENT, `username` varchar(32) CHARACTER SET utf8 COLLATE utf8_general_ci NOT NULL, PRIMARY KEY (`id`) USING BTREE ) ENGINE = InnoDB AUTO_INCREMENT = 8 CHARACTER SET = utf8 COLLATE = utf8_general_ci ROW_FORMAT = Dynamic; -- ---------------------------- -- Records of user_db -- ---------------------------- INSERT INTO `user_db` VALUES (1, '张三'); INSERT INTO `user_db` VALUES (2, '李四'); INSERT INTO `user_db` VALUES (3, '王二'); INSERT INTO `user_db` VALUES (4, '麻子'); INSERT INTO `user_db` VALUES (5, '王三'); INSERT INTO `user_db` VALUES (6, '李三');- 1
- 2
- 3
- 4
- 5
- 6
- 7
- 8
- 9
- 10
- 11
- 12
- 13
- 14
- 15
- 16
四、请求接口和服务
@RequestMapping("/user") @RestController public class UserController{ @Autowired private UserService userService; @GetMapping("/get/{id}") @Cache(name = "get method") //@Cacheable(cacheNames = {"get"}) public Result get(@PathVariable("id") Integer id){ return userService.get(id); } @PostMapping("/updateData") @ClearAndReloadCache(name = "get method") public Result updateData(@RequestBody User user){ return userService.update(user); } @PostMapping("/insert") public Result insert(@RequestBody User user){ return userService.insert(user); } @DeleteMapping("/delete/{id}") public Result delete(@PathVariable("id") Integer id){ return userService.delete(id); } }- 1
- 2
- 3
- 4
- 5
- 6
- 7
- 8
- 9
- 10
- 11
- 12
- 13
- 14
- 15
- 16
- 17
- 18
- 19
- 20
- 21
- 22
- 23
- 24
- 25
- 26
- 27
- 28
- 29
- 30
@Service public class UserService { @Resource private UserMapper userMapper; public Result get(Integer id){ LambdaQueryWrapper<User> wrapper = new LambdaQueryWrapper<>(); wrapper.eq(User::getId,id); User user = userMapper.selectOne(wrapper); return Result.success(user); } public Result insert(User user){ int line = userMapper.insert(user); if(line > 0) return Result.success(line); return Result.fail(888,"操作数据库失败"); } public Result delete(Integer id) { LambdaQueryWrapper<User> wrapper = new LambdaQueryWrapper<>(); wrapper.eq(User::getId, id); int line = userMapper.delete(wrapper); if (line > 0) return Result.success(line); return Result.fail(888, "操作数据库失败"); } public Result update(User user){ int i = userMapper.updateById(user); if(i > 0) return Result.success(i); return Result.fail(888,"操作数据库失败"); } }- 1
- 2
- 3
- 4
- 5
- 6
- 7
- 8
- 9
- 10
- 11
- 12
- 13
- 14
- 15
- 16
- 17
- 18
- 19
- 20
- 21
- 22
- 23
- 24
- 25
- 26
- 27
- 28
- 29
- 30
- 31
- 32
- 33
- 34
- 35
- 36
五、测试验证
1、ID=10,新增一条数据

2、第一次查询数据库,Redis会保存查询结果

3、第一次访问ID为10
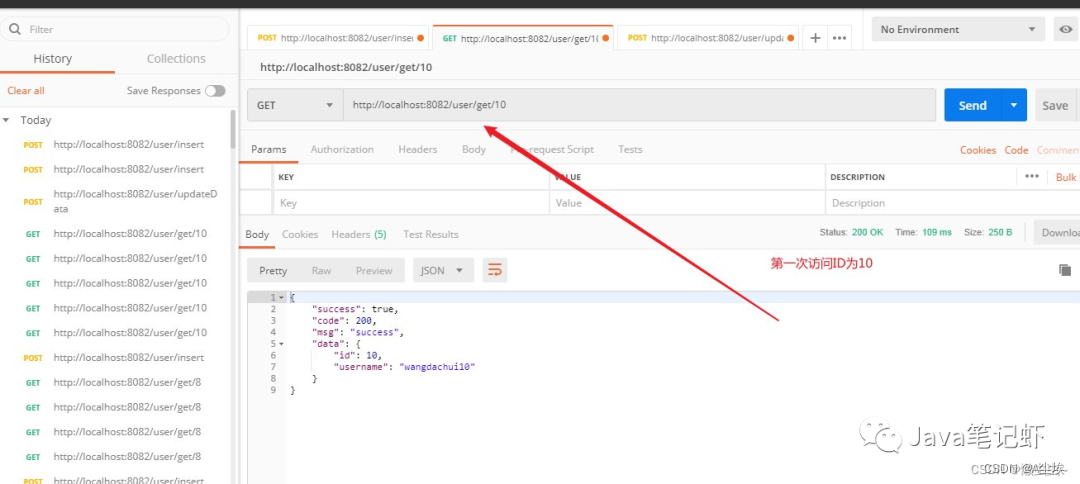
4、第一次访问数据库ID为10,将结果存入Redis

5、更新ID为10对应的用户名(验证数据库和缓存不一致方案)
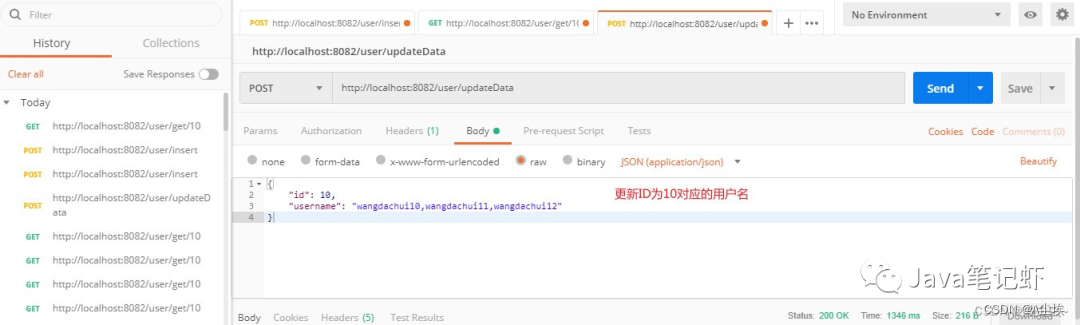
数据库和缓存不一致验证方案:打个断点,模拟A线程执行第一次删除后,在A更新数据库完成之前,另外一个线程B访问ID=10,读取的还是旧数据。


6、采用第二次删除,根据业务场景设置延时时间,两次删除缓存成功后,Redis结果为空。读取的都是数据库真实数据,不会出现读缓存和数据库不一致情况。

-
相关阅读:
k8s:部署k8s单master节点集群(kubeadm)v1.23.13
5分钟搞懂Web3架构
欧拉函数——最大公约数(gcd+筛质数+欧拉函数)
一文带你弄懂 JVM 三色标记算法!
第18篇ESP32platformio-arduino框架-ili9488-3.5lcd显示时间天气
RISC Zero的Bonsai证明服务
k8s如何快速部署tomcat
华为与「DaoCloud 道客」推出面向元宇宙的云边协同超融合一体机
二叉树及其相关题目相关的功能的实现
区块链技术与人工智能如何相互赋能
- 原文地址:https://blog.csdn.net/usa_washington/article/details/132887769
