-
【深度学习】- NLP系列文章之 1.文本表示以及mlp来处理分类问题
系列文章目录
1. 文本分类与词嵌入表示,mlp来处理分类问题
2. RNN、LSTM、GRU三种方式处理文本分类问题
3. 评论情绪分类
还是得开个坑,最近搞论文,使用lstm做的ssd的cache prefetching,意味着我不能再划水了。
1. 文本数据表示法与词嵌入
torch 是做张量计算的框架,张量只能存储数字类型的值,因此无论啥样的文本(中文、英文)都不能直接用张量表示,这就引出了文本数据的表示问题,如何表示文本数据?
1.1 文本是什么,如何表示?
文本是常用的序列化数据类型之一。文本数据可以看作是一
个字符序列或词的序列。对大多数问题,我们都将文本看作
词序列。
深度学习序列模型(如RNN及其变体)能够较好的对序列化
数据建模。
深度学习序列模型(如RNN及其变体)可以解决类似以下领
域中的问题:自然语言理解、文献分类、情感分类、问答系统等。深度学习模型并不能理解文本,因此需要将文本转换为数值
的表示形式。
将文本转换为数值表示形式的过程称为向量化过程,可以用
不同的方式来完成,词嵌入是单词的一种数值化表示方式,一般情况下会将一个单词映射到一个高维的向量中(词向量)
来代表这个单词‘机器学习’表示为 [1, 2, 3]
‘深度学习’表示为 [1, 3, 3]
‘日月光华’表示为 [9, 9, 6]
对于词向量,我们可以使用余弦相似度在计算机中来判断
单词之间的距离。
词嵌入用密集的分布式向量来表示每个单词。词向量表示方式依赖于单词的使用习惯,这就使得具有相似使用方式的单词具有相似的表示形式。Glove算法是对word2vec方法的拓展,并且更为有效。
1.2 文本的词嵌入表示处理流程
每个较小的文本单元称为token,将文本分解成token的过程称为分词(tokenization)。在 Python中有很多强大的库可以用来进行分词.
one-hot(独热)编码和词嵌入是将token映射到向量最流行的两种方法。1.3 代码展示分词过程
import torch import numpy as np import string s = "Life is not easy for any of us.We must work,and above all we must believe in ourselves.We must believe that each one of us is able to do some thing well.And that we must work until we succeed."- 1
- 2
- 3
- 4
string.punctuation- 1
'!"#$%&\'()*+,-./:;<=>?@[\\]^_`{|}~'- 1
for c in string.punctuation: s = s.replace(c," ").lower()- 1
- 2
去掉标点符号 s- 1
- 2
'life is not easy for any of us we must work and above all we must believe in ourselves we must believe that each one of us is able to do some thing well and that we must work until we succeed ’
s.split()- 1
['life', 'is', 'not', 'easy', 'for', 'any', 'of', 'us', 'we', 'must', 'work', 'and', 'above', 'all', 'we', 'must', 'believe', 'in', 'ourselves', 'we', 'must', 'believe', 'that', 'each', 'one', 'of', 'us', 'is', 'able', 'to', 'do', 'some', 'thing', 'well', 'and', 'that', 'we', 'must', 'work', 'until', 'we', 'succeed']- 1
- 2
- 3
- 4
- 5
- 6
- 7
- 8
- 9
- 10
- 11
- 12
- 13
- 14
- 15
- 16
- 17
- 18
- 19
- 20
- 21
- 22
- 23
- 24
- 25
- 26
- 27
- 28
- 29
- 30
- 31
- 32
- 33
- 34
- 35
- 36
- 37
- 38
- 39
- 40
- 41
- 42
分词方式(三):n-gram
向量化:one-hot emdedingimport numpy as np np.unique(s.split())- 1
- 2
array([‘able’, ‘above’, ‘all’, ‘and’, ‘any’, ‘believe’, ‘do’, ‘each’,
‘easy’, ‘for’, ‘in’, ‘is’, ‘life’, ‘must’, ‘not’, ‘of’, ‘one’,
‘ourselves’, ‘some’, ‘succeed’, ‘that’, ‘thing’, ‘to’, ‘until’,
‘us’, ‘we’, ‘well’, ‘work’], dtype=‘vocab = dict((word,index) for index, word in enumerate(np.unique(s.split()))) vocab 建立映射关系- 1
- 2
- 3
{‘able’: 0,
‘above’: 1,
‘all’: 2,
‘and’: 3,
‘any’: 4,
‘believe’: 5,
‘do’: 6,
‘each’: 7,
‘easy’: 8,
‘for’: 9,
‘in’: 10,
‘is’: 11,
‘life’: 12,
‘must’: 13,
‘not’: 14,
‘of’: 15,
‘one’: 16,
‘ourselves’: 17,
‘some’: 18,
‘succeed’: 19,
‘that’: 20,
‘thing’: 21,
‘to’: 22,
‘until’: 23,
‘us’: 24,
‘we’: 25,
‘well’: 26,
‘work’: 27}这是one-hot的表示方法
for index, i in enumerate(s): b[index,i] = 1 b[0:5]- 1
- 2
- 3
array([[0., 0., 0., 0., 0., 0., 0., 0., 0., 0., 0., 0., 1., 0., 0., 0., 0., 0., 0., 0., 0., 0., 0., 0., 0., 0., 0., 0.], [0., 0., 0., 0., 0., 0., 0., 0., 0., 0., 0., 1., 0., 0., 0., 0., 0., 0., 0., 0., 0., 0., 0., 0., 0., 0., 0., 0.], [0., 0., 0., 0., 0., 0., 0., 0., 0., 0., 0., 0., 0., 0., 1., 0., 0., 0., 0., 0., 0., 0., 0., 0., 0., 0., 0., 0.], [0., 0., 0., 0., 0., 0., 0., 0., 1., 0., 0., 0., 0., 0., 0., 0., 0., 0., 0., 0., 0., 0., 0., 0., 0., 0., 0., 0.], [0., 0., 0., 0., 0., 0., 0., 0., 0., 1., 0., 0., 0., 0., 0., 0., 0., 0., 0., 0., 0., 0., 0., 0., 0., 0., 0., 0.]])- 1
- 2
- 3
- 4
- 5
- 6
- 7
- 8
- 9
- 10
1.4 词嵌入表示
import torch em = torch.nn.Embedding(len(vocab), 20) s_em = em(torch.LongTensor(s)) s_em.shape torch.Size([42, 20])- 1
- 2
- 3
- 4
- 5
2.简单文本分类
这里要说明一下,torch1.8 gpu 和 torchtext 0.90 版本,这俩个要匹配,否则安装torchtext的时候,会吧torch uninstall 再install,特别麻烦。
对应关系 ref:https://pypi.org/project/torchtext/0.14.0/
可以看到2.0的torch还没有对应的torchtextimport torch import torchtext from torchtext import data import numpy as np import torch.nn as nn import torch.nn.functional as F from torchtext.vocab import GloVe from torchtext.datasets import IMDB- 1
- 2
- 3
- 4
- 5
- 6
- 7
- 8
用的是这个数据集:
IMDB:http://ai.stanford.edu/~amaas/data/sentiment/

是影评,包括三个标签,正向、负向和未知。
TORCHTEXT.DATASETS, 所有数据集都是子类 torch.data.Dataset, 她们继承自torch.utils.data.Dataset,并且具有split和iters实现的方法切分数据集:
TEXT = torchtext.legacy.data.Field(lower=True, fix_length=200,batch_first=True) LABEL = torchtext.legacy.data.Field(sequential=False) # make splits for data train,test = torchtext.legacy.datasets.IMDB.splits(TEXT,LABEL)- 1
- 2
- 3
- 4
构建词嵌入:
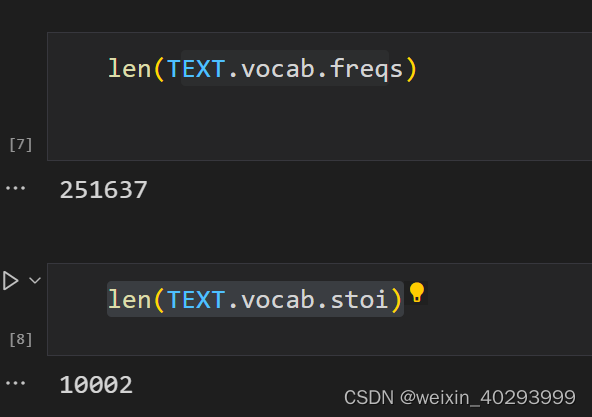
最多容量10000个词,最小的频率是出现10次。# 构建词表 vocab 构建train训练集的 top 10000个单词做训练, vectors用来提供预训练模型 TEXT.build_vocab(train, max_size = 10000,min_freq=10, vectors=None) LABEL.build_vocab(train)- 1
- 2
- 3
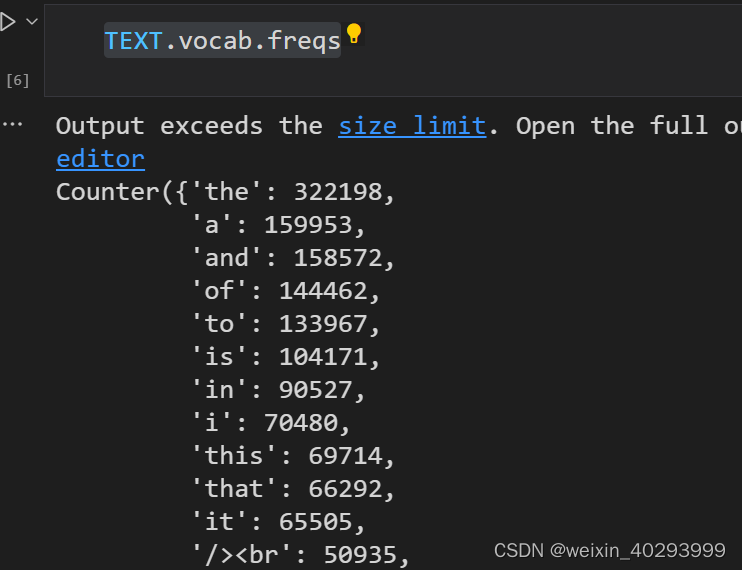
查看频率
TEXT.vocab.freqs- 1


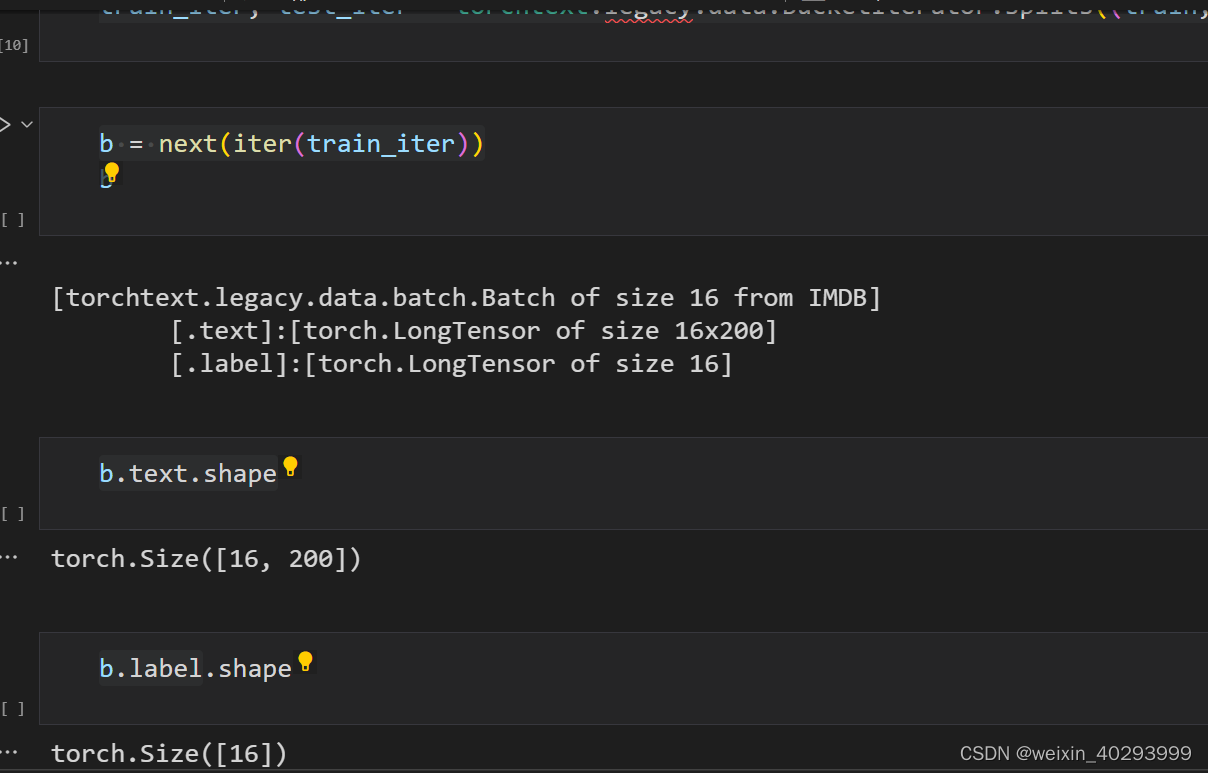
一共10002行数据,因为0是unknown, 1是padding。 超过10000的词都标记为unknowntrain_iter, test_iter = torchtext.legacy.data.BucketIterator.splits((train,test),batch_size=16)- 1

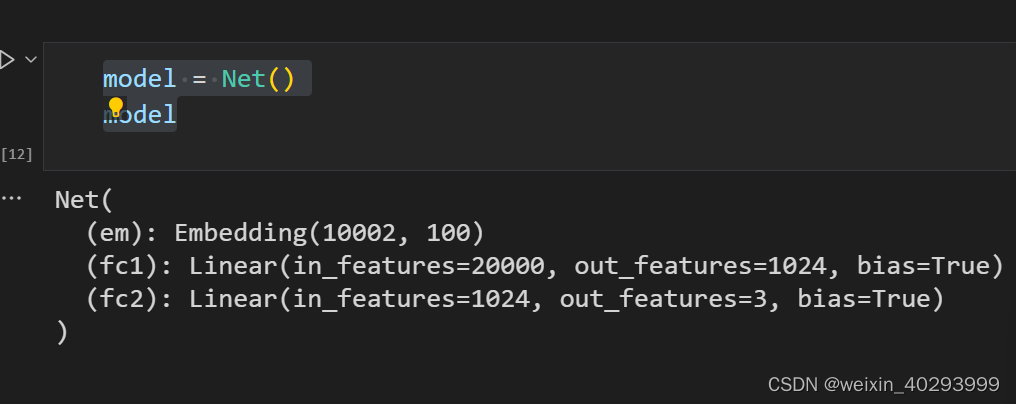
创建模型class Net(nn.Module): def __init__(self): super().__init__() self.em = nn.Embedding(len(TEXT.vocab.stoi),100) # batch*200-->batch*200*100 self.fc1 = nn.Linear(200*100,1024) self.fc2 = nn.Linear(1024,3) def forward(self,x): x = self.em(x) x = x.view(x.size(0), -1) x = self.fc1(x) x = F.relu(x) x = self.fc2(x) return x model = Net() model- 1
- 2
- 3
- 4
- 5
- 6
- 7
- 8
- 9
- 10
- 11
- 12
- 13
- 14
- 15
- 16

损失函数:loss_fn = nn.CrossEntropyLoss() optimizer = torch.optim.Adam(model.parameters(),lr=0.001)- 1
- 2
训练过程:这个代码是固定的,和我其它的文章里面也有很多
def fit(epoch, model, trainloader, testloader): correct = 0 total = 0 running_loss = 0 model.train() for b in trainloader: x, y = b.text, b.label if torch.cuda.is_available(): x, y = b.text.to('cuda'), b.label.to('cuda') y_pred = model(x) loss = loss_fn(y_pred, y) optimizer.zero_grad() loss.backward() optimizer.step() with torch.no_grad(): y_pred = torch.argmax(y_pred, dim=1) correct += (y_pred == y).sum().item() total += y.size(0) running_loss += loss.item() # exp_lr_scheduler.step() epoch_loss = running_loss / len(trainloader.dataset) epoch_acc = correct / total test_correct = 0 test_total = 0 test_running_loss = 0 model.eval() with torch.no_grad(): for b in testloader: x, y = b.text, b.label if torch.cuda.is_available(): x, y = x.to('cuda'), y.to('cuda') y_pred = model(x) loss = loss_fn(y_pred, y) y_pred = torch.argmax(y_pred, dim=1) test_correct += (y_pred == y).sum().item() test_total += y.size(0) test_running_loss += loss.item() epoch_test_loss = test_running_loss / len(testloader.dataset) epoch_test_acc = test_correct / test_total print('epoch: ', epoch, 'loss: ', round(epoch_loss, 3), 'accuracy:', round(epoch_acc, 3), 'test_loss: ', round(epoch_test_loss, 3), 'test_accuracy:', round(epoch_test_acc, 3) ) return epoch_loss, epoch_acc, epoch_test_loss, epoch_test_acc- 1
- 2
- 3
- 4
- 5
- 6
- 7
- 8
- 9
- 10
- 11
- 12
- 13
- 14
- 15
- 16
- 17
- 18
- 19
- 20
- 21
- 22
- 23
- 24
- 25
- 26
- 27
- 28
- 29
- 30
- 31
- 32
- 33
- 34
- 35
- 36
- 37
- 38
- 39
- 40
- 41
- 42
- 43
- 44
- 45
- 46
- 47
- 48
- 49
- 50
- 51
- 52
- 53
- 54
训练:
epochs = 10 train_loss = [] train_acc = [] test_loss = [] test_acc = [] for epoch in range(epochs): epoch_loss, epoch_acc, epoch_test_loss, epoch_test_acc = fit(epoch, model, train_iter, test_iter) train_loss.append(epoch_loss) train_acc.append(epoch_acc) test_loss.append(epoch_test_loss) test_acc.append(epoch_test_acc)- 1
- 2
- 3
- 4
- 5
- 6
- 7
- 8
- 9
- 10
- 11
- 12
- 13
- 14
- 15
结果输出:
epoch: 0 loss: 0.046 accuracy: 0.55 test_loss: 0.041 test_accuracy: 0.618 epoch: 1 loss: 0.026 accuracy: 0.809 test_loss: 0.046 test_accuracy: 0.69 epoch: 2 loss: 0.009 accuracy: 0.945 test_loss: 0.053 test_accuracy: 0.721 epoch: 3 loss: 0.004 accuracy: 0.975 test_loss: 0.068 test_accuracy: 0.729 epoch: 4 loss: 0.002 accuracy: 0.985 test_loss: 0.115 test_accuracy: 0.708 epoch: 5 loss: 0.002 accuracy: 0.989 test_loss: 0.098 test_accuracy: 0.737 epoch: 6 loss: 0.002 accuracy: 0.991 test_loss: 0.096 test_accuracy: 0.744 epoch: 7 loss: 0.001 accuracy: 0.996 test_loss: 0.108 test_accuracy: 0.742 epoch: 8 loss: 0.001 accuracy: 0.994 test_loss: 0.12 test_accuracy: 0.744 epoch: 9 loss: 0.001 accuracy: 0.994 test_loss: 0.128 test_accuracy: 0.74- 1
- 2
- 3
- 4
- 5
- 6
- 7
- 8
- 9
- 10
- 11
-
相关阅读:
2022数学建模国赛C题思路分析
JavaScript 字符串(String) 对象
网络安全(黑客)自学
AcWing算法提高课-5.6.1同余方程
d栈上的类
嵌入式实操----基于RT1170 移植mbw做SDRAM带宽测试(三十一)
SamSung三星笔记本NP930QCG-K02CN原装出厂OEM预装Win10系统
用数字隔离器取代传统的光耦合器
【Docker】云原生利用Docker确保环境安全、部署的安全性、安全问题的主要表现和新兴技术产生
C++中位运算符使用
- 原文地址:https://blog.csdn.net/weixin_40293999/article/details/132864421