-
【前端】CSS-Flex弹性盒模型布局
目录
一、前言
CSS弹性盒子(Flexbox)是一种强大而灵活的布局模型,能够简化我们对网页布局的控制,并使页面在不同设备上的适应性更强。本文将介绍CSS弹性盒子的基本概念、属性和使用方法,帮助你更好地掌握弹性盒子布局。
二、Flex布局是什么
Flex是Flexible Box的缩写,意为“弹性布局”,用来为盒状模型提供最大的灵活性。
1、任何一个容器都可以指定为Flex布局
.box{ display: flex; }- 1
- 2
- 3
2、行内元素也可以使用Flex布局
.box{ display: inline-flex; }- 1
- 2
- 3
3、Webkit内核的浏览器,必须加上-webkit前缀
.box{ display: -webkit-flex; display: flex; }- 1
- 2
- 3
- 4
注意:设置为Flex布局以后,子元素的float、clear和vertical-align属性将失效
三、基本概念
采用Flex布局的元素,称为Flex容器(flex container),简称“容器”。它的所有子元素自动成为容器成员,成为Flex项目(flex item),简称“项目”。
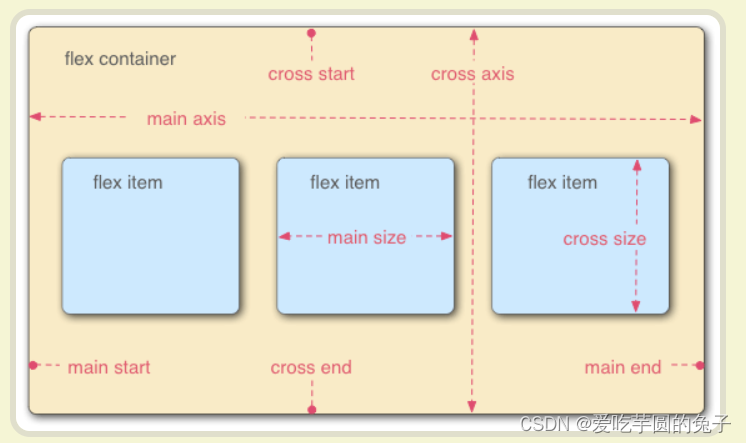
容器默认存在两根轴:水平的主轴(main axis)和垂直的交叉轴(cross asix)。主轴的开始位置(与边框的交叉点)叫做main start,结束位置叫做main end;交叉轴的开始位置叫做cross start,结束位置叫做cross end项目默认沿主轴排列。单个项目占据的主轴空间叫做main size,占据的交叉轴空间叫做cross size
四、flex常用的两种属性
关于flex常用的属性,我们可以划分为容器属性和项目属性
1、容器属性
- flex-direction
- flex-wrap
- flex-flow
- justify-content
- align-items
- align-content
2、项目属性
- order
- flex-grow
- flex-shrink
- flex-basis
- flex
- align-self
五、容器属性
1、flex-direction
①、定义
决定主轴的方向(即项目的排列方向)
②、语句
.container { flex-direction: row | row-reverse | column | column-reverse; }- 1
- 2
- 3
1)、属性值
- row(默认值):主轴为水平方向,起点在左端
- row-reverse:主轴为水平方向,起点在右端
- column:主轴为垂直方向,起点在上沿
- column-reverse:主轴为垂直方向,起点在下沿
③、代码示例
1)、flex-direction: row
<div class="container"> <div class="item">div> <div class="item">div> <div class="item">div> div> .container { display: flex; flex-direction: row; } .item { width: 100px; height: 100px; background-color: #f0f0f0; margin: 10px; }- 1
- 2
- 3
- 4
- 5
- 6
- 7
- 8
- 9
- 10
- 11
- 12
- 13
- 14
- 15
- 16
- 17

2)、flex-direction: row-reverse
<div class="container"> <div class="item">div> <div class="item">div> <div class="item">div> div> .container { display: flex; flex-direction: row-reverse; } .item { width: 100px; height: 100px; background-color: #f0f0f0; margin: 10px; }- 1
- 2
- 3
- 4
- 5
- 6
- 7
- 8
- 9
- 10
- 11
- 12
- 13
- 14
- 15
- 16
- 17

3)、flex-direction: column
<div class="container"> <div class="item">div> <div class="item">div> <div class="item">div> div> .container { display: flex; flex-direction: column; } .item { width: 100px; height: 100px; background-color: #f0f0f0; margin: 10px; }- 1
- 2
- 3
- 4
- 5
- 6
- 7
- 8
- 9
- 10
- 11
- 12
- 13
- 14
- 15
- 16
- 17

4)、flex-direction: column-reverse
<div class="container"> <div class="item">div> <div class="item">div> <div class="item">div> div> .container { display: flex; flex-direction: column-reverse; } .item { width: 100px; height: 100px; background-color: #f0f0f0; margin: 10px; }- 1
- 2
- 3
- 4
- 5
- 6
- 7
- 8
- 9
- 10
- 11
- 12
- 13
- 14
- 15
- 16
- 17

2、flex-wrap
①、定义
弹性元素永远沿主轴排列,那么如果主轴排不下,通过flex-wrap决定容器内项目是否可换行
②、语句
.container { flex-wrap: nowrap | wrap | wrap-reverse; }- 1
- 2
- 3
1)、属性值
- nowrap(默认值):不换行
- wrap:第一行在下方
- wrap-reverse:换行,第一行在上方
默认情况是不换行,但这里也不会任由元素直接移除容器,会涉及到元素的弹性伸缩
③、代码示例
1)、flex-wrap:nowrap
<div class="content1"> <div class="red">1div> <div class="green">2div> <div class="blue">3div> div> .content1 { color: #fff; font: 100 24px/100px sans-serif; height: 150px; width: 897px; text-align: center; } .content1 div { height: 50%; width: 300px; } .content1 { display: flex; flex-wrap: nowrap; }- 1
- 2
- 3
- 4
- 5
- 6
- 7
- 8
- 9
- 10
- 11
- 12
- 13
- 14
- 15
- 16
- 17
- 18
- 19
- 20
- 21
- 22
- 23

2)、flex-wrap:wrap
<div class="content"> <div class="red">1div> <div class="green">2div> <div class="blue">3div> div> .content { color: #fff; font: 100 24px/100px sans-serif; height: 150px; width: 897px; text-align: center; } .content div { height: 50%; width: 300px; } .content { display: flex; flex-wrap: wrap; }- 1
- 2
- 3
- 4
- 5
- 6
- 7
- 8
- 9
- 10
- 11
- 12
- 13
- 14
- 15
- 16
- 17
- 18
- 19
- 20
- 21
- 22
- 23

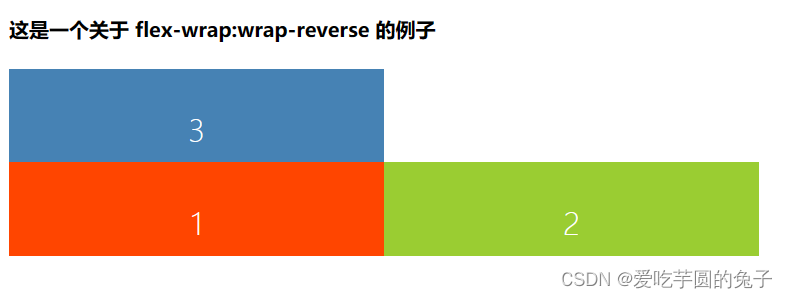
3)、flex-wrap:wrap-reverse
<div class="content2"> <div class="red">1div> <div class="green">2div> <div class="blue">3div> div> .content2 { color: #fff; font: 100 24px/100px sans-serif; height: 150px; width: 897px; text-align: center; } .content2 div { height: 50%; width: 300px; } .content2 { display: flex; flex-wrap: wrap-reverse; }- 1
- 2
- 3
- 4
- 5
- 6
- 7
- 8
- 9
- 10
- 11
- 12
- 13
- 14
- 15
- 16
- 17
- 18
- 19
- 20
- 21
- 22
- 23
3、flex-flow
①、定义
是flex-direction属性和flex-wrap属性的简写形式,默认值为row nowrap
②、语句
.box { flex-flow: <flex-direction> || <flex-wrap>; }- 1
- 2
- 3
③、代码示例
element { flex-flow: column-reverse wrap; }- 1
- 2
- 3
4、justify-content
①、定义
定义了项目在主轴上的对齐方式
②、语句
.box { justify-content: flex-start | flex-end | center | space-between | space-around; }- 1
- 2
- 3
1)、属性值
- flex-start(默认值):左对齐
- flex-end:右对齐
- center:居中
- spac-between:两端对齐,项目之间的间隔相等
- space-around:两个项目两侧间隔相等
③、代码示例
1)、justify-content:flex-start
<div class="container"> <div class="item">div> <div class="item">div> <div class="item">div> div> .container { display: flex; justify-content: flex-start; } .item { width: 100px; height: 100px; background-color: #e18181; margin: 10px; }- 1
- 2
- 3
- 4
- 5
- 6
- 7
- 8
- 9
- 10
- 11
- 12
- 13
- 14
- 15
- 16

2)、justify-content:flex-end
<div class="container"> <div class="item">div> <div class="item">div> <div class="item">div> div> .container { display: flex; justify-content: flex-end; } .item { width: 100px; height: 100px; background-color: #e18181; margin: 10px; }- 1
- 2
- 3
- 4
- 5
- 6
- 7
- 8
- 9
- 10
- 11
- 12
- 13
- 14
- 15
- 16

3)、justify-content:center
<div class="container"> <div class="item">div> <div class="item">div> <div class="item">div> div> .container { display: flex; justify-content: center; } .item { width: 100px; height: 100px; background-color: #e18181; margin: 10px; }- 1
- 2
- 3
- 4
- 5
- 6
- 7
- 8
- 9
- 10
- 11
- 12
- 13
- 14
- 15
- 16

4)、justify-content:space-between
<div class="container"> <div class="item">div> <div class="item">div> <div class="item">div> div> .container { display: flex; justify-content: space-between; } .item { width: 100px; height: 100px; background-color: #e18181; margin: 10px; }- 1
- 2
- 3
- 4
- 5
- 6
- 7
- 8
- 9
- 10
- 11
- 12
- 13
- 14
- 15
- 16

5)、justify-content:space-around
<div class="container"> <div class="item">div> <div class="item">div> <div class="item">div> div> .container { display: flex; justify-content: space-around; } .item { width: 100px; height: 100px; background-color: #e18181; margin: 10px; }- 1
- 2
- 3
- 4
- 5
- 6
- 7
- 8
- 9
- 10
- 11
- 12
- 13
- 14
- 15
- 16

5、align-items
①、定义
定义项目在交叉轴上如何对齐
②、语句
.box { align-items: flex-start | flex-end | center | baseline | stretch; }- 1
- 2
- 3
1)、属性值
- flex-start:交叉轴的起点对齐
- flex-end: 交叉轴的终点对齐
- center:交叉轴的中点对齐
- baseline:项目的第一行文字的基线对齐
- stretch(默认值):如果项目未设置高度或设置为auto,将沾满整个容器的高度

6、align-content
①、定义
定义了多根轴线的对齐方式。如果项目只有一根轴线,该属性不起作用
②、语句
.box { align-content: flex-start | flex-end | center | space-between | space-around | stretch; }- 1
- 2
- 3
1)、属性值
- flex-start:与交叉轴的起点对齐
- flex-end:与交叉轴的终点对齐
- center:与交叉轴的中点对齐
- space-between:与交叉轴两端对齐,轴线之间的间隔平均分布
- space-around:每根轴线两侧的间隔都相等。所以,轴线之间的间隔比轴线与边框的间隔大一倍
- stretch(默认值):轴线占满整个交叉轴

六、项目属性
1、order
①、定义
定义项目的排列顺序。数值越小,排列越靠前,默认为0
②、语句
.item { order: <integer>; }- 1
- 2
- 3

2、flex-grow
①、定义
上面讲到当容器设为 flex-wrap: nowrap;不换行的时候,容器宽度不够分的情况,弹性元素会根据 flex-grow 来决定定义项目的放大比例(容器宽度 > 元素总宽度时如何伸展)。默认为0,即如果存在剩余空间,也不放大
②、语句
.item { flex-grow: <number>; }- 1
- 2
- 3

1)、属性值
- 0(默认值):如果存在剩余空间,也不放大
- 如果所有项目的 flex-grow 属性都为1,则它们将等份剩余空间(如果有的话)
- 如果一个项目的flex-grow属性为2,其他项目都为1,则前者占据的剩余空间将比其他项多一倍
注意:弹性容器的宽度正好等于元素宽度总和,无多余宽度,此时无论flex-grow是什么值都不会生效
3、flex-shrink
①、定义
定义了项目的缩小比例(容器宽度<元素总宽度时如何收缩),默认为1,即如果空间不足,该项目将缩小
②、语句
.item { flex-shrink: <number>; /* default 1 */ }- 1
- 2
- 3
如果所有项目的flex-shrink属性都为1,当空间不足时,都将等比例缩小
如果一个项目的flex-shrink属性为0,其他项目都为1,则空间不足时,前者不缩小
在容器宽度有剩余时,flex-shrink也是不会生效的
4、flex-basis
①、定义
设置的是元素在主轴上的初始尺寸,所谓的初始尺寸就是元素在flex-grow和flex-shrink生效前的尺寸
浏览器根据这个属性,计算主轴是否有多余空间,默认值为auto,即项目的本来大小,如设置了width则元素尺寸由width/height决定(主轴方向),没有设置则由内容决定②、语句
.item { flex-basis: <length> | auto; /* default auto */ }- 1
- 2
- 3
当设置为0的是,会根据内容撑开
它可以设为跟width或height属性一样的值(比如350px),则项目将占据固定空间5、flex
①、定义
flex属性是flex-grow, flex-shrink 和 flex-basis的简写,默认值为0 1 auto,也是比较难懂的一个复合属性
②、语句
.item { flex: none | [ <'flex-grow'> <'flex-shrink'>? || <'flex-basis'> ] }- 1
- 2
- 3
1)、属性值
- flex: 1 = flex: 1 1 0%
- flex: 2 = flex: 2 1 0%
- flex: auto = flex: 1 1 auto
- flex: none = flex: 0 0 auto,常用于固定尺寸不伸缩
flex:1 和 flex:auto 的区别,可以归结于flex-basis:0和flex-basis:auto的区别
当设置为0时(绝对弹性元素),此时相当于告诉flex-grow和flex-shrink在伸缩的时候不需要考虑我的尺寸
当设置为auto时(相对弹性元素),此时则需要在伸缩时将元素尺寸纳入考虑
注意:建议优先使用这个属性,而不是单独写三个分离的属性,因为浏览器会推算相关值6、align-self
①、定义
允许单个项目有与其他项目不一样的对齐方式,可覆盖align-items属性
默认值为auto,表示继承父元素的align-items属性,如果没有父元素,则等同于stretch②、语句
.item { align-self: auto | flex-start | flex-end | center | baseline | stretch; }- 1
- 2
- 3

七、弹性盒模型布局的应用场景
Flexbox弹性盒模型布局可以应用于几乎所有需要布局和排列元素的场景,特别是在响应式设计中非常重要。以下是一些应用场景:
- 垂直和水平居中元素
- 创建网格布局
- 创建自适应布局
- 管理空间分配和对齐
- 创建交错布局
- 创建多列布局
- 适应不同屏幕大小和设备
总之,Flexbox弹性盒模型布局是一种非常灵活的布局方法,可用于简单和复杂的布局需求。它还可以与其他CSS属性一起使用,例如Grid布局和响应式设计技术,这使得它在Web开发中非常有用。
八、弹性盒模型布局的优势
1、简化布局
使用弹性盒子布局可以大大简化我们对网页布局的控制,减少定位和浮动等属性的使用
2、响应式设计
弹性盒子布局适应性强,可以根据不同的设备和屏幕尺寸自动调整布局,实现响应式设计
3、灵活性强
弹性盒子布局具有非常灵活的伸缩性,能够适应各种排列和对齐需求,提供更好的布局控制
九、总结
Flex弹性布局的出现是为了满足软件界面和功能不断丰富、复杂的市场需求,它的核心诉求是子元素的尺寸要能够动态响应父元素尺寸变化,并保持一定的结构特征。
1、实现原理
在实现原理上,为了满足灵活多变的布局方式,flex布局引入一组非常重要的概念:
- 主轴(main axis):flex项延伸的方向,决定着下一个flex项的排列位置;
- 交叉轴(cross axis):和主轴垂直的方向,决定着主轴遇见换行情景时的具体行为细节。
2、布局工作步骤
对flex容器来说,整个布局工作可分为三步:
- 第一步:所有flex项按照自身尺寸和主轴尺寸进行分行。简单来说,当主轴空间容纳不下flex项时,进行分行;
- 第二步:根据上一步所得的分行信息,和每一行上flex项特征,计算本行所有flex项的主轴尺寸和布局信息;
- 第三步:通过align-content、align-items和align-self三个属性计算所有flex项在交叉轴上的尺寸和布局信息。
总的来说,flex布局的出现让形式丰富多样的网页布局成为可能,一方面解放了工程师们的创造力,另一方面满足了要求越来越多、越来越复杂的市场需求。
-
相关阅读:
【CT】LeetCode手撕—42. 接雨水
苹果iOS App Store上架操作流程
『开源资讯』JimuReport 积木报表 v1.6.5 版本发布 — 免费报表工具
Java面试——锁
使用 JPA 访问数据
计算机网络常见面试题
Mockito搭配junit单元测试
Redis-应用问题(缓存穿透/缓存击穿/缓存雪崩/分布式锁)
JAVA 版多商家入驻 直播带货 商城系统 B2B2C 商城免费搭建之 B2B2C产品概述
【题解】Codeforces Round #804 (Div. 2)
- 原文地址:https://blog.csdn.net/weixin_45490023/article/details/132615340