-
RabbitMq深度学习
什么是RabbitMq?
RabbitMQ是一个开源的消息队列中间件,它实现了高级消息队列协议(AMQP)。它被广泛用于分布式系统中的消息传递和异步通信。RabbitMQ提供了一种可靠的、可扩展的机制来传递消息,使不同的应用程序能够相互之间进行通信。它支持多种编程语言和平台,并且具有灵活的路由和队列配置选项。
同步调用
同步调用的优点:
-
时效性较强,可以立即得到结果
同步调用的问题:
-
耦合度高
-
性能和吞吐能力下降
-
有额外的资源消耗
-
有级联失败问题
异步调用
好处:
-
吞吐量提升:无需等待订阅者处理完成,响应更快速
-
故障隔离:服务没有直接调用,不存在级联失败问题
-
调用间没有阻塞,不会造成无效的资源占用
-
耦合度极低,每个服务都可以灵活插拔,可替换
-
流量削峰:不管发布事件的流量波动多大,都由Broker接收,订阅者可以按照自己的速度去处理事件
缺点:
-
架构复杂了,业务没有明显的流程线,不好管理
-
需要依赖于Broker的可靠、安全、性能
MQ的种类
 RabbitMq安装和使用
 云服务器安装Rabbitmq。
在docker 中拉去Ribbitmq镜像。
在docker 中运行ribbitmq。
docker run -d -p 5672:5672 -p 15672:15672 -p 25672:25672 --name rabbitmq rabbitmq查看rabbitmq的状态。
rabbitmqctl status
接着我们还可以将Rabbitmq的管理面板开启,这样就可以在浏览器上进行实时访问和监控了。
我们需要先进入rabbitmq容器。
docker exec -it [在docker中对应的ID] [进入容器的路径] #路径一般为/bin/bash开启rabbitmq的控制面板设置。
rabbitmq-plugins enable rabbitmq_management打开rabbitmq的控制面板,就是对应的控制面板端口为15672。

账号和密码都是:guest
消息队列模型

SpringAMQP
什么是springAMQP?
Spring AMQP 是一个基于 Spring 框架的 AMQP(高级消息队列协议)的开发框架。它提供了一种简化和抽象化的方式来使用 AMQP,使得在应用程序中使用消息队列变得更加容易。
springAMQP的使用
导入依赖
- <!--AMQP依赖,包含RabbitMQ-->
- <dependency>
- <groupId>org.springframework.boot</groupId>
- <artifactId>spring-boot-starter-amqp</artifactId>
- </dependency>
编写发送者
编写applcation.yml文件
- spring:
- rabbitmq:
- host: 119.9.212.171 # 主机名
- port: 5672 # 端口
- virtual-host: / # 虚拟主机
- username: guest # 用户名
- password: guest # 密码
进行测试
- import com.rabbitmq.client.Channel;
- import com.rabbitmq.client.Connection;
- import com.rabbitmq.client.ConnectionFactory;
- import org.junit.Test;
- import org.junit.runner.RunWith;
- import org.springframework.amqp.rabbit.core.RabbitTemplate;
- import org.springframework.beans.factory.annotation.Autowired;
- import org.springframework.boot.test.context.SpringBootTest;
- import org.springframework.test.context.junit4.SpringRunner;
- import java.io.IOException;
- import java.util.concurrent.TimeoutException;
- @RunWith(SpringRunner.class) #如果不加此注解,spring容器无法自动注入RabbitTemplate
- @SpringBootTest
- public class PublisherTest {
- @Autowired
- RabbitTemplate rabbitTemplate;
- @Test
- public void tess1() {
- String queueName = "queueName";
- String message = "hello, tolen";
- rabbitTemplate.convertAndSend(queueName, message);
- }
- }
测试结果为下:
 可能会出现没有队列生成的情况,这是因为@Test无法自动一个 queue,我们手动创建一个即可。
编写消费者
编辑application.yml文件
- spring:
- rabbitmq:
- host: 192.168.150.101 # 主机名
- port: 5672 # 端口
- virtual-host: / # 虚拟主机
- username: test # 用户名
- password: 123456 # 密码
创建消息监听者
- import org.springframework.amqp.rabbit.annotation.RabbitListener;
- import org.springframework.stereotype.Component;
- @Component
- public class RabbitMqListener {
- @RabbitListener(queues = "queueName")
- public void getMessage(String message) {
- System.out.println("获取的消息是:" + message);
- }
- }
直接配置即可,在后续的项目中消费者会监听对应的消息进行操作。
WorkQueue
我们可以对一个消息标签设置多个监听者,并且默认的设置是预取,也就是即使服务模块处理能力差的情况也会分配到相同个数的信息,不能达到能者多劳的效果,为了到达此效果,我们可以在application.yml中进行设置。
- spring:
- rabbitmq:
- listener:
- simple:
- prefetch: 1 # 每次只能获取一条消息,处理完成才能获取下一个消息
发布与订阅

FanoutExchange的使用
在消费者模块编写:新建交换机,新建队列,交换机和队列绑定操作。
在配置类中完成上述操作
- import org.springframework.amqp.core.Binding;
- import org.springframework.amqp.core.BindingBuilder;
- import org.springframework.amqp.core.FanoutExchange;
- import org.springframework.amqp.core.Queue;
- import org.springframework.context.annotation.Bean;
- import org.springframework.context.annotation.Configuration;
- @Configuration
- public class MQConfiguration {
- //声明交换机FanoutExchange
- @Bean
- public FanoutExchange fanoutExchange() {
- // 设置交换机的名字
- return new FanoutExchange("tolen.fanout");
- }
- // 创建一个信息队列1
- @Bean
- public Queue fanoutQueue1() {
- return new Queue("fanout.queue1");
- }
- // 创建信息队列2
- @Bean
- public Queue fanoutQueue2() {
- return new Queue("fanout.queue2");
- }
- //将交换机和队列1进行绑定
- @Bean
- public Binding bindingQueue1(Queue fanoutQueue1, FanoutExchange fanoutExchange) {
- //绑定队列给对应的交换机
- return BindingBuilder.bind(fanoutQueue1).to(fanoutExchange);
- }
- //将交换机和队列2进行绑定
- @Bean
- public Binding bindingQueue2(Queue fanoutQueue2, FanoutExchange fanoutExchange) {
- return BindingBuilder.bind(fanoutQueue2).to(fanoutExchange);
- }
- }
在消费者模块中创建两个队列的监听器
- import org.springframework.amqp.rabbit.annotation.RabbitListener;
- import org.springframework.stereotype.Component;
- @Component
- public class RabbitMqListener {
- @RabbitListener(queues = "fanout.queue1")
- public void getMessage1(String message) {
- System.out.println("消息队列1中获取的消息是:" + message);
- }
- @RabbitListener(queues = "fanout.queue2")
- public void getMessage2(String message) {
- System.out.println("消息队列2中获取的消息是:" + message);
- }
- }
接下来不信消息发送模块,这里需要注意的是,此时我们是向对应的交换机发送消息,通过交换机发送消息给两个消息队列。
发送消息的代码为下:
- import com.rabbitmq.client.Channel;
- import com.rabbitmq.client.Connection;
- import com.rabbitmq.client.ConnectionFactory;
- import org.junit.Test;
- import org.junit.runner.RunWith;
- import org.springframework.amqp.rabbit.core.RabbitTemplate;
- import org.springframework.beans.factory.annotation.Autowired;
- import org.springframework.boot.test.context.SpringBootTest;
- import org.springframework.test.context.junit4.SpringRunner;
- import java.io.IOException;
- import java.util.concurrent.TimeoutException;
- @RunWith(SpringRunner.class)
- @SpringBootTest
- public class PublisherTest {
- @Autowired
- RabbitTemplate rabbitTemplate;
- @Test
- public void tess1() {
- String queueName = "queueName";
- String message = "hello, tolen";
- rabbitTemplate.convertAndSend(queueName, message);
- }
- @Test
- public void fanoutTest() {
- String exchangeName = "tolen.fanout";
- String message = "hi, tolen!";
- //routingKey不进行设置
- rabbitTemplate.convertAndSend(exchangeName, "", message);
- }
- }
如果不设置routingKey的话,就会默认将消息发送到使用绑定的消息队列上。
测试结果为下:
交换机状态
 监听器接收到的消息
DirectExchange
可以设置routingKey,交换机可以向指定的队列发送消息。
配置监听器
- import org.springframework.amqp.rabbit.annotation.Exchange;
- import org.springframework.amqp.rabbit.annotation.Queue;
- import org.springframework.amqp.rabbit.annotation.QueueBinding;
- import org.springframework.amqp.rabbit.annotation.RabbitListener;
- import org.springframework.stereotype.Component;
- @Component
- public class RabbitMqListener {
- //使用注解进行绑定, 不再需要configuration配置
- @RabbitListener(bindings = @QueueBinding(
- value = @Queue(name = "directQueue1"),
- exchange = @Exchange(name = "direct"), //默认使用的交换机类型就是directExchange
- key = {"red", "blue"}
- ))
- public void directQueue1(String message) {
- System.out.println("directQueue2:" + message);
- }
- //使用注解进行绑定, 不再需要configuration配置
- @RabbitListener(bindings = @QueueBinding(
- value = @Queue(name = "directQueue2"),
- exchange = @Exchange(name = "direct"), //默认使用的交换机类型就是directExchange
- key = {"red"}
- ))
- public void directQueue2(String message) {
- System.out.println("directQueue2:" + message);
- }
- }
编写消息发布模块
- import org.junit.Test;
- import org.junit.runner.RunWith;
- import org.springframework.amqp.rabbit.core.RabbitTemplate;
- import org.springframework.beans.factory.annotation.Autowired;
- import org.springframework.boot.test.context.SpringBootTest;
- import org.springframework.test.context.junit4.SpringRunner;
- @RunWith(SpringRunner.class)
- @SpringBootTest
- public class PublisherTest {
- @Autowired
- RabbitTemplate rabbitTemplate;
- @Test
- public void fanoutTest() {
- String exchangeName = "direct";
- String message = "hi, tolen!";
- //设置routingKey
- rabbitTemplate.convertAndSend(exchangeName, "blue", message);
- }
- }
测试结果为下:

此时就只有routingKey=blue的监听器才会接收到消息。
TopicExchage
Topic类型的Exchange与Direct相比,都是可以根据RoutingKey把消息路由到不同的队列。只不过Topic类型Exchange可以让队列在绑定Routing key的时候使用通配符!Routingkey一般都是有一个或多个单词组成,多个单词之间以”.”分割,例如:item.insert通配符规则:
#:匹配一个或多个词*:匹配不多不少恰好1个词修改编写监听器的配置
- //使用注解进行绑定, 不再需要configuration配置
- @RabbitListener(bindings = @QueueBinding(
- value = @Queue(name = "directQueue2"),
- exchange = @Exchange(name = "direct", type = ExchangeTypes.TOPIC), //默认使用的交换机类型就是directExchange
- key = {"#.new"}
- ))
- public void directQueue2(String message) {
- System.out.println("directQueue2:" + message);
- }
只要发送的消息中的routingKey中尾部为新闻的消息全部会被监听。(routingKey使用"."作间隔)
消息转换器
在springboot中默认使用JDK的序列化,为了提高使用性,我们可以使用json转换器。
在消费者和发送者中都导入对应的依赖。
com.fasterxml.jackson.dataformat jackson-dataformat-xml 2.9.10
在configuration中配置信息转换器。(消费者和发布者都需要配置)
- import org.springframework.amqp.support.converter.Jackson2JsonMessageConverter;
- import org.springframework.amqp.support.converter.MessageConverter;
- import org.springframework.context.annotation.Bean;
- import org.springframework.context.annotation.Configuration;
- @Configuration
- public class MQConfiguration {
- @Bean
- public MessageConverter jsonMessageConverter(){
- return new Jackson2JsonMessageConverter();
- }
- }
进行测试,在发送一个对象类型的消息。
对应的监听器
- import org.springframework.amqp.rabbit.annotation.Exchange;
- import org.springframework.amqp.rabbit.annotation.Queue;
- import org.springframework.amqp.rabbit.annotation.QueueBinding;
- import org.springframework.amqp.rabbit.annotation.RabbitListener;
- import org.springframework.stereotype.Component;
- import java.util.Map;
- import java.util.Objects;
- @Component
- public class RabbitMqListener {
- //使用注解进行绑定, 不再需要configuration配置
- @RabbitListener(bindings = @QueueBinding(
- value = @Queue(name = "directQueue2"),
- exchange = @Exchange(name = "direct"), //默认使用的交换机类型就是directExchange
- key = {"blue"}
- ))
- public void directQueue2(Map
- System.out.println("directQueue2:" + message);
- }
- }
对应的发送代码
- import org.junit.Test;
- import org.junit.runner.RunWith;
- import org.springframework.amqp.rabbit.core.RabbitTemplate;
- import org.springframework.beans.factory.annotation.Autowired;
- import org.springframework.boot.test.context.SpringBootTest;
- import org.springframework.test.context.junit4.SpringRunner;
- import java.util.LinkedHashMap;
- import java.util.Map;
- @RunWith(SpringRunner.class)
- @SpringBootTest
- public class PublisherTest {
- @Autowired
- RabbitTemplate rabbitTemplate;
- @Test
- public void fanoutTest() {
- String exchangeName = "direct";
- Map
- message.put("name", "tolen");
- message.put("age", "19");
- //设置routingKey
- rabbitTemplate.convertAndSend(exchangeName, "blue", message);
- }
- }
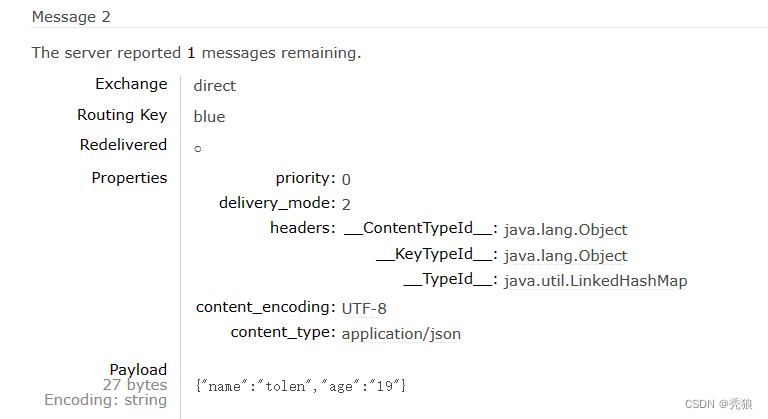
测试效果为下:
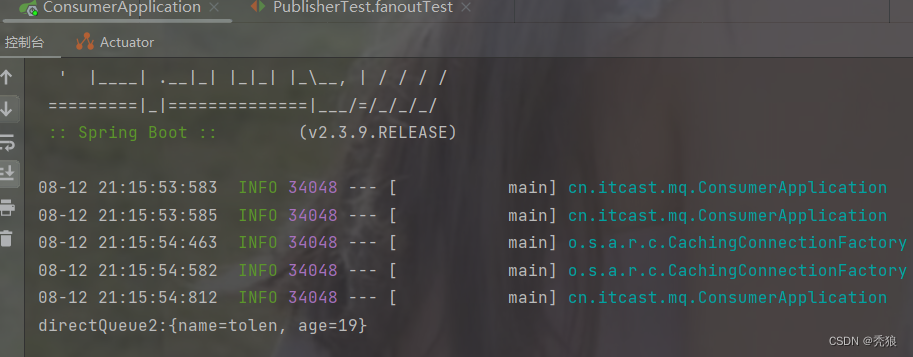
接收到的数据 。

消息队列中的数据。
mq存在的几个问题

1.消息可靠性
在mq中我们没有办法直接知道消息发送和消息被消费者消费是否成功,所以需要使用方法来进行判断。
消息发送的过程为下:
 在该过程中可能会出现的情况: 发送消息到交换机失败, 交换机发送消息到消息队列失败,消费者消费信息失败。
为此rabbitmq通过了publisher confirm 机制用于判断是否失败。
返回的方式有两种
1.pulish-confirm (该返回出现在 发送消息到交换机, 消费者消费消息)
ack(acknowledge):执行成功。
nack(no-acknowledge) :执行失败。
2.publish-reutrn (该返回出现在交换机将消息路由到消息队列)
ack:交换机路由消息到消息队列失败,并且返回错误信息。
实现pulish-confirm和publish-return (在生产者中设置)
在信息发送模块publisher的application.yml中配置上述机制。
- spring:
- rabbitmq:
- host: 139.9.4.176 # rabbitMQ的ip地址
- port: 5672 # 端口
- username: test
- password: 123456
- virtual-host: /test
- publisher-confirm-type: correlated #开启publisher-confirm并设置confirm的方法
- publisher-returns: true #开启publisher-returns
- template:
- mandatory: false #自定义失败策略,如果为false则直接丢弃失败消息
-
publish-confirm-type:开启publisher-confirm,这里支持两种类型:-
simple:同步等待confirm结果,直到超时 -
correlated:异步回调,定义ConfirmCallback,MQ返回结果时会回调这个ConfirmCallback
-
-
publish-returns:开启publish-return功能,同样是基于callback机制,不过是定义ReturnCallback -
template.mandatory:定义消息路由失败时的策略。true,则调用ReturnCallback;false:则直接丢弃消息
自定义publisher-return回调
- import lombok.extern.slf4j.Slf4j;
- import org.springframework.amqp.rabbit.core.RabbitTemplate;
- import org.springframework.beans.BeansException;
- import org.springframework.context.ApplicationContext;
- import org.springframework.context.ApplicationContextAware;
- import org.springframework.context.annotation.Configuration;
- //自定义return回调
- @Slf4j
- @Configuration
- public class CommonConfig implements ApplicationContextAware {
- @Override
- public void setApplicationContext(ApplicationContext applicationContext) throws BeansException {
- //获取RabbitTemple在ioc中的bean实例
- RabbitTemplate rabbitTemplate = applicationContext.getBean(RabbitTemplate.class);
- //设置returnCallback
- rabbitTemplate.setReturnCallback((message, replyCode, replyText, exchange, routingKey) -> {
- //设置return机制错误后的操作
- //exchange路由消息到消息队列失败
- log.error("消息发送失败,应答码{},原因{},交换机{},路由键{},消息{}",
- replyCode, replyText, exchange, routingKey, message.toString());
- //一般在最好会进行重试操作
- });
- }
- }
自定义ConfirmCallback, 在触发publisher-confirm时自定义成功后操作和失败后的操作。(在测试类中设置)
- import lombok.extern.slf4j.Slf4j;
- import org.junit.Test;
- import org.junit.runner.RunWith;
- import org.springframework.amqp.rabbit.connection.CorrelationData;
- import org.springframework.amqp.rabbit.core.RabbitTemplate;
- import org.springframework.beans.factory.annotation.Autowired;
- import org.springframework.boot.test.context.SpringBootTest;
- import org.springframework.test.context.junit4.SpringRunner;
- import java.util.UUID;
- @Slf4j
- @RunWith(SpringRunner.class)
- @SpringBootTest
- public class SpringAmqpTest {
- @Autowired
- private RabbitTemplate rabbitTemplate;
- @Test
- public void testSendMessage2SimpleQueue() throws InterruptedException {
- String message = "hello, spring amqp!";
- //创建CorrelationData,设置全局ID,并将其封装到CorrelationData中
- CorrelationData correlationData = new CorrelationData(UUID.randomUUID().toString());
- //设置publisher-confirm回调方法,分别是: 成功后的方法,失败后的方法
- correlationData.getFuture().addCallback(
- result -> {
- //confirm成功,也就是ack
- if(result.isAck()) {
- log.debug("消息发送成功, ID:{}", correlationData.getId());
- } else {
- //confirm失败,也就是nack
- log.error("消息发送失败, ID:{}, 原因:{}", correlationData.getId(), result.getReason());
- }
- },
- ex -> {
- log.error("消息发送失败, ID:{}, 原因:{}", correlationData.getId(), ex.getMessage());
- //一般会在此处重试发送
- });
- rabbitTemplate.convertAndSend("amp.topic", "simple.test", message, correlationData);
- // 休眠一会儿,等待ack回执,需要在rabbitmq连接断开之前消费消息,否则就会报错
- Thread.sleep(2000);
- }
- }
进行测试
如果出现下图情况,是以为channel和connection已经被关闭了,肯定就消费不了消息了。我们需要晚一点关闭这两个东西就行。
也就是多休眠几秒(Thread.sleep(2000))。
最终解决消息的可靠性问题。
2.消息持久化
交换机的持久化
实现代码为下:
- import org.springframework.amqp.core.DirectExchange;
- import org.springframework.context.annotation.Bean;
- import org.springframework.context.annotation.Configuration;
- @Configuration
- public class MqConfig {
- //创建持久化交换机
- @Bean
- public DirectExchange getExchange() {
- //参数1:设置交换机的名字
- //参数2:设置是否持久化
- //参数3:设置是否在交换机中的消息队列被删除后自动删除该交换机
- return new DirectExchange("simple.direct", true, false);
- }
- }
其实在源码的direct交换机中的构造函数默认参数2和参数3就是true和false。
构造函数的源码为下:

消息队列持久化
实现代码为下:
- @Bean
- public Queue getQueue() {
- //通过QueueBuilder可以设置消息队列的属性
- //这里通过QueueBuilder的方法durable来设置持久化
- return QueueBuilder.durable("simple.queue").build();
- }
其实在默认的queue创建的时候就是设置为持久化。

消息的持久化
实现代码为下(需要在消息进行发送时设置其属性):
- @Test
- public void send2DurableMessage() {
- //将消息的编码设置为UTF-8
- //setDeliveryMode用于设置消息的存储方式,这里的PERSISTENT为持久化设置
- Message message = MessageBuilder.withBody("hello, tolen!".getBytes(StandardCharsets.UTF_8))
- .setDeliveryMode(MessageDeliveryMode.PERSISTENT)
- .build();
- rabbitTemplate.convertAndSend("directQueue1", message);
- }
消息持久化的效果图:
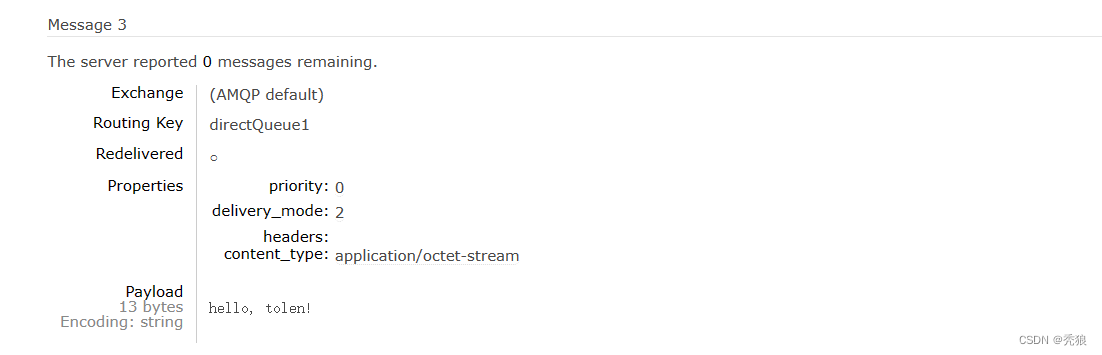
delivery_mode=2就是表示消息为持久化消息。
观察其他未手动设置持久化的信息。我们会发现delivery_mode都为2,说明默认消息都是持久化的。
消费者消息确认
在上面我们实现了发送端的消息确认,此时存在的问题就是:我们无法确定消费者是否消费了,所以我们需要解决消费者的消息确认。
在springAMQP中有三种消费者消息确认的模式,分别为下:
1.manual:手动返回ack,在消息被消费者接收到消息后通过调用对应的api返回ack。
在消费者模块中的application.yml中进行设置:
- spring:
- rabbitmq:
- listener:
- simple:
- acknowledge-mode: manual
2. auto:自动返回ack,在消费者接收到消息后,没异常则直接返回ack,如果有异常的化就返回nack(消息会被重新发送,如果消息存在问题就会出现无限重新发送消息的情况)
在消费者模块中的application.yml中进行设置:
- spring:
- rabbitmq:
- listener:
- simple:
- acknowledge-mode: auto
3.none:发送者在发送消息后,就直接认为消息成功被接收了,不考虑消费者是否接收到了,消息在被发送后就直接被删除了。
在消费者模块中的application.yml中进行设置:
- spring:
- rabbitmq:
- listener:
- simple:
- acknowledge-mode: none
消费者消息确认如果使用auto模式的话,会出现无限重发消息的情况,这是我们就可以使用spring的retry机制进行本地重试的方式。
本地重试的配置代码为下(在消费者中的application.ymnl中配置)
- spring:
- rabbitmq:
- listener:
- simple:
- retry:
- enabled: true # 开启消费者失败重试
- initial-interval: 1000 # 初识的失败等待时长为1秒
- multiplier: 2 # 失败的等待时长倍数,下次等待时长 = multiplier * last-interval
- max-attempts: 4 # 最大重试次数
- stateless: true # true无状态;false有状态。如果业务中包含事务,这里改为false
initial-interval:初始的失败等待时长。下次等待时长就是 multiplier*last-interval
multipliter:失败的等待时长倍数,最终这种情况的重试时间就是 1秒, 2秒, 4秒, 8秒,结束重试。
max-attempts:最大重试的次数。
stateless:在有事务的情况下开启,防止事务丢失。(正常情况就使用false)
失败策略
默认在使用auto模式时,多次重新发送消息失败后会直接丢弃,为了避免消息的丢失,spring提供三种失败策略。
-
RejectAndDontRequeueRecoverer:重试耗尽后,直接reject,丢弃消息。默认就是这种方式
-
ImmediateRequeueMessageRecoverer:重试耗尽后,返回nack,消息重新入队
-
RepublishMessageRecoverer:重试耗尽后,将失败消息投递到指定的交换机
使用代码实现 RepublishMessageRecoverer(在消费者模块中实现)
- import org.springframework.amqp.core.Binding;
- import org.springframework.amqp.core.BindingBuilder;
- import org.springframework.amqp.core.DirectExchange;
- import org.springframework.amqp.core.Queue;
- import org.springframework.amqp.rabbit.core.RabbitTemplate;
- import org.springframework.amqp.rabbit.retry.MessageRecoverer;
- import org.springframework.amqp.rabbit.retry.RepublishMessageRecoverer;
- import org.springframework.context.annotation.Bean;
- import org.springframework.context.annotation.Configuration;
- @Configuration
- public class CommonConfig {
- //创建error交换机
- @Bean
- public DirectExchange getErrorExchange() {
- return new DirectExchange("error.direct");
- }
- //创建消息队列
- @Bean
- public Queue getQueue() {
- return new Queue("error.queue");
- }
- //将二者进行绑定
- @Bean
- public Binding errorBinding() {
- //with方法就是设置routingKey,这里routingKey的值为:error
- return BindingBuilder.bind(getQueue()).to(getErrorExchange()).with("error");
- }
- //设置失败策略
- @Bean
- public MessageRecoverer getRepublishMessageRecoverer(RabbitTemplate rabbitTemplate) {
- return new RepublishMessageRecoverer(rabbitTemplate, "error.direct", "error");
- }
- }
最终当消息的重试次数达到上限,就会将消息发送给error.direct交换机,该交换机会将对应的消息发送给error.queue,管理员就可以在该消息队列中查看错误消息的信息。(最终确保消息不会丢失)
如果确保信息的可靠性
1.开启生产者的消息确认机制,确保消息能够传到消息队列。
2.开启消息队列和消息和交换机的持久化。
3.开启消费者的消息确认机制,开启auto模式,在消息被接收到消息后返回ack。
4.开启消费者失败重试机制,配置RepublishMessageRecoverer类,保证失败后的消息不会丢失。
死信交换机
什么是死信?
1.消费者使用reject或返回nack声明导致的失败的消息,并且此消息设置requeue为false。
2.消息是个过期消息,且超时没有被消费。
3.要投递的消息队列满了,无法被投递的消息。
为了防止这些死信丢失,我们就需要创建一个死信交换机,用于接收死信。

创建死信交换机的代码为下:
- import org.springframework.amqp.core.*;
- import org.springframework.context.annotation.Bean;
- import org.springframework.context.annotation.Configuration;
- @Configuration
- public class CommonConfig {
- //创建普通的交换机
- @Bean
- public DirectExchange getDirectExchange() {
- return new DirectExchange("simple.direct");
- }
- //创建普通的消息队列
- @Bean
- public Queue getQueue() {
- return QueueBuilder.durable("simple.queue")
- .deadLetterExchange("dl.direct") //设置死信交换机的名字
- .build();
- }
- //将普通交换机和普通消息队列进行绑定
- @Bean
- public Binding DirectBinding() {
- return BindingBuilder.bind(getQueue()).to(getDirectExchange()).with("simple");//普通消息队列的routingKey为:simple
- }
- //创建死信交换机
- @Bean
- public DirectExchange getDlExchange() {
- return new DirectExchange("dl.direct");
- }
- //创建存放死信的消息队列
- @Bean
- public Queue getDLQueue() {
- return new Queue("dl.queue");
- }
- //将死信交换机和死信消息队列进行绑定
- @Bean
- public Binding DLBinding() {
- return BindingBuilder.bind(getDlExchange()).to(getDlExchange()).with("dl");
- }
- }
只要在普通队列中出现的死信都会进入死信队列中,只需要提供该死信队列就可以获取对应的死信。
死信队列和RepublishMessageRecoverer策略的区别
死信队列的流程图为下:

RepublishMessageRecoverer策略的流程图为下:

死信队列中的死信先退回到消息队列中,提供消息队列发送给死信交换机,提供死信交换机将死信发送到死信消息队列中。(在发送端的消息队列中操作)
而在RepublishMessageRecoverer策略中,异常的消息直接由消费者直接发送给异常交换机。(在消费端进行操作)
TTL(Time-to-Live)
消息队列中的消息超时未被消费,则会成为死信,超时分为两种情况:
1.消息所在的消息队列设置了超时时间。
2.消息本身设置了过期时间。

提供设置对应的过期时间,将死信传入死信队列,从而完成实现延迟队列。(用于解决需要延迟处理的业务)
延迟队列的实现效果的步骤为下:
1. 创建普通交换机和消息队列,死信交换机和消息队列,提供设置对应的routingKey进行发送消息。(这里直接使用注解创建对应的交换机和消息队列)
- import lombok.extern.slf4j.Slf4j;
- import org.springframework.amqp.rabbit.annotation.*;
- import org.springframework.stereotype.Component;
- @Slf4j
- @Component
- public class SpringRabbitListener {
- @RabbitListener(bindings = @QueueBinding(
- value = @Queue(name = "dl.queue", durable = "true"),
- exchange = @Exchange(name = "dl.direct"),
- key = "dl"
- ))
- public void listenDLQueue(String message) {
- System.out.println("DL2message:" + message);
- log.info("DL2message:" + message);
- }
- //正常消费测试
- @RabbitListener(bindings = @QueueBinding(
- value = @Queue(name = "simple.queue", durable = "true",
- arguments = {
- @Argument(name = "x-dead-letter-exchange",value = "dl.direct"), //指定一下死信交换机
- @Argument(name = "x-dead-letter-routing-key",value = "dl"), //指定死信交换机的路由key
- @Argument(name = "x-message-ttl",value = "10000", type = "java.lang.Long") //指定过期时间,并设置时间的类型
- }),
- exchange = @Exchange(name = "simple.direct"),
- key = "simple"
- ))
- public void listenQueue(String message) {
- System.out.println("正常的message:" + message);
- log.info("正常的message:" + message);
- }
- }
2.进行测试(让消息在普通的消息队列中过期,让其进入死信队列,并被消费)
代码为下:
- import lombok.extern.slf4j.Slf4j;
- import org.junit.Test;
- import org.junit.runner.RunWith;
- import org.springframework.amqp.rabbit.connection.CorrelationData;
- import org.springframework.amqp.rabbit.core.RabbitTemplate;
- import org.springframework.beans.factory.annotation.Autowired;
- import org.springframework.boot.test.context.SpringBootTest;
- import org.springframework.test.context.junit4.SpringRunner;
- import java.util.UUID;
- @Slf4j
- @RunWith(SpringRunner.class)
- @SpringBootTest
- public class tests {
- @Autowired
- RabbitTemplate rabbitTemplate;
- @Test
- public void DLTest() {
- String message = "接收到死信!";
- CorrelationData correlationData = new CorrelationData(UUID.randomUUID().toString());
- rabbitTemplate.convertAndSend("simple.direct", "simple", message, correlationData);
- log.info("消息发送了!");
- }
- }
因为普通消息队列中的消息会被正常正常消费所以不会进入死信消息队列中。

为了让消息过期,我们需要设置消息队列不进行自动监听,这里在@RabbitListener注解中使用autoStartup = "false"
所以监听类的修改后的代码为下:
- import lombok.extern.slf4j.Slf4j;
- import org.springframework.amqp.rabbit.annotation.*;
- import org.springframework.stereotype.Component;
- @Slf4j
- @Component
- public class SpringRabbitListener {
- @RabbitListener(bindings = @QueueBinding(
- value = @Queue(name = "dl.queue", durable = "true"),
- exchange = @Exchange(name = "dl.direct"),
- key = "dl"
- ))
- public void listenDLQueue(String message) {
- System.out.println("DL2message:" + message);
- log.info("DL2message:" + message);
- }
- //正常消费测试
- @RabbitListener(bindings = @QueueBinding(
- value = @Queue(name = "simple.queue", durable = "true",
- arguments = {
- @Argument(name = "x-dead-letter-exchange",value = "dl.direct"), //指定一下死信交换机
- @Argument(name = "x-dead-letter-routing-key",value = "dl"), //指定死信交换机的路由key
- @Argument(name = "x-message-ttl",value = "10000", type = "java.lang.Long") //指定过期时间,并设置时间的类型
- }),
- exchange = @Exchange(name = "simple.direct"),
- key = "simple"
- ),
- autoStartup = "false") //关闭自动监听,这里要保证消息过期,使得该死信进入死信队列
- public void listenQueue(String message) {
- System.out.println("正常的message:" + message);
- log.info("正常的message:" + message);
- }
- }
就比上面的监听类多了个属性 autoStartup = "false"。
测试结果为下:
测试类的效果图
 死信队列的消费者监听到的结果图
我们也可以设置消息的有效时间,使得消息过期,这样也可以达到死信的效果。
设置消息有效时间的代码为下:
- //设置消息的有效性
- @Test
- public void setMessageValidity() {
- Message message = MessageBuilder.withBody("此消息为死信!".getBytes(StandardCharsets.UTF_8))
- .setDeliveryMode(MessageDeliveryMode.PERSISTENT) //把消息设置为持久化
- .setExpiration("5000") // 设置有效时间 (该时间要小于普通消息队列的有效时间, 这里就是要小于5000)
- .build();
- rabbitTemplate.convertAndSend("simple.direct", "simple", message);
- log.info("消息发送成功!");
- }
这里设置信息的有效时间为:5秒。
如果信息的有效时间和消息队列的有效时间都设置了,那么就会以那个更短的时间将信息变为死信。
惰性队列
消息堆积问题:消息的消费速度小于消息的接收速度,最终导致消息堆积。

解决方案:
1.增加更多的消费者。
2.使用多线程进行消费。
3.扩大消息队列的容量。
惰性队列
就是基于方案三的思想进行实现的。
惰性队列的优点:
1.容量大,基于磁盘的大小。
2.消费者要消费消息时才会到磁盘中查找消息。
惰性队列的实现代码为下
基于ioc的实现
- import org.springframework.amqp.core.QueueBuilder;
- import org.springframework.context.annotation.Bean;
- import org.springframework.context.annotation.Configuration;
- import org.springframework.amqp.core.Queue;
- @Configuration
- public class rabbitMQConfig {
- @Bean
- public Queue getLazyQueue() {
- return QueueBuilder
- .durable("lazy.queue")
- .lazy()
- .build();
- }
- }
基于注解的实现
- import lombok.extern.slf4j.Slf4j;
- import org.springframework.amqp.rabbit.annotation.*;
- import org.springframework.stereotype.Component;
- @Slf4j
- @Component
- public class SpringRabbitListener {
- @RabbitListener(bindings = @QueueBinding(
- value = @Queue(name = "lazy.queue", durable = "true",
- arguments = {
- @Argument(name = "x-queue-mode", value = "lazy")
- }),
- exchange = @Exchange(name = "lazy.direct"),
- key = "lazy"
- ),
- autoStartup = "false")
- public void LazyQueue(String message) {
- System.out.println(message);
- log.info("惰性队列!");
- }
- }
进行测试,惰性队列和普通队列进行对比。
测试代码为下:
- @Test //普通消息队列
- public void normalQueue() {
- String message = "欢迎!";
- for (int i = 0; i < 100000; i++) {
- rabbitTemplate.convertAndSend("queueName", message);
- }
- }
- @Test //惰性消息队列
- public void lazyQueue() {
- String message = "欢迎!";
- for (int i = 0; i < 100000; i++) {
- rabbitTemplate.convertAndSend("lazy.queue", message);
- }
- }
惰性队列的优缺点
优点:
-
基于磁盘存储,消息上限高
-
没有间歇性的page-out,性能比较稳定
缺点:
-
基于磁盘存储,消息时效性会降低
-
性能受限于磁盘的IO
-
-
相关阅读:
kubeadm 部署方式修改kube-proxy为 ipvs模式
【java筑基】IO流进阶之文件随机访问、序列化与反序列化
路由算法(凑够五个字)
基于单片机的自动循迹小车(论文+源码)
树莓派4B_OpenCv学习笔记10:调整视频帧大小
我的十年编程路 尾声
IDEA中字符串怎么自动转义,双引号自动转义的小技巧
卷积神经网络特征融合,两个神经网络同时训练
vue 项目内vue指令常用
Redis 学习笔记 3:黑马点评
- 原文地址:https://blog.csdn.net/Ostkakah/article/details/132233583
