-
基于nginx+keepalived的负载均衡、高可用web集群
目录
基于nginx+keepalived的负载均衡、高可用web集群
项目描述:
本项目旨在构建一个高性能、高可用的web集群,使用ansible批量部署项目环境,nginx实现七层负载均衡,NFS实现web服务器机器的数据同源,keepalived搭建双VIP实现高可用,Prometheus+grafana实现对LB负载均衡服务器以及NFS服务器的监控。项目环境:
CentOS 7.9、Nginx 1.25.2、Ansiblle 2.9.27、Prometheus 2.46.0、Grafana 10.1.1、NFS nfs v4、ApacheBenchmark 2.3IP划分:
服务器 IP LB1 192.168.232.161 LB2 192.168.232.165 Prometheus 192.168.232.166 web1 192.168.232.162 web2 192.168.232.163 web3 192.168.232.167 NFS 192.168.232.164 Ansible 192.168.232.168 AB 192.168.232.169 项目拓扑图:

关闭所有机器的相关服务
# 临时关闭selinux setenforce 0 # 永久关闭SELINUX sed -i '/^SELINUX=/ s/enforcing/disabled/' /etc/selinux/config # 关闭防火墙 service firewalld stop systemctl disable firewalld- 1
- 2
- 3
- 4
- 5
- 6
- 7
一、按照IP规划配置好静态IP。
查看IP地址
ip add- 1
查看默认网关地址
ip route default via 192.168.232.2- 1
- 2
- 3
进入网卡文件的配置目录
cd /etc/sysconfig/network-scripts vim ifcfg-ens33 # 具体的配置如下 BOOTPROTO="none" # none/static 表示静态配置ip地址 dhcp # 表示动态获得ip地址 NAME="ens33" # 网络连接的名字 DEVICE="ens33" # 设备名字 ONBOOT="yes" # 开机激活网卡 yes激活 no 禁用 IPADDR=192.168.232.161 # 具体的ip地址 PREFIX=24 # 子网掩码 NETMASK=255.255.255.0 # 子网掩码 GATEWAY=192.168.232.2 # 默认网关 DNS1=114.114.114.114 # 首选DNS服务器- 1
- 2
- 3
- 4
- 5
- 6
- 7
- 8
- 9
- 10
- 11
- 12
- 13
刷新网络服务
service network restart- 1
测试是否可以上网
ping二、建立免密通道,使用Ansible自动化批量部署软件环境
1、安装配置ansible
yum install epel-release -y yum install ansible -y- 1
- 2
2、编写主机清单
需要远程控制的清单
vim /etc/ansible/hosts [web_servers] 192.168.232.162 # web1 192.168.232.163 # web2 192.168.232.167 # web3 [lb_servers] 192.168.232.161 # lb1 192.168.232.165 # lb2 [nfs_server] 192.168.232.164 # NFS_server- 1
- 2
- 3
- 4
- 5
- 6
- 7
- 8
- 9
- 10
- 11
- 12
- 13
3、在ansible上生成密钥对,并将公钥复制到其他主机上
ssh-keygen -t rsa ssh-copy-id -i /root/.ssh/id_rsa.pub root@(其他IP)- 1
- 2
4、编写一键安装nginx脚本
mkdir -p /etc/ansible/nginx cd /etc/ansible/nginx vim onekey_install_nginx.sh #!/bin/bash # 新建一个文件夹存放下载的nginx源码包 mkdir -p /nginx cd /nginx # 下载nginx curl -O http://nginx.org/download/nginx-1.25.2.tar.gz # 解压nginx源码包 tar xf nginx-1.25.2.tar.gz # 解决依赖关系 yum install gcc gcc-c++ openssl openssl-devel pcre pcre-devel automake make psmisc net-tools lsof vim geoip geoip-devel wget zlib zlib-devel-y # 新建一个用户并来动nginx useradd -s /sbin/nologin chen # 编译前的配置 ./configure --prefix=/usr/local/chennginx1 --user=chen --with-http_ssl_module --with-http_v2_module --with-threads --with-http_stub_status_module --with-stream # 编译,开启1个进程编译 make -j 1 # 将编译好的二进制文件复制到指定安装路径目录下 make install # 启动nginx cd /usr/local/chennginx1/sbin ./nginx #永久修改PATH变量 PATH=$PATH:/usr/local/chennginx1/sbin echo "PATH=$PATH:/usr/local/chennginx1/sbin" >>/root/.bashrc #设置nginx的开机启动--手动添加 #在/etc/rc.local中添加启动命令 #/usr/local/chennginx1/sbin/nginx echo "/usr/local/chennginx1/sbin/nginx" >>/etc/rc.local #给文件可执行权限 chmod +x /etc/rc.d/rc.local- 1
- 2
- 3
- 4
- 5
- 6
- 7
- 8
- 9
- 10
- 11
- 12
- 13
- 14
- 15
- 16
- 17
- 18
- 19
- 20
- 21
- 22
- 23
- 24
- 25
- 26
- 27
- 28
- 29
- 30
- 31
- 32
- 33
- 34
- 35
- 36
- 37
- 38
- 39
- 40
- 41
- 42
- 43
- 44
- 45
5、编写一键安装node exporter脚本
mkdir -p /etc/ansible/node_exporter cd /etc/ansible/node_exporter vim onekey_install_node_exporter.sh #!/bin/bash cd ~ tar xf node_exporter-1.5.0.linux-amd64.tar.gz # 解压node_exporters源码包 mv node_exporter-1.5.0.linux-amd64 /node_exporter cd /node_exporter PATH=/node_exporter:$PATH #加入PATH环境变量 echo "PATH=/node_exporter:$PATH" >>/root/.bashrc # 加入开机启动 nohup node_exporter --web.listen-address 0.0.0.0:8090 & # 后台运行,监听8090端口- 1
- 2
- 3
- 4
- 5
- 6
- 7
- 8
- 9
- 10
- 11
- 12
其中的压缩文件需要从官网https://prometheus.io/download/上下载,然后传到web_servers和lb_servers内的机器的/root根目录下

6、编写playbook批量部署nginx、keepalived等软件
mkdir /playbook cd /playbook vim software_install.yaml - hosts: web_servers # web集群 remote_user: root tasks: # web主机组中编译安装部署nginx集群 - name: install nginx script: /etc/ansible/nginx/onekey_install_nginx.sh # 调用本地一键安装部署nginx脚本,在远程主机上编译安装 # web主机组中安装nfs,访问nfs服务器,实现数据同源 - name: install nfs yum: name=nfs-utils state=installed - hosts: lb_servers # 负载均衡服务器 remote_user: root tasks: # lb主机组中编译安装nginx - name: install nginx script: /etc/ansible/nginx/onekey_install_nginx.sh # lb主机组中安装keepalived,实现高可用 - name: install keepalived yum: name=keepalived state=installed - hosts: nfs_server # NFS服务器 remote_user: root tasks: - name: install nfs yum: name=nfs-utils state=installed # 调用本地onekey_install_node_exporter脚本,批量安装部署node_exporter,为prometheus采集数据 - hosts: web_servers lb_servers remote_user: root tasks: - name: install node_exporters script: /etc/ansible/node_exporter/onekey_install_node_exporter.sh tags: install_exporter - name: start node_exporters #后台运行node_exporters shell: nohup node_exporter --web.listen-address 0.0.0.0:8090 & tags: start_exporters # 打标签,方便后面直接跳转到此处批量启动node_exporters- 1
- 2
- 3
- 4
- 5
- 6
- 7
- 8
- 9
- 10
- 11
- 12
- 13
- 14
- 15
- 16
- 17
- 18
- 19
- 20
- 21
- 22
- 23
- 24
- 25
- 26
- 27
- 28
- 29
- 30
- 31
- 32
- 33
- 34
- 35
- 36
- 37
- 38
编写完成后执行
ansible-playbook software_install.yaml- 1
三、配置LB服务器实现负载均衡load balance
参考:https://blog.csdn.net/qq_45742976/article/details/132645253?spm=1001.2014.3001.5502
修改LB的配置文件
用于cpu的核心是两个,所以可以修改配置文件中的进程数为2,并将应该worker的并发数修改为2048
worker_processes 2; events { worker_connections 2048; }- 1
- 2
- 3
- 4
- 5
负载均衡器的配置
http { upstream chenapp1 { server 192.168.232.162; server 192.168.232.163; server 192.168.232.167; } server { listen 80; server_name localhost; location / { proxy_pass http://chenapp1; } }- 1
- 2
- 3
- 4
- 5
- 6
- 7
- 8
- 9
- 10
- 11
- 12
- 13
- 14
- 15
修改web1和web2的页面显示,然后在浏览器中输入LB服务器的网址,反复刷新可以看见不同的页面
四、配置NFS服务器实现web集群的数据同源
参考:https://blog.csdn.net/qq_45742976/article/details/132653600?spm=1001.2014.3001.5502
1、配置NFS服务
开启NFS服务
service nfs restart- 1
编辑共享文件的配置文件
vim /etc/exports /web 192.168.232.0/24(rw,all_squash,sync)- 1
- 2
- 3
/web是共享的文件夹的路径,不会自动产生,需要新建
192.168.232.0是允许来访问的客户机的IP地址段
(rw,all_squash,sync)表示权限的限制修改完成之后要刷新服务
service nfs resart 或 exportfs -rv- 1
- 2
- 3
2、在/web文件夹下新建一个HTML文件进行共享
这个HTML文件是做测试用,看是否共享数据成功
[root@nfs web]# cat index.html welcome to index!- 1
- 2
在其他web服务器上挂载使用共享目录
mount 192.168.232.164:/web /usr/local/scnginx99/html/ 源路径文件(NFS) 本机的挂载点- 1
- 2
这个时候再去访问,就会显示NFS服务器中的
index.html页面3、NFS文件系统的自动挂载
将这个命令写在
/etc/rc.local目录下,授予执行权限,实现开机挂载vim /etc/rc.local mount 192.168.232.164:/web /usr/local/scnginx99/html/ chmod +x /etc/rc.local- 1
- 2
- 3
- 4
五、在LB服务器上使用keepalived实现双VIP的高可用
参考:https://blog.csdn.net/qq_45742976/article/details/132666585?spm=1001.2014.3001.5502
修改配置文件
修改主LB服务器的配置文件
cd /etc/keepalived/ vim keepalived.conf ! Configuration File for keepalived global_defs { notification_email { acassen@firewall.loc failover@firewall.loc sysadmin@firewall.loc } notification_email_from Alexandre.Cassen@firewall.loc smtp_server 192.168.200.1 smtp_connect_timeout 30 router_id LVS_DEVEL vrrp_skip_check_adv_addr #vrrp_strict # 注释这一行 vrrp_garp_interval 0 vrrp_gna_interval 0 } vrrp_instance VI_1 { state MASTER # 主LB interface ens33 virtual_router_id 58 # 虚拟路由器id priority 120 # 优先级(0~255) advert_int 1 # 宣告消息的间隔事件为1秒 authentication { # 认证 auth_type PASS auth_pass 1111 } virtual_ipaddress { # VIP 192.168.232.111 } } vrrp_instance VI_2 { state BACKUP interface ens33 virtual_router_id 59 priority 100 advert_int 1 authentication { auth_type PASS auth_pass 1111 } virtual_ipaddress { 192.168.232.112 } }- 1
- 2
- 3
- 4
- 5
- 6
- 7
- 8
- 9
- 10
- 11
- 12
- 13
- 14
- 15
- 16
- 17
- 18
- 19
- 20
- 21
- 22
- 23
- 24
- 25
- 26
- 27
- 28
- 29
- 30
- 31
- 32
- 33
- 34
- 35
- 36
- 37
- 38
- 39
- 40
- 41
- 42
- 43
- 44
- 45
- 46
- 47
- 48
- 49
- 50
- 51
修改从LB的配置文件
cd /etc/keepalived/ vim keepalived.conf ! Configuration File for keepalived global_defs { notification_email { acassen@firewall.loc failover@firewall.loc sysadmin@firewall.loc } notification_email_from Alexandre.Cassen@firewall.loc smtp_server 192.168.200.1 smtp_connect_timeout 30 router_id LVS_DEVEL vrrp_skip_check_adv_addr #vrrp_strict vrrp_garp_interval 0 vrrp_gna_interval 0 } vrrp_instance VI_1 { state BACKUP # 从LB interface ens33 virtual_router_id 58 priority 100 # 优先级要比主LB小 advert_int 1 authentication { auth_type PASS auth_pass 1111 } virtual_ipaddress { 192.168.232.111 } } vrrp_instance VI_2 { state BACKUP interface ens33 virtual_router_id 59 priority 120 advert_int 1 authentication { auth_type PASS auth_pass 1111 } virtual_ipaddress { 192.168.232.112 } }- 1
- 2
- 3
- 4
- 5
- 6
- 7
- 8
- 9
- 10
- 11
- 12
- 13
- 14
- 15
- 16
- 17
- 18
- 19
- 20
- 21
- 22
- 23
- 24
- 25
- 26
- 27
- 28
- 29
- 30
- 31
- 32
- 33
- 34
- 35
- 36
- 37
- 38
- 39
- 40
- 41
- 42
- 43
- 44
- 45
- 46
- 47
- 48
- 49
- 50
- 51
配置完成之后刷新服务
service keepalived restart- 1
六、配置Prometheus+grafana对集群进行监控
1、Prometheus的安装和配置
参考:https://blog.csdn.net/qq_45742976/article/details/132686037?spm=1001.2014.3001.5502
1、安装和配置
-
在监控服务器(192.168.232.166)上编译安装
首先在官网上下载源码包https://prometheus.io/download/
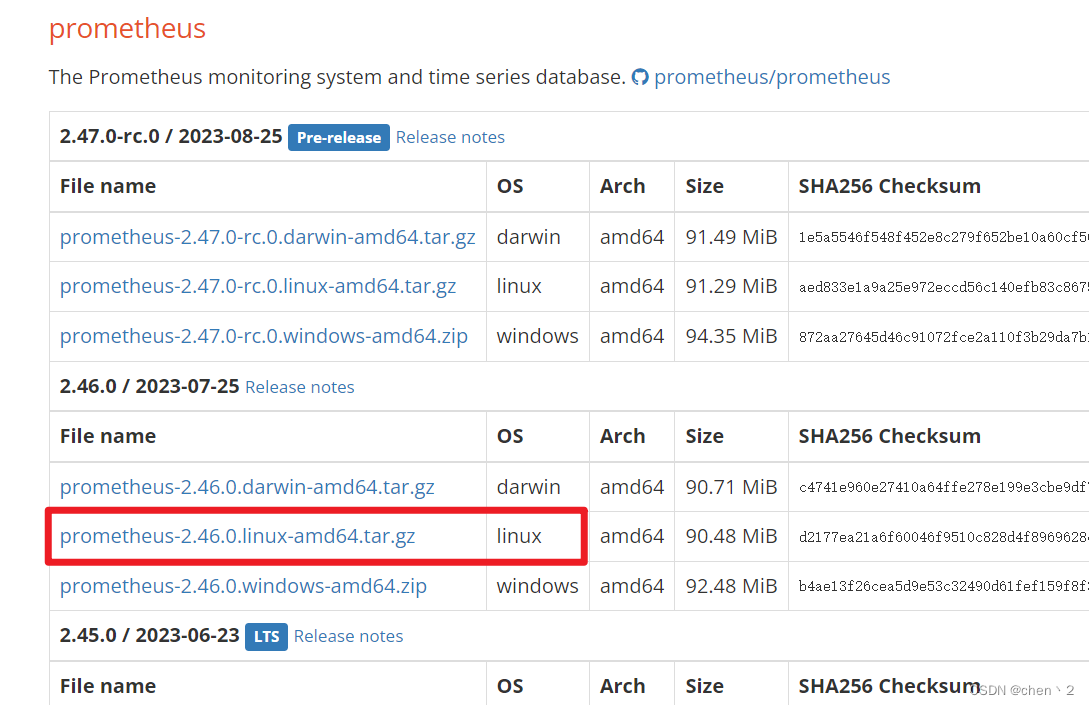
将下载好的源码包传到监控服务器,解压
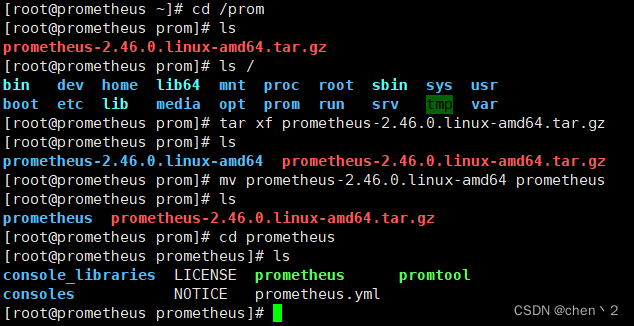
-
临时和永久修改PATH变量,添加prometheus路径
PATH=/prom/prometheus:$PATH [root@prometheus prometheus]# cat /root/.bashrc # .bashrc # User specific aliases and functions alias rm='rm -i' alias cp='cp -i' alias mv='mv -i' # Source global definitions if [ -f /etc/bashrc ]; then . /etc/bashrc fi PATH=/prom/prometheus:$PATH # 添加的信息- 1
- 2
- 3
- 4
- 5
- 6
- 7
- 8
- 9
- 10
- 11
- 12
- 13
- 14
- 15
-
启动prometheus服务,并让他在后台运行,不受到终端关闭的影响(Prometheus监听9090端口)
nohup prometheus --config.file=/prom/prometheus/prometheus.yml &- 1
-
关闭防火墙,并设置永久关闭。然后就可以在服务器上输入
192.168.232.166:9090看到监控页面了service firewalld stop systemctl disable firewalld- 1
- 2
-
将源码二进制安装的Prometheus配置成一个服务,便于管理
[root@prometheus prometheus]# cat /usr/lib/systemd/system/prometheus.service [Unit] Description=prometheus [Service] ExecStart=/prom/prometheus/prometheus --config.file=/prom/prometheus/prometheus.yml ExecReload=/bin/kill -HUP $MAINPID KillMode=process Restart=on-failure [Install] WantedBy=multi-user.target # 重新加载systemd相关的服务 [root@prometheus prometheus]# systemctl daemon-reload- 1
- 2
- 3
- 4
- 5
- 6
- 7
- 8
- 9
- 10
- 11
- 12
- 13
- 14
将之前使用nohup方式启动的Prometheus服务杀死,再使用以下命令开启
service prometheus start- 1
容器安装prometheus:
docker run -d -p 9090:9090 --name sc-prom-1 prom/prometheus- 1
2、将 NFS服务器和LB服务器作为exporter采集数据
-
在官网上下载node节点源码包,解压
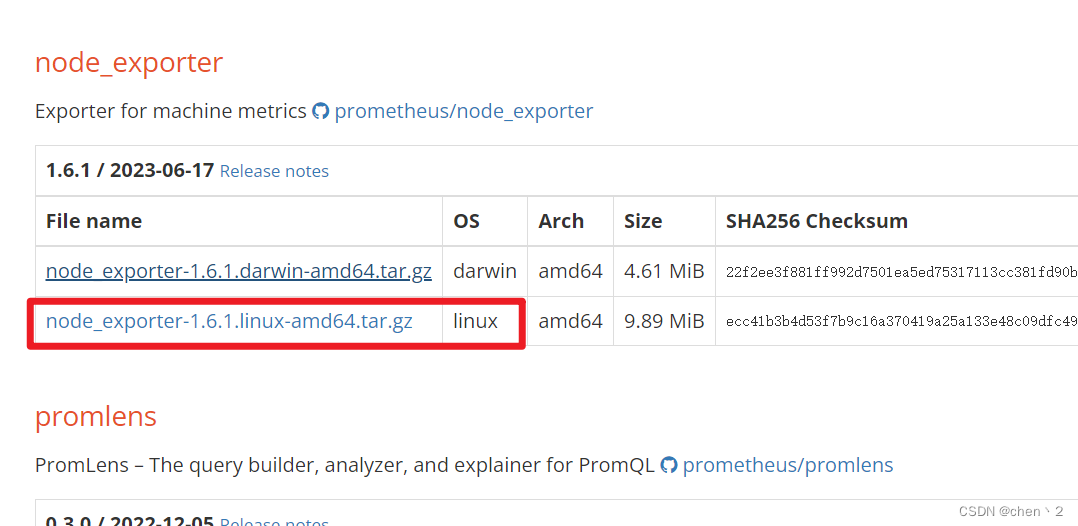
tar xf node_exporter-1.6.1.linux-amd64.tar.gz mv node_exporter-1.6.1.linux-amd64 /node_exporter cd /node_exporter/- 1
- 2
- 3
- 4
-
修改PATH变量
PATH=/node_exporter/:$PATH [root@lb node_exporter]# cat /root/.bashrc # .bashrc # User specific aliases and functions alias rm='rm -i' alias cp='cp -i' alias mv='mv -i' # Source global definitions if [ -f /etc/bashrc ]; then . /etc/bashrc fi PATH=/usr/local/sbin:/usr/local/bin:/usr/sbin:/usr/bin:/root/bin:/usr/local/scnginx99/sbin:/usr/local/scnginx99/sbin PATH=/node_exporter/:$PATH- 1
- 2
- 3
- 4
- 5
- 6
- 7
- 8
- 9
- 10
- 11
- 12
- 13
- 14
- 15
- 16
- 17
- 18
-
启动exporter服务,并让他在后台运行,不受到终端关闭的影响(自定义exporter监听8090端口)
nohup node_exporter --web.listen-address 0.0.0.0:8090 &- 1
-
在浏览器上访问node节点上的metrics(指标)
http://192.168.232.164:8090/metrics- 1
3、在prometheus server里添加安装exporter程序的服务器
[root@prometheus prometheus]# pwd /prom/prometheus [root@prometheus prometheus]# cat prometheus.yml # The job name is added as a label `job=` to any timeseries scraped from this config. - job_name: "prometheus" static_configs: - targets: ["localhost:9090"] - job_name: "LB1" static_configs: - targets: ["192.168.232.161:8090"] - job_name: "LB2" static_configs: - targets: ["192.168.232.165:8090"] - job_name: "NFS" static_configs: - targets: ["192.168.232.164:8090"] - 1
- 2
- 3
- 4
- 5
- 6
- 7
- 8
- 9
- 10
- 11
- 12
- 13
- 14
- 15
- 16
- 17
- 18
修改完之后记得重启服务
然后再去浏览器查看监控页面,就可以看到LB和NFS的相关信息了
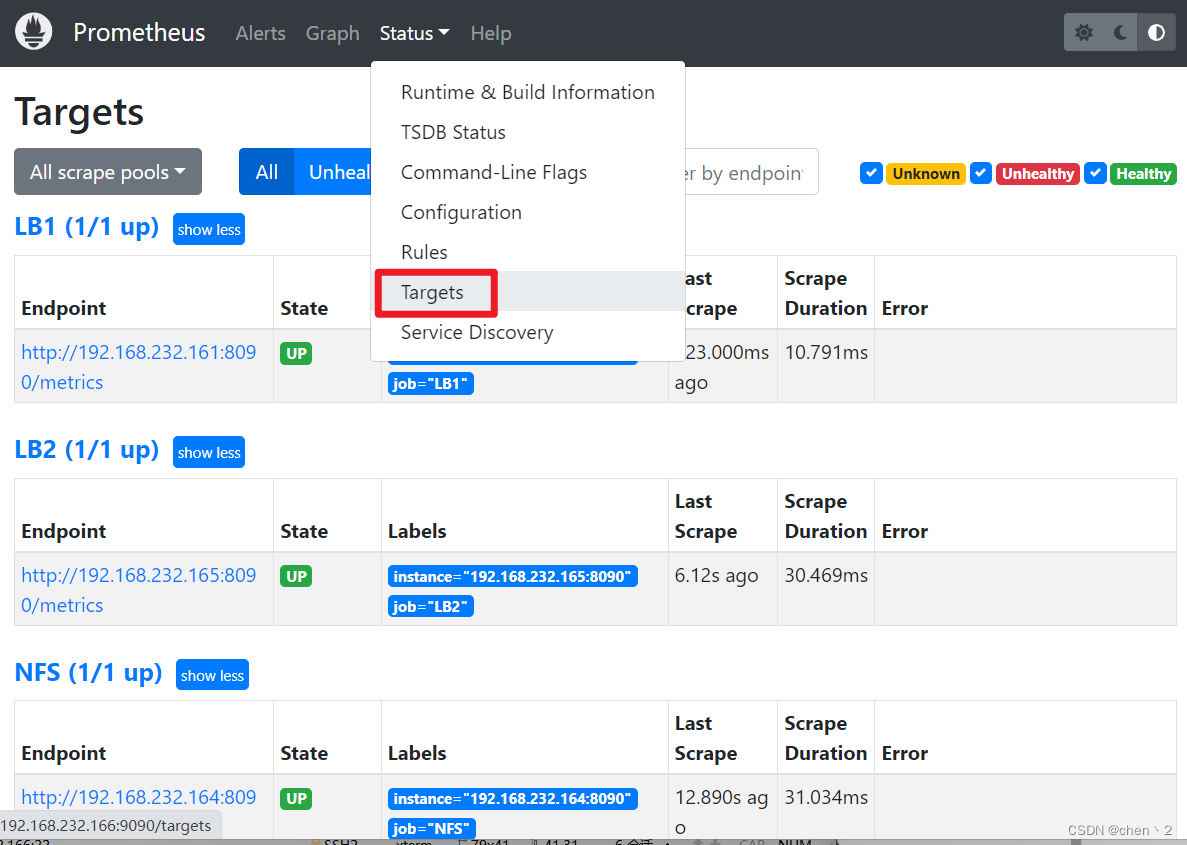
2、grafana出图工具
-
将grafana和prometheus安装在一台机器上
官网https://dl.grafana.com/enterprise/release/grafana-enterprise-10.1.1-1.x86_64.rpm下载rpm包,传入prometheus服务器中
[root@prometheus grafana]# ls grafana-enterprise-10.1.1-1.x86_64.rpm [root@prometheus grafana]# yum install grafana-enterprise-10.1.1-1.x86_64.rpm service grafana-server start systemctl enable grafana-server- 1
- 2
- 3
- 4
- 5
- 6
grafana监听3000端口
可以在浏览器上访问,用户和密码都为
admin -
配置prometheus的数据源,导入模版
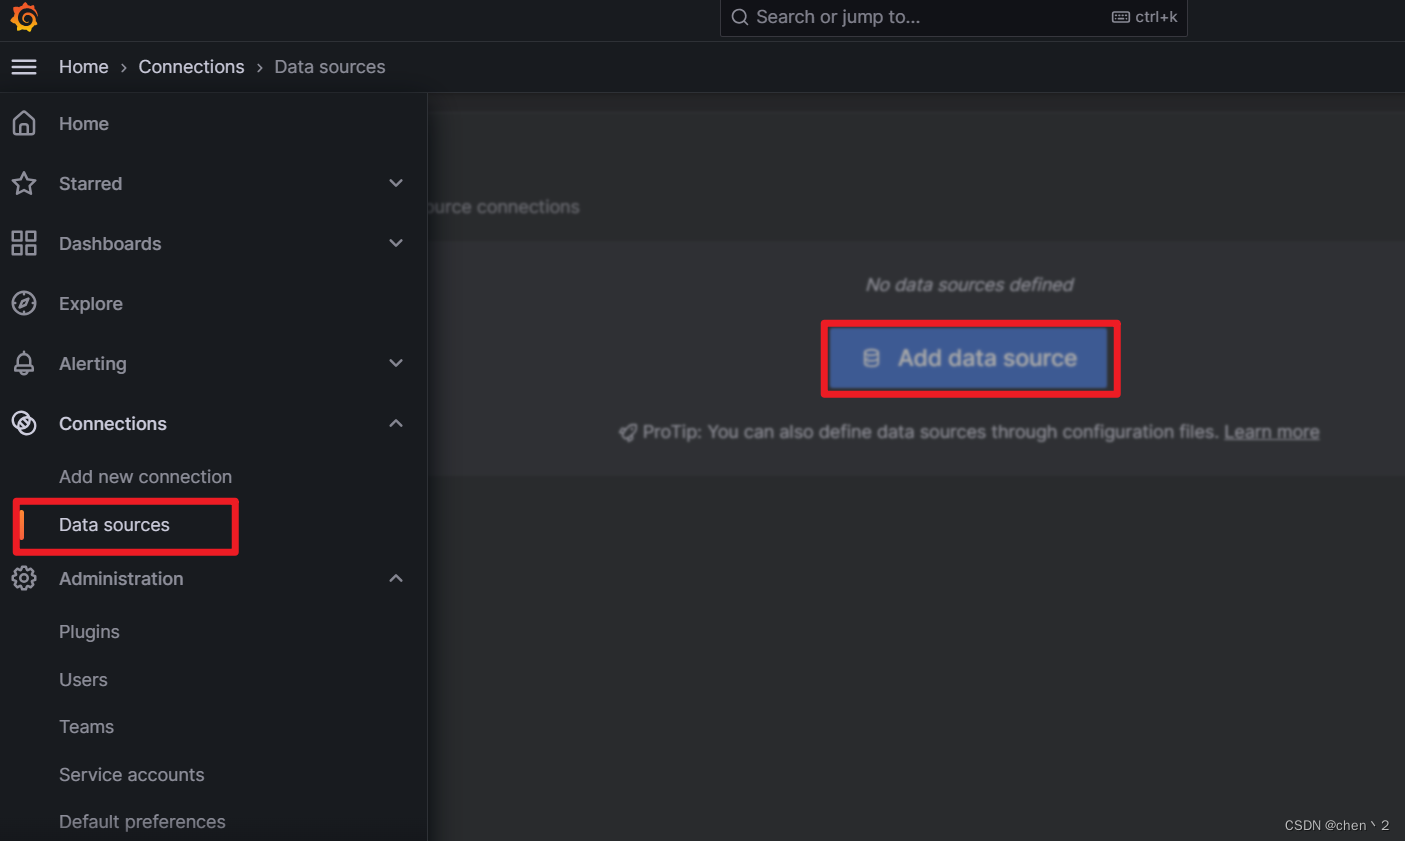
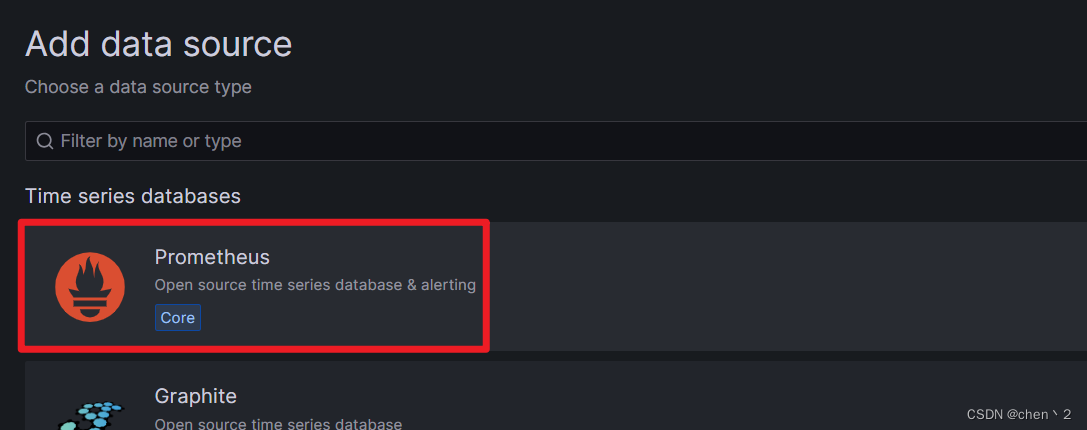
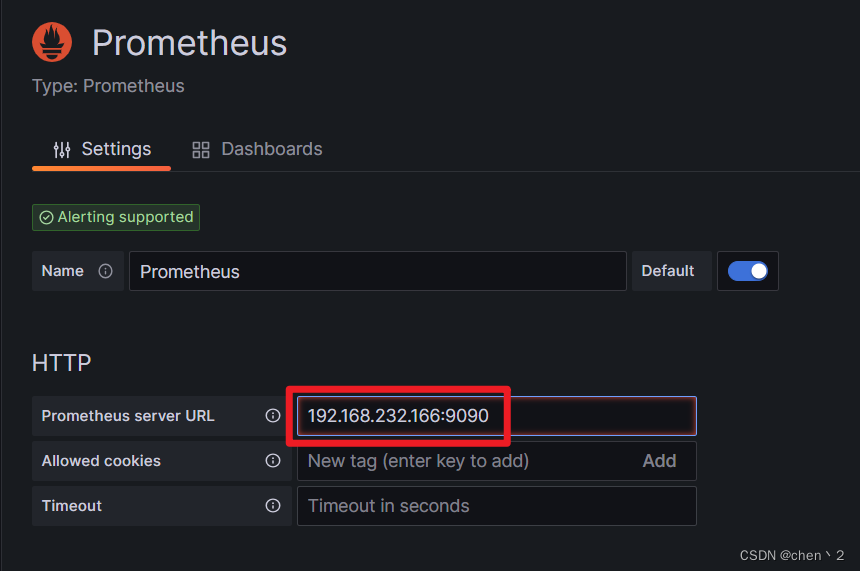
这里输入Prometheus的IP地址和端口号

导入出图模版
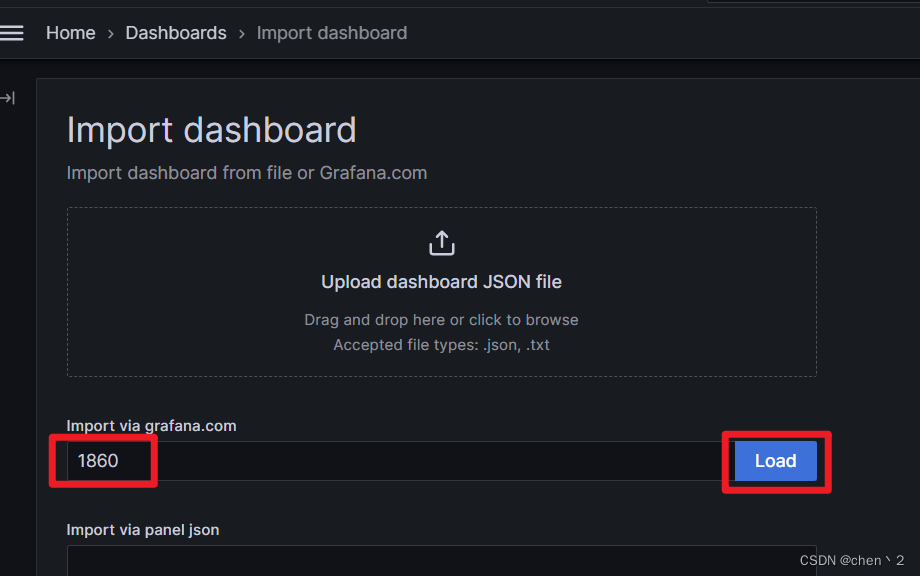
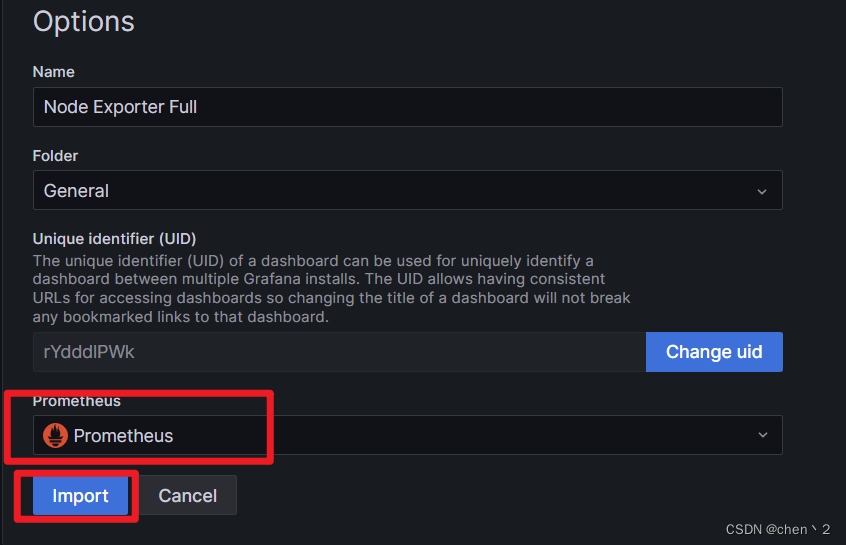
七、配置ApacheBenchmark压力测试
基本用法:
ab -n 请求总数 -c 并发数 URL- 1
其中,
-n表示要发送的请求数,-c表示并发请求数,URL是你要测试的目标 URL安装
yum insttall httpd-tools -y- 1
测试
ab -c 150 -n 10000 http://192.168.232.111/- 1
八、对系统性能资源进行调优,提升系统性能
1、提高系统的并发性能和吞吐量
设置用户打开文件描述符限制,可以使用户打开文件的数量变多。
在Linux系统中,每个进程可以打开的文件描述符数量是有限的,而这个限制在一些高负载的应用场景下可能会成为性能瓶颈。
通过将ulimit -n设置为较大的值,如65535,提高了进程能够同时打开的文件描述符数量,这样应用就能够更好地处理大量连接和文件操作,提高系统的并发性能和吞吐量。
ulimit -n 65535 [root@nginx-lb1 ~]# ulimit -n 65535 [root@nginx-lb1 ~]# ulimit -a #查看内核参数- 1
- 2
- 3
- 4
2、交换分区调优
交换分区是从磁盘里划分出来的一块空间临时做内存使用的,当物理内存不足的时候,将不活跃的进程交换到swap分区里。但由于交换分区速度慢,尽量不使用
[root@lb-2 ~]# cat /proc/sys/vm/swappiness 30 # 当物理内存只剩下30%的时候,开始使用交换分区,临时修改为0% echo 0 >/proc/sys/vm/swappiness- 1
- 2
- 3
- 4
3、对nginx配置文件的参数调优
#user nobody; worker_processes 2; # 增加worker进程数量(可以与CPU数量一致) #error_log logs/error.log; #error_log logs/error.log notice; #error_log logs/error.log info; #pid logs/nginx.pid; events { worker_connections 2048; # 增加每个worker进程的最大并发连接数 }- 1
- 2
- 3
- 4
- 5
- 6
- 7
- 8
- 9
- 10
- 11
- 12
- 13
-
相关阅读:
react-state hook
计算机网络 | 应用层
LeetCode HOT 100 —— 49.全排列
BiConsumer的使用
Spring架构浅析
通过python简单预测彩票下次是否中奖:LSTM、LogisticRegression
自定义一个下划线分词器
js中 scrollHeight、clientHeight、scrollTop的理解
flink 技术总结待续
为了方便,采用数据库连接池druid
- 原文地址:https://blog.csdn.net/qq_45742976/article/details/132732502
