-
部署Redis集群
部署Redis集群
1. 准备集群主机
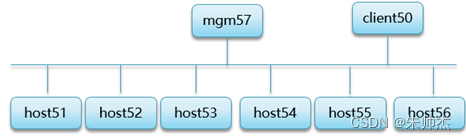
准备6台Redis服务器
主机名 IP地址 端口 host51 192.168.88.51 6379 host52 192.168.88.52 6379 Host53 192.168.88.53 6379 Host54 192.168.88.54 6379 Host55 192.168.88.55 6379 Host56 192.168.88.56 6379 说明准备做集群的主机,不允许存储数据、不允许设置连接密码
配置服务器192.168.88.51 (删除已有虚拟机host51 重新创建新虚拟机 做如下配置) [root@host51 ~]# yum -y install gcc [root@host51 ~]# tar -xf redis-4.0.8.tar.gz [root@host51 ~]# cd redis-4.0.8/ [root@host51 ~]# make && make install [root@host51 ~]# ./utils/install_server.sh 遇到提示就回车 配置服务器192.168.88.52 [root@host52 ~]# yum -y install gcc [root@host52 ~]# tar -xf redis-4.0.8.tar.gz [root@host52 ~]# cd redis-4.0.8/ [root@host52 ~]# make && make install [root@host52 ~]# ./utils/install_server.sh 遇到提示就回车 配置服务器192.168.88.53 [root@host53 ~]# yum -y install gcc [root@host53 ~]# tar -xf redis-4.0.8.tar.gz [root@host53 ~]# cd redis-4.0.8/ [root@host53 ~]# make && make install [root@host53 ~]# ./utils/install_server.sh 遇到提示就回车 配置服务器192.168.88.54 [root@host54 ~]# yum -y install gcc [root@host54 ~]# tar -xf redis-4.0.8.tar.gz [root@host54 ~]# cd redis-4.0.8/ [root@host54 ~]# make && make install [root@host54 ~]# ./utils/install_server.sh 遇到提示就回车 配置服务器192.168.88.55 [root@host55 ~]# yum -y install gcc [root@host55 ~]# tar -xf redis-4.0.8.tar.gz [root@host55 ~]# cd redis-4.0.8/ [root@host55 ~]# make && make install [root@host55 ~]# ./utils/install_server.sh 遇到提示就回车 配置服务器192.168.88.56 [root@host56 ~]# yum -y install gcc [root@host56 ~]# tar -xf redis-4.0.8.tar.gz [root@host56 ~]# cd redis-4.0.8/ [root@host56 ~]# make && make install [root@host56 ~]# ./utils/install_server.sh 遇到提示就回车- 1
- 2
- 3
- 4
- 5
- 6
- 7
- 8
- 9
- 10
- 11
- 12
- 13
- 14
- 15
- 16
- 17
- 18
- 19
- 20
- 21
- 22
- 23
- 24
- 25
- 26
- 27
- 28
- 29
- 30
- 31
- 32
- 33
- 34
- 35
- 36
- 37
- 38
- 39
- 40
- 41
- 42
- 43
- 44
- 45
- 46
2. 启用集群功能
1.启用host51主机集群功能 [root@host51 ~]# /etc/init.d/redis_6379 stop [root@host51 ~]# vim /etc/redis/6379.conf bind 192.168.88.51 port 6379 cluster-enabled yes #启用集群功能 cluster-config-file nodes-6379.conf 保存集群信息的配置文件 cluster-node-timeout 5000 集群中主机的连接超时时间 [root@host51 ~]# [root@host51 ~]# /etc/init.d/redis_6379 start [root@host51 ~]# netstat -utnlp | grep redis-server tcp 0 0 192.168.88.51:16379 0.0.0.0:* LISTEN 4249/redis-server 1 tcp 0 0 192.168.88.51:6379 0.0.0.0:* LISTEN 4249/redis-server 1 2.启用host52主机集群功能 [root@host52 ~]# /etc/init.d/redis_6379 stop [root@host52 ~]# sed -n '70p;93p;815p;823p;829p' /etc/redis/6379.conf bind 192.168.88.52 port 6379 cluster-enabled yes #启用集群功能 cluster-config-file nodes-6379.conf 保存集群信息的配置文件 cluster-node-timeout 5000 集群中主机的连接超时时间 [root@host52 ~]# [root@host52 ~]# /etc/init.d/redis_6379 start [root@host52 ~]# netstat -utnlp | grep redis-server tcp 0 0 192.168.88.52:16379 0.0.0.0:* LISTEN 4249/redis-server 1 tcp 0 0 192.168.88.52:6379 0.0.0.0:* LISTEN 4249/redis-server 1 3.启用host53主机集群功能 [root@host53 ~]# /etc/init.d/redis_6379 stop [root@host53 ~]# sed -n '70p;93p;815p;823p;829p' /etc/redis/6379.conf bind 192.168.88.53 port 6379 cluster-enabled yes cluster-config-file nodes-6379.conf cluster-node-timeout 5000 [root@host53 ~]# [root@host53 ~]# /etc/init.d/redis_6379 start [root@host53 ~]# netstat -utnlp | grep redis-server tcp 0 0 192.168.88.53:16379 0.0.0.0:* LISTEN 4249/redis-server 1 tcp 0 0 192.168.88.53:6379 0.0.0.0:* LISTEN 4249/redis-server 1 4.启用host54主机集群功能 [root@host54 ~]# /etc/init.d/redis_6379 stop [root@host54 ~]# sed -n '70p;93p;815p;823p;829p' /etc/redis/6379.conf bind 192.168.88.54 port 6379 cluster-enabled yes cluster-config-file nodes-6379.conf cluster-node-timeout 5000 [root@host54 ~]# [root@host54 ~]# /etc/init.d/redis_6379 start [root@host54 ~]# netstat -utnlp | grep redis-server tcp 0 0 192.168.88.54:16379 0.0.0.0:* LISTEN 4249/redis-server 1 tcp 0 0 192.168.88.54:6379 0.0.0.0:* LISTEN 4249/redis-server 1 5.启用host55主机集群功能 [root@host55 ~]# /etc/init.d/redis_6379 stop [root@host55 ~]# sed -n '70p;93p;815p;823p;829p' /etc/redis/6379.conf bind 192.168.88.55 port 6379 cluster-enabled yes cluster-config-file nodes-6379.conf cluster-node-timeout 5000 [root@host55 ~]# [root@host55 ~]# /etc/init.d/redis_6379 start [root@host55 ~]# netstat -utnlp | grep redis-server tcp 0 0 192.168.88.55:16379 0.0.0.0:* LISTEN 4249/redis-server 1 tcp 0 0 192.168.88.55:6379 0.0.0.0:* LISTEN 4249/redis-server 1 6.启用host56主机集群功能 [root@host56 ~]# /etc/init.d/redis_6379 stop [root@host56 ~]# sed -n '70p;93p;815p;823p;829p' /etc/redis/6379.conf bind 192.168.88.56 port 6379 cluster-enabled yes cluster-config-file nodes-6379.conf cluster-node-timeout 5000 [root@host56 ~]# [root@host56 ~]# /etc/init.d/redis_6379 start [root@host56 ~]# netstat -utnlp | grep redis-server tcp 0 0 192.168.88.56:16379 0.0.0.0:* LISTEN 4249/redis-server 1 tcp 0 0 192.168.88.56:6379 0.0.0.0:* LISTEN 4249/redis-server 1- 1
- 2
- 3
- 4
- 5
- 6
- 7
- 8
- 9
- 10
- 11
- 12
- 13
- 14
- 15
- 16
- 17
- 18
- 19
- 20
- 21
- 22
- 23
- 24
- 25
- 26
- 27
- 28
- 29
- 30
- 31
- 32
- 33
- 34
- 35
- 36
- 37
- 38
- 39
- 40
- 41
- 42
- 43
- 44
- 45
- 46
- 47
- 48
- 49
- 50
- 51
- 52
- 53
- 54
- 55
- 56
- 57
- 58
- 59
- 60
- 61
- 62
- 63
- 64
- 65
- 66
- 67
- 68
- 69
- 70
- 71
- 72
- 73
- 74
- 75
- 76
- 77
- 78
- 79
- 80
- 81
- 82
- 83
- 84
- 85
- 86
- 87
- 88
- 89
3. 配置管理主机并创建集群
准备新虚拟机
主机名 IP****地址 角色 Mgm57 192.168.88.57 管理主机 拓扑结构
- redis服务器:6台
- 管理主机:1台
- 客户端:1台
3.1 配置管理主机 192.168.88.57
第一步:准备ruby脚本的运行环境 第二步:创建脚本 第三步:查看脚本帮助信息- 1
- 2
- 3
]#yum -y install rubygems ruby ]#gem install redis-3.2.1.gem ]#mkdir /root/bin //创建命令检索目录 ]#tar -xf redis-4.0.8.tar.gz ]#cp redis-4.0.8/src/redis-trib.rb /root/bin/ ]#chmod +x /root/bin/redis-trib.rb 设置执行权限 ]#redis-trib.rb help (能看到帮助信息为成功)- 1
- 2
- 3
- 4
- 5
- 6
- 7
3.2 创建集群
创建集群命令
说明,创建集群时,会把前3台服务器 配置为主服务器,剩下的其他主机全做从服务器
–replicas 从服务器的台数
redis-trib.rb create --replicas 数字 ip地址:端口 ip地址:端口 ip地址:端口 …
例子[root@mgm57 ~]# redis-trib.rb create --replicas 1 192.168.88.51:6379 192.168.88.52:6379 192.168.88.53:6379 192.168.88.54:6379 192.168.88.55:6379 192.168.88.56:6379 >>> Creating cluster >>> Performing hash slots allocation on 6 nodes... Using 3 masters: 192.168.88.51:6379 192.168.88.52:6379 192.168.88.53:6379 Adding replica 192.168.88.55:6379 to 192.168.88.51:6379 Adding replica 192.168.88.56:6379 to 192.168.88.52:6379 Adding replica 192.168.88.54:6379 to 192.168.88.53:6379 M: 0eb3b7aa0493a19189cba35b0c658202cc20884b 192.168.88.51:6379 slots:0-5460 (5461 slots) master M: a9cb8ccd31bf3eb70433c00906c9f1a99b5e8441 192.168.88.52:6379 slots:5461-10922 (5462 slots) master M: f2c1bdb78d8d224c3666fa6440bdf80ba563c581 192.168.88.53:6379 slots:10923-16383 (5461 slots) master S: bdba77868965371680fa825badff59bf8ef95a81 192.168.88.54:6379 replicates f2c1bdb78d8d224c3666fa6440bdf80ba563c581 S: 11510f42bfd9cf667bab5f31c01476d94984200a 192.168.88.55:6379 replicates 0eb3b7aa0493a19189cba35b0c658202cc20884b S: fe572ce003ee634c52adc4b42d92d15f847937d7 192.168.88.56:6379 replicates a9cb8ccd31bf3eb70433c00906c9f1a99b5e8441 Can I set the above configuration? (type 'yes' to accept): yes 同意 .... .... [OK] All nodes agree about slots configuration. >>> Check for open slots... >>> Check slots coverage... [OK] All 16384 slots covered. 创建成功的提示- 1
- 2
- 3
- 4
- 5
- 6
- 7
- 8
- 9
- 10
- 11
- 12
- 13
- 14
- 15
- 16
- 17
- 18
- 19
- 20
- 21
- 22
- 23
- 24
- 25
- 26
- 27
- 28
- 29
创建集群失败解决办法
- 1 检查7台主机的防火墙和selinux服务是否关闭了
- 2 在6台Redis服务器 分别执行如下操作:
停止Redis服务
清空数据库目录 rm –rf /var/lib/redis/6379/*
启动Redis服务 - 3 管理主机创建集群
3.3 查看集群信息
查看集群统计信息
[root@mgm57 ~]# redis-trib.rb info 192.168.4.51:6379 192.168.88.53:6379 (f2c1bdb7...) -> 0 keys | 5461 slots | 1 slaves. 192.168.88.51:6379 (0eb3b7aa...) -> 0 keys | 5461 slots | 1 slaves. 192.168.88.52:6379 (a9cb8ccd...) -> 0 keys | 5462 slots | 1 slaves. [OK] 0 keys in 3 masters. 0.00 keys per slot on average. [root@mgm57 ~]#- 1
- 2
- 3
- 4
- 5
- 6
- 7
查看集群详细信息
[root@mgm57 ~]# redis-trib.rb check 192.168.88.51:6379 >>> Performing Cluster Check (using node 192.168.88.51:6379) M: 0eb3b7aa0493a19189cba35b0c658202cc20884b 192.168.88.51:6379 slots:0-5460 (5461 slots) master 1 additional replica(s) M: f2c1bdb78d8d224c3666fa6440bdf80ba563c581 192.168.88.53:6379 slots:10923-16383 (5461 slots) master 1 additional replica(s) S: bdba77868965371680fa825badff59bf8ef95a81 192.168.88.54:6379 slots: (0 slots) slave replicates f2c1bdb78d8d224c3666fa6440bdf80ba563c581 M: a9cb8ccd31bf3eb70433c00906c9f1a99b5e8441 192.168.88.52:6379 slots:5461-10922 (5462 slots) master 1 additional replica(s) S: 11510f42bfd9cf667bab5f31c01476d94984200a 192.168.88.55:6379 slots: (0 slots) slave replicates 0eb3b7aa0493a19189cba35b0c658202cc20884b S: fe572ce003ee634c52adc4b42d92d15f847937d7 192.168.88.56:6379 slots: (0 slots) slave replicates a9cb8ccd31bf3eb70433c00906c9f1a99b5e8441 [OK] All nodes agree about slots configuration. >>> Check for open slots... >>> Check slots coverage... [OK] All 16384 slots covered.- 1
- 2
- 3
- 4
- 5
- 6
- 7
- 8
- 9
- 10
- 11
- 12
- 13
- 14
- 15
- 16
- 17
- 18
- 19
- 20
- 21
- 22
- 23
- 24
4. 测试集群及集群工作原理
4.1. 访问集群存取数据
命令
-c 连接集群中的主机 使用集群算法存储数据 ]# redis-cli -c -h redis服务器的ip -p 端口号 说明:连接集群中的任意一台服务器都可以查询数据和存储数据- 1
- 2
- 3
- 4
- 5
4.2 在客户端连接集群中的主机
说明:
统一在Host51主机演示存储数数据
向集群中的主机存储数据一次只能存储一个变量集群算法每次只有一个计算结果
#存储数据 [root@host51 ~]# redis-cli -c -h 192.168.88.51 192.168.88.51:6379> keys * (empty list or set) 192.168.88.51:6379> set name zsj -> Redirected to slot [5798] located at 192.168.88.52:6379 OK 192.168.88.52:6379> keys * 1) "name" 192.168.88.52:6379> set age 19 -> Redirected to slot [741] located at 192.168.88.51:6379 OK 192.168.88.51:6379> keys * 1) "age" 192.168.88.51:6379> set school tarena -> Redirected to slot [8455] located at 192.168.88.52:6379 OK 192.168.88.52:6379> exit #查询数据 root@host51 ~]# redis-cli -c -h 192.168.88.56 192.168.88.56:6379> keys * 1) "school" 2) "name" 192.168.88.56:6379> get name -> Redirected to slot [5798] located at 192.168.88.52:6379 "zsj" 192.168.88.52:6379> keys * 1) "name" 2) "school" 192.168.88.52:6379> get age -> Redirected to slot [741] located at 192.168.88.51:6379 "19" 192.168.88.51:6379> keys 1) "age" 192.168.88.51:6379> exit- 1
- 2
- 3
- 4
- 5
- 6
- 7
- 8
- 9
- 10
- 11
- 12
- 13
- 14
- 15
- 16
- 17
- 18
- 19
- 20
- 21
- 22
- 23
- 24
- 25
- 26
- 27
- 28
- 29
- 30
- 31
- 32
- 33
- 34
- 35
- 36
- 37
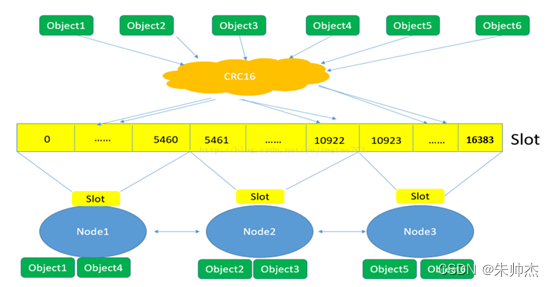
4.3 集群存储数据的工作原理
Redis集群是如何实现数据的分布式存储的?
存储数据和查询数据时 调用集群算法CRC16
集群算法会计算出1个数字, 数字在哪个主服务占用的hash slots范围内 ,就连接对应的主服务器存储数据或查询数据。
4.4 测试数据自动备份
连接slave角色服务器可以查看到和master角色服务器一样的数据
root@host51 ~]# redis-cli -c -h 192.168.88.54 > keys * root@host51 ~]# redis-cli -c -h 192.168.88.55 > keys * root@host51 ~]# redis-cli -c -h 192.168.88.56 > keys *- 1
- 2
- 3
- 4
- 5
- 6
- 7
- 8
**4.5 **测试高可用
#停止master角色主机的redis服务 root@host53 ~]# redis-cli -h 192.168.88.53 -p 6379 shutdown #在管理主机查看集群信息 发现mater角色主机的ip发生了变化 [root@mgm57 ~]# redis-trib.rb info 192.168.88.51:6379- 1
- 2
- 3
- 4
- 5
- 6
5. 管理集群
环境准备:
- 创建2台新虚拟机 ip 192.168.88.58 和 192.168.88.59
主机名 IP地址 端口号 Host58 192.168.88.58 6379 Host59 192.168.88.59 6379 - 准备redis服务器Host58
[root@host58 ~]# yum -y install gcc [root@host58 ~]# tar -xf redis-4.0.8.tar.gz [root@host58 ~]# cd redis-4.0.8/ [root@host58 ~]# make && make install [root@host58 ~]# ./utils/install_server.sh 遇到提示就回车- 1
- 2
- 3
- 4
- 5
- 准备redis服务器Host59
[root@host59 ~]# yum -y install gcc [root@host59 ~]# tar -xf redis-4.0.8.tar.gz [root@host59 ~]# cd redis-4.0.8/ [root@host59 ~]# make && make install [root@host59 ~]# ./utils/install_server.sh 遇到提示就回车- 1
- 2
- 3
- 4
- 5
5.1 向集群里添加新服务器
说明:什么情况下需要向集群里添加新主机
扩大内存空间(添加master角色服务器)。
为了保证服务的可靠性(给主服务器添加多个从服务器)1. 添加master角色的服务器
要求:把新的Redis服务器Host58 添加到集群里做master 服务器
具体配置如下:
(1) Host58运行redis 服务且启用了集群功能
[root@host58 ~]# /etc/init.d/redis_6379 stop [root@host58 ~]# sed -n '70p;93p;815p;823p;829p' /etc/redis/6379.conf [root@host58 ~]# vim /etc/redis/6379.conf bind 192.168.88.58 port 6379 cluster-enabled yes #启用集群功能 cluster-config-file nodes-6379.conf #保存集群信息的配置文件 cluster-node-timeout 5000 #集群中主机的连接超时时间 [root@host58 ~]# /etc/init.d/redis_6379 restart [root@host58 ~]# netstat -utnlp | grep redis-server tcp 0 0 192.168.88.58:16379 0.0.0.0:* LISTEN 4249/redis-server 1 tcp 0 0 192.168.88.58:6379 0.0.0.0:* LISTEN 4249/redis-server 1- 1
- 2
- 3
- 4
- 5
- 6
- 7
- 8
- 9
- 10
- 11
- 12
- 13
- 14
(2) 在管理主机mgm57 如下操作:
2.1 把host58主机添加到集群里 命令 redis-trib.rb add-node 新主机Ip:端口 集群中已有主机的ip:端口 [root@mgm57 ~]# redis-trib.rb add-node 192.168.88.58:6379 192.168.88.51:6379 ..... ..... [OK] All nodes agree about slots configuration. > > > Check for open slots... > > > Check slots coverage... > > > [OK] All 16384 slots covered. > > > Send CLUSTER MEET to node 192.168.88.58:6379 to make it join the cluster. > > > [OK] New node added correctly. 添加成功的提示 > > > [root@mgm57 ~]# #新添加的master角色主机没有hash slots [root@mgm57 ~]# redis-trib.rb info 192.168.88.51:6379 192.168.88.51:6379 (0eb3b7aa...) -> 2 keys | 5461 slots | 1 slaves. 192.168.88.53:6379 (f2c1bdb7...) -> 1 keys | 5461 slots | 1 slaves. 192.168.88.52:6379 (a9cb8ccd...) -> 3 keys | 5462 slots | 1 slaves. 192.168.88.58:6379 (87cc1c12...) -> 0 keys | 0 slots | 0 slaves. 零个hash slots [OK] 6 keys in 4 masters. 0.00 keys per slot on average. [root@mgm57 ~]# 2.2 分配hast slots master角色的服务器没有hast slots得不到存储数据机会 命令 redis-trib.rb reshard 集群中已有主机的ip:端口 [root@mgm57 ~]# redis-trib.rb reshard 192.168.88.56:6379 第1个问题 移除多少个hast slots How many slots do you want to move (from 1 to 16384)? 4096 第2个问题 把4096个槽给哪台主数据库服务器 (host58主机的id) What is the receiving node ID?87cc1c128166e08a16cc294758611453bbc71437 第3个问题 提供4096个槽 主机的id (all 表示当前所有主服务器一起提供4096个槽给host58) Source node #1:all 第4个问题 确认前3步的配置 yes 同意 no 退出 Do you want to proceed with the proposed reshard plan (yes/no)? yes 2.3 查看集群信息 (查看到多新的主服务器且有hast slots 为成功) [root@mgm57 ~]# redis-trib.rb info 192.168.88.56:6379 192.168.88.53:6379 (f2c1bdb7...) -> 1 keys | 4096 slots | 1 slaves. 192.168.88.51:6379 (0eb3b7aa...) -> 1 keys | 4096 slots | 1 slaves. 192.168.88.52:6379 (a9cb8ccd...) -> 2 keys | 4096 slots | 1 slaves. 192.168.88.58:6379 (87cc1c12...) -> 2 keys | 4096 slots | 0 slaves. [OK] 6 keys in 4 masters. 0.00 keys per slot on average. [root@mgm57 ~]# #具体查看host58 占用4096个槽的范围 [root@mgm57 ~]# redis-trib.rb check 192.168.88.56:6379 .... .... M: 87cc1c128166e08a16cc294758611453bbc71437 192.168.88.58:6379 slots:0-1364,5461-6826,10923-12287 (4096 slots) master 0 additional replica(s)- 1
- 2
- 3
- 4
- 5
- 6
- 7
- 8
- 9
- 10
- 11
- 12
- 13
- 14
- 15
- 16
- 17
- 18
- 19
- 20
- 21
- 22
- 23
- 24
- 25
- 26
- 27
- 28
- 29
- 30
- 31
- 32
- 33
- 34
- 35
- 36
- 37
- 38
- 39
- 40
- 41
- 42
- 43
- 44
- 45
- 46
- 47
- 48
- 49
- 50
- 51
- 52
- 53
- 54
- 55
- 56
- 57
- 58
- 59
- 60
2. 添加slave角色的服务器
说明:从角色服务器的数据是master服务器同步过来的数据
所以slave角色的服务器不需要分配hash slots
只要把主机添加到集群了做slave服务器就可以了。
命令[root@mgm57 ~]# redis-trib.rb add-node --slave 新主机Ip:端口 集群中已有主机的ip:端口- 1
要求: 把Redis服务器host59 添加到集群里做host58 的slave 服务器
具体操作如下:
(1) 在host59 主机运行redis服务且启用了集群功能
[root@host59 ~]# /etc/init.d/redis_6379 stop [root@host59 ~]# sed -n '70p;93p;815p;823p;829p' /etc/redis/6379.conf [root@host59 ~]# vim /etc/redis/6379.conf bind 192.168.88.59 port 6379 cluster-enabled yes #启用集群功能 cluster-config-file nodes-6379.conf 保存集群信息的配置文件 cluster-node-timeout 5000 集群中主机的连接超时时间 [root@host59 ~]# /etc/init.d/redis_6379 restart [root@host59 ~]# netstat -utnlp | grep redis-server tcp 0 0 192.168.88.59:16379 0.0.0.0:* LISTEN 4249/redis-server 1 tcp 0 0 192.168.88.59:6379 0.0.0.0:* LISTEN 4249/redis-server 1- 1
- 2
- 3
- 4
- 5
- 6
- 7
- 8
- 9
- 10
- 11
- 12
- 13
(2) 在管理主机57做如下操作:
- 2.1 把host59 添加到集群里 做slave服务器
- 2.2 查看集群统计信息 (发现host58 有一个slave服务器)
- 2.3 连接host59 查看数据 (会自动同步主服务器host58 的数据)
!!!!会自动做从服务器个数最少的 master服务器的从服务器。!!!
[root@mgm57 ~]# redis-trib.rb add-node --slave 192.168.88.59:6379 192.168.88.56:6379 .... .... [OK] All 16384 slots covered. Automatically selected master 192.168.88.58:6379 > > > Send CLUSTER MEET to node 192.168.88.59:6379 to make it join the cluster. > > > Waiting for the cluster to join. > > > Configure node as replica of 192.168.88.58:6379. > > > [OK] New node added correctly. > > > [root@mgm57 ~]# [root@mgm57 ~]# redis-trib.rb info 192.168.88.56:6379 192.168.88.53:6379 (f2c1bdb7...) -> 1 keys | 4096 slots | 1 slaves. 192.168.88.51:6379 (0eb3b7aa...) -> 1 keys | 4096 slots | 1 slaves. 192.168.88.52:6379 (a9cb8ccd...) -> 2 keys | 4096 slots | 1 slaves. 192.168.88.58:6379 (87cc1c12...) -> 2 keys | 4096 slots | 1 slaves. host58主机的从 [OK] 6 keys in 4 masters. 0.00 keys per slot on average. [root@mgm57 ~]# #查看详细信息 [root@mgm57 ~]# redis-trib.rb check 192.168.88.56:6379 .... ..... S: d50aa7c1acebe69af0834f1838c8b17b2348472e 192.168.88.59:6379 slots: (0 slots) slave replicates 87cc1c128166e08a16cc294758611453bbc71437 主服务器的id #连接host59 查看数据 [root@host56 ~]# redis-cli -c -h 192.168.88.59 -p 6379 192.168.88.59:6379> keys * 1) "name" 2) "age" 192.168.88.59:6379>- 1
- 2
- 3
- 4
- 5
- 6
- 7
- 8
- 9
- 10
- 11
- 12
- 13
- 14
- 15
- 16
- 17
- 18
- 19
- 20
- 21
- 22
- 23
- 24
- 25
- 26
- 27
- 28
- 29
- 30
- 31
- 32
- 33
- 34
- 35
- 36
- 37
5.2 把服务器移除集群
1. 移除slave角色的主机
命令
[root@mgm57 ~]# redis-trib.rb del-node 集群中任意主机的Ip:端口 被移除主机的id
说明: slave角色的主机的没有hash slots 直接移除即可
主机被移除集群后redis服务会自动停止诉求: 把Host59 slave 服务器移除集群,在管理主机做如下操作
- 1查看host59主机的id , 执行移除主机host59的命令- 2 查看集群信息 (发现host58 主机slave 服务个数是 0台) **具体操作如下 :**- 1
- 2
- 3
没删除之前查看信息 root@mgm57 ~]# redis-trib.rb info 192.168.88.56:6379 192.168.88.53:6379 (f2c1bdb7...) -> 1 keys | 4096 slots | 1 slaves. 192.168.88.51:6379 (0eb3b7aa...) -> 1 keys | 4096 slots | 1 slaves. 192.168.88.52:6379 (a9cb8ccd...) -> 2 keys | 4096 slots | 1 slaves. 192.168.88.58:6379 (87cc1c12...) -> 2 keys | 4096 slots | 1 slaves. [OK] 6 keys in 4 masters. 0.00 keys per slot on average. 查看详细信息 [root@mgm57 ~]# redis-trib.rb check 192.168.88.56:6379 | grep 192.168.88.59 S: d50aa7c1acebe69af0834f1838c8b17b2348472e 192.168.4.59:6379 移除slave角色主机 [root@mgm57 ~]# redis-trib.rb del-node 192.168.88.56:6379 d50aa7c1acebe69af0834f1838c8b17b2348472e Removing node d50aa7c1acebe69af0834f1838c8b17b2348472e from cluster 192.168.88.56:6379 Sending CLUSTER FORGET messages to the cluster... SHUTDOWN the node. 把服务给停止了 查看集群信息 [root@mgm57 ~]# redis-trib.rb info 192.168.88.56:6379 192.168.88.53:6379 (f2c1bdb7...) -> 1 keys | 4096 slots | 1 slaves. 192.168.88.51:6379 (0eb3b7aa...) -> 1 keys | 4096 slots | 1 slaves. 192.168.88.52:6379 (a9cb8ccd...) -> 2 keys | 4096 slots | 1 slaves. 192.168.88.58:6379 (87cc1c12...) -> 2 keys | 4096 slots | 0 slaves. 零台从服务器 [OK] 6 keys in 4 masters. 0.00 keys per slot on average. #host59主机查看Redis状态 (看不到了) 主机被移除集群后redis服务会自动停止 [root@host59 ~]# netstat -utnalp | grep redis-server- 1
- 2
- 3
- 4
- 5
- 6
- 7
- 8
- 9
- 10
- 11
- 12
- 13
- 14
- 15
- 16
- 17
- 18
- 19
- 20
- 21
- 22
- 23
- 24
- 25
- 26
- 27
- 28
- 29
- 30
- 31
- 32
- 33
- 34
- 35
2. 移除master角色的主机
**说明:**master角色的服务器会占用hash slots
要先释放hash slots 再执行移除主机的命令具体操作步骤:
- 第一步:释放 hash slots (再次执行reshard命令)
- 第二步:移除主机 (执行删除主机的命令)
诉求:把master角色 主机 host58移除集群,
在管理主机mgm57 做如下操作:#释放 hash slots (再次执行reshard命令) [root@mgm57 ~]# redis-trib.rb reshard 192.168.88.56:6379 第1个问题:释放hash slots 的个数 How many slots do you want to move (from 1 to 16384)? 4096 (host58主机占用hash slots 的个数) 第2个问题:接收4096的个hash slots的主数据库服务器的ID (随便给那个主服务器都可以) What is the receiving node ID?0eb3b7aa0493a19189cba35b0c658202cc20884b (host51主机的id ,就是把释放的4096个hash slots给主数据库服务器host51) 第3个问题:从那台主服务器移除4096个hash slots Source node #1:87cc1c128166e08a16cc294758611453bbc71437 (host58主机的id) Source node #2:done 结束指定 第4个问题:确认配置 yes同意 no 退出 Do you want to proceed with the proposed reshard plan (yes/no)? yes 同意 查看集群信息(发现host51 主服务器hash slots变多了 ) [root@mgm57 ~]# redis-trib.rb info 192.168.88.56:6379 192.168.88.53:6379 (f2c1bdb7...) -> 1 keys | 4096 slots | 1 slaves. 192.168.88.51:6379 (0eb3b7aa...) -> 3 keys | 8192 slots | 1 slaves. 槽多了 192.168.88.52:6379 (a9cb8ccd...) -> 2 keys | 4096 slots | 1 slaves. 192.168.88.58:6379 (87cc1c12...) -> 0 keys | 0 slots | 0 slaves. 一个槽也没有了 [OK] 6 keys in 4 masters. 0.00 keys per slot on average. 查看host58主机的id 然后删除主机 Host58 [root@mgm57 ~]# redis-trib.rb check 192.168.88.56:6379 | grep 192.168.88.58 M: 87cc1c128166e08a16cc294758611453bbc71437 192.168.4.58:6379 [root@mgm57 ~]# [root@mgm57 ~]# redis-trib.rb del-node 192.168.88.56:6379 87cc1c128166e08a16cc294758611453bbc71437 Removing node 87cc1c128166e08a16cc294758611453bbc71437 from cluster 192.168.88.56:6379 Sending CLUSTER FORGET messages to the cluster... SHUTDOWN the node. 再次查看集群信息 (没有host58 主机了 ) [root@mgm57 ~]# redis-trib.rb info 192.168.88.56:6379 192.168.88.53:6379 (f2c1bdb7...) -> 1 keys | 4096 slots | 1 slaves. 192.168.88.51:6379 (0eb3b7aa...) -> 3 keys | 8192 slots | 1 slaves. 192.168.88.52:6379 (a9cb8ccd...) -> 2 keys | 4096 slots | 1 slaves. [OK] 6 keys in 3 masters. 0.00 keys per slot on average. 128166e08a16cc294758611453bbc71437 192.168.4.58:6379 [root@mgm57 ~]# [root@mgm57 ~]# redis-trib.rb del-node 192.168.88.56:6379 87cc1c128166e08a16cc294758611453bbc71437 Removing node 87cc1c128166e08a16cc294758611453bbc71437 from cluster 192.168.88.56:6379 Sending CLUSTER FORGET messages to the cluster... SHUTDOWN the node. 再次查看集群信息 (没有host58 主机了 ) [root@mgm57 ~]# redis-trib.rb info 192.168.88.56:6379 192.168.88.53:6379 (f2c1bdb7...) -> 1 keys | 4096 slots | 1 slaves. 192.168.88.51:6379 (0eb3b7aa...) -> 3 keys | 8192 slots | 1 slaves. 192.168.88.52:6379 (a9cb8ccd...) -> 2 keys | 4096 slots | 1 slaves. [OK] 6 keys in 3 masters. 0.00 keys per slot on average.- 1
- 2
- 3
- 4
- 5
- 6
- 7
- 8
- 9
- 10
- 11
- 12
- 13
- 14
- 15
- 16
- 17
- 18
- 19
- 20
- 21
- 22
- 23
- 24
- 25
- 26
- 27
- 28
- 29
- 30
- 31
- 32
- 33
- 34
- 35
- 36
- 37
- 38
- 39
- 40
- 41
- 42
- 43
- 44
- 45
- 46
- 47
- 48
- 49
- 50
- 51
- 52
- 53
- 54
- 55
- 56
- 57
- 58
- 59
- 60
- 61
- 62
- 63
- 64
-
相关阅读:
56、springboot ------ RESTful服务及RESTful接口设计
es带用户名密码验证并配置elasticsearch-head连接
鸿蒙4.0正式版升级机型
低功耗水下物联网:愿景与关键技术
停车位预约导航系统APP
因果引擎(Causal Engine)是基于因果推理的人工智能系统
ORB-SLAM2从理论到代码实现(十四):KeyFrame类
10.26 来 CNCC 2023 T16 展位,TDengine 精美周边等你来领!
Nacos源码系列—订阅机制的前因后果(上)
不忘初心
- 原文地址:https://blog.csdn.net/weixin_56619848/article/details/132722624