-
Use PlantUML to write the Sequence Diagram
Sequence Diagram
Back to top Basic examples
Back to top The sequence
->is used to draw a message between two participants. Participants do not have to be explicitly declared.To have a dotted arrow, you use
-->It is also possible to use
<-and<--. That does not change the drawing, but may improve readability. Note that this is only true for sequence diagrams, rules are different for the other diagrams.- @startuml
- Alice -> Bob: Authentication Request
- Bob --> Alice: Authentication Response
- Alice -> Bob: Another authentication Request
- Alice <-- Bob: Another authentication Response
- @enduml

Declaring participant
Back to top If the keyword
participantis used to declare a participant, more control on that participant is possible.The order of declaration will be the (default) order of display.
Using these other keywords to declare participants will change the shape of the participant representation:
actorboundarycontrolentitydatabasecollectionsqueue
- @startuml
- participant Participant as Foo
- actor Actor as Foo1
- boundary Boundary as Foo2
- control Control as Foo3
- entity Entity as Foo4
- database Database as Foo5
- collections Collections as Foo6
- queue Queue as Foo7
- Foo -> Foo1 : To actor
- Foo -> Foo2 : To boundary
- Foo -> Foo3 : To control
- Foo -> Foo4 : To entity
- Foo -> Foo5 : To database
- Foo -> Foo6 : To collections
- Foo -> Foo7: To queue
- @enduml

Rename a participant using the
askeyword.You can also change the background color of actor or participant.
- @startuml
- actor Bob #red
- ' The only difference between actor
- 'and participant is the drawing
- participant Alice
- participant "I have a really\nlong name" as L #99FF99
- /' You can also declare:
- participant L as "I have a really\nlong name" #99FF99
- '/
- Alice->Bob: Authentication Request
- Bob->Alice: Authentication Response
- Bob->L: Log transaction
- @enduml

You can use the
orderkeyword to customize the display order of participants.- @startuml
- participant Last order 30
- participant Middle order 20
- participant First order 10
- @enduml

Declaring participant on multiline
Back to top You can declare participant on multi-line.
- @startuml
- participant Participant [
- =Title
- ----
- ""SubTitle""
- ]
- participant Bob
- Participant -> Bob
- @enduml

[Ref. QA-15232]
Use non-letters in participants
Back to top You can use quotes to define participants. And you can use the
askeyword to give an alias to those participants.- @startuml
- Alice -> "Bob()" : Hello
- "Bob()" -> "This is very\nlong" as Long
- ' You can also declare:
- ' "Bob()" -> Long as "This is very\nlong"
- Long --> "Bob()" : ok
- @enduml

Message to Self
Back to top A participant can send a message to itself.
It is also possible to have multi-line using
\n.- @startuml
- Alice -> Alice: This is a signal to self.\nIt also demonstrates\nmultiline \ntext
- @enduml

- @startuml
- Alice <- Alice: This is a signal to self.\nIt also demonstrates\nmultiline \ntext
- @enduml

[Ref. QA-1361]
Text alignment
Back to top Text alignment on arrows can be set to
left,rightorcenterusingskinparam sequenceMessageAlign.You can also use
directionorreverseDirectionto align text depending on arrow direction. Further details and examples of this are available on the skinparam page.- @startuml
- skinparam sequenceMessageAlign right
- Bob -> Alice : Request
- Alice -> Bob : Response
- @enduml

Text of response message below the arrow
You can put the text of the response message below the arrow, with the
skinparam responseMessageBelowArrow truecommand.- @startuml
- skinparam responseMessageBelowArrow true
- Bob -> Alice : hello
- Alice -> Bob : ok
- @enduml

Change arrow style
Back to top You can change arrow style by several ways:
- add a final
xto denote a lost message - use
\or/instead of<or>to have only the bottom or top part of the arrow - repeat the arrow head (for example,
>>or//) head to have a thin drawing - use
--instead of-to have a dotted arrow - add a final "o" at arrow head
- use bidirectional arrow
<->
- @startuml
- Bob ->x Alice
- Bob -> Alice
- Bob ->> Alice
- Bob -\ Alice
- Bob \\- Alice
- Bob //-- Alice
- Bob ->o Alice
- Bob o\\-- Alice
- Bob <-> Alice
- Bob <->o Alice
- @enduml

Change arrow color
Back to top You can change the color of individual arrows using the following notation:
- @startuml
- Bob -[#red]> Alice : hello
- Alice -[#0000FF]->Bob : ok
- @enduml

Message sequence numbering
Back to top The keyword
autonumberis used to automatically add an incrementing number to messages.- @startuml
- autonumber
- Bob -> Alice : Authentication Request
- Bob <- Alice : Authentication Response
- @enduml

You can specify a startnumber with
autonumber, and also an increment withautonumber.- @startuml
- autonumber
- Bob -> Alice : Authentication Request
- Bob <- Alice : Authentication Response
- autonumber 15
- Bob -> Alice : Another authentication Request
- Bob <- Alice : Another authentication Response
- autonumber 40 10
- Bob -> Alice : Yet another authentication Request
- Bob <- Alice : Yet another authentication Response
- @enduml

You can specify a format for your number by using between double-quote.
The formatting is done with the Java class
DecimalFormat(0means digit,#means digit and zero if absent).You can use some html tag in the format.
- @startuml
- autonumber "[000]"
- Bob -> Alice : Authentication Request
- Bob <- Alice : Authentication Response
- autonumber 15 "(##)"
- Bob -> Alice : Another authentication Request
- Bob <- Alice : Another authentication Response
- autonumber 40 10 "Message 0 "
- Bob -> Alice : Yet another authentication Request
- Bob <- Alice : Yet another authentication Response
- @enduml

You can also use
autonumber stopandautonumber resumeto respectively pause and resume automatic numbering.- @startuml
- autonumber 10 10 "[000]"
- Bob -> Alice : Authentication Request
- Bob <- Alice : Authentication Response
- autonumber stop
- Bob -> Alice : dummy
- autonumber resume "Message 0 "
- Bob -> Alice : Yet another authentication Request
- Bob <- Alice : Yet another authentication Response
- autonumber stop
- Bob -> Alice : dummy
- autonumber resume 1 "Message 0 "
- Bob -> Alice : Yet another authentication Request
- Bob <- Alice : Yet another authentication Response
- @enduml

Your startnumber can also be a 2 or 3 digit sequence using a field delimiter such as
.,;,,,:or a mix of these. For example:1.1.1or1.1:1.Automatically the last digit will increment.
To increment the first digit, use:
autonumber inc A. To increment the second digit, use:autonumber inc B.- @startuml
- autonumber 1.1.1
- Alice -> Bob: Authentication request
- Bob --> Alice: Response
- autonumber inc A
- 'Now we have 2.1.1
- Alice -> Bob: Another authentication request
- Bob --> Alice: Response
- autonumber inc B
- 'Now we have 2.2.1
- Alice -> Bob: Another authentication request
- Bob --> Alice: Response
- autonumber inc A
- 'Now we have 3.1.1
- Alice -> Bob: Another authentication request
- autonumber inc B
- 'Now we have 3.2.1
- Bob --> Alice: Response
- @enduml

You can also use the value of
autonumberwith the%autonumber%variable:- @startuml
- autonumber 10
- Alice -> Bob
- note right
- the <U+0025>autonumber<U+0025> works everywhere.
- Here, its value is ** %autonumber% **
- end note
- Bob --> Alice: //This is the response %autonumber%//
- @enduml

[Ref. QA-7119]
Page Title, Header and Footer
Back to top The
titlekeyword is used to add a title to the page.Pages can display headers and footers using
headerandfooter.- @startuml
- header Page Header
- footer Page %page% of %lastpage%
- title Example Title
- Alice -> Bob : message 1
- Alice -> Bob : message 2
- @enduml

Splitting diagrams
Back to top The
newpagekeyword is used to split a diagram into several images.You can put a title for the new page just after the
newpagekeyword. This title overrides the previously specified title if any.This is very handy with Word to print long diagram on several pages.
(Note: this really does work. Only the first page is shown below, but it is a display artifact.)
- @startuml
- Alice -> Bob : message 1
- Alice -> Bob : message 2
- newpage
- Alice -> Bob : message 3
- Alice -> Bob : message 4
- newpage A title for the\nlast page
- Alice -> Bob : message 5
- Alice -> Bob : message 6
- @enduml

Grouping message
Back to top It is possible to group messages together using the following keywords:
alt/elseoptloopparbreakcriticalgroup, followed by a text to be displayed
It is possible to add a text that will be displayed into the header (for
group, see next paragraph 'Secondary group label').The
endkeyword is used to close the group.Note that it is possible to nest groups.
- @startuml
- Alice -> Bob: Authentication Request
- alt successful case
- Bob -> Alice: Authentication Accepted
- else some kind of failure
- Bob -> Alice: Authentication Failure
- group My own label
- Alice -> Log : Log attack start
- loop 1000 times
- Alice -> Bob: DNS Attack
- end
- Alice -> Log : Log attack end
- end
- else Another type of failure
- Bob -> Alice: Please repeat
- end
- @enduml

Secondary group label
Back to top For
group, it is possible to add, between[and], a secondary text or label that will be displayed into the header.- @startuml
- Alice -> Bob: Authentication Request
- Bob -> Alice: Authentication Failure
- group My own label [My own label 2]
- Alice -> Log : Log attack start
- loop 1000 times
- Alice -> Bob: DNS Attack
- end
- Alice -> Log : Log attack end
- end
- @enduml

[Ref. QA-2503]
Notes on messages
Back to top It is possible to put notes on message using the
note leftornote rightkeywords just after the message.You can have a multi-line note using the
end notekeywords.- @startuml
- Alice->Bob : hello
- note left: this is a first note
- Bob->Alice : ok
- note right: this is another note
- Bob->Bob : I am thinking
- note left
- a note
- can also be defined
- on several lines
- end note
- @enduml

Some other notes
Back to top It is also possible to place notes relative to participant with
note left of,note right ofornote overkeywords.It is possible to highlight a note by changing its background color.
You can also have a multi-line note using the
end notekeywords.- @startuml
- participant Alice
- participant Bob
- note left of Alice #aqua
- This is displayed
- left of Alice.
- end note
- note right of Alice: This is displayed right of Alice.
- note over Alice: This is displayed over Alice.
- note over Alice, Bob #FFAAAA: This is displayed\n over Bob and Alice.
- note over Bob, Alice
- This is yet another
- example of
- a long note.
- end note
- @enduml

Changing notes shape [hnote, rnote]
Back to top You can use
hnoteandrnotekeywords to change note shapes :hnotefor hexagonal note;rnotefor rectangle note.
- @startuml
- caller -> server : conReq
- hnote over caller : idle
- caller <- server : conConf
- rnote over server
- "r" as rectangle
- "h" as hexagon
- endrnote
- rnote over server
- this is
- on several
- lines
- endrnote
- hnote over caller
- this is
- on several
- lines
- endhnote
- @enduml

[Ref. QA-1765]
Note over all participants [across]
Back to top You can directly make a note over all participants, with the syntax:
note across: note_description
- @startuml
- Alice->Bob:m1
- Bob->Charlie:m2
- note over Alice, Charlie: Old method for note over all part. with:\n ""note over //FirstPart, LastPart//"".
- note across: New method with:\n""note across""
- Bob->Alice
- hnote across:Note across all part.
- @enduml

[Ref. QA-9738]
Several notes aligned at the same level [/]
Back to top You can make several notes aligned at the same level, with the syntax
/:- without
/(by default, the notes are not aligned)
- @startuml
- note over Alice : initial state of Alice
- note over Bob : initial state of Bob
- Bob -> Alice : hello
- @enduml

- with
/(the notes are aligned)
- @startuml
- note over Alice : initial state of Alice
- / note over Bob : initial state of Bob
- Bob -> Alice : hello
- @enduml

[Ref. QA-354]
Creole and HTML
Back to top It is also possible to use creole formatting:
- @startuml
- participant Alice
- participant "The **Famous** Bob" as Bob
- Alice -> Bob : hello --there--
- ... Some ~~long delay~~ ...
- Bob -> Alice : ok
- note left
- This is **bold**
- This is //italics//
- This is ""monospaced""
- This is --stroked--
- This is __underlined__
- This is ~~waved~~
- end note
- Alice -> Bob : A //well formatted// message
- note right of Alice
- This is <back:cadetblue><size:18>displayed</size></back>
- __left of__ Alice.
- end note
- note left of Bob
- <u:red>This</u> is <color #118888>displayed</color>
- **
left of - end note
- note over Alice, Bob
- <w:#FF33FF>This is hosted</w> by <img sourceforge.jpg>
- end note
- @enduml

Divider or separator
Back to top If you want, you can split a diagram using
==separator to divide your diagram into logical steps.- @startuml
- == Initialization ==
- Alice -> Bob: Authentication Request
- Bob --> Alice: Authentication Response
- == Repetition ==
- Alice -> Bob: Another authentication Request
- Alice <-- Bob: another authentication Response
- @enduml

Reference
Back to top You can use reference in a diagram, using the keyword
ref over.- @startuml
- participant Alice
- actor Bob
- ref over Alice, Bob : init
- Alice -> Bob : hello
- ref over Bob
- This can be on
- several lines
- end ref
- @enduml

Delay
Back to top You can use
...to indicate a delay in the diagram. And it is also possible to put a message with this delay.- @startuml
- Alice -> Bob: Authentication Request
- ...
- Bob --> Alice: Authentication Response
- ...5 minutes later...
- Bob --> Alice: Good Bye !
- @enduml

Text wrapping
Back to top To break long messages, you can manually add
\nin your text.Another option is to use
maxMessageSizesetting:- @startuml
- skinparam maxMessageSize 50
- participant a
- participant b
- a -> b :this\nis\nmanually\ndone
- a -> b :this is a very long message on several words
- @enduml

Space
Back to top You can use
|||to indicate some spacing in the diagram.It is also possible to specify a number of pixel to be used.
- @startuml
- Alice -> Bob: message 1
- Bob --> Alice: ok
- |||
- Alice -> Bob: message 2
- Bob --> Alice: ok
- ||45||
- Alice -> Bob: message 3
- Bob --> Alice: ok
- @enduml

Lifeline Activation and Destruction
Back to top The
activateanddeactivateare used to denote participant activation.Once a participant is activated, its lifeline appears.
The
activateanddeactivateapply on the previous message.The
destroydenote the end of the lifeline of a participant.- @startuml
- participant User
- User -> A: DoWork
- activate A
- A -> B: << createRequest >>
- activate B
- B -> C: DoWork
- activate C
- C --> B: WorkDone
- destroy C
- B --> A: RequestCreated
- deactivate B
- A -> User: Done
- deactivate A
- @enduml

Nested lifeline can be used, and it is possible to add a color on the lifeline.
- @startuml
- participant User
- User -> A: DoWork
- activate A #FFBBBB
- A -> A: Internal call
- activate A #DarkSalmon
- A -> B: << createRequest >>
- activate B
- B --> A: RequestCreated
- deactivate B
- deactivate A
- A -> User: Done
- deactivate A
- @enduml

Autoactivation is possible and works with the return keywords:
- @startuml
- autoactivate on
- alice -> bob : hello
- bob -> bob : self call
- bill -> bob #005500 : hello from thread 2
- bob -> george ** : create
- return done in thread 2
- return rc
- bob -> george !! : delete
- return success
- @enduml

Return
Back to top Command
returngenerates a return message with optional text label.The return point is that which caused the most recent life-line activation.
The syntax is
return labelwherelabelif provided is any string acceptable for conventional messages.- @startuml
- Bob -> Alice : hello
- activate Alice
- Alice -> Alice : some action
- return bye
- @enduml

Participant creation
Back to top You can use the
createkeyword just before the first reception of a message to emphasize the fact that this message is actually creating this new object.- @startuml
- Bob -> Alice : hello
- create Other
- Alice -> Other : new
- create control String
- Alice -> String
- note right : You can also put notes!
- Alice --> Bob : ok
- @enduml

Shortcut syntax for activation, deactivation, creation
Back to top Immediately after specifying the target participant, the following syntax can be used:
++Activate the target (optionally a color may follow this)--Deactivate the source**Create an instance of the target!!Destroy an instance of the target
- @startuml
- alice -> bob ++ : hello
- bob -> bob ++ : self call
- bob -> bib ++ #005500 : hello
- bob -> george ** : create
- return done
- return rc
- bob -> george !! : delete
- return success
- @enduml

Then you can mix activation and deactivation, on same line:
- @startuml
- alice -> bob ++ : hello1
- bob -> charlie --++ : hello2
- charlie --> alice -- : ok
- @enduml

- @startuml
- @startuml
- alice -> bob --++ #gold: hello
- bob -> alice --++ #gold: you too
- alice -> bob --: step1
- alice -> bob : step2
- @enduml
- @enduml

[Ref. QA-4834, QA-9573 and QA-13234]
Incoming and outgoing messages
Back to top You can use incoming or outgoing arrows if you want to focus on a part of the diagram.
Use square brackets to denote the left "
[" or the right "]" side of the diagram.- @startuml
- [-> A: DoWork
- activate A
- A -> A: Internal call
- activate A
- A ->] : << createRequest >>
- A<--] : RequestCreated
- deactivate A
- [<- A: Done
- deactivate A
- @enduml

You can also have the following syntax:
- @startuml
- participant Alice
- participant Bob #lightblue
- Alice -> Bob
- Bob -> Carol
- ...
- [-> Bob
- [o-> Bob
- [o->o Bob
- [x-> Bob
- ...
- [<- Bob
- [x<- Bob
- ...
- Bob ->]
- Bob ->o]
- Bob o->o]
- Bob ->x]
- ...
- Bob <-]
- Bob x<-]
- @enduml

Short arrows for incoming and outgoing messages
Back to top You can have short arrows with using
?.- @startuml
- ?-> Alice : ""?->""\n**short** to actor1
- [-> Alice : ""[->""\n**from start** to actor1
- [-> Bob : ""[->""\n**from start** to actor2
- ?-> Bob : ""?->""\n**short** to actor2
- Alice ->] : ""->]""\nfrom actor1 **to end**
- Alice ->? : ""->?""\n**short** from actor1
- Alice -> Bob : ""->"" \nfrom actor1 to actor2
- @enduml

[Ref. QA-310]
Anchors and Duration
Back to top With
teozit is possible to add anchors to the diagram and use the anchors to specify duration time.- @startuml
- !pragma teoz true
- {start} Alice -> Bob : start doing things during duration
- Bob -> Max : something
- Max -> Bob : something else
- {end} Bob -> Alice : finish
- {start} <-> {end} : some time
- @enduml

You can use the
-Pcommand-line option to specify the pragma:java -jar plantuml.jar -Pteoz=true[Ref. issue-582]
Stereotypes and Spots
Back to top It is possible to add stereotypes to participants using
<<and>>.In the stereotype, you can add a spotted character in a colored circle using the syntax
(X,color).- @startuml
- participant "Famous Bob" as Bob << Generated >>
- participant Alice << (C,#ADD1B2) Testable >>
- Bob->Alice: First message
- @enduml

By default, the guillemet character is used to display the stereotype. You can change this behavious using the skinparam
guillemet:- @startuml
- skinparam guillemet false
- participant "Famous Bob" as Bob << Generated >>
- participant Alice << (C,#ADD1B2) Testable >>
- Bob->Alice: First message
- @enduml

- @startuml
- participant Bob << (C,#ADD1B2) >>
- participant Alice << (C,#ADD1B2) >>
- Bob->Alice: First message
- @enduml

More information on titles
Back to top You can use creole formatting in the title.
- @startuml
- title __Simple__ **communication** example
- Alice -> Bob: Authentication Request
- Bob -> Alice: Authentication Response
- @enduml

You can add newline using
\nin the title description.- @startuml
- title __Simple__ communication example\non several lines
- Alice -> Bob: Authentication Request
- Bob -> Alice: Authentication Response
- @enduml

You can also define title on several lines using
titleandend titlekeywords.- @startuml
- title
- <u>Simple</u> communication example
- on <i>several</i> lines and using <font color=red>html</font>
- This is hosted by <img:sourceforge.jpg>
- end title
- Alice -> Bob: Authentication Request
- Bob -> Alice: Authentication Response
- @enduml

Participants encompass
Back to top It is possible to draw a box around some participants, using
boxandend boxcommands.You can add an optional title or a optional background color, after the
boxkeyword.- @startuml
- box "Internal Service" #LightBlue
- participant Bob
- participant Alice
- end box
- participant Other
- Bob -> Alice : hello
- Alice -> Other : hello
- @enduml

It is also possible to nest boxes - to draw a box within a box - when using the teoz rendering engine, for example:
- @startuml
- !pragma teoz true
- box "Internal Service" #LightBlue
- participant Bob
- box "Subteam"
- participant Alice
- participant John
- end box
- end box
- participant Other
- Bob -> Alice : hello
- Alice -> John : hello
- John -> Other: Hello
- @enduml

Removing Foot Boxes
Back to top You can use the
hide footboxkeywords to remove the foot boxes of the diagram.- @startuml
- hide footbox
- title Foot Box removed
- Alice -> Bob: Authentication Request
- Bob --> Alice: Authentication Response
- @enduml

Skinparam
Back to top You can use the skinparam command to change colors and fonts for the drawing.
You can use this command:
- In the diagram definition, like any other commands,
- In an included file,
- In a configuration file, provided in the command line or the ANT task.
You can also change other rendering parameter, as seen in the following examples:
- @startuml
- skinparam sequenceArrowThickness 2
- skinparam roundcorner 20
- skinparam maxmessagesize 60
- skinparam sequenceParticipant underline
- actor User
- participant "First Class" as A
- participant "Second Class" as B
- participant "Last Class" as C
- User -> A: DoWork
- activate A
- A -> B: Create Request
- activate B
- B -> C: DoWork
- activate C
- C --> B: WorkDone
- destroy C
- B --> A: Request Created
- deactivate B
- A --> User: Done
- deactivate A
- @enduml

- @startuml
- skinparam backgroundColor #EEEBDC
- skinparam handwritten true
- skinparam sequence {
- ArrowColor DeepSkyBlue
- ActorBorderColor DeepSkyBlue
- LifeLineBorderColor blue
- LifeLineBackgroundColor #A9DCDF
- ParticipantBorderColor DeepSkyBlue
- ParticipantBackgroundColor DodgerBlue
- ParticipantFontName Impact
- ParticipantFontSize 17
- ParticipantFontColor #A9DCDF
- ActorBackgroundColor aqua
- ActorFontColor DeepSkyBlue
- ActorFontSize 17
- ActorFontName Aapex
- }
- actor User
- participant "First Class" as A
- participant "Second Class" as B
- participant "Last Class" as C
- User -> A: DoWork
- activate A
- A -> B: Create Request
- activate B
- B -> C: DoWork
- activate C
- C --> B: WorkDone
- destroy C
- B --> A: Request Created
- deactivate B
- A --> User: Done
- deactivate A
- @enduml

Changing padding
Back to top It is possible to tune some padding settings.
- @startuml
- skinparam ParticipantPadding 20
- skinparam BoxPadding 10
- box "Foo1"
- participant Alice1
- participant Alice2
- end box
- box "Foo2"
- participant Bob1
- participant Bob2
- end box
- Alice1 -> Bob1 : hello
- Alice1 -> Out : out
- @enduml

Appendix: Examples of all arrow type
Back to top Normal arrow
- @startuml
- participant Alice as a
- participant Bob as b
- a -> b : ""-> ""
- a ->> b : ""->> ""
- a -\ b : ""-\ ""
- a -\\ b : ""-\\\\""
- a -/ b : ""-/ ""
- a -// b : ""-// ""
- a ->x b : ""->x ""
- a x-> b : ""x-> ""
- a o-> b : ""o-> ""
- a ->o b : ""->o ""
- a o->o b : ""o->o ""
- a <-> b : ""<-> ""
- a o<->o b : ""o<->o""
- a x<->x b : ""x<->x""
- a ->>o b : ""->>o ""
- a -\o b : ""-\o ""
- a -\\o b : ""-\\\\o""
- a -/o b : ""-/o ""
- a -//o b : ""-//o ""
- a x->o b : ""x->o ""
- @enduml

Itself arrow
- @startuml
- participant Alice as a
- participant Bob as b
- a -> a : ""-> ""
- a ->> a : ""->> ""
- a -\ a : ""-\ ""
- a -\\ a : ""-\\\\""
- a -/ a : ""-/ ""
- a -// a : ""-// ""
- a ->x a : ""->x ""
- a x-> a : ""x-> ""
- a o-> a : ""o-> ""
- a ->o a : ""->o ""
- a o->o a : ""o->o ""
- a <-> a : ""<-> ""
- a o<->o a : ""o<->o""
- a x<->x a : ""x<->x""
- a ->>o a : ""->>o ""
- a -\o a : ""-\o ""
- a -\\o a : ""-\\\\o""
- a -/o a : ""-/o ""
- a -//o a : ""-//o ""
- a x->o a : ""x->o ""
- @enduml

Incoming and outgoing messages (with '[', ']')
Incoming messages (with '[')
- @startuml
- participant Alice as a
- participant Bob as b
- [-> b : ""[-> ""
- [->> b : ""[->> ""
- [-\ b : ""[-\ ""
- [-\\ b : ""[-\\\\""
- [-/ b : ""[-/ ""
- [-// b : ""[-// ""
- [->x b : ""[->x ""
- [x-> b : ""[x-> ""
- [o-> b : ""[o-> ""
- [->o b : ""[->o ""
- [o->o b : ""[o->o ""
- [<-> b : ""[<-> ""
- [o<->o b : ""[o<->o""
- [x<->x b : ""[x<->x""
- [->>o b : ""[->>o ""
- [-\o b : ""[-\o ""
- [-\\o b : ""[-\\\\o""
- [-/o b : ""[-/o ""
- [-//o b : ""[-//o ""
- [x->o b : ""[x->o ""
- @enduml

Outgoing messages (with ']')
- @startuml
- participant Alice as a
- participant Bob as b
- a ->] : ""->] ""
- a ->>] : ""->>] ""
- a -\] : ""-\] ""
- a -\\] : ""-\\\\]""
- a -/] : ""-/] ""
- a -//] : ""-//] ""
- a ->x] : ""->x] ""
- a x->] : ""x->] ""
- a o->] : ""o->] ""
- a ->o] : ""->o] ""
- a o->o] : ""o->o] ""
- a <->] : ""<->] ""
- a o<->o] : ""o<->o]""
- a x<->x] : ""x<->x]""
- a ->>o] : ""->>o] ""
- a -\o] : ""-\o] ""
- a -\\o] : ""-\\\\o]""
- a -/o] : ""-/o] ""
- a -//o] : ""-//o] ""
- a x->o] : ""x->o] ""
- @enduml

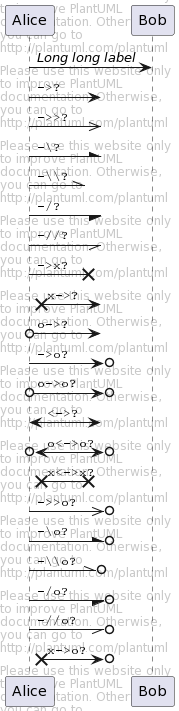
Short incoming and outgoing messages (with '?')
Short incoming (with '?')
- @startuml
- participant Alice as a
- participant Bob as b
- a -> b : //Long long label//
- ?-> b : ""?-> ""
- ?->> b : ""?->> ""
- ?-\ b : ""?-\ ""
- ?-\\ b : ""?-\\\\""
- ?-/ b : ""?-/ ""
- ?-// b : ""?-// ""
- ?->x b : ""?->x ""
- ?x-> b : ""?x-> ""
- ?o-> b : ""?o-> ""
- ?->o b : ""?->o ""
- ?o->o b : ""?o->o ""
- ?<-> b : ""?<-> ""
- ?o<->o b : ""?o<->o""
- ?x<->x b : ""?x<->x""
- ?->>o b : ""?->>o ""
- ?-\o b : ""?-\o ""
- ?-\\o b : ""?-\\\\o ""
- ?-/o b : ""?-/o ""
- ?-//o b : ""?-//o ""
- ?x->o b : ""?x->o ""
- @enduml

Short outgoing (with '?')
- @startuml
- participant Alice as a
- participant Bob as b
- a -> b : //Long long label//
- a ->? : ""->? ""
- a ->>? : ""->>? ""
- a -\? : ""-\? ""
- a -\\? : ""-\\\\?""
- a -/? : ""-/? ""
- a -//? : ""-//? ""
- a ->x? : ""->x? ""
- a x->? : ""x->? ""
- a o->? : ""o->? ""
- a ->o? : ""->o? ""
- a o->o? : ""o->o? ""
- a <->? : ""<->? ""
- a o<->o? : ""o<->o?""
- a x<->x? : ""x<->x?""
- a ->>o? : ""->>o? ""
- a -\o? : ""-\o? ""
- a -\\o? : ""-\\\\o?""
- a -/o? : ""-/o? ""
- a -//o? : ""-//o? ""
- a x->o? : ""x->o? ""
- @enduml
Specific SkinParameter
Back to top By default
- @startuml
- Bob -> Alice : hello
- Alice -> Bob : ok
- @enduml

LifelineStrategy
- nosolid (by default)
- @startuml
- skinparam lifelineStrategy nosolid
- Bob -> Alice : hello
- Alice -> Bob : ok
- @enduml

[Ref. QA-9016]
- solid
In order to have solid life line in sequence diagrams, you can use:
skinparam lifelineStrategy solid- @startuml
- skinparam lifelineStrategy solid
- Bob -> Alice : hello
- Alice -> Bob : ok
- @enduml

[Ref. QA-2794]
style strictuml
To be conform to strict UML (for arrow style: emits triangle rather than sharp arrowheads), you can use:
skinparam style strictuml
- @startuml
- skinparam style strictuml
- Bob -> Alice : hello
- Alice -> Bob : ok
- @enduml

[Ref. QA-1047]
Hide unlinked participant
Back to top By default, all participants are displayed.
- @startuml
- participant Alice
- participant Bob
- participant Carol
- Alice -> Bob : hello
- @enduml

But you can
hide unlinkedparticipant.- @startuml
- hide unlinked
- participant Alice
- participant Bob
- participant Carol
- Alice -> Bob : hello
- @enduml

[Ref. QA-4247]
Color a group message
Back to top It is possible to color a group messages:
- @startuml
- Alice -> Bob: Authentication Request
- alt#Gold #LightBlue Successful case
- Bob -> Alice: Authentication Accepted
- else #Pink Failure
- Bob -> Alice: Authentication Rejected
- end
- @enduml

Mainframe
Back to top - @startuml
- mainframe This is a **mainframe**
- Alice->Bob : Hello
- @enduml
Slanted or odd arrows
Back to top You can use the
(nn)option (before or after arrow) to make the arrows slanted, where nn is the number of shift pixels.[Available only after v1.2022.6beta+]
- @startuml
- A ->(10) B: text 10
- B ->(10) A: text 10
- A ->(10) B: text 10
- A (10)<- B: text 10
- @enduml

- @startuml
- A ->(40) B++: Rq
- B -->(20) A--: Rs
- @enduml

[Ref. QA-14145]
- @startuml
- !pragma teoz true
- A ->(50) C: Starts\nwhen 'B' sends
- & B ->(25) C: \nBut B's message\n arrives before A's
- @enduml

[Ref. QA-6684]
- @startuml
- !pragma teoz true
- S1 ->(30) S2: msg 1\n
- & S2 ->(30) S1: msg 2
- note left S1: msg\nS2 to S1
- & note right S2: msg\nS1 to S2
- @enduml

[Ref. QA-1072]
-
相关阅读:
火狐自定义CSS、高级首选项
Python升级之路( Lv10 ) 文件操作
【人工智能Ⅰ】3-遗传算法及其应用
爬虫面试手册
Android网络基础面试题之HTTPS的工作流程和原理
数据结构——线性表的顺序表示和实现
视图、存储过程、触发器
Linux操作系统的Web服务器优点
umich cv-2-1
代码优化技巧
- 原文地址:https://blog.csdn.net/moshowgame/article/details/132703216
