-
苍穹外卖技术栈
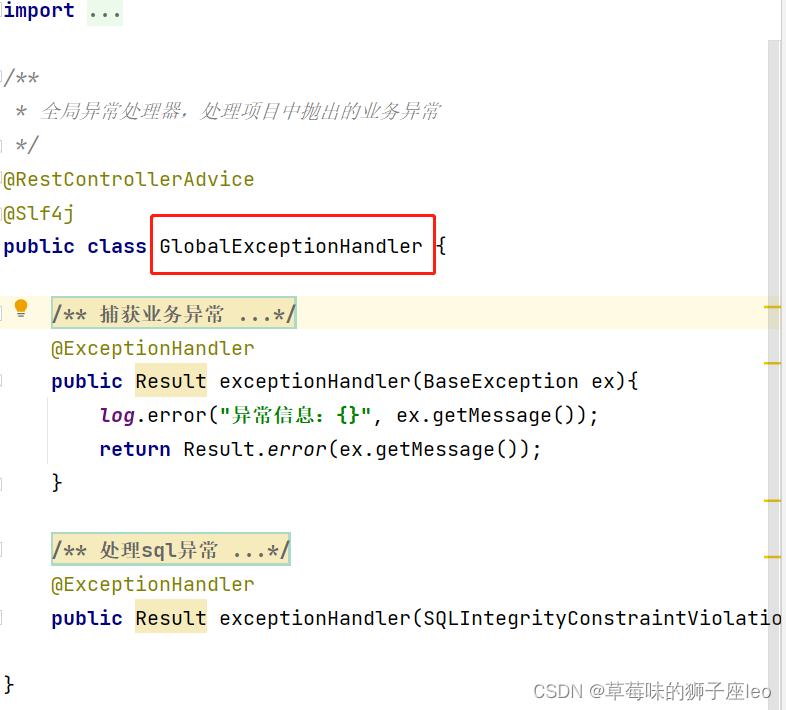
1、定义全局异常

2、ThreadLocal
- ThreadLocal 并不是一个Thread,而是Thread的一个局部变量
- ThreadLocal 为每一个线程提供独立的存储空间,具有线程隔离的效果,只有在线程内才能取到值,线程外则不能访问
public void set(T value) 设置当前线程的线程局部变量的值 public T get() 返回当前线程所对应的线程局部变量的值 public void remove() 移除当前线程的线程局部变量- 1
- 2
- 3
- 4
- 5
注意:客户端每次发送http请求,对应的服务端都会分配一个新的线程,在处理过程中涉及到系列方法属于同一个线程:
【1】LoginCheckFilter的doFilter方法
【2】EmployeeController的update方法
【3】MyMetaObjectHandler的updateFill方法3、BaseContext上下文
BaseContext是基于ThreadLocal类封装的工具类,用于在同一线程中的封装数据和获取数据。> BaseContext工具类用于存放和取出当前登录的用户的id > public class BaseContext { public static ThreadLocal<Long> threadLocal = new ThreadLocal<>(); /** * 设置当前线程的线程局部变量的值 * @param id */ public static void setCurrentId(Long id) { threadLocal.set(id); } public static Long getCurrentId() { return threadLocal.get(); } public static void removeCurrentId() { threadLocal.remove(); }- 1
- 2
- 3
- 4
- 5
- 6
- 7
- 8
- 9
- 10
- 11
- 12
- 13
- 14
- 15
- 16
- 17
- 18
- 19
- 20
- 21
- 22
4、PageHelper分页
pagehelper是mybatis 提供的分页插件
开始分页
PageHelper.startPage(1, 10) // selectlist查询数据库的时候会自动加上limit 1,10。- 1
- 2
- 3
在CategoryServiceImpl声明pageQuery方法,及其父类接口:
public PageResult pageQuery(CategoryPageQueryDTO categoryPageQueryDTO) { // 分页器对象 Page<Category> page = new Page<>(); List<Category> categoryList = categoryMapper.pageQuery(categoryPageQueryDTO); Long total = page.getTotal(); // 分页 return new PageResult(total,categoryList); }- 1
- 2
- 3
- 4
- 5
- 6
- 7
- 8
- 9
在EmployeeServiceImpl声明pageQuery方法,及其父类接口
public PageResult pageQuery(EmployeePageQueryDTO dto) { PageHelper.startPage(dto.getPage(),dto.getPageSize()); Page<Employee> page = employeeMapper.pageQuery(dto); return new PageResult(page.getTotal(),page.getResult()); }- 1
- 2
- 3
- 4
- 5
- 6
- 7
原理:
- Mybatis内置了分页拦截器PageInterceptor,即在执行相关sql之前会拦截一些操作
- 通过`setLocalPage()方法,将分页信息保存在当前线程中。分页查询方法与之处在同一个线程中,共享ThreadLocal中的数据
- selectlist查询之后赋值给的List list。这个list是Page 类型
- 再将list放到PageInfo<>中即可。
查询
List<Employee> list = employeeMapper.selectByExample(Example);- 1
- 2
分页结果展示
PageInfo<Employee> pageInfo = new PageInfo<>(list); System.out.println("总记录数:"+pageInfo.getTotal()); System.out.println("总页数:"+pageInfo.getPages()); System.out.println("一页的大小:"+pageInfo.getSize());- 1
- 2
- 3
- 4
- 5
- 6
5、日期按年月日显示
- 在
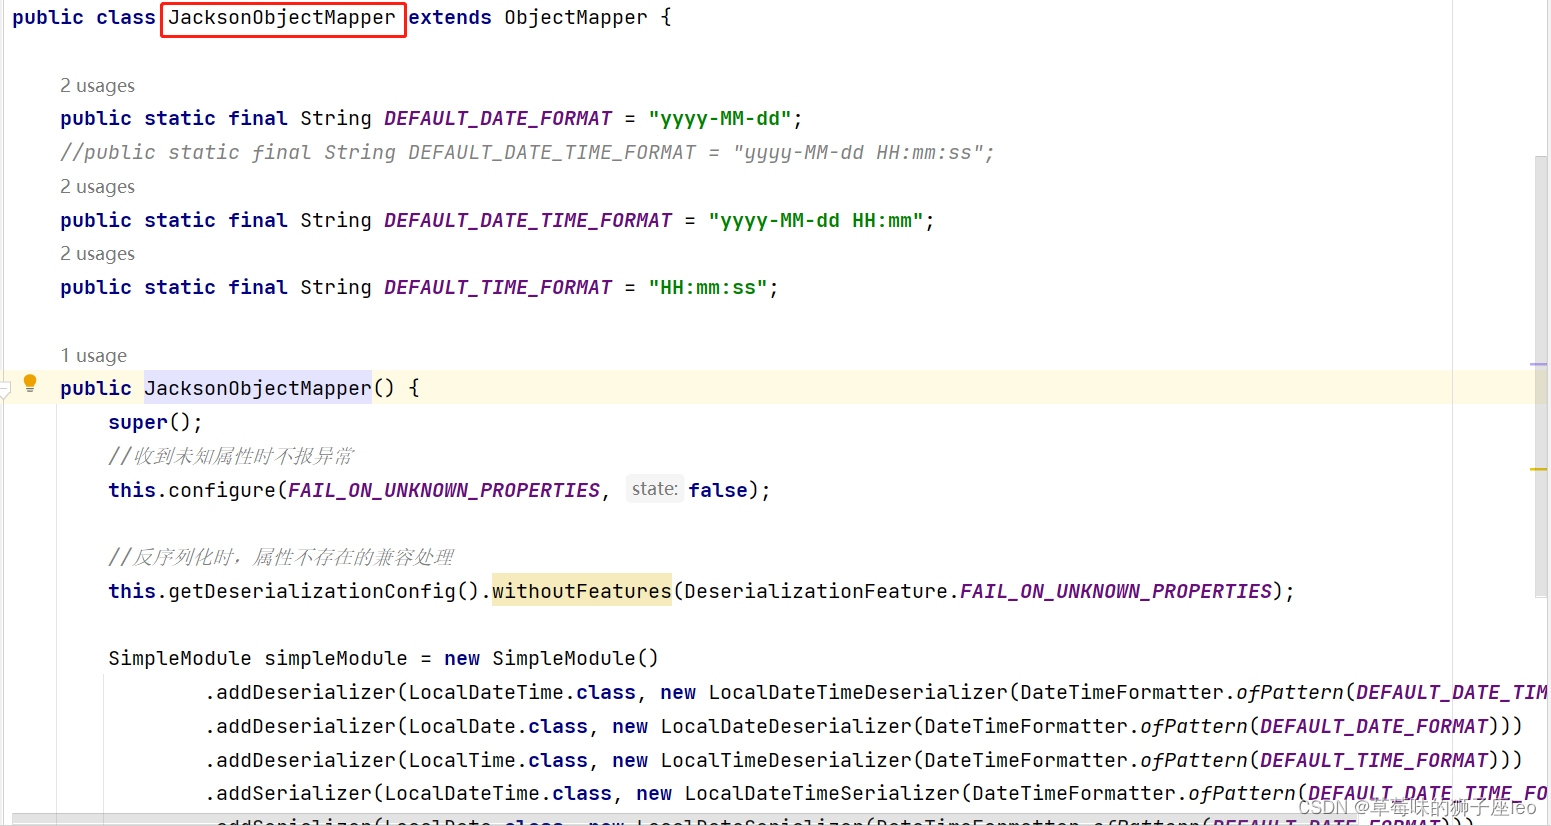
WebMvcConfiguration中扩展Spring MVC的消息转换器,统一对日期类型进行格式化处理
protected void extendMessageConverters(List<HttpMessageConverter<?>> converters) { log.info("Spring MVC扩展消息转化器..."); // 创建消息转换器对象 MappingJackson2HttpMessageConverter messageConverter = new MappingJackson2HttpMessageConverter(); // 设置该消息转换器使用 JacksonObjectMapper 进行转换 messageConverter.setObjectMapper(new JacksonObjectMapper()); // 将消息转换器对象追加到 mvc 框架的转换器集合中(加到最前面) converters.add(0,messageConverter); }- 1
- 2
- 3
- 4
- 5
- 6
- 7
- 8
- 9
- 10

6、启用/禁用账号
/** * 启用禁用员工账号 */ @Override public void startOrStop(Integer status, Long id) { Employee employee = Employee.builder() .status(status) .id(id) .build(); employeeMapper.update(employee); }- 1
- 2
- 3
- 4
- 5
- 6
- 7
- 8
- 9
- 10
- 11
- 12
- 13
- 14
Employee.builder().build()建造者模式,builder构造对象;@Builder 注解6、公共字段填充
mybatis-plus提供了公共字段自动填充功能// 在EmployeeMapper @AutoFill(value = OperationType.INSERT) void insert(Employee employee); @AutoFill(value = OperationType.UPDATE) void update(Employee employee); // CategoryMapper @AutoFill(value = OperationType.INSERT) void insert(Category category); @AutoFill(value = OperationType.UPDATE) void update(Category category);- 1
- 2
- 3
- 4
- 5
- 6
- 7
- 8
- 9
- 10
- 11
- 12
- 13
- 14
实现步骤
【1】实体类的属性上加入注解@TableFieldcreate_time,create_user 使用 Insert update_time,update_user 使用 Insert/update FieldFill.DEFAULT //默认不自动填充 @ApiModelProperty(value = "创建时间") @TableField(fill = FieldFill.INSERT) private LocalDateTime createTime; @ApiModelProperty(value = "更新时间") @TableField(fill = FieldFill.INSERT_UPDATE) private LocalDateTime updateTime;- 1
- 2
- 3
- 4
- 5
- 6
- 7
- 8
- 9
- 10
- 11
- 12
【2】元数据对象处理器,实现
MetaObjectHandler接口,@Slf4j @Component // 交给spring管理 public class MyMetaObjectHandler implements MetaObjectHandler { @Override public void insertFill(MetaObject metaObject) { log.info("start insert fill..."); metaObject.setValue("createTime", LocalDateTime.now()); metaObject.setValue("updateTime",LocalDateTime.now()); metaObject.setValue("createUser", BaseContext.getCurrentId()); metaObject.setValue("updateUser",BaseContext.getCurrentId()); } @Override public void updateFill(MetaObject metaObject) { log.info("start update fill..."); long id = Thread.currentThread().getId(); log.info("当前线程id:{}",id); metaObject.setValue("updateTime",LocalDateTime.now()); metaObject.setValue("updateUser",BaseContext.getCurrentId()); }- 1
- 2
- 3
- 4
- 5
- 6
- 7
- 8
- 9
- 10
- 11
- 12
- 13
- 14
- 15
- 16
- 17
- 18
- 19
- 20
- 21
- 22
- 23
- 24
- 25
7、文件上传
@PostMapping("/upload") @ApiOperation("文件上传") public Result<String> upload(MultipartFile file){ log.info("文件上传: {}", file); try { // 原始文件名 String originalFilename = file.getOriginalFilename(); // 截取原始文件名的后缀 String suffix= originalFilename.substring(originalFilename.lastIndexOf(".")); // 构造新文件名称 String objectName = UUID.randomUUID().toString() + extension; // 文件的请求路径 File dir = new File(basePath);// 创建一个目录对象 // 将临时文件转存到指定位置 file.transferTo(new File(basePath+fileName));- 1
- 2
- 3
- 4
- 5
- 6
- 7
- 8
- 9
- 10
- 11
- 12
- 13
- 14
- 15
- 16
7、请求参数requestparam与requestbody
@ResquestBody要搭配@PostMapping使用,@ResquestParam要搭配@GetMapping使用
区别equestparam与requestbody- 【@RequestParam】接收的参数是来自HTTP请求体或请求url的QueryString中
public void aliReceive(@RequestParam("message") String message)- 1
@RequestParam用来处理 Content-Type 为
application/x-www-form-urlencoded编码的内容@RequestParam注解无法读取application/json格式数据
- 【@RequestBody】一般用来处理
application/json、application/xml等类型的数据。
POST请求中,通过HttpEntity传递的参数,必须要在请求头中声明数据的类型Content-Type,SpringMVC通过使用
- 【@PathVariable】
// 参数名和url变量名不一致 @RequestMapping("/user/{id}") public String testPathVariable(@PathVariable("id") String userId){ System.out.println("路径上的占位符的值="+id); } // 参数名和url变量名一致 @RequestMapping("/getUser/{name}") public User getUser(@PathVariable String name){ return userService.selectUser(name); } 通过@PathVariable,例如/blogs/1 通过@RequestParam,例如blogs?blogId=1- 1
- 2
- 3
- 4
- 5
- 6
- 7
- 8
- 9
- 10
- 11
- 12
- 13
- 14
8、HttpClient
【发送请求步骤】
- 创建HttpClient对象
- 创建请求对象HttpGet、HttpPost等
- 请求对象调用HttpClient的execute方法发送请求
/** * 测试通过httpclient发送GET方式的请求 */ @Test public void testGET() throws Exception { // 创建httpclient对象 CloseableHttpClient httpClient = HttpClients.createDefault(); // 创建请求对象 HttpGet httpGet = new HttpGet("http://localhost:8080/user/shop/status"); // 发送请求,接收响应结果 CloseableHttpResponse response = httpClient.execute(httpGet); // 获取客户端返回的状态码 int statusCode = response.getStatusLine().getStatusCode(); System.out.println("服务端返回的状态码为:" + statusCode); HttpEntity entity = response.getEntity(); String body = EntityUtils.toString(entity); System.out.println("服务端返回的数据为:" +body); // 关闭资源 response.close(); httpClient.close(); }- 1
- 2
- 3
- 4
- 5
- 6
- 7
- 8
- 9
- 10
- 11
- 12
- 13
- 14
- 15
- 16
- 17
- 18
- 19
- 20
- 21
- 22
- 23
- 24
- 25
- 26
- 27
9、微信小程序登录
在application-dev.yml中写入具体的配置属性
sky wechat: appid: ${sky.wechat.appid} secret: ${sky.wechat.secret}- 1
- 2
- 3
- 4
创建user/UserController,创建微信登录的方法
@PostMapping("/login") @ApiOperation("微信登录") public Result<UserLoginVO> login(@RequestBody UserLoginDTO userLoginDTO){ log.info("微信用户登录:{}",userLoginDTO); // 微信登录 User user = userService.wxLogin(userLoginDTO); // 为微信用户生成jwt令牌 Map<String, Object> claims = new HashMap<>(); claims.put(JwtClaimsConstant.USER_ID, user.getId()); String token = JwtUtil.createJWT(jwtProperties.getUserSecretKey(), jwtProperties.getUserTtl(), claims); UserLoginVO userLoginVO = UserLoginVO.builder() .id(user.getId()) .openid(user.getOpenid()) .token(token) .build(); return Result.success(userLoginVO);- 1
- 2
- 3
- 4
- 5
- 6
- 7
- 8
- 9
- 10
- 11
- 12
- 13
- 14
- 15
- 16
- 17
- 18
- 19
- 20
在UserServiceImpl中,实现wxLogin的方法,及其父类接口
// 微信服务接口地址 public static final String WX_LOGIN = "https://api.weixin.qq.com/sns/jscode2session"; public User wxLogin(UserLoginDTO userLoginDTO) { String openid = getOpenid(userLoginDTO.getCode()); // 判断openid是否为空,如果为空表示登录失败,抛出业务异常 if (openid == null){ throw new LoginFailedException(MessageConstant.LOGIN_FAILED); } // 判断当前用户是否为新用户 User user = userMapper.getByOpenId(openid); // 如果是新用户,自动完成注册 if (user == null){ user = User.builder() .openid(openid) .createTime(LocalDateTime.now()) .build(); userMapper.insert(user); } private String getOpenid(String code){ // 调用微信接口服务,获取当前微信用户的openid Map<String, String> map = new HashMap<>(); map.put("appid", weChatProperties.getAppid()); map.put("secret", weChatProperties.getSecret()); map.put("js_code", code); map.put("grant_type", "authorization_code"); String json = HttpClientUtil.doGet(WX_LOGIN, map); JSONObject jsonObject = JSON.parseObject(json); String openid = jsonObject.getString("openid"); return openid; }- 1
- 2
- 3
- 4
- 5
- 6
- 7
- 8
- 9
- 10
- 11
- 12
- 13
- 14
- 15
- 16
- 17
- 18
- 19
- 20
- 21
- 22
- 23
- 24
- 25
- 26
- 27
- 28
- 29
- 30
- 31
- 32
- 33
- 34
- 35
- 36
- 37
- 38
编写JwtTokenUserInterceptor拦截器,校验用户端token是否是合法的
public class JwtTokenUserInterceptor implements HandlerInterceptor {...}- 1
在WebMvcConfiguration中,注册拦截器
@Autowired private JwtTokenUserInterceptor jwtTokenUserInterceptor; protected void addInterceptors(InterceptorRegistry registry) { log.info("开始注册自定义拦截器..."); registry.addInterceptor(jwtTokenAdminInterceptor) .addPathPatterns("/admin/**") .excludePathPatterns("/admin/employee/login"); registry.addInterceptor(jwtTokenUserInterceptor) .addPathPatterns("/user/**") .excludePathPatterns("/user/user/login") .excludePathPatterns("/user/shop/status");- 1
- 2
- 3
- 4
- 5
- 6
- 7
- 8
- 9
- 10
- 11
- 12
- 13
- 14
- 15
10、Redis缓存
RedisTemplate是Spring Data Redis提供给用户的最高级的抽象客户端,用户可直接通过RedisTemplate进行多种操作、异常处理、序列化、发布订阅等
————————————————————
spring-data-redis的提供了如下功能:- 连接池自动管理,提供了一个高度封装的“RedisTemplate”类
- 进行了归类封装,将同一类型操作封装为operation接口
ValueOperations:简单K-V操作 redisTemplate.opsForValue().
SetOperations:set类型数据操作 redisTemplate.opsForSet().
ZSetOperations:zset类型数据操作 redisTemplate.opsForZSet().
HashOperations:针对map类型的数据操作 redisTemplate.opsForHash()
ListOperations:针对list类型的数据操作 redisTemplate.opsForList().- 针对数据的“序列化/反序列化”,提供了多种可选择策略(RedisSerializer)
JdkSerializationRedisSerializer:POJO对象的存取场景,使用JDK本身序列化机制,将pojo类通过ObjectInputStream/ObjectOutputStream进行序列化操作,最终redis-server中将存储字节序列。是目前最常用的序列化策略。
StringRedisSerializer:Key或者value为字符串的场景,根据指定的charset对数据的字节序列编码成string,是“newString(bytes,charset)”和“string.getBytes(charset)”的直接封装。是最轻量级和高效的策略。
JacksonJsonRedisSerializer:jackson-json工具提供了javabean与json之间的转换能力,可以将pojo实例序列化成json格式存储在redis中,也可以将json格式的数据转换成pojo实例。因为jackson工具在序列化和反序列化时,需要明确指定Class类型,因此此策略封装起来稍微复杂。
- OxmSerializer:提供了将javabean与xml之间的转换能力,目前可用的三方支持包括jaxb,apache-xmlbeans;redis存储的数据将是xml工具。不过使用此策略,编程将会有些难度,而且效率最低;不建议使用。【需要spring-oxm模块的支持】
11.BeanUtils
常见场景:
- 接口中将前端请求参数xxVo,转化为xxQuery对象,查询数据库条件对象
BeanUtils.copyProperties(source,target); BeanUtils.copyProperties("要转换的类", "转换后的类");- 1
- 2
- 3
- 源对象source的属性拷贝值赋给目标对象target的过程中,属性名和属性类型都相同的属性才能被成功拷贝赋值
- 做赋值的属性一定要有对应的setter/getter才能成功赋值
- 1.对于类型为Boolean/Short/Integer/Float/Double的属性,它会转换为0:
- java.util.Date/BigDecimal/java.sql.Date/java.sql.Timestamp/java.sql.Time这几个类,如果值为null,则在copy时会抛异常,需要使用对应的Conveter:
org.springframework.beans.BeanUtilsBeanUtils.copyProperties(a, b):a复制到b
org.apache.commons.beanutils.BeanUtilsBeanUtils.copyProperties(a, b):b复制到a12、Spring Task定时处理
Spring Task 是Spring框架提供的任务调度工具
【Spring Task实现步骤】
- 导入maven左边
- 启动类添加@EnableScheduling注解,开启任务调度
- 自定义定时任务 @Scheduled(cron=" ")
@Scheduled(cron = "0 * * * * ? *") // 每分钟触发一次 public void processTimeoutOrder(){ log.info("定时处理超时订单:{}", LocalDateTime.now());- 1
- 2
- 3
13、WebSocket
WebSocket 是基于 TCP 的一种新的网络协议。它实现了浏览器与服务器全双工通信——浏览器和服务器只需要完成一次握手,两者之间就可以创建持久性的连接, 并进行双向数据传输
创建websocket/WebSocketServer,实现WebSocket服务
@Component @ServerEndpoint("/ws/{sid}") public class WebSocketServer { // 存放会话对象 private static Map<String, Session> sessionMap = new HashMap(); //连接建立成功 @OnOpen public void onOpen(Session session, @PathParam("sid") String sid) { System.out.println("客户端:" + sid + "建立连接"); sessionMap.put(sid, session); } //收到客户端消息 @OnMessage public void onMessage(String message, @PathParam("sid") String sid) { System.out.println("收到来自客户端:" + sid + "的信息:" + message); } // 关闭连接 @OnClose public void onClose(@PathParam("sid") String sid) { System.out.println("连接断开:" + sid); sessionMap.remove(sid); } // public void sendToAllClient(String message) { Collection<Session> sessions = sessionMap.values(); for (Session session : sessions) { try { //服务器向客户端发送消息 session.getBasicRemote().sendText(message); } catch (Exception e) { e.printStackTrace(); } } }- 1
- 2
- 3
- 4
- 5
- 6
- 7
- 8
- 9
- 10
- 11
- 12
- 13
- 14
- 15
- 16
- 17
- 18
- 19
- 20
- 21
- 22
- 23
- 24
- 25
- 26
- 27
- 28
- 29
- 30
- 31
- 32
- 33
- 34
- 35
- 36
- 37
创建WebSocketTask中,通过WebSocket向客户端发送消息
public void sendMessageToClient() { webSocketServer.sendToAllClient("这是来自服务端的消息:" + DateTimeFormatter.ofPattern("HH:mm:ss").format(LocalDateTime.now())); }- 1
- 2
- 3
14、LambdaQueryWrapper
LambdaQueryWrapper是Mybatis-Plus框架中的一个查询条件构造器
LambdaQueryWrapper<User> queryWrapper = new LambdaQueryWrapper<>(); queryWrapper.eq(User::getName, "张三") // 等于eq .ne(User::getAge, 18) // 不等于ne .gt(User::getSalary, 5000) // 大于gt .like(User::getEmail, "abc") //模糊查询 .orderByDesc(User::getCreateTime);// 降序 List<User> userList = userMapper.selectList(queryWrapper);- 1
- 2
- 3
- 4
- 5
- 6
- 7
- 8
15、Nginx
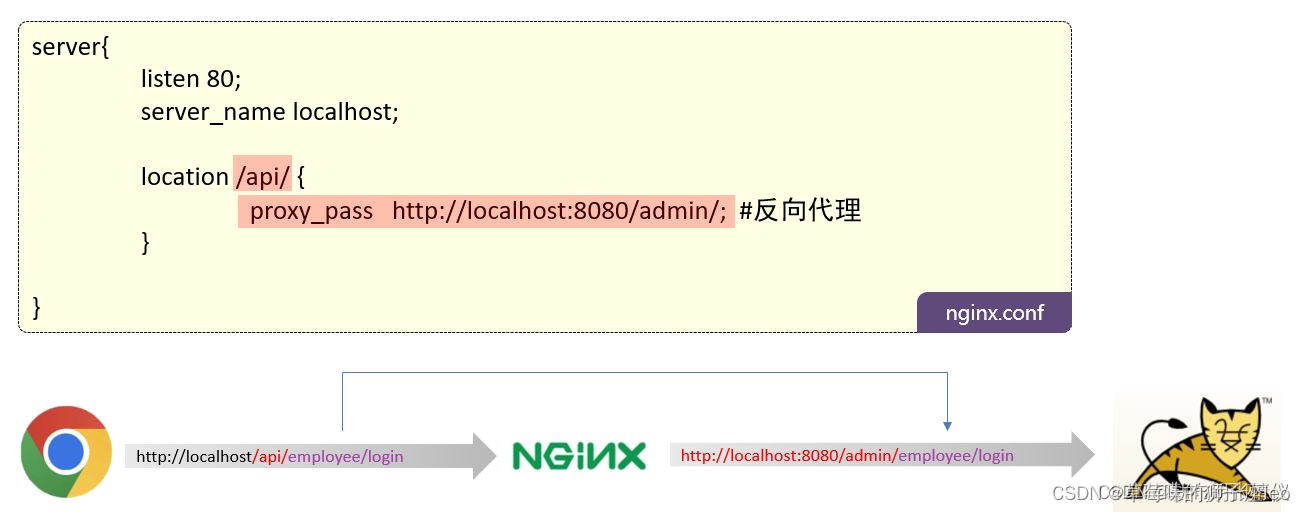
- 反向代理:允许Nginx服务器代表客户端将请求转发给后端的多个应用服务器

16、Spring Cache
Spring Cache 是一个框架,实现了基于注解的缓存功能;底层可以切换不同的缓存实现,如:Redis
@PostMapping @ApiOperation(value = "新增套餐") @CacheEvict(cacheNames = "setmealCache",key = "#setmealDTO.categoryId") public Result save(@RequestBody SetmealDTO setmealDTO){ setmealService.save(setmealDTO); } // 修改信息 @CacheEvict(cacheNames = "setmealCache",allEntries = true) public Result update(@RequestBody SetmealDTO setmealDTO){ setmealService.update(setmealDTO); return Result.success(); }- 1
- 2
- 3
- 4
- 5
- 6
- 7
- 8
- 9
- 10
- 11
- 12
- 13
常用注解:
@EnableCaching // 开启缓存注解功能,启动类上 @Cacheable //在方法执行前查询缓存中是否有数据 @CachePut //将方法的返回值加入缓存中 @CacheEvict //删除缓存- 1
- 2
- 3
- 4
- 5
- 6
- 7
-
相关阅读:
声网3D在线互动场景空间音频的实时渲染——如何把“声临其境”推向极致
读书笔记: 如何把一件事做到最好
Unity丨移动相机朝向目标并确定目标在摄像机可视范围内丨摄像机注释模型丨摄像机移动丨不同尺寸模型优化丨
mysql中binlog日志
400电话申请办理:为企业提供高效沟通的必备工具
刚学python不知道该如何学习?初学者必看学习路线图!
MySQL之复制(五)
Linux 的致命弱点是什么?Fedora项目负责人现身说法
ThreadLocal类
Linux编程基础案例:第3章用户与用户组管理
- 原文地址:https://blog.csdn.net/Mikon_0703/article/details/132662420
