-
【Spring】Spring AOP入门及实现原理剖析
1 初探Aop
1.1 何为AOP?
AOP (Aspect-Oriented Programming) 是一种编程范式,它提供一种将程序中的横切关注点模块化的方式。横切关注点可以是日志、事务、安全等,它们不属于业务逻辑,但是又必须要与业务逻辑紧密耦合在一起。在 AOP 中,我们将这些横切关注点称为“切面”,它们独立于业务逻辑模块,但是可以在程序运行的不同阶段被织入到业务逻辑中。使用 AOP 可以提高代码复用性、降低模块之间的耦合度、简化代码的维护性等。
1.2 AOP的组成
AOP由切面、切点、连接点和通知组成。
1.2.1 切面(Aspect)
切面是包含了通知、切点和切面的类,相当于AOP实现的某个功能的集合。通俗理解,在程序中就是一个处理某方面具体问题的一个类。里面包含了许多方法,这些方法就是切点和通知。
1.2.2 连接点(Join Point)
应⽤执⾏过程中能够插⼊切⾯的⼀个点,这个点可以是⽅法调⽤时,抛出异常时,甚⾄修改字段时。切⾯代码可以利⽤这些点插⼊到应⽤的正常流程之中,并添加新的⾏为。连接点可以理解为可能会触发AOP规则的所有点。 狭义可以理解为需要进行功能增强的方法。
1.2.3 切点(Pointcut)
切点是连接点的集合。它定义了在哪些连接点上应用特定的通知。通过使用切点表达式,可以根据连接点的特征(例如方法签名或类名)选择特定的连接点。即,切点是用来进行主动拦截的规则(配置)。
具体来说:Pointcut 的作⽤就是提供⼀组规则(使⽤ AspectJ pointcut expression language 来描述)来匹配 Join Point,给满⾜规则的 Join Point 添加 Advice。1.2.4 通知(Advice)
在AOP术语中,切面的工作被称之为通知。 通知是切面在连接点上执行的动作。它定义了在何时(例如在方法调用之前或之后)以及如何(例如打印日志或进行性能监控)应用切面的行为。即,程序中被拦截请求触发的具体动作。
1.3 AOP的使用场景
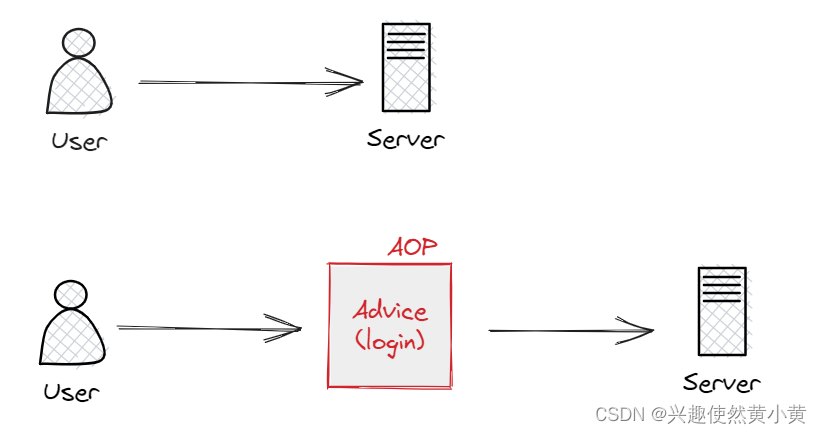
回顾下笔者之前的文章,基于Servlet实现的前后端分离的博客系统中,除了登录等⼏个功能不需要做⽤户登录验证之外,其他⼏乎所有⻚⾯调⽤的前端控制器( Controller)都需要先验证⽤户登录的状态。然⽽,当系统的功能越来越多,则要写的登录验证也越来越多,一旦某些功能需要改动,这种处理方式由于耦合性很高,牵一发就会动全身。⽽这些⽅法⼜是相同的,对于这种功能统⼀,且使⽤的地⽅较多的功能,就可以考虑 AOP来统⼀处理了。
例如,原本的博客系统在作者删除、发布、浏览博客前都需要进行登录状态的验证,如果用户未登录,则请求重定向到登录界面。使用AOP后,在用户调用Server服务之前,统一进行校验,验证通过则正常服务,否则,被“拦截”。
除了统一登录判断外,使用AOP还可以实现:- 统⼀⽇志记录
- 统⼀⽅法执⾏时间统计
- 统⼀的返回格式设置
- 统⼀的异常处理
- 事务的开启和提交等
2 Spring AOP入门
以上,我们已经对AOP有了基本的了解。接下来,我们的目标是尝试使用Spring AOP来实现AOP的功能,完成的目标如下:
拦截所有StudentController里的方法,即每次调用StudentController中的任意方法的时候,执行相应的通知事件。
Spring AOP 的实现步骤如下:
- 添加 Spring AOP 框架⽀持。
- 定义切⾯和切点。
(1)创建切面类
(2)配置拦截规则 - 定义通知。
2.1 添加 Spring AOP 框架⽀持
首先,创建Spring Boot项目
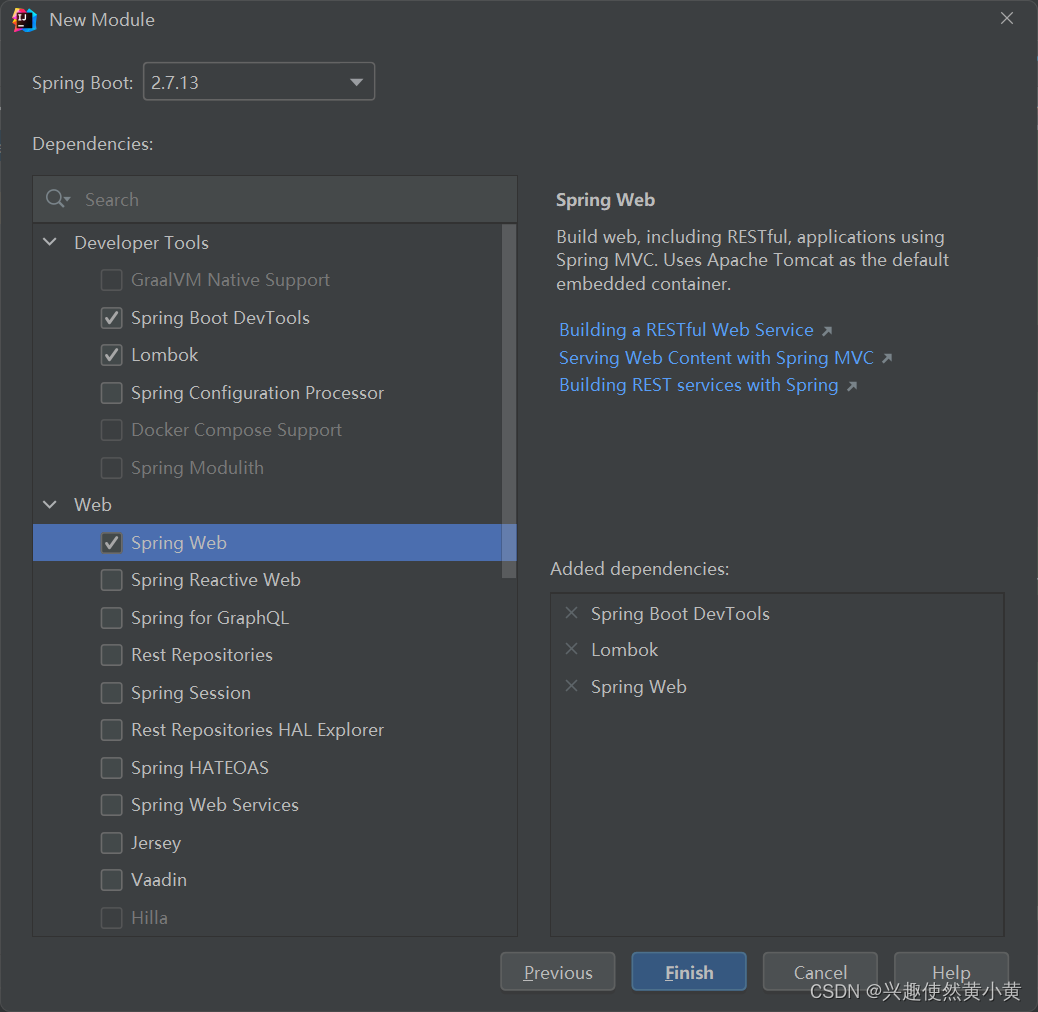
在pom.xml中添加Spring AOP的依赖配置:<dependency> <groupId>org.springframework.bootgroupId> <artifactId>spring-boot-starter-aopartifactId> dependency>- 1
- 2
- 3
- 4
- 5
2.2 定义切面和切点
使用
@Aspect注解表明当前类为一个切面,而在切点中,我们要定义拦截的规则,具体实现如下:import org.aspectj.lang.annotation.Aspect; import org.aspectj.lang.annotation.Pointcut; import org.springframework.stereotype.Component; @Aspect // 表明此类为一个切面 @Component // 随着框架的启动而启动 public class StudentAspect { // 定义切点, 这里使用 Aspect 表达式语法 @Pointcut("execution(* com.hxh.demo.controller.StudentController.*(..))") public void pointcut(){ } }- 1
- 2
- 3
- 4
- 5
- 6
- 7
- 8
- 9
- 10
- 11
在上述实现代码中,pointcut 为一个空方法,只是起到一个“标识”的作用,即,标识下面的通知方法具体指的是哪个切点,切点可以有多个。
切点表达式由切点函数组成,其中
execution()是最常⽤的切点函数,⽤来匹配⽅法,语法为:execution(<修饰符><返回类型><包.类.⽅法(参数)><异常>)
修饰符和异常可以省略*常见的切点表达式的示例:
- 匹配特定类的所有方法:
execution(* com.example.MyClass.*(..)):匹配 com.example.MyClass 类中的所有方法。 - 匹配特定包下的所有方法:
execution(* com.example.*.*(..)):匹配 com.example 包及其子包下的所有方法。 - 匹配特定注解标注的方法:
execution(@com.example.MyAnnotation * *(..)):匹配被 com.example.MyAnnotation 注解标注的所有方法。 - 匹配特定方法名的方法:
execution(* com.example.MyClass.myMethod(..)):匹配 com.example.MyClass 类中名为 myMethod 的方法。 - 匹配特定方法参数类型的方法:
execution(* com.example.MyClass.myMethod(String, int)):匹配 com.example.MyClass 类中具有一个 String 参数和一个 int 参数的 myMethod 方法。 - 匹配特定返回类型的方法:
execution(String com.example.MyClass.myMethod(..)):匹配 com.example.MyClass 类中返回类型为 String 的 myMethod 方法。
StudentController.java
import org.springframework.web.bind.annotation.RequestMapping; import org.springframework.web.bind.annotation.RestController; @RestController @RequestMapping("/student") public class StudentController { @RequestMapping("/hi") public String sayHi(String name) { System.out.println("执行了 sayHi 方法~"); return "Hi," + name; } @RequestMapping("/hello") public String sayHello() { System.out.println("执行了 sayHello 方法~"); return "Hello, hxh"; } }- 1
- 2
- 3
- 4
- 5
- 6
- 7
- 8
- 9
- 10
- 11
- 12
- 13
- 14
- 15
- 16
- 17
- 18
- 19
2.3 定义相关通知
通知定义的是被拦截方法具体要执行的业务。
Spring 切⾯类中,可以在⽅法上使⽤以下注解,会设置⽅法为通知⽅法,在满⾜条件后会通知本⽅法进⾏调⽤:- 前置通知使⽤
@Before:通知⽅法会在⽬标⽅法调⽤之前执⾏。 - 后置通知使⽤
@After:通知⽅法会在⽬标⽅法返回或者抛出异常后调⽤。 - 返回之后通知使⽤
@AfterReturning:通知⽅法会在⽬标⽅法返回后调⽤。 - 抛异常后通知使⽤
@AfterThrowing:通知⽅法会在⽬标⽅法抛出异常后调⽤。 - 环绕通知使⽤
@Around:通知包裹了被通知的⽅法,在被通知的⽅法调用之前和调⽤之后执⾏⾃定义的⾏为。
具体实现如下:
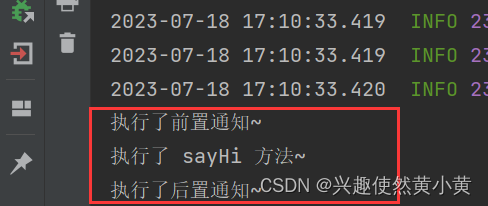
前置通知与后置通知(异常通知和返回后通知仅仅是注解不同,方式一致,这里不再赘述~)
import org.aspectj.lang.annotation.After; import org.aspectj.lang.annotation.Aspect; import org.aspectj.lang.annotation.Before; import org.aspectj.lang.annotation.Pointcut; import org.springframework.stereotype.Component; @Aspect // 表明此类为一个切面 @Component // 随着框架的启动而启动 public class StudentAspect { // 定义切点, 这里使用 Aspect 表达式语法 @Pointcut("execution(* com.hxh.demo.controller.StudentController.*(..))") public void pointcut(){ } // 前置通知 @Before("pointcut()") public void beforeAdvice() { System.out.println("执行了前置通知~"); } // 后置通知 @After("pointcut()") public void afterAdvice() { System.out.println("执行了后置通知~"); } }- 1
- 2
- 3
- 4
- 5
- 6
- 7
- 8
- 9
- 10
- 11
- 12
- 13
- 14
- 15
- 16
- 17
- 18
- 19
- 20
- 21
- 22
- 23
- 24
- 25
环绕通知的具体实现
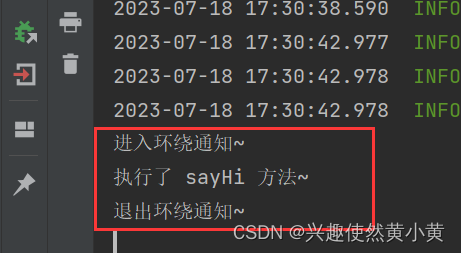
环绕通知是有Object返回值的,需要把执行流程的结果返回给框架,框架拿到对象继续执行。import org.aspectj.lang.ProceedingJoinPoint; import org.aspectj.lang.annotation.*; import org.springframework.stereotype.Component; @Aspect // 表明此类为一个切面 @Component // 随着框架的启动而启动 public class StudentAspect { // 定义切点, 这里使用 Aspect 表达式语法 @Pointcut("execution(* com.hxh.demo.controller.StudentController.*(..))") public void pointcut(){ } // 环绕通知 @Around("pointcut()") public Object aroundAdvice(ProceedingJoinPoint joinPoint) { System.out.println("进入环绕通知~"); Object obj = null; // 执行目标方法 try { obj = joinPoint.proceed(); } catch (Throwable e) { e.printStackTrace(); } System.out.println("退出环绕通知~"); return obj; } }- 1
- 2
- 3
- 4
- 5
- 6
- 7
- 8
- 9
- 10
- 11
- 12
- 13
- 14
- 15
- 16
- 17
- 18
- 19
- 20
- 21
- 22
- 23
- 24
- 25
- 26
- 27
- 28
3 Spring AOP实现原理
Spring AOP 是通过动态代理的⽅式,在运⾏期将 AOP 代码织⼊到程序中的,它的实现⽅式有两种:
JDK Proxy和CGLIB。因此,Spring 对 AOP 的支持局限于方法级别的拦截。- CGLIB是Java中的动态代理框架,主要作⽤就是根据⽬标类和⽅法,动态⽣成代理类。
- Java中的动态代理框架,⼏乎都是依赖字节码框架(如 ASM,Javassist 等)实现的。
- 字节码框架是直接操作 class 字节码的框架。可以加载已有的class字节码⽂件信息,修改部分信息,或动态⽣成⼀个 class。
3.1 何为动态代理?
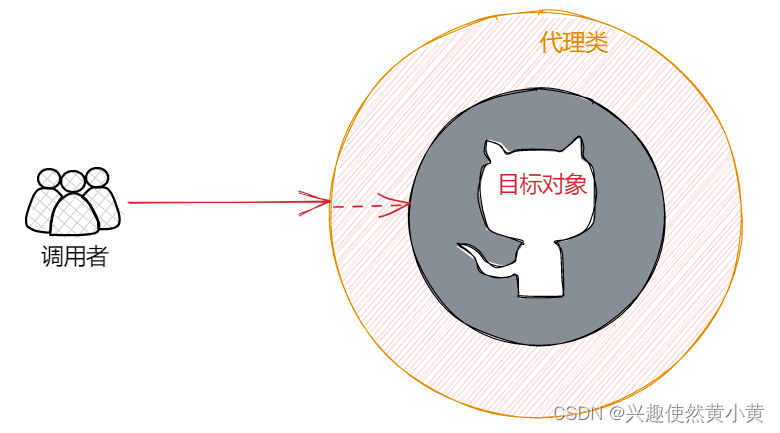
动态代理(Dynamic Proxy)是一种设计模式,它允许 在运行时创建代理对象,并将方法调用转发给实际的对象。 动态代理可以用于实现横切关注点(如日志记录、性能监控、事务管理等)的功能,而无需修改原始对象的代码。
在Java中,动态代理通常使用java.lang.reflect.Proxy类和java.lang.reflect.InvocationHandler接口来实现。以下是使用动态代理的一般步骤:
-
创建一个实现InvocationHandler接口的类,该类将作为代理对象的调用处理程序。在InvocationHandler接口的invoke方法中,可以定义在方法调用前后执行的逻辑。
-
使用Proxy类的newProxyInstance方法创建代理对象。该方法接受三个参数:类加载器、代理接口数组和调用处理程序。它将返回一个实现指定接口的代理对象。
-
使用代理对象调用方法。当调用代理对象的方法时,实际上会调用调用处理程序的invoke方法,并将方法调用转发给实际的对象。
3.2 JDK 动态代理实现
先通过实现 InvocationHandler 接⼝创建⽅法调⽤处理器,再通过 Proxy 来创建代理类。
// 动态代理:使⽤JDK提供的api(InvocationHandler、Proxy实现),此种⽅式实现,要求被代理类必须实现接⼝ public class PayServiceJDKInvocationHandler implements InvocationHandler { // ⽬标对象即就是被代理对象 private Object target; public PayServiceJDKInvocationHandler(Object target) { this.target = target; } // proxy代理对象 @Override public Object invoke(Object proxy, Method method, Object[] args) throws Throwable { // 1.安全检查 System.out.println("安全检查"); // 2.记录⽇志 System.out.println("记录⽇志"); // 3.时间统计开始 System.out.println("记录开始时间"); // 通过反射调⽤被代理类的⽅法 Object retVal = method.invoke(target, args); //4.时间统计结束 System.out.println("记录结束时间"); return retVal; } public static void main(String[] args) { PayService target= new AliPayService(); // ⽅法调⽤处理器 InvocationHandler handler = new PayServiceJDKInvocationHandler(target); // 创建⼀个代理类:通过被代理类、被代理实现的接⼝、⽅法调⽤处理器来创建 PayService proxy = (PayService) Proxy.newProxyInstance( target.getClass().getClassLoader(), new Class[]{PayService.class}, handler ); proxy.pay(); } }- 1
- 2
- 3
- 4
- 5
- 6
- 7
- 8
- 9
- 10
- 11
- 12
- 13
- 14
- 15
- 16
- 17
- 18
- 19
- 20
- 21
- 22
- 23
- 24
- 25
- 26
- 27
- 28
- 29
- 30
- 31
- 32
- 33
- 34
- 35
- 36
- 37
- 38
- 39
- 40
3.3 CGLIB 动态代理实现
public class PayServiceCGLIBInterceptor implements MethodInterceptor { // 被代理对象 private Object target; public PayServiceCGLIBInterceptor(Object target) { this.target = target; } @Override public Object intercept(Object o, Method method, Object[] args, MethodProxy methodProxy) throws Throwable { // 1.安全检查 System.out.println("安全检查"); // 2.记录⽇志 System.out.println("记录⽇志"); // 3.时间统计开始 System.out.println("记录开始时间"); // 通过cglib的代理⽅法调⽤ Object retVal = methodProxy.invoke(target, args); // 4.时间统计结束 System.out.println("记录结束时间"); return retVal; } public static void main(String[] args) { PayService target= new AliPayService(); PayService proxy= (PayService) Enhancer.create(target.getClass(),new PayServiceCGLIBInterceptor(target)); proxy.pay(); } }- 1
- 2
- 3
- 4
- 5
- 6
- 7
- 8
- 9
- 10
- 11
- 12
- 13
- 14
- 15
- 16
- 17
- 18
- 19
- 20
- 21
- 22
- 23
- 24
- 25
- 26
- 27
- 28
- 29
3.4 两种方式的区别
- JDK 实现,要求被代理类必须实现接⼝, 之后是通过 InvocationHandler 及 Proxy,在运⾏时动态的在内存中⽣成了代理类对象,该代理对象是通过实现同样的接⼝实现(类似静态代理接⼝实现的⽅式),只是该代理类是在运⾏期时,动态的织⼊统⼀的业务逻辑字节码来完成。
- CGLIB 实现,被代理类可以不实现接⼝, 是通过继承被代理类,在运⾏时动态的⽣成代理类对象。
写在最后
本文被 JavaEE编程之路 收录点击订阅专栏 , 持续更新中。
以上便是本文的全部内容啦!创作不易,如果你有任何问题,欢迎私信,感谢您的支持!
-
相关阅读:
寄存器与ROM与RAM
【机器学习】聚类【Ⅳ】高斯混合模型数学推导
前端实战|React18极客园——发布文章模块(切换单/三/无图、暂存图片列表)
【前端】Vue+Element UI案例:通用后台管理系统-用户管理:Form表单填写、Dialog对话框弹出
【Windows】Windows Terminal教程
JavaSE的思维导图
ES6中 Promise 概念、基本用法和封装ajax(json数据使用)
4.drf-版本管理
富滇银行完成数字化升级|OceanBase数据库助力布局分布式架构中台
虚拟数字人直播软件实现带货功能,成为新一代直播风口!
- 原文地址:https://blog.csdn.net/m0_60353039/article/details/131745079
