-
Nginx使用教程
一 快速认识Nginx
-
Nginx介绍
- 官网:nginx news
- 是一个高性能的[HTTP]和[反向代理]web服务器
- Nginx代码完全用[C语言]从头写成
- 系统:Mac/Windows/Linux
- 正向代理服务器

- 反向代理服务器(Nginx)
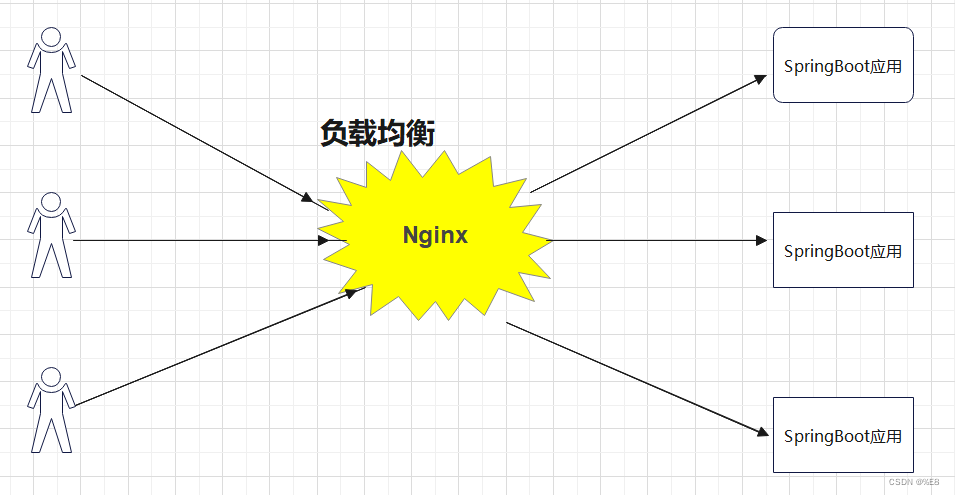
- 客户端和目标服务器之间的服务器,客户端向代理发送一个请求,然后代理向目标服务器请求并获得内容,并返回给客户端。反向代理隐藏了真实的服务器
- 核心:客户端不知道要访问的目标服务器是哪台服务器,代理会根据一定的策略选择一个真实的服务器进行请求
- 场景:访问淘宝,知道访问的域名是taobao.com, 但是后面提供数据的具体是什么域名或ip我们是不知道的

二 nginx下载和阿里快速安装
-
下载压缩包 并上传
-
安装依赖
yum -y install gcc zlib zlib-devel pcre-devel openssl openssl-devel - 创建一个文件夹,上传本地提供的nginx包
tar -zxvf nginx-1.18.0.tar.gz- //执行命令
- ./configure
- make
- make install
-
默认安装路径
- /usr/local/nginx
-
访问配置
- cd /usr/local/nginx/sbin
- ./nginx
-
防火墙开放端口,阿里云网络安全组配置80端口
Nginx目录文件讲解
- 源码编译安装后,默认目录
/usr/local/nginx目录核心介绍
- conf #所有配置文件目录
- nginx.conf #默认的主要的配置文件
- nginx.conf.default #默认模板
-
- html # 这是编译安装时Nginx的默认站点目录
- 50x.html #错误页面
- index.html #默认首页
- logs # nginx默认的日志路径,包括错误日志及访问日志
- error.log #错误日志
- nginx.pid #nginx启动后的进程id
- access.log #nginx访问日志
-
- sbin #nginx命令的目录
- nginx #启动命令
- 常见命令
- ./nginx #默认配置文件启动
-
- ./nginx -s reload #重启,加载默认配置文件
-
- ./nginx -c /usr/local/nginx/conf/nginx.conf #启动指定某个配置文件
-
- ./nginx -s stop #停止
-
- #关闭进程,nginx有master process 和worker process,关闭master即可
- ps -ef | grep "nginx"
- kill -9 PID
三 域名备案和线上访问服务器应用流程解析
-
一个http请求基本流程
- 客户端通过发起域名资源请求 -> DNS解析获得IP -> 寻找服务器获得资源
-
域名和ip的关系,DNS作用
- DNS:Domain Name Server 域名服务器 域名虽然便于人们记忆,但网络中的计算机之间只能互相认识IP地址,它们之间的转换工作称为域名解析,域名解析需要由专门的域名解析服务器来完成,DNS 就是进行域名解析的服务器
-
什么是cname和a记录
-
a记录
- 用户可以在此设置域名并指向到自己的目标主机地址上,从而实现通过域名找到服务器(也叫ip指向域名配置)aabbcc.com -> 120.24.216.117
-
cname
- 别名指向,可以为一个主机设置别名。比如设置open1024.com,用来指向一个主机 baidu.net 那么以后就可以用open1024.com来代替访问 baidu.net 了
- www.xdclass.netbaiduwww.xdclass.net --> xdclass.net
-
-
购买服务器,阿里云,腾讯云,亚马逊云aws
-
购买域名,备案
- 阿里云 备案地址:网站备案_ICP备案_备案迁移_备案-阿里云
-
安装项目依赖的基本环境,比如java、nginx等软件(看项目)
-
配置域名解析到服务器,nginx是80端口,我们解析到80端口就行
四 Nginx目录文件讲解
- 源码编译安装后,默认目录
/usr/local/nginx-
目录核心介绍
- conf #所有配置文件目录
- nginx.conf #默认的主要的配置文件
- nginx.conf.default #默认模板
-
- html # 这是编译安装时Nginx的默认站点目录
- 50x.html #错误页面
- index.html #默认首页
- logs # nginx默认的日志路径,包括错误日志及访问日志
- error.log #错误日志
- nginx.pid #nginx启动后的进程id
- access.log #nginx访问日志
-
- sbin #nginx命令的目录
- nginx #启动命令
- 常见命令
- ./nginx #默认配置文件启动
-
- ./nginx -s reload #重启,加载默认配置文件
-
- ./nginx -c /usr/local/nginx/conf/nginx.conf #启动指定某个配置文件
-
- ./nginx -s stop #停止
-
- #关闭进程,nginx有master process 和worker process,关闭master即可
- ps -ef | grep "nginx"
- kill -9 PID
五 Nginx核心知识之默认配置文件讲解
- 全局配置
- server 主机设置
- location(URL匹配特定位置的设置)
- # 每个配置项由配置指令和指令参数 2 个部分构成
- #user nobody; # 指定Nginx Worker进程运行以及用户组
- worker_processes 1; #
-
- #error_log logs/error.log; # 错误日志的存放路径 和错误日志
- #error_log logs/error.log notice;
- #error_log logs/error.log info;
-
- #pid logs/nginx.pid; # 进程PID存放路径
-
-
- # 事件模块指令,用来指定Nginx的IO模型,Nginx支持的有select、poll、kqueue、epoll 等。不同的是epoll用在Linux平台上,而kqueue用在BSD系统中,对于Linux系统,epoll工作模式是首选
- events {
- use epoll;
- # 定义Nginx每个进程的最大连接数, 作为服务器来说: worker_connections * worker_processes,
- # 作为反向代理来说,最大并发数量应该是worker_connections * worker_processes/2。因为反向代理服务器,每个 并发会建立与客户端的连接和与后端服务的连接,会占用两个连接
- worker_connections 1024;
- }
-
-
-
-
- http {
- include mime.types;
- default_type application/octet-stream;
- # 自定义服务日志
- #log_format main '$remote_addr - $remote_user [$time_local] "$request" '
- # '$status $body_bytes_sent "$http_referer" '
- # '"$http_user_agent" "$http_x_forwarded_for"';
-
- #access_log logs/access.log main;
-
- # 是否开启高效传输模式 on开启 off关闭
- sendfile on;
- #减少网络报文段的数量
- #tcp_nopush on;
-
- #keepalive_timeout 0;
- # 客户端连接保持活动的超时时间,超过这个时间之后,服务器会关闭该连接
- keepalive_timeout 65;
-
- #gzip on;
- # 虚拟主机的配置
- server {
- listen 80; # 虚拟主机的服务端口
- server_name localhost; #用来指定IP地址或域名,多个域名之间用空格分开
-
- #charset koi8-r;
-
- #access_log logs/host.access.log main;
-
- #URL地址匹配
- location / {
- root html; # 服务默认启动目录
- index index.html index.htm; #默认访问文件,按照顺序找
- }
-
- #error_page 404 /404.html; #错误状态码的显示页面
-
- # redirect server error pages to the static page /50x.html
- #
- error_page 500 502 503 504 /50x.html;
- location = /50x.html {
- root html;
- }
-
- # proxy the PHP scripts to Apache listening on 127.0.0.1:80
- #
- #location ~ \.php$ {
- # proxy_pass http://127.0.0.1;
- #}
-
- # pass the PHP scripts to FastCGI server listening on 127.0.0.1:9000
- #
- #location ~ \.php$ {
- # root html;
- # fastcgi_pass 127.0.0.1:9000;
- # fastcgi_index index.php;
- # fastcgi_param SCRIPT_FILENAME /scripts$fastcgi_script_name;
- # include fastcgi_params;
- #}
-
- # deny access to .htaccess files, if Apache's document root
- # concurs with nginx's one
- #
- #location ~ /\.ht {
- # deny all;
- #}
- }
-
-
- # another virtual host using mix of IP-, name-, and port-based configuration
- #
- #server {
- # listen 8000;
- # listen somename:8080;
- # server_name somename alias another.alias;
-
- # location / {
- # root html;
- # index index.html index.htm;
- # }
- #}
-
-
- # HTTPS server
- #
- #server {
- # listen 443 ssl;
- # server_name localhost;
-
- # ssl_certificate cert.pem;
- # ssl_certificate_key cert.key;
-
- # ssl_session_cache shared:SSL:1m;
- # ssl_session_timeout 5m;
-
- # ssl_ciphers HIGH:!aNULL:!MD5;
- # ssl_prefer_server_ciphers on;
-
- # location / {
- # root html;
- # index index.html index.htm;
- # }
- #}
- }
使用nignx搭建图片-文件服务器
-
图片服务器
- 学javaweb、node、或者其他基础web项目,基本都是图片上传到项目本身,这个是生成很少用
- 公司一般会使用图片服务器或者云厂商提供的CDN
-
使用流程
-
前端提交图片->后端处理->存储到图片服务器->拼接好访问路径存储到数据库和范围前端

本地图片上传上去,配置专属访问路径
- server {
- listen 80;
- server_name aabbccdd.com;
- location /app/img {
- alias /usr/local/software/img/;
- }
- }
-
注意
- 在location / 中配置root目录
- 在location /path中配置alias虚拟目录, 目录后面的"/"符号一定要带上
-
-
相关阅读:
原地算法(数组向)
软件测试工程师-月入20k+,你要知道的
KL散度与率失真优化问题
React 18发布,仅用400行代码就能实现一个Mini-React
HBuilderX配置Git插件
vue2+webpack/vue3+vite 封装svg组件总结笔记
Linux学习第21天:Linux内核定时器驱动开发: 流淌的时间长河
Unity接入腾讯云
el-upload 上传&表单校验成功后再触发上传
【算法系列专栏介绍】
- 原文地址:https://blog.csdn.net/m0_37647376/article/details/130515868
