-
动态线程池 dynamic-tp 源码
目录
2.1 DtpBeanDefinitionRegistrar
4.1 检查报警 checkAlarm(executorNames);
4.2 指标收集 collect(executorNames);
1. 介绍
官方文档 https://dynamictp.cn/guide/introduction/background.html
动态线程池 在 传统线程池 基础上增加了两大功能:
(1)支持运行时动态修改线程池参数
字段包括:核心线程数、最大线程数等
(2)近实时监控线程池情况,如果发现超过指定阈值就告警通知用户
告知用户后,用户就可以修改线程池配置,怎么修改呢?直接修改配置中心的数据,也就是将线程池字段存储在配置中心,线程池也从配置中心读取,用户也从配置中心修改。
如想了解更多使用信息,请查看上方官方文档。
2. Spring 环境整合配置源码
本次使用 Nacos 作为配置中心
源码中的 example-nacos-cloud 模块就是 nacos 配置中的示例工程
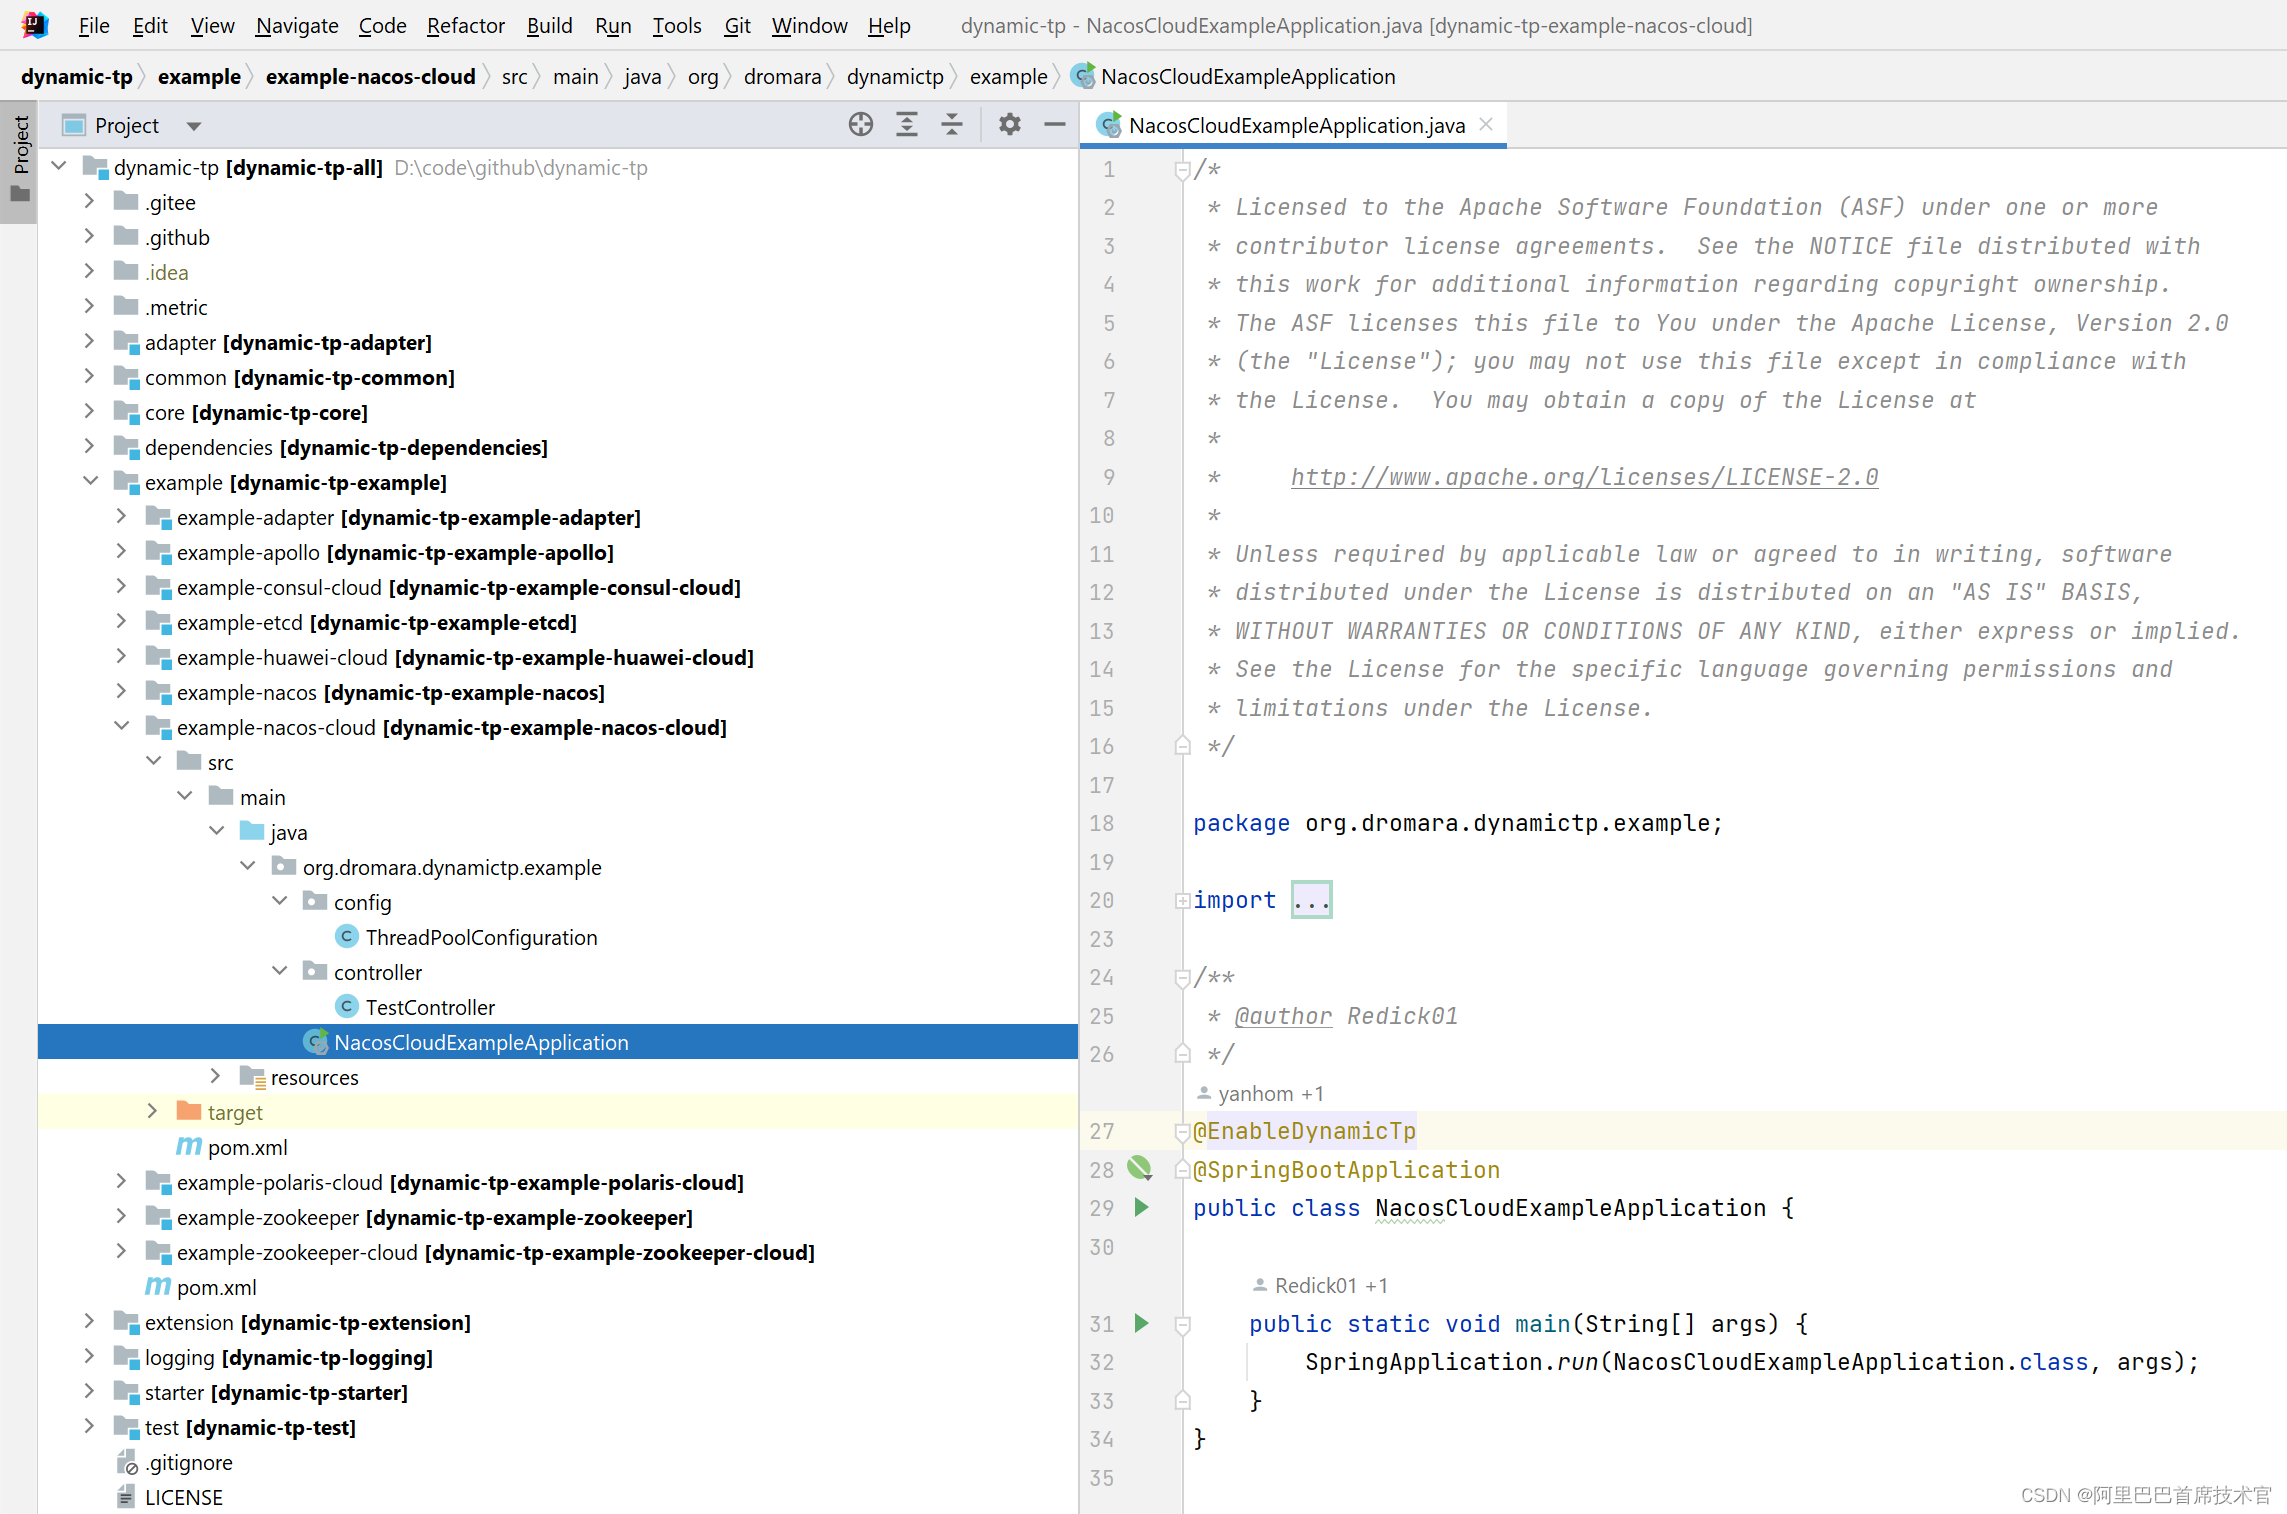
在主类上使用 @EnableDynamicTp 注解来启用 动态线程池功能。
- @Target({ElementType.TYPE, ElementType.ANNOTATION_TYPE})
- @Retention(RetentionPolicy.RUNTIME)
- @Documented
- @Import(DtpConfigurationSelector.class)
- public @interface EnableDynamicTp {
- }
在 @EnableDynamicTp 又引入了 DtpConfigurationSelector 类,负责整合导入当前 动态线程池的所有配置项
- public class DtpConfigurationSelector implements DeferredImportSelector {
- // 简化代码
- @Override
- public String[] selectImports(AnnotationMetadata metadata) {
- return new String[] {
- // 将配置中心的线程池注册为 bean
- DtpBeanDefinitionRegistrar.class.getName(),
- // 将直接定义的线程池注册到 DtpRegistry 中
- DtpPostProcessorRegistrar.class.getName(),
- // 存储 ApplicationContext
- ApplicationContextHolder.class.getName(),
- // 基本 bean 配置
- DtpBaseBeanConfiguration.class.getName()
- };
- }
- }
下面来讲解以下 DtpConfigurationSelector 中导入的每个配置的作用
2.1 DtpBeanDefinitionRegistrar
DtpBeanDefinitionRegistrar 类做的事情就是 将配置中心的线程池注册为bean
在配置中心配置了 线程池

DtpBeanDefinitionRegistrar 就是将这个配置注册为一个 Bean 放入 Spring 容器,bean name 就是 线程池名称。
到时候用的时候就是直接注入一个线程池,指定线程池名就可以使用了。

看看源码如何实现:
- @Slf4j
- public class DtpBeanDefinitionRegistrar implements ImportBeanDefinitionRegistrar {
- // 简化代码
- @Override
- public void registerBeanDefinitions(AnnotationMetadata importingClassMetadata, BeanDefinitionRegistry registry) {
- DtpProperties dtpProperties = new DtpProperties();
- // 将配置中心的属性 加载到 DtpProperties
- PropertiesBinder.bindDtpProperties(environment, dtpProperties);
- val executors = dtpProperties.getExecutors();
- executors.forEach(e -> {
- // 循环线程池数组,一个个加入 bean
- Class executorTypeClass = ExecutorType.getClass(e.getExecutorType());
- Map
- // 构建构造器参数数组(corePoolSize、maximumPoolSize 等)
- Object[] args = buildConstructorArgs(executorTypeClass, e);
- // 注册 bean
- BeanUtil.registerIfAbsent(registry, e.getThreadPoolName(), executorTypeClass, propertyValues, args);
- });
- }
- }
BeanUtil.registerIfAbsent () 源码
- public final class BeanUtil {
- public static void registerIfAbsent(BeanDefinitionRegistry registry,
- String beanName,
- Class clazz,
- Map
- Object... constructorArgs) {
- // 简化代码
- doRegister(registry, beanName, clazz, propertyValues, constructorArgs);
- }
- public static void doRegister(BeanDefinitionRegistry registry,
- String beanName,
- Class clazz,
- Map
- Object... constructorArgs) {
- // 简化代码
- // 使用 Spring 自带功能注册
- registry.registerBeanDefinition(beanName, builder.getBeanDefinition());
- }
- }
2.2 DtpPostProcessorRegistrar
DtpPostProcessorRegistrar 将直接定义的线程池注册到 DtpRegistry 中
什么意思呢,本来动态线程池是在 配置中心定义的。而动态线程池也可以使用代码编程方式定义。
定义方式可查看这里 代码使用 | dynamic-tp (dynamictp.cn)
DtpPostProcessorRegistrar 要处理的是图中如此方式定义的,即对 @Bean 修饰的线程池 使用 @DynamicTp("commonExecutor") 注解,括号内参数为动态线程池名称。

DtpPostProcessorRegistrar 要做的事情是什么呢,就是将普通的 JUC ThreadPoolExecutor 线程封装为 支持运行时修改参数、支持告警监控的 动态线程池。
看看源码如何实现
- public class DtpPostProcessorRegistrar implements ImportBeanDefinitionRegistrar {
- private static final String BEAN_NAME = "dtpPostProcessor";
- @Override
- public void registerBeanDefinitions(AnnotationMetadata importingClassMetadata,
- BeanDefinitionRegistry registry) {
- if (!registry.containsBeanDefinition(BEAN_NAME)) {
- AbstractBeanDefinition beanDefinition = BeanDefinitionBuilder
- .genericBeanDefinition(DtpPostProcessor.class,
- DtpPostProcessor::new)
- .getBeanDefinition();
- // 完全后台角色
- beanDefinition.setRole(BeanDefinition.ROLE_INFRASTRUCTURE);
- beanDefinition.setSynthetic(true);
- registry.registerBeanDefinition(BEAN_NAME, beanDefinition);
- }
- }
- }
其实主要是注册了另一个 bean DtpPostProcessor
BeanPostProcessor 是 Spring Bean 初始化阶段的回调接口
阅读 DtpPostProcessor 源码,其实就是将普通的线程池注册为动态线程池。
- public class DtpPostProcessor implements BeanPostProcessor {
- private DefaultListableBeanFactory beanFactory;
- @Override
- public Object postProcessAfterInitialization(@NonNull Object bean, @NonNull String beanName) throws BeansException {
- if (!(bean instanceof ThreadPoolExecutor) && !(bean instanceof ThreadPoolTaskExecutor)) {
- return bean;
- }
- if (bean instanceof DtpExecutor) {
- // 处理 DtpExecutor
- registerDtp(bean);
- } else {
- // 处理 ThreadPoolExecutor or ThreadPoolTaskExecutor
- registerCommon(bean, beanName);
- }
- return bean;
- }
- private void registerDtp(Object bean) {
- DtpExecutor dtpExecutor = (DtpExecutor) bean;
- if (bean instanceof EagerDtpExecutor) {
- ((TaskQueue) dtpExecutor.getQueue()).setExecutor((EagerDtpExecutor) dtpExecutor);
- }
- // 注册为动态线程池
- DtpRegistry.registerExecutor(ExecutorWrapper.of(dtpExecutor), "beanPostProcessor");
- }
- private void registerCommon(Object bean, String beanName) {
- String dtpAnnotationVal;
- try {
- // 获取到注解
- DynamicTp dynamicTp = beanFactory.findAnnotationOnBean(beanName, DynamicTp.class);
- // 省略
- String poolName = StringUtils.isNotBlank(dtpAnnotationVal) ? dtpAnnotationVal : beanName;
- Executor executor;
- if (bean instanceof ThreadPoolTaskExecutor) {
- executor = ((ThreadPoolTaskExecutor) bean).getThreadPoolExecutor();
- } else {
- executor = (Executor) bean;
- }
- // 注册为动态线程池
- DtpRegistry.registerExecutor(new ExecutorWrapper(poolName, executor), "beanPostProcessor");
- }
- }
2.3 ApplicationContextHolder
就是存储一下 ApplicationContext
- public class ApplicationContextHolder implements ApplicationContextAware {
- private static ApplicationContext context;
- @Override
- public void setApplicationContext(ApplicationContext applicationContext) throws BeansException {
- context = applicationContext;
- }
- public static
T getBean(Class clazz) { - if (Objects.isNull(context)) {
- throw new NullPointerException("ApplicationContext is null, please check if the spring container is started.");
- }
- return context.getBean(clazz);
- }
- public static
T getBean(String name, Class clazz) { - return context.getBean(name, clazz);
- }
- public static
Map clazz) { - return context.getBeansOfType(clazz);
- }
- public static ApplicationContext getInstance() {
- return context;
- }
- public static Environment getEnvironment() {
- return getInstance().getEnvironment();
- }
- public static void publishEvent(ApplicationEvent event) {
- context.publishEvent(event);
- }
- }
2.4 DtpBaseBeanConfiguration
DtpBaseBeanConfiguration 配置了 dynamic-tp 要用的 bean。
- /**
- * 动态线程池基本 bean 配置
- */
- @Configuration(proxyBeanMethods = false)
- @EnableConfigurationProperties(DtpProperties.class)
- @Role(BeanDefinition.ROLE_INFRASTRUCTURE)
- public class DtpBaseBeanConfiguration {
- /**
- * 动态线程池生命周期
- */
- @Bean
- public DtpLifecycle dtpLifecycle() {
- return new DtpLifecycle();
- }
- /**
- * 动态线程池注册器
- */
- @Bean
- public DtpRegistry dtpRegistry(DtpProperties dtpProperties) {
- return new DtpRegistry(dtpProperties);
- }
- /**
- * 动态线程池监控
- */
- @Bean
- public DtpMonitor dtpMonitor(DtpProperties dtpProperties) {
- return new DtpMonitor(dtpProperties);
- }
- /**
- * 动态线程池暴露的端点
- */
- @Bean
- @ConditionalOnAvailableEndpoint
- public DtpEndpoint dtpEndpoint() {
- return new DtpEndpoint();
- }
- /**
- * banner 打印
- */
- @Bean
- public DtpBannerPrinter dtpBannerPrinter() {
- return new DtpBannerPrinter();
- }
- /**
- * hash 时间轮
- * 用于实现 任务超时监控、队列超时监控功能
- */
- @Bean
- public HashedWheelTimer hashedWheelTimer() {
- return new HashedWheelTimer(new NamedThreadFactory("dtpRunnable-timeout", true), 10, TimeUnit.MILLISECONDS);
- }
- }
Dtp 是 dynamic thread pool 的缩写
这里简单介绍一下这些类的作用
-
DtpLifecycle 动态线程池生命周期,负责全部动态线程池的启动、停止
-
DtpRegistry 动态线程池注册器,负责注册线程池
-
DtpMonitor 动态线程池监控,负责监控当前线程池,检查报警、收集监控指标
-
DtpEndpoint 就是 spring-boot-actuator 向外暴露指标的端点配置
-
DtpBannerPrinter 用于打印 dynamic-tp 的 logo
-
HashedWheelTimer hash 时间轮 用于实现 任务超时监控、队列超时监控功能
2. 动态线程池 DtpLifecycle 生命周期源码
DtpLifecycle 负责管理动态线程池的生命周期。如:初始化、销毁。
源码如下
- public class DtpLifecycle implements SmartLifecycle {
- private final AtomicBoolean running = new AtomicBoolean(false);
- @Override
- public void start() {
- if (this.running.compareAndSet(false, true)) {
- // 初始化全部线程池
- DtpRegistry.listAllExecutors().forEach((k, v) -> DtpLifecycleSupport.initialize(v));
- }
- }
- @Override
- public void stop() {
- if (this.running.compareAndSet(true, false)) {
- shutdownInternal();
- // 销毁全部线程池
- DtpRegistry.listAllExecutors().forEach((k, v) -> DtpLifecycleSupport.destroy(v));
- }
- }
- @Override
- public boolean isRunning() {
- return this.running.get();
- }
- public void shutdownInternal() {
- DtpMonitor.destroy();
- AlarmManager.destroy();
- NoticeManager.destroy();
- }
- }
可见,由 Spring 容器回调当前容器的状态(start、stop)。
在回调里获取到全部动态线程池后,循环遍历交由 DtpLifecycleSupport 实现:
初始化实现 initialize
- public class DtpLifecycleSupport {
- public static void initialize(ExecutorWrapper executorWrapper) {
- if (executorWrapper.isDtpExecutor()) {
- DtpExecutor dtpExecutor = (DtpExecutor) executorWrapper.getExecutor();
- dtpExecutor.initialize();
- }
- }
- }
最终委托给了 DtpExecutor#initialize
- public class DtpExecutor extends ThreadPoolExecutor
- implements SpringExecutor, ExecutorAdapter
{ - public void initialize() {
- // 初始化通知
- NotifyHelper.initNotify(this);
- if (preStartAllCoreThreads) {
- // 预启动全部核心线程
- prestartAllCoreThreads();
- }
- // 设置拒绝策略
- setRejectHandler(RejectHandlerGetter.buildRejectedHandler(getRejectHandlerType()));
- }
- }
销毁实现 destroy
- public class DtpLifecycleSupport {
- public static void destroy(ExecutorWrapper executorWrapper) {
- if (executorWrapper.isDtpExecutor()) {
- destroy((DtpExecutor) executorWrapper.getExecutor());
- } else if (executorWrapper.isThreadPoolExecutor()) {
- internalShutdown(((ThreadPoolExecutorAdapter) executorWrapper.getExecutor()).getOriginal(),
- executorWrapper.getThreadPoolName(),
- true,
- 0);
- }
- }
- // 关闭线程池
- public static void internalShutdown(ThreadPoolExecutor executor,
- String threadPoolName,
- boolean waitForTasksToCompleteOnShutdown,
- int awaitTerminationSeconds) {
- if (Objects.isNull(executor)) {
- return;
- }
- log.info("Shutting down ExecutorService, threadPoolName: {}", threadPoolName);
- if (waitForTasksToCompleteOnShutdown) {
- // waitForTasksToCompleteOnShutdown 在 shutdown 线程池的时候等待任务完成
- // executor.shutdown(); 表示不接受新任务了,有序的执行完之前提交的任务后再关闭
- executor.shutdown();
- } else {
- // 线程池关闭的时候不等待任务完成
- // 直接强行关闭任务
- for (Runnable remainingTask : executor.shutdownNow()) {
- // 取消剩余任务
- cancelRemainingTask(remainingTask);
- }
- }
- // 如果必要,等待 awaitTerminationSeconds 秒后关闭线程池
- awaitTerminationIfNecessary(executor, threadPoolName, awaitTerminationSeconds);
- }
- }
3. 动态线程池 DtpRegistry 注册源码
动态线程池注册到底做了个什么事情呢,来看看源码
本质就是将动态线程池存到 map 里,也即是全部收集起来。
- public class DtpRegistry implements ApplicationRunner {
- // 简化代码
- /**
- * 维护所有自动注册和手动注册的 动态线程池
- */
- private static final Map
- = new ConcurrentHashMap<>();
- public static void registerExecutor(ExecutorWrapper wrapper, String source) {
- EXECUTOR_REGISTRY.putIfAbsent(wrapper.getThreadPoolName(), wrapper);
- }
- }
4. 动态线程池 DtpMonitor 监听源码
到此位置,动态线程池环境配好了,也收集起来了,现在就是该监听了动态线程池内容了。
当监听到到超过配置阈值后,就得告警了,现在先做到监听到。
监听功能的入口类是 DtpMonitor
观察该类源码,可见做的核心事情就是 周期性执行一个监控检查任务(每 5 秒执行一次)
- public class DtpMonitor implements ApplicationRunner {
- // 简化代码
- private static final ScheduledExecutorService MONITOR_EXECUTOR = new ScheduledThreadPoolExecutor(
- 1, new NamedThreadFactory("dtp-monitor", true));
- @Override
- public void run(ApplicationArguments args) {
- MONITOR_EXECUTOR.scheduleWithFixedDelay(this::run,
- 0, dtpProperties.getMonitorInterval(), TimeUnit.SECONDS);
- }
- /**
- * 周期性的检查
- * 默认 5 秒检查一次
- */
- private void run() {
- // 获取全部线程池名字
- Set
executorNames = DtpRegistry.listAllExecutorNames(); - // 检查报警
- checkAlarm(executorNames);
- // 指标收集
- collect(executorNames);
- }
- }
run 方法做了两个事情
4.1 检查报警 checkAlarm(executorNames);
- public class DtpMonitor implements ApplicationRunner {
- private void checkAlarm(Set
executorNames) { - executorNames.forEach(x -> {
- // 遍历循环 对每一个线程池检查报警
- ExecutorWrapper wrapper = DtpRegistry.getExecutorWrapper(x);
- // 1. 异步检查报警
- AlarmManager.doAlarmAsync(wrapper, SCHEDULE_NOTIFY_ITEMS);
- });
- // 2. 发布监控检查事件
- publishAlarmCheckEvent();
- }
- }
首先说一下第二步的 发布监控检查事件 就是使用的 Spring 自带的事件通知机制。发布这个事件是为了给 第三方组件线程池监控用的,就是让那个模块直到当前要做这个 报警检查事情。这里使用事件机制,就是为了减耦合的。
- public class DtpMonitor implements ApplicationRunner {
- private void publishAlarmCheckEvent() {
- AlarmCheckEvent event = new AlarmCheckEvent(this, dtpProperties);
- ApplicationContextHolder.publishEvent(event);
- }
- }
回到之前的正文,再说第一步的 异步检查报警源码 AlarmManager.doAlarmAsync
- public class AlarmManager {
- public static void doAlarmAsync(ExecutorWrapper executorWrapper, List
notifyItemEnums) { - ALARM_EXECUTOR.execute(() -> notifyItemEnums.forEach(x -> doAlarm(executorWrapper, x)));
- }
- /**
- * 检查报警
- */
- public static void doAlarm(ExecutorWrapper executorWrapper, NotifyItemEnum notifyItemEnum) {
- NotifyHelper.getNotifyItem(executorWrapper, notifyItemEnum).ifPresent(notifyItem -> {
- // 如果当前线程池存在这个报警项目
- val alarmCtx = new AlarmCtx(executorWrapper, notifyItem);
- ALARM_INVOKER_CHAIN.proceed(alarmCtx);
- });
- }
- }
这里就只看最后这里的 ALARM_INVOKER_CHAIN.proceed(alarmCtx) 核心源码,重点只有这一行。前面的都是优化写法、优化手段。
4.1.1 ALARM_INVOKER_CHAIN
ALARM_INVOKER_CHAIN 是什么呢
其实就是一个 调用链,第一个元素一定是 AlarmBaseFilter 负责做 前置判断逻辑,第二个元素就是做真正的业务操作了。
- public class AlarmManager {
- private static final InvokerChain
ALARM_INVOKER_CHAIN; - static {
- // 默认初始化,构建一个调用链
- ALARM_INVOKER_CHAIN = NotifyFilterBuilder.getAlarmInvokerChain();
- }
- }
- public class NotifyFilterBuilder {
- public static InvokerChain
getAlarmInvokerChain() { - val filters = ApplicationContextHolder.getBeansOfType(NotifyFilter.class);
- Collection
alarmFilters = Lists.newArrayList(filters.values()); - // 添加 base filter
- alarmFilters.add(new AlarmBaseFilter());
- // 做排序
- alarmFilters = alarmFilters.stream()
- .filter(x -> x.supports(NotifyTypeEnum.ALARM))
- .sorted(Comparator.comparing(Filter::getOrder))
- .collect(Collectors.toList());
- // 构建调用链
- return InvokerChainFactory.buildInvokerChain(new AlarmInvoker(), alarmFilters.toArray(new NotifyFilter[0]));
- }
- }
这里的代码最初是由 周期性定时任务调度过来的(每隔5秒)。
看看调用链的第一个元素 AlarmBaseFilter 源码
- public class AlarmBaseFilter implements NotifyFilter {
- private static final Object SEND_LOCK = new Object();
- @Override
- public void doFilter(BaseNotifyCtx context, Invoker
nextInvoker) { - // 简化代码
- val executorWrapper = context.getExecutorWrapper();
- val notifyItem = context.getNotifyItem();
- // 是否报警
- boolean ifAlarm = AlarmLimiter.ifAlarm(executorWrapper.getThreadPoolName(), notifyItem.getType());
- if (!ifAlarm) {
- // 不报警,直接返回,不执行后面了
- return;
- }
- // 检查阈值是否触发
- if (!AlarmManager.checkThreshold(executorWrapper, context.getNotifyItemEnum(), notifyItem)) {
- return;
- }
- synchronized (SEND_LOCK) {
- // 简化代码
- // 存储当前线程池的通知项目
- AlarmLimiter.putVal(executorWrapper.getThreadPoolName(), notifyItem.getType());
- }
- nextInvoker.invoke(context);
- }
- }
其实直接分为 2 大块
- 是否报警
- 阈值是否超过
如果这两个判断都满足了,就走入下一个调用链了。
这两个判断都有必要细说一下
4.1.2 是否报警
是否报警进入了 AlarmLimiter 类
这个类主要是实现,指定间隔时间之后才报警一次功能。
比如,配置中心如下配置,代表 120 秒才告警一次。否则的话每触发一次就直接告警一次,就可能导致短时间发送了大量相同的警告,其实挺无用的。

下来看看这个类源码
- public class AlarmLimiter {
- /**
- * Cache<线程池名称,通知项目>
- */
- private static final Map
- private AlarmLimiter() { }
- /**
- * 初始化
- */
- public static void initAlarmLimiter(String threadPoolName, NotifyItem notifyItem) {
- if (NotifyItemEnum.CHANGE.getValue().equalsIgnoreCase(notifyItem.getType())) {
- // 内容改变报警项,本类不处理
- return;
- }
- // threadPoolName + ":" + type
- String key = genKey(threadPoolName, notifyItem.getType());
- Cache
- .expireAfterWrite(notifyItem.getInterval(), TimeUnit.SECONDS)
- .build();
- ALARM_LIMITER.put(key, cache);
- }
- public static void putVal(String threadPoolName, String type) {
- String key = genKey(threadPoolName, type);
- ALARM_LIMITER.get(key).put(type, type);
- }
- public static String getAlarmLimitInfo(String key, String type) {
- val cache = ALARM_LIMITER.get(key);
- if (Objects.isNull(cache)) {
- return null;
- }
- return cache.getIfPresent(type);
- }
- public static boolean ifAlarm(String threadPoolName, String type) {
- String key = genKey(threadPoolName, type);
- // 返回 null 才报警
- return StringUtils.isBlank(getAlarmLimitInfo(key, type));
- }
- public static String genKey(String threadPoolName, String type) {
- return threadPoolName + ":" + type;
- }
- }
其实本质就是用了 Guava的缓存功能,这个缓存的有效期就配置指定的间隔时间。
每一次触发的时候,就put进去(如果 key 存在了,put 操作只是替换 value 值)
所以过期时间就是从第一次put 不存在的 key 的时候开始计算的。当过期时间到了,缓存中的缓存就自动清除了。就是这样一个机制。
所以这个过滤器的第一个节点 AlarmBaseFilter#doFilter 的 是否报警 判断的是什么呢
ifAlarm 判断的就是缓存中是否存在这个key,不存在才去才往下走真正的告警逻辑。
如果存在了代表这个时间间隔里已经处理过了,就不能往下继续处理了。
- public class AlarmLimiter {
- private static final Map
- // 是否报警
- public static boolean ifAlarm(String threadPoolName, String type) {
- // key 是 threadPoolName + ":" + type;
- String key = genKey(threadPoolName, type);
- // 返回 null 才报警
- return StringUtils.isBlank(getAlarmLimitInfo(key, type));
- }
- public static String getAlarmLimitInfo(String key, String type) {
- val cache = ALARM_LIMITER.get(key);
- if (Objects.isNull(cache)) {
- return null;
- }
- return cache.getIfPresent(type);
- }
- }
4.1.3 阈值是否超过
这里就是真正的判断是否到底是否需要告警了吗,因为当超过阈值了才去告警。
阈值在这里配置。

首先告警分为 不同的告警项目,由 NotifyItemEnum 类列出来全部告警项目。
- public enum NotifyItemEnum {
- /**
- * 变更通知
- */
- CHANGE("change"),
- /**
- * 线程池活跃度通知
- * 活性报警
- * ThreadPool liveness notify.
- * liveness = activeCount / maximumPoolSize
- */
- LIVENESS("liveness"),
- /**
- * 容量报警
- */
- CAPACITY("capacity"),
- /**
- * 任务被拒绝报警
- */
- REJECT("reject"),
- /**
- * 任务超时报警
- */
- RUN_TIMEOUT("run_timeout"),
- /**
- * 任务队列等待超时报警
- */
- QUEUE_TIMEOUT("queue_timeout");
- private final String value;
- NotifyItemEnum(String value) {
- this.value = value;
- }
- }
检查阈值源码如下
- /**
- * 检查阈值
- * @return false 没触发
- */
- public static boolean checkThreshold(ExecutorWrapper executor, NotifyItemEnum itemEnum, NotifyItem notifyItem) {
- switch (itemEnum) {
- case CAPACITY:
- // 检查容量
- return checkCapacity(executor, notifyItem);
- case LIVENESS:
- // 检查活性
- return checkLiveness(executor, notifyItem);
- case REJECT:
- case RUN_TIMEOUT:
- case QUEUE_TIMEOUT:
- return checkWithAlarmInfo(executor, notifyItem);
- default:
- log.error("Unsupported alarm type, type: {}", itemEnum);
- return false;
- }
- }
检查容量 checkCapacity
- public class AlarmManager {
- private static boolean checkCapacity(ExecutorWrapper executorWrapper, NotifyItem notifyItem) {
- // 获取到当前线程池
- val executor = executorWrapper.getExecutor();
- if (executor.getQueueSize() <= 0) {
- return false;
- }
- // 阈值比对判断
- double div = NumberUtil.div(executor.getQueueSize(), executor.getQueueCapacity(), 2) * 100;
- return div >= notifyItem.getThreshold();
- }
- }
检查活性 checkLiveness
- public class AlarmManager {
- private static boolean checkLiveness(ExecutorWrapper executorWrapper, NotifyItem notifyItem) {
- val executor = executorWrapper.getExecutor();
- int maximumPoolSize = executor.getMaximumPoolSize();
- // 阈值判断
- double div = NumberUtil.div(executor.getActiveCount(), maximumPoolSize, 2) * 100;
- return div >= notifyItem.getThreshold();
- }
- }
其他
任务被拒绝报警、任务运行超时报警、任务队列等待超时报警
- public class AlarmManager {
- private static boolean checkWithAlarmInfo(ExecutorWrapper executorWrapper, NotifyItem notifyItem) {
- // 获取当前线程当前报警项目的 报警信息
- AlarmInfo alarmInfo = AlarmCounter.getAlarmInfo(executorWrapper.getThreadPoolName(), notifyItem.getType());
- return alarmInfo.getCount() >= notifyItem.getThreshold();
- }
- }
可见 ,这里由 alarmInfo 的 count 字段判断。
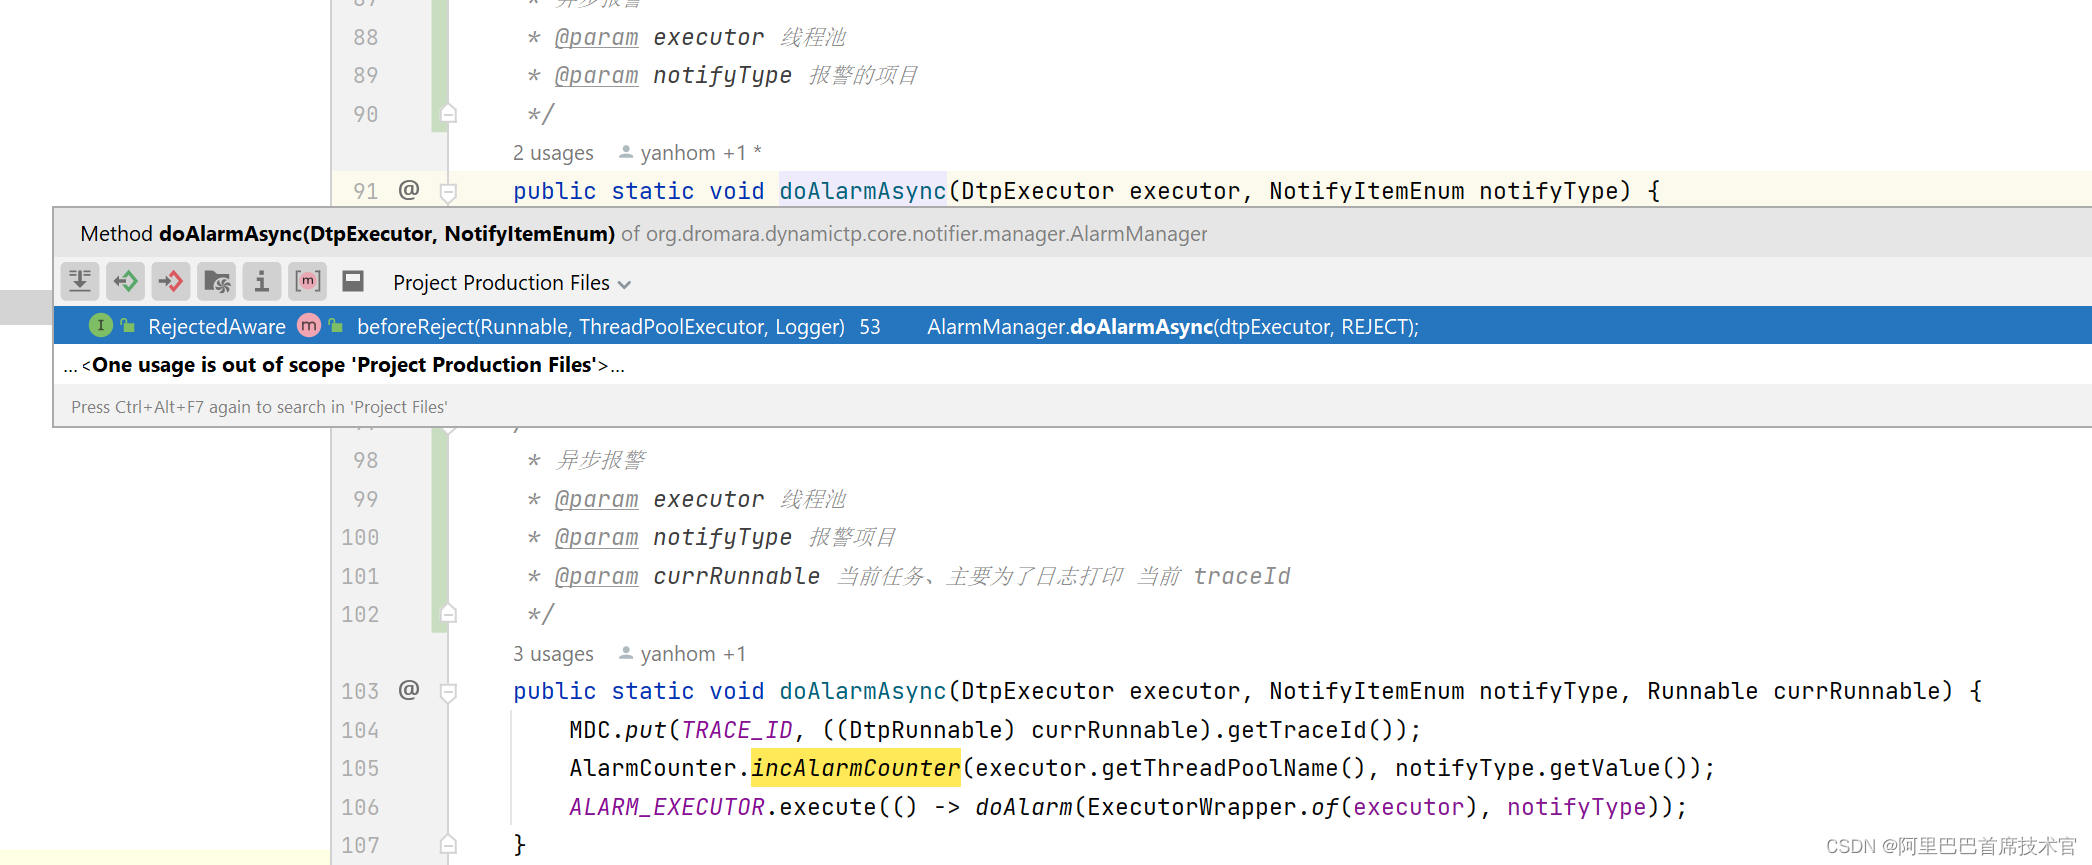
counte 字段是在 AlarmManager 提供的 供外部直接调用的 doAlarmAsync 方法里直接累加的。

追踪这个方法的调用方,正好是那两个事件(任务运行超时、队列排队超时),也就是那两个事件检测到超时后,就来调用这个类了,并完成一次次数的累加用于判断阈值。

任务被拒绝 是上面的方法调用方调用的。
至此就完成了 阈值检查的判断。

4.1.4 发送告警信息
现在两个关键判断都走完了,就可以进入真正的发送告警的下一个链节点了。
也就是 AlarmInvoker
- public class AlarmInvoker implements Invoker
{ - @Override
- public void invoke(BaseNotifyCtx context) {
- val alarmCtx = (AlarmCtx) context;
- val executorWrapper = alarmCtx.getExecutorWrapper();
- // 当前报警项目
- val notifyItem = alarmCtx.getNotifyItem();
- // 获取当前线程当前报警项目的 报警信息
- val alarmInfo = AlarmCounter.getAlarmInfo(executorWrapper.getThreadPoolName(), notifyItem.getType());
- alarmCtx.setAlarmInfo(alarmInfo);
- try {
- // 设置环境
- DtpNotifyCtxHolder.set(context);
- // 发送告警
- NotifierHandler.getInstance().sendAlarm(NotifyItemEnum.of(notifyItem.getType()));
- // 重置报警次数
- AlarmCounter.reset(executorWrapper.getThreadPoolName(), notifyItem.getType());
- } finally {
- DtpNotifyCtxHolder.remove();
- }
- }
- }
真正干活的代码时 try 中间的 发送告警
NotifierHandler.getInstance().sendAlarm(NotifyItemEnum.of(notifyItem.getType()));
- public final class NotifierHandler {
- /**
- * 发送告警
- * @param notifyItemEnum 当前通知的报警项目
- */
- public void sendAlarm(NotifyItemEnum notifyItemEnum) {
- NotifyItem notifyItem = DtpNotifyCtxHolder.get().getNotifyItem();
- for (String platformId : notifyItem.getPlatformIds()) {
- NotifyHelper.getPlatform(platformId).ifPresent(p -> {
- DtpNotifier notifier = NOTIFIERS.get(p.getPlatform().toLowerCase());
- if (notifier != null) {
- notifier.sendAlarmMsg(p, notifyItemEnum);
- }
- });
- }
- }
- }
这段代码做了一个循环遍历判断,这是什么意思呢
配置中心可以配置当前报警项目的通知平台

循环判断是为了,只拿到当前配置的 通知器对象,拿到通知器对象后,使用通知器发送通知、告警。
最终得到的是 DtpNotifier 对象,看看类图。

DtpNotifier 代表一个通知器
AbstractDtpNotifier 实现了通用方法
子类代表不同的通知类型
-
DtpWechatNotifier 企业微信通知
-
DtpEmailNotifier 邮件通知
-
DtpDingNotifier 钉钉通过
-
DtpLarkNotifier 飞书通知
不过真正干活的(发送web请求)还是 Notifier 子类
这里就是纯粹的发送通知类,不包含 dynamic-tp 相关业务代码的类,上面的 DtpNotifier 其实相当于一个适配器了,用来分离耦合代码。

举其中一个例子 LarkNotifier
本质就是发送一个 api 请求

4.2 指标收集 collect(executorNames);
回到这里,该看第二部的 指标收集源码了。
指标收集后可以用于 grafana 查看
- public class DtpMonitor implements ApplicationRunner {
- private void run() {
- // 获取全部线程池名字
- Set
executorNames = DtpRegistry.listAllExecutorNames(); - // 1. 检查报警
- checkAlarm(executorNames);
- // 2. 指标收集
- collect(executorNames);
- }
- private void collect(Set
executorNames) { - if (!dtpProperties.isEnabledCollect()) {
- return;
- }
- executorNames.forEach(x -> {
- ExecutorWrapper wrapper = DtpRegistry.getExecutorWrapper(x);
- doCollect(ExecutorConverter.toMetrics(wrapper));
- });
- publishCollectEvent();
- }
- private void doCollect(ThreadPoolStats threadPoolStats) {
- try {
- CollectorHandler.getInstance().collect(threadPoolStats, dtpProperties.getCollectorTypes());
- } catch (Exception e) {
- log.error("DynamicTp monitor, metrics collect error.", e);
- }
- }
- }
最后的 doCollect 是核心了。
第一个参数是 当前线程池的统计信息,也就是要收集的指标
第二个参数是 配置的指标收集类型

进入 collect 方法源码
- public final class CollectorHandler {
- private static final Map
- private CollectorHandler() {
- // 系统初始化 加入 收集器
- ServiceLoader
loader = ServiceLoader.load(MetricsCollector.class); - for (MetricsCollector collector : loader) {
- COLLECTORS.put(collector.type(), collector);
- }
- MetricsCollector microMeterCollector = new MicroMeterCollector();
- LogCollector logCollector = new LogCollector();
- InternalLogCollector internalLogCollector = new InternalLogCollector();
- COLLECTORS.put(microMeterCollector.type(), microMeterCollector);
- COLLECTORS.put(logCollector.type(), logCollector);
- COLLECTORS.put(internalLogCollector.type(), internalLogCollector);
- }
- public void collect(ThreadPoolStats poolStats, List
types) { - if (poolStats == null || CollectionUtils.isEmpty(types)) {
- return;
- }
- for (String collectorType : types) {
- MetricsCollector collector = COLLECTORS.get(collectorType.toLowerCase());
- if (collector != null) {
- // 获取到当前收集器
- collector.collect(poolStats);
- }
- }
- }
- }
最后,得到收集器,开始进行收集 。
收集器类图如下

4.2.1 MetricsCollector
MetricsCollector 代表一个收集器
4.2.2 InternalLogCollector
内部日志收集器 直接把指标打印到当前项目的日志里
- @Slf4j
- public class InternalLogCollector extends AbstractCollector {
- @Override
- public void collect(ThreadPoolStats poolStats) {
- log.info("dynamic.tp metrics: {}", JsonUtil.toJson(poolStats));
- }
- @Override
- public String type() {
- return CollectorTypeEnum.INTERNAL_LOGGING.name().toLowerCase();
- }
- }
4.2.3 LogCollector
日志收集器 将指标打印到外部日志
- @Slf4j
- public class LogCollector extends AbstractCollector {
- @Override
- public void collect(ThreadPoolStats threadPoolStats) {
- String metrics = JsonUtil.toJson(threadPoolStats);
- if (LogHelper.getMonitorLogger() == null) {
- log.error("Cannot find monitor logger...");
- return;
- }
- LogHelper.getMonitorLogger().info("{}", metrics);
- }
- @Override
- public String type() {
- return CollectorTypeEnum.LOGGING.name().toLowerCase();
- }
- }
4.2.4 MicroMeterCollector
指标收集 调用 Metrics.gauge api 以 HTTP 方式暴露指标,到时候可以使用 grafana 客户端查看
- @Slf4j
- public class MicroMeterCollector extends AbstractCollector {
- /**
- * Prefix used for all dtp metric names.
- */
- public static final String DTP_METRIC_NAME_PREFIX = "thread.pool";
- public static final String POOL_NAME_TAG = DTP_METRIC_NAME_PREFIX + ".name";
- public static final String APP_NAME_TAG = "app.name";
- private static final Map
- @Override
- public void collect(ThreadPoolStats threadPoolStats) {
- // metrics must be held with a strong reference, even though it is never referenced within this class
- ThreadPoolStats oldStats = GAUGE_CACHE.get(threadPoolStats.getPoolName());
- if (Objects.isNull(oldStats)) {
- GAUGE_CACHE.put(threadPoolStats.getPoolName(), threadPoolStats);
- } else {
- BeanUtil.copyProperties(threadPoolStats, oldStats);
- }
- gauge(GAUGE_CACHE.get(threadPoolStats.getPoolName()));
- }
- @Override
- public String type() {
- return CollectorTypeEnum.MICROMETER.name().toLowerCase();
- }
- public void gauge(ThreadPoolStats poolStats) {
- Iterable
tags = Lists.newArrayList( - Tag.of(POOL_NAME_TAG, poolStats.getPoolName()),
- Tag.of(APP_NAME_TAG, CommonUtil.getInstance().getServiceName()));
- Metrics.gauge(metricName("core.size"), tags, poolStats, ThreadPoolStats::getCorePoolSize);
- Metrics.gauge(metricName("maximum.size"), tags, poolStats, ThreadPoolStats::getMaximumPoolSize);
- Metrics.gauge(metricName("current.size"), tags, poolStats, ThreadPoolStats::getPoolSize);
- Metrics.gauge(metricName("largest.size"), tags, poolStats, ThreadPoolStats::getLargestPoolSize);
- Metrics.gauge(metricName("active.count"), tags, poolStats, ThreadPoolStats::getActiveCount);
- Metrics.gauge(metricName("task.count"), tags, poolStats, ThreadPoolStats::getTaskCount);
- Metrics.gauge(metricName("completed.task.count"), tags, poolStats, ThreadPoolStats::getCompletedTaskCount);
- Metrics.gauge(metricName("wait.task.count"), tags, poolStats, ThreadPoolStats::getWaitTaskCount);
- Metrics.gauge(metricName("queue.size"), tags, poolStats, ThreadPoolStats::getQueueSize);
- Metrics.gauge(metricName("queue.capacity"), tags, poolStats, ThreadPoolStats::getQueueCapacity);
- Metrics.gauge(metricName("queue.remaining.capacity"), tags, poolStats, ThreadPoolStats::getQueueRemainingCapacity);
- Metrics.gauge(metricName("reject.count"), tags, poolStats, ThreadPoolStats::getRejectCount);
- Metrics.gauge(metricName("run.timeout.count"), tags, poolStats, ThreadPoolStats::getRunTimeoutCount);
- Metrics.gauge(metricName("queue.timeout.count"), tags, poolStats, ThreadPoolStats::getQueueTimeoutCount);
- }
- private static String metricName(String name) {
- return String.join(".", DTP_METRIC_NAME_PREFIX, name);
- }
- }
5. 动态线程池 直接修改线程池参数原理
由于线程池配置都存储在了配置中心,所以直接在配置中心修改就行。

修改后,nacos 就可以监听到修改的内容然后就可以告知 dynamic-tp 了
dynamic-tp 就要做一个 refresh 操作,也即是刷新最新的配置内容。
刷新操作定义在 Refresher 类中,类图如下

查看关键类 AbstractRefresher 源码
doRefresh 方法由子类调用,不同的子类,不同的配置中心当监听到变化后,就来调用父类的 doRefresh 方法,父类完成刷新操作。
- public abstract class AbstractRefresher implements Refresher {
- protected void doRefresh(DtpProperties dtpProperties) {
- // 刷新注册器
- DtpRegistry.refresh(dtpProperties);
- // 发布刷新事件
- publishEvent(dtpProperties);
- }
- private void publishEvent(DtpProperties dtpProperties) {
- RefreshEvent event = new RefreshEvent(this, dtpProperties);
- ApplicationContextHolder.publishEvent(event);
- }
- }
观察源码,做了两件事情
- DtpRegistry.refresh 这个就是做的真正的刷新操作
- 发布刷新事件,这个事件是给 三方线程池监控用的,为了松耦合的。
看看刷新操作做了什么吧
- public class DtpRegistry implements ApplicationRunner {
- public static void refresh(DtpProperties dtpProperties) {
- // 简化代码
- dtpProperties.getExecutors().forEach(x -> {
- // 遍历所有配置的线程池
- // 根据名称获取到当前线程池
- ExecutorWrapper executorWrapper = EXECUTOR_REGISTRY.get(x.getThreadPoolName());
- if (Objects.nonNull(executorWrapper)) {
- // 刷新
- refresh(executorWrapper, x);
- return;
- }
- });
- }
- // 刷新
- private static void refresh(ExecutorWrapper executorWrapper, DtpExecutorProps props) {
- // 简化代码
- // 获取到旧的 主要参数
- TpMainFields oldFields = ExecutorConverter.toMainFields(executorWrapper);
- // 刷新
- doRefresh(executorWrapper, props);
- // 获取到新的 主要参数
- TpMainFields newFields = ExecutorConverter.toMainFields(executorWrapper);
- if (oldFields.equals(newFields)) {
- // 参数配置没有改变过,不做后续处理了,直接返回
- return;
- }
- // 参数改变了
- // 获取到改变的参数
- List
diffFields = EQUATOR.getDiffFields(oldFields, newFields); - List
diffKeys = StreamUtil.fetchProperty(diffFields, FieldInfo::getFieldName); - // 用户修改了配置中心的参数是要 发送参数改变通知 告知用户的
- NoticeManager.doNoticeAsync(executorWrapper, oldFields, diffKeys);
- }
- }
首先先说后面,就是发现参数变了,就发送通知告诉用户。
然后看中间的关键代码 doRefresh()
- public class DtpRegistry implements ApplicationRunner {
- private static void doRefresh(ExecutorWrapper executorWrapper, DtpExecutorProps props) {
- // 获取到当前的线程池
- ExecutorAdapter executor = executorWrapper.getExecutor();
- // 更新线程池大小参数
- doRefreshPoolSize(executor, props);
- // 更新 KeepAliveTime
- if (!Objects.equals(executor.getKeepAliveTime(props.getUnit()), props.getKeepAliveTime())) {
- executor.setKeepAliveTime(props.getKeepAliveTime(), props.getUnit());
- }
- // 更新 allowCoreThreadTimeOut
- if (!Objects.equals(executor.allowsCoreThreadTimeOut(), props.isAllowCoreThreadTimeOut())) {
- executor.allowCoreThreadTimeOut(props.isAllowCoreThreadTimeOut());
- }
- // 更新队列
- // update queue
- updateQueueProps(executor, props);
- if (executor instanceof DtpExecutor) {
- // 刷新动态线程池
- doRefreshDtp(executorWrapper, props);
- return;
- }
- // 刷新普通线程池
- doRefreshCommon(executorWrapper, props);
- }
- private static void doRefreshPoolSize(ExecutorAdapter executor, DtpExecutorProps props) {
- if (props.getMaximumPoolSize() < executor.getMaximumPoolSize()) {
- if (!Objects.equals(executor.getCorePoolSize(), props.getCorePoolSize())) {
- executor.setCorePoolSize(props.getCorePoolSize());
- }
- if (!Objects.equals(executor.getMaximumPoolSize(), props.getMaximumPoolSize())) {
- executor.setMaximumPoolSize(props.getMaximumPoolSize());
- }
- return;
- }
- if (!Objects.equals(executor.getMaximumPoolSize(), props.getMaximumPoolSize())) {
- executor.setMaximumPoolSize(props.getMaximumPoolSize());
- }
- if (!Objects.equals(executor.getCorePoolSize(), props.getCorePoolSize())) {
- executor.setCorePoolSize(props.getCorePoolSize());
- }
- }
- }
所谓刷新,本质就是对改变的参数重新 set 为新值而已。
6. 三方组件线程池管理源码
三方组件线程池代码是在 adapter 模块下,名称为 adapter-三方组件名。

这到底是怎么管理的呢,比如说,为什么可以管理到 rockqtMq 的线程池?
下面来一探究竟,就具一个模块的例子,其他都大差不差。
6.1 DtpAdapterListener
得先介绍公共模块的这个类,监听器,就是用来监听上面发的 Spring 事件的。
- public class DtpAdapterListener implements GenericApplicationListener {
- // 简化代码
- @Override
- public void onApplicationEvent(@NonNull ApplicationEvent event) {
- if (event instanceof RefreshEvent) {
- doRefresh(((RefreshEvent) event).getDtpProperties());
- } else if (event instanceof CollectEvent) {
- doCollect(((CollectEvent) event).getDtpProperties());
- } else if (event instanceof AlarmCheckEvent) {
- doAlarmCheck(((AlarmCheckEvent) event).getDtpProperties());
- }
- }
- }
这里只以刷新事件为例
- public class DtpAdapterListener implements GenericApplicationListener {
- protected void doRefresh(DtpProperties dtpProperties) {
- val handlerMap = ApplicationContextHolder.getBeansOfType(DtpAdapter.class);
- if (CollectionUtils.isEmpty(handlerMap)) {
- return;
- }
- handlerMap.forEach((k, v) -> v.refresh(dtpProperties));
- }
- }
最终回调到举例的 RocketMQ
RocketMqDtpAdapter#refresh
- public class RocketMqDtpAdapter extends AbstractDtpAdapter {
- private static final String NAME = "rocketMqTp";
- private static final String CONSUME_EXECUTOR_FIELD_NAME = "consumeExecutor";
- @Override
- public void refresh(DtpProperties dtpProperties) {
- // 调用父类的 refresh
- refresh(NAME, dtpProperties.getRocketMqTp(), dtpProperties.getPlatforms());
- }
- }
为什么又调回去了呢,其实是因为要传递当前线程池相关信息啦
也就是,每个三方监控类传递给父类自己的线程池相关信息,父类统一对抽象继续处理。
因为每个子类的配置来源都不一样,这些差异由子类自己实现。
子类线程池是哪里来的呢?
父类 AbstractDtpAdapter 提供了 initialize 初始化回调

RocketMqDtpAdapter#initialize 源码如此实现
- public class RocketMqDtpAdapter extends AbstractDtpAdapter {
- @Override
- protected void initialize() {
- super.initialize();
- // 消费者 consumer 线程池
- adaptConsumerExecutors();
- // 生产者 producer 线程池
- adaptProducerExecutors();
- }
- public void adaptConsumerExecutors() {
- val beans = ApplicationContextHolder.getBeansOfType(DefaultRocketMQListenerContainer.class);
- if (MapUtils.isEmpty(beans)) {
- log.warn("Cannot find beans of type DefaultRocketMQListenerContainer.");
- return;
- }
- beans.forEach((k, v) -> {
- DefaultRocketMQListenerContainer container = (DefaultRocketMQListenerContainer) v;
- DefaultMQPushConsumer consumer = container.getConsumer();
- val pushConsumer = (DefaultMQPushConsumerImpl) ReflectionUtil.getFieldValue(DefaultMQPushConsumer.class,
- "defaultMQPushConsumerImpl", consumer);
- if (Objects.isNull(pushConsumer)) {
- return;
- }
- String cusKey = container.getConsumerGroup() + "#" + container.getTopic();
- ThreadPoolExecutor executor = null;
- val consumeMessageService = pushConsumer.getConsumeMessageService();
- if (consumeMessageService instanceof ConsumeMessageConcurrentlyService) {
- executor = (ThreadPoolExecutor) ReflectionUtil.getFieldValue(ConsumeMessageConcurrentlyService.class,
- CONSUME_EXECUTOR_FIELD_NAME, consumeMessageService);
- } else if (consumeMessageService instanceof ConsumeMessageOrderlyService) {
- executor = (ThreadPoolExecutor) ReflectionUtil.getFieldValue(ConsumeMessageOrderlyService.class,
- CONSUME_EXECUTOR_FIELD_NAME, consumeMessageService);
- }
- if (Objects.nonNull(executor)) {
- val executorWrapper = new ExecutorWrapper(cusKey, executor);
- initNotifyItems(cusKey, executorWrapper);
- executors.put(cusKey, executorWrapper);
- }
- });
- }
- public void adaptProducerExecutors() {
- val beans = ApplicationContextHolder.getBeansOfType(DefaultMQProducer.class);
- if (MapUtils.isEmpty(beans)) {
- log.warn("Cannot find beans of type TransactionMQProducer.");
- return;
- }
- beans.forEach((k, v) -> {
- DefaultMQProducer defaultMQProducer = (DefaultMQProducer) v;
- val producer = (DefaultMQProducerImpl) ReflectionUtil.getFieldValue(DefaultMQProducer.class,
- "defaultMQProducerImpl", defaultMQProducer);
- if (Objects.isNull(producer)) {
- return;
- }
- String proKey = defaultMQProducer.getProducerGroup() + "#" + defaultMQProducer.getCreateTopicKey();
- ThreadPoolExecutor executor = (ThreadPoolExecutor) producer.getAsyncSenderExecutor();
- if (Objects.nonNull(executor)) {
- val executorWrapper = new ExecutorWrapper(proKey, executor);
- initNotifyItems(proKey, executorWrapper);
- executors.put(proKey, executorWrapper);
- }
- });
- }
- }
观察源码,实际上使用的是反射取到的线程池。


利用反射取到线程池后再包装为动态线程池后,放入父类的 executors map 中。
最后子类调用父类的 refresh ,父类也能从 executors map 拿到当前子类的 线程池,就可以走之前的流程了。
-
相关阅读:
基于Matlab+ AlexNet神经网络的动物识别系统
剑指 Offer 13. 机器人的运动范围
在HBuilderX的git上导入github项目/把项目传到github
阿里二面:列出 Api 接口优化的几个技巧
学习阶段单片机买esp32还是stm32?
git stash 问题记录
css常见布局
Vue、js底层深入理解笔记(二)
Java将获取的参数,图片以及pdf文件放入到word文档指定位置
测量信号的功率
- 原文地址:https://blog.csdn.net/weixin_42195284/article/details/130873180