-
ElasticSearch实战
一、es集群的搭建
1.集群相关概念
单节点故障问题
单台服务器,往往都有最大的负载能力,超过这个阈值,服务器性能就会大大降低甚至不可用。单点的elasticsearch也是一样那单点的es服务器存在哪些可能出现的问题呢?
单台机器存储容量有限
单服务器容易出现单点故障,无法实现高可用
单服务的并发处理能力有限
所以,为了应对这些问题,我们需要对elasticsearch搭建集群集群中节点数量没有限制,大于等于2个节点就可以看做是集群了。一般出于高性能及高可用方面来考虑集群中节点数量都是3个以上。
集群 cluster
一个集群就是由一个或多个节点组织在一起,它们共同持有整个的数据,并一起提供索引和搜索功能。一个集群由一个唯一的名字标识,这个名字默认就是“elasticsearch”。这个名字是重要的,因为一个节点只能通过指定某个集群的名字,来加入这个集群。
节点node
一个节点是集群中的一个服务器,作为集群的一部分,它存储数据,参与集群的索引和搜索功能。
一个节点也是由一个名字来标识的,默认情况下,这个名字是一个随机的漫威漫画角色的名字,这个名字会在启动的时候赋予节点。这个名字对于管理工作来说挺重要的,因为在这个管理过程中,你会去确定网络中的哪些服务器对应于ElasticSearch集群中的哪些节点。
一个节点可以通过配置集群名称的方式来加入一个指定的集群。默认情况下,每个节点都会被安排加入到一个叫做“elasticsearch”的集群中,这意味着,如果你在你的网络中启动了若干个节点,并假定它们能够相互发现彼此,它们将会自动地形成并加入到一个叫做“elasticsearch”的集群中。
在一个集群里,只要你想,可以拥有任意多个节点。而且,如果当前你的网络中没有运行任何Elasticsearch节点,这时启动一个节点,会默认创建并加入一个叫做“elasticsearch”的集群。
分片和复制 shards&replicas
一个索引可以存储超出单个节点硬件限制的大量数据。比如,一个具有10亿文档的索引占据1TB的磁盘空间,而任一节点都没有这样大的磁盘空间;或者单个节点处理搜索请求,响应太慢。为了解决这个问题,ElasticSearch提供了将索引划分成多份的能力,这些份就叫做分片。当你创建一个索引的时候,你可以指定你想要的分片的数量。每个分片本身也是一个功能完善并且独立的“索引”,这个“索引”可以被放置到集群中的任何节点上。
分片很重要,主要有两方面的原因:
1)允许你水平分割/扩展你的内容容量。
2)允许你在分片(潜在地,位于多个节点上)之上进行分布式的、并行的操作,进而提高性能/吞吐量。
至于一个分片怎样分布,它的文档怎样聚合回搜索请求,是完全由ElasticSearch管理的,对于作为用户的你来说,这些都是透明的。
在一个网络/云的环境里,失败随时都可能发生,在某个分片/节点不知怎么的就处于离线状态,或者由于任何原因消失了,这种情况下,有一个故障转移机制是非常有用并且是强烈推荐的。为此目的,ElasticSearch允许你创建分片的一份或多份拷贝,这些拷贝叫做复制分片( 副本)。
复制之所以重要,有两个主要原因: 在分片/节点失败的情况下,提供了高可用性。因为这个原因,注意到复制分片从不与原/主要(original/primary)分片置于同一节点上是非常重要的。扩展你的搜索量/吞吐量,因为搜索可以在所有的复制上并行运行。总之,每个索引可以被分成多个分片。一个索引也可以被复制0次(意思是没有复制)或多次。一旦复制了,每个索引就有了主分片(作为复制源的原来的分片)和复制分片(主分片的拷贝)之别。分片和复制的数量可以在索引创建的时候指定。在索引创建之后,你可以在任何时候动态地改变复制的数量,但是你事后不能改变分片的数量。
默认情况下,Elasticsearch中的每个索引被分片5个主分片和1个复制,这意味着,如果你的集群中至少有两个节点,你的索引将会有5个主分片和另外5个复制分片(1个完全拷贝),这样的话每个索引总共就有10个分片。
2.服务搭建
在usr/local/software目录下创建es-cluster文件夹

拷贝单机版的es到es-cluster目录下
cp -r elasticsearch-7.12.1 es-cluster
删除单机版es的数据

修改配置文件

cluster.name: my-es cluster.routing.allocation.disk.threshold_enabled: false node.name: node-1 network.host: 0.0.0.0 http.port: 9201 transport.tcp.port: 9301 discovery.zen.ping.unicast.hosts: ["10.211.55.95:9301","10.211.55.95:9302"] cluster.initial_master_nodes: ["node-1"]- 1
- 2
- 3
- 4
- 5
- 6
- 7
- 8
拷贝出两台节点

注意修改另外一台节点的配置信息
cluster.name: my-es cluster.routing.allocation.disk.threshold_enabled: false node.name: node-2 network.host: 0.0.0.0 http.port: 9202 transport.tcp.port: 9302 discovery.zen.ping.unicast.hosts: ["10.211.55.95:9301","10.211.55.95:9302"] cluster.initial_master_nodes: ["node-1"]- 1
- 2
- 3
- 4
- 5
- 6
- 7
- 8
配置文件的解释
#节点1的配置信息: #集群名称,保证唯一 cluster.name: my-elasticsearch #默认为true。设置为false禁用磁盘分配决定器。 cluster.routing.allocation.disk.threshold_enabled: false #节点名称,必须不一样 node.name: node-1 #本机的ip地址 network.host: 127.0.0.1 #服务端口号,在同一机器下必须不一样 http.port: 9201 #集群间通信端口号,在同一机器下必须不一样 transport.tcp.port: 9301 #设置集群自动发现机器ip集合 discovery.zen.ping.unicast.hosts: ["127.0.0.1:9301","127.0.0.1:9302"]- 1
- 2
- 3
- 4
- 5
- 6
- 7
- 8
- 9
- 10
- 11
- 12
- 13
- 14
- 15
分别启动节点1和节点2
更改es-cluster文件归属aqrlmy用户
chown -R aqrlmy es-cluster
bin/elasticsearch -d

3.安装ES插件ElasticSearch-head
拖拽插件
在Chrome浏览器地址栏中输入:chrome://extensions/,或按照下图打开“扩展程序”
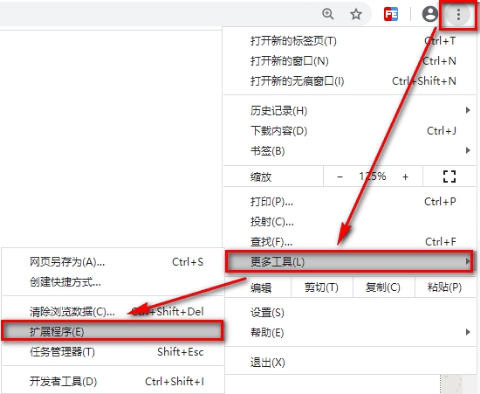
将资料中【ElasticSearch-head-Chrome-0.1.5-Crx4Chrome.crx】文件拖到扩展程序
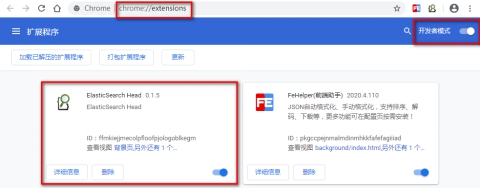
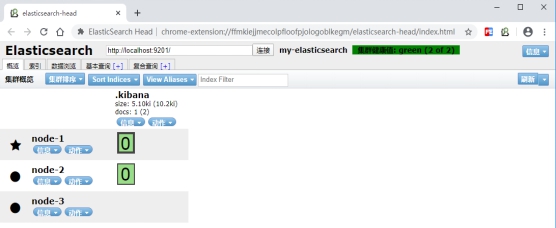
使用elasticsearch-head查看集群情况
没有创建任何索引前的情况,只有一个默认的索引.kibana
集群测试
创建索引及映射 # 请求方法:PUT PUT /shopping { "settings": {}, "mappings": { "product":{ "properties": { "title":{ "type": "text", "analyzer": "ik_max_word" }, "subtitle":{ "type": "text", "analyzer": "ik_max_word" }, "images":{ "type": "keyword", "index": false }, "price":{ "type": "float", "index": true } } } } } 添加文档 POST /shopping/product { "title":"小米手机", "images":"http://www.gulixueyuan.com/xm.jpg", "price":3999.00 }- 1
- 2
- 3
- 4
- 5
- 6
- 7
- 8
- 9
- 10
- 11
- 12
- 13
- 14
- 15
- 16
- 17
- 18
- 19
- 20
- 21
- 22
- 23
- 24
- 25
- 26
- 27
- 28
- 29
- 30
- 31
- 32
- 33
- 34
- 35
- 36
再次使用elasticsearch-head查看集群情况
命令查看:GET _cluster/health(待截图)
Elasticsearch-head查看:
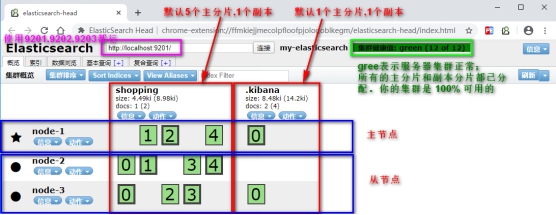
服务器运行状态
Green
所有的主分片和副本分片都已分配。你的集群是 100% 可用的。
yellow
所有的主分片已经分片了,但至少还有一个副本是缺失的。不会有数据丢失,所以搜索结果依然是完整的。不过,你的高可用性在某种程度上被弱化。如果 更多的 分片消失,你就会丢数据了。把 yellow 想象成一个需要及时调查的警告。
red
至少一个主分片(以及它的全部副本)都在缺失中。这意味着你在缺少数据:搜索只能返回部分数据,而分配到这个分片上的写入请求会返回一个异常。
二、项目的搭建
新建一个maven项目


修改pom文件
<parent> <groupId>org.springframework.bootgroupId> <artifactId>spring-boot-starter-parentartifactId> <version>2.2.6.RELEASEversion> <relativePath/> parent> <dependencies> <dependency> <groupId>org.springframework.bootgroupId> <artifactId>spring-boot-starter-data-elasticsearchartifactId> dependency> <dependency> <groupId>org.elasticsearch.clientgroupId> <artifactId>elasticsearch-rest-high-level-clientartifactId> <version>6.8.1version> dependency> <dependency> <groupId>org.springframework.bootgroupId> <artifactId>spring-boot-starter-testartifactId> <scope>testscope> dependency> <dependency> <groupId>org.springframework.bootgroupId> <artifactId>spring-boot-configuration-processorartifactId> <optional>trueoptional> dependency> <dependency> <groupId>org.springframework.bootgroupId> <artifactId>spring-boot-starterartifactId> dependency> <dependency> <groupId>org.elasticsearchgroupId> <artifactId>elasticsearchartifactId> <version>6.8.1version> dependency> <dependency> <groupId>org.elasticsearch.clientgroupId> <artifactId>transportartifactId> <version>6.8.7version> <scope>testscope> dependency> <dependency> <groupId>com.fasterxml.jackson.coregroupId> <artifactId>jackson-databindartifactId> <version>2.10.3version> dependency> <dependency> <groupId>org.projectlombokgroupId> <artifactId>lombokartifactId> <optional>trueoptional> dependency> dependencies>- 1
- 2
- 3
- 4
- 5
- 6
- 7
- 8
- 9
- 10
- 11
- 12
- 13
- 14
- 15
- 16
- 17
- 18
- 19
- 20
- 21
- 22
- 23
- 24
- 25
- 26
- 27
- 28
- 29
- 30
- 31
- 32
- 33
- 34
- 35
- 36
- 37
- 38
- 39
- 40
- 41
- 42
- 43
- 44
- 45
- 46
- 47
- 48
- 49
- 50
- 51
- 52
- 53
- 54
- 55
- 56
- 57
- 58
- 59
三、API接口编写
1.原生接口编写
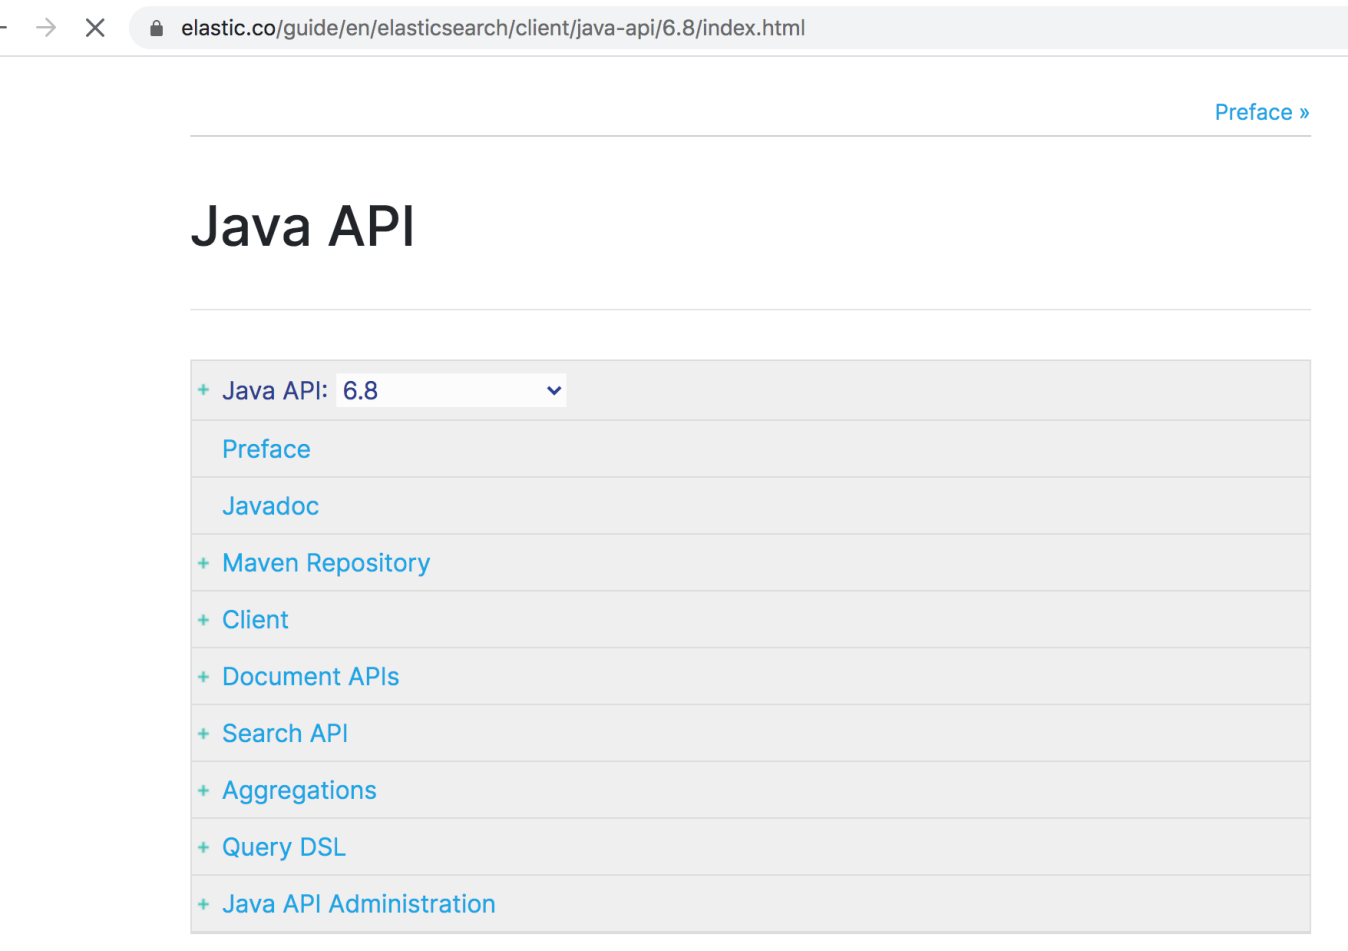
官网
https://www.elastic.co/guide/en/elasticsearch/client/java-api/6.8/index.html
构建初始化方法
PreBuiltTransportClient client = null; //执行测试之前做的事情 @Before public void getClient() { try { //1) 创建一个Settings对象,相当于配置信息,主要配置集群名称。 Settings settings = Settings.builder() .put("cluster.name", "my-es") .build(); //2) 创建一个客户端client对象 client = new PreBuiltTransportClient(settings); client.addTransportAddress(new TransportAddress(InetAddress.getByName("182.92.234.71"), 9300)); } catch (Exception e) { } } @After public void closeClient() { client.close(); }- 1
- 2
- 3
- 4
- 5
- 6
- 7
- 8
- 9
- 10
- 11
- 12
- 13
- 14
- 15
- 16
- 17
- 18
- 19
创建索引
@Test public void testCreateIndex01(){ // 创建指定索引 client.admin().indices().prepareCreate("shop").get(); }- 1
- 2
- 3
- 4
- 5
删除索引
@Test public void testDeleteIndex02(){ client.admin().indices().prepareDelete("blog").get(); }- 1
- 2
- 3
- 4
创建映射方式一
@Test public void testCreateMapping03() throws Exception{ XContentBuilder builder = XContentFactory.jsonBuilder(); builder .startObject() //对哪张表进行添加映射 .startObject("properties") .startObject("id") .field("type","long") .field("store", false) .endObject() .startObject("title") .field("type", "text") .field("store", false) .field("analyzer", "ik_smart") .endObject() .startObject("content") .field("type", "text") .field("store", false) .field("analyzer","ik_smart") .endObject() .endObject() .endObject(); PutMappingRequest mapping = Requests.putMappingRequest("blog").type("article").source(builder); client.admin().indices().putMapping(mapping); }- 1
- 2
- 3
- 4
- 5
- 6
- 7
- 8
- 9
- 10
- 11
- 12
- 13
- 14
- 15
- 16
- 17
- 18
- 19
- 20
- 21
- 22
- 23
- 24
- 25
- 26
创建映射方式二
@Test public void testCreateMapping031() { String jsonData="{\"properties\":{\"title\":{\"type\":\"text\",\"analyzer\":\"ik_max_word\"},\"subtitle\":{\"type\":\"text\",\"analyzer\":\"ik_max_word\"},\"price\":{\"type\":\"float\"}," + "\"images\":{\"type\":\"keyword\",\"index\":false}}}"; PutMappingRequest mapping = Requests.putMappingRequest("shop").type("article").source(jsonData,XContentType.JSON); client.admin().indices().putMapping(mapping); }- 1
- 2
- 3
- 4
- 5
- 6
- 7
创建索引数据
@Test public void testPutIndexData04() { //通过XContentBuilder构建数据 // XContentBuilder builder = XContentFactory.jsonBuilder(); // builder.startObject(); // builder.field("id",1); // builder.field("title","es是一个基于Lucene的搜索服务器!"); // builder.field("content","它提供了一个分布式多用户能力的全文搜索引擎,基于RESTful web接口。"); // builder.endObject(); Map<String, String> map = new HashMap<String, String>(); map.put("id","1"); map.put("title","今日头条来啦"); map.put("content","抖音是一个好app"); //使用TransportClient对象增加数据 client.prepareIndex("blog","article","1").setSource(map).get(); //关闭资源 }- 1
- 2
- 3
- 4
- 5
- 6
- 7
- 8
- 9
- 10
- 11
- 12
- 13
- 14
- 15
- 16
- 17
以对象添加到索引
@Test public void testPutBeanIndex05() throws Exception{ //创建一个Article对象 Article article = new Article(); article.setId(2); article.setTitle("MH370坠毁在柬埔寨密林?中国一公司调十颗卫星去拍摄"); article.setContent("警惕荒唐的死亡游戏!俄15岁少年输掉游戏后用电锯自杀"); // json转换对象 ObjectMapper objectMapper = new ObjectMapper(); //把article对象转换成json格式的字符串。 String json = objectMapper.writeValueAsString(article); System.out.println(json); //使用client对象把文档写入索引库 client.prepareIndex("blog","article",article.getId().toString()) //把article对象转换成json格式的字符串。 .setSource(json.getBytes(), XContentType.JSON) .get(); }- 1
- 2
- 3
- 4
- 5
- 6
- 7
- 8
- 9
- 10
- 11
- 12
- 13
- 14
- 15
- 16
- 17
- 18
修改索引方式一
@Test public void testUpdateIndexData06() throws Exception{ //创建一个Article对象 Article article = new Article(); article.setId(2); article.setTitle("女美女路遇昏迷男子跪地抢救:救人是职责更是本能"); article.setContent("江西变质营养餐事件已致24多名官员被调查"); //json转换对象 ObjectMapper objectMapper = new ObjectMapper(); client.prepareUpdate("blog","article",article.getId().toString()) .setDoc(objectMapper.writeValueAsString(article),XContentType.JSON) .get(); }- 1
- 2
- 3
- 4
- 5
- 6
- 7
- 8
- 9
- 10
- 11
- 12
- 13
修改索引方式二
@Test public void testUpdateIndexData07() throws Exception{ //创建一个Article对象 Article article = new Article(); article.setId(2); article.setTitle("团结是最好的良药"); article.setContent("巴总理商务顾问 中巴经济走廊进展顺利"); // json转换对象 ObjectMapper objectMapper = new ObjectMapper(); String s = objectMapper.writeValueAsString(article); // 创建索引数据 client.update(new UpdateRequest("blog","article",article.getId().toString()) .doc(s,XContentType.JSON)) .get(); }- 1
- 2
- 3
- 4
- 5
- 6
- 7
- 8
- 9
- 10
- 11
- 12
- 13
- 14
- 15
- 16
- 17
删除数据
@Test public void testDeleteIndexData08() { client.prepareDelete("blog","article","2").get(); }- 1
- 2
- 3
- 4
批量添加数据
@Test public void testInsertBatchData09() throws Exception{ // 批量增加数据构建对象 BulkRequestBuilder prepareBulk = client.prepareBulk(); // json转换对象 ObjectMapper objectMapper = new ObjectMapper(); for (int i = 0; i < 100; i++) { Article article = new Article(); article.setId(i+1); article.setTitle("在这个日子中"+(i+1)); article.setContent("巴总理商务顾问:中巴经济走廊进展顺利"+(i+1)); // 增加数据 IndexRequestBuilder requestBuilder = client .prepareIndex("blog", "article", article.getId().toString()) .setSource(objectMapper.writeValueAsString(article), XContentType.JSON); // 将indexRequestBuilder添加到批量执行对象中 prepareBulk.add(requestBuilder); } // 执行操作 prepareBulk.get(); }- 1
- 2
- 3
- 4
- 5
- 6
- 7
- 8
- 9
- 10
- 11
- 12
- 13
- 14
- 15
- 16
- 17
- 18
- 19
- 20
- 21
2.原生查询接口
根据id查询
@Test public void testQueryById01() throws Exception { //查询数据 GetResponse response = client.prepareGet("movie_index", "movie", "1").get(); //获取结果集数据 String result = response.getSourceAsString(); System.out.println(result); }- 1
- 2
- 3
- 4
- 5
- 6
- 7
- 8
各种查询类型
@Test public void testAllKindsOfQuery02() throws Exception { //1.查询name 分词后包含operation 的term的文档 //QueryBuilder queryBuilder = QueryBuilders.termQuery("name", "river"); //2.模糊匹配operation meigong river //QueryBuilder queryBuilder = QueryBuilders.wildcardQuery("name", "*eigon*"); //3.找一个分词后 能和搜索内容相似的记录 //QueryBuilder queryBuilder =QueryBuilders.fuzzyQuery("name","rad"); //4.豆瓣评分在4到8分之间的结果 //QueryBuilder queryBuilder =QueryBuilders.rangeQuery("doubanScore").from(4).to(8); //5.字符串查询 QueryBuilder queryBuilder = QueryBuilders.queryStringQuery("peration meigong").field("name"); printSearchResult(queryBuilder); }- 1
- 2
- 3
- 4
- 5
- 6
- 7
- 8
- 9
- 10
- 11
- 12
- 13
- 14
分页查询
@Test public void testQueryPage03() throws Exception { SearchResponse response = client .prepareSearch("movie_index") .setTypes("movie") // 设置查询条件 .setQuery(QueryBuilders.matchAllQuery()) // 0:表示第一条记录,0不是页码,是记录,N*SIZE .setFrom(0) // size:表示每页显示的条数 .setSize(2) .get(); }- 1
- 2
- 3
- 4
- 5
- 6
- 7
- 8
- 9
- 10
- 11
- 12
- 13
高亮查询
@Test public void testQueryHighlight04() throws Exception { SearchRequestBuilder searchRequestBuilder = client .prepareSearch("movie_index") .setTypes("movie") // 设置查询条件 搜索 .setQuery(QueryBuilders.termQuery("name", "river")) .setFrom(0) // 0:表示第一条记录,0不是页码,是记录,N*SIZE .setSize(2); // 开启高亮 HighlightBuilder highlightBuilder = new HighlightBuilder();//高亮配置 highlightBuilder.preTags(""); //前缀 highlightBuilder.postTags(""); // 指定高亮域 :用户搜索的关键词在指定域中出现,则添加高亮样式关键词 highlightBuilder.field("name"); // 设置高亮对象 searchRequestBuilder.highlighter(highlightBuilder); SearchResponse response = searchRequestBuilder.get(); //处理结果 SearchHits hits = response.getHits(); //总记录数 long totalHits = hits.getTotalHits(); //获取数据结果集 Iterator<SearchHit> iterator = hits.iterator(); while (iterator.hasNext()) { //获取数据 SearchHit hit = iterator.next(); //获取所有数据,并转成JSON字符串 String result = hit.getSourceAsString(); // 获取高亮结果 Text[] titles = hit.getHighlightFields().get("name").getFragments(); String hitTitle = ""; if (titles != null && titles.length > 0) { hitTitle = titles[0].toString(); System.out.println(hitTitle); } } }- 1
- 2
- 3
- 4
- 5
- 6
- 7
- 8
- 9
- 10
- 11
- 12
- 13
- 14
- 15
- 16
- 17
- 18
- 19
- 20
- 21
- 22
- 23
- 24
- 25
- 26
- 27
- 28
- 29
- 30
- 31
- 32
- 33
- 34
- 35
- 36
- 37
- 38
3.Rest高级客户端
https://www.elastic.co/guide/en/elasticsearch/reference/6.8/query-dsl-range-query.html
修改pom依赖文件
<parent> <groupId>org.springframework.bootgroupId> <artifactId>spring-boot-starter-parentartifactId> <version>2.2.6.RELEASEversion> <relativePath/> parent> <dependencies> <dependency> <groupId>org.elasticsearch.clientgroupId> <artifactId>elasticsearch-rest-high-level-clientartifactId> <version>6.8.1version> dependency> <dependency> <groupId>org.springframework.bootgroupId> <artifactId>spring-boot-starter-testartifactId> <scope>testscope> dependency> <dependency> <groupId>org.springframework.bootgroupId> <artifactId>spring-boot-configuration-processorartifactId> <optional>trueoptional> dependency> <dependency> <groupId>org.springframework.bootgroupId> <artifactId>spring-boot-starterartifactId> dependency> <dependency> <groupId>org.elasticsearchgroupId> <artifactId>elasticsearchartifactId> <version>6.8.1version> dependency> <dependency> <groupId>org.elasticsearch.clientgroupId> <artifactId>transportartifactId> <version>6.8.7version> <scope>testscope> dependency> <dependency> <groupId>com.fasterxml.jackson.coregroupId> <artifactId>jackson-databindartifactId> <version>2.10.3version> dependency> <dependency> <groupId>org.projectlombokgroupId> <artifactId>lombokartifactId> <optional>trueoptional> dependency> dependencies>- 1
- 2
- 3
- 4
- 5
- 6
- 7
- 8
- 9
- 10
- 11
- 12
- 13
- 14
- 15
- 16
- 17
- 18
- 19
- 20
- 21
- 22
- 23
- 24
- 25
- 26
- 27
- 28
- 29
- 30
- 31
- 32
- 33
- 34
- 35
- 36
- 37
- 38
- 39
- 40
- 41
- 42
- 43
- 44
- 45
- 46
- 47
- 48
- 49
- 50
- 51
- 52
- 53
- 54
添加配置文件

添加配置类
@Configuration @ConfigurationProperties(prefix = "elasticsearch") @Component @Data public class EsConfig { private String host ; private Integer port ; @Bean public RestHighLevelClient client(){ RestClientBuilder builder = RestClient.builder(new HttpHost(host, port)); RestHighLevelClient restHighLevelClient = new RestHighLevelClient(builder); return restHighLevelClient; } }- 1
- 2
- 3
- 4
- 5
- 6
- 7
- 8
- 9
- 10
- 11
- 12
- 13
- 14
编写主类
@SpringBootApplication public class EsApplication { public static void main(String[] args) { SpringApplication.run(EsApplication.class); } }- 1
- 2
- 3
- 4
- 5
- 6
同步保存
@RunWith(SpringRunner.class) @SpringBootTest public class IndexTest { //@Autowired @Resource private RestHighLevelClient client; //同步保存 @Test public void testSave() throws Exception { Map<String, Object> data = new HashMap<>(); data.put("id", 2003); data.put("title", "南京东路 二室一厅"); data.put("price", 4000); IndexRequest indexRequest = new IndexRequest("shengzhen", "house").source(data); IndexResponse response = client.index(indexRequest, RequestOptions.DEFAULT); System.out.println("id -> " + response.getId()); System.out.println("version -> " + response.getVersion()); System.out.println("result -> " + response.getResult()); } }- 1
- 2
- 3
- 4
- 5
- 6
- 7
- 8
- 9
- 10
- 11
- 12
- 13
- 14
- 15
- 16
- 17
- 18
- 19
- 20
- 21
- 22
- 23
- 24
异步保存
@Test public void testCreateAsync() throws Exception { Map<String, Object> data = new HashMap<>(); data.put("id", "2005"); data.put("title", "南京东路2 最新房源 二室一厅"); data.put("price", "5600"); IndexRequest indexRequest = new IndexRequest("shengzhen", "house").source(data); client.indexAsync(indexRequest, RequestOptions.DEFAULT, new ActionListener<IndexResponse>() { @Override public void onResponse(IndexResponse indexResponse) { System.out.println(indexResponse); } @Override public void onFailure(Exception e) { System.out.println(e); } }); System.out.println("over"); Thread.sleep(20000); }- 1
- 2
- 3
- 4
- 5
- 6
- 7
- 8
- 9
- 10
- 11
- 12
- 13
- 14
- 15
- 16
- 17
- 18
- 19
- 20
- 21
- 22
- 23
查询
@Test public void testQuery() throws Exception { GetRequest getRequest = new GetRequest("shengzhen", "house", "wx0CuXMB_gs6qSBYMJgp"); // 指定返回的字段 String[] includes = new String[]{"title", "id"}; //排除的字段 String[] excludes = Strings.EMPTY_ARRAY; FetchSourceContext fetchSourceContext = new FetchSourceContext(true, includes, excludes); getRequest.fetchSourceContext(fetchSourceContext); GetResponse response = client.get(getRequest, RequestOptions.DEFAULT); System.out.println("数据 -> " + response.getSource()); }- 1
- 2
- 3
- 4
- 5
- 6
- 7
- 8
- 9
- 10
- 11
- 12
判断是否存在
@Test public void testExists() throws Exception { GetRequest getRequest = new GetRequest("shengzhen", "house", "wx0CuXMB_gs6qSBYMJgp"); // 不返回的字段 getRequest.fetchSourceContext(new FetchSourceContext(false)); boolean exists = client.exists(getRequest, RequestOptions.DEFAULT); System.out.println("exists -> " + exists); }- 1
- 2
- 3
- 4
- 5
- 6
- 7
- 8
更新数据
@Test public void testUpdate() throws Exception { UpdateRequest updateRequest = new UpdateRequest("shengzhen", "house", "wx0CuXMB_gs6qSBYMJgp"); Map<String, Object> data = new HashMap<>(); data.put("title", "南京西路2一室一厅2"); data.put("price", "4000"); updateRequest.doc(data); UpdateResponse response = client.update(updateRequest, RequestOptions.DEFAULT); System.out.println("version -> " + response.getVersion()); }- 1
- 2
- 3
- 4
- 5
- 6
- 7
- 8
- 9
- 10
- 11
- 12
删除数据
@Test public void testDelete() throws Exception { DeleteRequest deleteRequest = new DeleteRequest("shengzhen", "house", "wx0CuXMB_gs6qSBYMJgp"); DeleteResponse response = client.delete(deleteRequest, RequestOptions.DEFAULT); System.out.println(response.status());// OK or NOT_FOUND }- 1
- 2
- 3
- 4
- 5
- 6
查询数据
@Test public void testSearch() throws Exception { SearchRequest searchRequest = new SearchRequest("shengzhen"); searchRequest.types("house"); SearchSourceBuilder sourceBuilder = new SearchSourceBuilder(); // 根据title进行查询 sourceBuilder.query(QueryBuilders.matchAllQuery()); // 分页 sourceBuilder.from(0); sourceBuilder.size(5); // 设置超时时间 sourceBuilder.timeout(new TimeValue(60, TimeUnit.SECONDS)); searchRequest.source(sourceBuilder); SearchResponse search = client.search(searchRequest,RequestOptions.DEFAULT); System.out.println("搜索到 " + search.getHits().totalHits + " 条数据."); SearchHits hits = search.getHits(); for (SearchHit hit : hits) { System.out.println(hit.getSourceAsString()); } }- 1
- 2
- 3
- 4
- 5
- 6
- 7
- 8
- 9
- 10
- 11
- 12
- 13
- 14
- 15
- 16
- 17
- 18
- 19
- 20
- 21
- 22
- 23
四、Spring data
1.SpringData基础知识
概念
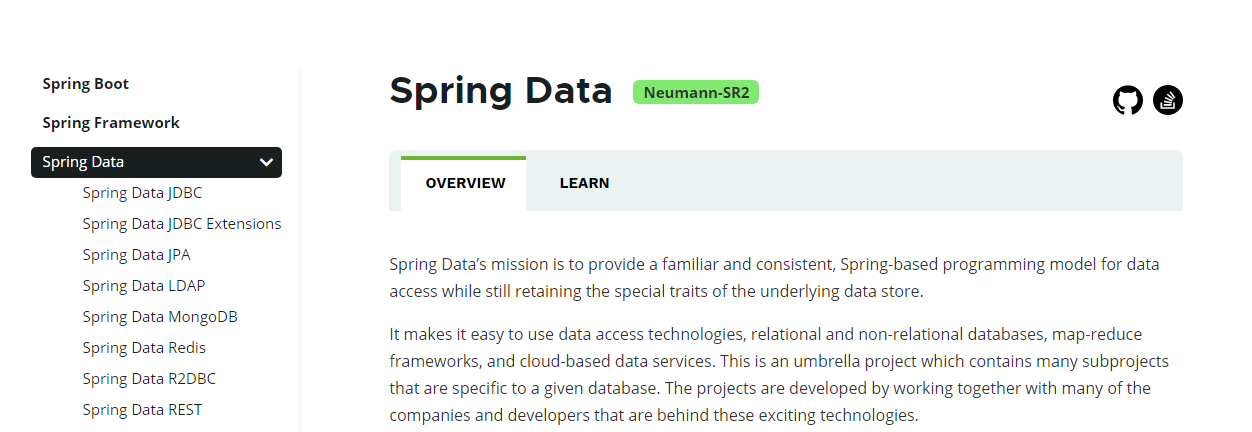
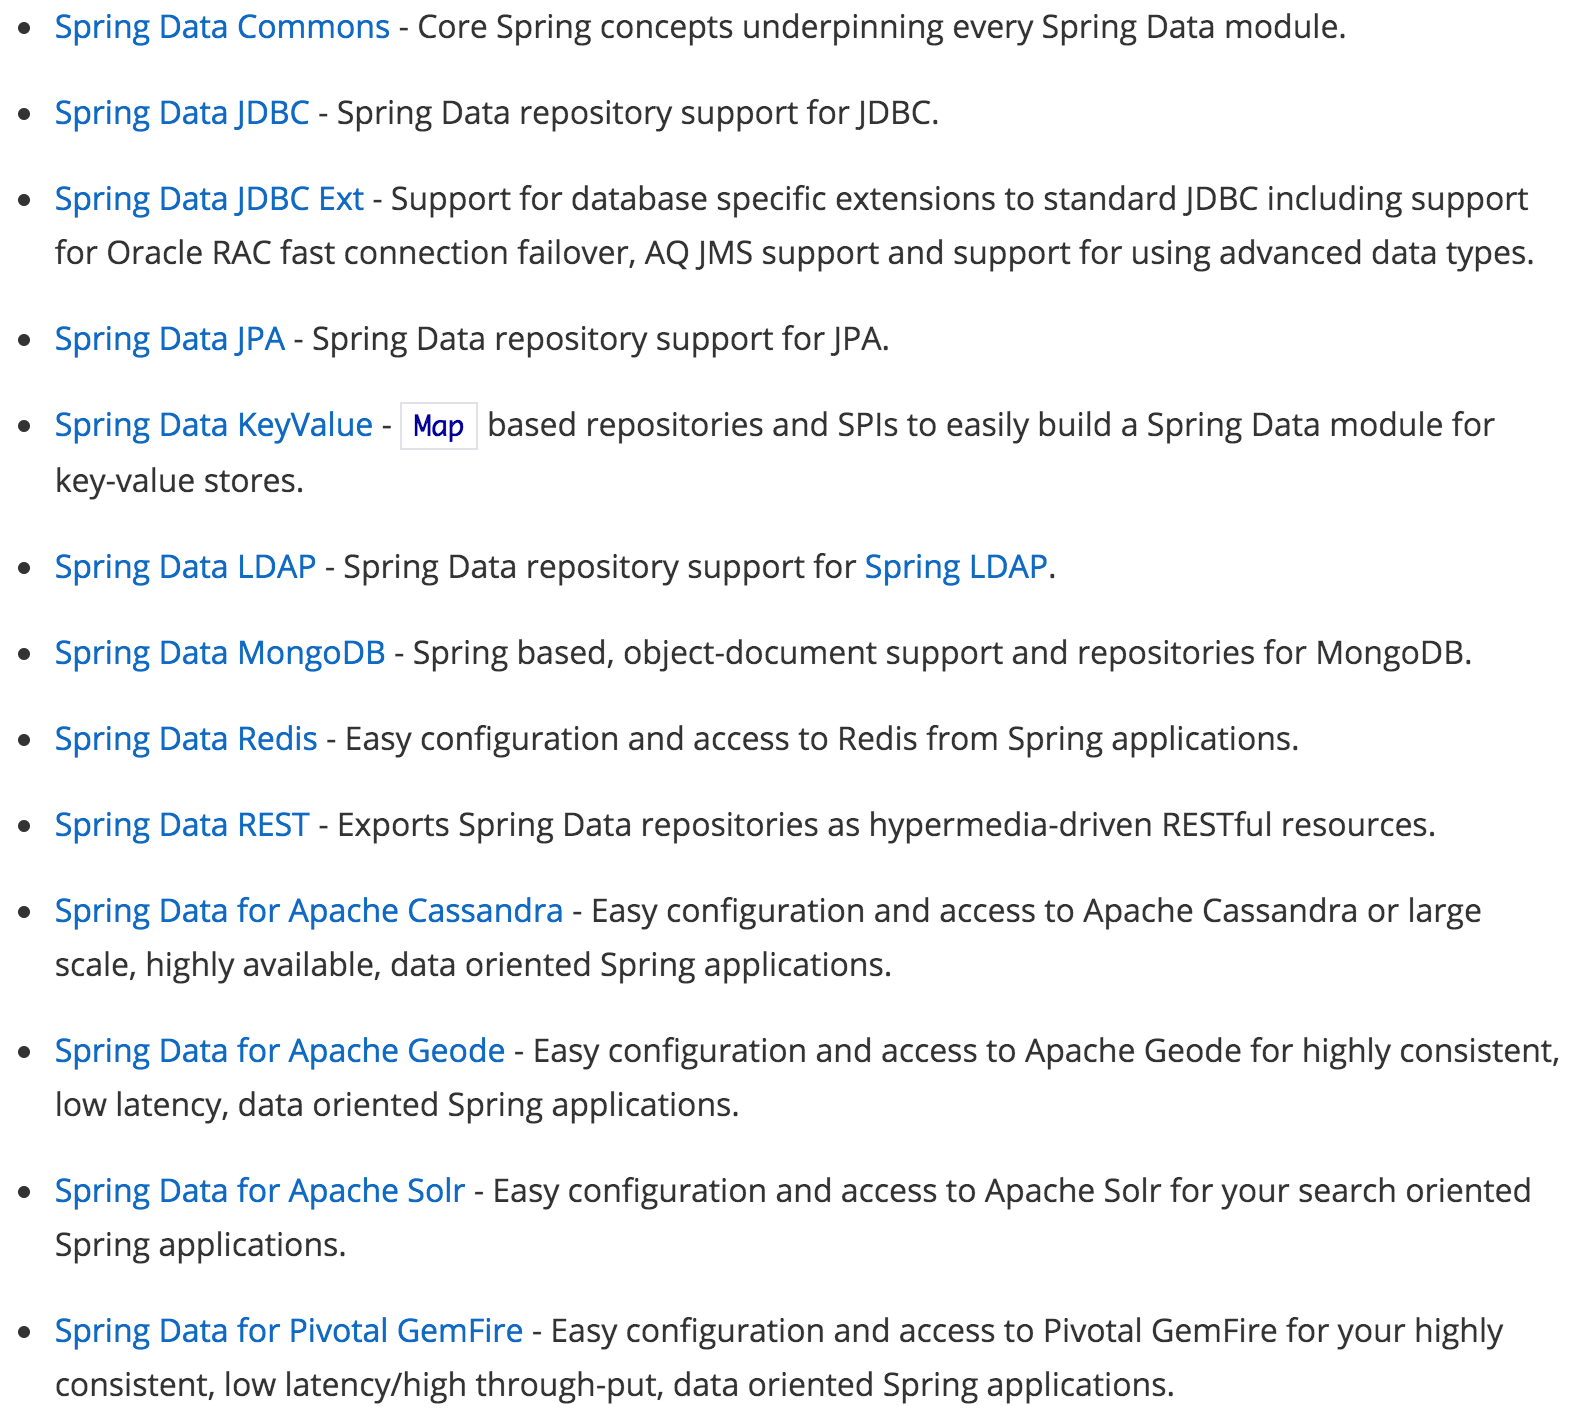
Spring Data是一个用于简化数据库、非关系型数据库、索引库访问,并支持云服务的开源框架。其主要目标是使得对数据的访问变得方便快捷,并支持map-reduce框架和云计算数据服务。 Spring Data可以极大的简化JPA(Elasticsearch…)的写法,可以在几乎不用写实现的情况下,实现对数据的访问和操作。除了CRUD外,还包括如分页、排序等一些常用的功能。
Spring Data的官网
http://projects.spring.io/spring-data/
主要模块
2.SpringData Elasticsearch
概念
Spring Data ElasticSearch 基于 spring data API 简化 elasticSearch操作,将原始操作elasticSearch的客户端API 进行封装 。Spring Data为Elasticsearch项目提供集成搜索引擎。Spring Data Elasticsearch POJO的关键功能区域为中心的模型与Elastichsearch交互文档和轻松地编写一个存储索引库数据访问层。官方网站:http://projects.spring.io/spring-data-elasticsearch/
SpringData ES接口接入准备
<dependency> <groupId>org.springframework.bootgroupId> <artifactId>spring-boot-starter-data-elasticsearchartifactId> dependency>- 1
- 2
- 3
- 4
SpringData ES索引操作
@RunWith(SpringRunner.class) @SpringBootTest public class Test01 { @Autowired private ElasticsearchRestTemplate elasticsearchRestTemplate; //创建索引并增加映射配置 @Test public void createIndex(){ //创建索引 boolean index = elasticsearchRestTemplate.createIndex(Product.class); System.out.println("index = " + index); index = elasticsearchRestTemplate.putMapping(Product.class); System.out.println("index = " + index); } //删除索引 @Test public void deleteIndex(){ boolean index = elasticsearchRestTemplate.deleteIndex(Product.class); System.out.println("index = " + index); } }- 1
- 2
- 3
- 4
- 5
- 6
- 7
- 8
- 9
- 10
- 11
- 12
- 13
- 14
- 15
- 16
- 17
- 18
- 19
- 20
- 21
3.SpringData ES数据操作
创建数据映射
@Data @NoArgsConstructor @AllArgsConstructor @ToString @Document(indexName = "shopping", type = "product", shards = 5, replicas = 1) public class Product implements Serializable { //商品唯一标识 @Id private Long id; //商品名称 @Field(type = FieldType.Text, analyzer = "ik_max_word") private String title; //分类名称 @Field(type = FieldType.Keyword) private String category; //商品价格 @Field(type = FieldType.Double) private Double price; //图片地址 @Field(type = FieldType.Keyword, index = false) private String images; }- 1
- 2
- 3
- 4
- 5
- 6
- 7
- 8
- 9
- 10
- 11
- 12
- 13
- 14
- 15
- 16
- 17
- 18
- 19
- 20
- 21
- 22
数据的增删改查
@RunWith(SpringRunner.class) @SpringBootTest public class Test02 { @Autowired private ProductDao productDao; /** * 新增 */ @Test public void save(){ Product Product = new Product(); Product.setId(1L); Product.setTitle("小米手机"); Product.setCategory("手机"); Product.setPrice(1999.0); Product.setImages("http://www.gulixueyuan/xm.jpg"); productDao.save(Product); } //修改 @Test public void update(){ Product Product = new Product(); Product.setId(1L); Product.setTitle("小米2手机"); Product.setCategory("手机"); Product.setPrice(9999.0); Product.setImages("http://www.gulixueyuan/xm.jpg"); productDao.save(Product); } //根据id查询 @Test public void findById(){ Product Product = productDao.findById(1L).get(); System.out.println(Product); } //查询所有 @Test public void findAll(){ Iterable<Product> products = productDao.findAll(); for (Product product : products) { System.out.println(product); } } //删除 @Test public void delete(){ Product product = new Product(); product.setId(1L); productDao.delete(product); } //批量新增 @Test public void saveAll(){ List<Product> productList = new ArrayList<>(); for (int i = 0; i < 100; i++) { Product product = new Product(); product.setId(Long.valueOf(i)); product.setTitle("["+i+"]小米手机"); product.setCategory("手机"); product.setPrice(1999.0+i); product.setImages("http://www.gulixueyuan/xm.jpg"); productList.add(product); } productDao.saveAll(productList); } //分页查询 @Test public void findByPage(){ //设置排序(排序方式,正序还是倒序,排序的id) Sort sort = Sort.by(Sort.Direction.DESC,"id"); int currentPage=0;//当前页 int pageSize = 20;//每页显示多少条 //设置查询分页 PageRequest pageRequest = PageRequest.of(currentPage, pageSize,sort); //分页查询 Page<Product> productPage = productDao.findAll(pageRequest); for (Product product : productPage.getContent()) { System.out.println(product); } } }- 1
- 2
- 3
- 4
- 5
- 6
- 7
- 8
- 9
- 10
- 11
- 12
- 13
- 14
- 15
- 16
- 17
- 18
- 19
- 20
- 21
- 22
- 23
- 24
- 25
- 26
- 27
- 28
- 29
- 30
- 31
- 32
- 33
- 34
- 35
- 36
- 37
- 38
- 39
- 40
- 41
- 42
- 43
- 44
- 45
- 46
- 47
- 48
- 49
- 50
- 51
- 52
- 53
- 54
- 55
- 56
- 57
- 58
- 59
- 60
- 61
- 62
- 63
- 64
- 65
- 66
- 67
- 68
- 69
- 70
- 71
- 72
- 73
- 74
- 75
- 76
- 77
- 78
- 79
- 80
- 81
- 82
- 83
- 84
term查询
@RunWith(SpringRunner.class) @SpringBootTest public class Test03 { @Autowired private ProductDao productDao; /** * term查询 * search(termQueryBuilder) 调用搜索方法,参数查询构建器对象 */ @Test public void termQuery(){ TermQueryBuilder queryBuilder = QueryBuilders.termQuery("productName", "小米"); Iterable<Product> products = productDao.search(queryBuilder); for (Product product : products) { System.out.println(product); } } /** * term查询加分页 */ @Test public void termQueryByPage(){ int currentPage= 0 ; int pageSize = 5; //设置查询分页 PageRequest pageRequest = PageRequest.of(currentPage, pageSize); TermQueryBuilder termQueryBuilder = QueryBuilders.termQuery("productName", "小米"); Iterable<Product> products = productDao.search(termQueryBuilder,pageRequest); for (Product product : products) { System.out.println(product); } } }- 1
- 2
- 3
- 4
- 5
- 6
- 7
- 8
- 9
- 10
- 11
- 12
- 13
- 14
- 15
- 16
- 17
- 18
- 19
- 20
- 21
- 22
- 23
- 24
- 25
- 26
- 27
- 28
- 29
- 30
- 31
- 32
- 33
- 34
4.自定义Dao查询方法
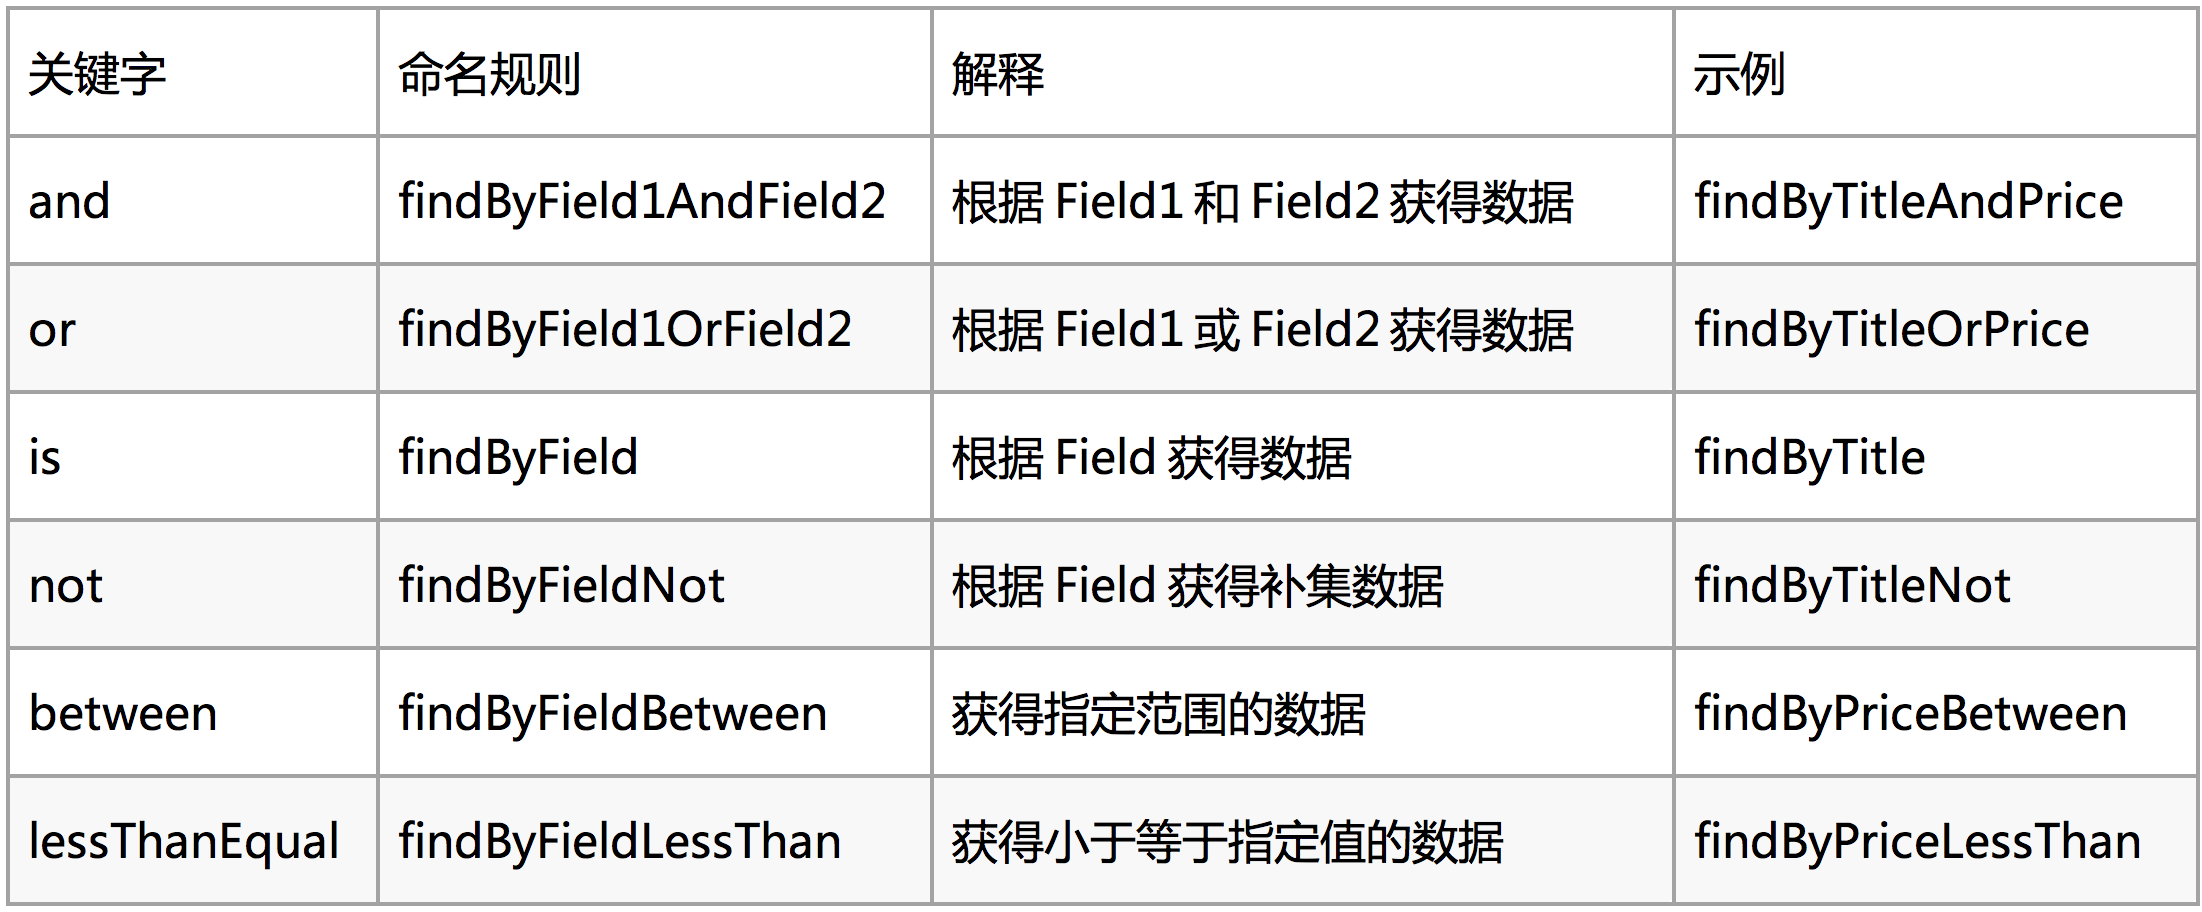
方法命名规则
持久化Dao接口
public interface ProductDao extends ElasticsearchRepository<Product,Long> { //根据title和价格查询,and的关系 List<Product> findAllByTitleAndPrice(String title, Double price); //根据商品价格范围查询 最低价格lowPrice 最高价格highPrice List<Product> findByPriceBetween(Double lowPrice, Double highPrice); }- 1
- 2
- 3
- 4
- 5
- 6
自定义Dao接口测试
@RunWith(SpringRunner.class) @SpringBootTest public class Test04 { @Autowired private ProductDao productDao; /** * 根据标题及价格查询 * 要求价格等于20050且标题的内容包含小米关键词 */ @Test public void findAllByTitleAndPrice(){ String title = "小米"; Double price = 2050.0; List<Product> products = productDao.findAllByTitleAndPrice(title, price); for (Product product : products) { System.out.println(product); } } /** * 根据价格范围查询 * 要求商品价格再2000,到2010之间 */ @Test public void findPriceBetween(){ double lowPrice = 2000.0;//最低价 double highPrice = 2010.0;//最高价 List<Product> products = productDao.findByPriceBetween(lowPrice, highPrice); for (Product product : products) { System.out.println(product); } } }- 1
- 2
- 3
- 4
- 5
- 6
- 7
- 8
- 9
- 10
- 11
- 12
- 13
- 14
- 15
- 16
- 17
- 18
- 19
- 20
- 21
- 22
- 23
- 24
- 25
- 26
- 27
- 28
- 29
- 30
- 31
- 32
-
相关阅读:
一文带你透析zookeeper原理
【仿牛客网笔记】 Redis,一站式高性能存储方案——点赞
LeetCode-667. 优美的排列 II【数组,数学】
ClickHouse SQL 查询优化
【Rust日报】2022-08-12 用 Rust 为 Linux 编写新的 Apple Silicon GPU 驱动程序
Spring面试题大全含答案共79题,最新全spring全家桶超级葵花宝典
贪心算法-活动选择问题
day36(http协议 服务器软件的使用 PHP的简单了解 前后端交互 ajax 同步和异步)
多语言翻译软件 Mate Translate mac中文版特色功能
Matlab|【分布鲁棒】数据驱动的多离散场景电热综合能源系统分布鲁棒优化算法
- 原文地址:https://blog.csdn.net/LMY0210/article/details/128209303
