在线体验:Seata实验室

一. 前言
相信 youlai-mall 的实验室大家有曾在项目中见到过,但应该都还处于陌生的阶段,毕竟在此之前实验室多是以概念般的形式存在,所以我想借着此次的机会,对其进行一个详细的说明。
实验室模块的建立初衷和开源项目的成立一致的,都是为了提升开发成员的技术能力,只不过开源项目是从技术栈广度上(全栈),而实验室则是从技术栈深度方面切入,更重要的它是一种更深刻而又高效的学习方式。为什么能够这么说?因为实验室是结合真实的业务场景把Seata分布式事务能力可视化,通过现象去看本质(原理和源码),不再是被动式输入的短期记忆学习。
实验室未来计划是将工作和面试常见的中间件(Spring、MyBatis、Redis、Seata、MQ、MySQL、ES等)做进来,本篇就以 Seata 为例正式为有来实验室拉开一个序幕。
二. Seata 概念
Seata 是一款开源的分布式事务解决方案,致力于提供高性能和简单易用的分布式事务服务。Seata 将为用户提供了 AT、TCC、SAGA 和 XA 事务模式,为用户打造一站式的分布式解决方案。
| 术语 | |
|---|---|
| TC (Transaction Coordinator) - 事务协调者 | 维护全局和分支事务的状态,驱动全局事务提交或回滚。 |
| TM (Transaction Manager) - 事务管理器 | 定义全局事务的范围:开始全局事务、提交或回滚全局事务。 |
| RM (Resource Manager) - 资源管理器 | 管理分支事务处理的资源,与TC交谈以注册分支事务和报告分支事务的状态,并驱动分支事务提交或回滚。 |
三. Seata 服务端部署
中间件声明
| 中间件 | 版本 | 服务器IP | 端口 |
|---|---|---|---|
| Seata | 1.5.2 | 192.168.10.100 | 8091、7091 |
| Nacos | 2.0.3 | 192.168.10.99 | 8848 |
| MySQL | 8.0.27 | 192.168.10.98 | 3306 |
官方链接
Seata 数据库
Seata 表结构MySQL脚本在线地址: https://github.com/seata/seata/blob/1.5.2/script/server/db/mysql.sql
执行以下脚本完成 Seata 数据库创建和表的初始化:
-- 1. 执行语句创建名为 seata 的数据库
CREATE DATABASE seata DEFAULT CHARACTER SET utf8mb4 DEFAULT COLLATE utf8mb4_general_ci;

-- 2.执行脚本完成 Seata 表结构的创建
use seata;

-- the table to store GlobalSession data
CREATE TABLE IF NOT EXISTS `global_table`
(
    `xid`                       VARCHAR(128) NOT NULL,
    `transaction_id`            BIGINT,
    `status`                    TINYINT      NOT NULL,
    `application_id`            VARCHAR(32),
    `transaction_service_group` VARCHAR(32),
    `transaction_name`          VARCHAR(128),
    `timeout`                   INT,
    `begin_time`                BIGINT,
    `application_data`          VARCHAR(2000),
    `gmt_create`                DATETIME,
    `gmt_modified`              DATETIME,
    PRIMARY KEY (`xid`),
    KEY `idx_status_gmt_modified` (`status` , `gmt_modified`),
    KEY `idx_transaction_id` (`transaction_id`)
) ENGINE = InnoDB
  DEFAULT CHARSET = utf8mb4;

-- the table to store BranchSession data
CREATE TABLE IF NOT EXISTS `branch_table`
(
    `branch_id`         BIGINT       NOT NULL,
    `xid`               VARCHAR(128) NOT NULL,
    `transaction_id`    BIGINT,
    `resource_group_id` VARCHAR(32),
    `resource_id`       VARCHAR(256),
    `branch_type`       VARCHAR(8),
    `status`            TINYINT,
    `client_id`         VARCHAR(64),
    `application_data`  VARCHAR(2000),
    `gmt_create`        DATETIME(6),
    `gmt_modified`      DATETIME(6),
    PRIMARY KEY (`branch_id`),
    KEY `idx_xid` (`xid`)
) ENGINE = InnoDB
  DEFAULT CHARSET = utf8mb4;

-- the table to store lock data
CREATE TABLE IF NOT EXISTS `lock_table`
(
    `row_key`        VARCHAR(128) NOT NULL,
    `xid`            VARCHAR(128),
    `transaction_id` BIGINT,
    `branch_id`      BIGINT       NOT NULL,
    `resource_id`    VARCHAR(256),
    `table_name`     VARCHAR(32),
    `pk`             VARCHAR(36),
    `status`         TINYINT      NOT NULL DEFAULT '0' COMMENT '0:locked ,1:rollbacking',
    `gmt_create`     DATETIME,
    `gmt_modified`   DATETIME,
    PRIMARY KEY (`row_key`),
    KEY `idx_status` (`status`),
    KEY `idx_branch_id` (`branch_id`),
    KEY `idx_xid_and_branch_id` (`xid` , `branch_id`)
) ENGINE = InnoDB
  DEFAULT CHARSET = utf8mb4;

CREATE TABLE IF NOT EXISTS `distributed_lock`
(
    `lock_key`       CHAR(20) NOT NULL,
    `lock_value`     VARCHAR(20) NOT NULL,
    `expire`         BIGINT,
    primary key (`lock_key`)
) ENGINE = InnoDB
  DEFAULT CHARSET = utf8mb4;

INSERT INTO `distributed_lock` (lock_key, lock_value, expire) VALUES ('AsyncCommitting', ' ', 0);
INSERT INTO `distributed_lock` (lock_key, lock_value, expire) VALUES ('RetryCommitting', ' ', 0);
INSERT INTO `distributed_lock` (lock_key, lock_value, expire) VALUES ('RetryRollbacking', ' ', 0);
INSERT INTO `distributed_lock` (lock_key, lock_value, expire) VALUES ('TxTimeoutCheck', ' ', 0);
Seata 配置
这里采用 Nacos 作为配置中心的方式,所以需要把 Seata 的外置配置放置在Nacos上
1. 获取 Seata 外置配置
Seata 外置配置在线地址:https://github.com/seata/seata/blob/1.5.2/script/config-center/config.txt
完整配置如下:
#For details about configuration items, see https://seata.io/zh-cn/docs/user/configurations.html
#Transport configuration, for client and server
transport.type=TCP
transport.server=NIO
transport.heartbeat=true
transport.enableTmClientBatchSendRequest=false
transport.enableRmClientBatchSendRequest=true
transport.enableTcServerBatchSendResponse=false
transport.rpcRmRequestTimeout=30000
transport.rpcTmRequestTimeout=30000
transport.rpcTcRequestTimeout=30000
transport.threadFactory.bossThreadPrefix=NettyBoss
transport.threadFactory.workerThreadPrefix=NettyServerNIOWorker
transport.threadFactory.serverExecutorThreadPrefix=NettyServerBizHandler
transport.threadFactory.shareBossWorker=false
transport.threadFactory.clientSelectorThreadPrefix=NettyClientSelector
transport.threadFactory.clientSelectorThreadSize=1
transport.threadFactory.clientWorkerThreadPrefix=NettyClientWorkerThread
transport.threadFactory.bossThreadSize=1
transport.threadFactory.workerThreadSize=default
transport.shutdown.wait=3
transport.serialization=seata
transport.compressor=none

#Transaction routing rules configuration, only for the client
service.vgroupMapping.default_tx_group=default
#If you use a registry, you can ignore it
service.default.grouplist=127.0.0.1:8091
service.enableDegrade=false
service.disableGlobalTransaction=false

#Transaction rule configuration, only for the client
client.rm.asyncCommitBufferLimit=10000
client.rm.lock.retryInterval=10
client.rm.lock.retryTimes=30
client.rm.lock.retryPolicyBranchRollbackOnConflict=true
client.rm.reportRetryCount=5
client.rm.tableMetaCheckEnable=true
client.rm.tableMetaCheckerInterval=60000
client.rm.sqlParserType=druid
client.rm.reportSuccessEnable=false
client.rm.sagaBranchRegisterEnable=false
client.rm.sagaJsonParser=fastjson
client.rm.tccActionInterceptorOrder=-2147482648
client.tm.commitRetryCount=5
client.tm.rollbackRetryCount=5
client.tm.defaultGlobalTransactionTimeout=60000
client.tm.degradeCheck=false
client.tm.degradeCheckAllowTimes=10
client.tm.degradeCheckPeriod=2000
client.tm.interceptorOrder=-2147482648
client.undo.dataValidation=true
client.undo.logSerialization=jackson
client.undo.onlyCareUpdateColumns=true
server.undo.logSaveDays=7
server.undo.logDeletePeriod=86400000
client.undo.logTable=undo_log
client.undo.compress.enable=true
client.undo.compress.type=zip
client.undo.compress.threshold=64k
#For TCC transaction mode
tcc.fence.logTableName=tcc_fence_log
tcc.fence.cleanPeriod=1h

#Log rule configuration, for client and server
log.exceptionRate=100

#Transaction storage configuration, only for the server. The file, DB, and redis configuration values are optional.
store.mode=file
store.lock.mode=file
store.session.mode=file
#Used for password encryption
store.publicKey=

#If `store.mode,store.lock.mode,store.session.mode` are not equal to `file`, you can remove the configuration block.
store.file.dir=file_store/data
store.file.maxBranchSessionSize=16384
store.file.maxGlobalSessionSize=512
store.file.fileWriteBufferCacheSize=16384
store.file.flushDiskMode=async
store.file.sessionReloadReadSize=100

#These configurations are required if the `store mode` is `db`. If `store.mode,store.lock.mode,store.session.mode` are not equal to `db`, you can remove the configuration block.
store.db.datasource=druid
store.db.dbType=mysql
store.db.driverClassName=com.mysql.jdbc.Driver
store.db.url=jdbc:mysql://127.0.0.1:3306/seata?useUnicode=true&rewriteBatchedStatements=true
store.db.user=username
store.db.password=password
store.db.minConn=5
store.db.maxConn=30
store.db.globalTable=global_table
store.db.branchTable=branch_table
store.db.distributedLockTable=distributed_lock
store.db.queryLimit=100
store.db.lockTable=lock_table
store.db.maxWait=5000

#These configurations are required if the `store mode` is `redis`. If `store.mode,store.lock.mode,store.session.mode` are not equal to `redis`, you can remove the configuration block.
store.redis.mode=single
store.redis.single.host=127.0.0.1
store.redis.single.port=6379
store.redis.sentinel.masterName=
store.redis.sentinel.sentinelHosts=
store.redis.maxConn=10
store.redis.minConn=1
store.redis.maxTotal=100
store.redis.database=0
store.redis.password=
store.redis.queryLimit=100

#Transaction rule configuration, only for the server
server.recovery.committingRetryPeriod=1000
server.recovery.asynCommittingRetryPeriod=1000
server.recovery.rollbackingRetryPeriod=1000
server.recovery.timeoutRetryPeriod=1000
server.maxCommitRetryTimeout=-1
server.maxRollbackRetryTimeout=-1
server.rollbackRetryTimeoutUnlockEnable=false
server.distributedLockExpireTime=10000
server.xaerNotaRetryTimeout=60000
server.session.branchAsyncQueueSize=5000
server.session.enableBranchAsyncRemove=false
server.enableParallelRequestHandle=false

#Metrics configuration, only for the server
metrics.enabled=false
metrics.registryType=compact
metrics.exporterList=prometheus
metrics.exporterPrometheusPort=9898
2. 导入配置至 Nacos
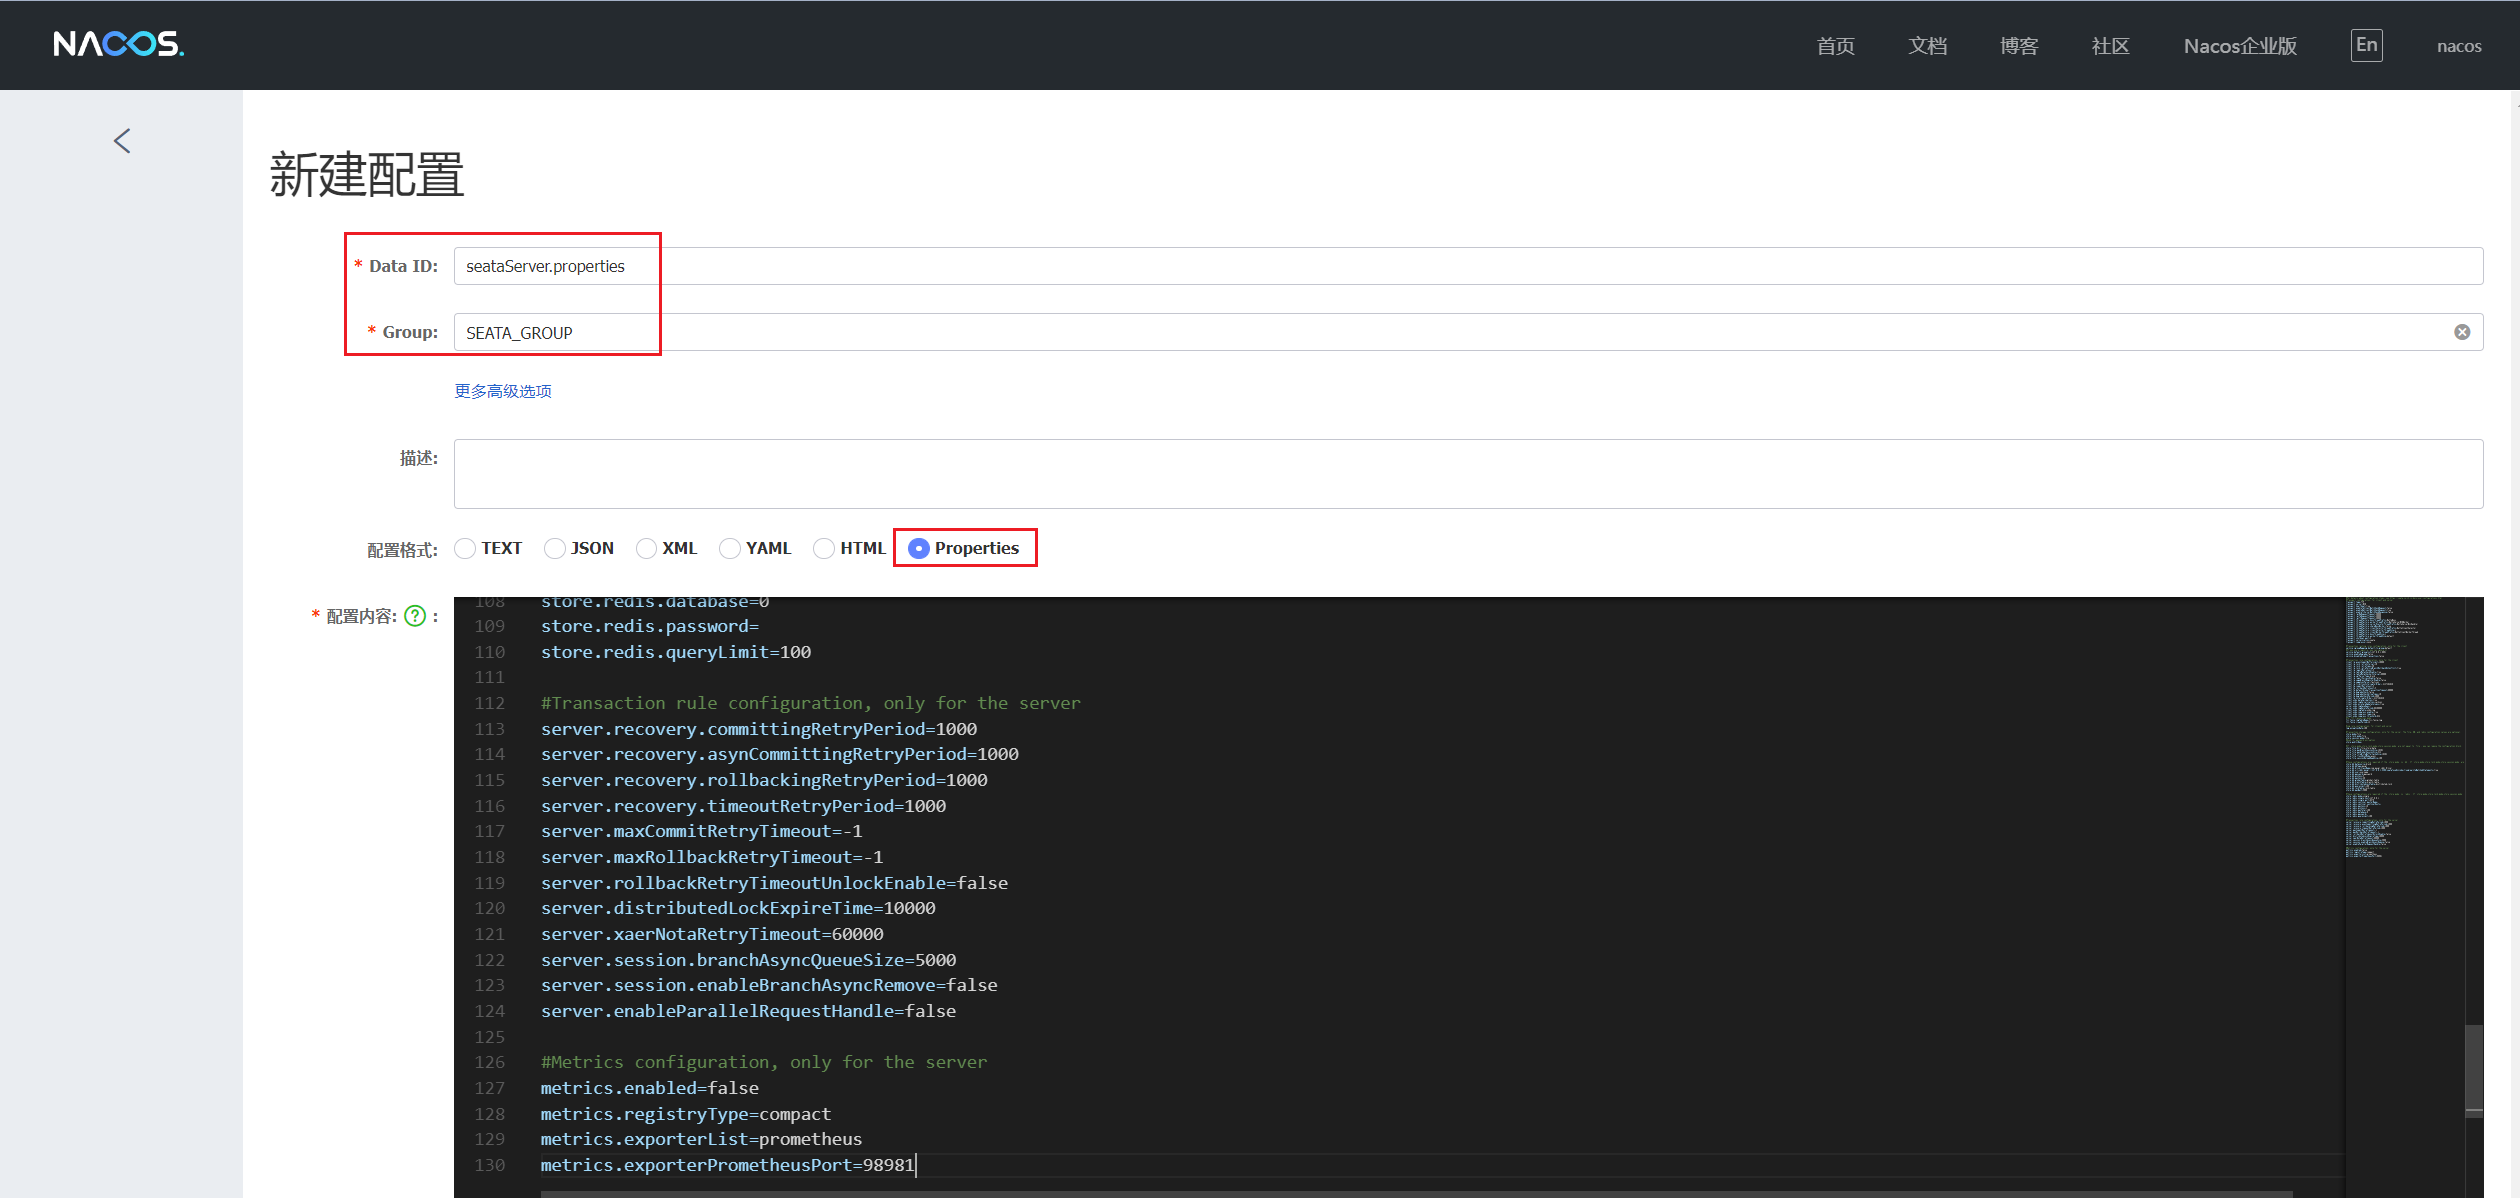
在 Nacos 管控台默认的 public 命名空间下 ,新建配置 Data ID 为 seataServer.properties ,Group 为 SEATA_GROUP 的配置,并将Seata外置配置config.txt 内容复制进来

3. 修改 Seata 外置配置
仅需修存储模式为db以及对应的db连接配置
# 修改store.mode为db,配置数据库连接
store.mode=db
store.db.dbType=mysql
store.db.driverClassName=com.mysql.cj.jdbc.Driver
store.db.url=jdbc:mysql://192.168.10.98:3306/seata?useUnicode=true&rewriteBatchedStatements=true
store.db.user=root
store.db.password=123456
- store.mode=db 存储模式选择为数据库
- 192.168.10.98 MySQL主机地址
- store.db.user=root 数据库用户名
- store.db.password=123456 数据库密码
Seata 部署
Seata 官方部署文档:https://seata.io/zh-cn/docs/ops/deploy-by-docker.html
1. 获取应用配置
按照官方文档描述使用自定义配置文件的部署方式,需要先创建临时容器把配置copy到宿主机
创建临时容器
docker run -d --name seata-server -p 8091:8091 -p 7091:7091 seataio/seata-server:1.5.2
创建挂载目录
mkdir -p /mnt/seata/config
复制容器配置至宿主机
docker cp seata-server:/seata-server/resources/. /mnt/seata/config
注意复制到宿主机的目录,下文启动容器需要做宿主机和容器的目录挂载

过河拆桥,删除临时容器
docker rm -f seata-server
2. 修改启动配置
在获取到 seata-server 的应用配置之后,因为这里采用 Nacos 作为 seata 的配置中心和注册中心,所以需要修改 application.yml 里的配置中心和注册中心地址,详细配置我们可以从 application.example.yml 拿到。
application.yml 原配置

vi /mnt/seata/config/application.yml
修改后的配置(参考 application.example.yml 示例文件),以下是需要调整的部分,其他配置默认即可
seata:
  config:
    type: nacos
    nacos:
      server-addr: 192.168.10.99:8848
      namespace:
      group: SEATA_GROUP
      data-id: seataServer.properties
  registry:
    type: nacos
    preferred-networks: 30.240.*
    nacos:
      application: seata-server
      server-addr: 192.168.10.99:8848
      namespace:
      group: SEATA_GROUP
      cluster: default
  # 存储模式在外置配置(Nacos)中,Nacos 配置加载优先级大于application.yml,会被application.yml覆盖,所以此处注释
  #store:
  	#mode: file
- 192.168.10.99 是Nacos宿主机的IP地址,Docker部署别错填 localhost 或Docker容器的IP(172.17. * . *)
- namespace nacos命名空间id,不填默认是public命名空间
- data-id: seataServer.properties Seata外置文件所处Naocs的Data ID,参考上小节的 导入配置至 Nacos
- group: SEATA_GROUP 指定注册至nacos注册中心的分组名
- cluster: default 指定注册至nacos注册中心的集群名
3. 启动容器
docker run -d --name seata-server --restart=always  \
-p 8091:8091 \
-p 7091:7091 \
-e SEATA_IP=192.168.10.100 \
-v /mnt/seata/config:/seata-server/resources \
seataio/seata-server:1.5.2
-
/mnt/seata/config Seata应用配置挂载在宿主机的目录
-
192.168.10.100 Seata 宿主机IP地址
在 nacos 控制台 的 public 命名空间下服务列表里有 seata-server 说明部署启动成功

如果启动失败或者未注册到 nacos , 基本是粗心的结果,请仔细检查下自己 application.yml 的注册中心配置或查看日志
docker logs -f --tail=100 seata-server
以上就完成对 Seata 服务端的部署和配置,接下来就是 SpringBoot 与 Seata 客户端的整合。
四. Seata 客户端搭建
1. Maven 依赖
<dependency>
    <groupId>com.alibaba.cloudgroupId>
    <artifactId>spring-cloud-starter-alibaba-seataartifactId>

    <exclusions>
        <exclusion>
            <groupId>io.seatagroupId>
            <artifactId>seata-spring-boot-starterartifactId>
        exclusion>
    exclusions>
dependency>
<dependency>
    <groupId>io.seatagroupId>
    <artifactId>seata-spring-boot-starterartifactId>
    <version>1.5.2version>
dependency>
2. undo_log 表
undo_log表脚本: https://github.com/seata/seata/blob/1.5.2/script/client/at/db/mysql.sql
-- for AT mode you must to init this sql for you business database. the seata server not need it.
CREATE TABLE IF NOT EXISTS `undo_log`
(
    `branch_id`     BIGINT       NOT NULL COMMENT 'branch transaction id',
    `xid`           VARCHAR(128) NOT NULL COMMENT 'global transaction id',
    `context`       VARCHAR(128) NOT NULL COMMENT 'undo_log context,such as serialization',
    `rollback_info` LONGBLOB     NOT NULL COMMENT 'rollback info',
    `log_status`    INT(11)      NOT NULL COMMENT '0:normal status,1:defense status',
    `log_created`   DATETIME(6)  NOT NULL COMMENT 'create datetime',
    `log_modified`  DATETIME(6)  NOT NULL COMMENT 'modify datetime',
    UNIQUE KEY `ux_undo_log` (`xid`, `branch_id`)
) ENGINE = InnoDB
  AUTO_INCREMENT = 1
  DEFAULT CHARSET = utf8mb4 COMMENT ='AT transaction mode undo table';
AT模式两阶段提交协议的演变:
- 一阶段:业务数据和回滚日志记录在同一个本地事务中提交,释放本地锁和连接资源。
- 二阶段:
- 提交异步化,非常快速地完成。
- 回滚通过一阶段的回滚日志进行反向补偿。
Seata的AT模式下之所以在第一阶段直接提交事务,依赖的是需要在每个RM创建一张undo_log表,记录业务执行前后的数据快照。
如果二阶段需要回滚,直接根据undo_log表回滚,如果执行成功,则在第二阶段删除对应的快照数据。
3. 客户端配置

# Seata配置
seata:
  enabled: true
  # 指定事务分组至集群映射关系,集群名default需要与seata-server注册到Nacos的cluster保持一致
  service:
    vgroup-mapping:
      mall_tx_group: default
  # 事务分组配置
  tx-service-group: mall_tx_group
  registry:
    type: nacos
    nacos:
      application: seata-server
      # nacos 服务地址
      server-addr: 192.168.10.99:8848
      namespace:
      group: SEATA_GROUP
以上3点就是 Seata 客户端需要做的事项,下面就 Seata 如何实战应用进行展开详细说明。
五. Seata 实战
Seata 官网示例: http://seata.io/zh-cn/docs/user/quickstart.html
需求
用户购买商品订单支付的业务逻辑。整个业务逻辑由3个微服务提供支持:
- 商品服务:扣减商品库存。
- 订单服务:修改订单状态【已支付】。
- 会员服务:扣减账户余额。
架构图

- TM:事务管理器(有来实验室:laboratory)
- RM:资源管理器(商城服务:mall-pms;会员服务:mall-ums;订单服务:mall-oms)
- TC :事务协调者(Seata服务端:seata-server)
代码实现
有来实验室
实验室在“订单支付”案例中扮演的是【事务管理器】的角色,其工作内容是开始全局事务、提交或回滚全局事务。
按照 【第三节-Seata客户端搭建 】 在 laboratory 模块添加 Maven 依赖和客户端的配置。
订单支付关键代码片段(SeataServiceImpl#payOrderWithGlobalTx),通过注解 GlobalTransactional 开启全局事务,通过对商品 Feign 客户端和订单 Feign 客户端的调用完成订单支付的流程,这是全局事务开始的地方。
    /**
     * 订单支付(全局事务)
     */
    @GlobalTransactional
    public boolean payOrderWithGlobalTx(SeataForm seataForm) {

        log.info("========扣减商品库存========");
        skuFeignClient.deductStock(skuId, 1);

        log.info("========订单支付========");
        orderFeignClient.payOrder(orderId, ...);

        return true;
    }
商品服务
按照 【第三节-Seata客户端搭建 】 在 mall-pms 模块添加 Maven 依赖和客户端的配置,在 mall-pms 数据库创建 undo_log 表。
扣减库存关键代码:
    /**
     * 「实验室」扣减商品库存
     */
    public boolean deductStock(Long skuId, Integer num) {
        boolean result = this.update(new LambdaUpdateWrapper()
                .setSql("stock_num = stock_num - " + num)
                .eq(PmsSku::getId, skuId)
        );
        return result;
    }
订单服务
按照 【第三节-Seata客户端搭建 】 在 mall-oms 模块添加 Maven 依赖和客户端的配置,在 mall-oms 数据库创建 undo_log 表。
订单支付关键代码:
    /**
     * 「实验室」订单支付
     */
    public Boolean payOrder(Long orderId, SeataOrderDTO orderDTO) {

        Long memberId = orderDTO.getMemberId();
        Long amount = orderDTO.getAmount();

        // 扣减账户余额
        memberFeignClient.deductBalance(memberId, amount);

        // 【关键】如果开启异常,全局事务将会回滚
        Boolean openEx = orderDTO.getOpenEx();
        if (openEx) {
            int i = 1 / 0;
        }

        // 修改订单【已支付】
        boolean result = this.update(new LambdaUpdateWrapper()
                .eq(OmsOrder::getId, orderId)
                .set(OmsOrder::getStatus, OrderStatusEnum.WAIT_SHIPPING.getValue())
        );

        return result;
    }
会员服务
按照 【第三节-Seata客户端搭建 】 在 mall-ums 模块添加 Maven 依赖和客户端的配置,在 mall-ums 数据库创建 undo_log 表。
扣减余额关键代码:
    @ApiOperation(value = "「实验室」扣减会员余额")
    @PutMapping("/{memberId}/balances/_deduct")
    public Result deductBalance(@PathVariable Long memberId, @RequestParam Long amount) {
        boolean result = memberService.update(new LambdaUpdateWrapper()
                .setSql("balance = balance - " + amount)
                .eq(UmsMember::getId, memberId));
        return Result.judge(result);
    }
测试
以上就基于 youlai-mall 商城订单支付的业务简单实现的 Seata 实验室,接下来通过测试来看看 Seata 分布式事务的能力。
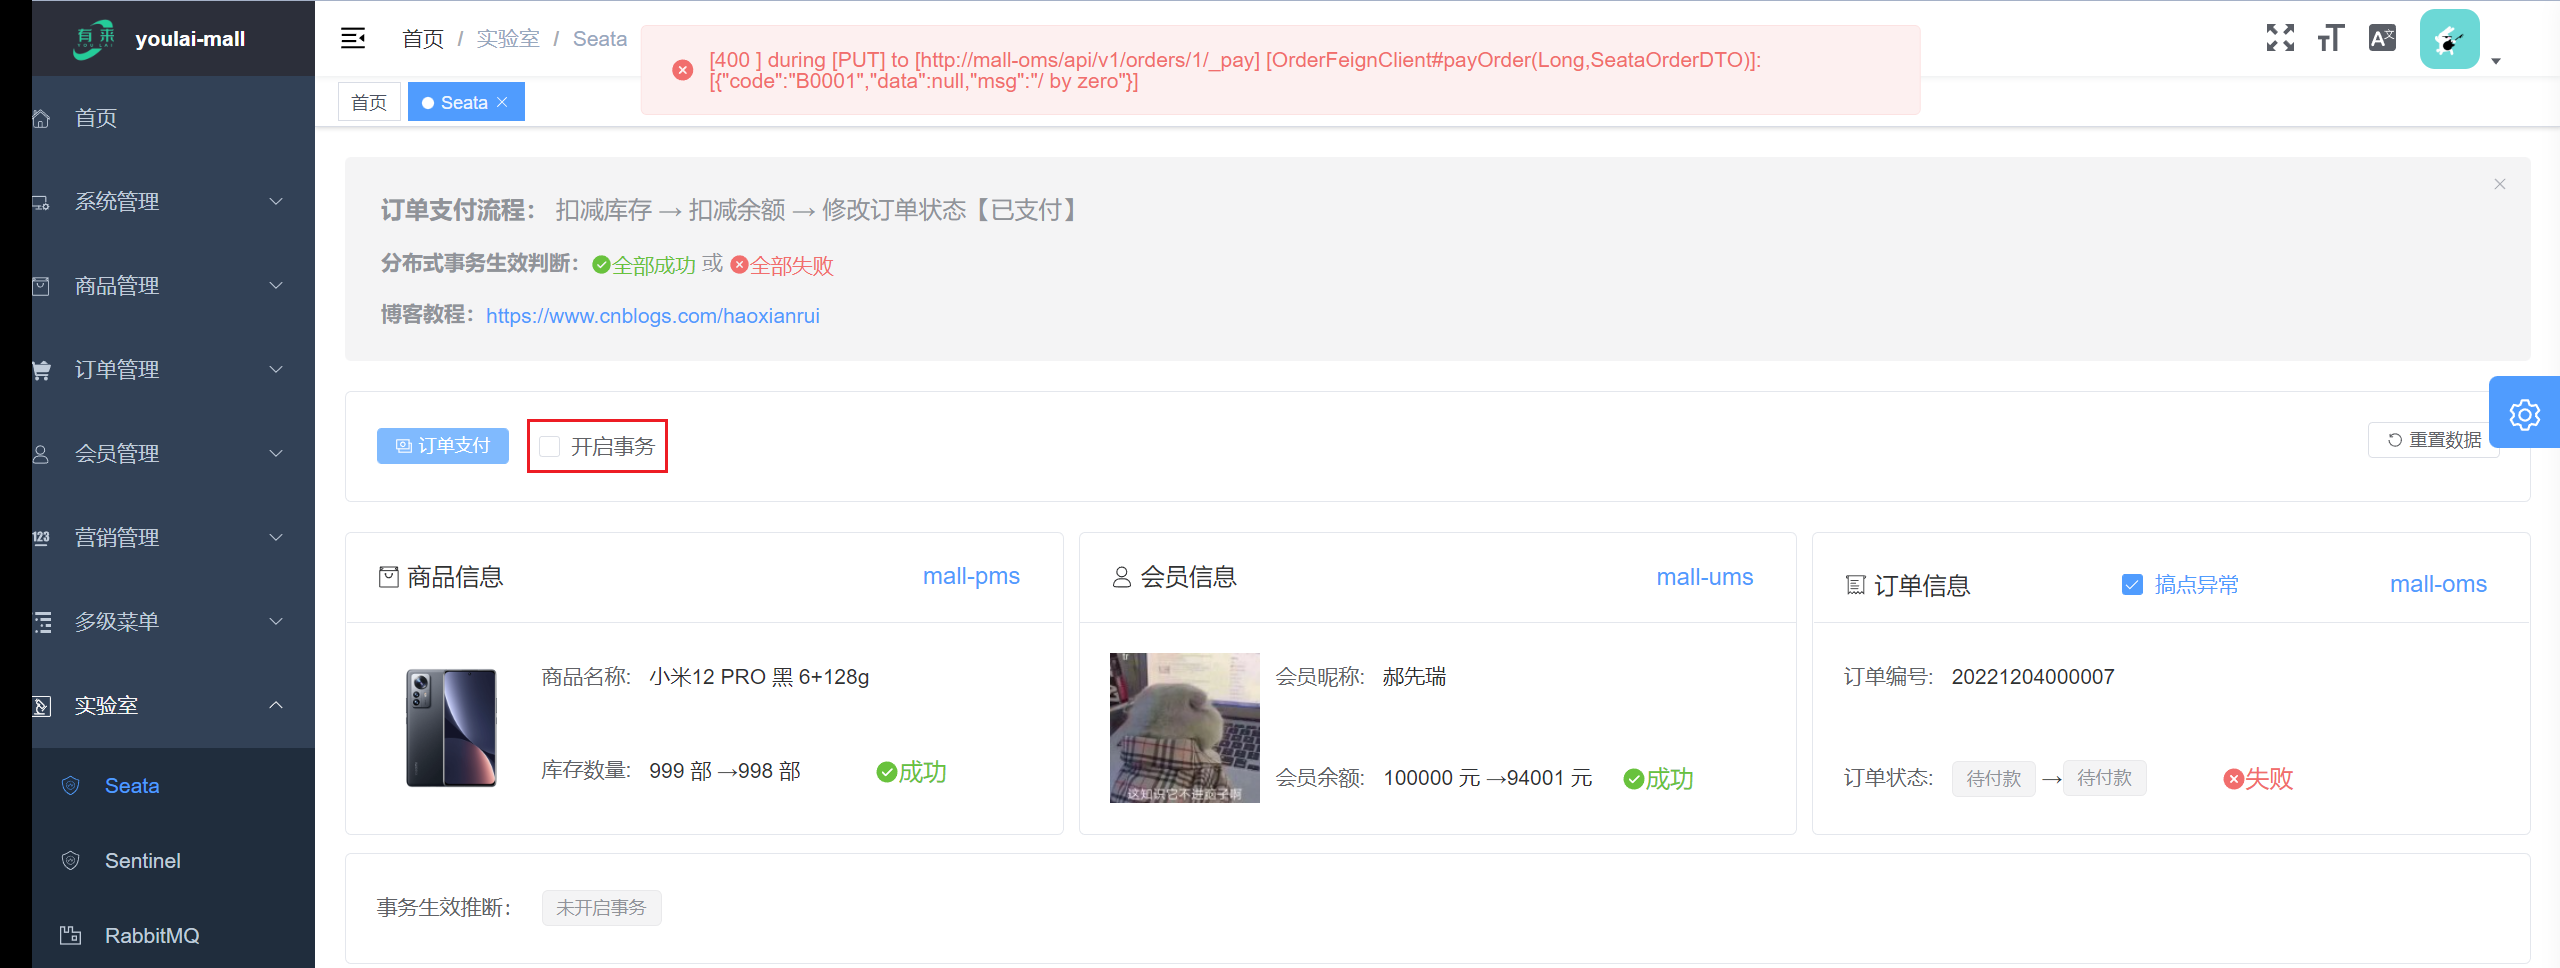
未开启事务
未开启事务前提: 订单状态因为异常修改失败,但这并未影响到商品库存扣减和余额扣减成功的结果,明显这不是希望的结果。

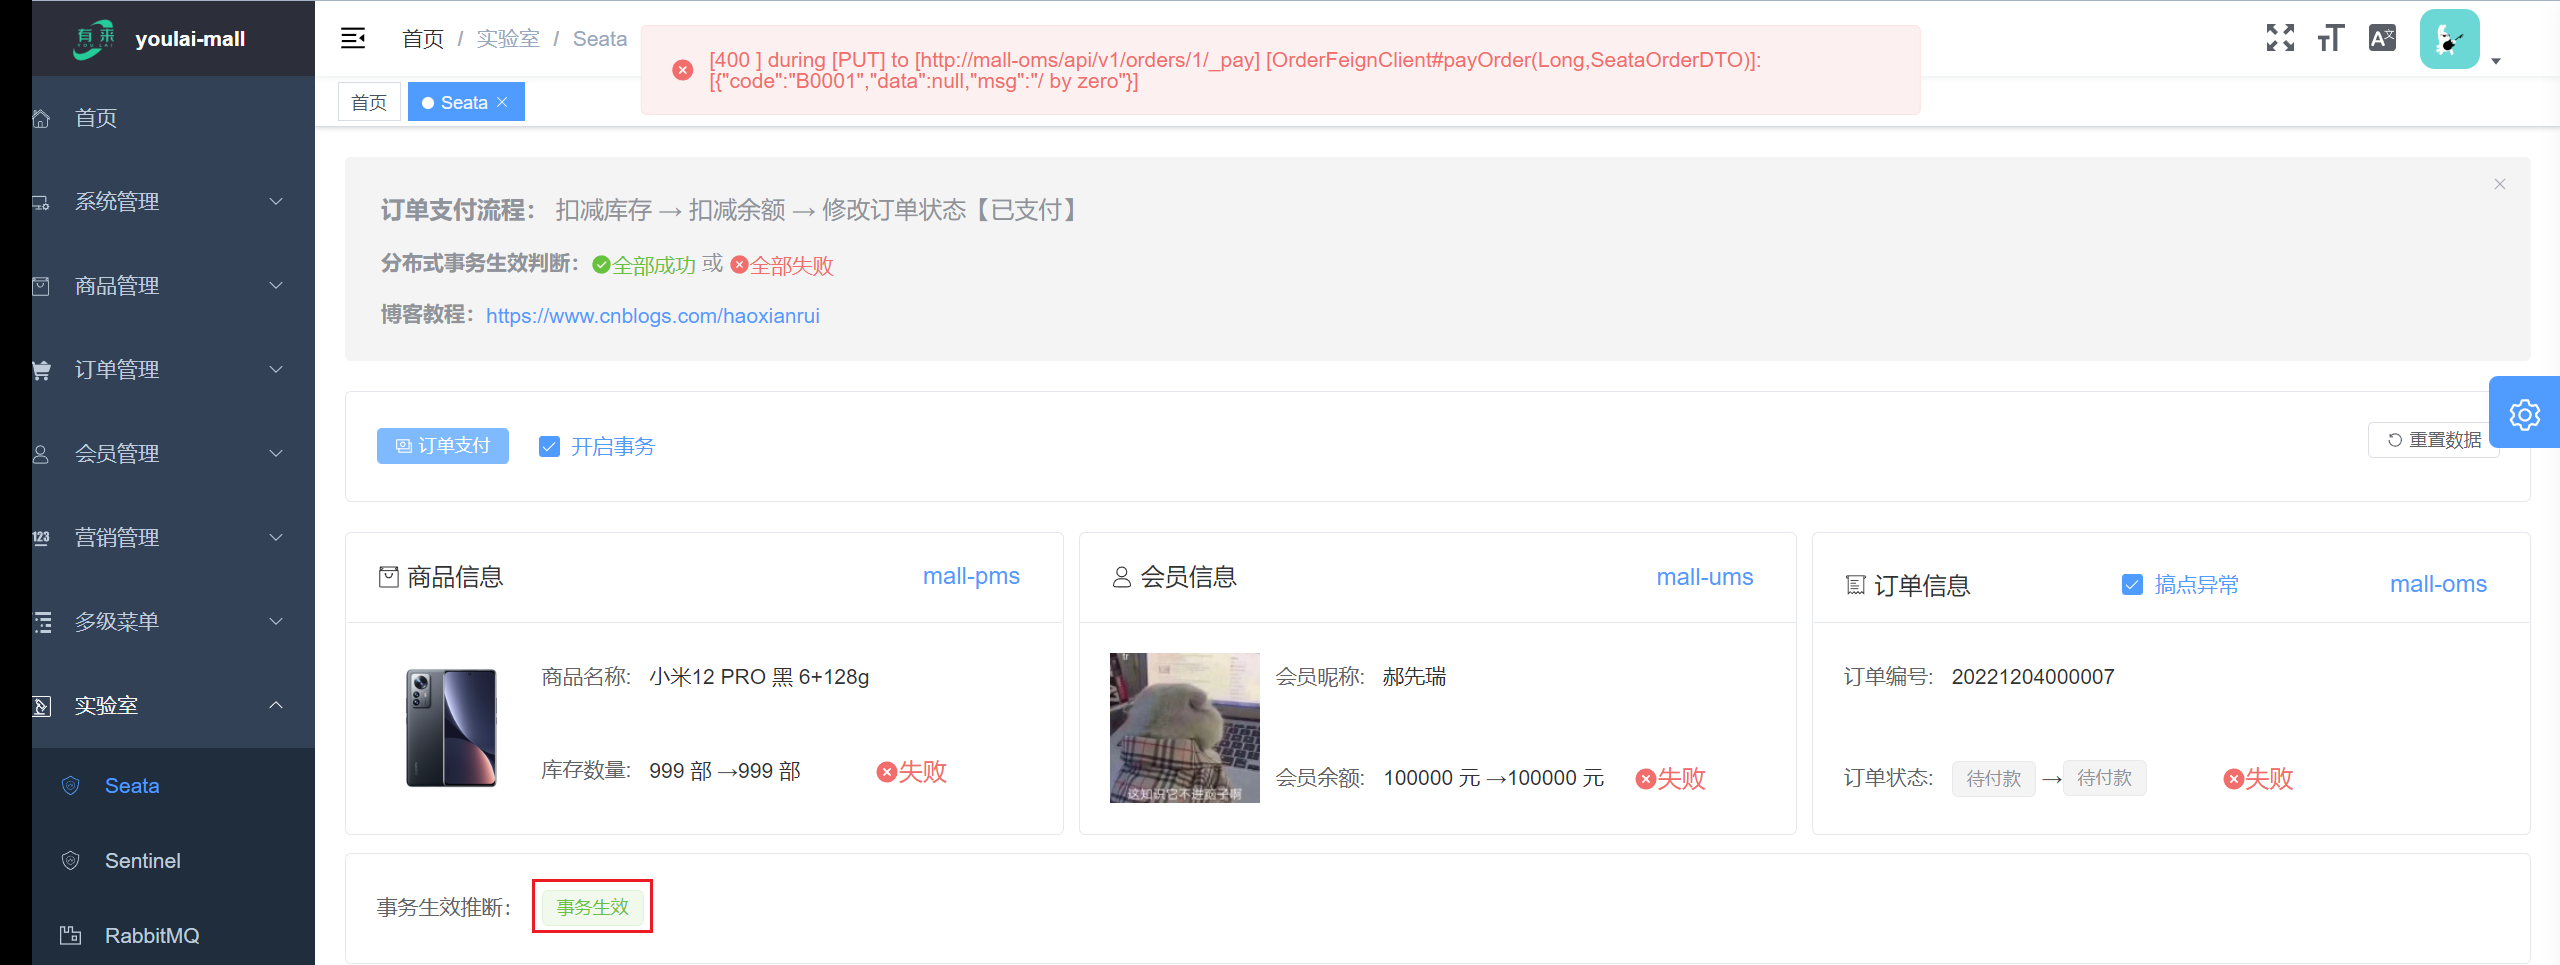
开启事务
开启事务前提:订单状态修改发生异常,同时也回滚了扣减库存、扣减余额的行为,可见 Seata 分布式事务生效。

六. Seata 源码
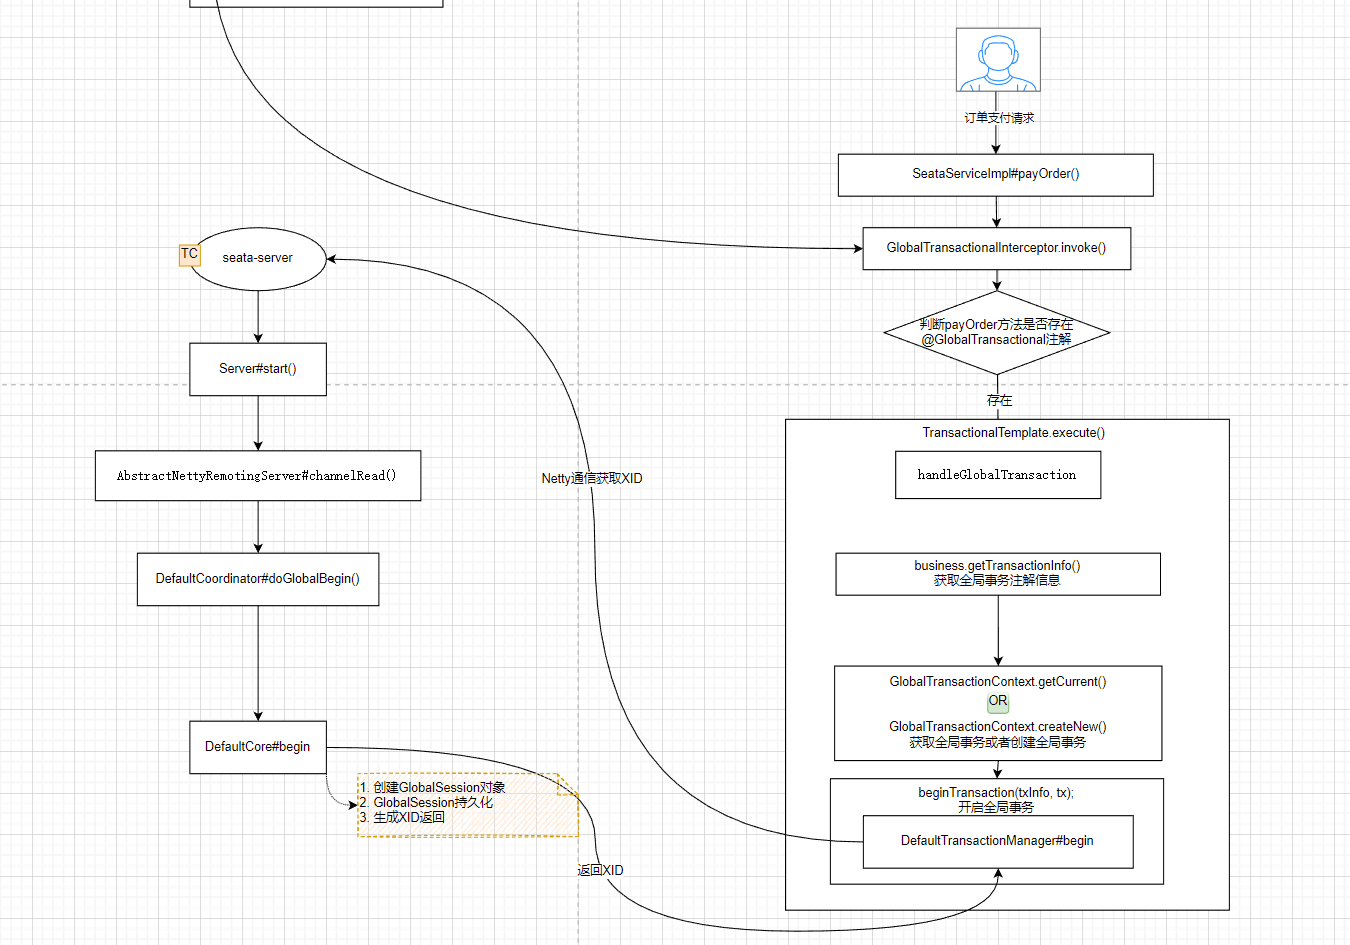
因为 Seata 源码牵涉角色比较多,需要在本地搭建 seata-server 然后和 Seata 客户端交互调试,后面整理出来会单独拿一篇文章进行进行具体分析。

七. 结语
本篇通过 Seata 1.5.2 版本部署到实战讲述了 Seata 分布式事务AT模式在商城订单支付业务场景的应用,相信大家对 Seata 和有来实验室有个初步的认知,但这里还只是一个开始,后续会有更多的热门中间件登上实验室舞台。当然,可见这个舞台很大,所以也希望有兴趣或者有想法同学加入有来实验室的开发。
附. 源码
本文源码已推送至gitee和github仓库