-
【应用】布隆过滤器
布隆过滤器简介及使用场景
布隆过滤器实际上是一列很长的二进制数组,在每个位置上只有 0 和 1两种可能,其出现的意义在于快速判断某个元素是否存在。
布隆过滤器可以判断某个元素一定不存在或者可能存在,这与其底层的实现原理有关,利用其可以判断元素一定不存在的特性,可以解决开发中的很多问题,如 redis 的缓存穿透问题。
布隆过滤器底层原理
数据添加
布隆过滤器的底层原理可以简单地理解为”二进制数组 + 若干哈希函数“,二进制数组的长度与哈希函数的数量决定了布隆过滤器在判断元素存在时的误判率。
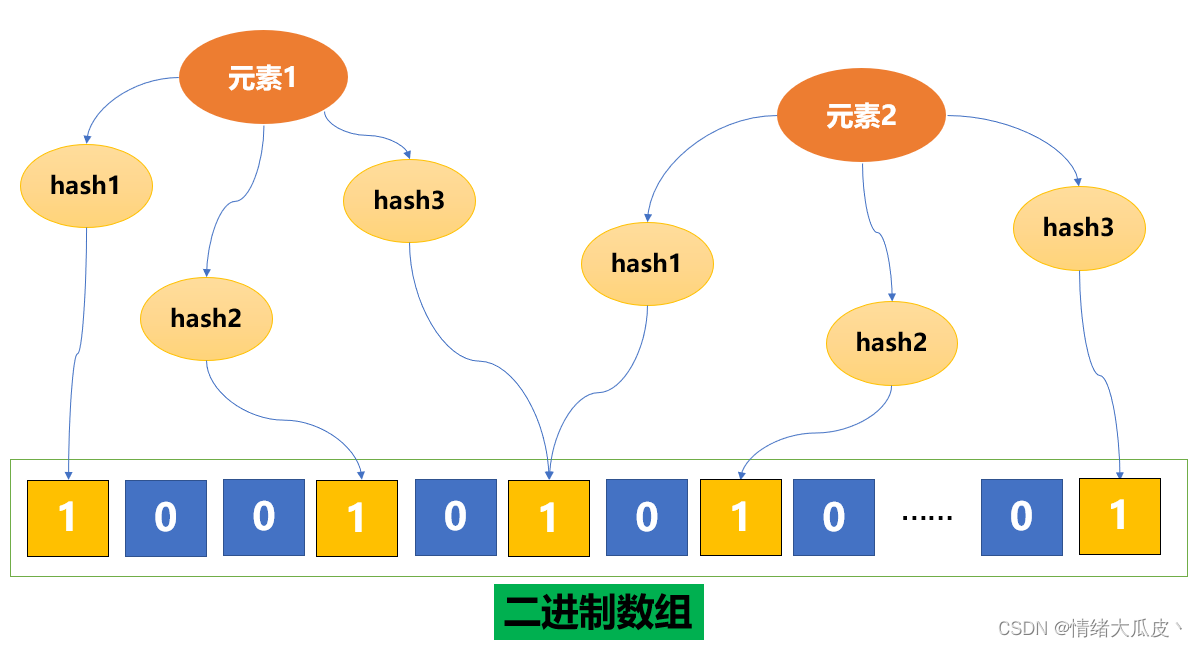
当我们往布隆过滤器中存放元素时,会利用每一个哈希函数对相应元素进行处理,每一次的处理都会得到一个值,将处理后的值对数组长度取模便得到该元素在数组中的一个位置,该过程类似于向 HashMap 中添加数据。
所有的哈希函数处理后得到的一组“位置”即定义了该元素在布隆过滤器中的存在,将二进制数组的对应位置标志为 1。
整个添加元素的过程如下图所示:

数据查询
基于上述添加元素的原理,进行元素是否存在的判断,即通过哈希函数计算对应的位置组,若对应位置组的值均为 1,则证明该元素可能存在(因为可能存在哈希冲突);若对应位置组的值存在 0,则证明该元素一定不存在。
因此,若要求误判率越小,则位数组就越长,空间的占用就越大;同时哈希函数的数量也就越多,计算的耗时也就越长。误判率本质上就是哈希冲突的概率。Bloom Filter Calculator可以根据数组长度与误判率计算布隆过滤器的哈希函数数量以及数组长度。
布隆过滤器的优缺点
-
优点:
-
增加和查询元素的时间复杂度小,为 O(N),其中 N 为哈希函数的数量;
-
数据保密性强,因为布隆过滤器不保存数据本身,而是保存的“位置信息”;
-
占用空间较小
-
-
缺点:
-
存在误判的可能,可以通过调整参数来降低误判率,但会增大空间占用和计算时间;
-
无法在布隆过滤器中获取元素本身,同时很难删除元素;
-
Redis 整合布隆过滤器
此处直接使用官方提供的整合了布隆过滤器的 redis 镜像进行测试,使用下列语句启动容器
docker run -p 6379:6379 \ > --name rebloom \ > -d --restart=always \ > -e TZ="Asia/Shanghai" \ > -v /root/rebloom/conf/redis.conf:/usr/local/etc/redis/redis.conf \ > -v /root/rebloom/data:/var/lib/redis \ > -v /root/rebloom/log:/var/log/redis \ > redislabs/rebloom:2.2.2- 1
- 2
- 3
- 4
- 5
- 6
- 7
- 8
容器启动成功后进入容器,登录 redis 客户端
docker exec -it rebloom /bin/bash- 1
root@75acaeca6568:/data# redis-cli 127.0.0.1:6379>- 1
- 2
向布隆过滤器中添加元素:
BF.ADD key ...options...127.0.0.1:6379> BF.ADD testKey key1 (integer) 1 127.0.0.1:6379> BF.ADD testKey key2 (integer) 1- 1
- 2
- 3
- 4
向布隆过滤器中批量添加元素:
BF.MADD key ...options...127.0.0.1:6379> BF.MADD testKey key3 key4 key5 1) (integer) 1 2) (integer) 1 3) (integer) 1- 1
- 2
- 3
- 4
在布隆过滤器中查询元素是否存在:
BF.EXISTS key ...options...(存在则返回 1;不存在则返回 0)127.0.0.1:6379> BF.EXISTS testKey key4 (integer) 1 127.0.0.1:6379> BF.EXISTS testkey key8 (integer) 0- 1
- 2
- 3
- 4
在布隆过滤器中批量查询元素是否存在:
BF.MEXISTS key ...options...127.0.0.1:6379> BF.MEXISTS testKey key1 key2 key3 key9 1) (integer) 1 2) (integer) 1 3) (integer) 1 4) (integer) 0- 1
- 2
- 3
- 4
- 5
Java 整合布隆过滤器
此处使用谷歌 guava 包中实现的布隆过滤器进行测试,引入相应的依赖
<dependency> <groupId>com.google.guavagroupId> <artifactId>guavaartifactId> <version>29.0-jreversion> dependency>- 1
- 2
- 3
- 4
- 5
编写 Java 程序实例化布隆过滤器对象并使用
public class BloomFilterDemo { public static void main(String[] args) { // 定义预计插入的数据量 int expectedInsertions = 10000000; // 定义误判率 double fpp = 0.01; /** * 生成布隆过滤器对象 * 主要参数: * Funnel funnel:数据类型,由 Funnels 类指定 * int expectedInsertions:预计插入数量 * double fpp:误判率 * BloomFilter.Strategy strategy:hash 策略 */ BloomFilter<String> bloomFilter = BloomFilter.create(Funnels.stringFunnel(Charset.defaultCharset()), expectedInsertions, fpp); // 向布隆过滤器中添加一千万数据 for (int i = 0; i < expectedInsertions; i++) { bloomFilter.put("test" + i); } // 使用一千万数据进行测试,计算误判数量以及误判率 double count = 0; for (int i = expectedInsertions; i < expectedInsertions * 2; i++) { if (bloomFilter.mightContain("test" + i)) { count++; } } System.out.println(">>>误判数量为:" + count); System.out.println(">>>误判率为:" + count / expectedInsertions); } }- 1
- 2
- 3
- 4
- 5
- 6
- 7
- 8
- 9
- 10
- 11
- 12
- 13
- 14
- 15
- 16
- 17
- 18
- 19
- 20
- 21
- 22
- 23
- 24
- 25
- 26
- 27
- 28
- 29
- 30
- 31
- 32
- 33
输出结果如下,实际的误判率与我们设置的误判率几乎相同
>>>误判数量为:100936.0 >>>误判率为:0.0100936- 1
- 2
SpringBoot 整合 Redis 使用布隆过滤器
使用轻量级的连接包 redission 实现,引入依赖
<dependency> <groupId>org.redissongroupId> <artifactId>redisson-spring-boot-starterartifactId> <version>3.16.0version> dependency>- 1
- 2
- 3
- 4
- 5
编写代码,连接 Redis 服务并测试使用布隆过滤器
public class BloomFilterDemo2 { public static void main(String[] args) { // 定义预计插入的数据量 long expectedInsertions = 10; // 定义误判率 double fpp = 0.01; // 配置 redis 服务地址 Config redisConfig = new Config(); redisConfig.useSingleServer().setAddress("redis://47.92.146.85:6379"); // 构建 redis-cli RedissonClient redissonClient = Redisson.create(redisConfig); // 生成并初始化布隆过滤器 RBloomFilter<Object> bloomFilter = redissonClient.getBloomFilter("username"); bloomFilter.tryInit(expectedInsertions, fpp); // 向布隆过滤器中添加对象 for (int i = 0; i < expectedInsertions; i++) { bloomFilter.add("username" + i); } // 验证对象是否存在 System.out.println(bloomFilter.contains("username1")); // true System.out.println(bloomFilter.contains("username11")); // false } }- 1
- 2
- 3
- 4
- 5
- 6
- 7
- 8
- 9
- 10
- 11
- 12
- 13
- 14
- 15
- 16
- 17
- 18
- 19
- 20
- 21
- 22
- 23
- 24
- 25
-
-
相关阅读:
《苍穹外卖》Day08部分知识点记录
Javaweb与Mybatis实现简单的用户注册登录
java File类 通过程序 创建/删除 文件/目录
敏感接口权限校验
国密GmSSL v2版本命令行方式生成国密sm2私钥、公钥、签名和验证签名
第2-4-8章 规则引擎Drools实战(1)-个人所得税计算器
算法D38 | 动态规划1 | 509. 斐波那契数 70. 爬楼梯 746. 使用最小花费爬楼梯
知识图谱实战应用28-基于py2neo的ICD-11疾病分类的知识图谱的查询与问答实战应用
计算机网络练习-计算机网络体系结构与参考模型
微信小程序 java网上购物商城系统python php
- 原文地址:https://blog.csdn.net/zqf787351070/article/details/128174524
