-
【应用】Docker Swarm
Docker Swarm 集群配置
master node1 node2 192.168.86.133 192.168.86.131 192.168.86.139 配置前准备
关闭各个节点服务器的防火墙
systemctl stop firewalld systemctl disable firewalld- 1
- 2
关闭各个服务器节点的 selinux,修改配置文件
/etc/selinux/config,关注SELINUX属性SELINUX=disabled- 1
配置三台机器 host 文件相互解析
master执行:hostnamectl set-hostname master node01执行:hostnamectl set-hostname node01 node02执行:hostnamectl set-hostname node02- 1
- 2
- 3
在每台服务器的 host 配置文件(
/etc/hosts)中添加192.168.86.133 master 192.168.86.131 node01 192.168.86.139 node02- 1
- 2
- 3
初始化 Swarm
将 master 节点作为管理节点,在该节点执行初始化命令
docker swarm init --advertise-addr 192.168.86.133- 1
输出的结果即为其他工作节点加入集群的命令
Swarm initialized: current node (get5cq8zb3hrelstzf72awfie) is now a manager. To add a worker to this swarm, run the following command: docker swarm join --token SWMTKN-1-34eiblqi14x64pjnmno9ayppnfrmkxtkn12fptq5mcjfj0tpwu-4m4ef5oedq5wnasybbx03h5fy 192.168.86.133:2377 To add a manager to this swarm, run 'docker swarm join-token manager' and follow the instructions.- 1
- 2
- 3
- 4
- 5
- 6
- 7
将两个工作节点 node1 和 node2 分别加入集群
docker swarm join --token SWMTKN-1-34eiblqi14x64pjnmno9ayppnfrmkxtkn12fptq5mcjfj0tpwu-4m4ef5oedq5wnasybbx03h5fy 192.168.86.133:2377- 1
在管理节点查看集群节点信息
docker node ls- 1
查询结果如下,配置成功
ID HOSTNAME STATUS AVAILABILITY MANAGER STATUS ENGINE VERSION get5cq8zb3hrelstzf72awfie * master Ready Active Leader 18.03.1-ce ztlexjj1iu1v8y6960f9shz9z node01 Ready Active 18.03.1-ce e4acehmt657d9mo5xd8nbrxm7 node02 Ready Active 18.03.1-ce- 1
- 2
- 3
- 4
为实现集群的高可用,将两个工作节点升级为管理节点,在管理节点执行下列两条命令
docker node promote node01 docker node promote node02- 1
- 2
重新查询集群节点信息,结果如下,工作节点状态变为 Reachable,即候选者
ID HOSTNAME STATUS AVAILABILITY MANAGER STATUS ENGINE VERSION get5cq8zb3hrelstzf72awfie * master Ready Active Leader 18.03.1-ce ztlexjj1iu1v8y6960f9shz9z node01 Ready Active Reachable 18.03.1-ce e4acehmt657d9mo5xd8nbrxm7 node02 Ready Active Reachable 18.03.1-ce- 1
- 2
- 3
- 4
在集群管理节点manage1上,创建以overlay为驱动的自定义网络
docker network create --driver overlay my-multi-host-network- 1
测试在集群中部署服务
docker service create --replicas 1 --name 别名 镜像ID # replicas:指定运行服务的数量 # 例如 以下命令将nginx容器中的端口80发布到群集中任何节点的端口8080 docker service create \ --network my-multi-host-network \ --name nginx \ --publish published=8080,target=80 \ --replicas 3 \ nginx- 1
- 2
- 3
- 4
- 5
- 6
- 7
- 8
- 9
- 10
查看集群服务
docker service ls- 1
Swarm 常用命令
集群节点相关
Manage Swarm nodes Options: Commands: demote Demote one or more nodes from manager in the swarm inspect Display detailed information on one or more nodes ls List nodes in the swarm promote Promote one or more nodes to manager in the swarm ps List tasks running on one or more nodes, defaults to current node rm Remove one or more nodes from the swarm update Update a node- 1
- 2
- 3
- 4
- 5
- 6
- 7
- 8
- 9
- 10
- 11
- 12
- 13
集群网络相关
Usage: docker network COMMAND Manage networks Options: Commands: connect Connect a container to a network create Create a network disconnect Disconnect a container from a network inspect Display detailed information on one or more networks ls List networks prune Remove all unused networks rm Remove one or more networks- 1
- 2
- 3
- 4
- 5
- 6
- 7
- 8
- 9
- 10
- 11
- 12
- 13
- 14
- 15
集群 stack 相关
Usage: docker stack COMMAND Manage Docker stacks Options: Commands: deploy Deploy a new stack or update an existing stack ls List stacks ps List the tasks in the stack rm Remove one or more stacks services List the services in the stack- 1
- 2
- 3
- 4
- 5
- 6
- 7
- 8
- 9
- 10
- 11
- 12
- 13
集群服务相关
Usage: docker service COMMAND Manage services Options: Commands: create Create a new service inspect Display detailed information on one or more services logs Fetch the logs of a service or task ls List services ps List the tasks of one or more services rm Remove one or more services rollback Revert changes to a service's configuration scale Scale one or multiple replicated services update Update a service- 1
- 2
- 3
- 4
- 5
- 6
- 7
- 8
- 9
- 10
- 11
- 12
- 13
- 14
- 15
- 16
- 17
Portainer 集群管理
在小规模的 Docker Swarm 节点上,可以使用 Portainer 的 Agent 模式对集群进行管理。Portainer 是一个 Docker 集群管理 UI 工具,有 CE 版和商业版。其中 CE 版本已经足够使用,此处使用的是 CE 版。
本示例中在本地的虚拟机进行配置,各节点防火墙关闭,在生产环境中需要注意开放对应端口。
在配置好的 swarm 集群的 master 节点编写 compose 文件,对服务进行定义
version: '3' services: portainer: image: portainer/portainer command: -H tcp://tasks.portainer_agent:9001 --tlsskipverify ports: - 9000:9000 networks: - my-multi-host-network volumes: - /var/run/docker.sock:/var/run/docker.sock deploy: placement: constraints: - node.hostname == master agent: image: portainer/agent environment: AGENT_CLUSTER_ADDR: tasks.portainer_agent volumes: - /var/run/docker.sock:/var/run/docker.sock - /var/lib/docker/volumes:/var/lib/docker/volumes networks: - my-multi-host-network deploy: mode: global networks: my-multi-host-network: driver: overlay- 1
- 2
- 3
- 4
- 5
- 6
- 7
- 8
- 9
- 10
- 11
- 12
- 13
- 14
- 15
- 16
- 17
- 18
- 19
- 20
- 21
- 22
- 23
- 24
- 25
- 26
- 27
- 28
- 29
- 30
- 31
使用
docker stack命令启动服务docker stack deploy -c docker_portainer.yml portainer- 1
Creating network portainer_my-multi-host-network Creating service portainer_portainer Creating service portainer_agent- 1
- 2
- 3
查看服务是否启动成功
docker service ls- 1
ID NAME MODE REPLICAS IMAGE PORTS z6zs9nei55f8 portainer_agent global 3/3 portainer/agent:latest 69nrafn0w3ec portainer_portainer replicated 1/1 portainer/portainer:latest *:9000->9000/tcp- 1
- 2
- 3
浏览器登录
:9000 Stack\Service\Containers\Inages\Networks\Volumes等
下面将配置的私有仓库注册进来,就可以通过 Portainer 直接从私有仓库中拉取镜像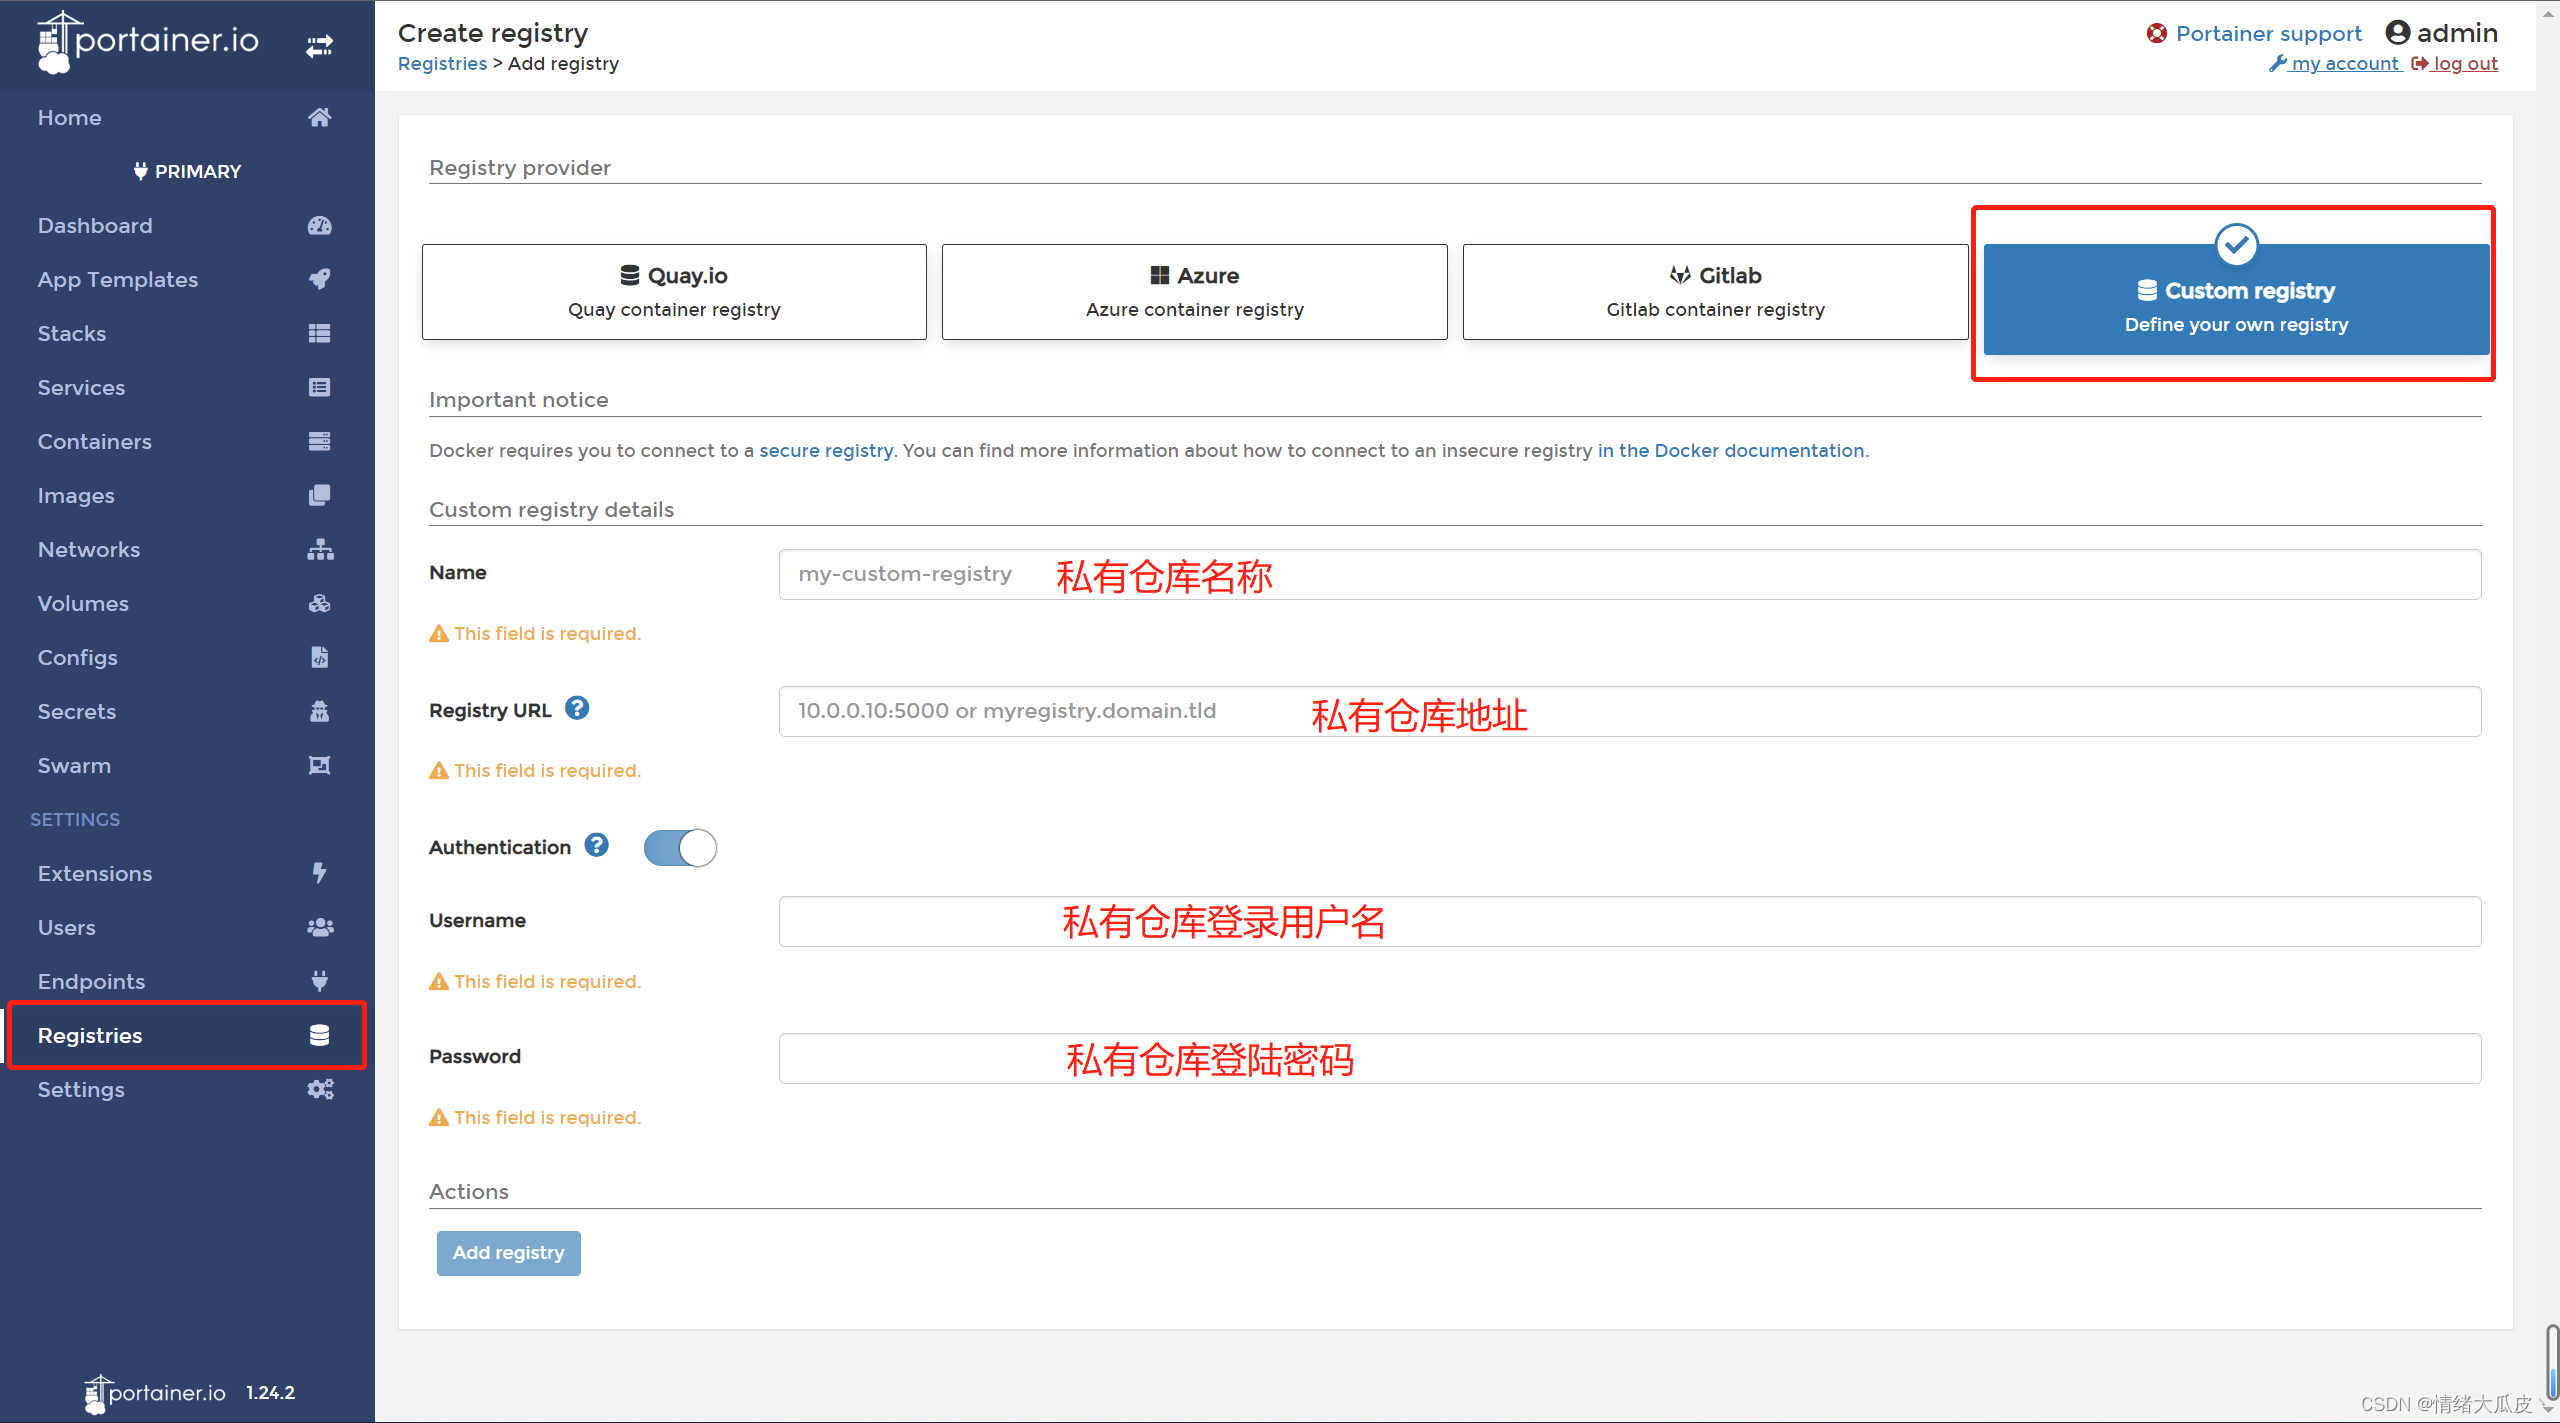
配置完成后即可在 Images 菜单拉取镜像
拉取镜像成功将在右上角有绿色的提示框,在对应节点即可查看到镜像 -
相关阅读:
代码随想录算法训练营第五十五天丨 动态规划part16
ubuntu20.04下Kafka安装部署及基础使用
Vue 官方文档2.x教程学习笔记 1 基础 1.1 安装
UE5笔记【四】UE5主材质Master Materials和材质实例MI
外包干了3天,技术退步明显.......
为RabbitMQ配置SSL
通过Power Platform自定义D365 CE 业务需求 - 4. 使用Power Automate
【点云处理】点云法向量估计及其加速(5)
Java多线程核心技术第一阶段-Java多线程基础 02
计算机毕业设计django基于python的热门短视频推荐系统(源码+系统+mysql数据库+Lw文档)
- 原文地址:https://blog.csdn.net/zqf787351070/article/details/128174153
