-
云计算-JavaAPI与Hadoop的互联的实现
云计算-JavaAPI与Hadoop的互联的实现
一、环境准备
-
已经搭建好的hadoop伪分布式集群,详见👉 云计算-Hadoop-2.7.7 最小化集群的搭建
-
IntelliJ IDEA(IntelliJ在业界被公认为最好的Java开发工具)或者 eclipse (著名的跨平台的自由集成开发环境)或者 其它自己用着顺手的 Code Editor。
二、HDFS 基本的命令操作
(1)查看帮助 hdfs dfs -help (2)查看当前目录信息 hdfs dfs -ls / (3)上传文件 hdfs dfs -put /本地路径 /hdfs路径 (4)剪切文件 hdfs dfs -moveFromLocal a.txt /aa.txt (5)下载文件到本地 hdfs dfs -get /hdfs路径 /本地路径 (6)合并下载 hdfs dfs -getmerge /hdfs路径文件夹 /合并后的文件 (7)创建文件夹 hdfs dfs -mkdir /hello (8)创建多级文件夹 hdfs dfs -mkdir -p /hello/world (9)移动hdfs文件 hdfs dfs -mv /hdfs路径 /hdfs路径 (10)复制hdfs文件 hdfs dfs -cp /hdfs路径 /hdfs路径 (11)删除hdfs文件 hdfs dfs -rm /a.txt (12)删除hdfs文件夹 hdfs dfs -rm -r /hello (13)查看hdfs中的文件 hdfs dfs -cat /hello.py hdfs dfs -tail -f /hello.py (14)查看文件夹中有多少个文件 hdfs dfs -count /文件夹名称 (15)查看hdfs的总空间 hdfs dfs -df / hdfs dfs -df -h / (16)修改副本数 hdfs dfs -setrep 1 /a.txt- 1
- 2
- 3
- 4
- 5
- 6
- 7
- 8
- 9
- 10
- 11
- 12
- 13
- 14
- 15
- 16
- 17
- 18
- 19
- 20
- 21
- 22
- 23
- 24
- 25
- 26
- 27
- 28
- 29
- 30
- 31
- 32
- 33
- 34
- 35
- 36
- 37
- 38
- 39
- 40
- 41
- 42
- 43
- 44
- 45
- 46
- 47
- 48
- 49
参考链接: HDFS常用命令的学习
三、HDFS客户端操作
IntelliJ IDEA 环境准备
这里呢我们主要是通过java API与hadoop集群进行互联从而实现HDFS的客户端操作
首先,在本机解压下载好的
hadoop-2.7.7.tar.gz因为里面有我们需要的jar包.然后的话把解压后的以下所有包导入到你的java运行环境里面
你的解压路径/hadoop-2.7.7/share/hadoop/common/下面有3个你的解压路径/hadoop-2.7.7/share/hadoop/common/lib下面的全部你的解压路径/hadoop-2.7.7/share/hadoop/hdfs/下面有3个你的解压路径/hadoop-2.7.7/share/hadoop/hdfs/lib下面的全部你的解压路径/hadoop-2.7.7/share/hadoop/yarn/下面有13个你的解压路径/hadoop-2.7.7/share/hadoop/yarn/lib下面的全部你的解压路径/hadoop-2.7.7/share/hadoop/httpfs/tomcat/lib下面的全部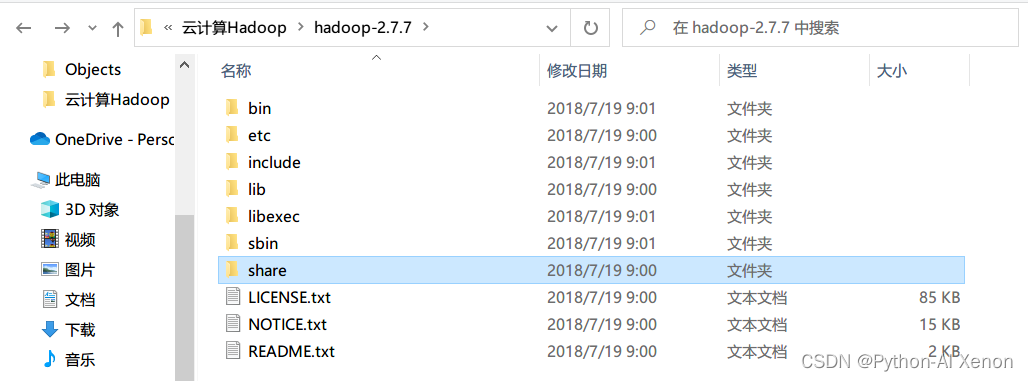
至于添加的方法有很多种:
- 法一:如过你使用的是maven包管理工具,那么
pom.xml配置文件需要导入的依赖如下:
<dependency> <groupId>org.apache.hadoopgroupId> <artifactId>hadoop-hdfsartifactId> <version>2.7.7version> <dependency> <groupId>org.apache.hadoopgroupId> <artifactId>hadoop-commonartifactId> <version>2.7.7version> dependency> <dependency> <groupId>org.apache.hadoopgroupId> <artifactId>hadoop-clientartifactId> <version>2.7.7version> dependency> <dependency> <groupId>junitgroupId> <artifactId>junitartifactId> <version>5.8.1version> dependency> <dependency> <groupId>jdk.toolsgroupId> <artifactId>jdk.toolsartifactId> <version>1.8.0version> <scope>systemscope> <systemPath>${JAVA_HOME}/lib/tools.jarsystemPath> dependency>- 1
- 2
- 3
- 4
- 5
- 6
- 7
- 8
- 9
- 10
- 11
- 12
- 13
- 14
- 15
- 16
- 17
- 18
- 19
- 20
- 21
- 22
- 23
- 24
- 25
- 26
- 27
- 28
参考 : HDFS3 客户端操作(基于IDEA) Maven构建Hadoop(基于eclipse)
- 法二: 直接把这些包添加到系统环境变量当中,然后原生编译.java文件就行,或者通过参数指定jar包路径
- 法三: 由于借助 IntelliJ IDEA 进行操作,所以我们的流程比较简单,新建项目的时候构建系统选择 IntelliJ就行了,具体步骤如下: (推荐)
- 创建IDEA 项目
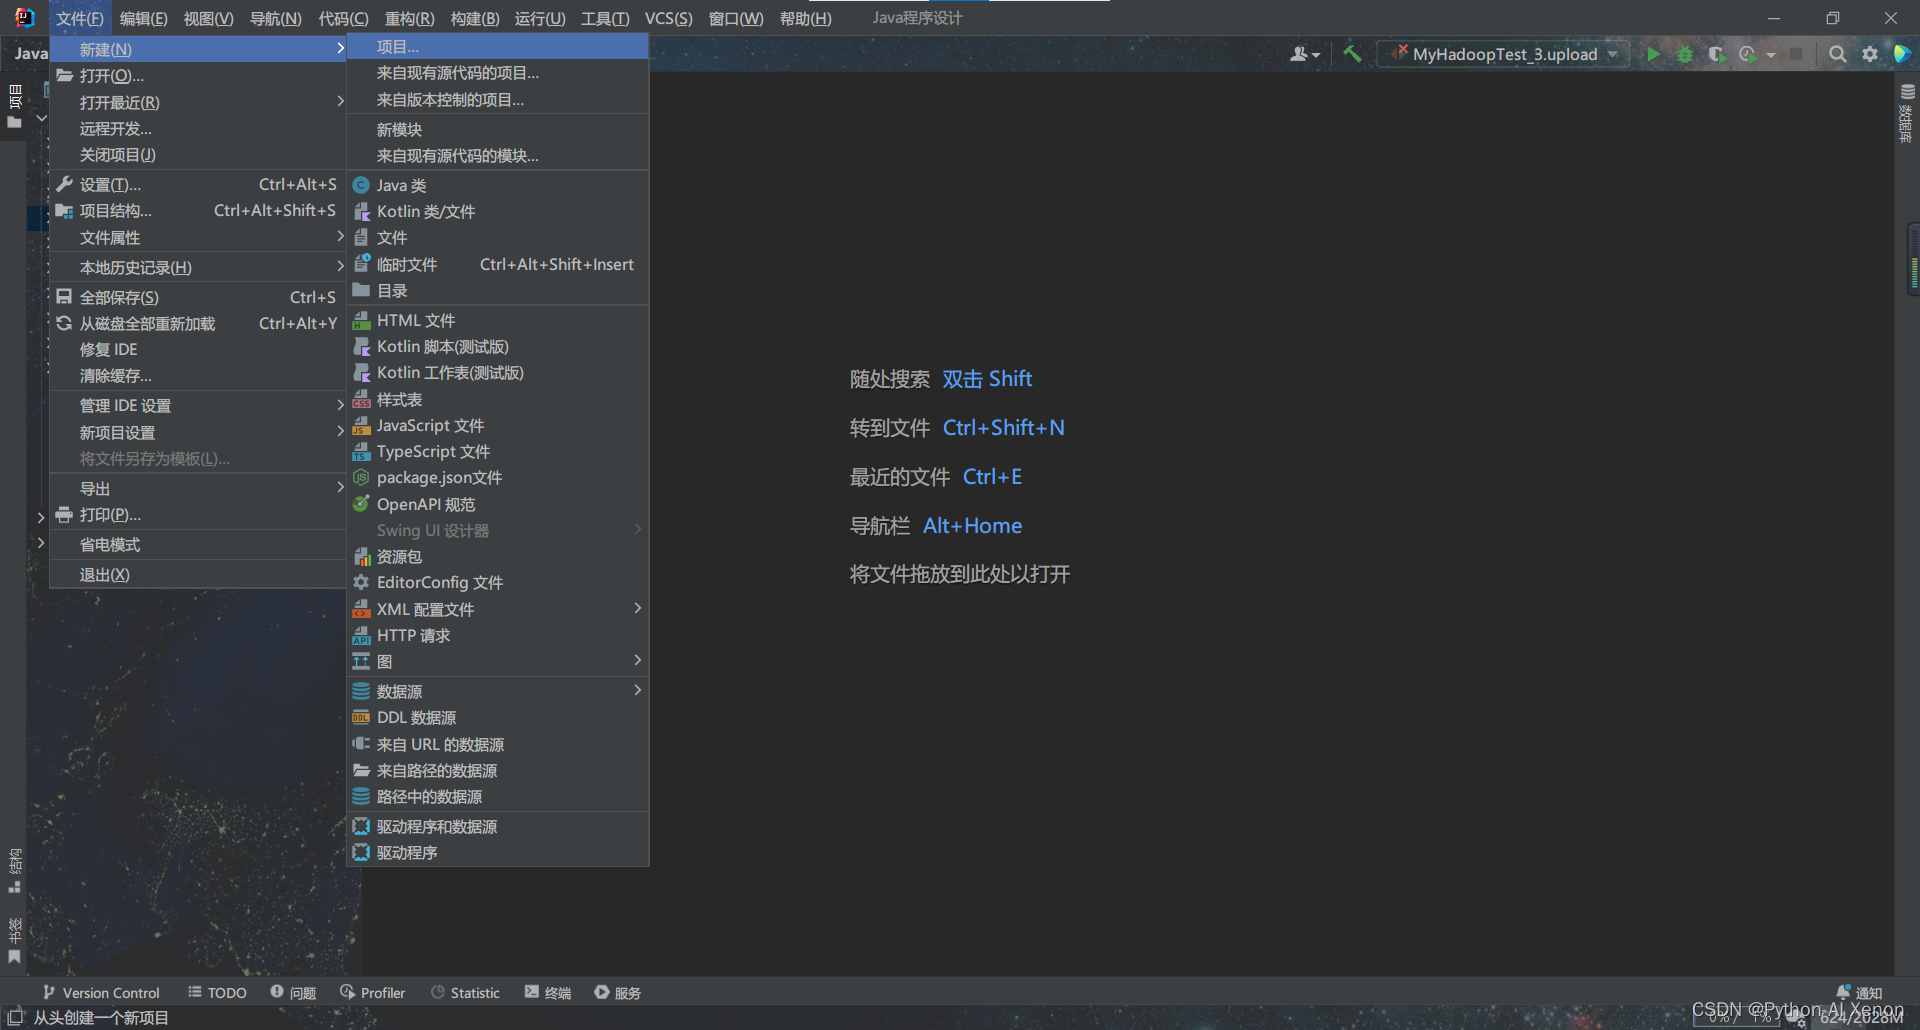
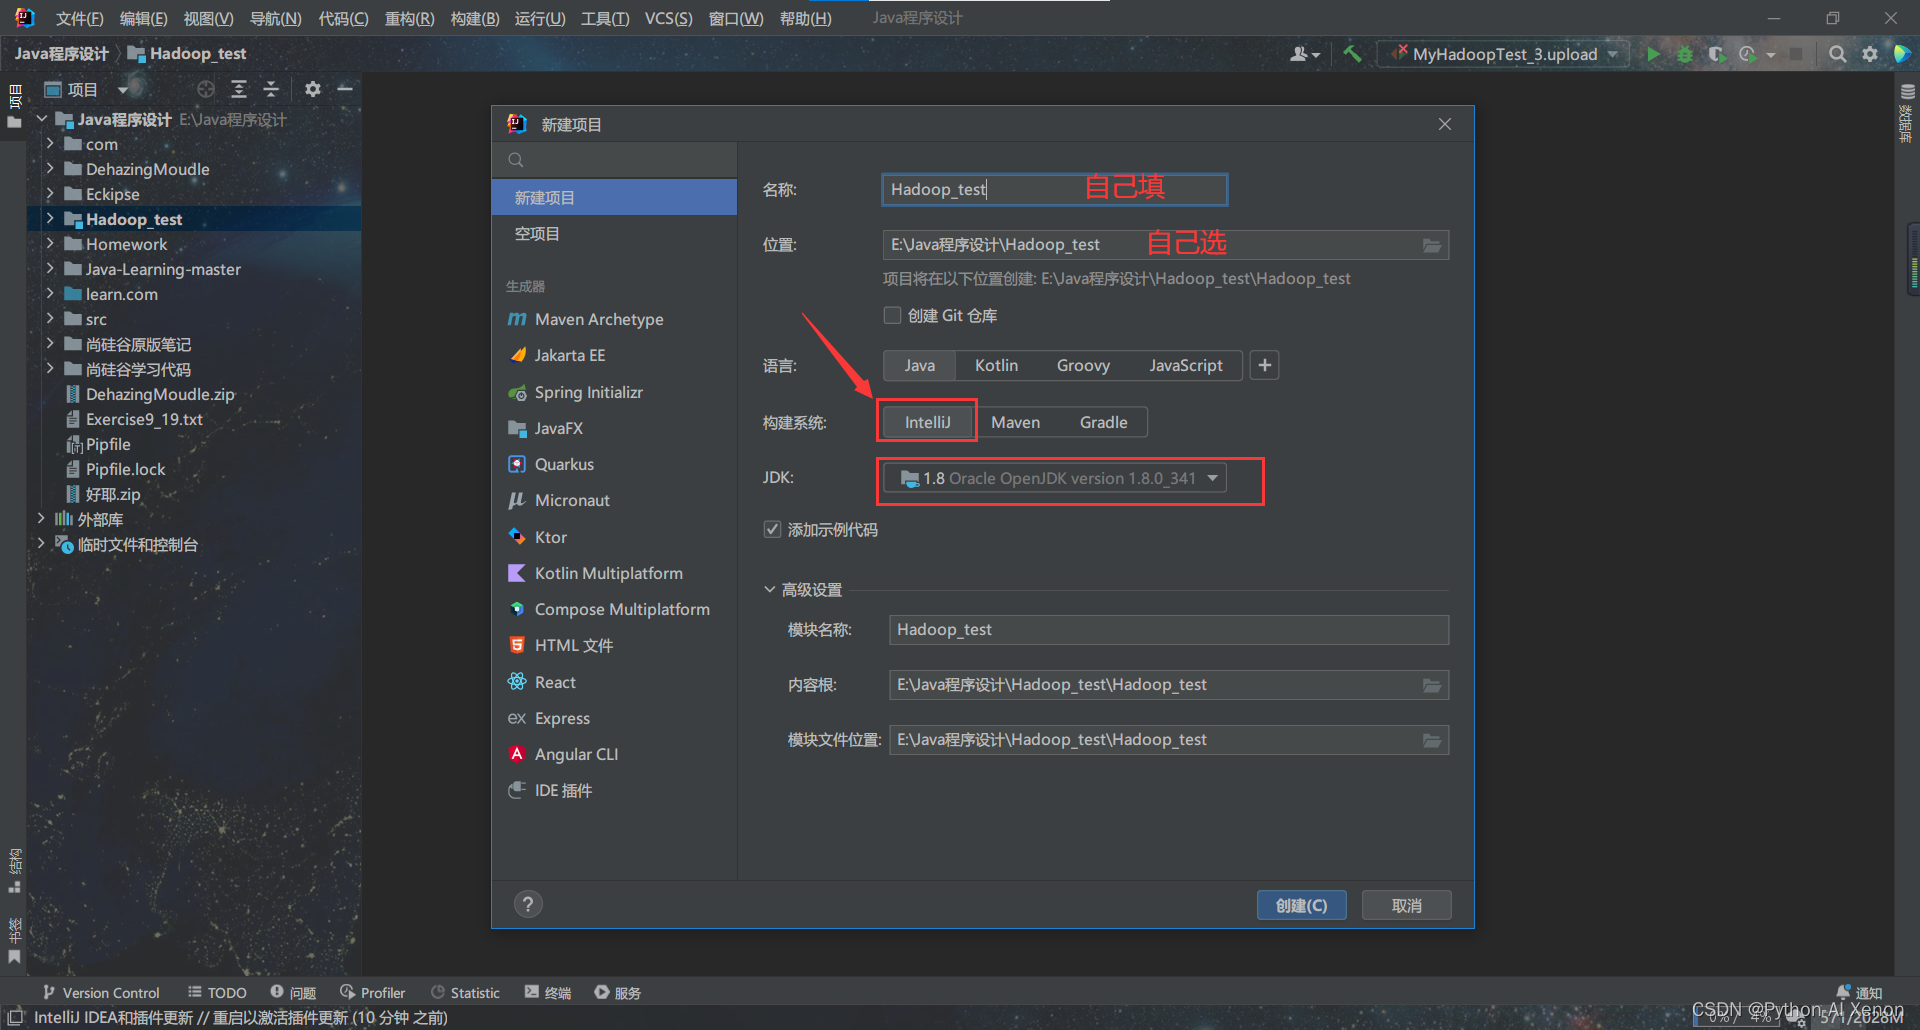
(当然,java命名规范是项目名全部小写,包名全部小写,类名首字母大写,我这里就暂且不管了)
创建完成之后会有个 main 文件,可以运行试试,能输出
"hello,world"代表可以正常使用java.- 添加 hadoop中的jar包 (可以直接选择lib文件夹导入)
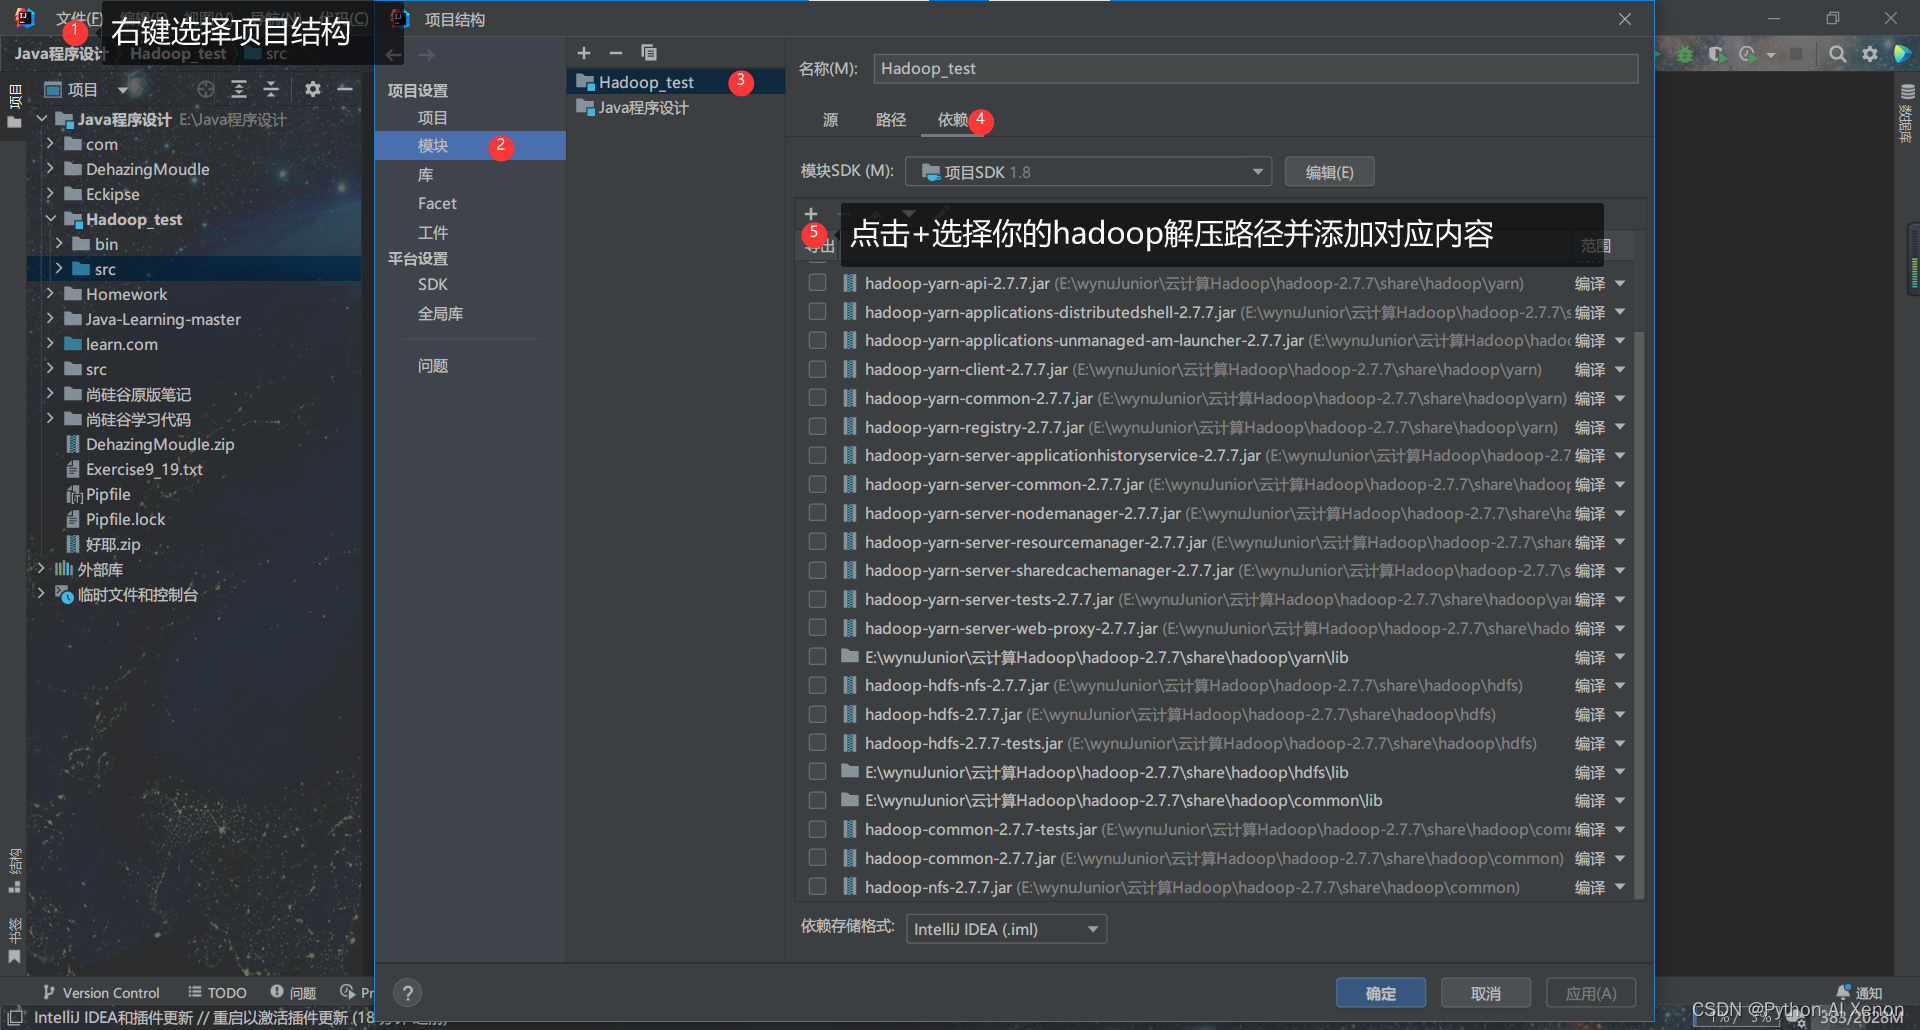
- 新建java文件进行代码编写
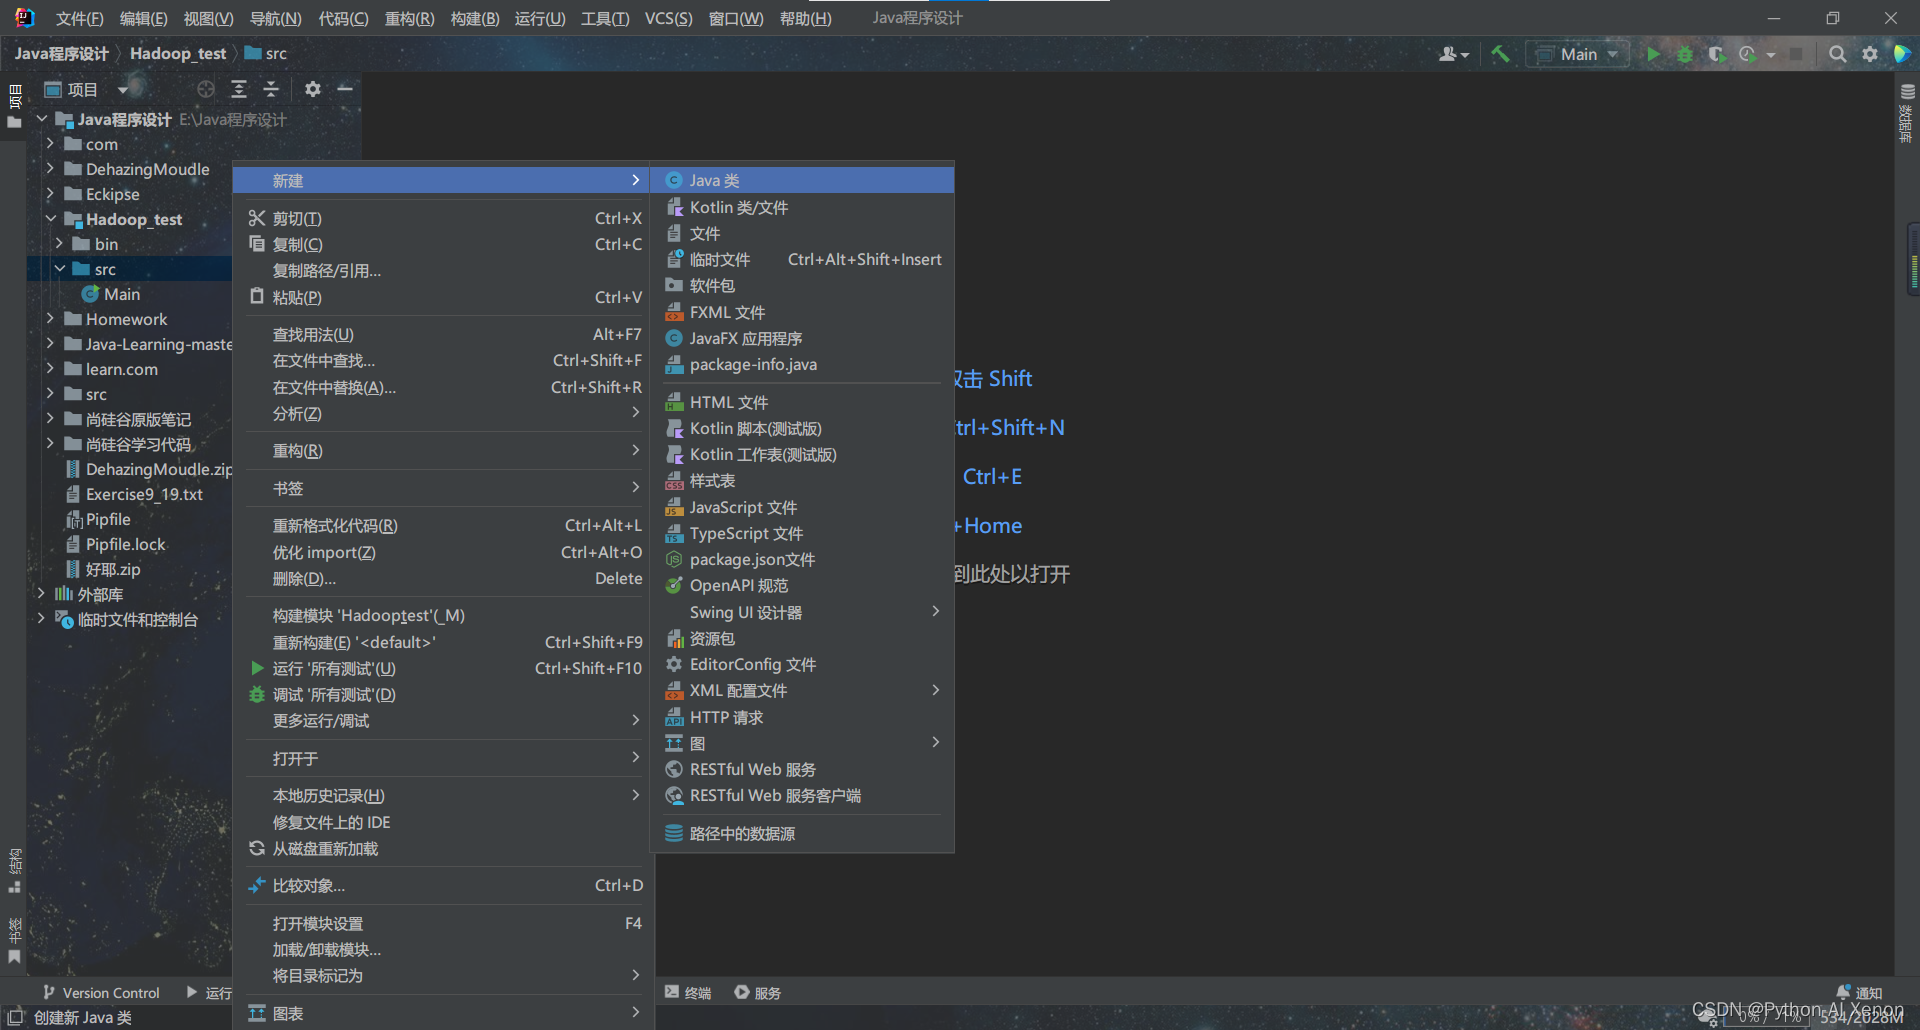
我这里将其命名为
MyHadoopTest1,后面的代码都在该文件中进行编写.通过API操作HDFS
记得打开你的虚拟机并启动Hadoop集群
先导入后续操作相关的包
import org.apache.hadoop.conf.Configuration; import org.apache.hadoop.fs.FileSystem; import org.apache.hadoop.fs.*; import org.apache.log4j.BasicConfigurator; import org.apache.log4j.PropertyConfigurator; import org.apache.zookeeper.common.IOUtils; import org.junit.jupiter.api.AfterEach; import org.junit.jupiter.api.BeforeEach; import org.junit.jupiter.api.Test; import java.io.*; import java.net.URI; import java.net.URISyntaxException; import java.nio.file.Files; import java.nio.file.Paths;- 1
- 2
- 3
- 4
- 5
- 6
- 7
- 8
- 9
- 10
- 11
- 12
- 13
- 14
- 15
下面的代码就不做过的的解释了,关键地方会有注释,特别说明,由于为了方便操作及调试,我们都采用单元测试的方式进行代码的编写(即不依赖主函数单独运行)
并且我这里采用的是 JUnit5和JUnit4有些许不同,可参考 JUnit4和JUnit5的主要区别
主函数程序进行连接测试
/* 主函数程序测试是否可以连接成功 */ public static void main(String[] args) throws Exception { BasicConfigurator.configure(); //自动快速地使用缺省Log4j环境 //1.实列化获得hdfs文件系统 Configuration configuration = new Configuration(); //2.连接的集群地址,访问nameNode的端口 String user = "root"; FileSystem fileSystem = FileSystem.get(new URI("hdfs://192.168.242.201:9000"), configuration, user); //3.打印输出测试连接是否成功 System.out.println(fileSystem); // 3 关闭资源 fileSystem.close(); System.out.println("--------over---------"); }- 1
- 2
- 3
- 4
- 5
- 6
- 7
- 8
- 9
- 10
- 11
- 12
- 13
- 14
连接成功输出类似如下:

由于影响查看结果,后面我们就不对Log4j环境进行配置了,所以请忽略后文警告
log4j:WARN!1. 初始化hdfs连接获得FileSystem对象
/* 初始化hdfs连接获得FileSystem对象 */ // 默认使用9000端口号,50070是客户端的端口号 public static final String HDFS_PATH = "hdfs://192.168.242.201:9000"; // 用于实列化hadoop的hdfs配置文件对象,用来修改配置 private Configuration configuration; // 用于实列化文件系统对象fileSystem,用来对hdfs中的文件进行操作 private FileSystem fileSystem; @BeforeEach //在每个测试方法执行前要执行的方法 public void fun_before() throws URISyntaxException, IOException, InterruptedException { // 自动快速地使用缺省Log4j环境,要查看日志请打开下面行2行的注释 // BasicConfigurator.configure(); // System.setOut(new PrintStream(new File("./outLog.txt"))); //实列化hadoop的hdfs配置文件对象 configuration = new Configuration(); //new成功即获取成功 //实列化hdfs文件系统对象fileSystem fileSystem = FileSystem.get(new URI(HDFS_PATH), configuration, "root"); System.out.println("fun_before():--------start---------"); } @AfterEach //每个测试方法执行后要执行的方法 public void fun_after() throws Exception { fileSystem.close(); //关闭hdfs文件系统对象fileSystem System.out.println("fun_after():--------over---------"); }- 1
- 2
- 3
- 4
- 5
- 6
- 7
- 8
- 9
- 10
- 11
- 12
- 13
- 14
- 15
- 16
- 17
- 18
- 19
- 20
- 21
- 22
- 23
- 24
- 25
小技巧: Junit5可以在在idea里面进行下载,下面输入@Test之后点击黄灯泡选择5.8.1就可以下载啦
1. HDFS获取文件系统
见上面
@BeforeEach操作,其中,根据文档,获取FileSystem有5种方式,这里我随便挑了一种我常用的方法进行测试.2. HDFS创建文件夹
在Hdfs根目录下创建文件夹test1和test2
@Test public void testMkdir() throws Exception { fileSystem.mkdirs(new Path("/test1")); fileSystem.mkdirs(new Path("/test2")); }- 1
- 2
- 3
- 4
- 5

3. 查看HDFS文件夹
查看根目录下有那些文件或文件夹
@Test public void testLSR() throws IOException { Path path = new Path("/"); FileStatus fileStatus = fileSystem.getFileStatus(path); System.out.println("*************************************"); System.out.println("文件根目录: " + fileStatus.getPath()); System.out.println("文件目录为:"); for (FileStatus fs : fileSystem.listStatus(path)) { System.out.println(fs.getPath()); } }- 1
- 2
- 3
- 4
- 5
- 6
- 7
- 8
- 9
- 10
- 11

4. HDFS文件上传
将本地路径的hadoop.txt上传到HDFS,请先在本地新建该文件并输入自定义内容
@Test public void testPUT() throws Exception { Path srcPath = new Path("E:/Java程序设计/Hadoop_test/src/hadoop.txt"); Path dstPath = new Path("/test1"); fileSystem.copyFromLocalFile(false, srcPath, dstPath); fileSystem.close(); System.out.println("*************************************"); System.out.println("文件上传成功!"); }- 1
- 2
- 3
- 4
- 5
- 6
- 7
- 8
- 9

5. 下载HDFS文件
将 /test1文件夹下的hadoop.txt文件下载到本地并命名未hadoop_1.txt
@Test public void testGET() throws Exception { InputStream in = fileSystem.open(new Path("/test1/hadoop.txt")); OutputStream out = Files.newOutputStream(Paths.get("./hadoop_1.txt")); IOUtils.copyBytes(in, out, 4096, true); System.out.println("*************************************"); System.out.println("文件下载成功!"); }- 1
- 2
- 3
- 4
- 5
- 6
- 7
- 8
6. 查看HDFS文件详情
查看刚刚上传的 hadoop.txt 文件中的内容
@Test public void testCAT() throws Exception { Path path = new Path("/test1/hadoop.txt"); FSDataInputStream fsDataInputStream = fileSystem.open(path); System.out.println("*************************************"); System.out.println("文件内容如下:"); int c; while ((c = fsDataInputStream.read()) != -1) { System.out.print((char) c); } fsDataInputStream.close(); }- 1
- 2
- 3
- 4
- 5
- 6
- 7
- 8
- 9
- 10
- 11
- 12

7. 删除HDFS文件或文件夹
删除/test2文件夹
@Test public void testRM() throws Exception { Path path = new Path("/test2"); fileSystem.delete(path, true); System.out.println("*************************************"); System.out.println("删除成功!"); }- 1
- 2
- 3
- 4
- 5
- 6
- 7
删除 /test1文件夹下面的 hadoop.txt 文件
@Test public void testRM1() throws Exception { Path path = new Path("test1/hadoop.txt"); fileSystem.delete(path, true); System.out.println("*************************************"); System.out.println("删除成功!"); }- 1
- 2
- 3
- 4
- 5
- 6
- 7

8.判断HDFS文件和文件夹
@Test public void testListStatus() throws IOException, InterruptedException, URISyntaxException { //获取文件配置信息 configuration = new Configuration(); fileSystem = FileSystem.get(new URI("hdfs://192.168.242.201:9000"), configuration, "root"); //判断是文件还是文件夹 FileStatus[] lisFileStatus = fileSystem.listStatus(new Path("/")); for (FileStatus fileStatus : lisFileStatus) { //如果是文件 if (fileStatus.isFile()) { System.out.println(fileStatus.getPath().getName() + " is 文件"); } else { System.out.println(fileStatus.getPath().getName() + " is 文件夹"); } } }- 1
- 2
- 3
- 4
- 5
- 6
- 7
- 8
- 9
- 10
- 11
- 12
- 13
- 14
- 15
- 16

9. 通过I/O流操作HDFS
上传文件
public static void io1() throws Exception { // 1 获取文件系统 Configuration configuration = new Configuration(); configuration.set("dfs.client.use.datanode.hostname", "true"); // configuration.set("fs.defaultFS", "hdfs://ea99qngm2v98asii1aZ:8020"); FileSystem fs = FileSystem.get(new URI("hdfs://192.168.242.201:9000"), configuration, "root"); // 2 创建输入流 FileInputStream fis = new FileInputStream(new File("E:\\Java程序设计\\Hadoop_test\\src\\hello.py")); // 3 获取输出流 FSDataOutputStream fos = fs.create(new Path("/hello2.py")); // 4 流对拷 IOUtils.copyBytes(fis, fos, configuration.size()); // 5 关闭资源 IOUtils.closeStream(fos); IOUtils.closeStream(fis); fs.close(); System.out.println("over>>>>>>>>>>上传"); }- 1
- 2
- 3
- 4
- 5
- 6
- 7
- 8
- 9
- 10
- 11
- 12
- 13
- 14
- 15
- 16
- 17
- 18
- 19
- 20
- 21
- 22
- 23
下载文件
public static void io_2() throws Exception { // 1 获取文件系统 configuration = new Configuration(); configuration.set("dfs.client.use.datanode.hostname", "true"); configuration.set("fs.defaultFS", "hdfs://192.168.242.201:8020"); FileSystem fs = FileSystem.get(new URI("hdfs://192.168.242.201:9000"), configuration, "root"); // 2 获取输入流 FSDataInputStream fis = fs.open(new Path("/hello.txt")); // 3 获取输出流 FileOutputStream fos = new FileOutputStream(new File("E:\\Java程序设计\\Hadoop_test\\src\\helloworld.py")); // 4 流的对拷 IOUtils.copyBytes(fis, fos, configuration.size()); // 5 关闭资源 IOUtils.closeStream(fos); IOUtils.closeStream(fis); fs.close(); System.out.println("over>>>>>>>>>>下载"); }- 1
- 2
- 3
- 4
- 5
- 6
- 7
- 8
- 9
- 10
- 11
- 12
- 13
- 14
- 15
- 16
- 17
- 18
- 19
- 20
- 21
- 22
-
-
相关阅读:
前端通过Blob或File文件获取二进制数据
2023-09-14 mysql-Item_subselect-分析
Kafka核心概念详解
go-zero&go web集成redis实战
【前端】HTML
git 迭代开发分支流程规范
通过R Studio用Markdown写Beamer
FME在变更地类流向统计中的应用
JavaSE 第七章 面向对象基础(下)静态&枚举&抽象类
数据库备份
- 原文地址:https://blog.csdn.net/yxn4065/article/details/128124959
