-
Java JUC并发容器之BlockingQueue的多种实现详解
Java JUC并发容器之BlockingQueue的多种实现详解
BlockingQueue
在所有的并发容器中, BlockingQueue是最常见的⼀种。 BlockingQueue是⼀个带阻塞功能的队列,当⼊队列时,若队列已满,则阻塞调⽤者;当出队列时,若队列为空,则阻塞调用者。
在Concurrent包中, BlockingQueue是⼀个接⼝,有许多个不同的实现类,如图所示。

BlockQueue类图 该接口包含了以下一些方法:
public interface BlockingQueue<E> extends Queue<E> { //... boolean add(E e); boolean offer(E e); void put(E e) throws InterruptedException; boolean remove(Object o); E take() throws InterruptedException; E poll(long timeout, TimeUnit unit) throws InterruptedException; //... }- 1
- 2
- 3
- 4
- 5
- 6
- 7
- 8
- 9
- 10
该接口和JDK集合包中的Queue接口是兼容的,同时在其基础上增加了阻塞功能。在这里,⼊队提供了
add()、offer()、put()3个方法,有什么区别呢?从上面的定义可以看到,add()和offer()的返回值是布尔类型,而put()⽆返回值,还会抛出中断异常,所以add()和offer()是⽆阻塞的,也是Queue本身定义的接⼝,而put()是阻塞的。add()和offer()的区别不大,当队列为满的时候,前者会抛出异常,后者则直接返回false。出队列与之类似,提供了
remove()、poll()、take()等方法,remove()是非阻塞式的,take()和poll()是阻塞式的。接下来,介绍BlockingQueue的一些常用实现类。
ArrayBlockingQueue
ArrayBlockingQueue是⼀个⽤数组实现的环形队列,在构造方法中,会要求传入数组的容量。
public ArrayBlockingQueue(int capacity) { this(capacity, false); } public ArrayBlockingQueue(int capacity, boolean fair) { // ... } public ArrayBlockingQueue(int capacity, boolean fair, Collection<? extends E> c) { this(capacity, fair); // ... }- 1
- 2
- 3
- 4
- 5
- 6
- 7
- 8
- 9
- 10
该阻塞队列对元素进行FIFO(先进先出)排序。队列的头是在队列上停留时间最长的元素。队列的尾部是在队列上停留时间最短的元素。在队列尾部插入新元素,队列检索操作获取队列头部的元素。
ArrayBlockingQueue是一个经典的“有界缓冲器”,其中一个固定大小的数组包含生产者插入的元素和消费者提取的元素。容量一旦创建,就不能更改。尝试将元素放入满队列将导致操作阻塞,同时,尝试从空队列中获取元素同样会阻塞。
该类支持一个可选的公平策略,用于排序等待的生产者线程和消费者线程。默认情况下,不保证这种排序。如果,将公平性设置为true的队列会以FIFO顺序授予线程访问权。公平性通常会降低吞吐量,但会减少可变性并避免饥饿。
其核心数据结构如下:
public class ArrayBlockingQueue<E> extends AbstractQueue<E> implements BlockingQueue<E>, java.io.Serializable { //... final Object[] items; // 队头指针 int takeIndex; // 队尾指针 int putIndex; int count; // 核⼼为1个锁外加两个条件 final ReentrantLock lock; private final Condition notEmpty; private final Condition notFull; //... }- 1
- 2
- 3
- 4
- 5
- 6
- 7
- 8
- 9
- 10
- 11
- 12
- 13
- 14
- 15
其中,ReentrantLock是可重入锁,在同一个时间点只能被一个线程锁持有。可重入的意思是,ReentrantLock锁,可以被单个线程多次获取。ReentraantLock是通过一个FIFO的等待队列来管理获取该锁所有线程的。在“公平锁”的机制下,线程依次排队获取锁;而“非公平锁”在锁是可获取状态时,不管自己是不是在队列的开头都会获取锁。
Condition类将Object监控器方法( wait , notify和notifyAll )分解为不同的对象,通过将它们与任意Lock实现结合使用,可以使每个对象具有多个等待集。当 Lock替换了synchronized方法和语句的使用时,“Condition替换了“对象”监视器方法的使用。
其put/take方法也很简单,如下所示 :
put方法
public void put(E e) throws InterruptedException { checkNotNull(e); // Condition与Lock联合使用,该句表示在等待队列中获取锁,当获取锁时,执行下面的语句 final ReentrantLock lock = this.lock; // 可中断的lock lock.lockInterruptibly(); try { // 如果队列满,则阻塞 while (count == items.length) notFull.await(); // 队列不满,则将数据入队 enqueue(e); } finally { lock.unlock(); } }- 1
- 2
- 3
- 4
- 5
- 6
- 7
- 8
- 9
- 10
- 11
- 12
- 13
- 14
- 15
- 16
enqueue
private void enqueue(E x) { // assert lock.getHoldCount() == 1; // assert items[putIndex] == null; final Object[] items = this.items; items[putIndex] = x; // 循环队列 if (++putIndex == items.length) putIndex = 0; count++; // 当将数据put到队列后,调用signal唤醒等待队列非空的线程 // 类似于wait/notify 生产者-消费者通信的方式 notEmpty.signal(); }- 1
- 2
- 3
- 4
- 5
- 6
- 7
- 8
- 9
- 10
- 11
- 12
- 13
take方法:
public E take() throws InterruptedException { // 尝试获取Lock锁,当获取锁时,执行下面的语句 final ReentrantLock lock = this.lock; lock.lockInterruptibly(); try { // take时,如果队列为空,则阻塞 while (count == 0) notEmpty.await(); return dequeue(); } finally { lock.unlock(); } }- 1
- 2
- 3
- 4
- 5
- 6
- 7
- 8
- 9
- 10
- 11
- 12
- 13
dequeue:
private E dequeue() { // assert lock.getHoldCount() == 1; // assert items[takeIndex] != null; final Object[] items = this.items; @SuppressWarnings("unchecked") E x = (E) items[takeIndex]; items[takeIndex] = null; // 循环队列 if (++takeIndex == items.length) takeIndex = 0; count--; if (itrs != null) itrs.elementDequeued(); // take后,调用signal唤醒等待put的生产线程,告知生产线程非满 notFull.signal(); return x; }- 1
- 2
- 3
- 4
- 5
- 6
- 7
- 8
- 9
- 10
- 11
- 12
- 13
- 14
- 15
- 16
- 17
LinkedBlockingQueue
LinkedBlockingQueue是⼀种基于单向链表的阻塞队列。该队列对元素进行FIFO(先进先出)排序。队列的头是在队列上停留时间最长的元素。队列的尾是在队列上停留时间最短的元素。在队列尾部插入新元素,队列检索操作获取队列头部的元素。链接队列通常比基于数组的队列具有更高的吞吐量,但在大多数并发应用程序中性能的可预测性较差。
因为队头和队尾是2个指针分开操作的,所以用了2把锁+2个条件,同时有1个AtomicInteger的原子变量记录count数。
public class LinkedBlockingQueue<E> extends AbstractQueue<E> implements BlockingQueue<E>, java.io.Serializable { // ... private final int capacity; // 原⼦变量,当前元素数量 private final AtomicInteger count = new AtomicInteger(0); // 单向链表的头部 private transient Node<E> head; // 单向链表的尾部 private transient Node<E> last; // 两把锁,两个条件 private final ReentrantLock takeLock = new ReentrantLock(); private final Condition notEmpty = takeLock.newCondition(); private final ReentrantLock putLock = new ReentrantLock(); private final Condition notFUll = putLock.newCondition(); // ... }- 1
- 2
- 3
- 4
- 5
- 6
- 7
- 8
- 9
- 10
- 11
- 12
- 13
- 14
- 15
- 16
- 17
- 18
在其构造⽅法中,也可以指定队列的总容量。如果不指定,默认为Integer.MAX_VALUE。 可选的容量绑定构造函数参数是防止队列过度扩展的一种方法。在每次插入时动态创建链接节点,除非这会使队列超出容量。
public LinkedBlockingQueue() { this(Integer.MAX_VALUE); }- 1
- 2
- 3
take实现:
public E take() throws InterruptedException { E x; int c = -1; // 当前链表的包含的元素个数 final AtomicInteger count = this.count; // 尝试获取Lock锁,当获取锁时,执行下面的语句 final ReentrantLock takeLock = this.takeLock; takeLock.lockInterruptibly(); try { // 如果链表为空,则阻塞 while (count.get() == 0) { notEmpty.await(); } // 链表头出链 x = dequeue(); // 元素个数减1 c = count.getAndDecrement(); if (c > 1) // signal方法将唤醒将等待时间最长的线程(如果存在),从此条件的等待队列(wait set)移动到所属锁的等待队列(entry list)。 notEmpty.signal(); } finally { takeLock.unlock(); } if (c == capacity) // 唤醒阻塞的put线程 signalNotFull(); return x; }- 1
- 2
- 3
- 4
- 5
- 6
- 7
- 8
- 9
- 10
- 11
- 12
- 13
- 14
- 15
- 16
- 17
- 18
- 19
- 20
- 21
- 22
- 23
- 24
- 25
- 26
- 27
- 28
put方法:
public void put(E e) throws InterruptedException { if (e == null) throw new NullPointerException(); // Note: convention in all put/take/etc is to preset local var // holding count negative to indicate failure unless set. int c = -1; Node<E> node = new Node<E>(e); // 尝试获取Lock锁,当获取锁时,执行下面的语句 final ReentrantLock putLock = this.putLock; final AtomicInteger count = this.count; putLock.lockInterruptibly(); try { /* * Note that count is used in wait guard even though it is * not protected by lock. This works because count can * only decrease at this point (all other puts are shut * out by lock), and we (or some other waiting put) are * signalled if it ever changes from capacity. Similarly * for all other uses of count in other wait guards. */ // 链表个数==设定的容量,非满线程阻塞 while (count.get() == capacity) { notFull.await(); } // 入链 enqueue(node); c = count.getAndIncrement(); if (c + 1 < capacity) notFull.signal(); } finally { putLock.unlock(); } if (c == 0) signalNotEmpty(); }- 1
- 2
- 3
- 4
- 5
- 6
- 7
- 8
- 9
- 10
- 11
- 12
- 13
- 14
- 15
- 16
- 17
- 18
- 19
- 20
- 21
- 22
- 23
- 24
- 25
- 26
- 27
- 28
- 29
- 30
- 31
- 32
- 33
- 34
LinkedBlockingQueue和ArrayBlockingQueue的差异
- 为了提⾼并发度,⽤2把锁,分别控制队头、队尾的操作。意味着在
put()和put()之间、take()与take()之间是互斥的,put()和take()之间并不互斥。但对于count变量,双方都需要操作,所以必须是原⼦类型。 - 因为各自拿了⼀把锁,所以当需要调用对方的condition的signal时,还必须再加上对方的锁,就是
signalNotEmpty()和signalNotFull()方法。示例如下所示。
private void signalNotEmpty() { final ReentrantLock takeLock = this.takeLock; // 必须先获取takeLock才可以调用notEmpty.signal()方法 takeLock.lock(); try { notEmpty.signal(); } finally { takeLock.unlock(); } } private void signalNotFull() { final ReentrantLock putLock = this.putLock; // 必须先获取putLock,才可以调用notFull.signal()方法 putLock.lock(); try { notFull.signal(); } finally { putLock.unlock(); } }- 1
- 2
- 3
- 4
- 5
- 6
- 7
- 8
- 9
- 10
- 11
- 12
- 13
- 14
- 15
- 16
- 17
- 18
- 19
- 20
- 21
- 不仅put会通知 take, take 也会通知 put。当put 发现非满的时候,也会通知其他 put线程;当take发现非空的时候,也会通知其他take线程。
PriorityBlockingQueue
队列通常是先进先出的,而PriorityQueue是按照元素的优先级从小到大出队列的。正因为如此, PriorityQueue维护了一个最小二叉堆,其中的2个元素之间需要可以比较大小,并实现Comparable接口。
其核心数据结构如下:
public class PriorityBlockingQueue<E> extends AbstractQueue<E> implements BlockingQueue<E>, java.io.Serializable { //... // ⽤数组实现的⼆插⼩根堆 private transient Object[] queue; private transient int size; private transient Comparator<? super E> comparator; // 1个锁+⼀个条件,没有⾮满条件 private final ReentrantLock lock; private final Condition notEmpty; //... }- 1
- 2
- 3
- 4
- 5
- 6
- 7
- 8
- 9
- 10
- 11
- 12
- 13
- 14
其构造方法如下所示,如果不指定初始大小,内部会设定⼀个默认值11,当元素个数超过这个大小之后,会自动扩容。
public PriorityBlockingQueue() { this(DEFAULT_INITIAL_CAPACITY, null); } private static final int DEFAULT_INITIAL_CAPACITY = 11;- 1
- 2
- 3
- 4
- 5
下面是对应的put/take方法的实现。
put方法的实现:
public void put(E e) { offer(e); // never need to block } public boolean offer(E e) { if (e == null) throw new NullPointerException(); // 尝试获取Lock锁,当获取锁时,执行下面的语句 final ReentrantLock lock = this.lock; lock.lock(); int n, cap; Object[] array; while ((n = size) >= (cap = (array = queue).length)) // 如果元素超过了数组长度,则扩容 tryGrow(array, cap); try { Comparator<? super E> cmp = comparator; if (cmp == null) // 如果没有定义比较操作,则使用元素自身的比较功能 siftUpComparable(n, e, array); else // 元素入堆,即执行siftUp siftUpUsingComparator(n, e, array, cmp); size = n + 1; // 因为有元素入堆了,则唤醒等待非空条件的线程 notEmpty.signal(); } finally { lock.unlock(); } return true; }- 1
- 2
- 3
- 4
- 5
- 6
- 7
- 8
- 9
- 10
- 11
- 12
- 13
- 14
- 15
- 16
- 17
- 18
- 19
- 20
- 21
- 22
- 23
- 24
- 25
- 26
- 27
- 28
- 29
- 30
- 31
take的实现 :
public E take() throws InterruptedException { final ReentrantLock lock = this.lock; lock.lockInterruptibly(); E result; try { while ( (result = dequeue()) == null) // 由于堆为空,则非空条件Condition阻塞 // 直到上述offer方法中元素入堆后,调用signal唤醒 notEmpty.await(); } finally { lock.unlock(); } return result; }- 1
- 2
- 3
- 4
- 5
- 6
- 7
- 8
- 9
- 10
- 11
- 12
- 13
- 14
dequeue方法:
private E dequeue() { int n = size - 1; if (n < 0) return null; else { Object[] array = queue; // 因为是最小二叉堆,堆顶就是要出队的元素 E result = (E) array[0]; E x = (E) array[n]; array[n] = null; Comparator<? super E> cmp = comparator; if (cmp == null) // 堆顶元素出堆后,需要重新调整堆,执行siftDown操作 siftDownComparable(0, x, array, n); else // 堆顶元素出堆后,需要重新调整堆,执行siftDown操作 siftDownUsingComparator(0, x, array, n, cmp); size = n; return result; } }- 1
- 2
- 3
- 4
- 5
- 6
- 7
- 8
- 9
- 10
- 11
- 12
- 13
- 14
- 15
- 16
- 17
- 18
- 19
- 20
- 21
从上面可以看到,在阻塞的实现方面,和ArrayBlockingQueue的机制相似,主要区别是用数组实现了⼀个⼆叉堆,从而实现按优先级从小到大出队列。另⼀个区别是没有notFull条件,当元素个数超出数组长度时,执执行扩容操作。
DelayQueue
DelayQueue即延迟队列,也就是⼀个按延迟时间从小到大出队的PriorityQueue。所谓延迟时间,就是“未来将要执行的时间”减去“当前时间”。为此,放入DelayQueue中的元素,必须实现Delayed接口,如下所示。
public interface Delayed extends Comparable<Delayed> { /** * Returns the remaining delay associated with this object, in the * given time unit. * * @param unit the time unit * @return the remaining delay; zero or negative values indicate * that the delay has already elapsed */ // 返回距离指定时间的剩余延迟时间 long getDelay(TimeUnit unit); }- 1
- 2
- 3
- 4
- 5
- 6
- 7
- 8
- 9
- 10
- 11
- 12
- 13
关于该接⼝:
- 如果getDelay的返回值小于或等于0,则说明该元素到期,需要从队列中拿出来执行。
- 该接口首先继承了 Comparable 接口,所以要实现该接口,必须实现 Comparable 接口。具体来说,就是基于getDelay()的返回值比较两个元素的大小。
下面看⼀下DelayQueue的核心数据结构。
public class DelayQueue<E extends Delayed> extends AbstractQueue<E> implements BlockingQueue<E> { // ... // ⼀把锁和⼀个⾮空条件 private final transient ReentrantLock lock = new ReentrantLock(); private final Condition available = lock.newCondition(); // 优先级队列 private final PriorityQueue<E> q = new PriorityQueue<E>(); // ... }- 1
- 2
- 3
- 4
- 5
- 6
- 7
- 8
- 9
- 10
下面介绍put/take的实现,先从take说起,因为这样更能看出DelayQueue的特性。
public E take() throws InterruptedException { final ReentrantLock lock = this.lock; lock.lockInterruptibly(); try { for (;;) { // 取出二叉堆的堆顶元素,即延迟时间最小的 E first = q.peek(); if (first == null) // 如果队列为空,则take线程阻塞 available.await(); else { long delay = first.getDelay(NANOSECONDS); // 堆顶元素的延迟时间小于等于0,出队列返回 if (delay <= 0) return q.poll(); first = null; // don't retain ref while waiting // 如果有其它线程也在等待该元素,则无限期等待。 if (leader != null) available.await(); else { // 如果没有其它线程等待,当前线程变成leader Thread thisThread = Thread.currentThread(); leader = thisThread; try { // 因为有可能此时堆顶元素的延迟时间还没到,所以需要再等待有限delay时间 // 当前线程是leader线程,等待有限时间delay后被唤醒,返回堆顶元素 available.awaitNanos(delay); } finally { if (leader == thisThread) leader = null; } } } } } finally { if (leader == null && q.peek() != null) available.signal(); lock.unlock(); } }- 1
- 2
- 3
- 4
- 5
- 6
- 7
- 8
- 9
- 10
- 11
- 12
- 13
- 14
- 15
- 16
- 17
- 18
- 19
- 20
- 21
- 22
- 23
- 24
- 25
- 26
- 27
- 28
- 29
- 30
- 31
- 32
- 33
- 34
- 35
- 36
- 37
- 38
- 39
- 40
关于take()方法:
- 不同于⼀般的阻塞队列,只在队列为空的时候,才阻塞。如果堆顶元素的延迟时间没到,也会阻塞。
- 在上面的代码中使⽤了⼀个优化技术,用一个Thread leader变量记录了等待堆顶元素的第1个线程。为什么这样做呢?通过
getDelay()可以知道堆顶元素何时到期,不必无限期等待,可以使用condition.awaitNanos()等待⼀个有限的时间。只有当发现还有其他线程也在等待堆顶元素(leader!=NULL)时,才需要无限期等待。
put的实现:
public void put(E e) { offer(e); }- 1
- 2
- 3
public boolean offer(E e) { final ReentrantLock lock = this.lock; lock.lock(); try { // 元素放入二叉堆 q.offer(e); // 如果放进去的元素刚好在堆顶,说明放入的元素延迟时间最小 // 需要通知等待的线程 // 否则放入的元素不在堆顶,没有必要通知等待的线程 if (q.peek() == e) { leader = null; available.signal(); } return true; } finally { lock.unlock(); } }- 1
- 2
- 3
- 4
- 5
- 6
- 7
- 8
- 9
- 10
- 11
- 12
- 13
- 14
- 15
- 16
- 17
- 18
注意:不是每放入⼀个元素,都需要通知等待的线程。放入的元素,如果其延迟时间⼤于当前堆顶的元素延迟时间,就没必要通知等待的线程;只有当延迟时间是最小的,在堆顶时,才有必要通知等待的线程。
SynchronousQueue
SynchronousQueue是⼀种特殊的BlockingQueue,它本身没有容量。先调
put(),线程会阻塞。直到另外⼀个线程调用了take(),两个线程才同时解锁,可以理解为容量为0的BlockingQueue,反之亦然。对于多个线程而言,例如3个线程,调用3次put(), 3个线程都会阻塞。直到另外的线程调用3次take(), 6个线程才同时解锁,反之亦然。接下来看SynchronousQueue的实现。
构造方法:
public SynchronousQueue(boolean fair) { transferer = fair ? new TransferQueue<E>() : new TransferStack<E>(); }- 1
- 2
- 3
和锁⼀样,也有公平和非公平模式。如果是公平模式,则⽤TransferQueue实现。如果是非公平模式,则用TransferStack实现。这两个类分别是什么呢?先看⼀下put/take的实现。
put方法:
public void put(E e) throws InterruptedException { if (e == null) throw new NullPointerException(); if (transferer.transfer(e, false, 0) == null) { Thread.interrupted(); throw new InterruptedException(); } }- 1
- 2
- 3
- 4
- 5
- 6
- 7
take方法:
public E take() throws InterruptedException { E e = transferer.transfer(null, false, 0); if (e != null) return e; Thread.interrupted(); throw new InterruptedException(); }- 1
- 2
- 3
- 4
- 5
- 6
- 7
可以看到, put/take都调⽤了transfer(…)接口。而TransferQueue和TransferStack分别实现了这个接口。该接口在SynchronousQueue内部,如下所示。如果是
put(),则第1个参数就是对应的元素,如果是take(),则第1个参数为null。后2个参数分别为是否设置超时和对应的超时时间。abstract static class Transferer<E> { /** * Performs a put or take. * * @param e if non-null, the item to be handed to a consumer; * if null, requests that transfer return an item * offered by producer. * @param timed if this operation should timeout * @param nanos the timeout, in nanoseconds * @return if non-null, the item provided or received; if null, * the operation failed due to timeout or interrupt -- * the caller can distinguish which of these occurred * by checking Thread.interrupted. */ abstract E transfer(E e, boolean timed, long nanos); }- 1
- 2
- 3
- 4
- 5
- 6
- 7
- 8
- 9
- 10
- 11
- 12
- 13
- 14
- 15
- 16
接下来看⼀下什么是公平模式和非公平模式。假设3个线程分别调用了
put(), 3个线程会进⼊阻塞状态,直到其他线程调用3次take(),和3个put()⼀⼀配对。如果是公平模式(队列模式),则第1个调用
put()的线程1会在队列头部,第1个到来的take()线程和它进行配对,遵循先到先配对的原则,所以是公平的。如果是非公平模式(栈模式),则第3个调用put()的线程3会在栈顶,第1个到来的take()线程和它进行配对,遵循的是后到先配对的原则,所以是非公平的。
下⾯分别看⼀下TransferQueue和TransferStack的实现。
- TransferQueue
public class SynchronousQueue<E> extends AbstractQueue<E> implements BlockingQueue<E>, java.io.Serializable { // ... static final class TransferQueue<E> extends Transferer<E> { static final class QNode { volatile QNode next; volatile Object item; volatile Thread waiter; final boolean isData; //... } transient volatile QNode head; transient volatile QNode tail; // ... } }- 1
- 2
- 3
- 4
- 5
- 6
- 7
- 8
- 9
- 10
- 11
- 12
- 13
- 14
- 15
- 16
从上面的代码可以看出, TransferQueue是⼀个基于单向链表而实现的队列,通过head和tail 2个指针记录头部和尾部。初始的时候, head和tail会指向⼀个空节点,构造⽅法如下所示。
TransferQueue() { QNode h = new QNode(null, false); // initialize to dummy node. head = h; tail = h; }- 1
- 2
- 3
- 4
- 5
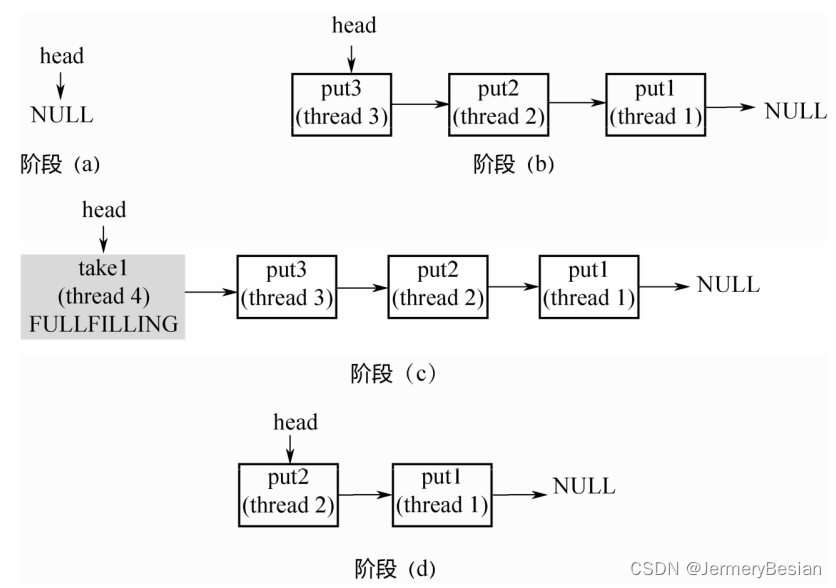
下面显示一个TransferQueue的执行过程:
- 阶段(a):队列中是⼀个空的节点, head/tail都指向这个空节点。
- 阶段(b): 3个线程分别调⽤put,⽣成3个QNode,进⼊队列。
- 阶段(c):来了⼀个线程调⽤take,会和队列头部的第1个QNode进⾏配对。
- 阶段(d):第1个QNode出队列。

这里有⼀个关键点: put节点和take节点⼀旦相遇,就会配对出队列,所以在队列中不可能同时存在put节点和take节点,要么所有节点都是put节点,要么所有节点都是take节点。
接下来看⼀下TransferQueue的代码实现。
E transfer(E e, boolean timed, long nanos) { /* Basic algorithm is to loop trying to take either of * two actions: * * 1. If queue apparently empty or holding same-mode nodes, * try to add node to queue of waiters, wait to be * fulfilled (or cancelled) and return matching item. * * 2. If queue apparently contains waiting items, and this * call is of complementary mode, try to fulfill by CAS'ing * item field of waiting node and dequeuing it, and then * returning matching item. * * In each case, along the way, check for and try to help * advance head and tail on behalf of other stalled/slow * threads. * * The loop starts off with a null check guarding against * seeing uninitialized head or tail values. This never * happens in current SynchronousQueue, but could if * callers held non-volatile/final ref to the * transferer. The check is here anyway because it places * null checks at top of loop, which is usually faster * than having them implicitly interspersed. */ QNode s = null; // constructed/reused as needed boolean isData = (e != null); for (;;) { QNode t = tail; QNode h = head; // 队列还未初始化,自旋等待 if (t == null || h == null) // saw uninitialized value continue; // spin // 队列为空或者当前线程和队列中元素为同一种模式 // 两种模式:put或take if (h == t || t.isData == isData) { // empty or same-mode QNode tn = t.next; // 不一致读,重复执行for循环 if (t != tail) // inconsistent read continue; if (tn != null) { // lagging tail advanceTail(t, tn); continue; } if (timed && nanos <= 0) // can't wait return null; if (s == null) // 新建一个节点 s = new QNode(e, isData); // casNext里利用CAS操作尝试将S替换队尾的Null // 也就是相当于将put加入队尾 if (!t.casNext(null, s)) // failed to link in continue; // 上面添加了新的节点到队尾,所以需要后移tail指针 advanceTail(t, s); // swing tail and wait // 方法里调用park将线程进入阻塞 Object x = awaitFulfill(s, e, timed, nanos); if (x == s) { // wait was cancelled clean(t, s); return null; } // 从阻塞中唤醒,确定已经处于队列中的第1个元素 if (!s.isOffList()) { // not already unlinked advanceHead(t, s); // unlink if head if (x != null) // and forget fields s.item = s; s.waiter = null; } return (x != null) ? (E)x : e; } else { // complementary-mode // else里表示不是同一种模式 // 则当前线程可以和队列中的第一个元素进行配对 // 取队列中的第一个元素 QNode m = h.next; // node to fulfill // 不一致读 if (t != tail || m == null || h != head) continue; // inconsistent read Object x = m.item; // isData == (x != null) 表示已经配对 // m.casItem(x, e) 表示尝试配对 if (isData == (x != null) || // m already fulfilled x == m || // m cancelled !m.casItem(x, e)) { // lost CAS // 已经配对,直接出队列 advanceHead(h, m); // dequeue and retry continue; } // 配对成功,出队列 advanceHead(h, m); // successfully fulfilled // 唤醒队列中与第一个元素对应的线程 LockSupport.unpark(m.waiter); // 返回队头元素的节点 return (x != null) ? (E)x : e; } } }- 1
- 2
- 3
- 4
- 5
- 6
- 7
- 8
- 9
- 10
- 11
- 12
- 13
- 14
- 15
- 16
- 17
- 18
- 19
- 20
- 21
- 22
- 23
- 24
- 25
- 26
- 27
- 28
- 29
- 30
- 31
- 32
- 33
- 34
- 35
- 36
- 37
- 38
- 39
- 40
- 41
- 42
- 43
- 44
- 45
- 46
- 47
- 48
- 49
- 50
- 51
- 52
- 53
- 54
- 55
- 56
- 57
- 58
- 59
- 60
- 61
- 62
- 63
- 64
- 65
- 66
- 67
- 68
- 69
- 70
- 71
- 72
- 73
- 74
- 75
- 76
- 77
- 78
- 79
- 80
- 81
- 82
- 83
- 84
- 85
- 86
- 87
- 88
- 89
- 90
- 91
- 92
- 93
- 94
- 95
- 96
- 97
- 98
- 99
- 100
- 101
- 102
- 103
总结
整个 for 循环有两个大的 if-else 分⽀,如果当前线程和队列中的元素是同⼀种模式(都是put节点或者take节点),则与当前线程对应的节点被加入队列尾部并且阻塞。如果不是同⼀种模式,则选取队列头部的第1个元素进行配对。
这⾥的配对就是
m.casItem(x, e),把自己的item x换成对方的item e,如果CAS操作成功,则配对成功。如果是put节点,则isData=true, item! =null;如果是take节点,则isData=false, item=null。- 对于take节点而言,如果跟队头的put元素配对成功,则CAS操作
UNSAFE.compareAndSwapObject(this, itemOffset, cmp, val);会尝试将take节点的item=null赋给队头的put item=e替换。 - 对于put节点而言,如果跟队头的take元素配对成功,则CAS操作会尝试将put节点的item=e赋给队头的take item=null。
如果CAS操作不成功,则isData和item之间将不⼀致,也就是isData! =(x! =null),通过这个条件可以判断节点是否已经被匹配过了。
SynchronousQueue的代码相对上面的来说,比较难理解。大家可以写个测试程序,来Debug上述transfer方法的过程。
一个简单的测试代码如下:
public class SynchronizeQueueTest { public static void main(String[] args) throws InterruptedException { SynchronousQueue<Person> queue = new SynchronousQueue(true); for(int i = 0; i < 1; i++){ Person person = new Person(10 + (int)(Math.random()*10)); new Thread(() -> { try { queue.put(person); } catch (InterruptedException e) { e.printStackTrace(); } }).start(); } Thread.sleep(10); for(int i = 0 ; i < 1; i++) { new Thread(() -> { try { Person take = queue.take(); System.out.println(take); } catch (InterruptedException e) { e.printStackTrace(); } }).start(); } } }- 1
- 2
- 3
- 4
- 5
- 6
- 7
- 8
- 9
- 10
- 11
- 12
- 13
- 14
- 15
- 16
- 17
- 18
- 19
- 20
- 21
- 22
- 23
- 24
- 25
- 26
- 27
- 28
- 29
- 30
- 31
- TransferStack
TransferStack的定义如下所示,首先,它也是⼀个单向链表。不同于队列,只需要head指针就能实现入栈和出栈操作。
static final class TransferStack extends Transferer { static final int REQUEST = 0; static final int DATA = 1; static final int FULFILLING = 2; static final class SNode { volatile SNode next; // 单向链表 volatile SNode match; // 配对的节点 volatile Thread waiter; // 对应的阻塞线程 Object item; int mode; // 三种模式 //... } volatile SNode head; }- 1
- 2
- 3
- 4
- 5
- 6
- 7
- 8
- 9
- 10
- 11
- 12
- 13
- 14
链表中的节点有三种状态, REQUEST对应take节点, DATA对应put节点,⼆者配对之后,会生成⼀个FULFILLING节点,⼊栈,然后FULLING节点和被配对的节点⼀起出栈。
流程:
- 阶段(a): head指向NULL。不同于TransferQueue,这里没有空的头节点。
- 阶段(b): 3个线程调用3次put,依次入栈。
- 阶段(c):线程4调用take,和栈顶的第1个元素配对,生成FULLFILLING节点,入栈。
- 阶段(d):栈顶的2个元素同时入栈。
-
相关阅读:
扩展包的安装
甘露糖-顺铂mannose-cisplatin|甘露糖-聚乙二醇-顺铂cisplatin-PEG-mannose
ARM IIC总线实现温湿传感器
SpringCloud(35):Nacos 服务发现快速入门
Jmeter组件作用域及执行顺序
浦惠钱包app拉新推广渠道 实时数据
一文带你了解RabbitMQ
要精通Java,先研究它的执行原理
上海国际会展深入未来智能相机的发展趋势
外汇天眼:如何交易外汇缺口?
- 原文地址:https://blog.csdn.net/Urbanears/article/details/128095051
