-
RabbitMQ 快速入门-消息的收发
RabbitMQ 快速入门七种简单模式
起步
七种模式
这七种模型其实是 RabbitMQ 官方入门文档中给出的消息队运行模式
分别是:
- “Hello World!” (最初入门,一发一收)
- Work Queues (工作队列,一发多收)
- Publish/Subscribe (发布/订阅)
- Routing(消息路由)
- Topics(话题)
- RPC(请求/回复)
- Publisher Confirms(发布者确认)
官网地址:https://www.rabbitmq.com/getstarted.html

项目依赖
推荐创建两个 SpringBoot 项目,一个作为生产者,另一个作为消费者
也可使用 Maven 的继承聚合模式管理两个项目
项目中需要引入下面的依赖
<dependency> <groupId>org.springframework.bootgroupId> <artifactId>spring-boot-starter-amqpartifactId> dependency>- 1
- 2
- 3
- 4
- 5
1、“Hello World!”
最简单的模式就是一发一收,也是最基础的模式,所以官方称之为 “Hello World!”,表示最初的入门

(1) Connection 方式
RabbitMQ 中有几种概念,分别是:虚拟主机(virtualHost),通道(channel),队列(queue),还有一个交换机(exchanges)的概念在之后会遇到
服务先与虚拟主机建立连接,然后创建通道,声明或创建队列之后发送或接收消息,消息最终会在队列中传输
下面使用 connection 的方式来实现接发消息,以便于理解 RabbitMQ 的模式(不常用到,了解即可)
生产者测试类
@SpringBootTest public class PublisherTest { @Test public void testSendMessage() throws IOException, TimeoutException { // 1.建立连接 ConnectionFactory factory = new ConnectionFactory(); // 1.1.设置连接参数,分别是:主机名、端口号、vhost、用户名、密码 factory.setHost("192.168.0.102"); factory.setPort(5672); factory.setVirtualHost("/"); factory.setUsername("root"); factory.setPassword("123456"); // 1.2.建立连接 Connection connection = factory.newConnection(); // 2.创建通道 Channel Channel channel = connection.createChannel(); // 3. 声明队列(不存在则创建) String queueName = "simple.queue"; // 队列名 channel.queueDeclare(queueName, false, false, false, null); // 4.发送消息 String message = "hello, rabbitmq!"; channel.basicPublish("", queueName, null, message.getBytes()); System.out.println("发送消息成功:" + message); // 5.关闭通道和连接 channel.close(); connection.close(); } }- 1
- 2
- 3
- 4
- 5
- 6
- 7
- 8
- 9
- 10
- 11
- 12
- 13
- 14
- 15
- 16
- 17
- 18
- 19
- 20
- 21
- 22
- 23
- 24
- 25
- 26
- 27
- 28
- 29
- 30
- 31
- 32
消费者测试类
@SpringBootTest public class ConsumerTest { public static void main(String[] args) throws IOException, TimeoutException { // 1. 建立连接 ConnectionFactory factory = new ConnectionFactory(); // 1.1 设置连接参数,分别是:主机名、端口号、vhost、用户名、密码 factory.setHost("192.168.0.102"); factory.setPort(5672); factory.setVirtualHost("/"); factory.setUsername("root"); factory.setPassword("123456"); // 1.2 建立连接 Connection connection = factory.newConnection(); // 2. 创建通道 Channel Channel channel = connection.createChannel(); // 3. 声明队列(不存在则创建) String queueName = "simple.queue"; // 队列名 channel.queueDeclare(queueName, false, false, false, null); // 4. 获取消息 channel.basicConsume(queueName, true, new DefaultConsumer(channel) { @SneakyThrows @Override public void handleDelivery(String consumerTag, Envelope envelope, AMQP.BasicProperties properties, byte[] body) { // 5.处理消息 String message = new String(body); System.out.println("接收到消息:" + message); } }); System.out.println("等待接收消息......"); } }- 1
- 2
- 3
- 4
- 5
- 6
- 7
- 8
- 9
- 10
- 11
- 12
- 13
- 14
- 15
- 16
- 17
- 18
- 19
- 20
- 21
- 22
- 23
- 24
- 25
- 26
- 27
- 28
- 29
- 30
- 31
- 32
- 33
- 34
- 35
- 36
我们可以在 RabbitMQ 的管理页面查看相关信息:

注意:
- 消费者接收消息是异步过程,而不会阻塞主线程
- queueDeclare 在不存在该队列时会创建队列,否则不创建
- 队列不会被自动删除,可以在管理页删除(点击队列名称,点击 Delete 选项)
- 消息只会被读取一次,未被读取的消息存放在队列中等待被消费
- 上例消费者没有关闭通道和连接的操作,不会只读取一条消息,而是一直等待不停读取
- RabbitMQ 重启后,队列因未持久化被删除,将 queueDeclare 第二个参数改为 true 以创建持久化队列(已存在的队列不可更改)
- RabbitMQ 重启后,虽有队列但消息没了,因为消息未持久化,发送消息时将 basicPublish 方法第三个参数改为
MessageProperties.PERSISTENT_TEXT_PLAIN以持久化消息
持久化的队列在 Features 栏会有字母 D 标示,如图:

有持久化的消息可以看到 Properties 信息,未持久化则没有,如图:
(2) RabbitTemplate 方式
上面的例子可以看出,大多数代码是重复的,所以 SpringAMQP 中封装了 RabbitTemplate 以便于进行消息队列的操作
首先在项目 yaml 配置文件中假如 RabbitMQ 的连接相关配置
spring: rabbitmq: host: 192.168.0.102 # RabbitMQ 服务 ip 地址 port: 5672 # 消息服务端口 username: root # 用户名 password: "123456" # 密码 virtual-host: / #虚拟主机- 1
- 2
- 3
- 4
- 5
- 6
- 7
然后就能自动装配 RabbitTemplate 类了
生产者测试类
@RunWith(SpringRunner.class) @SpringBootTest() public class SpringAmqpTest { @Autowired private RabbitTemplate rabbitTemplate; @Test public void helloWorldModeTest() { String queueName = "hello.world.queue"; String message = "Hello, springAMQP!"; rabbitTemplate.convertAndSend(queueName, message); } }- 1
- 2
- 3
- 4
- 5
- 6
- 7
- 8
- 9
- 10
- 11
- 12
- 13
- 14
只需调用 convertAndSend 方法即可发送消息
注意:此操作不会创建队列,如果队列不存在则没有效果
若要创建队列,需要声明一个 Queue 类型的 bean 并受到 Spring 的管理
通常放在一个 Configuration 配置类中,示例如下:
@Configuration public class RabbitMqConfig { @Bean public Queue simpleQueue() { return new Queue("hello.world.queue"); // 队列名与函数名无关 } }- 1
- 2
- 3
- 4
- 5
- 6
- 7
如此启动项目时,bean 被创建,就会创建一个队列(若已存在则不再创建)
消费者不再在测试类中演示,而是使用监听队列的方式
只需在一个方法上注解 @RabbitListener,并指定队列名
同时方法所在的类也要被 Spring 管理(注解 @Component)@Component public class SpringRabbitListener { @RabbitListener(queues = "hello.world.queue") public void listenSimpleQueue(String message) { System.out.printf("消费者接收到 hello.world.queue 的消息:【 %s 】\n", message); } }- 1
- 2
- 3
- 4
- 5
- 6
- 7
- 8
- 9
启动项目即可监听队列并处理接收到的消息
注意:如果监听的队列名不存在,则会报错
Failed to declare queue(s):[hello.world.queue],解决方法同前面的配置里创建队列注意:
- 此方式创建的队列默认持久化
- 此方式生产的消息默认持久化
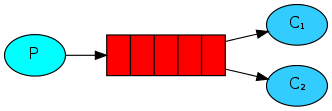
2、Work Queues
Work Queues 工作队列其实就是一发多收的模式,当然也可以是多发多收
主要在于每一个消息可能就是一个要处理任务,所以多个消费者处理任务可以提高任务的执行效率
创建队列
创建队列的配置类可以只在生产者和消费者其一中配置,但有配置的一方应先启动,否则另一方会因不存在队列而失效
当然都配置也没问题,若队列已存在,也可以都不配置
@Configuration public class RabbitMqConfig { @Bean public Queue simpleQueue() { return new Queue("work.queue"); } }- 1
- 2
- 3
- 4
- 5
- 6
- 7
生产者
这里循环 50 次模拟多个任务的发布
@RunWith(SpringRunner.class) @SpringBootTest public class SpringAmqpTest { @Autowired private RabbitTemplate rabbitTemplate; @Test public void testSendMessage2WorkQueue() { String queueName = "work.queue"; String message = "work message ---- "; for (int i = 1; i <= 50; i ++) { rabbitTemplate.convertAndSend(queueName, message + i + "th"); } } }- 1
- 2
- 3
- 4
- 5
- 6
- 7
- 8
- 9
- 10
- 11
- 12
- 13
- 14
- 15
- 16
- 17
消费者
使用两个监听方法来模拟两个消费者,用线程的 sleep() 方法模拟处理任务花费的时间
@Component public class SpringRabbitListener { private int count1 = 0; private int count2 = 0; @RabbitListener(queues = "work.queue") public void listenSimpleQueue1(String msg) throws InterruptedException { System.out.printf("消费者 1 第 %d 次接收消息:【 %s 】 %s", ++count1, msg, LocalTime.now().toString()); Thread.sleep(50); } @RabbitListener(queues = "work.queue") public void listenSimpleQueue2(String msg) throws InterruptedException { System.err.printf("消费者 2 第 %d 次接收消息:【 %s 】 %s", ++count2, msg, LocalTime.now().toString()); Thread.sleep(200); } }- 1
- 2
- 3
- 4
- 5
- 6
- 7
- 8
- 9
- 10
- 11
- 12
- 13
- 14
- 15
- 16
- 17
- 18
- 19
- 20
由于两个消费者睡眠时间不同,应该时速度快的消费者处理的任务更多些
但实际运行起来结果是两种处理了相同的任务数量,速度较快消费者 1 处理了一半任务便不在处理了
这和消息队列的预取机制有关
当消费者端存在未处理完成的消息时,队列依然会派发消息给消费者,这些消息会存放在消费者端的缓存中
解决方法就是限制消费者端的预取信息条数,在消费者的 yaml 配置文件中做如下配置即可:
spring: rabbitmq: listener: simple: prefetch: 1 # 预取信息条数- 1
- 2
- 3
- 4
- 5
预取数量限制为 1 时,消费者只会在处理好当前消息后才会收到新的消息
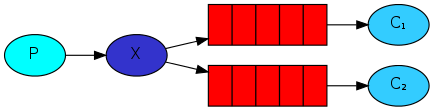
3、Publish/Subscribe
前面两种模式中,消息只会被一个消费之接收一次,在这里则不同
Publish/Subscribe(发布 / 订阅)模式中,表示生产者的发布的消息会广播给所有的消费者,类似于博主与粉丝的关系
也称为 fanout 模式,因为是使用 fanout 交换机来实现的
关系绑定
@Configuration public class FanoutConfig { // 创建 Fanout (广播)交换机 @Bean public FanoutExchange fanoutExchange() { return new FanoutExchange("my.fanout"); } // 创建队列 1 @Bean public Queue fanoutQueue1() { return new Queue("fanout.queue1"); } // 创建队列 2 @Bean public Queue fanoutQueue2() { return new Queue("fanout.queue2"); } // 创建绑定关系(Fanout交换机与队列 1) @Bean public Binding fanoutBinding1(FanoutExchange fanoutExchange, Queue fanoutQueue1) { return BindingBuilder.bind(fanoutQueue1).to(fanoutExchange); } // 创建绑定关系(Fanout交换机与队列 2) @Bean public Binding fanoutBinding2(FanoutExchange fanoutExchange, Queue fanoutQueue2) { return BindingBuilder.bind(fanoutQueue2).to(fanoutExchange); } }- 1
- 2
- 3
- 4
- 5
- 6
- 7
- 8
- 9
- 10
- 11
- 12
- 13
- 14
- 15
- 16
- 17
- 18
- 19
- 20
- 21
- 22
- 23
- 24
- 25
- 26
- 27
- 28
- 29
- 30
- 31
- 32
- 33
- 34
生产者
此时生产者就不再是向队列发送消息,而是向 Fanout 交换机发送
Fanout 交换机会将消息广播给所有与之绑定的队列
@RunWith(SpringRunner.class) @SpringBootTest public class SpringAmqpTest { @Autowired private RabbitTemplate rabbitTemplate; @Test public void fanoutMode() { String exchangeName = "my.fanout"; String msg = "Hello, everyone!"; rabbitTemplate.convertAndSend(exchangeName, "", msg); } }- 1
- 2
- 3
- 4
- 5
- 6
- 7
- 8
- 9
- 10
- 11
- 12
- 13
- 14
- 15
convertAndSend 向交换机发送消息时,第一个参数为交换机名称,第三个参数为消息内容
第二个参数为 routingKey 路由键,在之后的路由模式中会说到
消费者
消费者监听的依然是队列,没有什么特别的
@Component public class SpringRabbitListener { @RabbitListener(queues = "fanout.queue1") public void listenFanoutQueue1(String msg) { System.out.printf("消费者接收到 fanout.queue1 的消息:【 %s 】\n", msg); } @RabbitListener(queues = "fanout.queue2") public void listenFanoutQueue2(String msg) { System.out.printf("消费者接收到 fanout.queue2 的消息:【 %s 】\n", msg); } }- 1
- 2
- 3
- 4
- 5
- 6
- 7
- 8
- 9
- 10
- 11
- 12
- 13
- 14
4、Routing
Routing 也就是路由模式,根据 Direct 交换机实现,也称为 Direct 模式
交换机根据收到的消息的路由键,有条件的路由给不同的队列,且可以是多个队列

消费者
在前面的 Fanout 模式中,我们知道了在配置类中创建交换机与队列绑定的方式
其实在 @RabbitListener 注解中我们就可以完成这一步骤
先看消费者的实现:
@Component public class SpringRabbitListener { @RabbitListener(bindings = @QueueBinding( // 监听一个绑定关系 value = @Queue("direct.queue1") // 队列 , exchange = @Exchange(name = "my.direct", type = ExchangeTypes.DIRECT) // 交换机(名称与类型) , key = {"info", "warning", "err"} // 监听的路由键 )) public void listenDirectQueue1(String msg) { System.out.printf("消费者接收 direct.queue1 的消息:【 %s 】", msg); } @RabbitListener(bindings = @QueueBinding( value = @Queue("direct.queue2") , exchange = @Exchange(name = "my.direct") // 交换机默认类型即为 ExchangeTypes.DIRECT , key = {"err"} )) public void listenDirectQueue2(String msg) { System.err.printf("消费者接收 direct.queue2 的消息:【 %s 】", msg); } }- 1
- 2
- 3
- 4
- 5
- 6
- 7
- 8
- 9
- 10
- 11
- 12
- 13
- 14
- 15
- 16
- 17
- 18
- 19
- 20
- 21
- 22
注意:当注解中的交换机及队列不存在时,要先启动消费者来创建,然后再启动生产者
顺便一提:如若在配置里中声明 Binding 的 bean 时,使用 with() 来指定路由键
如:
BindingBuilder.bind(queue).to(directExchange).with("info, err");生产者
此时生产者向指定交换机发送消息时,指定路由键,即可将消息发送到对应的队列中
@RunWith(SpringRunner.class) @SpringBootTest public class SpringAmqpTest { @Autowired private RabbitTemplate rabbitTemplate; @Test public void testSendDirectExchange() { String exchangeName = "my.direct"; String msg; msg = "Info message."; rabbitTemplate.convertAndSend(exchangeName, "info", msg); msg = "Warning message."; rabbitTemplate.convertAndSend(exchangeName, "warning", msg); msg = "Error message."; rabbitTemplate.convertAndSend(exchangeName, "err", msg); } }- 1
- 2
- 3
- 4
- 5
- 6
- 7
- 8
- 9
- 10
- 11
- 12
- 13
- 14
- 15
- 16
- 17
- 18
- 19
- 20
- 21
- 22
- 23
输出结果:
消费者接收 direct.queue2 的消息:【 Error message. 】 消费者接收 direct.queue1 的消息:【 Info message. 】 消费者接收 direct.queue1 的消息:【 Warning message. 】 消费者接收 direct.queue1 的消息:【 Error message. 】- 1
- 2
- 3
- 4
queue2 最先输出是由于错误流与输出流的差异
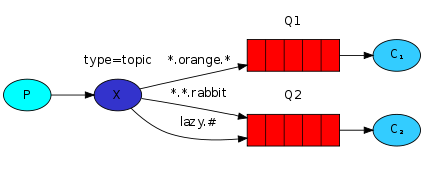
5. Topics
Topics 即话题模式,它和 Routing 模式很相似,都是根据路由键来路由给符合条件的队列,但 Topic 的路由键支持通配符
消费者
@Component public class SpringRabbitListener { @RabbitListener(bindings = @QueueBinding( value = @Queue(name = "topic.queue1") , exchange = @Exchange(name = "my.topic", type = ExchangeTypes.TOPIC) // 交换机类型为 TOPIC , key = {"cn.*"} // * 为通配符,只能匹配到下一个点的任意字符串(如 cn.news 可匹配, cn.news.today 不可匹配) )) public void listenTopicQueue1(String msg) { System.out.printf("消费者接收 cn.* 的消息:【 %s 】\n", msg); } @RabbitListener(bindings = @QueueBinding( value = @Queue(name = "topic.queue2") , exchange = @Exchange(name = "my.topic", type = ExchangeTypes.TOPIC) , key = {"#.news"} // 也可用 # 做通配符,效果同 * )) public void listenTopicQueue2(String msg) { System.out.printf("消费者接收 *.news 的消息:【 %s 】\n", msg); } }- 1
- 2
- 3
- 4
- 5
- 6
- 7
- 8
- 9
- 10
- 11
- 12
- 13
- 14
- 15
- 16
- 17
- 18
- 19
- 20
- 21
- 22
- 23
生产者
@RunWith(SpringRunner.class) @SpringBootTest public class SpringAmqpTest { @Autowired private RabbitTemplate rabbitTemplate; @Test public void testSendTopicExchange() { String exchangeName = "my.topic"; String message = "富强民主文明和谐自由平等公正法制爱国敬业诚信友善"; rabbitTemplate.convertAndSend(exchangeName, "cn.news", message); } }- 1
- 2
- 3
- 4
- 5
- 6
- 7
- 8
- 9
- 10
- 11
- 12
- 13
- 14
- 15
6、RPC
RPC 也就是 Request/reply 请求回复模式,类似于网络请求与响应
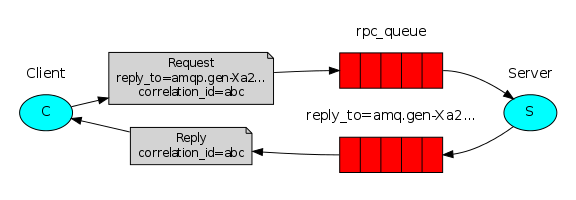
在这种模式下,不在用生产者与消费者的称呼了,而是用客户端与服务端下面是一个简单的小例子
创建队列
在服务端配置创建比较好
@Configuration public class RpcConfig { // 创建用于接收请求的队列 @Bean public Queue requestQueue() { return new Queue("request.queue"); } }- 1
- 2
- 3
- 4
- 5
- 6
- 7
- 8
- 9
- 10
服务端
RabbitListener 注解在类上,而 @RabbitHandler 注解在方法上表示处理消息的方法
类似于 web 项目中的 Controller 控制器
@Component @RabbitListener(queues = "request.queue") public class RpcServer { @RabbitHandler public String process(String request) { System.out.println("收到请求内容:" + request); return "好的已收到!"; } }- 1
- 2
- 3
- 4
- 5
- 6
- 7
- 8
- 9
- 10
- 11
客户端
使用 convertSendAndReceive() 方法向请求队列发送消息即可,会返回一个 Object 对象,即为服务端 @RabbitHandler 所注解方法的返回值
测试类如下:
@RunWith(SpringRunner.class) @SpringBootTest public class RabbitRpcTest { @Autowired private RabbitTemplate rabbitTemplate; @Test public void rpcTest() { String request = "收到请回复"; Object reply = rabbitTemplate.convertSendAndReceive("request.queue", request); System.out.println("响应:" + reply); }- 1
- 2
- 3
- 4
- 5
- 6
- 7
- 8
- 9
- 10
- 11
- 12
- 13
- 14
7、Publisher Confirms
Publisher Confirms 即发布确认,用以保证消息成功推送到队列中,或者发送失败时做出相应的措施
配置
在生产者端配置 publisher-confirm-type,如下
spring: rabbitmq: publisher-confirm-type: correlated- 1
- 2
- 3
消费者
在 rabbitTemplate 中添加消息确认的回调函数,当消息发送之后会根据发送结果调用该函数进行处理
为了标示消息的状态,一般还会设置一个 CorrelationData 对象根据消息一起发送,其中可以包含消息的内容或者一些属性
看如下示例:
@RunWith(SpringRunner.class) @SpringBootTest public class SpringAmqpTest { @Autowired private RabbitTemplate rabbitTemplate; @Test public void confirmTest() throws ExecutionException, InterruptedException { // 设定消息确认的回调函数 rabbitTemplate.setConfirmCallback(new RabbitTemplate.ConfirmCallback() { @Override public void confirm(CorrelationData correlationData, boolean ack, String cause) { System.out.println("id: " + correlationData.getId()); System.out.println("ack: " + ack); // 是否成功 System.out.println("cause: " + cause); // 原因 Message returnedMessage = correlationData.getReturnedMessage(); // 获取返回信息 System.out.println("returnedMessage: " + new String(returnedMessage.getBody())); } }); // 消息本体 String message = "Hello!"; // 创建 CorrelationData 并设置返回信息 CorrelationData correlationData = new CorrelationData("id-1"); correlationData.setReturnedMessage(new Message(message.getBytes(), new MessageProperties())); // 发送消息到 confirm.queue 队列并携带 correlationData rabbitTemplate.convertAndSend("confirm.queue", (Object) message, correlationData); // 调用 correlationData.getFuture().get() 阻塞主线程等待消息确认 CorrelationData.Confirm confirm = correlationData.getFuture().get(); System.out.println("confirm: " + confirm); } }- 1
- 2
- 3
- 4
- 5
- 6
- 7
- 8
- 9
- 10
- 11
- 12
- 13
- 14
- 15
- 16
- 17
- 18
- 19
- 20
- 21
- 22
- 23
- 24
- 25
- 26
- 27
- 28
- 29
- 30
- 31
- 32
注意:只要消息发送到了队列中,便返回正常结果(ack 为 true),而非是消费者接收之后
-
相关阅读:
批量图片转文字识别OCR身份证件信息提取软件
ABAP调用Https接口 Ssl证书导入
python:numpy查询定位赋值数值所在行列
窄带高清画质增强之生成式细节修复
《向量数据库指南》——Range Search 使用方法和参数检查
数据结构与算法简介
【英语:语法基础】B5.核心语法-句子成分和五种简单句
YOLOv5白皮书-第Y6周:模型改进
【优测云服务平台】打造承载百倍级增长后台背后的力量-性能优化
毕业设计-基于机器视觉的颜色目标识别
- 原文地址:https://blog.csdn.net/Cey_Tao/article/details/128098509
