-
[Spring Boot 5]安全管理
本文介绍了Spring Security 以及Shiro 在Spring Boot中的使用,对于Spring Security 有基于传统认证方式的Session认证,也有使用OAuth 协议的认证。一般来说,传统的Web架构中,使用Session 认证更加快速,但是,若结合微服务,前后端分离等架构时,则使用OAuth 认证更加方便。
在Spring Boot项目中,Spring Security 整合相对更加容易,可以首选,Shiro 虽不及其强大,但也能胜任绝大部分的项目了。
本文没有细谈密码学,关于这部分的加密内容,可以参见我之前密码学的文章,安全管理中对于密码还是相当看重的。不过在安全管理中,除了密码学认证同时还有权限角色的认证等,值得学习。
引言
在Java 开发领域常见的安全框架有Shiro 和Spring Security。Shiro 是一个轻量级的安全管理框架,提供了认证、授权、会话管理、密码管理、缓存管理等功能。Spring Security是一个相对复杂的安全管理框架,对OAuth 2的支持也更友好,可以和Spring 框架无缝整合。
Spring Security 基本配置
基本用法
添加依赖:
<dependency> <groupId>org.springframework.bootgroupId> <artifactId>spring-boot-starter-securityartifactId> dependency>- 1
- 2
- 3
- 4
项目中的资源就会被保护起来。
下面添加一个接口:@GetMapping("/hello") public String hello() { return "hello"; }- 1
- 2
- 3
- 4
启动后,访问80/hello接口,会自动跳转到这个登陆页面,这个页面就是由Spring Security提供的。
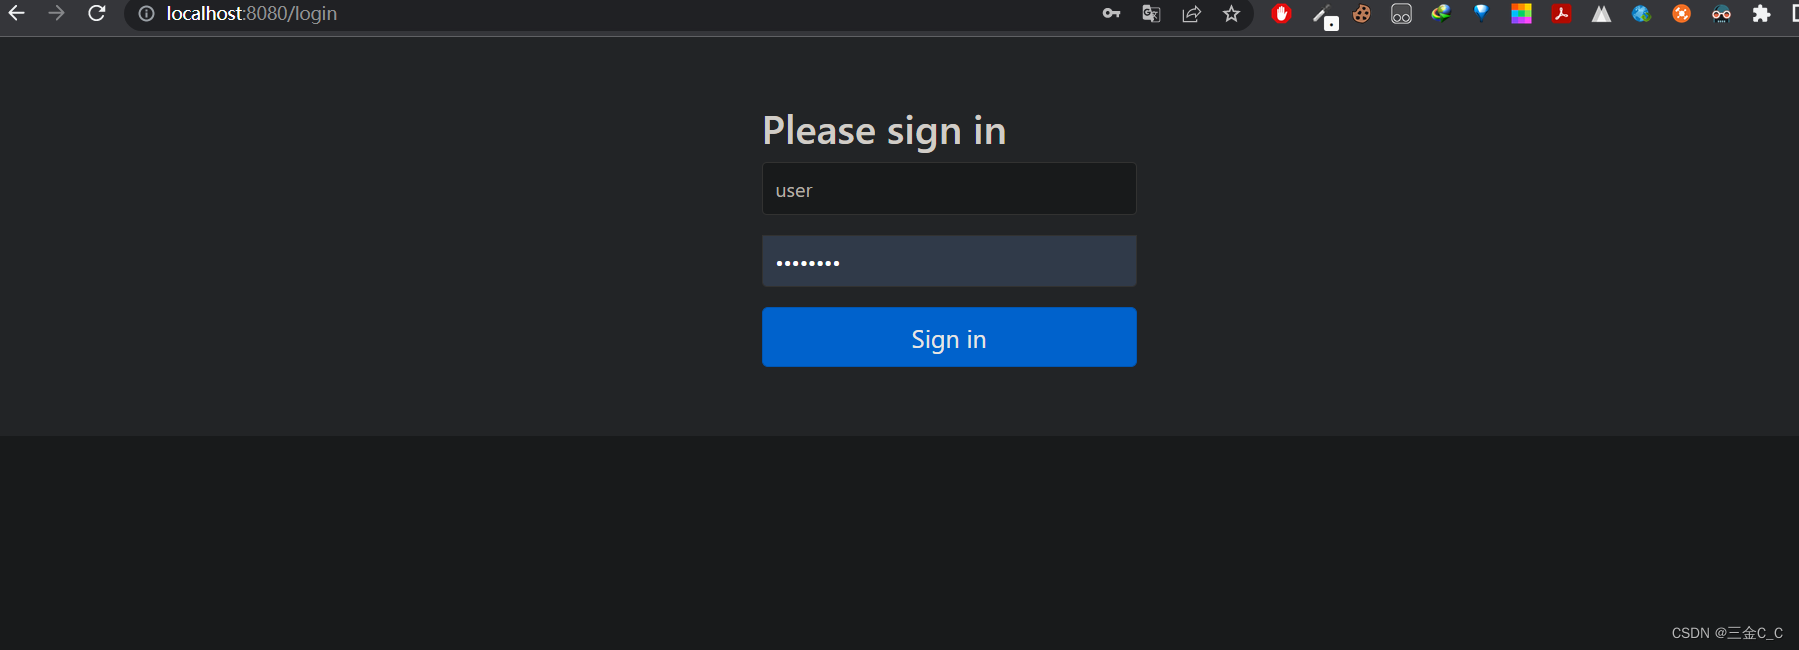
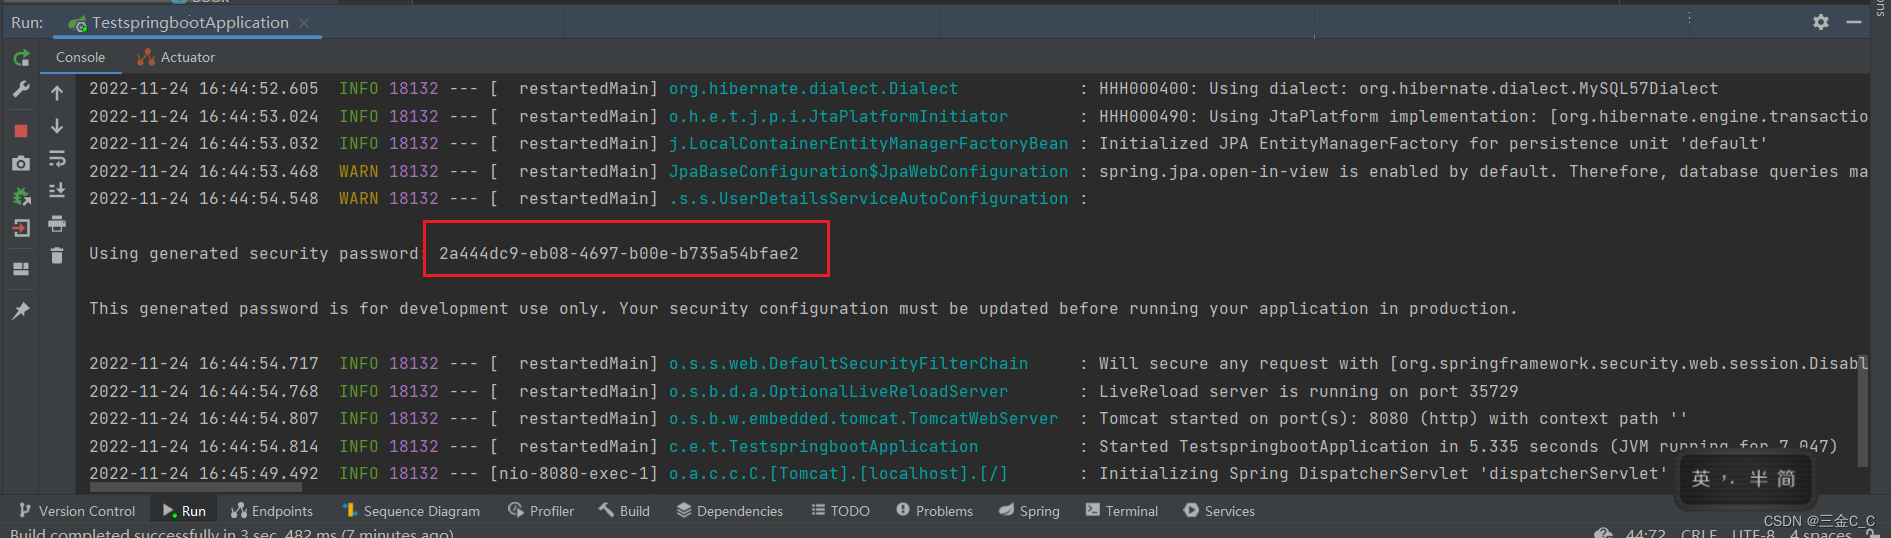
用户名就是user,密码如下图得到:默认的密码随项目随机生成的,查看项目启动日志就行。
当然了,可以自定义配置用户名和密码:
在配置文件:
具有的角色是adminspring.security.user.name=jacin spring.security.user.password=123 spring.security.user.roles=admin- 1
- 2
- 3
基于内存的认证
开发者可以自定义类继承自WebSecurityConfigurerAdapter ,进而实现对Spring Secuity进行更多的配置:
@Configuration public class MySecurityConfig extends WebSecurityConfigurerAdapter { @Bean PasswordEncoder passwordEncoder() { return NoOpPasswordEncoder.getInstance(); } @Override protected void configure(AuthenticationManagerBuilder auth) throws Exception { auth.inMemoryAuthentication() .withUser("admin").password("123").roles("ADMIN","USER") .and() .withUser("jacin").password("123").roles("ADMIN"); } }- 1
- 2
- 3
- 4
- 5
- 6
- 7
- 8
- 9
- 10
- 11
- 12
- 13
- 14
- 15
- 16
继承了 WebSecurityConfigurerAdapter 并重写了configure方法,在这里配置了两个用户,一个是admin 具有两个角色,另一个是jacin 角色是admin。
在Spring Security 5.x 引入了众多密码加密方式,本案例使用的是NoOpPasswordEncoder 不加密。HttpSecurity
可以实现认证功能,但是受保护的资源是默认的,不能根据实际情况进行角色管理。如果要实现功能,就要重写WebSecurityConfigurerAdapter的方法:
@Configuration public class MySecurityConfig extends WebSecurityConfigurerAdapter { @Bean PasswordEncoder passwordEncoder() { return NoOpPasswordEncoder.getInstance(); } @Override protected void configure(AuthenticationManagerBuilder auth) throws Exception { auth.inMemoryAuthentication() .withUser("root").password("123").roles("ADMIN","DBA") .and() .withUser("admin").password("123").roles("ADMIN","USER") .and() .withUser("user").password("123").roles("USERS"); } @Override protected void configure(HttpSecurity http) throws Exception{ //调用了authorizeRequests()方法开启HttpSecurity配置 http.authorizeRequests() //其中/admin/**的URL必须具有admin的角色 .antMatchers("/admin/**") .hasRole("ADMIN") .antMatchers("/users/**") .access("hasAnyRole('ADMIN','USER')") .antMatchers("/db/**") .access("hasAnyRole('ADMIN') and hasRole('DBA')") //下两行表示除了前面定义的URL模式以外,用户访问其他的URL都必须认证后访问 .anyRequest() .authenticated() .and() // 开启表单登陆 .formLogin() //配置此接口方便Ajax 或者 移动端调用登录接口 .loginProcessingUrl("/login") // 和登录相关的接口不需要认证即可访问 .permitAll() .and() // 关闭csrf .csrf() .disable(); } }- 1
- 2
- 3
- 4
- 5
- 6
- 7
- 8
- 9
- 10
- 11
- 12
- 13
- 14
- 15
- 16
- 17
- 18
- 19
- 20
- 21
- 22
- 23
- 24
- 25
- 26
- 27
- 28
- 29
- 30
- 31
- 32
- 33
- 34
- 35
- 36
- 37
- 38
- 39
- 40
- 41
- 42
- 43
- 44
- 45
这里设置了三个用户,分别具有不同的角色。
下面在controller进行测试:// 此Controller层为RestController @GetMapping("/admin/hello") public String admin() { return "hello admin!"; } @GetMapping("/user/hello") public String user() { return "hello user"; } @GetMapping("/db/hello") public String dba() { return "hello dba"; } @GetMapping("/hello") public String hello() { return "hello"; }- 1
- 2
- 3
- 4
- 5
- 6
- 7
- 8
- 9
- 10
- 11
- 12
- 13
- 14
- 15
- 16
- 17
- 18
- 19
- 20
测试的时候,会发现登陆相应的页面。例如管理登陆后可以访问/admin/**,/user/ 界面。
登陆表单详细配置
到目前为止,登陆表单使用的是Spring Security 提供的页面,登陆成功后也是默认的页面跳转。但是前后端分离是开发的主流,在此开发模式下,前后端数据通过JSON进行,这是登陆后就不是页面跳转了,而是一段JSON提示。
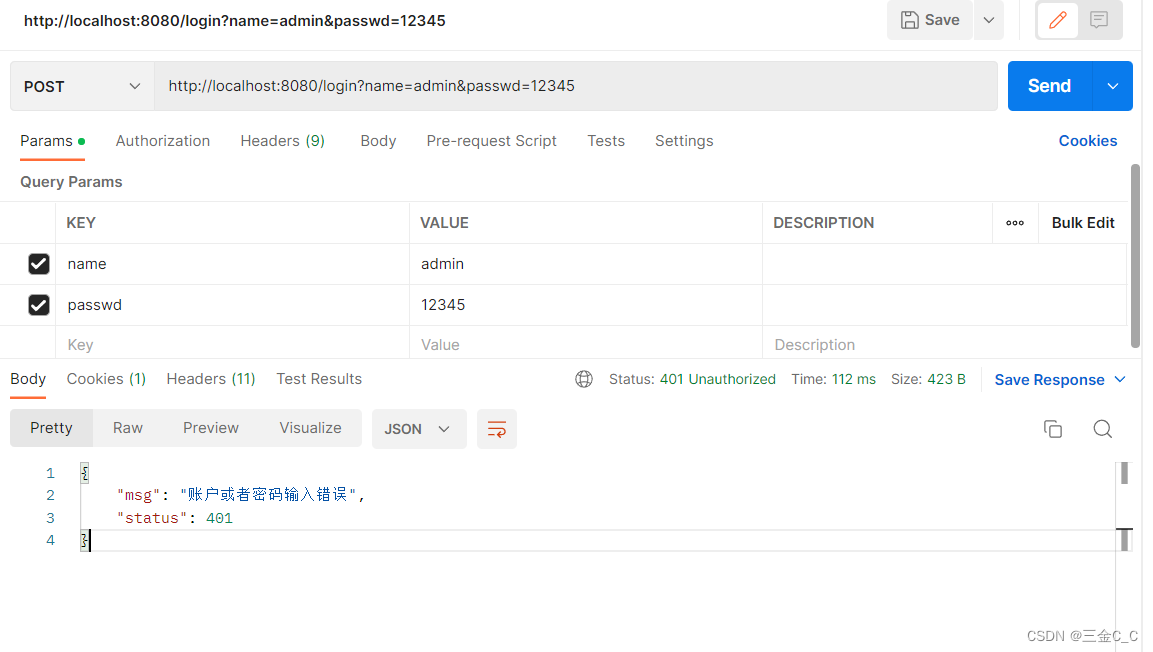
和上文一样,这里给出部分代码,其余部分见上文:.formLogin() //登陆页面。这里的/login就是开发者自定义的登陆页面,也就是路径 .loginPage("/login") // 配置了loginProcessingUrl,登陆请求处理接口 .loginProcessingUrl("/login") // 认证需要的参数 .usernameParameter("name") .passwordParameter("passwd") // 登陆成功的处理逻辑,本次是返回一段JSON,第三个参数是当前用户登陆信息 .successHandler(new AuthenticationSuccessHandler() { @Override public void onAuthenticationSuccess(HttpServletRequest request, HttpServletResponse response, Authentication authentication) throws IOException, ServletException { Object principal = authentication.getPrincipal(); response.setContentType("application/json;charset=utf-8"); PrintWriter out = response.getWriter(); response.setStatus(200); Map<String,Object> map = new HashMap<>(); map.put("status",200); map.put("msq",principal); ObjectMapper om = new ObjectMapper(); out.write(om.writeValueAsString(map)); out.flush(); out.close(); } }) .failureHandler(new AuthenticationFailureHandler() { @Override public void onAuthenticationFailure(HttpServletRequest request, HttpServletResponse response, AuthenticationException exception) throws IOException, ServletException { response.setContentType("application/json;charset=utf-8"); PrintWriter out = response.getWriter(); response.setStatus(401); Map<String,Object> map = new HashMap<>(); map.put("status",401); if(exception instanceof LockedException) { map.put("msg","账户被锁定"); } else if (exception instanceof BadCredentialsException) { map.put("msg","账户或者密码输入错误"); } else if (exception instanceof DisabledException) { map.put("msg","账户被禁用"); } else if (exception instanceof AccountExpiredException) { map.put("msg","账户过期"); } ObjectMapper om = new ObjectMapper(); out.write(om.writeValueAsString(map)); out.flush(); out.close(); } }) .permitAll()- 1
- 2
- 3
- 4
- 5
- 6
- 7
- 8
- 9
- 10
- 11
- 12
- 13
- 14
- 15
- 16
- 17
- 18
- 19
- 20
- 21
- 22
- 23
- 24
- 25
- 26
- 27
- 28
- 29
- 30
- 31
- 32
- 33
- 34
- 35
- 36
- 37
- 38
- 39
- 40
- 41
- 42
- 43
- 44
- 45
- 46
- 47
- 48
- 49
在templates下面建一个简单的提交表单:
- 1
- 2
- 3
- 4
- 5
然后在Controller写跳转页面:
这里返回的就是视图层而不是字符串。@Controller public class testController { @GetMapping("/login") public String login() { return "login_page"; } }- 1
- 2
- 3
- 4
- 5
- 6
- 7
- 8
当然我们也可以用postman来进行测试:
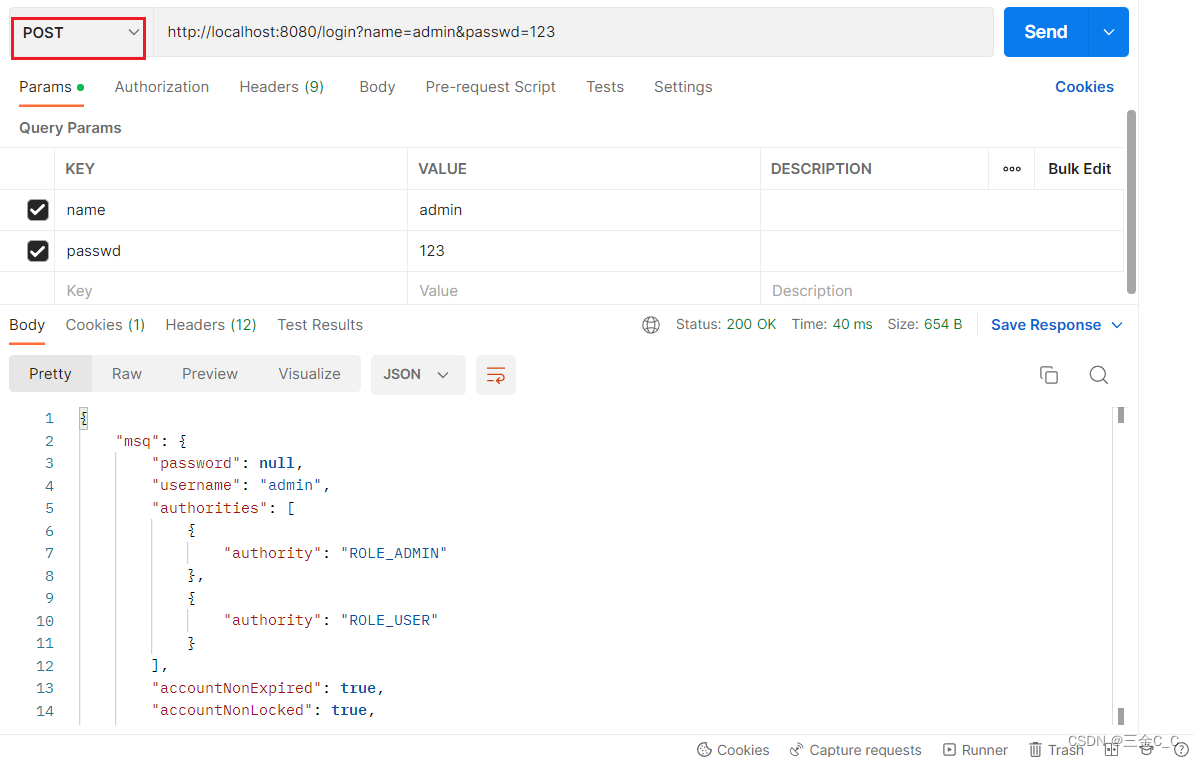
这里用到了Ajax技术。注销登录配置
如果想注销登录也只需要提供简单的配置:
.and() // 开启注销登陆的配置 .logout() .logoutUrl("/logout") // 清除身份认证信息 .clearAuthentication(true) // 使session失效 .invalidateHttpSession(true) //可以写一下数据清除工作 .addLogoutHandler(new LogoutHandler() { @Override public void logout(HttpServletRequest request, HttpServletResponse response, Authentication authentication) { } }) // 注销成功后的业务逻辑 .logoutSuccessHandler(new LogoutSuccessHandler() { @Override public void onLogoutSuccess(HttpServletRequest request, HttpServletResponse response, Authentication authentication) throws IOException, ServletException { response.sendRedirect("/login"); } }) .and()- 1
- 2
- 3
- 4
- 5
- 6
- 7
- 8
- 9
- 10
- 11
- 12
- 13
- 14
- 15
- 16
- 17
- 18
- 19
- 20
- 21
- 22
- 23
方法安全
上述的认证和授权都是基于URL的,开发者也可以通过注解来灵活配置方法安全,要通过注解来开启基于注解的安全配置:
@Configuration // 解锁两个注解 @EnableGlobalMethodSecurity(prePostEnabled = true,securedEnabled = true) public class SecutityCon { }- 1
- 2
- 3
- 4
- 5
- 6
开启安全配置后,可以创建一个Service来测试:
@Service public class MethodService { // 访问该方法需要admin角色,注意在角色面前需要加ROLE_ @Secured("ROLE_ADMIN") public String admin() { return "hello admin"; } // 既需要ADMIN 又需要 DBA @PreAuthorize("hasRole('ADMIN') and hasRole('DBA')") public String dba() { return "hello dba"; } }- 1
- 2
- 3
- 4
- 5
- 6
- 7
- 8
- 9
- 10
- 11
- 12
- 13
- 14
基于数据库的认证
上述的认证数据定义在内存中,真实项目中,用户的基本信息和角色存储在数据库中。
数据库建表:create table user ( id int(11) primary key , username varchar(32), password varchar(255), enabled tinyint(1), locked tinyint(1) ); create table role( id int(11) primary key , name varchar(32), nameZh varchar(32) ); create table user_role( id int(11) primary key , uid int(11), rid int(11) );- 1
- 2
- 3
- 4
- 5
- 6
- 7
- 8
- 9
- 10
- 11
- 12
- 13
- 14
- 15
- 16
- 17
- 18
- 19
默认插入一些数据:
use ay_user;show tables ; insert into user (id, username, password, enabled, locked) values (1,'root','123','1','0'); insert into user (id, username, password, enabled, locked) values (2,'user','123','1','0'); insert into role (id, name, nameZh) values (1,'ROLE_dba','ADMINDBA'); insert into role (id, name, nameZh) values (2,'ROLE_user','user'); insert into user_role values (1,'1','1'); insert into user_role values (2,'1','2');- 1
- 2
- 3
- 4
- 5
- 6
- 7
- 8
- 9
- 10
创建实体类:
public class Role { private Integer id; private String name; private String nameZh; //省略getter/setter }- 1
- 2
- 3
- 4
- 5
- 6
创建用户表类:
public class User implements UserDetails { private Integer id; private String username; private String password; private Boolean enabled; private Boolean locked; private List<Role> roles; // 获取当前用户的角色信息,角色都存储在roles,直接遍历roles 属性,然后构造集合并返回。 @Override public Collection<? extends GrantedAuthority> getAuthorities() { List<SimpleGrantedAuthority> authorities = new ArrayList<>(); for (Role role : roles) { authorities.add(new SimpleGrantedAuthority(role.getName())); } return authorities; } @Override public String getPassword() { return password; } @Override public String getUsername() { return username; } @Override public boolean isAccountNonExpired() { return true; } @Override public boolean isAccountNonLocked() { return !locked; } @Override public boolean isCredentialsNonExpired() { return true; } @Override public boolean isEnabled() { return enabled; } //省略getter/setter // public Boolean getEnabled() { // return enabled; // } public void setEnabled(Boolean enabled) { this.enabled = enabled; } public Boolean getLocked() { return locked; } public void setLocked(Boolean locked) { this.locked = locked; } public List<Role> getRoles() { return roles; } public void setRoles(List<Role> roles) { this.roles = roles; } }- 1
- 2
- 3
- 4
- 5
- 6
- 7
- 8
- 9
- 10
- 11
- 12
- 13
- 14
- 15
- 16
- 17
- 18
- 19
- 20
- 21
- 22
- 23
- 24
- 25
- 26
- 27
- 28
- 29
- 30
- 31
- 32
- 33
- 34
- 35
- 36
- 37
- 38
- 39
- 40
- 41
- 42
- 43
- 44
- 45
- 46
- 47
- 48
- 49
- 50
- 51
- 52
- 53
- 54
- 55
- 56
- 57
- 58
- 59
- 60
- 61
- 62
- 63
- 64
- 65
- 66
- 67
- 68
用户类需要实现UserDetails 接口,并实现接口的方法:
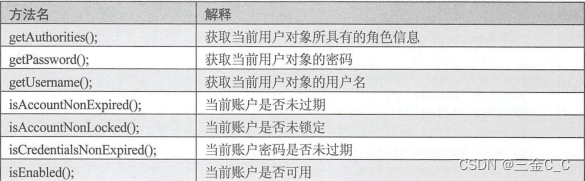
本案例中数据库只有enabled和locked 字段,故未过期和密码未过期都返回true.(不需要自己进行密码角色等匹配了)创建UserService:
// 实现接口 @Service public class UserService implements UserDetailsService { @Resource UserMapper userMapper; // 用户登陆时的用户名,并通过用户名去数据库查找用户,如果没查到就抛出异常 @Override public UserDetails loadUserByUsername(String username) throws UsernameNotFoundException { User user = userMapper.loadUserByUsername(username); if(user == null) { throw new UsernameNotFoundException("账户不存在"); } user.setRoles(userMapper.getUserRolesByUid(user.getId())); return user; } }- 1
- 2
- 3
- 4
- 5
- 6
- 7
- 8
- 9
- 10
- 11
- 12
- 13
- 14
- 15
- 16
- 17
- 18
UserMapper.java:
@Mapper public interface UserMapper { User loadUserByUsername(String username); List<Role> getUserRolesByUid(Integer id); }- 1
- 2
- 3
- 4
- 5
- 6
其中UserMapper.xml:
DOCTYPE mapper PUBLIC "-//mybatis.org//DTD Mapper 3.0//EN" "http://mybatis.org/dtd/mybatis-3-mapper.dtd"> <mapper namespace="com.example.testspringboot.mapper.UserMapper"> <select id="loadUserByUsername" resultType="com.example.testspringboot.model.User"> select * from user where username=#{username} select> <select id="getUserRolesByUid" resultType="com.example.testspringboot.model.Role"> select * from role r,user_role ur where r.id=ur.rid and ur.uid=#{id} select> mapper>- 1
- 2
- 3
- 4
- 5
- 6
- 7
- 8
- 9
- 10
- 11
- 12
对Spring Security 配置:
@Configuration public class SQLsecuity extends WebSecurityConfigurerAdapter { @Resource UserService userService; @Bean PasswordEncoder passwordEncoder() { return NoOpPasswordEncoder.getInstance(); } @Override protected void configure(AuthenticationManagerBuilder auth) throws Exception { auth.userDetailsService(userService); } @Override protected void configure(HttpSecurity http) throws Exception { http.authorizeRequests() .antMatchers("/admin/**").hasRole("admin") .antMatchers("/db/**").hasRole("dba") .antMatchers("/user/**").hasRole("user") .anyRequest().authenticated() .and() .formLogin() .loginProcessingUrl("/login").permitAll() .and() .csrf().disable(); } }- 1
- 2
- 3
- 4
- 5
- 6
- 7
- 8
- 9
- 10
- 11
- 12
- 13
- 14
- 15
- 16
- 17
- 18
- 19
- 20
- 21
- 22
- 23
- 24
- 25
- 26
- 27
- 28
- 29
这里同样没有使用加密方法,接着便可以像之前基于内存的方法在controller层进行测试了。
OAuth 2
OAuth 是一个开发标准,允许用户第三方应用访问在某一网站存储的私密资源,而这个过程中无须提供用户名和密码,实现这个功能是通过一个令牌(token)。例如,用户想通过QQ登录知乎,这是知乎就是第三方应用,知乎要访问用户的基本信息就需要得到授权,采取令牌的方式可以让用户灵活对第三方应用授权或者收回权限。传统Web开发基于Session,前后端分离的时候有不便,所以OAuth 2都可以解决。
OAuth 2授权模式
基本角色:资源所有者(用户)、客户端(上文提到的知乎)、授权服务器,资源服务器。
具体步骤:

一般来说授权模式有4种:
1.授权码模式 (基本都是使用这个) 2.简化模式 3.密码模式 4.客户端模式实践
本次介绍的是在前后端分离应用提供的认证服务器如何搭建OAuth服务,主要是密码模式。
添加依赖:
<dependency> <groupId>org.springframework.bootgroupId> <artifactId>spring-boot-starter-data-redisartifactId> <exclusions> <exclusion> <groupId>io.lettucegroupId> <artifactId>lettuce-coreartifactId> exclusion> exclusions> dependency> <dependency> <groupId>redis.clientsgroupId> <artifactId>jedisartifactId> dependency> <dependency> <groupId>org.springframework.security.oauthgroupId> <artifactId>spring-security-oauth2artifactId> <version>2.3.3.RELEASEversion> dependency>- 1
- 2
- 3
- 4
- 5
- 6
- 7
- 8
- 9
- 10
- 11
- 12
- 13
- 14
- 15
- 16
- 17
- 18
- 19
- 20
OAuth协议是在Spring Security 基础上完成的,因此要添加Spring Security 依赖,令牌可以存储在Redis缓存服务器上,同时Redis具有过期等功能,所以也加入Redis 依赖。
在application.properties配置Redis 连接信息:
# redis spring.redis.database=0 spring.redis.host=127.0.0.1 spring.redis.port=6379 spring.redis.password= spring.redis.jedis.pool.max-active=8 spring.redis.jedis.pool.max-idle=8 spring.redis.jedis.pool.max-wait=-1ms spring.redis.jedis.pool.min-idle=0- 1
- 2
- 3
- 4
- 5
- 6
- 7
- 8
- 9
授权服务器和资源服务器可以是同一台服务器,通过不同的配置分别开启授权和资源服务器:
授权服务器:@Configuration @EnableAuthorizationServer // 继承,完成对授权服务器配置,通过上面注解开启 public class AuthorizationServerConfig extends AuthorizationServerConfigurerAdapter { // 支持password 模式 @Resource AuthenticationManager authenticationManager; // 用来完成Redis 缓存,将令牌信息存储到Redis 缓存中 @Resource RedisConnectionFactory redisConnectionFactory; // 刷新token 提供支持 @Autowired UserDetailsService userDetailsService; @Bean PasswordEncoder passwordEncoder() { return new BCryptPasswordEncoder(); } @Override public void configure(ClientDetailsServiceConfigurer clients) throws Exception { clients.inMemory() .withClient("password") .authorizedGrantTypes("password", "refresh_token") .accessTokenValiditySeconds(1800) .resourceIds("rid") .scopes("all") // 明文是123 .secret("$2a$10$RMuFXGQ5AtH4wOvkUqyvuecpqUSeoxZYqilXzbz50dceRsga.WYiq"); } @Override public void configure(AuthorizationServerEndpointsConfigurer endpoints) throws Exception { endpoints.tokenStore(new RedisTokenStore(redisConnectionFactory)) .authenticationManager(authenticationManager) .userDetailsService(userDetailsService); } @Override public void configure(AuthorizationServerSecurityConfigurer security) throws Exception { security.allowFormAuthenticationForClients(); } }- 1
- 2
- 3
- 4
- 5
- 6
- 7
- 8
- 9
- 10
- 11
- 12
- 13
- 14
- 15
- 16
- 17
- 18
- 19
- 20
- 21
- 22
- 23
- 24
- 25
- 26
- 27
- 28
- 29
- 30
- 31
- 32
- 33
- 34
- 35
- 36
- 37
- 38
- 39
- 40
- 41
- 42
- 43
资源服务器:
@Configuration @EnableResourceServer public class ResourceServerConfig extends ResourceServerConfigurerAdapter { @Override public void configure(ResourceServerSecurityConfigurer resources) throws Exception { // 配置资源id,和授权服务器资源id 一致,然后设置这些资源仅基于令牌认证 resources.resourceId("rid").stateless(true); } @Override public void configure(HttpSecurity http) throws Exception { http.authorizeRequests() .antMatchers("/admin/**").hasRole("admin") .antMatchers("/user/**").hasRole("user") .anyRequest().authenticated(); } }- 1
- 2
- 3
- 4
- 5
- 6
- 7
- 8
- 9
- 10
- 11
- 12
- 13
- 14
- 15
- 16
- 17
- 18
- 19
配置Spring Security:
@Configuration public class WebSecurityConfig extends WebSecurityConfigurerAdapter { @Bean // 注入授权服务器配置类使用 @Override public AuthenticationManager authenticationManagerBean() throws Exception { return super.authenticationManagerBean(); } @Bean @Override protected UserDetailsService userDetailsService() { return super.userDetailsService(); } @Override protected void configure(AuthenticationManagerBuilder auth) throws Exception { auth.inMemoryAuthentication() .withUser("admin") .password("$2a$10$RMuFXGQ5AtH4wOvkUqyvuecpqUSeoxZYqilXzbz50dceRsga.WYiq") .roles("admin") .and() .withUser("sang") .password("$2a$10$RMuFXGQ5AtH4wOvkUqyvuecpqUSeoxZYqilXzbz50dceRsga.WYiq") .roles("user"); } @Override protected void configure(HttpSecurity http) throws Exception { http.antMatcher("/oauth/**").authorizeRequests() // 遇到oauth 直接放行 .antMatchers("/oauth/**").permitAll() .and().csrf().disable(); } }- 1
- 2
- 3
- 4
- 5
- 6
- 7
- 8
- 9
- 10
- 11
- 12
- 13
- 14
- 15
- 16
- 17
- 18
- 19
- 20
- 21
- 22
- 23
- 24
- 25
- 26
- 27
- 28
- 29
- 30
- 31
- 32
在controller层依旧是:
@GetMapping("/admin/hello") public String admin() { return "hello admin!"; } @GetMapping("/user/hello") public String user() { return "hello user"; } @GetMapping("/hello") public String hello() { return "hello"; }- 1
- 2
- 3
- 4
- 5
- 6
- 7
- 8
- 9
- 10
- 11
- 12
- 13
- 14
- 15
- 16
现在启动Redis 服务器,首先发送一个POST请求,地址如下:
http://localhost:8080/oauth/token?username=sang&password=123&grant_type=password&client_id=password&scope=all&client_secret=123- 1
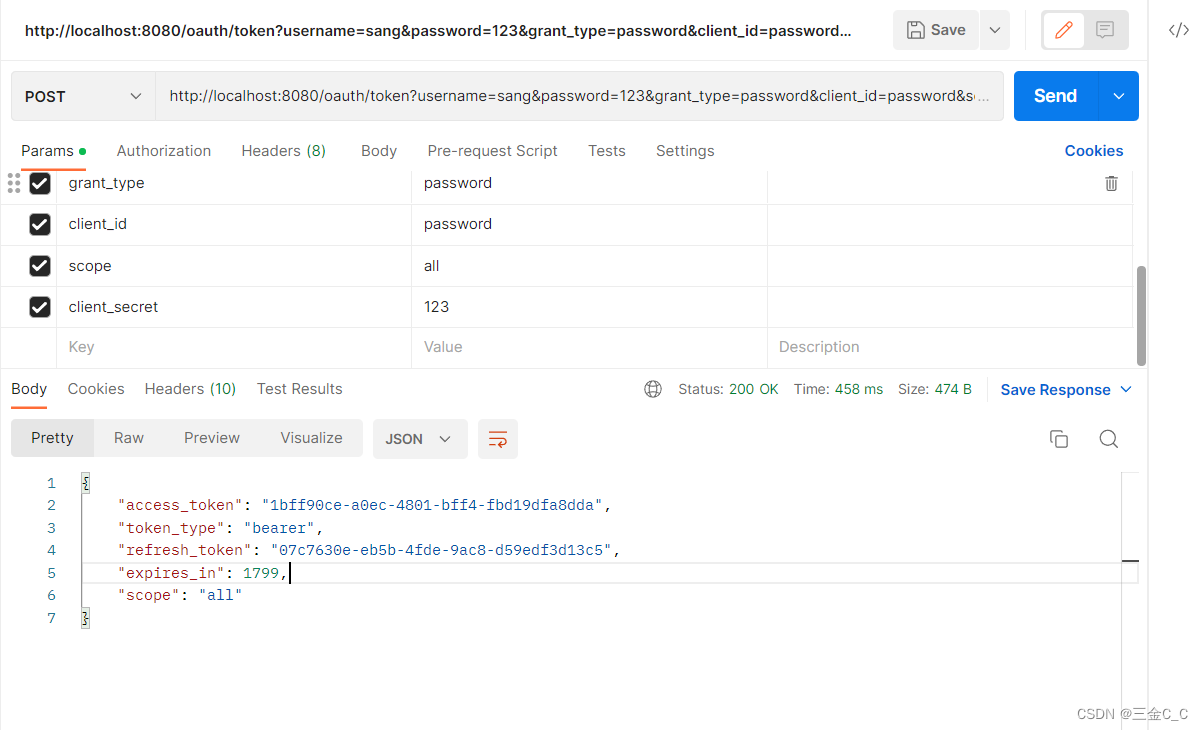
请求地址包括了用户名密码授权模式 客户端id scope 以及客户端密码。
返回结果如上,其中access_token 是获取其他资源要用的令牌,refresh_token 用来刷新令牌,expires_in 表示过期时间,当过期后,使用refresh_token 重新获取新的access_token 。访问所有资源,携带access_token 参数接口:
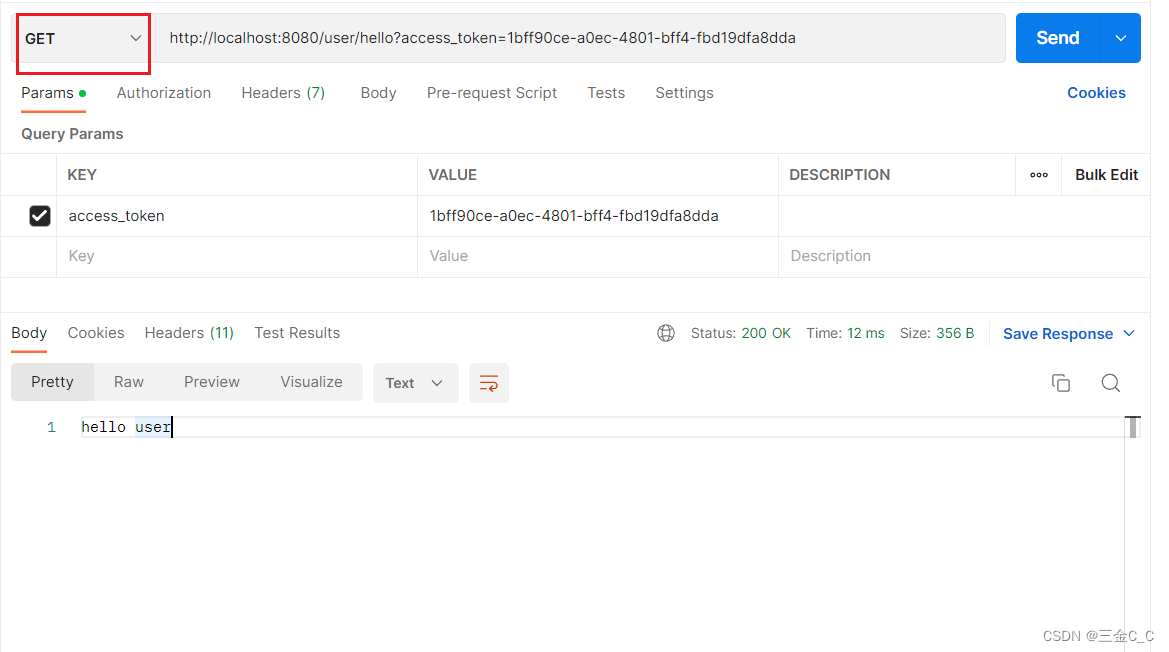
如果非法访问一个资源,访问/admin/hello:
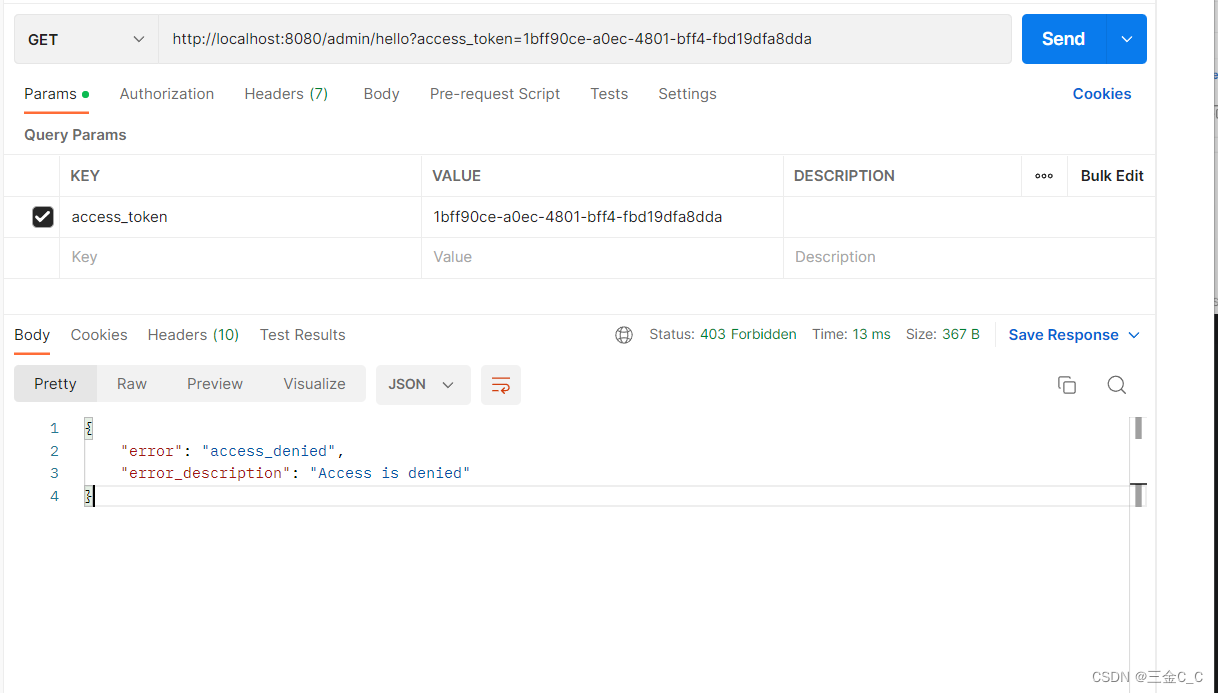
接着来看Redis 数据:
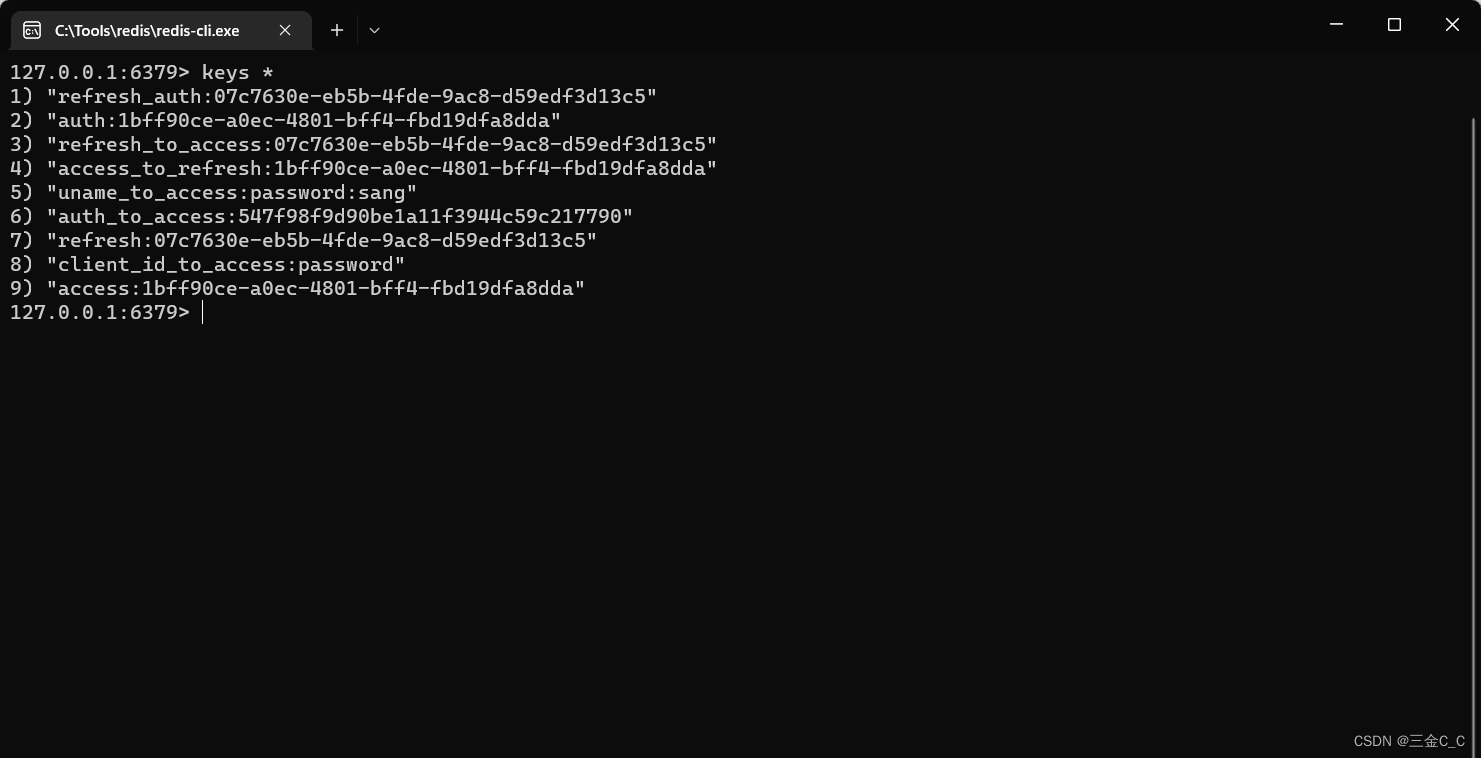
至此一个password 模式的OAuth 认证体系就搭建完成了。
整体来说,Spring Security OAuth 2的使用还是比较复杂,配置也相当繁琐,如果应用场景较简单,可以按照上文搭建。Spring Boot 整合 Shiro
Apache Shiro 是一个开源轻量级Java 安全框架,提供身份验证,授权,密码管理以及会话管理,相对于Spring Security ,Shiro 更加直观易用,也提供健壮的安全性。在SSM框架中,手动整合Shiro 配置步骤还是比较多,针对Spring Boot ,Shiro 提供了shiro-spring-boot-web-starter 用来简化配置。
引入依赖:// 这部分代码可以不要,因为在shiro-spring已经集成了 <dependency> <groupId>org.apache.shirogroupId> <artifactId>shiro-spring-boot-web-starterartifactId> <version>1.5.3version> dependency> <dependency> <groupId>com.github.theborakompanionigroupId> <artifactId>thymeleaf-extras-shiroartifactId> <version>2.1.0version> dependency> <dependency> <groupId>org.springframework.bootgroupId> <artifactId>spring-boot-starter-thymeleafartifactId> dependency>- 1
- 2
- 3
- 4
- 5
- 6
- 7
- 8
- 9
- 10
- 11
- 12
- 13
- 14
- 15
- 16
- 17
- 18
- 19
在application.properties 中配置Shiro 信息:
# 开启Shiro shiro.enabled=true # 开启Shiro Web shiro.web.enabled=true # 表示登录地址 shiro.loginUrl=/login shiro.successUrl=/index shiro.unauthorizedUrl=/unauthorized # 表示允许通过URL 参数实现会话跟踪,如果网站支持Cook shiro.sessionManager.sessionIdUrlRewritingEnabled=true shiro.sessionManager.sessionIdCookieEnabled=true- 1
- 2
- 3
- 4
- 5
- 6
- 7
- 8
- 9
- 10
- 11
配置Shiro ,提供两个最基本的Bean:
@Configuration public class ShiroConfig { // 没有配置数据库连接,这里直接配置两个用户,分别对应不同的角色,同时角色也有不同的读写权限 @Bean public Realm realm() { TextConfigurationRealm realm = new TextConfigurationRealm(); realm.setUserDefinitions("sang=123,user\n admin=123,admin"); realm.setRoleDefinitions("admin=read,write\n user=read"); return realm; } @Bean public ShiroFilterChainDefinition shiroFilterChainDefinition() { DefaultShiroFilterChainDefinition chainDefinition = new DefaultShiroFilterChainDefinition(); // 可以匿名访问 chainDefinition.addPathDefinition("/login", "anon"); chainDefinition.addPathDefinition("/doLogin", "anon"); // 注销操作 chainDefinition.addPathDefinition("/logout", "logout"); chainDefinition.addPathDefinition("/**", "authc"); return chainDefinition; } // 如果不在Thymelead 使用Shiro,可以不写 @Bean public ShiroDialect shiroDialect() { return new ShiroDialect(); } }- 1
- 2
- 3
- 4
- 5
- 6
- 7
- 8
- 9
- 10
- 11
- 12
- 13
- 14
- 15
- 16
- 17
- 18
- 19
- 20
- 21
- 22
- 23
- 24
- 25
- 26
- 27
- 28
- 29
接下来配置登录接口以及页面访问接口:
@Controller public class UserController { @PostMapping("/doLogin") public String doLogin(String username, String password, Model model) { System.out.println("123"); UsernamePasswordToken token = new UsernamePasswordToken(username, password); Subject subject = SecurityUtils.getSubject(); try { subject.login(token); } catch (AuthenticationException e) { model.addAttribute("error", "用户名或密码输入错误!"); return "login"; } return "redirect:/index"; } @RequiresRoles("admin") @GetMapping("/admin") public String admin() {看, return "admin"; } @RequiresRoles(value = {"admin","user"},logical = Logical.OR) @GetMapping("/user") public String user() { return "user"; } }- 1
- 2
- 3
- 4
- 5
- 6
- 7
- 8
- 9
- 10
- 11
- 12
- 13
- 14
- 15
- 16
- 17
- 18
- 19
- 20
- 21
- 22
- 23
- 24
- 25
- 26
- 27
在doLogin 中,构造了 UsernamePasswordToken实例,获取一个Subject对象并调用login 方法执行登录,当异常抛出的时候,说明登录失败,登录成功重新定向/index
对于其他不需要角色就能访问的接口,直接在WebMvc配置即可:@Configuration public class WebMvcConfig implements WebMvcConfigurer{ @Override public void addViewControllers(ViewControllerRegistry registry) { registry.addViewController("/login").setViewName("login"); registry.addViewController("/index").setViewName("index"); registry.addViewController("/unauthorized").setViewName("unauthorized"); } }- 1
- 2
- 3
- 4
- 5
- 6
- 7
- 8
- 9
- 10
接下来创建全局异常处理器进行全局异常处理,本案例主要是处理授权异常:
@Configuration public class WebMvcConfig implements WebMvcConfigurer{ @Override public void addViewControllers(ViewControllerRegistry registry) { registry.addViewController("/login").setViewName("login"); registry.addViewController("/index").setViewName("index"); registry.addViewController("/unauthorized").setViewName("unauthorized"); } }- 1
- 2
- 3
- 4
- 5
- 6
- 7
- 8
- 9
- 10
然后分别建立5个html:
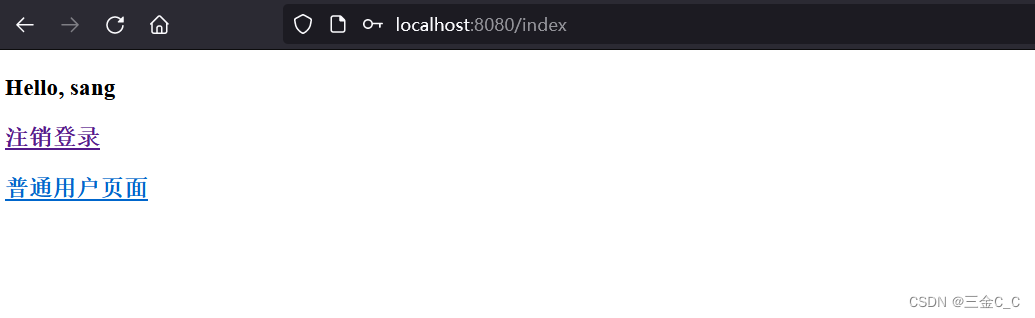
index.html:DOCTYPE html> <html lang="en" xmlns:shiro="http://www.pollix.at/thymeleaf/shiro"> <head> <meta charset="UTF-8"> <title>Titletitle> head> <body> <h3>Hello, <shiro:principal/>h3> <h3><a href="/logout">注销登录a>h3> <h3><a shiro:hasRole="admin" href="/admin">管理员页面a>h3> <h3><a shiro:hasAnyRoles="admin,user" href="/user">普通用户页面a>h3> body> html>- 1
- 2
- 3
- 4
- 5
- 6
- 7
- 8
- 9
- 10
- 11
- 12
- 13
注意这里导入的名称空间和jsp中导入的shiro 是不同的。
login.html:
<form action="/doLogin" method="post"> <input type="text" name="username"><br> <input type="password" name="password"><br> <div th:text="${error}">div> <input type="submit" value="登录"> form>- 1
- 2
- 3
- 4
- 5
- 6
user.html:
<h1>普通用户页面h1>- 1
admin.html:
<h1>管理员页面h1>- 1
unauthorized.html:
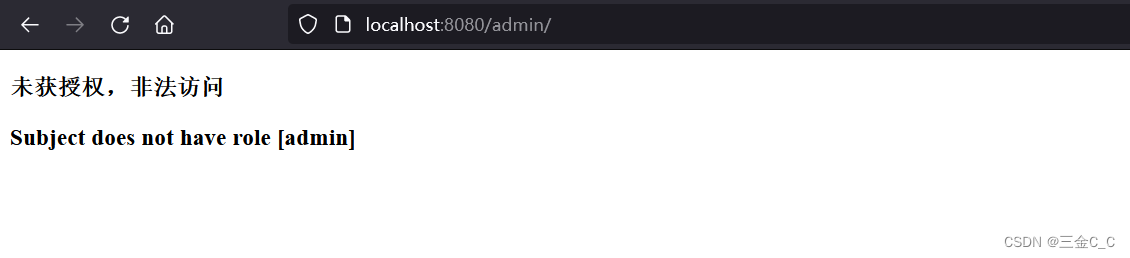
<div> <h3>未获授权,非法访问h3> <h3 th:text="${error}">h3> div>- 1
- 2
- 3
- 4
下面开始测试,直接运行后,输入sang ,123 便可以登录:
如果此时的路径是admin,将会提示非法访问。
以上。
-
相关阅读:
【小程序源码】强大的多功能图片处理图片画框合成
重磅联合!飞桨携手Apollo共建Paddle3D自动驾驶感知能力
数据结构系列学习(六) - 顺序栈(Stack)
【毕业设计】 基于Django的会议室预定系统
短视频平台爆火的AI配音|超实用的配音工具分享篇
java+maven+testng+allure+git搭建持续集成报告配置
Java学习笔记零基础入门2
使用新的 NVIDIA Isaac Foundation 模型和工作流程创建、设计和部署机器人应用程序
【C语言游戏】三子棋完整代码和正确结果截图
【MindSpore】【图片加载】加载RGB-D图片失败
- 原文地址:https://blog.csdn.net/QAZJOU/article/details/128020616
