-
SSM框架-从JDBC到Mybatis,你今天CRUD了吗?
1 Jdbc
1.1 jdbc入门使用
- 导入驱动jar包
- 新建一个目录lib,把jar包放进去

- add as library

- 具体代码
public class JDBCdEMO { public static void main(String[] args) throws Exception{ //1.注册驱动 Class.forName("com.mysql.jdbc.Driver"); //2.获取连接 String url = "jdbc:mysql://127.0.0.1:3306/test2"; String username = "root"; String password = "xxxxxx"; Connection conn = DriverManager.getConnection(url, username, password); //3.定义sql语句 String sql = "update account set money=2000 where id = 1"; //4.获取执行对象Statement Statement stmt = conn.createStatement(); //5.执行sql,返回值是指影响行数 int count = stmt.executeUpdate(sql); //6.处理结果 System.out.println(count); //7.释放资源 stmt.close(); conn.close(); } }- 1
- 2
- 3
- 4
- 5
- 6
- 7
- 8
- 9
- 10
- 11
- 12
- 13
- 14
- 15
- 16
- 17
- 18
- 19
- 20
- 21
- 22
- 23
- 24
- 25
- 26
- 27
- 28
- 29
- 数据库对应的数据发生改变

1.2 常用API
1.2.1 DriverManager
- DriverManager(驱动管理类)作用
- 注册驱动
- 获取数据库连接
- 注册驱动
是个工具类,里面大都是静态方法,后续打点获取方法名就可以,注意里面的registerDriver方法

- Class.forName中Driver点进去是个静态代码块

静态代码块中有DriverManager.registerDriver就是DriverManager的方法了
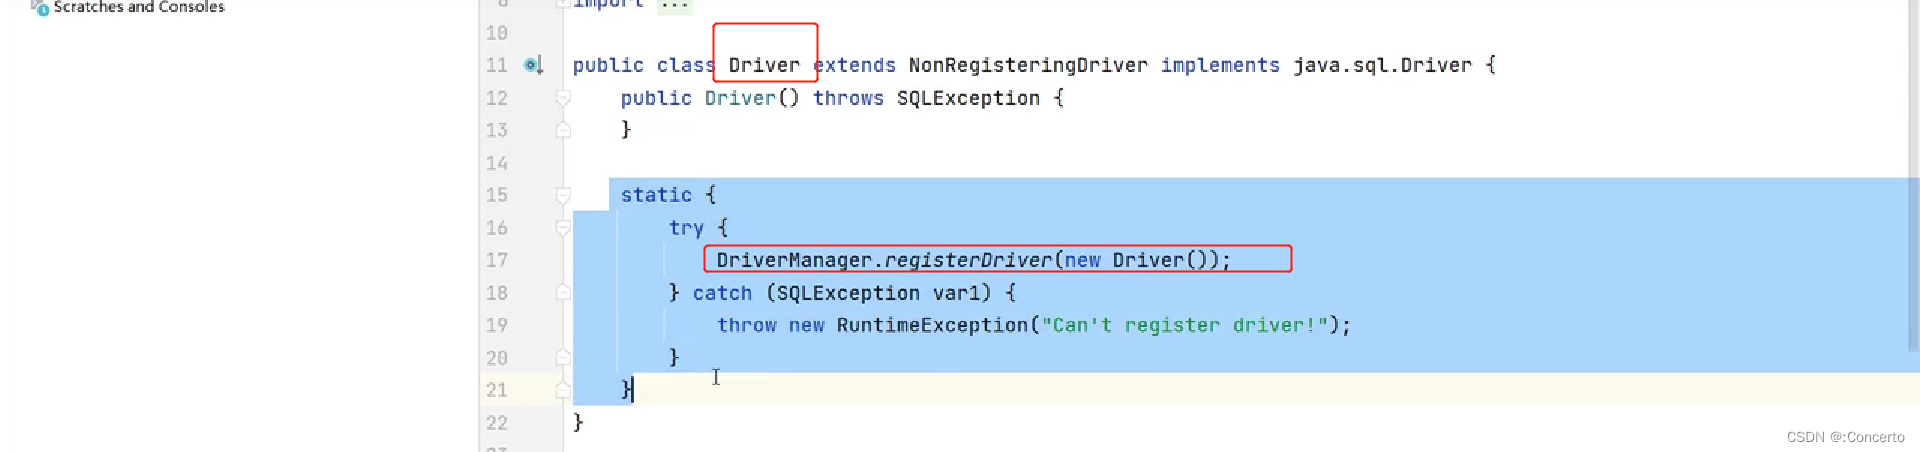
mysql驱动5的jar包,可以省略不写Class.forName,一样能跑,是因为驱动jar包中有

- 获取数据库连接

1.2.2 Connection
- 作用
- 获取执行SQL对象
- 管理事务
- 获取执行SQL对象
- 方法createStatement()
- 方法prepareStatement()
- 管理事务
-
开启事务:setAutoCommit(boolean autoCommit)
- true为表示自动提交
- false表示手动提交
-
提交事务:commit()
-
回滚事务:rollback()
-
上代码
public class JDBCDemo2 { public static void main(String[] args) throws Exception{ //1.注册驱动 Class.forName("com.mysql.jdbc.Driver"); //2.获取连接 String url = "jdbc:mysql://127.0.0.1:3306/test2"; String username = "root"; String password = "xxxxxx"; Connection conn = DriverManager.getConnection(url, username, password); //3.定义sql语句 String sql1 = "update account set money=3000 where id = 1"; String sql2 = "update account set money=3000 where id = 2"; //4.获取执行对象Statement Statement stmt = conn.createStatement(); //使用try,catch来管理事务 //5.执行sql,返回值是指影响行数 try { //6.开启事务 conn.setAutoCommit(false); int count1 = stmt.executeUpdate(sql1); System.out.println(count1); int count2 = stmt.executeUpdate(sql2); System.out.println(count2); //7.提交事务 conn.commit(); } catch (Exception e) { //8.回滚事务 conn.rollback(); } //9.释放资源 stmt.close(); conn.close(); } }- 1
- 2
- 3
- 4
- 5
- 6
- 7
- 8
- 9
- 10
- 11
- 12
- 13
- 14
- 15
- 16
- 17
- 18
- 19
- 20
- 21
- 22
- 23
- 24
- 25
- 26
- 27
- 28
- 29
- 30
- 31
- 32
- 33
- 34
- 35
- 36
- 37
- 38
- 39
- 40
- 41
- 42
- 43
- 44
1.2.3 Statement
- 概述
- 通过conn.createStatement()创建stmt
- 在使用executeUpdate(sql)指定sql语句
Statement stmt = conn.createStatement(); //5.执行sql,返回值是指影响行数 int count = stmt.executeUpdate(sql);- 1
- 2
- 3
- 4
- 执行SQL语句
- DML可以在最后进行判断是否成功
if(count>0){ System.out.println("修改成功"); }else { System.out.println("修改失败"); }- 1
- 2
- 3
- 4
- 5
- DDL的成功不依赖返回值0或者1,因此只要不报异常即可
代码无变动- 1
1.2.4 ResultSet
- 作用
封装了DQL查询语句的结果
- 代码
public class JDBCDemo4 { @Test public void testResultSet() throws Exception{ //1.注册驱动 Class.forName("com.mysql.jdbc.Driver"); //2.获取连接 String url = "jdbc:mysql://127.0.0.1:3306/test2"; String username = "root"; String password = "xxxxxx"; Connection conn = DriverManager.getConnection(url, username, password); //3.定义sql String sql = "select * from account"; //4.获取statement对象 Statement stmt = conn.createStatement(); //5.执行sql ResultSet rs = stmt.executeQuery(sql); //6.处理结果,遍历rs中的所有数据 //6.1光标向下移动一行,并且判断当前行是否有数据 while (rs.next()){ //6.2获取数据,可以是列索引,也可以是列名称 int id = rs.getInt(1); String name = rs.getString("name"); double money = rs.getDouble(3); System.out.println(id); System.out.println(name); System.out.println(money); System.out.println("---------------------"); } //7.释放资源 rs.close(); stmt.close(); conn.close(); } }- 1
- 2
- 3
- 4
- 5
- 6
- 7
- 8
- 9
- 10
- 11
- 12
- 13
- 14
- 15
- 16
- 17
- 18
- 19
- 20
- 21
- 22
- 23
- 24
- 25
- 26
- 27
- 28
- 29
- 30
- 31
- 32
- 33
- 34
- 35
- 36
- 37
- 38
- 39
- 40
- 41
- 42
- 再来个案例
- 需求:查询account账户表数据,封装为Account对象中,并存储到ArrayList集合中

- 新建一个实体类对象
public class Account { private int id; private String name; private double money; public int getId() { return id; } public void setId(int id) { this.id = id; } public String getName() { return name; } public void setName(String name) { this.name = name; } public double getMoney() { return money; } public void setMoney(double money) { this.money = money; } @Override public String toString() { return "Account{" + "id=" + id + ", name='" + name + '\'' + ", money=" + money + '}'; } }- 1
- 2
- 3
- 4
- 5
- 6
- 7
- 8
- 9
- 10
- 11
- 12
- 13
- 14
- 15
- 16
- 17
- 18
- 19
- 20
- 21
- 22
- 23
- 24
- 25
- 26
- 27
- 28
- 29
- 30
- 31
- 32
- 33
- 34
- 35
- 36
- 37
- 38
- 核心实现
@Test public void testResultSet2() throws Exception{ //1.注册驱动 Class.forName("com.mysql.jdbc.Driver"); //2.获取连接 String url = "jdbc:mysql://127.0.0.1:3306/test2"; String username = "root"; String password = "xxxxxx"; Connection conn = DriverManager.getConnection(url, username, password); //3.定义sql String sql = "select * from account"; //4.获取statement对象 Statement stmt = conn.createStatement(); //5.执行sql ResultSet rs = stmt.executeQuery(sql); ArrayList<Account> list = new ArrayList<>(); //6.处理结果,遍历rs中的所有数据 //6.1光标向下移动一行,并且判断当前行是否有数据 while (rs.next()){ Account account = new Account(); //6.2获取数据 int id = rs.getInt(1); String name = rs.getString("name"); double money = rs.getDouble(3); //6.3赋值给对象 account.setId(id); account.setName(name); account.setMoney(money); //存入集合 list.add(account); } System.out.println(list); //7.释放资源 rs.close(); stmt.close(); conn.close(); } }- 1
- 2
- 3
- 4
- 5
- 6
- 7
- 8
- 9
- 10
- 11
- 12
- 13
- 14
- 15
- 16
- 17
- 18
- 19
- 20
- 21
- 22
- 23
- 24
- 25
- 26
- 27
- 28
- 29
- 30
- 31
- 32
- 33
- 34
- 35
- 36
- 37
- 38
- 39
- 40
- 41
- 42
- 43
- 44
- 45
- 46
- 47
- 48
- 49
1.2.5 PreparedStatement
- SQL注入概念

- 代码
@Test public void testResultSet2() throws Exception { //2.获取连接 String url = "jdbc:mysql://127.0.0.1:3306/test2"; String username = "root"; String password = "xxxxxx"; Connection conn = DriverManager.getConnection(url, username, password); // 接收用户输入 用户名和密码 String name = "zhangsan"; String pwd = "' or '1' = '1"; String sql = "select * from tb_user where username = '" + name + "' and password = '" + pwd + "'"; // 获取stmt对象 Statement stmt = conn.createStatement(); // 执行sql ResultSet rs = stmt.executeQuery(sql); // 判断登录是否成功 if (rs.next()) { System.out.println("登录成功~"); } else {2. System.out.println("登录失败~"); } //7. 释放资源 rs.close(); stmt.close(); conn.close(); } }- 1
- 2
- 3
- 4
- 5
- 6
- 7
- 8
- 9
- 10
- 11
- 12
- 13
- 14
- 15
- 16
- 17
- 18
- 19
- 20
- 21
- 22
- 23
- 24
- 25
- 26
- 27
- 28
- 29
- 30
- 31
- 32
- 33
- 34
- 解决
- sql不使用拼接
- sql传给prepareStatement中
- 再用setString获取变量的值
- 最终执行
@Test public void testResultSet2() throws Exception { //2.获取连接 String url = "jdbc:mysql://127.0.0.1:3306/test2"; String username = "root"; String password = "xxxxxx"; Connection conn = DriverManager.getConnection(url, username, password); // 接收用户输入 用户名和密码 String name = "zhangsan"; String pwd = "' or '1' = '1"; //定义sql String sql = "select * from tb_user where username = ? and password = ?"; //获取pstmt对象 PreparedStatement pstmt = conn.prepareStatement(sql); //设置问号值 pstmt.setString(1,name); pstmt.setString(2,pwd); //指定sql ResultSet rs = pstmt.executeQuery(); // 判断登录是否成功 if (rs.next()) { System.out.println("登录成功~"); } else { System.out.println("登录失败~"); } //7. 释放资源 rs.close(); pstmt.close(); conn.close(); } }- 1
- 2
- 3
- 4
- 5
- 6
- 7
- 8
- 9
- 10
- 11
- 12
- 13
- 14
- 15
- 16
- 17
- 18
- 19
- 20
- 21
- 22
- 23
- 24
- 25
- 26
- 27
- 28
- 29
- 30
- 31
- 32
- 33
- 34
- 35
- 36
- 37
- 38
- 39
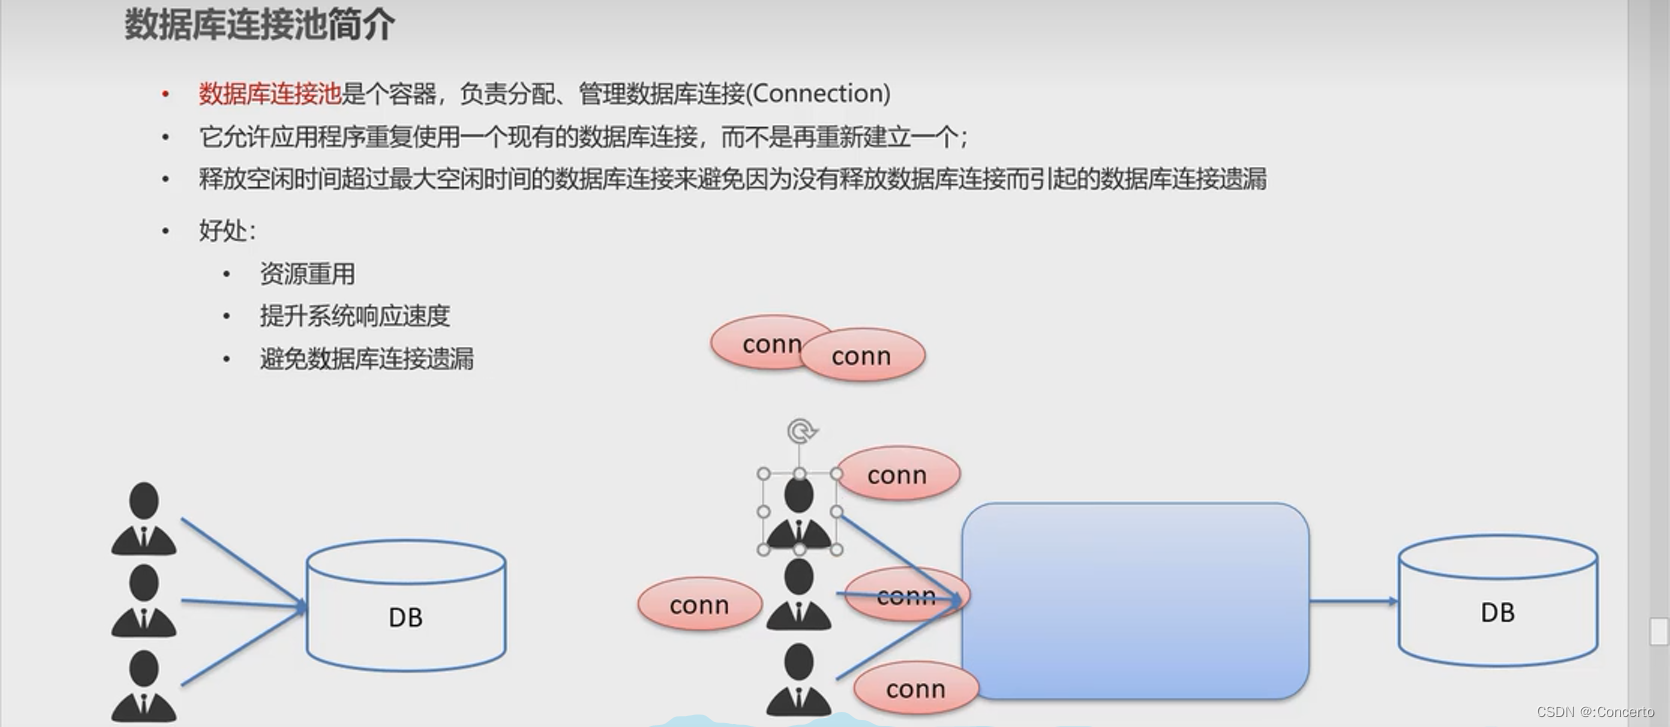
1.3 数据库连接池
- 连接池简介
允许重复使用一个现有的数据库连接,而不是重新新建一个,保证了资源的复用
- Druid连接池使用
-
jar包粘贴到lib后,add as library变成模块有效
-
代码
/** * Druid数据库连接池演示 */ public class DruidDemo { public static void main(String[] args) throws Exception { //1.导入jar包 //2.定义配置文件 //3.加载配置文件 Properties prop = new Properties(); prop.load(new FileInputStream("C:\\Users\\CZyue\\Desktop\\javaSE\\11-JavaWeb补充\\jdbc-demo\\src\\druid.properties")); //4.获取连接池对象 DataSource dataSource = DruidDataSourceFactory.createDataSource(prop); //5.获取对应的数据库连接Connection Connection connection = dataSource.getConnection(); System.out.println(connection); //获取当前路径 //System.out.println(System.getProperty("user.dir")); //C:\Users\CZyue\Desktop\javaSE\11-JavaWeb补充\jdbc-demo } }- 1
- 2
- 3
- 4
- 5
- 6
- 7
- 8
- 9
- 10
- 11
- 12
- 13
- 14
- 15
- 16
- 17
- 18
- 19
- 20
- 21
- 22
- 23
- 24
- 25
- 26
2 Mybatis
2.1 什么是Mybatis
- 作用
- 用于简化JDBC
- 持久层
JavaEE三层架构:表现层、业务层、持久层
- JDBC缺点
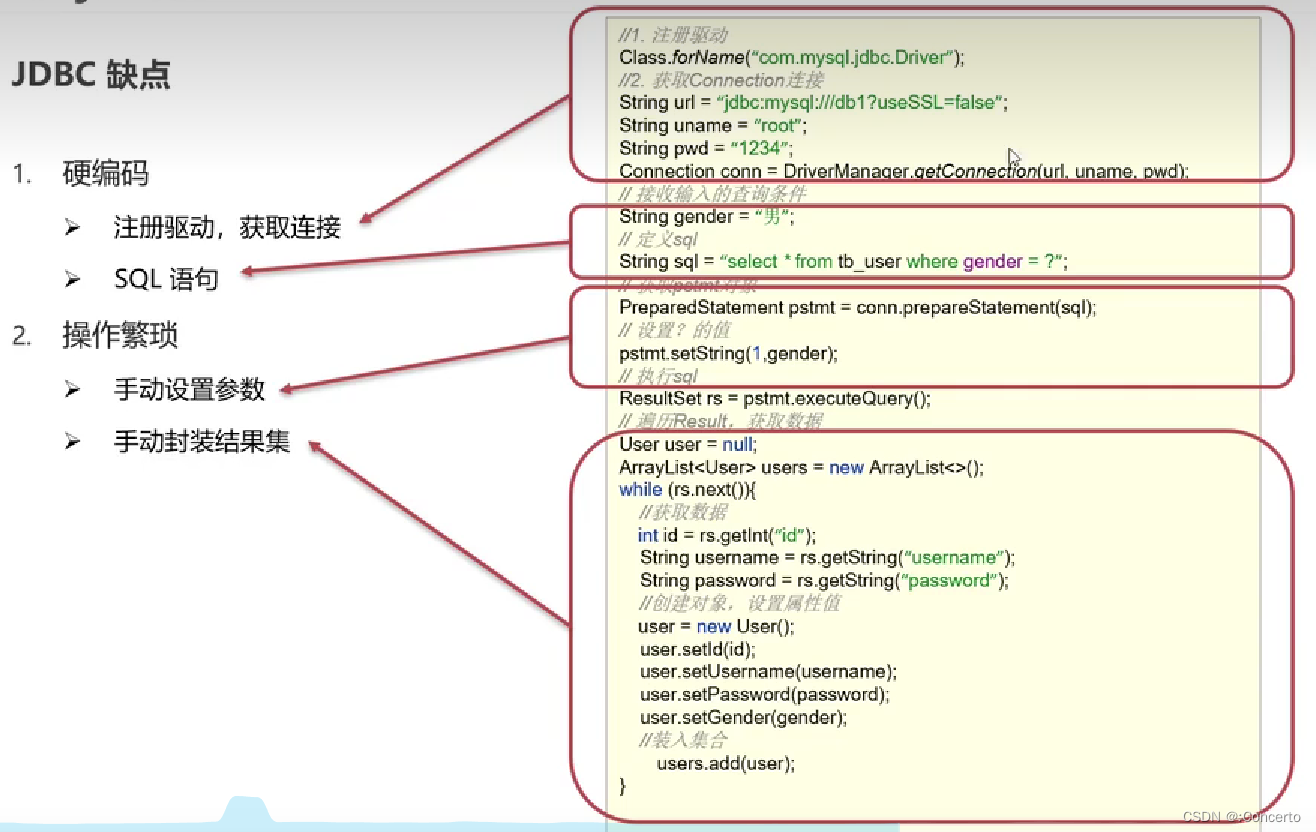
- 硬编码
- 体现在驱动连接信息可能发生改变
- sql语句也可能发生改变
- 操作繁琐
- ?问号需要手动编译
- 对结果进行对象封装结果集的时候比较繁琐
2.2 mybatis快速入门
- 去官网下载maven依赖https://mybatis.net.cn/getting-started.html
<dependency> <groupId>org.mybatis</groupId> <artifactId>mybatis</artifactId> <version>x.x.x</version> </dependency>- 1
- 2
- 3
- 4
- 5
- 去maven仓库下载mysql驱动
<!-- https://mvnrepository.com/artifact/mysql/mysql-connector-java --> <dependency> <groupId>mysql</groupId> <artifactId>mysql-connector-java</artifactId> <version>5.1.46</version> </dependency>- 1
- 2
- 3
- 4
- 5
- 6
- 7
- 添加slf4j日志api
<!-- 添加slf4j日志api --> <dependency> <groupId>org.slf4j</groupId> <artifactId>slf4j-api</artifactId> <version>1.7.20</version> </dependency> <!-- 添加logback-classic依赖 --> <dependency> <groupId>ch.qos.logback</groupId> <artifactId>logback-classic</artifactId> <version>1.2.3</version> </dependency> <!-- 添加logback-core依赖 --> <dependency> <groupId>ch.qos.logback</groupId> <artifactId>logback-core</artifactId> <version>1.2.3</version> </dependency>- 1
- 2
- 3
- 4
- 5
- 6
- 7
- 8
- 9
- 10
- 11
- 12
- 13
- 14
- 15
- 16
- 17
- 18
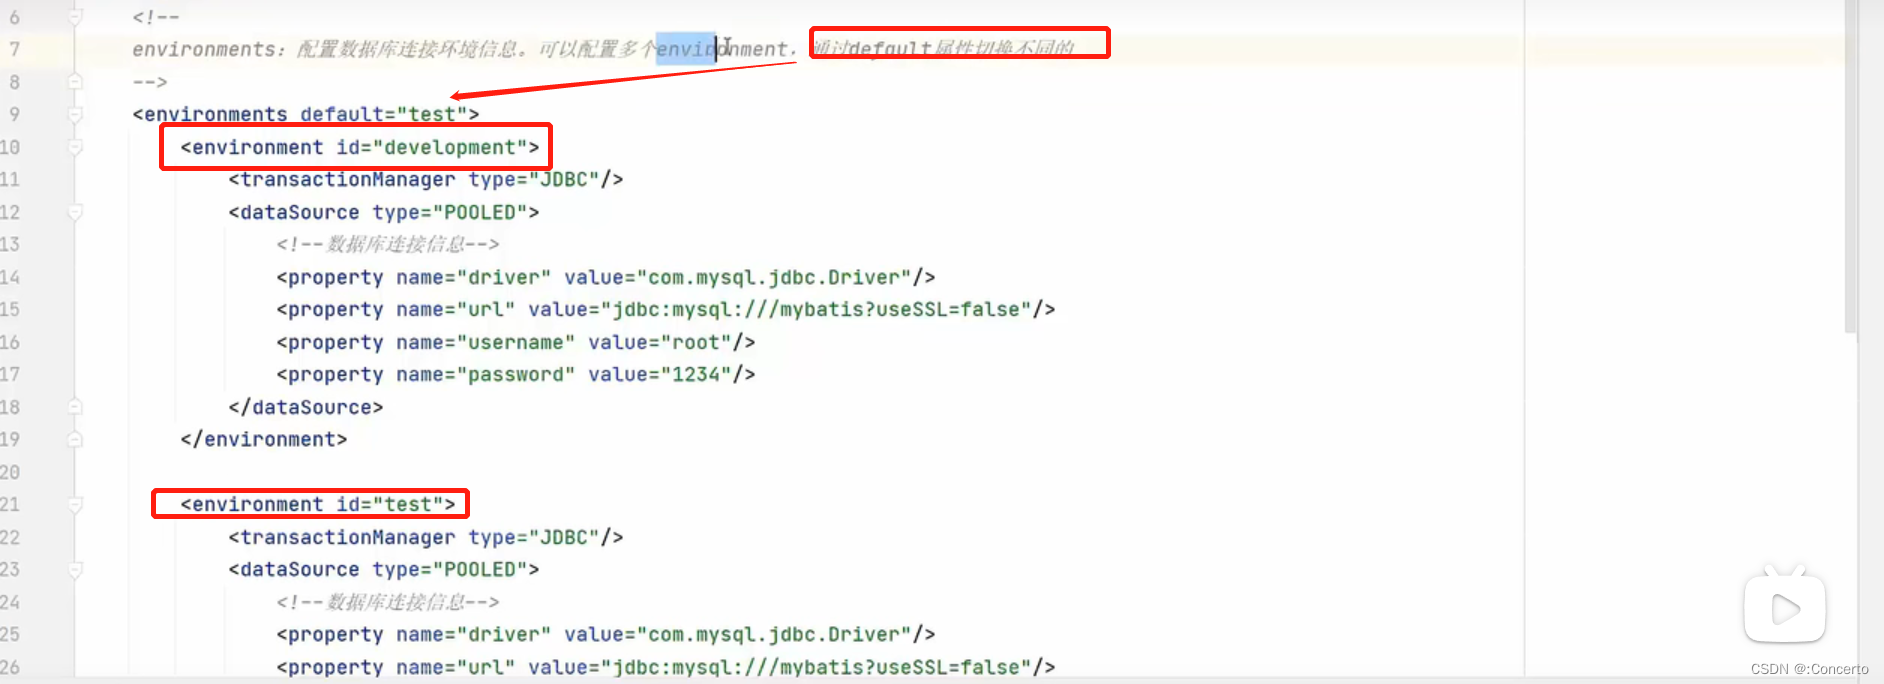
- 配置文件方resource中

- xml的核心配置
- 将数据库连接信息放入
- 加载了sql映射文件
DOCTYPE configuration PUBLIC "-//mybatis.org//DTD Config 3.0//EN" "http://mybatis.org/dtd/mybatis-3-config.dtd"> <configuration> <environments default="development"> <environment id="development"> <transactionManager type="JDBC"/> <dataSource type="POOLED"> <property name="driver" value="com.mysql.jdbc.Driver"/> <property name="url" value="jdbc:mysql://localhost:3306/mybatis"/> <property name="username" value="root"/> <property name="password" value="123456"/> dataSource> environment> environments> <mappers> <mapper resource="UserMapper.xml"/> mappers> configuration>- 1
- 2
- 3
- 4
- 5
- 6
- 7
- 8
- 9
- 10
- 11
- 12
- 13
- 14
- 15
- 16
- 17
- 18
- 19
- 20
- 21
- 22
- sql映射文件的具体配置
DOCTYPE mapper PUBLIC "-//mybatis.org//DTD Mapper 3.0//EN" "http://mybatis.org/dtd/mybatis-3-mapper.dtd"> <mapper namespace="test"> <select id="selectAll" resultType="com.itheima.pojo.User"> select * from tb_user; select> mapper>- 1
- 2
- 3
- 4
- 5
- 6
- 7
- 8
- 9
- 10
- 11

7.定义POJP类
public class User { private Integer id; private String username; private String password; private String gender; private String addr; public Integer getId() { return id; } public void setId(Integer id) { this.id = id; } public String getUsername() { return username; } public void setUsername(String username) { this.username = username; } public String getPassword() { return password; } public void setPassword(String password) { this.password = password; } public String getGender() { return gender; } public void setGender(String gender) { this.gender = gender; } public String getAddr() { return addr; } public void setAddr(String addr) { this.addr = addr; } @Override public String toString() { return "User{" + "id=" + id + ", username='" + username + '\'' + ", password='" + password + '\'' + ", gender='" + gender + '\'' + ", addr='" + addr + '\'' + '}'; } }- 1
- 2
- 3
- 4
- 5
- 6
- 7
- 8
- 9
- 10
- 11
- 12
- 13
- 14
- 15
- 16
- 17
- 18
- 19
- 20
- 21
- 22
- 23
- 24
- 25
- 26
- 27
- 28
- 29
- 30
- 31
- 32
- 33
- 34
- 35
- 36
- 37
- 38
- 39
- 40
- 41
- 42
- 43
- 44
- 45
- 46
- 47
- 48
- 49
- 50
- 51
- 52
- 53
- 54
- 55
- 56
- 57
- 58
- 59
- 核心代码
- 1.加载Mybatis的核心配置文件,获取SqlSessionFactory
- 2.获取SqlSession对象,用它来执行sql
- 3.执行sql语句
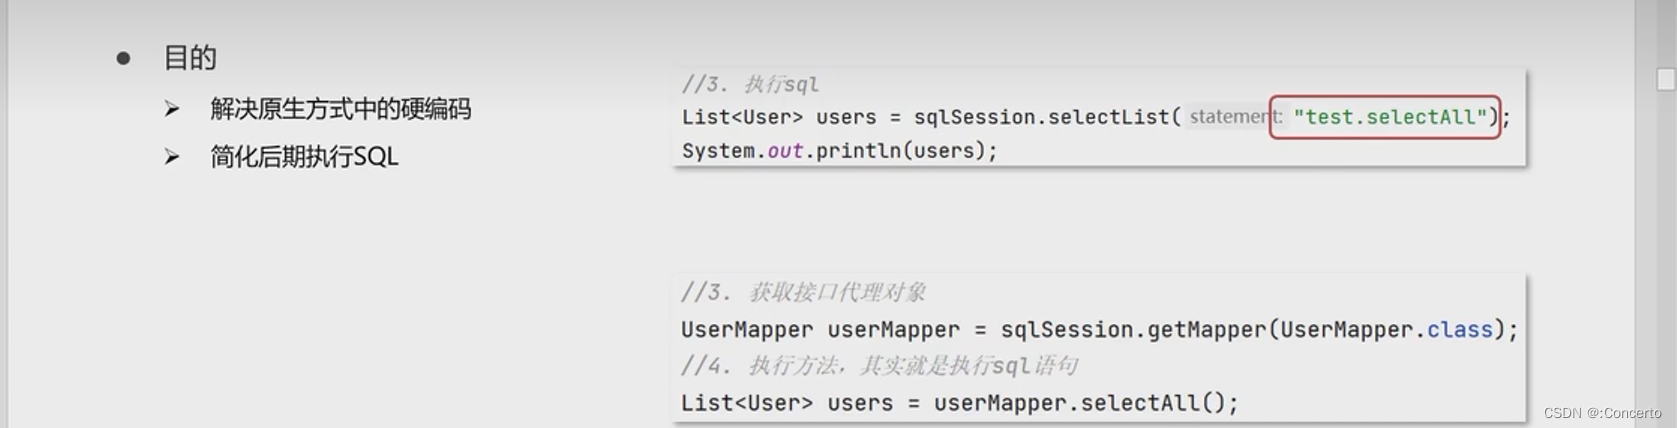
public class MybatisDemo { public static void main(String[] args) throws IOException { //1.加载Mybatis的核心配置文件,获取SqlSessionFactory String resource = "mybatis-config.xml"; InputStream inputStream = Resources.getResourceAsStream(resource); SqlSessionFactory sqlSessionFactory = new SqlSessionFactoryBuilder().build(inputStream); //2.获取SqlSession对象,用它来执行sql SqlSession sqlSession = sqlSessionFactory.openSession(); //3.执行sql语句 List<User> users = sqlSession.selectList("test.selectAll"); System.out.println(users); //4.释放资源 sqlSession.close(); } }- 1
- 2
- 3
- 4
- 5
- 6
- 7
- 8
- 9
- 10
- 11
- 12
- 13
- 14
- 15
- 16
- 17
- 18
- 19
- 20
- 可以将idea中配置mysql的连接后进行连接

2.3 Mapper代理开发
- 目的
- 建立一个mapper的包,并新建一个UserMapper的接口
与SQL映射文件同名的Mapper接口

- 将UserMapper接口和UserMapper.xml文件要放在一起
- 在resource下新建mapper的包,用/新建

- 将UserMapper.xml拖进去

- 重新编译下

- 结果
这两在一起了

- 设置SQL映射文件的namespace属性为Mapper接口全限定名
<mapper namespace="com.itheima.mapper.UserMapper">- 1
- 2
- 在Mapper接口中定义方法,方法名就是SQL映射文件中sql语句的id,并且保持参数类型和返回值类型一致
public interface UserMapper { //返回User对象并且是list的集合,根据sql语句判断啦 // 方法名和是SQL映射文件中sql语句的id List<User> selectAll(); }- 1
- 2
- 3
- 4
- 5
- 更改mybatis-config中sql映射文件地址
<mappers> <mapper resource="com/itheima/mapper/UserMapper.xml"/> mappers>- 1
- 2
- 3
- 4
- 更改代码
理解:
- Mapper因为存在同名的配置文件,所以可以找到映射配置文件
- 调用方法后selectAll方法后,也是配置文件中的sql语句的id,也就可以获取sql语句了,最后返回List
public static void main(String[] args) throws IOException { //1.加载Mybatis的核心配置文件,获取SqlSessionFactory String resource = "mybatis-config.xml"; InputStream inputStream = Resources.getResourceAsStream(resource); SqlSessionFactory sqlSessionFactory = new SqlSessionFactoryBuilder().build(inputStream); //2.获取SqlSession对象,用它来执行sql SqlSession sqlSession = sqlSessionFactory.openSession(); //3.原来:执行sql语句 //Listusers = sqlSession.selectList("test.selectAll"); //3.1获取UserMapper接口的代理对象 //Mapper因为存在同名的配置文件,所以可以找到映射配置文件 UserMapper userMapper = sqlSession.getMapper(UserMapper.class); //执行方法 //调用方法后selectAll方法后,也是配置文件中的sql语句的id,也就可以获取sql语句了,最后返回List List<User> users = userMapper.selectAll(); System.out.println(users); //4.释放资源 sqlSession.close(); } }- 1
- 2
- 3
- 4
- 5
- 6
- 7
- 8
- 9
- 10
- 11
- 12
- 13
- 14
- 15
- 16
- 17
- 18
- 19
- 20
- 21
- 22
- 23
- 24
- 25
有个细节:如果Mapper接口名称和SQL映射文件名称相同,并在同一目录下,则可以使用包扫描的方式简化SQL

mybatis-config.xml中
<mappers> <package name="com.itheima.mapper"/> mappers>- 1
- 2
- 3
- 4
- 5
- 6
- 7
2.4 Mybatis核心配置文件
- environment
配置多个数据源
- typeAliases别名
- 在mybatis-config.xml中配置
给pojo中的实体类起了别名
<typeAliases> <package name="com.itheima.pojo"/> typeAliases>- 1
- 2
- 3
- UserMapper.xml中就可以简写成resultType=“user”
DOCTYPE mapper PUBLIC "-//mybatis.org//DTD Mapper 3.0//EN" "http://mybatis.org/dtd/mybatis-3-mapper.dtd"> <mapper namespace="com.itheima.mapper.UserMapper"> <select id="selectAll" resultType="user"> select * from tb_user; select> mapper>- 1
- 2
- 3
- 4
- 5
- 6
- 7
- 8
- 9
- 10
- 11
2.5 配置文件完成增删改查操作
2.5.1 环境配置
- 在mybatis创建表

- 写一个实体类
- 写一个测试用例
在test中创建包和类写
- 安装mybatisX插件
可以将UserMapper和UserMapper.xml匹配起来,跳转方便,以及语法检测
2.5.2 查询所有结果
- 创建一个BrandMapper类
public interface BrandMapper { /** * 查询所有 */ public List<Brand> selectAll(); }- 1
- 2
- 3
- 4
- 5
- 6
- 7
- BrandMapper.xml中写sql
通过BrandMapper类中selectAll()的alt+enter自动生成
DOCTYPE mapper PUBLIC "-//mybatis.org//DTD Mapper 3.0//EN" "http://mybatis.org/dtd/mybatis-3-mapper.dtd"> <mapper namespace="com.itheima.mapper.BrandMapper"> <select id="selectAll" resultType="brand"> select * from tb_brand; select> mapper>- 1
- 2
- 3
- 4
- 5
- 6
- 7
- 8
- 9
- 10
- 11
- 12
- 13
- 14
- 在src的test中创建类,在这边写测试代码

public class MyBatisTest { @Test public void testSelectAll() throws IOException { //1.加载Mybatis的核心配置文件,获取SqlSessionFactory String resource = "mybatis-config.xml"; InputStream inputStream = Resources.getResourceAsStream(resource); SqlSessionFactory sqlSessionFactory = new SqlSessionFactoryBuilder().build(inputStream); //2.获取SqlSession对象 SqlSession sqlSession = sqlSessionFactory.openSession(); //3.获取Mapper接口的代理对象 BrandMapper brandMapper = sqlSession.getMapper(BrandMapper.class); //4.执行方法 List<Brand> brands = brandMapper.selectAll(); System.out.println(brands); //5.释放资源 sqlSession.close(); } }- 1
- 2
- 3
- 4
- 5
- 6
- 7
- 8
- 9
- 10
- 11
- 12
- 13
- 14
- 15
- 16
- 17
- 18
- 19
- 20
- 21
- 22
- 23
- 24
- 有个细节
- 改别名
Brand类中的变量名字和数据中的不同


因此通过起别名的方式保持一致

<mapper namespace="com.itheima.mapper.BrandMapper"> <select id="selectAll" resultType="brand"> select id, brand_name as brandName, company_name as compangName, ordered, description, status from tb_brand; select> mapper>- 1
- 2
- 3
- 4
- 5
- 6
- 7
- 8
- 9
- 10
- 11
- 12
- 使用sql片段
<mapper namespace="com.itheima.mapper.BrandMapper"> <sql id="brand_column"> id, brand_name as brandName, company_name as compangName,ordered, description, status sql> <select id="selectAll" resultType="brand"> select <include refid="brand_column">include> from tb_brand; select> mapper>- 1
- 2
- 3
- 4
- 5
- 6
- 7
- 8
- 9
- 10
- 11
- 12
- 13
- 14
- 15
- 16
- 17
- 18
- 19
- resultMap
<resultMap id="brandResultMap" type="brand"> <result column ="brand_name" property="brandName"/> <result column ="company_name" property="companyName"/> resultMap> <select id="selectAll" resultMap="brandResultMap"> select * from tb_brand; select>- 1
- 2
- 3
- 4
- 5
- 6
- 7
- 8
- 9
- 10
- 11
- 12
- 13
- 14
- 15
- 16
- 17
- 18
- 19
- 20
- 21
2.5.3 查询查看详情
- 需求
接收一个id对象,然后返回brand对象
- 在BrandMapper类中写上方法
public interface BrandMapper { /** * 查看详情:根据id查询 */ Brand selectById(int id); }- 1
- 2
- 3
- 4
- 5
- 6
- BrandMapper.xml中写sql
通过BrandMapper类中selectById()的alt+enter自动生成
- 注意点
- 1
- 2
- 3
- 4
- 5
- 6
- 7
- 8
- 9
- 10
- 11
- 12
- 13
- 14
- 15
- 16
- 17
- 18
- xml配置内容
<select id="selectById" resultMap="brandResultMap"> /*id和接口名称的形参保持一致id,selectById(int id)*/ select * from tb_brand where id = #{id}; select>- 1
- 2
- 3
- 4
- 在test中写核心代码
public class MyBatisTest { @Test public void testSelectId() throws IOException { //0.接收参数,现在静态,以后是动态的接收 int id = 1; //1.加载Mybatis的核心配置文件,获取SqlSessionFactory String resource = "mybatis-config.xml"; InputStream inputStream = Resources.getResourceAsStream(resource); SqlSessionFactory sqlSessionFactory = new SqlSessionFactoryBuilder().build(inputStream); //2.获取SqlSession对象 SqlSession sqlSession = sqlSessionFactory.openSession(); //3.获取Mapper接口的代理对象 BrandMapper brandMapper = sqlSession.getMapper(BrandMapper.class); //4.执行方法 Brand brand = brandMapper.selectById(id); System.out.println(brand); //5.释放资源 sqlSession.close(); } }- 1
- 2
- 3
- 4
- 5
- 6
- 7
- 8
- 9
- 10
- 11
- 12
- 13
- 14
- 15
- 16
- 17
- 18
- 19
- 20
- 21
- 22
- 23
- 24
- 25
- 26
- 27
2.5.4 条件查询
- 需求分析

- 分析
- 散装参数代码
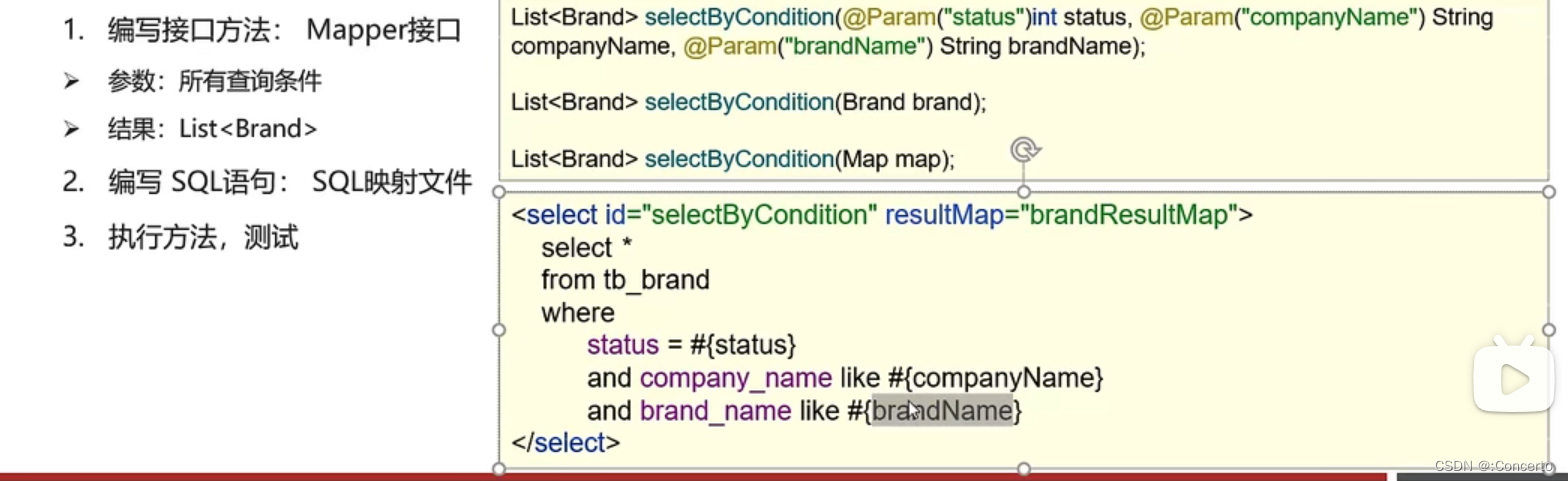
- BrandMapper接口
List<Brand> selectByCondition(@Param("status") int status,@Param("companyName") String companyName, @Param("brandName") String brandName); /* ListselectByCondition(Brand brand); List selectByCondition(Map map);*/ - 1
- 2
- 3
- 4
- 5
- BrandMapper.xml配置
<!--条件查询--> <select id="selectByCondition" resultMap="brandResultMap"> select * from tb_brand where status = #{status} and company_name like #{companyName} and brand_name like #{brandName} </select>- 1
- 2
- 3
- 4
- 5
- 6
- 7
- 核心代码
public class MybatisDemo { public static void main(String[] args) throws IOException { //1.加载Mybatis的核心配置文件,获取SqlSessionFactory String resource = "mybatis-config.xml"; InputStream inputStream = Resources.getResourceAsStream(resource); SqlSessionFactory sqlSessionFactory = new SqlSessionFactoryBuilder().build(inputStream); //2.获取SqlSession对象,用它来执行sql SqlSession sqlSession = sqlSessionFactory.openSession(); //3.执行sql语句 List<User> users = sqlSession.selectList("test.selectAll"); System.out.println(users); //4.释放资源 sqlSession.close(); } }- 1
- 2
- 3
- 4
- 5
- 6
- 7
- 8
- 9
- 10
- 11
- 12
- 13
- 14
- 15
- 16
- 17
- 18
- 19
- 20
- 21
- 实体类封装方式
- BrandMapper接口Brand brand
List<Brand> selectByCondition(Brand brand);- 1
- 核心代码
public class MyBatisTest { @Test public void testSelectByCondition() throws IOException { //0.接收参数,现在静态,以后是动态的接收 int status = 1; String companyName = "华为"; String brandName = "华为"; //处理参数 companyName = "%" + companyName + "%"; brandName = "%" + brandName + "%"; //封装对象 Brand brand = new Brand(); brand.setStatus(status); brand.setCompanyName(companyName); brand.setBrandName(brandName); //1.加载Mybatis的核心配置文件,获取SqlSessionFactory String resource = "mybatis-config.xml"; InputStream inputStream = Resources.getResourceAsStream(resource); SqlSessionFactory sqlSessionFactory = new SqlSessionFactoryBuilder().build(inputStream); //2.获取SqlSession对象 SqlSession sqlSession = sqlSessionFactory.openSession(); //3.获取Mapper接口的代理对象 BrandMapper brandMapper = sqlSession.getMapper(BrandMapper.class); //4.执行方法 //Listbrands = brandMapper.selectByCondition(status, companyName, brandName); List<Brand> brands = brandMapper.selectByCondition(brand); System.out.println(brands); //5.释放资源 sqlSession.close(); } }- 1
- 2
- 3
- 4
- 5
- 6
- 7
- 8
- 9
- 10
- 11
- 12
- 13
- 14
- 15
- 16
- 17
- 18
- 19
- 20
- 21
- 22
- 23
- 24
- 25
- 26
- 27
- 28
- 29
- 30
- 31
- 32
- 33
- 34
- 35
- 36
- 37
- 38
- 39
- 40
- 41
- map集合封装参数
- BrandMapper接口Map map
List<Brand> selectByCondition(Map map);- 1
- 核心代码
@Test public void testSelectByCondition() throws IOException { //0.接收参数,现在静态,以后是动态的接收 int status = 1; String companyName = "华为"; String brandName = "华为"; //处理参数 companyName = "%" + companyName + "%"; brandName = "%" + brandName + "%"; Map map = new HashMap<>(); map.put("status",status); map.put("companyName",companyName); map.put("brandName",brandName); //1.加载Mybatis的核心配置文件,获取SqlSessionFactory String resource = "mybatis-config.xml"; InputStream inputStream = Resources.getResourceAsStream(resource); SqlSessionFactory sqlSessionFactory = new SqlSessionFactoryBuilder().build(inputStream); //2.获取SqlSession对象 SqlSession sqlSession = sqlSessionFactory.openSession(); //3.获取Mapper接口的代理对象 BrandMapper brandMapper = sqlSession.getMapper(BrandMapper.class); //4.执行方法 //Listbrands = brandMapper.selectByCondition(status, companyName, brandName); //Listbrands = brandMapper.selectByCondition(brand); List<Brand> brands = brandMapper.selectByCondition(map); System.out.println(brands); //5.释放资源 sqlSession.close(); } }- 1
- 2
- 3
- 4
- 5
- 6
- 7
- 8
- 9
- 10
- 11
- 12
- 13
- 14
- 15
- 16
- 17
- 18
- 19
- 20
- 21
- 22
- 23
- 24
- 25
- 26
- 27
- 28
- 29
- 30
- 31
- 32
- 33
- 34
- 35
- 36
- 37
- 38
2.5.6 动态查询条件
- 需求
如果用户只输入了两个,而非三个,进行动态查询,称为动态SQL
- 分析
增加if判断即可
但是mybatis对于动态SQL有着很大支撑,拥有很多标签进行处理
- if
- choose(when,otherwise)
- trim(where,set)
- foreach
- 代码
- BrandMapper接口
List<Brand> selectByCondition(Map map);- 1
- 使用if进行标签处理BrandMapper.xml
<!--动态条件查询--> <select id="selectByCondition" resultMap="brandResultMap"> select * from tb_brand where <if test="status != null and status != ''"> status = #{status} and </if> <if test="companyName != null and companyName != ''"> company_name like #{companyName} and </if> <if test="brandName != null and brandName != ''"> brand_name like #{brandName} </if> </select>- 1
- 2
- 3
- 4
- 5
- 6
- 7
- 8
- 9
- 10
- 11
- 12
- 13
- 14
- 15
- 16
- 少输入一个看看
public class MyBatisTest { @Test public void testSelectByCondition() throws IOException { //0.接收参数,现在静态,以后是动态的接收 int status = 1; String companyName = "华为"; String brandName = "华为"; //处理参数 companyName = "%" + companyName + "%"; brandName = "%" + brandName + "%"; //封装对象 // Brand brand = new Brand(); // brand.setStatus(status); // brand.setCompanyName(companyName); // brand.setBrandName(brandName); Map map = new HashMap<>(); //map.put("status",status); map.put("companyName",companyName); map.put("brandName",brandName); //1.加载Mybatis的核心配置文件,获取SqlSessionFactory String resource = "mybatis-config.xml"; InputStream inputStream = Resources.getResourceAsStream(resource); SqlSessionFactory sqlSessionFactory = new SqlSessionFactoryBuilder().build(inputStream); //2.获取SqlSession对象 SqlSession sqlSession = sqlSessionFactory.openSession(); //3.获取Mapper接口的代理对象 BrandMapper brandMapper = sqlSession.getMapper(BrandMapper.class); //4.执行方法 //Listbrands = brandMapper.selectByCondition(status, companyName, brandName); //Listbrands = brandMapper.selectByCondition(brand); List<Brand> brands = brandMapper.selectByCondition(map); System.out.println(brands); //5.释放资源 sqlSession.close(); } }- 1
- 2
- 3
- 4
- 5
- 6
- 7
- 8
- 9
- 10
- 11
- 12
- 13
- 14
- 15
- 16
- 17
- 18
- 19
- 20
- 21
- 22
- 23
- 24
- 25
- 26
- 27
- 28
- 29
- 30
- 31
- 32
- 33
- 34
- 35
- 36
- 37
- 38
- 39
- 40
- 41
- 42
- 43
- 44
- 45
- 46
- 47
- 48
- 恒等式解决sql方法
<select id="selectByCondition" resultMap="brandResultMap"> select * from tb_brand where 1=1 <if test="status != null and status != ''"> status = #{status} if> <if test="companyName != null and companyName != ''"> and company_name like #{companyName} if> <if test="brandName != null and brandName != ''"> and brand_name like #{brandName} if> select>- 1
- 2
- 3
- 4
- 5
- 6
- 7
- 8
- 9
- 10
- 11
- 12
- 13
- 14
- 15
- 使用where解决sql的and问题
<select id="selectByCondition" resultMap="brandResultMap"> select * from tb_brand <where> <if test="status != null and status != ''"> status = #{status} if> <if test="companyName != null and companyName != ''"> and company_name like #{companyName} if> <if test="brandName != null and brandName != ''"> and brand_name like #{brandName} if> where> select>- 1
- 2
- 3
- 4
- 5
- 6
- 7
- 8
- 9
- 10
- 11
- 12
- 13
- 14
- 15
- 16
2.5.7 单条件动态查询
- 需求

- 分析
使用mybatis中的choose(when,otherwise),类比java的swith,case,default
- 代码
- BrandMapper接口
List<Brand> selectByConditionSingle(Brand brand);- 1
- 使用choose进行标签处理BrandMapper.xml
<select id="selectByConditionSingle" resultMap="brandResultMap"> select * from tb_brand where <choose> <when test="status != null and status != ''"> status = #{status} </when> <when test="companyName != null and companyName != ''"> company_name like #{companyName} </when> <when test="brandName != null and brandName != ''"> brand_name like #{brandName} </when> <otherwise> /*一个也没写,就是where 1 = 1;以防报错*/ 1 = 1 </otherwise> </choose> </select>- 1
- 2
- 3
- 4
- 5
- 6
- 7
- 8
- 9
- 10
- 11
- 12
- 13
- 14
- 15
- 16
- 17
- 18
- 19
- 核心代码
@Test public void testSelectByCondition() throws IOException { //0.接收参数,现在静态,以后是动态的接收 int status = 1; String companyName = "华为"; String brandName = "华为"; //处理参数 companyName = "%" + companyName + "%"; brandName = "%" + brandName + "%"; //封装对象 Brand brand = new Brand(); brand.setStatus(status); //brand.setCompanyName(companyName); //brand.setBrandName(brandName); //1.加载Mybatis的核心配置文件,获取SqlSessionFactory String resource = "mybatis-config.xml"; InputStream inputStream = Resources.getResourceAsStream(resource); SqlSessionFactory sqlSessionFactory = new SqlSessionFactoryBuilder().build(inputStream); //2.获取SqlSession对象 SqlSession sqlSession = sqlSessionFactory.openSession(); //3.获取Mapper接口的代理对象 BrandMapper brandMapper = sqlSession.getMapper(BrandMapper.class); //4.执行方法 //Listbrands = brandMapper.selectByCondition(status, companyName, brandName); //Listbrands = brandMapper.selectByCondition(brand); List<Brand> brands = brandMapper.selectByConditionSingle(brand); System.out.println(brands); //5.释放资源 sqlSession.close(); } }- 1
- 2
- 3
- 4
- 5
- 6
- 7
- 8
- 9
- 10
- 11
- 12
- 13
- 14
- 15
- 16
- 17
- 18
- 19
- 20
- 21
- 22
- 23
- 24
- 25
- 26
- 27
- 28
- 29
- 30
- 31
- 32
- 33
- 34
- 35
- 36
- 37
- 38
- 39
或者标签
<select id="selectByConditionSingle" resultMap="brandResultMap"> select * from tb_brand <where> <choose> <when test="status != null and status != ''"> status = #{status} </when> <when test="companyName != null and companyName != ''"> company_name like #{companyName} </when> <when test="brandName != null and brandName != ''"> brand_name like #{brandName} </when> </choose> </where> </select>- 1
- 2
- 3
- 4
- 5
- 6
- 7
- 8
- 9
- 10
- 11
- 12
- 13
- 14
- 15
- 16
2.5.8 添加
- 需求
- 代码
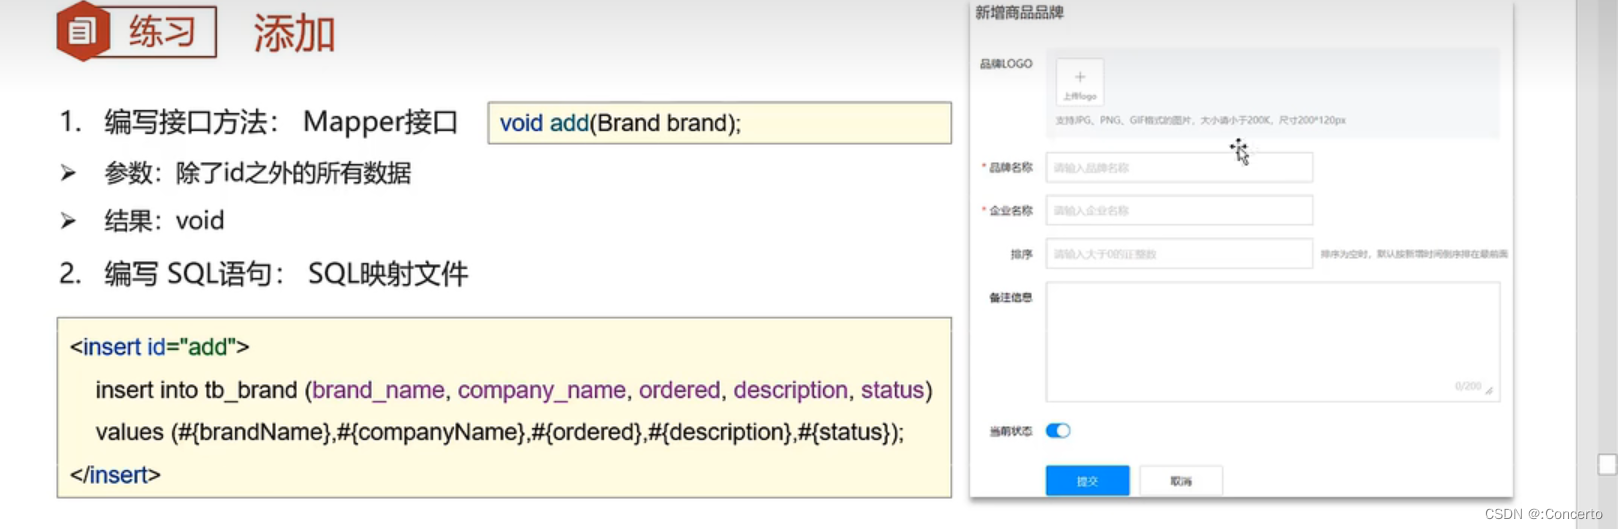
- BrandMapper接口类
void add(Brand brand);- 1
- BrandMapper.xml的sql语句
<insert id="add"> insert into tb_brand(brand_name, company_name, ordered, description, status) values (#{brand_name},#{companyname},#{ordered},#{description},#{status}); </insert>- 1
- 2
- 3
- 4
- 核心代码
@Test public void testAdd() throws IOException { //0.接收参数,现在静态,以后是动态的接收 int status = 1; String companyName = "波导手机"; String brandName = "波导"; String description = "手机中的战斗机"; int ordered = 100; //封装对象 Brand brand = new Brand(); brand.setStatus(status); brand.setCompanyName(companyName); brand.setBrandName(brandName); brand.setDescription(description); brand.setOrdered(ordered); //1.加载Mybatis的核心配置文件,获取SqlSessionFactory String resource = "mybatis-config.xml"; InputStream inputStream = Resources.getResourceAsStream(resource); SqlSessionFactory sqlSessionFactory = new SqlSessionFactoryBuilder().build(inputStream); //2.获取SqlSession对象 SqlSession sqlSession = sqlSessionFactory.openSession(); //3.获取Mapper接口的代理对象 BrandMapper brandMapper = sqlSession.getMapper(BrandMapper.class); //4.执行方法 brandMapper.add(brand); //5.释放资源 sqlSession.close(); }- 1
- 2
- 3
- 4
- 5
- 6
- 7
- 8
- 9
- 10
- 11
- 12
- 13
- 14
- 15
- 16
- 17
- 18
- 19
- 20
- 21
- 22
- 23
- 24
- 25
- 26
- 27
- 28
- 29
- 30
- 31
- 32
- 33
- 34
- 35
- 36
- 开启事务未提交

因此需要手动提交,增加这一行
//5.提交事务 //sqlSession.commit();- 1
- 2
//2.获取SqlSession对象 SqlSession sqlSession = sqlSessionFactory.openSession(true);- 1
- 2
- 主键返回
希望有时候可以返回主键的值,即id的值
可以在xml中配置useGeneratedKeys=“true” keyProperty=“id”
<insert id="add" useGeneratedKeys="true" keyProperty="id"> insert into tb_brand(brand_name, company_name, ordered, description, status) values (#{brandName},#{companyName},#{ordered},#{description},#{status}); insert>- 1
- 2
- 3
- 4
- 核心代码中加入获取id的值
brandMapper.add(brand); Integer id = brand.getId(); System.out.println(id);- 1
- 2
- 3
2.5.9 修改
- 修改全部字段
- BrandMapper接口类
int update(Brand brand);- 1
- BrandMapper.xml的sql语句
<update id="update"> update tb_brand set brand_name = #{brandName}, company_name = #{companyName}, ordered =#{ordered}, description = #{description}, status = #{status} where id =#{id}; </update>- 1
- 2
- 3
- 4
- 5
- 6
- 7
- 8
- 9
- 10
- 核心代码
@Test public void testAdd() throws IOException { //0.接收参数,现在静态,以后是动态的接收 int status = 1; String companyName = "波导手机"; String brandName = "波导"; String description = "波导手机手机中的战斗机"; int ordered = 200; int id = 5; //封装对象 Brand brand = new Brand(); brand.setStatus(status); brand.setCompanyName(companyName); brand.setBrandName(brandName); brand.setDescription(description); brand.setOrdered(ordered); brand.setId(id); //1.加载Mybatis的核心配置文件,获取SqlSessionFactory String resource = "mybatis-config.xml"; InputStream inputStream = Resources.getResourceAsStream(resource); SqlSessionFactory sqlSessionFactory = new SqlSessionFactoryBuilder().build(inputStream); //2.获取SqlSession对象 SqlSession sqlSession = sqlSessionFactory.openSession(true); //3.获取Mapper接口的代理对象 BrandMapper brandMapper = sqlSession.getMapper(BrandMapper.class); //4.执行方法 int count = brandMapper.update(brand); System.out.println(count); //5.提交事务 //sqlSession.commit(); //6.释放资源 sqlSession.close(); } }- 1
- 2
- 3
- 4
- 5
- 6
- 7
- 8
- 9
- 10
- 11
- 12
- 13
- 14
- 15
- 16
- 17
- 18
- 19
- 20
- 21
- 22
- 23
- 24
- 25
- 26
- 27
- 28
- 29
- 30
- 31
- 32
- 33
- 34
- 35
- 36
- 37
- 38
- 39
- 40
- 41
- 42
- 43
- 44
- 修改动态字段
如果传进来两个值,其他的字段没值会被修改成null
- BrandMapper.xml的sql语句
<update id="update"> update tb_brand <set> <if test="brandName != null and brandName != ''"> brand_name = #{brandName}, </if> <if test="companyName != null and companyName != ''"> company_name = #{companyName}, </if> <if test="ordered != null"> ordered =#{ordered}, </if> <if test="description != null and description != ''"> description = #{description}, </if> <if test="status != null"> status = #{status} </if> </set> where id =#{id}; </update>- 1
- 2
- 3
- 4
- 5
- 6
- 7
- 8
- 9
- 10
- 11
- 12
- 13
- 14
- 15
- 16
- 17
- 18
- 19
- 20
- 21
- 22
- 23
- 24
- 25
- 核心代码
@Test public void testAdd() throws IOException { //0.接收参数,现在静态,以后是动态的接收 int status = 0; String companyName = "波导手机"; String brandName = "波导"; String description = "波导手机手机中的战斗机"; int ordered = 200; int id = 5; //封装对象 Brand brand = new Brand(); brand.setStatus(status); //brand.setCompanyName(companyName); //brand.setBrandName(brandName); //brand.setDescription(description); //brand.setOrdered(ordered); brand.setId(id); //1.加载Mybatis的核心配置文件,获取SqlSessionFactory String resource = "mybatis-config.xml"; InputStream inputStream = Resources.getResourceAsStream(resource); SqlSessionFactory sqlSessionFactory = new SqlSessionFactoryBuilder().build(inputStream); //2.获取SqlSession对象 SqlSession sqlSession = sqlSessionFactory.openSession(true); //3.获取Mapper接口的代理对象 BrandMapper brandMapper = sqlSession.getMapper(BrandMapper.class); //4.执行方法 //Listbrands = brandMapper.selectByCondition(status, companyName, brandName); //Listbrands = brandMapper.selectByCondition(brand); //Listbrands = brandMapper.selectByConditionSingle(brand); int count = brandMapper.update(brand); System.out.println(count); //5.提交事务 //sqlSession.commit(); //6.释放资源 sqlSession.close(); } }- 1
- 2
- 3
- 4
- 5
- 6
- 7
- 8
- 9
- 10
- 11
- 12
- 13
- 14
- 15
- 16
- 17
- 18
- 19
- 20
- 21
- 22
- 23
- 24
- 25
- 26
- 27
- 28
- 29
- 30
- 31
- 32
- 33
- 34
- 35
- 36
- 37
- 38
- 39
- 40
- 41
- 42
- 43
- 44
- 45
- 46
- 47
- 48
2.5.10 删除
- 删除一个
- 接口
/** * 根据id删除 */ void deleteById(int id);- 1
- 2
- 3
- 4
- BrandMapper.xml的sql语句
<delete id="deleteById"> delete from tb_brand where id = #{id}; </delete>- 1
- 2
- 3
- 核心代码
@Test public void testDeleteById() throws IOException { //0.接收参数,现在静态,以后是动态的接收 int id = 6; //1.加载Mybatis的核心配置文件,获取SqlSessionFactory String resource = "mybatis-config.xml"; InputStream inputStream = Resources.getResourceAsStream(resource); SqlSessionFactory sqlSessionFactory = new SqlSessionFactoryBuilder().build(inputStream); //2.获取SqlSession对象 SqlSession sqlSession = sqlSessionFactory.openSession(true); //3.获取Mapper接口的代理对象 BrandMapper brandMapper = sqlSession.getMapper(BrandMapper.class); //4.执行方法 brandMapper.deleteById(id); //5.提交事务 //sqlSession.commit(); //6.释放资源 sqlSession.close(); }- 1
- 2
- 3
- 4
- 5
- 6
- 7
- 8
- 9
- 10
- 11
- 12
- 13
- 14
- 15
- 16
- 17
- 18
- 19
- 20
- 21
- 22
- 23
- 24
- 25
- 26
- 27
- 28
- 批量删除
- 需求
批量删除这个数据

- 接口
/** * 批量删除 */ void deleteByIds(@Param("ids") int[] ids);- 1
- 2
- 3
- 4
- BrandMapper.xml的sql语句
<delete id="deleteByIds"> delete from tb_brand where id in( <foreach collection="ids" item="id" separator=","> #{id} </foreach> ); </delete>- 1
- 2
- 3
- 4
- 5
- 6
- 7
- 核心代码
@Test public void testDeleteByIds() throws IOException { //0.接收参数,现在静态,以后是动态的接收 int[] ids = {5,7}; //1.加载Mybatis的核心配置文件,获取SqlSessionFactory String resource = "mybatis-config.xml"; InputStream inputStream = Resources.getResourceAsStream(resource); SqlSessionFactory sqlSessionFactory = new SqlSessionFactoryBuilder().build(inputStream); //2.获取SqlSession对象 SqlSession sqlSession = sqlSessionFactory.openSession(true); //3.获取Mapper接口的代理对象 BrandMapper brandMapper = sqlSession.getMapper(BrandMapper.class); //4.执行方法 brandMapper.deleteByIds(ids); //5.提交事务 //sqlSession.commit(); //6.释放资源 sqlSession.close(); }- 1
- 2
- 3
- 4
- 5
- 6
- 7
- 8
- 9
- 10
- 11
- 12
- 13
- 14
- 15
- 16
- 17
- 18
- 19
- 20
- 21
- 22
- 23
- 24
- 25
- 26
- 27
- 28
或者
void deleteByIds( int[] ids);
2.6 参数传递
- 代码
- 接口
User select(@Param("username") String username, @Param("password") String password);- 1
- UserMapper类
<!--参数传递--> <select id="select" resultType="com.itheima.pojo.User"> select * from tb_user where username = #{username} and password = #{password} </select>- 1
- 2
- 3
- 4
- 5
- 6
- 核心代码
//4.执行方法 String username = "zhangsan"; String password = "123"; userMapper.select(username,password);- 1
- 2
- 3
- 4
- 5
2.7 注解完成增删改查
- 原来的样子
- 接口
User selectById(int id);- 1
- UserMapper.xml
<select id="selectById" resultType="user"> select * from tb_user where id = #{id}; select>- 1
- 2
- 3
- 4
- 使用注解
- 直接接口写
@Select("select * from tb_user where id = #{id}") User selectById(int id);- 1
- 2
- 核心代码
@Test public void testSelectById() throws IOException { //1.加载Mybatis的核心配置文件,获取SqlSessionFactory String resource = "mybatis-config.xml"; InputStream inputStream = Resources.getResourceAsStream(resource); SqlSessionFactory sqlSessionFactory = new SqlSessionFactoryBuilder().build(inputStream); //2.获取SqlSession对象 SqlSession sqlSession = sqlSessionFactory.openSession(true); //3.获取Mapper接口的代理对象 UserMapper userMapper = sqlSession.getMapper(UserMapper.class); //4.执行方法 User user = userMapper.selectById(1); System.out.println(user); //5.提交事务 //6.释放资源 sqlSession.close(); } }- 1
- 2
- 3
- 4
- 5
- 6
- 7
- 8
- 9
- 10
- 11
- 12
- 13
- 14
- 15
- 16
- 17
- 18
- 19
- 20
- 21
- 22
- 23
- 24
- 25
- 26
-
相关阅读:
网络编程 day01 (linux ) 网络字节序 与 主机字节序的转化函数 ,与相关的知识 。
基于verdaccio工具搭建npm私服vue组件库
Github每日精选(第41期):跨端数据同步加密工具restic
react-demo项目:支持使用scss(不使用create-react-app脚手架)
GMSH如何对STL模型再次划分网格
除了ChatGPT,跨境电商必备的7个AI工具
牛客刷题<14>键盘编码电路
2563. 统计公平数对的数目
3dMax全球学习资源、资源文件和教程 !
Linux进程控制--程序替换
- 原文地址:https://blog.csdn.net/m0_46507516/article/details/128044848
