-
Spring Boot 入门
37) Boot 骨架项目
https://start.spring.io/pom.xml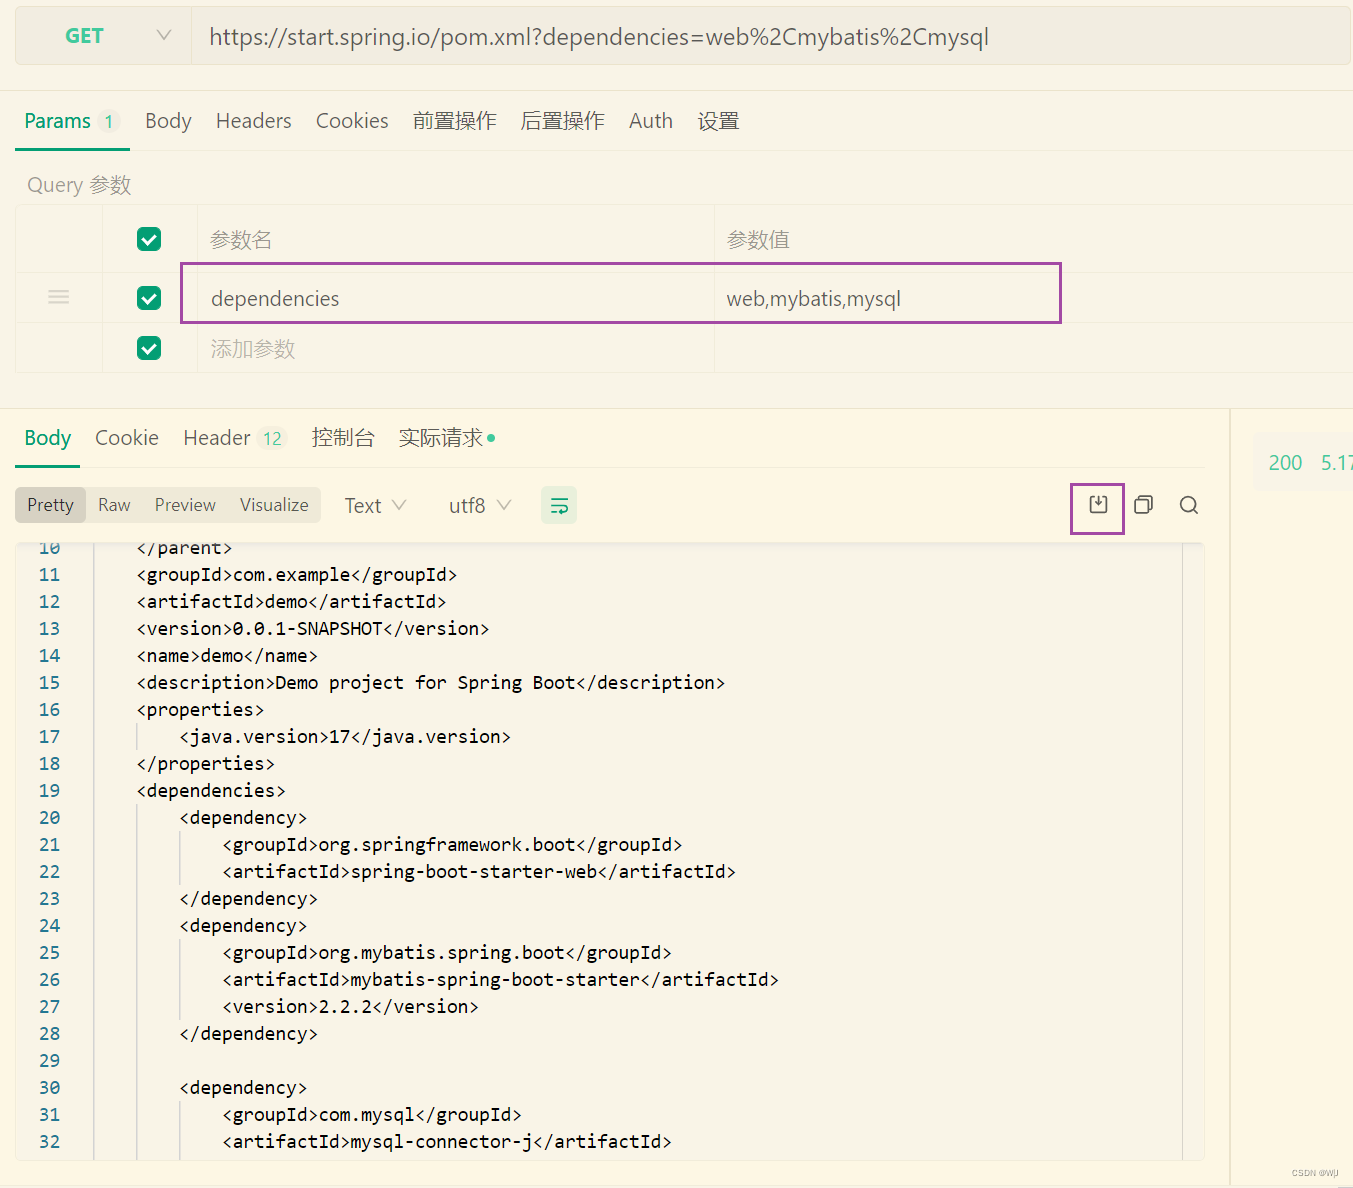
38) Boot War项目
步骤1:创建模块,区别在于打包方式选择 war

步骤2:编写控制器
- @Controller
- public class MyController {
-
- @RequestMapping("/hello")
- public String abc() {
- System.out.println("进入了控制器");
- return "hello";
- }
- }
步骤3:编写 jsp 视图,新建 webapp 目录和一个 hello.jsp 文件,注意文件名与控制器方法返回的视图逻辑名一致
src
    |- main
        |- java
        |- resources
        |- webapp
            |- hello.jsp
步骤4:配置视图路径,打开 application.properties 文件
- spring.mvc.view.prefix=/
- spring.mvc.view.suffix=.jsp
将来 prefix + 控制器方法返回值 + suffix 即为视图完整路径
测试
内置Tomcat测试 如果用 mvn 插件
mvn spring-boot:run或 main 方法测试-
必须添加如下依赖,因为此时用的还是内嵌 tomcat,而内嵌 tomcat 默认不带 jasper(用来解析 jsp)
- <dependency>
- <groupId>org.apache.tomcat.embedgroupId>
- <artifactId>tomcat-embed-jasperartifactId>
- <scope>providedscope>
- dependency>
也可以使用 Idea 配置 tomcat 来测试,此时用的是外置 tomcat
-
骨架生成的代码中,多了一个 ServletInitializer,它的作用就是配置外置 Tomcat 使用的,在外置 Tomcat 启动后,去调用它创建和运行 SpringApplication
对于 jar 项目,若要支持 jsp,也可以在加入 jasper 依赖的前提下,把 jsp 文件置入
META-INF/resources39) Boot 启动过程
阶段一:SpringApplication 构造
- public SpringApplication(ResourceLoader resourceLoader, Class... primarySources) {
- this.resourceLoader = resourceLoader;
- Assert.notNull(primarySources, "PrimarySources must not be null");
- // 记录 BeanDefinition 源
- this.primarySources = new LinkedHashSet<>(Arrays.asList(primarySources));
- // 推断应用类型
- this.webApplicationType = WebApplicationType.deduceFromClasspath();
- this.bootstrapRegistryInitializers = getBootstrapRegistryInitializersFromSpringFactories();
- // 记录 ApplicationContext 初始化器
- setInitializers((Collection) getSpringFactoriesInstances(ApplicationContextInitializer.class));
- // 记录监听器
- setListeners((Collection) getSpringFactoriesInstances(ApplicationListener.class));
- // 推断主启动类
- this.mainApplicationClass = deduceMainApplicationClass();
- }
-
记录 BeanDefinition 源
-
推断应用类型
-
记录 ApplicationContext 初始化器
-
记录监听器
-
推断主启动类
阶段二:执行 run 方法
- public ConfigurableApplicationContext run(String... args) {
- // ...
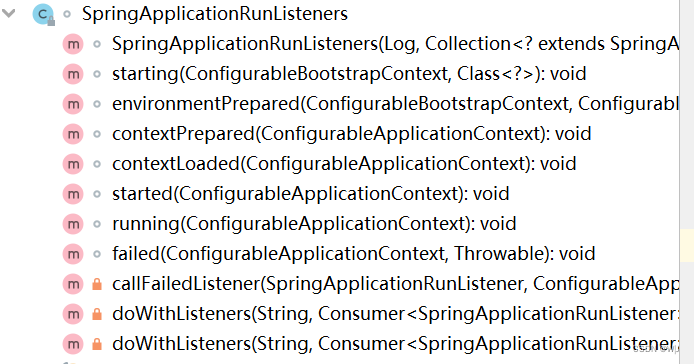
- // 1.得到 SpringApplicationRunListeners,名字取得不好,实际是事件发布器
- SpringApplicationRunListeners listeners = getRunListeners(args);
- // 发布 application starting 事件1️⃣,代表Spring Boot 应用开始启动了
- listeners.starting(bootstrapContext, this.mainApplicationClass);
- try {
- // 2.封装启动 args 把参数分为选项参与非选项参数
- ApplicationArguments applicationArguments = new DefaultApplicationArguments(args);
- // 3.
- ConfigurableEnvironment environment = prepareEnvironment(listeners, bootstrapContext, applicationArguments);
- configureIgnoreBeanInfo(environment);
- // 7.打印 banner(*)
- Banner printedBanner = printBanner(environment);
- // 8.创建容器
- context = createApplicationContext();
- context.setApplicationStartup(this.applicationStartup);
- // 9.准备容器
- prepareContext(bootstrapContext, context, environment, listeners, applicationArguments, printedBanner);
- // 11.refresh 容器
- refreshContext(context);
- afterRefresh(context, applicationArguments);
- stopWatch.stop();
- if (this.logStartupInfo) {
- new StartupInfoLogger(this.mainApplicationClass).logStarted(getApplicationLog(), stopWatch);
- }
- // 11.1 发布 application started 事件5️⃣
- listeners.started(context);
- // 12.执行 runner
- callRunners(context, applicationArguments);
- }catch (Throwable ex) {
- handleRunFailure(context, ex, listeners);
- throw new IllegalStateException(ex);
- }
- try {
- // 持续运行
- listeners.running(context);
- }
- // ....
- }
- // 3.
- private ConfigurableEnvironment prepareEnvironment(SpringApplicationRunListeners listeners,
- DefaultBootstrapContext bootstrapContext, ApplicationArguments applicationArguments) {
- // Create and configure the environment
- ConfigurableEnvironment environment = getOrCreateEnvironment();
- // 根据参数信息封装成一个propertiesSource并添加到 Environment -基于命令行的参数
- // 4.ConfigurationPropertySources 处理(*)
- configureEnvironment(environment, applicationArguments.getSourceArgs());
- // 对命名不规范的键统一处理成 ‘-’分割
- ConfigurationPropertySources.attach(environment);
- // 4.1发布 application environment 已准备事件2️⃣
- // 5.通过 EnvironmentPostProcessorApplicationListener 进行 env 后处理(*)
- //* application.properties,由 StandardConfigDataLocationResolver 解析
- // * spring.application.json
- listeners.environmentPrepared(bootstrapContext, environment);
- DefaultPropertiesPropertySource.moveToEnd(environment);
- Assert.state(!environment.containsProperty("spring.main.environment-prefix"),
- "Environment prefix cannot be set via properties.");
- // 6.绑定 spring.main 到 SpringApplication 对象(*)
- bindToSpringApplication(environment);
- if (!this.isCustomEnvironment) {
- environment = new EnvironmentConverter(getClassLoader()).convertEnvironmentIfNecessary(environment,
- deduceEnvironmentClass());
- }
- ConfigurationPropertySources.attach(environment);
- return environment;
- }
- // 9.
- private void prepareContext(DefaultBootstrapContext bootstrapContext, ConfigurableApplicationContext context,
- ConfigurableEnvironment environment, SpringApplicationRunListeners listeners,
- ApplicationArguments applicationArguments, Banner printedBanner) {
- context.setEnvironment(environment);
- postProcessApplicationContext(context);
- // 9.1发布 application context 已初始化事件3️⃣
- applyInitializers(context);
- listeners.contextPrepared(context);
- bootstrapContext.close(context);
- if (this.logStartupInfo) {
- logStartupInfo(context.getParent() == null);
- logStartupProfileInfo(context);
- }
- // Add boot specific singleton beans
- ConfigurableListableBeanFactory beanFactory = context.getBeanFactory();
- beanFactory.registerSingleton("springApplicationArguments", applicationArguments);
- if (printedBanner != null) {
- beanFactory.registerSingleton("springBootBanner", printedBanner);
- }
- if (beanFactory instanceof DefaultListableBeanFactory) {
- ((DefaultListableBeanFactory) beanFactory)
- .setAllowBeanDefinitionOverriding(this.allowBeanDefinitionOverriding);
- }
- if (this.lazyInitialization) {
- context.addBeanFactoryPostProcessor(new LazyInitializationBeanFactoryPostProcessor());
- }
- // Load the sources
- // 10.加载 bean 定义
- Set
- Assert.notEmpty(sources, "Sources must not be empty");
- load(context, sources.toArray(new Object[0]));
- // 10.1发布 application prepared 事件4️⃣
- listeners.contextLoaded(context);
- }
- // 11.1初始化每一个单例
- protected void refresh(ConfigurableApplicationContext applicationContext) {
- applicationContext.refresh();
- }
- // 12.1 调用实现了 ApplicationRunner或者CommandLineRunner接口的Bean
- private void callRunners(ApplicationContext context, ApplicationArguments args) {
- List
- runners.addAll(context.getBeansOfType(ApplicationRunner.class).values());
- runners.addAll(context.getBeansOfType(CommandLineRunner.class).values());
- AnnotationAwareOrderComparator.sort(runners);
- for (Object runner : new LinkedHashSet<>(runners)) {
- if (runner instanceof ApplicationRunner) {
- callRunner((ApplicationRunner) runner, args);
- }
- if (runner instanceof CommandLineRunner) {
- callRunner((CommandLineRunner) runner, args);
- }
- }
- }
-
得到 SpringApplicationRunListeners,名字取得不好,实际是事件发布器
-
发布 application starting 事件1️⃣
-
-
封装启动 args
-
准备 Environment 添加命令行参数(*)
-
ConfigurationPropertySources 处理(*)
-
发布 application environment 已准备事件2️⃣
-
-
通过 EnvironmentPostProcessorApplicationListener 进行 env 后处理(*)
-
application.properties,由 StandardConfigDataLocationResolver 解析
-
spring.application.json
-
-
绑定 spring.main 到 SpringApplication 对象(*)
-
打印 banner(*)
-
创建容器
-
准备容器
-
发布 application context 已初始化事件3️⃣
-
-
加载 bean 定义
-
发布 application prepared 事件4️⃣
-
-
refresh 容器
-
发布 application started 事件5️⃣
-
-
执行 runner
-
发布 application ready 事件6️⃣
-
这其中有异常,发布 application failed 事件7️⃣
-
41) Boot 自动配置
- public static void main(String[] args) throws IOException {
- GenericApplicationContext context = new GenericApplicationContext();
- // 设置是否应该通过注册具有相同名称的不同定义(自动替换前者)来覆盖bean定义
- context.getDefaultListableBeanFactory().setAllowBeanDefinitionOverriding(false);
- context.registerBean("config", Config.class);
- // 用于@Configuration类的引导处理
- context.registerBean(ConfigurationClassPostProcessor.class);
- context.refresh();
- for (String name : context.getBeanDefinitionNames()) {
- System.out.println(name);
- }
- System.out.println(context.getBean(Bean1.class));
- }
- @Configuration // 本项目的配置类,如果配置重复,优先处理本项目的Bean
- @Import(MyImportSelector.class)
- static class Config {
- @Bean
- public Bean1 bean1() {
- return new Bean1("本项目");
- }
- }
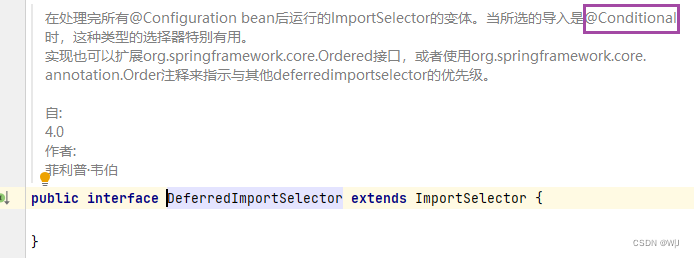
- // 在处理完所有@Configuration bean后运行的ImportSelector
- static class MyImportSelector implements DeferredImportSelector {
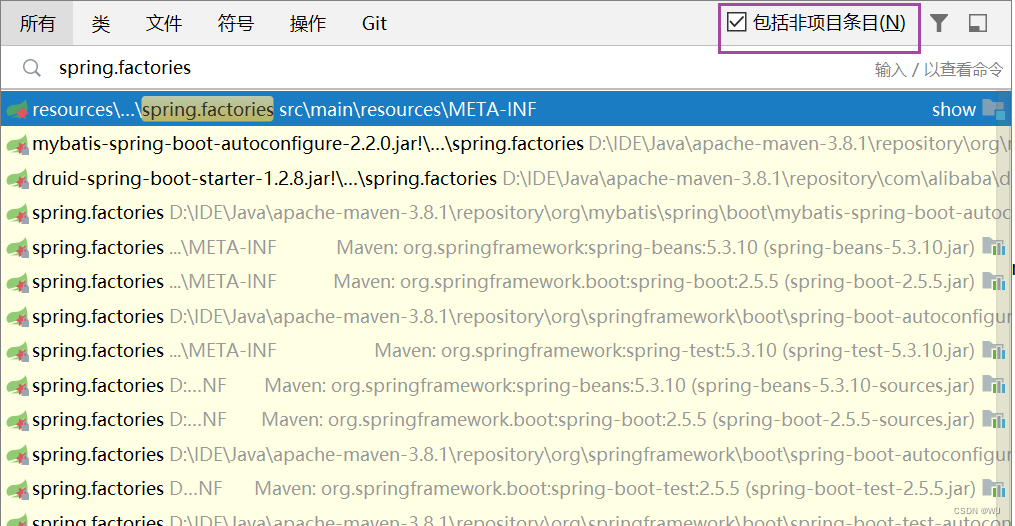
- // SpringFactoriesLoader 会扫描当前项目下 src/main/resources/META-INF/spring.factories 的配置信息
- @Override
- public String[] selectImports(AnnotationMetadata importingClassMetadata) {
- // System.out.println(">>>>>>>>>>>>>>>>>>>>>>>>>>>>>>>>>>>>>>>>>>>>");
- // for (String name : SpringFactoriesLoader.loadFactoryNames(EnableAutoConfiguration.class, null)) {
- // System.out.println(name);
- // }
- // System.out.println(">>>>>>>>>>>>>>>>>>>>>>>>>>>>>>>>>>>>>>>>>>>>");
- List
names = SpringFactoriesLoader.loadFactoryNames(MyImportSelector.class, null); - return names.toArray(new String[0]);
- }
- }
使用@Import + ImportSelector.class 结合 SpringFactoriesLoader.class 扫描所有依赖包 src/main/resources/META-INF/spring.factories 的配置信息 可以轻松的引入第三方的配置。
对于Bean类型重复的问题 需要检查 org.springframework.beans.factory.support.DefaultListableBeanFactory#registerBeanDefinition
检查DefaultListableBeanFactor的属性 allowBeanDefinitionOverriding(默认允许覆盖),可通过配置。
- # 不允许注册具有相同名称的bean
- spring.main.allow-bean-definition-overriding = false

当不许同名覆盖注册时,若想要优先本项目中的配置文件生效则可以配合使用 DeferredImportSelector.class 与 @Conditional 开头的注解配合使用。
Aop 自动配置
- @Configuration
- @Import(MyImportSelector.class)
- static class Config {
- }
- static class MyImportSelector implements DeferredImportSelector {
- @Override
- public String[] selectImports(AnnotationMetadata importingClassMetadata) {
- return new String[]{AopAutoConfiguration.class.getName()};
- }
- }
解析spring.factries 以spring.aop开头的配置信息
- spring.aop.auto=true 或者缺失了spring.aop.auto 会进入以下逻辑
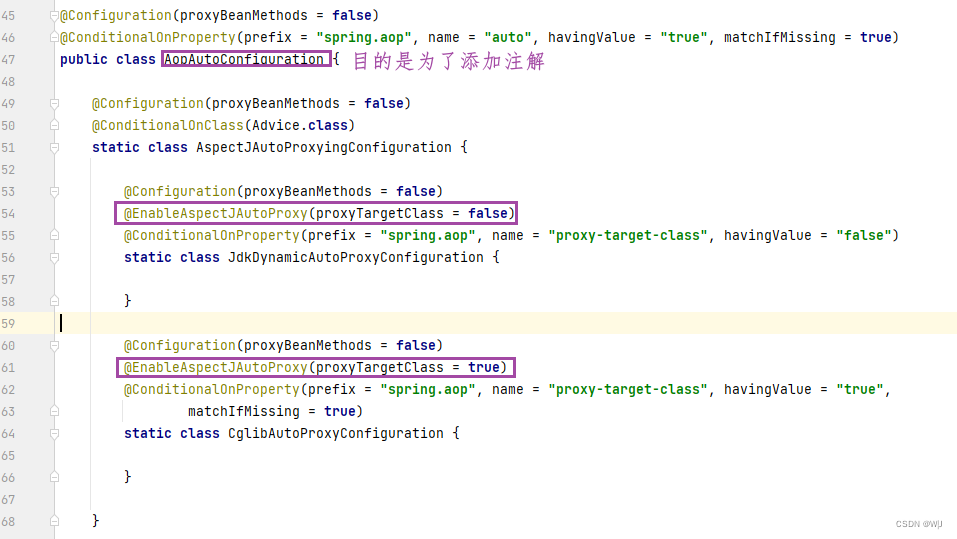
- AopAutoConfiguration
- # 类路径下是否存在 org.aspectj.weaver.Advice.class; springBoot加入了AOP的功能
- AspectJAutoProxyingConfiguration
- # spring.aop.proxy-target-class = false 使用JDK代理
- JdkDynamicAutoProxyConfiguration
- # spring.aop.proxy-target-class = true 或者缺失此键 使用Cglib代理
- CglibAutoProxyConfiguration
- #缺失 org.aspectj.weaver.Advice.class
- ClassProxyingConfiguration
- forceAutoProxyCreatorToUseClassProxying
- 使用InfrastructureAdvisorAutoProxyCreator 或者 org.springframework.aop.config.internalAutoProxyCreator
在引入第三方配置时候
其他自动配置类
- org.springframework.boot.autoconfigure.jdbc.DataSourceAutoConfiguration
- org.mybatis.spring.boot.autoconfigure.MybatisAutoConfiguration
- org.springframework.boot.autoconfigure.jdbc.DataSourceTransactionManagerAutoConfiguration
- org.springframework.boot.autoconfigure.transaction.TransactionAutoConfiguration
- #MVC
- org.springframework.boot.autoconfigure.web.servlet.ServletWebServerFactoryAutoConfiguration
- org.springframework.boot.autoconfigure.web.servlet.DispatcherServletAutoConfiguration
- org.springframework.boot.autoconfigure.web.servlet.WebMvcAutoConfiguration
- org.springframework.boot.autoconfigure.web.servlet.error.ErrorMvcAutoConfiguration
总结
AopAutoConfiguration
Spring Boot 是利用了自动配置类来简化了 aop 相关配置
-
AOP 自动配置类为
org.springframework.boot.autoconfigure.aop.AopAutoConfiguration -
可以通过
spring.aop.auto=false禁用 aop 自动配置 -
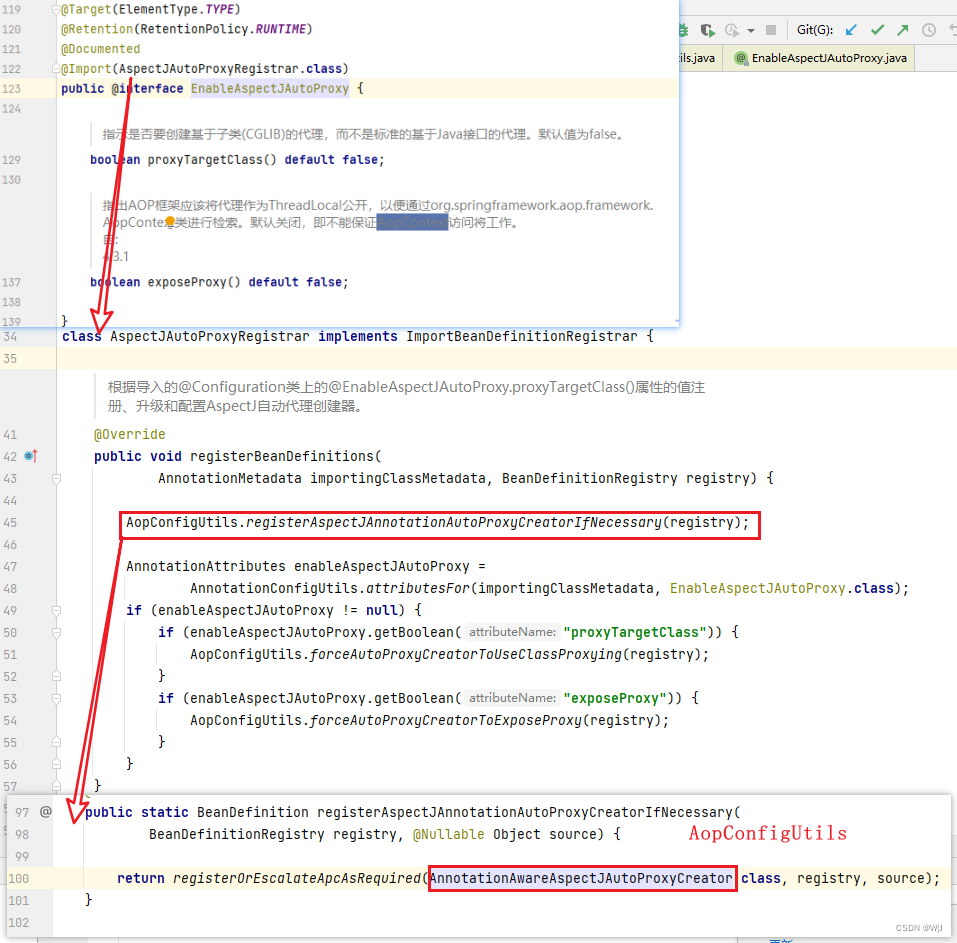
AOP 自动配置的本质是通过
@EnableAspectJAutoProxy来开启了自动代理,如果在引导类上自己添加了@EnableAspectJAutoProxy那么以自己添加的为准 -
@EnableAspectJAutoProxy的本质是向容器中添加了AnnotationAwareAspectJAutoProxyCreator这个 bean 后处理器,它能够找到容器中所有切面,并为匹配切点的目标类创建代理,创建代理的工作一般是在 bean 的初始化阶段完成的
DataSourceAutoConfiguration
-
对应的自动配置类为:org.springframework.boot.autoconfigure.jdbc.DataSourceAutoConfiguration
-
它内部采用了条件装配,通过检查容器的 bean,以及类路径下的 class,来决定该 @Bean 是否生效
简单说明一下,Spring Boot 支持两大类数据源:
-
EmbeddedDatabase - 内嵌数据库连接池
-
PooledDataSource - 非内嵌数据库连接池
PooledDataSource 又支持如下数据源
-
hikari 提供的 HikariDataSource
-
tomcat-jdbc 提供的 DataSource
-
dbcp2 提供的 BasicDataSource
-
oracle 提供的 PoolDataSourceImpl
如果知道数据源的实现类类型,即指定了
spring.datasource.type,理论上可以支持所有数据源,但这样做的一个最大问题是无法订制每种数据源的详细配置(如最大、最小连接数等)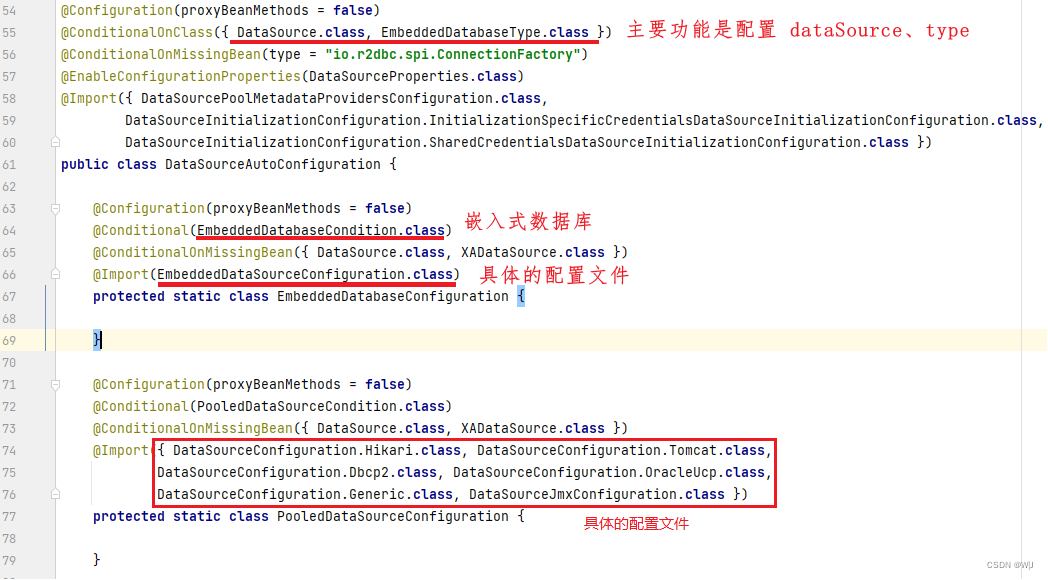
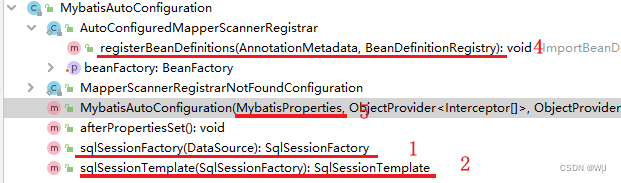
MybatisAutoConfiguration
-
MyBatis 自动配置类为
org.mybatis.spring.boot.autoconfigure.MybatisAutoConfiguration -
它主要配置了两个 bean
-
SqlSessionFactory - MyBatis 核心对象,用来创建 SqlSession 1
-
SqlSessionTemplate - SqlSession 的实现,此实现会与当前线程绑定 2
-
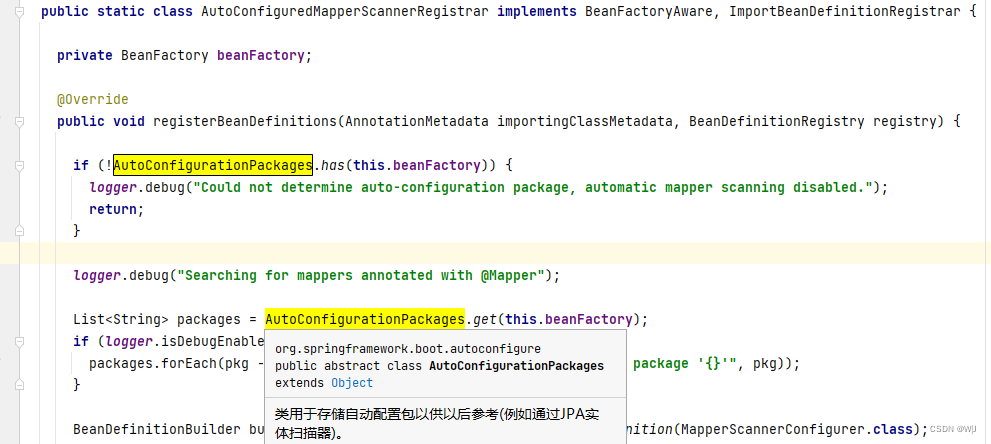
用 ImportBeanDefinitionRegistrar 的方式扫描所有标注了 @Mapper 注解的接口 3
-
用 AutoConfigurationPackages 来确定扫描的包 4
-
-
还有一个相关的 bean:MybatisProperties,它会读取配置文件中带
mybatis.前缀的配置项进行定制配置 5
@MapperScan 注解的作用与 MybatisAutoConfiguration 类似,会注册 MapperScannerConfigurer 有如下区别
-
@MapperScan 扫描具体包(当然也可以配置关注哪个注解)
-
@MapperScan 如果不指定扫描具体包,则会把引导类范围内,所有接口当做 Mapper 接口
-
MybatisAutoConfiguration 关注的是所有标注 @Mapper 注解的接口,会忽略掉非 @Mapper 标注的接口

这里有同学有疑问,之前介绍的都是将具体类交给 Spring 管理,怎么到了 MyBatis 这儿,接口就可以被管理呢?
-
其实并非将接口交给 Spring 管理,而是每个接口会对应一个 MapperFactoryBean,是后者被 Spring 所管理,接口只是作为 MapperFactoryBean 的一个属性来配置
TransactionAutoConfiguration

-
事务自动配置类有两个:
-
org.springframework.boot.autoconfigure.jdbc.DataSourceTransactionManagerAutoConfiguration -
org.springframework.boot.autoconfigure.transaction.TransactionAutoConfiguration
-
-
前者配置了 DataSourceTransactionManager 用来执行事务的提交、回滚操作
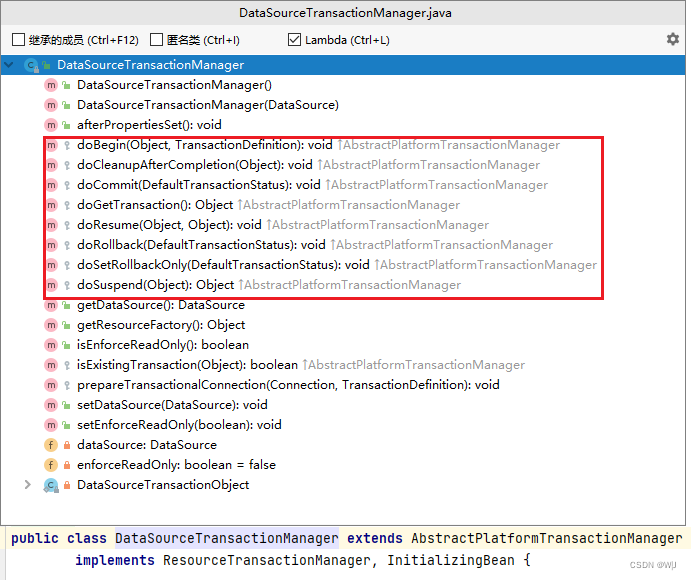
-
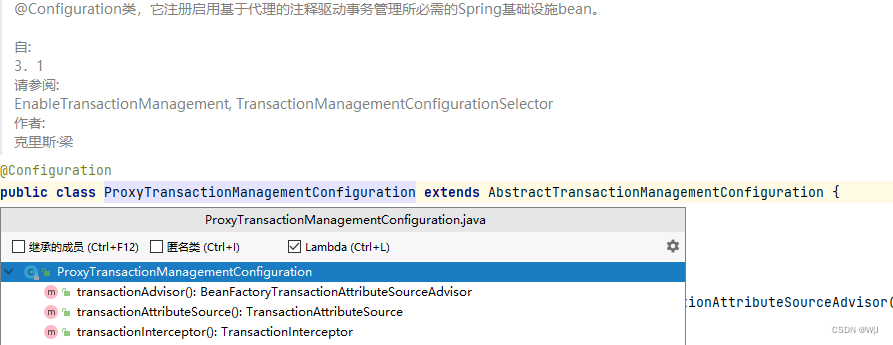
后者功能上对标 @EnableTransactionManagement,包含以下三个 bean
-
BeanFactoryTransactionAttributeSourceAdvisor 事务切面类,包含通知和切点
-
TransactionInterceptor 事务通知类,由它在目标方法调用前后加入事务操作
-
AnnotationTransactionAttributeSource 会解析 @Transactional 及事务属性,也包含了切点功能
-
-
如果自己配置了 DataSourceTransactionManager 或是在引导类加了 @EnableTransactionManagement,则以自己配置的为准

ServletWebServerFactoryAutoConfiguration
-
提供 ServletWebServerFactory
DispatcherServletAutoConfiguration
-
提供 DispatcherServlet
-
提供 DispatcherServletRegistrationBean
WebMvcAutoConfiguration
-
配置 DispatcherServlet 的各项组件,提供的 bean 见过的有
-
多项 HandlerMapping
-
多项 HandlerAdapter
-
HandlerExceptionResolver
-
ErrorMvcAutoConfiguration
-
提供的 bean 有 BasicErrorController
MultipartAutoConfiguration
-
它提供了 org.springframework.web.multipart.support.StandardServletMultipartResolver
-
该 bean 用来解析 multipart/form-data 格式的数据
HttpEncodingAutoConfiguration
-
POST 请求参数如果有中文,无需特殊设置,这是因为 Spring Boot 已经配置了 org.springframework.boot.web.servlet.filter.OrderedCharacterEncodingFilter
-
对应配置 server.servlet.encoding.charset=UTF-8,默认就是 UTF-8
-
当然,它只影响非 json 格式的数据
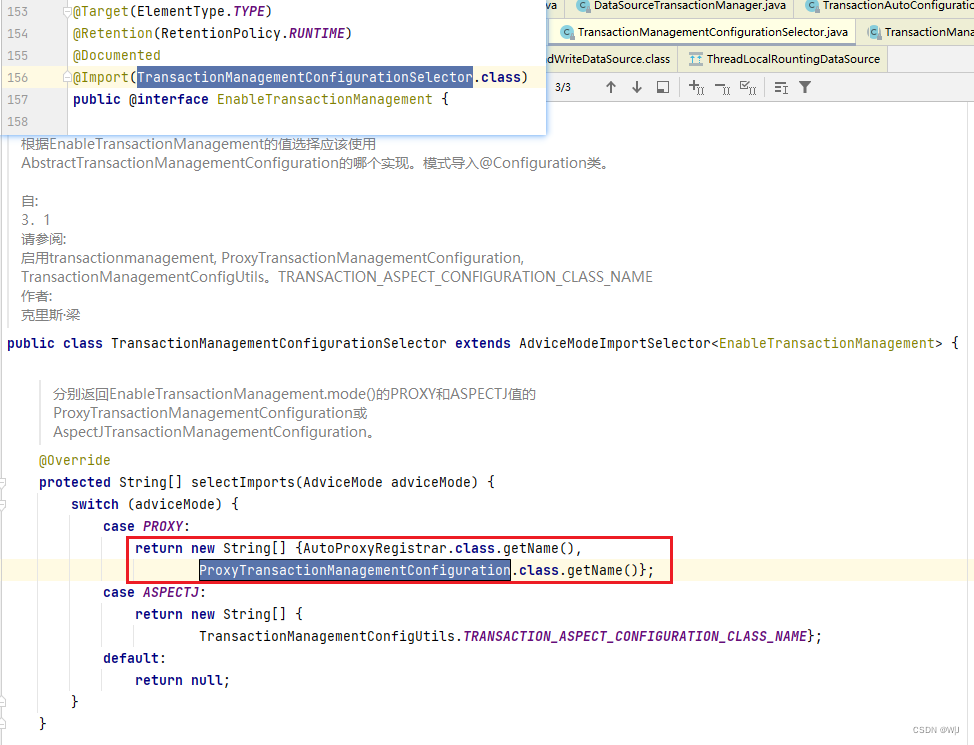
自动配置类实现步骤
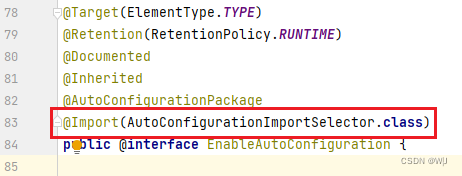
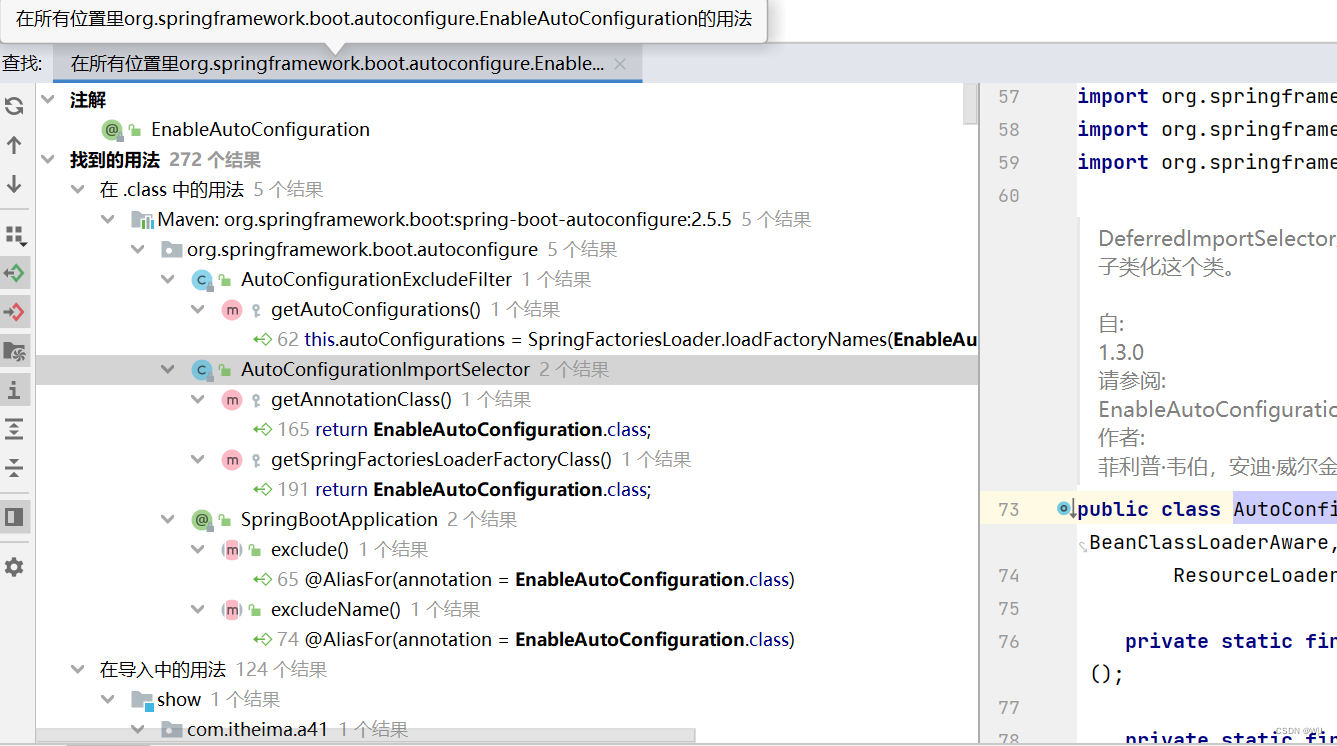
不能直接使用 @Import(AutoConfigurationImportSelector.class) 通过使用 @EnableAutoConfiguration,或者使用其子类 ImportAutoConfigurationImportSelector
- AutoConfigurationImportSelector
- AutoConfigurationImportSelector#selectImports -ImportSelector的重要方法
- AutoConfigurationImportSelector#getAutoConfigurationEntry
- AutoConfigurationImportSelector#getCandidateConfigurations
- SpringFactoriesLoader#loadFactoryNames -扫描 META-INF/spring.factories

42) 条件装配底层
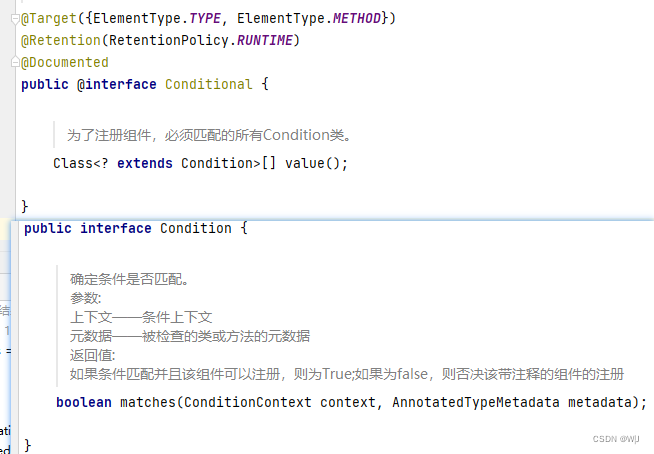
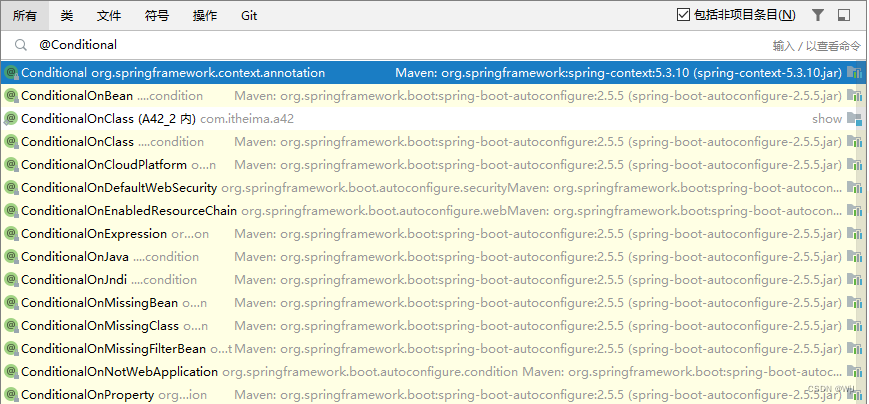
条件装基础注解时@Conditional,其value() 必须是Condition类。Condition类的matches方法可对ConditionContext AnnotatedTypeMetadata 进行判断。
我们可以引入自定义的注解在类上标注@Conditional(自己实现的Condition)参考org.springframework.boot.autoconfigure.condition.ConditionalOnClass
- static class MyCondition implements Condition { // 存在 Druid 依赖
- @Override
- public boolean matches(ConditionContext context, AnnotatedTypeMetadata metadata) {
- Map<String, Object> attributes = metadata.getAnnotationAttributes(ConditionalOnClass.class.getName());
- String className = attributes.get("className").toString();
- boolean exists = (boolean) attributes.get("exists");
- boolean present = ClassUtils.isPresent(className, null);
- return exists == present;
- }
- }
- @Retention(RetentionPolicy.RUNTIME)
- @Target({ElementType.METHOD, ElementType.TYPE})
- @Conditional(MyCondition.class)
- @interface ConditionalOnClass {
- boolean exists(); // true 判断存在 false 判断不存在
- String className(); // 要判断的类名
- }
- @Configuration // 第三方的配置类
- @ConditionalOnClass(className = "com.alibaba.druid.pool.DruidDataSource", exists = false)
- static class AutoConfiguration1 {
- @Bean
- public Bean1 bean1() {
- return new Bean1();
- }
- }
43) FactoryBean
44) @Indexed 原理
45) 代理进一步理解
收获💡
-
spring 代理的设计特点
-
依赖注入和初始化影响的是原始对象
-
因此 cglib 不能用 MethodProxy.invokeSuper()
-
-
代理与目标是两个对象,二者成员变量并不共用数据,代理立对象不能直接访问属性,代理的方法内原始对象 属性信息是完整的
-
-
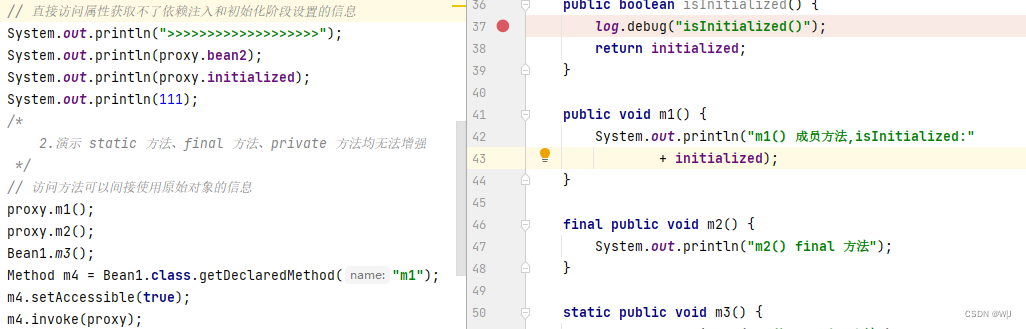
static 方法、final 方法、private 方法均无法增强JDK、Cglib
-
进一步理解代理增强基于方法重写
-
- @Component
- public class Bean1 {
- private static final Logger log = LoggerFactory.getLogger(Bean1.class);
- protected Bean2 bean2;
- protected boolean initialized;
- @Autowired
- public void setBean2(Bean2 bean2) {
- log.debug("setBean2(Bean2 bean2)");
- this.bean2 = bean2;
- }
- @PostConstruct
- public void init() {
- log.debug("init");
- initialized = true;
- }
- public Bean2 getBean2() {
- log.debug("getBean2()");
- return bean2;
- }
- public boolean isInitialized() {
- log.debug("isInitialized()");
- return initialized;
- }
- public void m1() {
- System.out.println("m1() 成员方法");
- }
- final public void m2() {
- System.out.println("m2() final 方法");
- }
- static public void m3() {
- System.out.println("m3() static 方法");
- }
- private void m4() {
- System.out.println("m4() private 方法");
- }
- }
- @SpringBootApplication
- public class A45 {
- public static void main(String[] args) throws Exception {
- ConfigurableApplicationContext context = SpringApplication.run(A45.class, args);
- displayAllBeans(context);
- Bean1 proxy = context.getBean(Bean1.class);
- /*
- 1.演示 spring 代理的设计特点
- 依赖注入和初始化影响的是原始对象
- 代理与目标是两个对象,二者成员变量并不共用数据
- */
- showProxyAndTarget(proxy);
- System.out.println(">>>>>>>>>>>>>>>>>>>");
- System.out.println(proxy.getBean2());
- System.out.println(proxy.isInitialized());
- /*
- 2.演示 static 方法、final 方法、private 方法均无法增强
- */
- proxy.m1();
- proxy.m2();
- Bean1.m3();
- Method m4 = Bean1.class.getDeclaredMethod("m1");
- m4.setAccessible(true);
- m4.invoke(proxy);
- context.close();
- }
- public static void showProxyAndTarget(Bean1 proxy) throws Exception {
- System.out.println(">>>>> 代理中的成员变量");
- System.out.println("\tinitialized=" + proxy.initialized);
- System.out.println("\tbean2=" + proxy.bean2);
- if (proxy instanceof Advised) {
- System.out.println(">>>>> 目标中的成员变量");
- Bean1 target = (Bean1) ((Advised) proxy).getTargetSource().getTarget();
- System.out.println("\tinitialized=" + target.initialized);
- System.out.println("\tbean2=" + target.bean2);
- }
- }
- }
46) @Value 装配底层
-
如果需要的值是字符串,先解析 ${ },再解析 #{ }
-
不是字符串,需要用 TypeConverter 转换
ContextAnnotationAutowireCandidateResolver 获取标注了@Value的内容(org.springframework.beans.factory.annotation.QualifierAnnotationAutowireCandidateResolver#getSuggestedValue),先通过Environment 解析#{}占位符(org.springframework.core.env.PropertyResolver#resolvePlaceholders),再通过BeanExpressionResolver计算(org.springframework.beans.factory.config.BeanExpressionResolver#evaluate)。- public class Bean2 {
- @Value("#{@bean3}") // SpringEL #{SpEL}
- private Bean3 bean3;
- }
- @Component("bean3")
- public class Bean3 {
- }
- static class Bean4 {
- @Value("#{'hello, ' + '${JAVA_HOME}'}")
- private String value;
- }
- /
- public static void main(String[] args) throws Exception {
- AnnotationConfigApplicationContext context = new AnnotationConfigApplicationContext(A46.class);
- DefaultListableBeanFactory beanFactory = context.getDefaultListableBeanFactory();
- ContextAnnotationAutowireCandidateResolver resolver = new ContextAnnotationAutowireCandidateResolver();
- resolver.setBeanFactory(beanFactory);
- test1(context, resolver, Bean1.class.getDeclaredField("home"));
- test2(context, resolver, Bean1.class.getDeclaredField("age"));
- test3(context, resolver, Bean2.class.getDeclaredField("bean3"));
- test3(context, resolver, Bean4.class.getDeclaredField("value"));
- }
- private static void test3(AnnotationConfigApplicationContext context, ContextAnnotationAutowireCandidateResolver resolver, Field field) {
- DependencyDescriptor dd1 = new DependencyDescriptor(field, false);
- // 获取 @Value 的内容
- String value = resolver.getSuggestedValue(dd1).toString();
- System.out.println(value);
- // 解析 ${}
- value = context.getEnvironment().resolvePlaceholders(value);
- System.out.println(value);
- System.out.println(value.getClass());
- // 解析 #{} @bean3
- Object bean3 = context.getBeanFactory().getBeanExpressionResolver().evaluate(value, new BeanExpressionContext(context.getBeanFactory(), null));
- // 类型转换
- Object result = context.getBeanFactory().getTypeConverter().convertIfNecessary(bean3, dd1.getDependencyType());
- System.out.println(result);
- }
47) @Autowired 装配底层
- 1. @Autowired 本质上是根据成员变量或方法参数的类型进行装配
- 2. 如果待装配类型是 Optional,需要根据 Optional 泛型找到 bean,再封装为 Optional 对象装配
- 3. 如果待装配的类型是 ObjectFactory,需要根据 ObjectFactory 泛型创建 ObjectFactory 对象装配
- * 此方法可以延迟 bean 的获取
- 4. 如果待装配的成员变量或方法参数上用 @Lazy 标注,会创建代理对象装配
- * 此方法可以延迟真实 bean 的获取
- * 被装配的代理不作为 bean
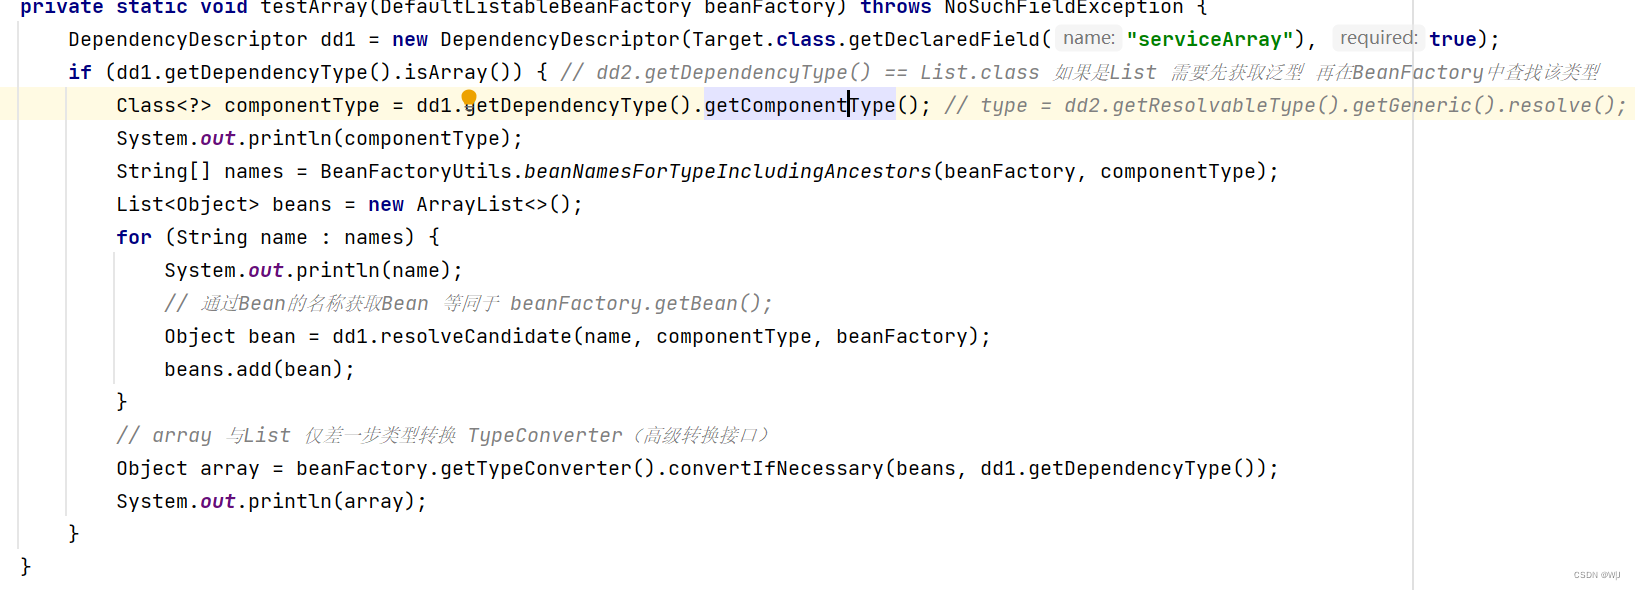
- 5. 如果待装配类型是数组,需要获取数组元素类型,根据此类型找到多个 bean 进行装配
- 6. 如果待装配类型是 Collection 或其子接口,需要获取 Collection 泛型,根据此类型找到多个 bean
- 7. 如果待装配类型是 ApplicationContext 等特殊类型
- * 会在 BeanFactory 的 resolvableDependencies 成员按类型查找装配
- * resolvableDependencies 是 map 集合,key 是特殊类型,value 是其对应对象
- * 不能直接根据 key 进行查找,而是用 isAssignableFrom 逐一尝试右边类型是否可以被赋值给左边的 key 类型
- 8. 如果待装配类型有泛型参数
- * 需要利用 ContextAnnotationAutowireCandidateResolver 按泛型参数类型筛选
- 9. 如果待装配类型有 @Qualifier
- * 需要利用 ContextAnnotationAutowireCandidateResolver 按注解提供的 bean 名称筛选
- 10. 有 @Primary 标注的 @Component 或 @Bean 的处理
- 11. 与成员变量名或方法参数名同名 bean 的处理
1-4
- @Configuration
- public class A47_1 {
- public static void main(String[] args) throws NoSuchFieldException, NoSuchMethodException {
- AnnotationConfigApplicationContext context = new AnnotationConfigApplicationContext(A47_1.class);
- // 1. 根据成员变量的类型注入
- DependencyDescriptor dd1 = new DependencyDescriptor(Bean1.class.getDeclaredField("bean2"), false);
- beanFactory.doResolveDependency(dd1, "bean1", null, null);
- // 2. 根据参数的类型注入
- Method setBean2 = Bean1.class.getDeclaredMethod("setBean2", Bean2.class);
- DependencyDescriptor dd2 = new DependencyDescriptor(new MethodParameter(setBean2, 0), false);
- beanFactory.doResolveDependency(dd2, "bean1", null, null);
- // 3. 结果包装为 Optional
- DependencyDescriptor dd3 = new DependencyDescriptor(Bean1.class.getDeclaredField("bean3"), false);
- if (dd3.getDependencyType() == Optional.class) {
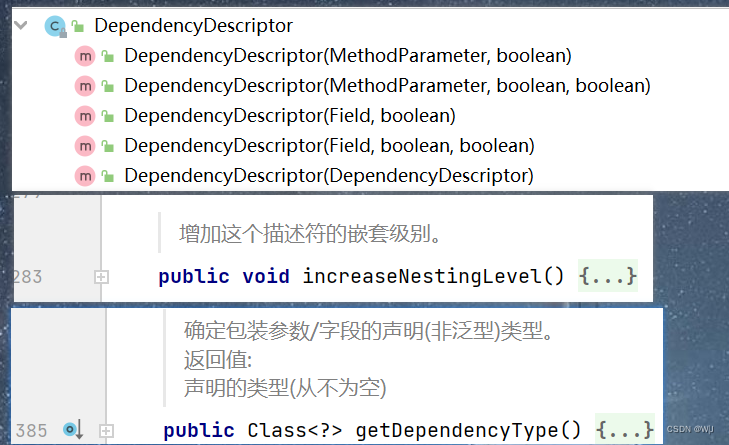
- dd3.increaseNestingLevel();
- Object result = beanFactory.doResolveDependency(dd3, "bean1", null, null);
- Optional.ofNullable(result);
- }
- // 4. 结果包装为 ObjectProvider,ObjectFactory
- DependencyDescriptor dd4 = new DependencyDescriptor(Bean1.class.getDeclaredField("bean4"), false);
- if (dd4.getDependencyType() == ObjectFactory.class) {
- dd4.increaseNestingLevel();
- ObjectFactory objectFactory = new ObjectFactory() {
- @Override
- public Object getObject() throws BeansException {
- return beanFactory.doResolveDependency(dd4, "bean1", null, null);
- }
- };
- // 需要的时候才去加载
- objectFactory.getObject();
- }
- // 5. 对 @Lazy 的处理
- DependencyDescriptor dd5 = new DependencyDescriptor(Bean1.class.getDeclaredField("bean2"), false);
- ContextAnnotationAutowireCandidateResolver resolver = new ContextAnnotationAutowireCandidateResolver();
- resolver.setBeanFactory(beanFactory);
- Object proxy = resolver.getLazyResolutionProxyIfNecessary(dd5, "bean1");
- // 返回的是代理对象
- System.out.println(proxy);
- System.out.println(proxy.getClass());
通过org.springframework.beans.factory.support.DefaultListableBeanFactory#doResolveDependency 可获取依赖注入的Bean,

对@Autowired 、@Qualifier、@Value的解析
5-9
- mport org.springframework.beans.factory.BeanFactoryUtils;
- import org.springframework.beans.factory.annotation.Autowired;
- import org.springframework.beans.factory.annotation.Qualifier;
- import org.springframework.beans.factory.config.BeanDefinition;
- import org.springframework.beans.factory.config.BeanDefinitionHolder;
- import org.springframework.beans.factory.config.DependencyDescriptor;
- import org.springframework.beans.factory.support.DefaultListableBeanFactory;
- import org.springframework.context.ConfigurableApplicationContext;
- import org.springframework.context.annotation.AnnotationConfigApplicationContext;
- import org.springframework.context.annotation.Configuration;
- import org.springframework.context.annotation.ContextAnnotationAutowireCandidateResolver;
- import org.springframework.stereotype.Component;
- import java.lang.reflect.Field;
- import java.util.ArrayList;
- import java.util.List;
- import java.util.Map;
- @SuppressWarnings("all")
- @Configuration
- public class A47_2 {
- public static void main(String[] args) throws NoSuchFieldException, IllegalAccessException {
- AnnotationConfigApplicationContext context = new AnnotationConfigApplicationContext(A47_2.class);
- DefaultListableBeanFactory beanFactory = context.getDefaultListableBeanFactory();
- System.out.println(">>>>>>>>>>>>>>>>>>>>>>>>>>>>> 1. 数组类型");
- testArray(beanFactory);
- System.out.println(">>>>>>>>>>>>>>>>>>>>>>>>>>>>> 2. List 类型");
- testList(beanFactory);
- System.out.println(">>>>>>>>>>>>>>>>>>>>>>>>>>>>> 3. applicationContext");
- testApplicationContext(beanFactory);
- System.out.println(">>>>>>>>>>>>>>>>>>>>>>>>>>>>> 4. 泛型");
- testGeneric(beanFactory);
- System.out.println(">>>>>>>>>>>>>>>>>>>>>>>>>>>>> 5. @Qualifier");
- testQualifier(beanFactory);
- /*
- 学到了什么
- 1. 如何获取数组元素类型
- 2. Spring 如何获取泛型中的类型
- 3. 特殊对象的处理, 如 ApplicationContext, 并注意 Map 取值时的类型匹配问题 (另见 TestMap)
- 4. 谁来进行泛型匹配 (另见 TestGeneric)
- 5. 谁来处理 @Qualifier
- 6. 刚开始都只是按名字处理, 等候选者确定了, 才会创建实例
- */
- }
- private static void testQualifier(DefaultListableBeanFactory beanFactory) throws NoSuchFieldException {
- DependencyDescriptor dd5 = new DependencyDescriptor(Target.class.getDeclaredField("service"), true);
- Class type = dd5.getDependencyType();
- ContextAnnotationAutowireCandidateResolver resolver = new ContextAnnotationAutowireCandidateResolver();
- resolver.setBeanFactory(beanFactory);
- for (String name : BeanFactoryUtils.beanNamesForTypeIncludingAncestors(beanFactory, type)) {
- BeanDefinition bd = beanFactory.getMergedBeanDefinition(name);
- // @Qualifier("service2")
- if (resolver.isAutowireCandidate(new BeanDefinitionHolder(bd,name), dd5)) {
- System.out.println(name);
- System.out.println(dd5.resolveCandidate(name, type, beanFactory));
- }
- }
- }
- private static void testGeneric(DefaultListableBeanFactory beanFactory) throws NoSuchFieldException {
- DependencyDescriptor dd4 = new DependencyDescriptor(Target.class.getDeclaredField("dao"), true);
- Class type = dd4.getDependencyType();
- ContextAnnotationAutowireCandidateResolver resolver = new ContextAnnotationAutowireCandidateResolver();
- resolver.setBeanFactory(beanFactory);
- for (String name : BeanFactoryUtils.beanNamesForTypeIncludingAncestors(beanFactory, type)) {
- BeanDefinition bd = beanFactory.getMergedBeanDefinition(name);
- // 对比 BeanDefinition 与 DependencyDescriptor 的泛型是否匹配
- if (resolver.isAutowireCandidate(new BeanDefinitionHolder(bd,name), dd4)) {
- System.out.println(name);
- System.out.println(dd4.resolveCandidate(name, type, beanFactory));
- }
- }
- }
- private static void testApplicationContext(DefaultListableBeanFactory beanFactory) throws NoSuchFieldException, IllegalAccessException {
- DependencyDescriptor dd3 = new DependencyDescriptor(Target.class.getDeclaredField("applicationContext"), true);
- Field resolvableDependencies = DefaultListableBeanFactory.class.getDeclaredField("resolvableDependencies");
- resolvableDependencies.setAccessible(true);
- Map
- // dependencies.forEach((k, v) -> {
- // System.out.println("key:" + k + " value: " + v);
- // });
- for (Map.Entry
- // 左边类型 右边类型
- if (entry.getKey().isAssignableFrom(dd3.getDependencyType())) {
- System.out.println(entry.getValue());
- break;
- }
- }
- }
- private static void testList(DefaultListableBeanFactory beanFactory) throws NoSuchFieldException {
- DependencyDescriptor dd2 = new DependencyDescriptor(Target.class.getDeclaredField("serviceList"), true);
- if (dd2.getDependencyType() == List.class) {
- Class resolve = dd2.getResolvableType().getGeneric().resolve();
- System.out.println(resolve);
- List
- // 在指定工厂
- String[] names = BeanFactoryUtils.beanNamesForTypeIncludingAncestors(beanFactory, resolve);
- for (String name : names) {
- // 通过Bean的名称获取Bean 等同于 beanFactory.getBean();
- Object bean = dd2.resolveCandidate(name, resolve, beanFactory);
- list.add(bean);
- }
- System.out.println(list);
- }
- }
- private static void testArray(DefaultListableBeanFactory beanFactory) throws NoSuchFieldException {
- DependencyDescriptor dd1 = new DependencyDescriptor(Target.class.getDeclaredField("serviceArray"), true);
- if (dd1.getDependencyType().isArray()) {
- Class componentType = dd1.getDependencyType().getComponentType();
- System.out.println(componentType);
- String[] names = BeanFactoryUtils.beanNamesForTypeIncludingAncestors(beanFactory, componentType);
- List
- for (String name : names) {
- System.out.println(name);
- Object bean = dd1.resolveCandidate(name, componentType, beanFactory);
- beans.add(bean);
- }
- // array 与List 仅差一步类型转换 TypeConverter(高级转换接口)
- Object array = beanFactory.getTypeConverter().convertIfNecessary(beans, dd1.getDependencyType());
- System.out.println(array);
- }
- }
- static class Target {
- @Autowired private Service[] serviceArray;
- @Autowired private List
serviceList; - @Autowired private ConfigurableApplicationContext applicationContext;
- @Autowired private Dao
dao; - @Autowired @Qualifier("service2") private Service service;
- }
- interface Dao
{ - }
- @Component("dao1") static class Dao1 implements Dao
{ - }
- @Component("dao2") static class Dao2 implements Dao
{ - }
- static class Student {
- }
- static class Teacher {
- }
- interface Service {
- }
- @Component("service1")
- static class Service1 implements Service {
- }
- @Component("service2")
- static class Service2 implements Service {
- }
- @Component("service3")
- static class Service3 implements Service {
- }
- }
@Autowired解析 数组类型、List类型需要通过DependencyDescriptor 进一步确定集合中的类型再从BeanFactory中查找该类型的Bean,并放在对应的数据结构中。
解析 ConfigurableApplicationContext 类型的依赖,该接口下属的实现常用类为 DefaultListableBeanFactory 其属性
resolvableDependencies 在org.springframework.context.support.AbstractApplicationContext#refresh 的org.springframework.context.support.AbstractApplicationContext#prepareBeanFactory中添加了ApplicationContext。
我们通过反射获取DefaultListableBeanFactory 的resolvableDependencies 遍历确定具有相同接口即可


对于标注有 @Qualifier、或者是具有泛型的接口,可通过org.springframework.beans.factory.annotation.QualifierAnnotationAutowireCandidateResolver#isAutowireCandidate 判断。
参数一 BeanDefinitionHolder 需要一个BeanDefinition和beanName beanName可以通过 org.springframework.beans.factory.BeanFactoryUtils#beanNamesForTypeIncludingAncestors(org.springframework.beans.factory.ListableBeanFactory, java.lang.Class) 传入的 dd.getDependencyType() 确定后返回 beanName。
@Autowired private Dao dao;
@Autowired @Qualifier("service2") private Service service;
@Qualifier 检查过后会再检查 @Primary,如果获取的仍不满足 就会以注入的name进行查找。
beanFactory.getMergedBeanDefinition(name).isPrimary() name.equals(dd.getDependencyName())
- private static void testPrimary(DefaultListableBeanFactory beanFactory) throws NoSuchFieldException {
- DependencyDescriptor dd = new DependencyDescriptor(Target1.class.getDeclaredField("service"), false);
- Class type = dd.getDependencyType();
- for (String name : BeanFactoryUtils.beanNamesForTypeIncludingAncestors(beanFactory, type)) {
- if (beanFactory.getMergedBeanDefinition(name).isPrimary()) {
- System.out.println(name);
- }
- if(name.equals(dd.getDependencyName())) {
- System.out.println(name);
- }
- }
- }
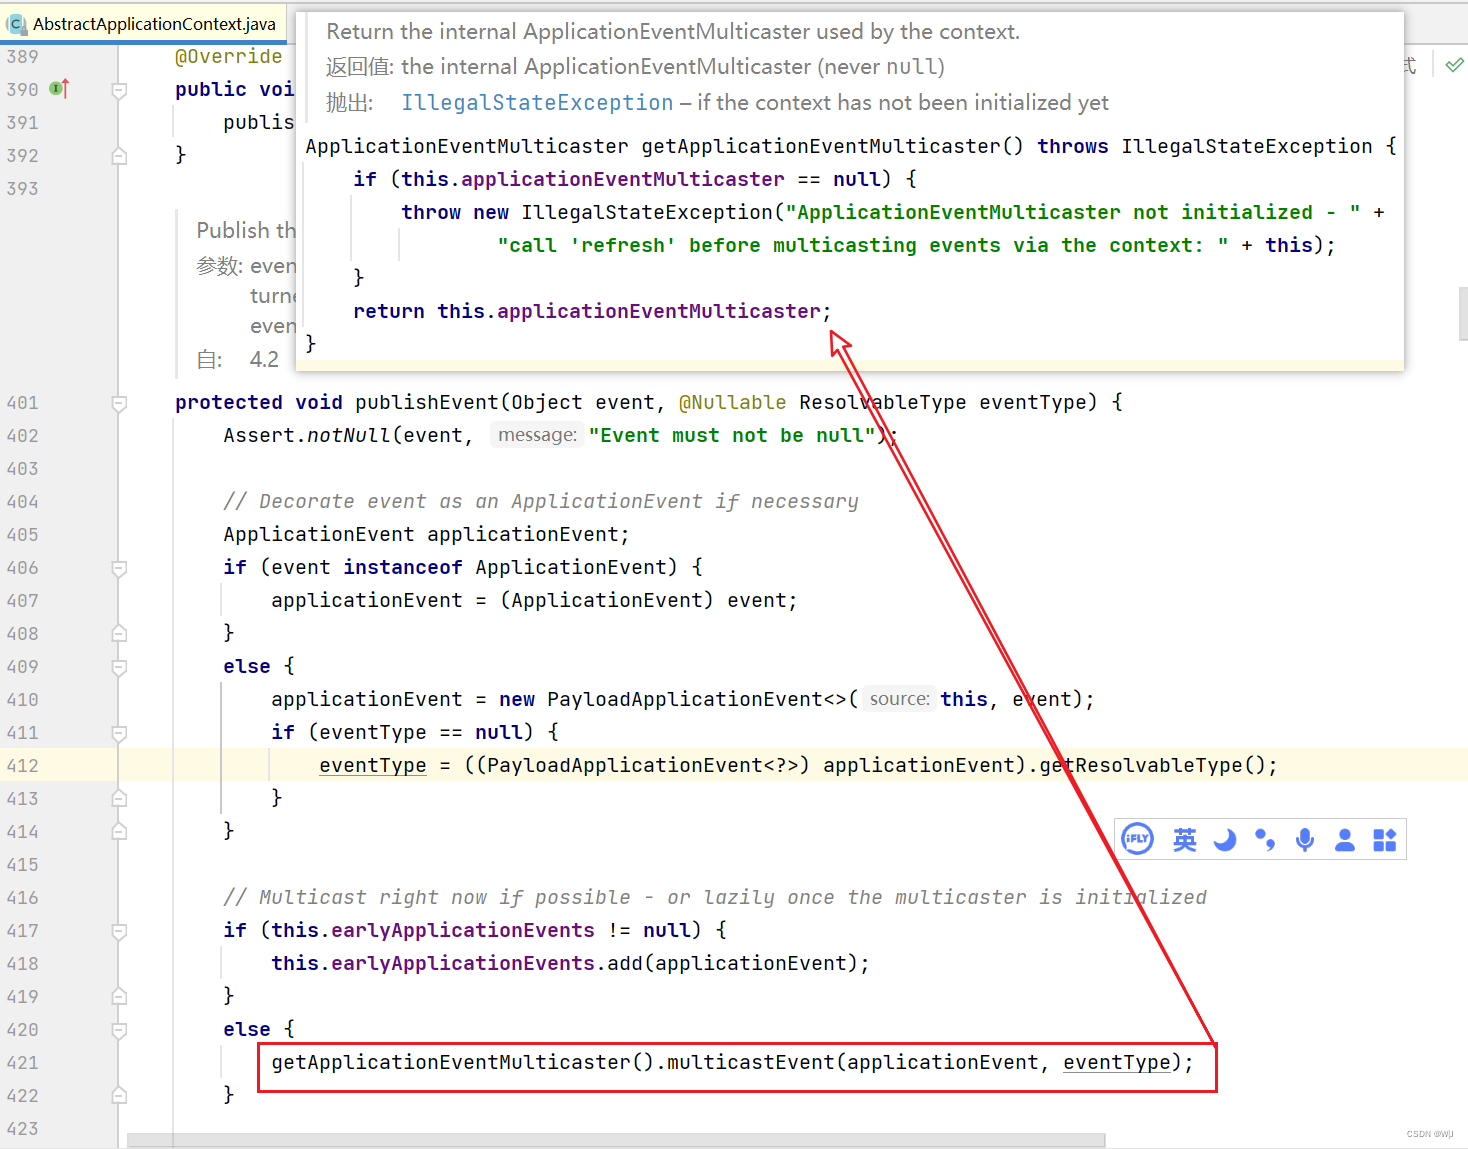
48) 事件监听器 49) 事件发布器
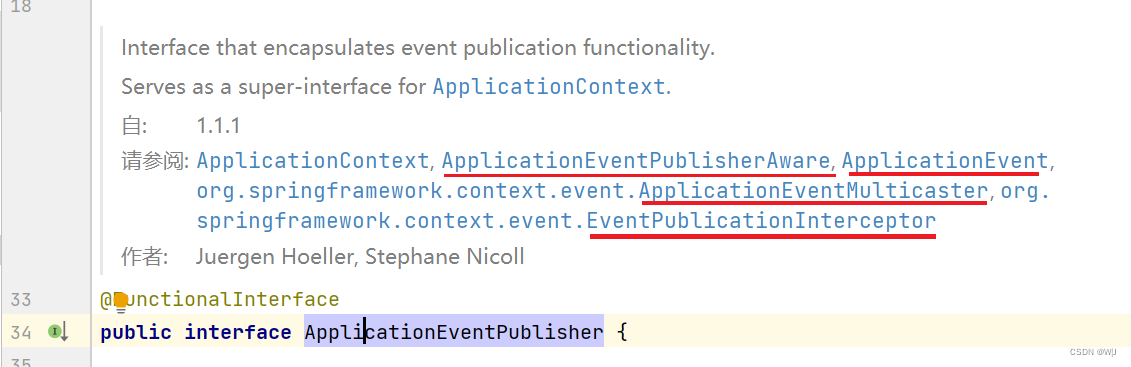
重要接口 org.springframework.context.ApplicationListener org.springframework.context.ApplicationEventPublisher | ApplicationEventPublisher的主要实现 AbstractApplicationContext
http://t.csdn.cn/8CzkO
 http://t.csdn.cn/8CzkO
自定义一个能够将自定义的注解方法注册为ApplicationListener。
org.springframework.beans.factory.SmartInitializingSingleton在BeanFactory引导期间,在单例初始化阶段结束时触发的回调接口。
- org.springframework.beans.factory.support.DefaultListableBeanFactory#preInstantiateSingletons
- org.springframework.beans.factory.SmartInitializingSingleton#afterSingletonsInstantiated AbstractApplicationContext.finishBeanFactoryInitialization(ConfigurableListableBeanFactory) (org.springframework.context.support)
- AbstractApplicationContext.refresh() (org.springframework.context.support)
- import org.slf4j.Logger;
- import org.slf4j.LoggerFactory;
- import org.springframework.beans.factory.SmartInitializingSingleton;
- import org.springframework.beans.factory.annotation.Autowired;
- import org.springframework.context.ApplicationEvent;
- import org.springframework.context.ApplicationEventPublisher;
- import org.springframework.context.ConfigurableApplicationContext;
- import org.springframework.context.annotation.AnnotationConfigApplicationContext;
- import org.springframework.context.annotation.Bean;
- import org.springframework.context.annotation.Configuration;
- import org.springframework.stereotype.Component;
- import java.lang.annotation.ElementType;
- import java.lang.annotation.Retention;
- import java.lang.annotation.RetentionPolicy;
- import java.lang.annotation.Target;
- import java.lang.reflect.Method;
- @Configuration
- public class A48_3 {
- public static void main(String[] args) {
- AnnotationConfigApplicationContext context = new AnnotationConfigApplicationContext(A48_3.class);
- context.getBean(MyService.class).doBusiness();
- context.close();
- }
- /**
- *
- * @param context SmartInitializingSingleton 需要一个beanFactory 同时需要支持addApplicationListener 方法
- * @return
- */
- @Bean
- public SmartInitializingSingleton smartInitializingSingleton(ConfigurableApplicationContext context) {
- return () -> {
- for (String name : context.getBeanDefinitionNames()) {
- Object bean = context.getBean(name);
- for (Method method : bean.getClass().getMethods()) {
- // 判断方法上是否标注的有自定义的注解 @MyListener
- if (method.isAnnotationPresent(MyListener.class)) {
- context.addApplicationListener((event) -> {
- System.out.println(event);
- Class eventType = method.getParameterTypes()[0];// 监听器方法需要的事件类型
- if (eventType.isAssignableFrom(event.getClass())) {
- try {
- // 此处通过反射执行方式时候的形参并不是方法上的参数 method.getParameters()[0]
- method.invoke(bean, event);
- } catch (Exception e) {
- e.printStackTrace();
- }
- }
- });
- }
- }
- }
- };
- }
- @Component
- static class MyService {
- private static final Logger log = LoggerFactory.getLogger(MyService.class);
- @Autowired
- private ApplicationEventPublisher publisher; // applicationContext
- public void doBusiness() {
- log.debug("主线业务");
- // 主线业务完成后需要做一些支线业务,下面是问题代码
- publisher.publishEvent(new MyEvent("MyService.doBusiness()"));
- }
- }
- @Component
- static class SmsService {
- private static final Logger log = LoggerFactory.getLogger(SmsService.class);
- @MyListener
- public void listener(MyEvent myEvent) {
- log.debug("发送短信");
- }
- }
- @Component
- static class EmailService {
- private static final Logger log = LoggerFactory.getLogger(EmailService.class);
- @MyListener
- public void listener(MyEvent myEvent) {
- log.debug("发送邮件");
- }
- }
- @Retention(RetentionPolicy.RUNTIME)
- @Target(ElementType.METHOD)
- @interface MyListener {
- }
- static class MyEvent extends ApplicationEvent {
- public MyEvent(Object source) {
- super(source);
- }
- }
- }
双亲委派模式 - 简书 (jianshu.com)
https://www.jianshu.com/p/5e0441cd2d4c -
相关阅读:
随手记录第六话 -- 在Mac上搭建整个开发环境记录(Java、Python、Vue、Docker、idea)
【手把手带你学Java EE】HTTP协议
第五章:最新版零基础学习 PYTHON 教程—Python 字符串操作指南(第七节 - Python 中使用 % 进行字符串格式化)
前端:nodejs多版本管理工具nvm
阿里云ACE认证的含金量高吗?如何通过ACE认证考试?
理论第六课——二分查找函数
中秋发祝福?一套程序让你成为【相亲相爱一家人】群里最靓的仔
手写RPC框架--4.服务注册
SQL注入简介
c++处理图像---绘制物体的凸包:cv::convexHull
- 原文地址:https://blog.csdn.net/qq_34922830/article/details/127680277
