-
大数据生态圈及分布式文件系统HDFS实践part2
前言 问题引入
(这是以前讲课的时候,给学生准备的一些问题,大家可以思考一下,对理解HDFS很有帮助)
1、如果一个文件中有10个数值(一行一个,并且都是可以用int来度量), 现在求10个数值的和。
这个思路很简单。
2、假如,这样的文件有很大一堆, 并且每个文件都很大,而且每个文件里面的内容都很多
例如:现在有10000个文件,每个文件2T,文件里面的内容依然是每行一个数值,要求这一堆文件的所有数值的和。
思路是什么?有没有更加好的方案?
3、又有个问题:该10000个2T的文件应该怎么分布, 才能让这10000个任务的执行效率达到最高?
4、数据的处理:存储 和 计算 是怎么设计的?
5、HDFS是怎么保障数据的安全的?
6、HDFS核心思想
第一章 HDFS介绍
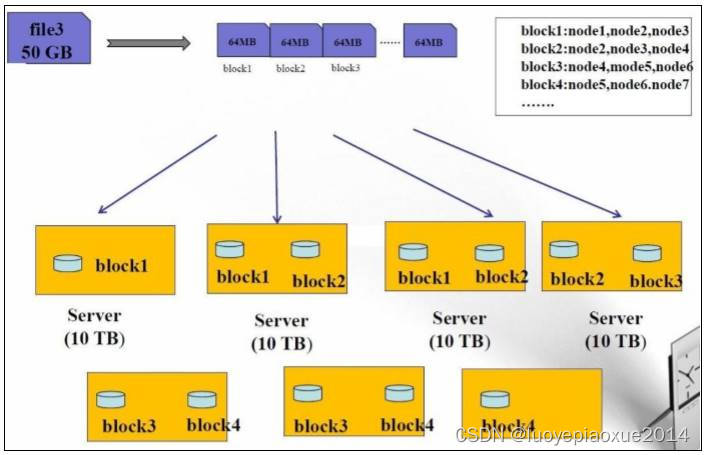
1.1 HDFS设计思路
HDFS 被设计成用来使用低廉的服务器来进行海量数据的存储,那是怎么做到的呢?
1、大文件被切割成小文件,使用分而治之的思想对同一个文件进行管理 分散存储
2、每个切分之后的块都进行冗余存储,高可用不丢失 冗余备份
1.2 HDFS架构
1、namenode:掌管文件系统的目录树,处理客户端的请求,保存元数据信息
2、datanode:存储实际的数据的,处理真正的读写
3、secondnamenode:分担namenode压力的,协助合并元数据信息

详细补充解释:1、NameNode:是Master,管理者节点。 (1)管理HDFS的名称空间 (2)配置副本策略 (3)管理数据块(Block)映射信息 (4)处理客户端读写请求 2、DataNode:是Worker,NameNode下达命令,DataNode执行实际的操作。 (1)存储实际的数据块 (2)执行数据块的读/写操作 3、Client:是客户端。 (1)文件切分。文件上传HDFS的时候,Client将文件切分成一个一个的Block,然后进行上传 (2)与NameNode交互,获取文件的位置信息 (3)与DataNode交互,读取或者写入数据 (4)Client提供一些命令来管理HDFS,比如NN格式化 hadoop namenode -format (5)Client提供一些命令来访问HDFS,比如对HDFS查询操作 4、Secondary NameNode:不是NameNode的热备。当NameNode挂掉的时候,它并不能马上替换NameNode并提供服务。 帮助NameNode,分担其工作量,比如定期合并Fsimage和Edits,并返回给NameNode- 1
- 2
- 3
- 4
- 5
- 6
- 7
- 8
- 9
- 10
- 11
- 12
- 13
- 14
- 15
- 16
1.3 HDFS优缺点
1.3.1 优点
1、可构建在廉价机器上
通过多个副本来提高可靠性,文件切分多个块进行存储
2、高容错性
数据自动保存多个副本,副本丢失后,可以自动恢复
3、适合批处理
数据规模:能够处理PB级别数据
文件数量:能够处理百万级别以上的文件数量4、适合大数据文件处理
10k+节点规模
5、流式写入
适合于一次写入、多次读出的场景。文件经过创建、写入和关系之后就不需要再改变。
一次写入,多次读取,可以保证数据的一致性
1.3.2 缺点
不适于以下操作
1、要求高的数据访问
比如毫秒级
2、小文件存取
寻道时间超过读取时间
3、并发写入、文件随机修改
一个文件只能有一个写
仅仅支持append追加4、不适合存储小文件
存储一个1亿个小文件,大小仅仅1t,但是消耗掉20g左右的内存
第二章 HDFS的shell操作
2.1 前言
HDFS 提供 shell 命令行客户端,使用方法如下:
hadoop fs 和 hdfs dfs 命令一样效果

hadoop fs 还有以下的命令行操作:
[root@hadoop0 software]# hadoop fs Usage: hadoop fs [generic options] [-appendToFile... ] [-cat [-ignoreCrc] ...] [-checksum ...] [-chgrp [-R] GROUP PATH...] [-chmod [-R] ... ] [-copyToLocal [-p] [-ignoreCrc] [-crc] ... ] [-count [-q] [-h] ...] [-cp [-f] [-p | -p[topax]] ... ] [-createSnapshot [ ]] [-deleteSnapshot ] [-df [-h] [ ...]] [-du [-s] [-h] ...] [-expunge] [-find ... ...] [-get [-p] [-ignoreCrc] [-crc] ... ] [-getfacl [-R] ] [-getfattr [-R] {-n name | -d} [-e en] ] [-getmerge [-nl] ] [-help [cmd ...]] [-ls [-d] [-h] [-R] [ ...]] [-mkdir [-p] ...] [-moveFromLocal ... ] [-moveToLocal ] [-mv ... ] [-put [-f] [-p] [-l] ... ] [-renameSnapshot ] [-rm [-f] [-r|-R] [-skipTrash] ...] [-rmdir [--ignore-fail-on-non-empty] ...] [-setfacl [-R] [{-b|-k} {-m|-x } ]|[--set ]] [-setfattr {-n name [-v value] | -x name} ] [-setrep [-R] [-w] ...] [-stat [format] ...] [-tail [-f] ] [-test -[defsz] ] [-text [-ignoreCrc] ...] [-touchz ...] [-truncate [-w] ...] [-usage [cmd ...]] - 1
- 2
- 3
- 4
- 5
- 6
- 7
- 8
- 9
- 10
- 11
- 12
- 13
- 14
- 15
- 16
- 17
- 18
- 19
- 20
- 21
- 22
- 23
- 24
- 25
- 26
- 27
- 28
- 29
- 30
- 31
- 32
- 33
- 34
- 35
- 36
- 37
- 38
- 39
- 40
- 41
- 42
- 43
2.2 常用命令参数介绍
-help 功能:输出这个命令参数手册 [root@hadoop0 software]# hadoop fs -help -ls 功能:显示目录信息 示例: hadoop fs -ls hdfs://hadoop0:9000/ 备注:这些参数中,所有的 hdfs 路径都可以简写成 hadoop fs -ls / 等同上条命令的效果 -put 功能:等同于 copyFromLocal,进行文件上传 示例:hadoop fs -put /aaa/jdk.tar.gz /bbb/jdk.tar.gz -get 功能:等同于 copyToLocal,就是从 hdfs 下载文件到本地 示例:hadoop fs -get /aaa/jdk.tar.gz -cp 功能:从 hdfs 的一个路径拷贝到 hdfs 的另一个路径 示例: hadoop fs -cp /aaa/jdk.tar.gz /bbb/jdk.tar.gz.2 -mv 功能:在 hdfs 目录中移动文件 示例: hadoop fs -mv /aaa/jdk.tar.gz / -rm 功能:删除文件或文件夹 示例:hadoop fs -rm -r /aaa/bbb/ -rmdir 功能:删除空目录 示例:hadoop fs -rmdir /aaa/bbb/ccc -moveFromLocal 功能:从本地剪切到 hdfs 示例:hadoop fs - moveFromLocal /home/hadoop/a.txt /aa/bb/cc/dd -moveToLocal 功能:从 hdfs 剪切到本地 示例:hadoop fs - moveToLocal /aa/bb/cc/dd /home/hadoop/a.txt -copyFromLocal 功能:从本地文件系统中拷贝文件到 hdfs 文件系统去 示例:hadoop fs -copyFromLocal ./jdk.tar.gz /aaa/ -copyToLocal 功能:从 hdfs 拷贝到本地 示例:hadoop fs -copyToLocal /aaa/jdk.tar.gz -appendToFile 功能:追加一个文件到已经存在的文件末尾 示例:hadoop fs -appendToFile ./hello.txt hdfs://hadoop0:9000/hello.txt 可以简写为: hadoop fs -appendToFile ./hello.txt /hello.txt -cat 功能:显示文件内容 hadoop fs -cat /hello.txt -tail 功能:显示一个文件的末尾 示例:hadoop fs -tail /weblog/access_log.1 -text 功能:以字符形式打印一个文件的内容 示例:hadoop fs -text /weblog/access_log.1 -chgrp -chmod -chown 功能:linux 文件系统中的用法一样,对文件所属权限 示例: hadoop fs -chmod 666 /hello.txt hadoop fs -chown someuser:somegrp /hello.txt hadoop fs -chown root:supergroup /zz/test1.txt -df 功能:统计文件系统的可用空间信息 示例:hadoop fs -df -h / -du 功能:统计文件夹的大小信息 示例:hadoop fs -du -s -h /aaa/* -count 功能:统计一个指定目录下的文件节点数量 示例:hadoop fs -count /aaa/ -setrep 功能:设置 hdfs 中文件的副本数量 示例:hadoop fs -setrep 3 /aaa/jdk.tar.gz- 1
- 2
- 3
- 4
- 5
- 6
- 7
- 8
- 9
- 10
- 11
- 12
- 13
- 14
- 15
- 16
- 17
- 18
- 19
- 20
- 21
- 22
- 23
- 24
- 25
- 26
- 27
- 28
- 29
- 30
- 31
- 32
- 33
- 34
- 35
- 36
- 37
- 38
- 39
- 40
- 41
- 42
- 43
- 44
- 45
- 46
- 47
- 48
- 49
- 50
- 51
- 52
- 53
- 54
- 55
- 56
- 57
- 58
- 59
- 60
- 61
- 62
- 63
- 64
- 65
- 66
- 67
- 68
- 69
- 70
- 71
- 72
- 73
- 74
- 75
- 76
- 77
- 78
- 79
- 80
- 81
- 82
- 83
- 84
- 85
- 86
- 87
- 88
- 89
- 90
- 91
- 92
补充:查看 dfs 集群工作状态的命令
hdfs dfsadmin -report
2.3 再次补充常见命令
基础命令 1、启动Hadoop集群 sbin/start-dfs.sh sbin/start-yarn.sh 2、-help:输出这个命令参数 hadoop fs -help rm 3、创建/zz文件夹 [root@hadoop10 software]# hadoop fs -mkdir /zz 4、追加文件操作 [root@hadoop10 data]# hadoop fs -put wordcount.txt /bb/cc [root@hadoop10 data]# hadoop fs -appendToFile aa.txt /bb/cc/wordcount.txt 上传相关 1、-moveFromLocal:从本地剪切到HDFS vim aa.txt 输入: aa 具体命令: [root@hadoop10 data]# hadoop fs -moveFromLocal ./aa.txt /zz 2、-copyFromLocal:从本地文件系统中拷贝文件到HDFS路径去 vim bb.txt bb [root@hadoop10 data]# hadoop fs -copyFromLocal bb.txt /zz 3、-put:等同于copyFromLocal,个人喜欢用put vim cc.txt cc hadoop fs -put ./cc.txt /zz 4、-appendToFile: 追加一个文件到已经存在的文件末尾 vim dd.txt dd [root@hadoop10 data]# hadoop fs -appendToFile dd.txt /zz/bb.txt 下载相关 1、-copyToLocal:HDFS拷贝到本地 [root@hadoop10 data]# hadoop fs -copyToLocal /zz/aa.txt ./ 2、-get:等同于copyToLocal,个人偏好get [root@hadoop10 data]# hadoop fs -get /zz/aa.txt ./aa2.txt HDFS其他一些常见操作 1、-ls: 显示目录信息 [root@hadoop10 data]# hadoop fs -ls /zz 2、-cat:显示文件内容 [root@hadoop10 data]# hadoop fs -cat /zz/aa.txt 3、-chgrp、-chmod、-chown:Linux文件系统中的用法一样,修改文件所属权限 [root@hadoop10 data]# hadoop fs -chmod 666 /zz/aa.txt 4、-mkdir:创建路径 hadoop fs -mkdir /yy 5、-cp:从HDFS的一个路径拷贝到HDFS的另一个路径 hadoop fs -cp /zz/aa.txt /yy 6、-mv:在HDFS目录中移动文件 hadoop fs -mv /zz/aa.txt /yy hadoop fs -mv /zz/bb.txt /yy 7、-tail:显示一个文件的末尾1kb的数据 hadoop fs -tail /yy/dd.txt 8、-rm:删除文件或文件夹 hadoop fs -rm /zz/dd.txt 9、-rm -r:递归删除目录及目录里面内容 hadoop fs -rm -r /zz 10、-du统计文件夹的大小信息 hadoop fs -du -s -h /yy 3 6 /yy [root@hadoop10 logs]# hadoop fs -du -h /zz 3 3 /zz/aa.txt 6 6 /zz/bb.txt 说明:第一个3表示文件大小;第二个3表示3*1个副本;/yy表示查看的目录 11)-setrep:设置HDFS中文件的副本数量 hadoop fs -setrep 5 /yy/aa.txt 这里设置的副本数只是记录在NameNode的元数据中,是否真的会有这么多副本,还得看DataNode的数量。目前只有2个datanode节点,最多也就2个副本,只有从节点数的增加到5台时,副本数才能达到5 页面上拷贝剪切的时候的出错 Couldn't move file aa.txt. Forbidden 给文件夹属性也改成777- 1
- 2
- 3
- 4
- 5
- 6
- 7
- 8
- 9
- 10
- 11
- 12
- 13
- 14
- 15
- 16
- 17
- 18
- 19
- 20
- 21
- 22
- 23
- 24
- 25
- 26
- 27
- 28
- 29
- 30
- 31
- 32
- 33
- 34
- 35
- 36
- 37
- 38
- 39
- 40
- 41
- 42
- 43
- 44
- 45
- 46
- 47
- 48
- 49
- 50
- 51
- 52
- 53
- 54
- 55
- 56
- 57
- 58
- 59
- 60
- 61
- 62
- 63
- 64
- 65
- 66
- 67
- 68
- 69
- 70
- 71
- 72
- 73
- 74
- 75
- 76
第三章 HDFS的API操作
3.0 在写客户端代码的时候本地的环境配置
1、现在本地给hadoop3.2.2安装包解压了
2、在解压之后的安装包的bin目录下面添加winutils.exe和hadoop.dll
3、配置环境变量


3.1 导入Maven依赖
bigdatapre com.aa 1.0-SNAPSHOT 4.0.0 hdfs org.apache.hadoop hadoop-client 3.2.2 junit junit 4.13.2 org.slf4j slf4j-log4j12 1.7.30 - 1
- 2
- 3
- 4
- 5
- 6
- 7
- 8
- 9
- 10
- 11
- 12
- 13
- 14
- 15
- 16
- 17
- 18
- 19
- 20
- 21
- 22
- 23
- 24
- 25
- 26
- 27
- 28
- 29
- 30
- 31
- 32
3.2 访问数据(使用文件系统方式)
说在前面:其中涉及到的几个类
在 Java 中操作 HDFS, 主要涉及以下 Class
Configuration:该类的对象封转了客户端或者服务器的配置
FileSystem:该类的对象是一个文件系统对象, 可以用该对象的一些方法来对文件进行操作, 通过 FileSystem 的静态方法 get 获得该对象
3.2.1 获取FileSystem
第一种方式:set方式+通过get
/** * 方式一:set方式+通过get * @throws IOException */ public void getFileSystem1() throws IOException { //1:创建Configuration对象 Configuration conf = new Configuration(); //2:设置文件系统类型 conf.set("fs.defaultFS", "hdfs://hadoop0:8020"); //3:获取指定文件系统 FileSystem fileSystem = FileSystem.get(conf); //4:输出测试 System.out.println(fileSystem); }- 1
- 2
- 3
- 4
- 5
- 6
- 7
- 8
- 9
- 10
- 11
- 12
- 13
- 14
- 15
- 16
- 17
- 18
测试结果:
DFS[DFSClient[clientName=DFSClient_NONMAPREDUCE_1593411524_1, ugi=LIAO (auth:SIMPLE)]] Process finished with exit code 0

方式二:set方式+通过newInstance
/** * 方式二:set方式+通过newInstance * @throws IOException */ public void getFileSystem2() throws IOException { //1:创建Configuration对象 Configuration conf = new Configuration(); //2:设置文件系统类型 conf.set("fs.defaultFS", "hdfs://hadoop0:8020"); //3:获取指定文件系统 FileSystem fileSystem = FileSystem.newInstance(conf); //4:输出测试 System.out.println(fileSystem); }- 1
- 2
- 3
- 4
- 5
- 6
- 7
- 8
- 9
- 10
- 11
- 12
- 13
- 14
- 15
- 16
- 17
- 18
方式三:new URI+get
/** * 方式三:new URI+get * @throws Exception */ public void getFileSystem3() throws Exception{ FileSystem fileSystem = FileSystem.get(new URI("hdfs://hadoop0:8020"), new Configuration()); System.out.println("fileSystem:"+fileSystem); }- 1
- 2
- 3
- 4
- 5
- 6
- 7
- 8
- 9
方式四:new URI+newInstance
/** * 方式四:newInstance+get * @throws Exception */ public void getFileSystem4() throws Exception{ FileSystem fileSystem = FileSystem.newInstance(new URI("hdfs://hadoop0:8020"), new Configuration()); System.out.println("fileSystem:"+fileSystem); }- 1
- 2
- 3
- 4
- 5
- 6
- 7
- 8
- 9
3.2.2 文件的遍历
/** * hdfs文件的遍历 * @throws URISyntaxException * @throws IOException */ public void listFiles() throws URISyntaxException, IOException { //1、获取FileSystem实例 FileSystem fileSystem = FileSystem.get(new URI("hdfs://hadoop10:8020"), new Configuration()); //2、调用方法listFiles 获取 /目录下所有的文件信息 RemoteIteratoriterator = fileSystem.listFiles(new Path("/"), true); //3、遍历迭代器 while (iterator.hasNext()){ LocatedFileStatus fileStatus = iterator.next(); //获取文件的绝对路径 : hdfs://hadoop0:8020/xxx System.out.println(fileStatus.getPath() + "======" +fileStatus.getPath().getName()); System.out.println(fileStatus.getPermission()); System.out.println(fileStatus.getOwner()); System.out.println(fileStatus.getGroup()); System.out.println(fileStatus.getLen()); System.out.println(fileStatus.getModificationTime()); System.out.println(fileStatus.getReplication()); System.out.println(fileStatus.getBlockSize()); System.out.println(fileStatus.getPath().getName()); //文件的block信息 BlockLocation[] blockLocations = fileStatus.getBlockLocations(); for (BlockLocation blockLocation : blockLocations) { String[] hosts = blockLocation.getHosts(); System.out.println("block数量为: "+hosts.length); for (String host : hosts) { System.out.println("主机为: "+host); } } System.out.println(); } } - 1
- 2
- 3
- 4
- 5
- 6
- 7
- 8
- 9
- 10
- 11
- 12
- 13
- 14
- 15
- 16
- 17
- 18
- 19
- 20
- 21
- 22
- 23
- 24
- 25
- 26
- 27
- 28
- 29
- 30
- 31
- 32
- 33
- 34
- 35
- 36
- 37
- 38
- 39
- 40
- 41
3.2.3 创建文件夹
/** * 创建文件夹 * @throws URISyntaxException * @throws IOException * @throws InterruptedException */ public void mkdirs() throws URISyntaxException, IOException, InterruptedException { //1:获取FileSystem实例 FileSystem fileSystem = FileSystem.get(new URI("hdfs://hadoop0:8020"), new Configuration(),"root"); //2:创建文件夹 boolean bl = fileSystem.mkdirs(new Path("/aaa/bbb/ccc")); //fileSystem.create(new Path("/aaa/bbb/ccc/a.txt")); //fileSystem.create(new Path("/aaa2/bbb/ccc/a.txt")); System.out.println(bl); //3: 关闭FileSystem fileSystem.close(); }- 1
- 2
- 3
- 4
- 5
- 6
- 7
- 8
- 9
- 10
- 11
- 12
- 13
- 14
- 15
- 16
- 17
- 18
- 19
- 20
3.2.4 文件的上传
简易版代码:
/** * 文件的上传 * @throws URISyntaxException * @throws IOException * @throws InterruptedException */ public void uploadFile() throws URISyntaxException, IOException, InterruptedException { //1:获取FileSystem FileSystem fileSystem = FileSystem.get(new URI("hdfs://hadoop0:8020"), new Configuration(),"root"); //2:调用方法,实现上传 fileSystem.copyFromLocalFile(new Path("D://test1.txt"), new Path("/")); //3:关闭FileSystem fileSystem.close(); }- 1
- 2
- 3
- 4
- 5
- 6
- 7
- 8
- 9
- 10
- 11
- 12
- 13
- 14
- 15
- 16
- 17
稍微复杂版本代码:
设置副本的优先级可以通过如下的代码设置
/**优先级:1>2>3>4 * (1)客户端代码中设置的参数值 * (2)resources资源目录下的用户自定义配置文件 * (3)服务器自定义配置(hdfs-site.xml) * (4)服务器默认配置(hdfs-default.xml) * @throws IOException * @throws InterruptedException * @throws URISyntaxException */ //@Test public void uploadFile() throws IOException, InterruptedException, URISyntaxException { // 1、获取文件系统 Configuration configuration = new Configuration(); configuration.set("dfs.replication", "3"); FileSystem fs = FileSystem.get(new URI("hdfs://hadoop10:8020"), configuration, "root"); // 2、上传文件操作 //fs.copyFromLocalFile(new Path("D:\\input\\test1.txt"), new Path("/bb/cc")); /** * @param delSrc whether to delete the src 默认是不删除 * @param overwrite whether to overwrite an existing file 默认是覆盖写入true * @param src path * @param dst path */ fs.copyFromLocalFile(false,true,new Path("D:\\input\\test1.txt"), new Path("/bb/cc")); // 3、关闭资源 fs.close(); }- 1
- 2
- 3
- 4
- 5
- 6
- 7
- 8
- 9
- 10
- 11
- 12
- 13
- 14
- 15
- 16
- 17
- 18
- 19
- 20
- 21
- 22
- 23
- 24
- 25
- 26
- 27
- 28
- 29
- 30
3.2.5 文件的下载
文件的下载方式一:使用copyToLocalFile
/** * 文件的下载方式一:使用copyToLocalFile * @throws URISyntaxException * @throws IOException * @throws InterruptedException */ //@Test public void downloadFile1() throws URISyntaxException, IOException{ //1:获取FileSystem FileSystem fileSystem = FileSystem.get(new URI("hdfs://hadoop10:8020"), new Configuration()); //2:调用方法,实现文件的下载 // boolean delSrc 指是否将原文件删除 // Path src 指要下载的文件路径 // Path dst 指将文件下载到的路径 // boolean useRawLocalFileSystem 是否开启文件校验 就是是否生成windows系统是上面那个crc文件,设置true,不会有crc文件。设置false在本地会有crc文件。 fileSystem.copyToLocalFile(false,new Path("/bb/cc/test1.txt"), new Path("D://test1_down1.txt"),false); //3:关闭FileSystem fileSystem.close(); }- 1
- 2
- 3
- 4
- 5
- 6
- 7
- 8
- 9
- 10
- 11
- 12
- 13
- 14
- 15
- 16
- 17
- 18
- 19
- 20
- 21
文件的下载方式二:通过输入输出流
/** * 文件的下载方式二:通过输入输出流 * @throws URISyntaxException * @throws IOException */ public void downloadFile2() throws URISyntaxException, IOException { //1:获取FileSystem FileSystem fileSystem = FileSystem.get(new URI("hdfs://hadoop0:8020"), new Configuration()); //2:获取hdfs的输入流 FSDataInputStream inputStream = fileSystem.open(new Path("/test1.txt")); //3:获取本地路径的输出流 FileOutputStream outputStream = new FileOutputStream("D://test1_down2.txt"); //4:文件的拷贝 IOUtils.copy(inputStream, outputStream); //5:关闭流 IOUtils.closeQuietly(inputStream); IOUtils.closeQuietly(outputStream); fileSystem.close(); }- 1
- 2
- 3
- 4
- 5
- 6
- 7
- 8
- 9
- 10
- 11
- 12
- 13
- 14
- 15
- 16
- 17
- 18
- 19
- 20
- 21
- 22
- 23
3.2.6 判断是文件或者文件夹
//判断某个路径下面的内容是文件或者文件夹 public void isFileOrDir() throws URISyntaxException, IOException, InterruptedException { //1、获取FileSystem FileSystem fileSystem = FileSystem.get(new URI("hdfs://hadoop10:8020"), new Configuration(), "root"); //2、找到根目录/下面所有的文件或文件夹 FileStatus[] listStatus = fileSystem.listStatus(new Path("/")); //3、判断 for (FileStatus status : listStatus) { if (status.isDirectory()){ System.out.println(status.getPath().getName() + " 是文件夹"); }else { System.out.println(status.getPath().getName() + " 是文件"); } } }- 1
- 2
- 3
- 4
- 5
- 6
- 7
- 8
- 9
- 10
- 11
- 12
- 13
- 14
- 15
- 16
- 17
3.2.7 重命名且具有剪切的效果
//重命名,并且具有剪切的功能。文件的移动和重命名。 public void moveRename() throws URISyntaxException, IOException, InterruptedException { //1:获取FileSystem(分布式文件系统) FileSystem fileSystem = FileSystem.get(new URI("hdfs://hadoop10:8020"), new Configuration(),"root"); //2、移动重命名操作 boolean b = fileSystem.rename(new Path("/bb/test1.txt"), new Path("/bb/cc/test1.txt")); System.out.println(b); //3、关闭FileSystem fileSystem.close(); }- 1
- 2
- 3
- 4
- 5
- 6
- 7
- 8
- 9
- 10
- 11
- 12
3.2.8 文件追加内容
//注意导包的时候别错了,是 import org.apache.commons.io.IOUtils; //文件的追加 public void appendFile() throws URISyntaxException, IOException, InterruptedException { //1:获取FileSystem(分布式文件系统) FileSystem fileSystem = FileSystem.get(new URI("hdfs://hadoop10:8020"), new Configuration(),"root"); //2、追加操作 BufferedInputStream inputStream = new BufferedInputStream(new FileInputStream("D:\\input\\test3.txt")); FSDataOutputStream outputStream = fileSystem.append(new Path("/bb/cc/wordcount.txt")); IOUtils.copy(inputStream,outputStream); //3、关闭FileSystem IOUtils.closeQuietly(); fileSystem.close(); }- 1
- 2
- 3
- 4
- 5
- 6
- 7
- 8
- 9
- 10
- 11
- 12
- 13
- 14
- 15
- 16
3.2.9 删除文件或文件夹
//删除文件或目录 public void deleteFileOrDir() throws URISyntaxException, IOException, InterruptedException { //1:获取FileSystem(分布式文件系统) FileSystem fileSystem = FileSystem.get(new URI("hdfs://hadoop10:8020"), new Configuration(),"root"); //2、删除操作 //boolean b = fileSystem.delete(new Path("/test_big.txt")); boolean b = fileSystem.delete(new Path("/aa")); System.out.println(b); //3、关闭FileSystem fileSystem.close(); }- 1
- 2
- 3
- 4
- 5
- 6
- 7
- 8
- 9
- 10
- 11
- 12
- 13
3.3 合并小文件
3.3.1 合并下载:通过命令方式:
在根目录下面新建一个文件夹
hadoop fs -mkdir -p /test- 1
讲test1.txt和test2.txt移动到/test文件夹下面
[root@hadoop0 data]# hadoop fs -mv /test1.txt /test [root@hadoop0 data]# hadoop fs -mv /test2.txt /test- 1
- 2
通过getmerge命令合并下载文件到当前目录下面:
[root@hadoop0 data]# hadoop fs -getmerge /test/*.txt ./test_merge.txt [root@hadoop0 data]# ll total 8 -rw-r--r--. 1 root root 36 Jun 24 19:50 test2.txt -rw-r--r--. 1 root root 74 Jun 24 20:34 test_merge.txt [root@hadoop0 data]# cat test_merge.txt hello world hello hadoop hello hbasehello world hello hive hello flume[root@hadoop0 data]#- 1
- 2
- 3
- 4
- 5
- 6
- 7
- 8
- 9
- 10
- 11
3.3.2 合并上传:通过Java API方式
/** * 小文件的合并上传 * @throws URISyntaxException * @throws IOException * @throws InterruptedException */ public void mergeFileUpload() throws URISyntaxException, IOException, InterruptedException { //1:获取FileSystem(分布式文件系统) FileSystem fileSystem = FileSystem.get(new URI("hdfs://hadoop0:8020"), new Configuration(),"root"); //2:获取hdfs大文件的输出流 FSDataOutputStream outputStream = fileSystem.create(new Path("/test_big.txt")); //3:获取一个本地文件系统 LocalFileSystem localFileSystem = FileSystem.getLocal(new Configuration()); //4:获取本地文件夹下所有文件的详情 FileStatus[] fileStatuses = localFileSystem.listStatus(new Path("D:\\input")); //5:遍历每个文件,获取每个文件的输入流 for (FileStatus fileStatus : fileStatuses) { FSDataInputStream inputStream = localFileSystem.open(fileStatus.getPath()); //6:将小文件的数据复制到大文件 IOUtils.copy(inputStream, outputStream); IOUtils.closeQuietly(inputStream); } //7:关闭流 IOUtils.closeQuietly(outputStream); localFileSystem.close(); fileSystem.close(); }- 1
- 2
- 3
- 4
- 5
- 6
- 7
- 8
- 9
- 10
- 11
- 12
- 13
- 14
- 15
- 16
- 17
- 18
- 19
- 20
- 21
- 22
- 23
- 24
- 25
- 26
- 27
- 28
- 29
- 30
- 31
- 32
- 33
- 34
其实3.3.1 也可以使用Java API的方式进行操作,同学们先自己思考一下。
3.4 必要性配置补充
3.4.1 控制台日志打印级别设置
在 resources下面新建log4j.properties 文件,然后配置如下:
log4j.rootLogger=INFO, stdout log4j.appender.stdout=org.apache.log4j.ConsoleAppender log4j.appender.stdout.layout=org.apache.log4j.PatternLayout log4j.appender.stdout.layout.ConversionPattern=%d %p [%c] - %m%n log4j.appender.logfile=org.apache.log4j.FileAppender log4j.appender.logfile.File=target/spring.log log4j.appender.logfile.layout=org.apache.log4j.PatternLayout log4j.appender.logfile.layout.ConversionPattern=%d %p [%c] - %m%n- 1
- 2
- 3
- 4
- 5
- 6
- 7
- 8
3.4.2 hdfs的副本个数优先级设置之 resources下面配置文件
在 resources下面新建hdfs-site.xml,然后配置如下:
dfs.replication 1 - 1
- 2
- 3
- 4
- 5
- 6
- 7
- 8
- 9
3.4.3 页面删除文件的时候报错解决方案

方案一: 到shell窗口中给对应的目录加权限
[root@hadoop10 data]# hdfs dfs -chmod -R 777 /wcout0909
然后就可以在页面上点击删除按钮直接删除
方案二:
在Hadoop的配置文件core-site.xml中增加如下配置:
<property> <name>hadoop.http.staticuser.username> <value>rootvalue> property> <property> <name>dfs.permissions.enabledname> <value>falsevalue> property>- 1
- 2
- 3
- 4
- 5
- 6
- 7
- 8
- 9
- 10
- 11
3.4.4 在页面中上传文件出错
在这里插入图片描述
shell窗口中给对应的目录加权限
[root@hadoop10 data]# hdfs dfs -chmod -R 777 /aa
然后再次选择对应的文件夹下面选择对应的文件上传就可以了。
声明:
文章中代码为自己根据相应理解编写,文章中出现的相关图片为自己实践中的截图和相关技术对应的图片,若有相关异议,请联系删除。感谢。
By luoyepiaoxue2014B站: https://space.bilibili.com/1523287361 点击打开链接
微博地址: http://weibo.com/luoyepiaoxue2014 点击打开链接 -
相关阅读:
无人机照片贴地实现
ShardingSphere简介(一)
SpringMVC的注解、参数传递、页面跳转
2022.8.8考试游记总结
【网络篇】第三篇——源端口号和目的端口号
未来的金融服务永远不会停歇,牛市仍将继续 2021-05-28
《PNAS》和《Nature Communications》仿章鱼和蜗牛的粘液真空吸附,赋予了机器人吸盘新的“超能力”
ATSS介绍
Jetson Xavier NX 与飞控(Pixhawk 4 Mini)实现串口通信
Linux系统命令——用户及用户组管理命令
- 原文地址:https://blog.csdn.net/luoyepiaoxue2014/article/details/128008389
