-
Spring Cloud(十二):Spring Cloud Security
主要内容
- Spring Security 模块
- 使用
- 设置用户名密码
- 基于内存
- 基于UserDetailsService 接口
- 基于配置类WebSecurityConfigurerAdapter
- 基于DB 用户-角色-权限
- 自定义登录页面
- 登录认证流程
- 自定义成功、自定义失败
- 会话管理(Session)
- 会话控制
- 会话超时
- 会话并发控制
- 集群session
- 安全会话cookie
- RememberMe
- 退出登录
- CSRF
- 原理
- 用户授权(访问控制)
- web授权: url拦截进行授权 FilterSecurityInterceptor
- 访问控制的url匹配
- RequestMatcher接口
- 内置的访问控制
- 自定义403处理方案
- 基于表达式的访问控制
- 自定义方法 ExceptionTranslationFilter
- 方法授权: 方法拦截进行授权 MethodSecurityInterceptor
- JSR-250注解
- @Secured注解
- 支持表达式的注解
- 授权原理
- 授权流程
- Spring Security实现原理 @EnableWebSecurity
- 主线源码分析
Spring Security 模块
- 核心模块 - spring-security-core.jar:包含核心验证和访问控制类和接口,远程支持的基本配置API,是基本模块
- 远程调用 - spring-security-remoting.jar:提供与 Spring Remoting 集成
- 网页 - spring-security-web.jar:包括网站安全的模块,提供网站认证服务和基于URL访问控制
- 配置 - spring-security-config.jar:包含安全命令空间解析代码,若使用XML进行配置则需要
- LDAP - spring-security-ldap.jar:LDAP 验证和配置,若需要LDAP验证和管理LDAP用户实体
- ACL访问控制表 - spring-security-acl.jar:ACL(Access Control List)专门领域对象的实现
- CAS - spring-security-cas.jar:CAS(Central Authentication Service)* 客户端继承,若想用CAS的SSO服务器网页验证
- OpenID - spring-security-openid.jar:OpenID网页验证支持
- Test - spring-security-test.jar:支持Spring Security的测试
使用
<dependency> <groupId>org.springframework.bootgroupId> <artifactId>spring-boot-starter-webartifactId> dependency> <dependency> <groupId>org.springframework.bootgroupId> <artifactId>spring-boot-starter-securityartifactId> dependency>- 1
- 2
- 3
- 4
- 5
- 6
- 7
- 8
- 9
- 10
- 11
@RestController @RequestMapping("/admin") public class AdminController { @RequestMapping("/demo") public String demo() { return "spring security demo"; } }- 1
- 2
- 3
- 4
- 5
- 6
- 7
- 8
- 9

http://localhost:8080/admin/demo
login DefaultLoginPageGeneratingFilter
需要登录,默认用户名:user,密码可以查看控制台日志获取

设置用户名密码
UserDetailsServiceAutoConfiguration -> UserDetailsService
public interface UserDetailsService { UserDetails loadUserByUsername(String username) throws UsernameNotFoundException; }- 1
- 2
- 3
- 基于内存
spring: security: user: name: mendd password: 123456- 1
- 2
- 3
- 4
- 5
- 基于UserDetailsService 接口
@Service public class UserDetailsServiceImpl implements UserDetailsService { @Override public UserDetails loadUserByUsername(String username) throws UsernameNotFoundException { return new org.springframework.security.core.userdetails.User("mendd", "123456", AuthorityUtils.commaSeparatedStringToAuthorityList("admin, user")); } }- 1
- 2
- 3
- 4
- 5
- 6
- 7

PasswordEncoderFactories
public class PasswordEncoderFactories { public static PasswordEncoder createDelegatingPasswordEncoder() { String encodingId = "bcrypt"; Map<String, PasswordEncoder> encoders = new HashMap<>(); encoders.put(encodingId, new BCryptPasswordEncoder()); encoders.put("ldap", new org.springframework.security.crypto.password.LdapShaPasswordEncoder()); encoders.put("MD4", new org.springframework.security.crypto.password.Md4PasswordEncoder()); encoders.put("MD5", new org.springframework.security.crypto.password.MessageDigestPasswordEncoder("MD5")); encoders.put("noop", org.springframework.security.crypto.password.NoOpPasswordEncoder.getInstance()); encoders.put("pbkdf2", new Pbkdf2PasswordEncoder()); encoders.put("scrypt", new SCryptPasswordEncoder()); encoders.put("SHA-1", new org.springframework.security.crypto.password.MessageDigestPasswordEncoder("SHA-1")); encoders.put("SHA-256", new org.springframework.security.crypto.password.MessageDigestPasswordEncoder("SHA-256")); encoders.put("sha256", new org.springframework.security.crypto.password.StandardPasswordEncoder()); encoders.put("argon2", new Argon2PasswordEncoder()); return new DelegatingPasswordEncoder(encodingId, encoders); } }- 1
- 2
- 3
- 4
- 5
- 6
- 7
- 8
- 9
- 10
- 11
- 12
- 13
- 14
- 15
- 16
- 17
- 18
- 19
指定加密方式 spring security官方推荐的加密方式BCrypt
@Configuration public class WebSecurityConfig { @Bean public PasswordEncoder passwordEncoder() { // return NoOpPasswordEncoder.getInstance(); return new BCryptPasswordEncoder(); } }- 1
- 2
- 3
- 4
- 5
- 6
- 7
- 8
UserDetailsService
@Service public class MyUserDetailsService implements UserDetailsService { @Autowired private PasswordEncoder passwordEncoder; @Override public UserDetails loadUserByUsername(String username) throws UsernameNotFoundException { //自定义逻辑封装 String password = passwordEncoder.encode("123456"); // return new org.springframework.security.core.userdetails.User("mendd", password, AuthorityUtils.commaSeparatedStringToAuthorityList("admin, user")); return User.withUsername("mendd").password(password).authorities("admin","user").build(); } }- 1
- 2
- 3
- 4
- 5
- 6
- 7
- 8
- 9
- 10
- 11
- 12
- 13
- 14
- 基于配置类WebSecurityConfigurerAdapter
@Configuration public class WebSecurityConfig extends WebSecurityConfigurerAdapter{ @Autowired private MyUserDetailsService myUserDetailsService; @Override protected void configure(AuthenticationManagerBuilder auth) throws Exception { // auth.userDetailsService(myUserDetailsService); auth.inMemoryAuthentication() .withUser("mendd1") .password(passwordEncoder().encode("123456")) .authorities("admin"); } }- 1
- 2
- 3
- 4
- 5
- 6
- 7
- 8
- 9
- 10
- 11
- 12
- 13
- 14
- 15
- DB 用户-角色-权限
DB
CREATE TABLE `tb_user` ( `id` bigint(20) NOT NULL AUTO_INCREMENT, `username` varchar(50) NOT NULL COMMENT '用户名', `password` varchar(64) NOT NULL COMMENT '密码,加密存储', `phone` varchar(20) DEFAULT NULL COMMENT '注册手机号', `email` varchar(50) DEFAULT NULL COMMENT '注册邮箱', `created` datetime NOT NULL, `updated` datetime NOT NULL, PRIMARY KEY (`id`), UNIQUE KEY `username` (`username`) USING BTREE, UNIQUE KEY `phone` (`phone`) USING BTREE, UNIQUE KEY `email` (`email`) USING BTREE ) ENGINE=InnoDB AUTO_INCREMENT=38 DEFAULT CHARSET=utf8 COMMENT='用户表'; insert into `tb_user`(`id`,`username`,`password`,`phone`,`email`,`created`,`updated`) values (37,'mendd','$2a$10$9ZhDOBp.sRKat4l14ygu/.LscxrMUcDAfeVOEPiYwbcRkoB09gCmi','158xxxxxxx','xxxxxxx@gmail.com','2019-04-04 23:21:27','2019-04-04 23:21:29'); CREATE TABLE `tb_role` ( `id` bigint(20) NOT NULL AUTO_INCREMENT, `parent_id` bigint(20) DEFAULT NULL COMMENT '父角色', `name` varchar(64) NOT NULL COMMENT '角色名称', `enname` varchar(64) NOT NULL COMMENT '角色英文名称', `description` varchar(200) DEFAULT NULL COMMENT '备注', `created` datetime NOT NULL, `updated` datetime NOT NULL, PRIMARY KEY (`id`) ) ENGINE=InnoDB AUTO_INCREMENT=38 DEFAULT CHARSET=utf8 COMMENT='角色表'; insert into `tb_role`(`id`,`parent_id`,`name`,`enname`,`description`,`created`,`updated`) values (37,0,'超级管理员','mendd',NULL,'2019-04-04 23:22:03','2019-04-04 23:22:05'); CREATE TABLE `tb_user_role` ( `id` bigint(20) NOT NULL AUTO_INCREMENT, `user_id` bigint(20) NOT NULL COMMENT '用户 ID', `role_id` bigint(20) NOT NULL COMMENT '角色 ID', PRIMARY KEY (`id`) ) ENGINE=InnoDB AUTO_INCREMENT=38 DEFAULT CHARSET=utf8 COMMENT='用户角色表'; insert into `tb_user_role`(`id`,`user_id`,`role_id`) values (37,37,37); CREATE TABLE `tb_permission` ( `id` bigint(20) NOT NULL AUTO_INCREMENT, `parent_id` bigint(20) DEFAULT NULL COMMENT '父权限', `name` varchar(64) NOT NULL COMMENT '权限名称', `enname` varchar(64) NOT NULL COMMENT '权限英文名称', `url` varchar(255) NOT NULL COMMENT '授权路径', `description` varchar(200) DEFAULT NULL COMMENT '备注', `created` datetime NOT NULL, `updated` datetime NOT NULL, PRIMARY KEY (`id`) ) ENGINE=InnoDB AUTO_INCREMENT=44 DEFAULT CHARSET=utf8 COMMENT='权限表'; insert into `tb_permission`(`id`,`parent_id`,`name`,`enname`,`url`,`description`,`created`,`updated`) values (37,0,'系统管理','System','/',NULL,'2019-04-04 23:22:54','2019-04-04 23:22:56'), (38,37,'用户管理','SystemUser','/users/',NULL,'2019-04-04 23:25:31','2019-04-04 23:25:33'), (39,38,'查看用户','SystemUserView','',NULL,'2019-04-04 15:30:30','2019-04-04 15:30:43'), (40,38,'新增用户','SystemUserInsert','',NULL,'2019-04-04 15:30:31','2019-04-04 15:30:44'), (41,38,'编辑用户','SystemUserUpdate','',NULL,'2019-04-04 15:30:32','2019-04-04 15:30:45'), (42,38,'删除用户','SystemUserDelete','',NULL,'2019-04-04 15:30:48','2019-04-04 15:30:45'), (44,37,'内容管理','SystemContent','/contents/',NULL,'2019-04-06 18:23:58','2019-04-06 18:24:00'), (45,44,'查看内容','SystemContentView','/contents/view/**',NULL,'2019-04-06 23:49:39','2019-04-06 23:49:41'), (46,44,'新增内容','SystemContentInsert','/contents/insert/**',NULL,'2019-04-06 23:51:00','2019-04-06 23:51:02'), (47,44,'编辑内容','SystemContentUpdate','/contents/update/**',NULL,'2019-04-06 23:51:04','2019-04-06 23:51:06'), (48,44,'删除内容','SystemContentDelete','/contents/delete/**',NULL,'2019-04-06 23:51:08','2019-04-06 23:51:10'); CREATE TABLE `tb_role_permission` ( `id` bigint(20) NOT NULL AUTO_INCREMENT, `role_id` bigint(20) NOT NULL COMMENT '角色 ID', `permission_id` bigint(20) NOT NULL COMMENT '权限 ID', PRIMARY KEY (`id`) ) ENGINE=InnoDB AUTO_INCREMENT=43 DEFAULT CHARSET=utf8 COMMENT='角色权限表'; insert into `tb_role_permission`(`id`,`role_id`,`permission_id`) values (37,37,37), (38,37,38), (39,37,39), (40,37,40), (41,37,41), (42,37,42), (43,37,44), (44,37,45), (45,37,46), (46,37,47), (47,37,48);- 1
- 2
- 3
- 4
- 5
- 6
- 7
- 8
- 9
- 10
- 11
- 12
- 13
- 14
- 15
- 16
- 17
- 18
- 19
- 20
- 21
- 22
- 23
- 24
- 25
- 26
- 27
- 28
- 29
- 30
- 31
- 32
- 33
- 34
- 35
- 36
- 37
- 38
- 39
- 40
- 41
- 42
- 43
- 44
- 45
- 46
- 47
- 48
- 49
- 50
- 51
- 52
- 53
- 54
- 55
- 56
- 57
- 58
- 59
- 60
- 61
- 62
- 63
- 64
- 65
- 66
- 67
- 68
- 69
- 70
- 71
- 72
- 73
- 74
- 75
- 76
- 77
- 78
- 79
- 80
- 81
pom
<dependency> <groupId>org.springframework.bootgroupId> <artifactId>spring-boot-starter-jdbcartifactId> dependency> <dependency> <groupId>mysqlgroupId> <artifactId>mysql-connector-javaartifactId> dependency> <dependency> <groupId>org.mybatis.spring.bootgroupId> <artifactId>mybatis-spring-boot-starterartifactId> <version>2.0.1version> dependency>- 1
- 2
- 3
- 4
- 5
- 6
- 7
- 8
- 9
- 10
- 11
- 12
- 13
application
spring: datasource: type: com.zaxxer.hikari.HikariDataSource driver-class-name: com.mysql.cj.jdbc.Driver url: jdbc:mysql://mysql.localhost.com:3306/oauth2-test?useUnicode=true&characterEncoding=utf-8&useSSL=false&serverTimezone=UTC username: root password: root hikari: minimum-idle: 5 idle-timeout: 600000 maximum-pool-size: 10 auto-commit: true pool-name: MyHikariCP max-lifetime: 1800000 connection-timeout: 30000 connection-test-query: SELECT 1- 1
- 2
- 3
- 4
- 5
- 6
- 7
- 8
- 9
- 10
- 11
- 12
- 13
- 14
- 15
- 16
UserDetailsService
public interface UserService extends UserDetailsService { User getByUsername(String username); } @Service public class UserServiceImpl implements UserService { @Autowired private UserMapper userMapper; @Autowired private PermissionMapper permissionMapper; @Override public User getByUsername(String username) { return userMapper.getByUsername(username); } @Override public UserDetails loadUserByUsername(String username) throws UsernameNotFoundException { System.out.println("自定义登录逻辑"); //从mysql查询用户 User user = getByUsername(username); List<GrantedAuthority> authorities = new ArrayList<>(); if(user!=null){ List<Permission> permissions = permissionMapper.findByUserId(user.getId()); //设置权限 permissions.forEach(permission -> { if (permission!=null && !StringUtils.isEmpty(permission.getEnname())){ GrantedAuthority grantedAuthority = new SimpleGrantedAuthority(permission.getEnname()); authorities.add(grantedAuthority); } }); // 封装成UserDetails的实现类 return new org.springframework.security.core.userdetails.User( user.getUsername(),user.getPassword(),authorities); }else { throw new UsernameNotFoundException("用户名不存在"); } } }- 1
- 2
- 3
- 4
- 5
- 6
- 7
- 8
- 9
- 10
- 11
- 12
- 13
- 14
- 15
- 16
- 17
- 18
- 19
- 20
- 21
- 22
- 23
- 24
- 25
- 26
- 27
- 28
- 29
- 30
- 31
- 32
- 33
- 34
- 35
- 36
- 37
- 38
- 39
- 40
- 41
- 42
@Configuration public class WebSecurityConfig extends WebSecurityConfigurerAdapter { @Autowired private UserService userService; @Override protected void configure(AuthenticationManagerBuilder auth) throws Exception { //设置UserDetailsService的实现类 auth.userDetailsService(userService); } @Bean public PasswordEncoder passwordEncoder(){ return new BCryptPasswordEncoder(); } }- 1
- 2
- 3
- 4
- 5
- 6
- 7
- 8
- 9
- 10
- 11
- 12
- 13
- 14
- 15
- 16
自定义登录页面
默认登录页面通过DefaultLoginPageGeneratingFilter#generateLoginPageHtml生成
DOCTYPE html> <html lang="en"> <head> <meta charset="UTF-8"> <title>Logintitle> head> <body> <form action="/user/login" method="post"> 用户名: <input type="text" name="username1"/> 密码: <input type="password" name="password1"/> <input type="submit" value="提交"/> form> body> html>- 1
- 2
- 3
- 4
- 5
- 6
- 7
- 8
- 9
- 10
- 11
- 12
- 13
- 14
WebSecurityConfig.configure(HttpSecurity)
@Configuration @EnableWebSecurity //spring-boot-starter-security依赖不需要添加@EnableWebSecurity public class WebSecurityConfig extends WebSecurityConfigurerAdapter{ @Override protected void configure(HttpSecurity http) throws Exception { http.formLogin() //POST .usernameParameter("username1") .passwordParameter("password1") .loginPage("/login.html") .loginProcessingUrl("/user/login") //.defaultSuccessUrl("/main.html") // SavedRequestAwareAuthenticationSuccessHandler AuthenticationSuccessHandler .successForwardUrl("/tomain") //ForwardAuthenticationSuccessHandler AuthenticationSuccessHandler .failureForwardUrl("/toerror"); //ForwardAuthenticationFailureHandler AuthenticationFailureHandler http.authorizeRequests() .antMatchers("/login.html","/user/login").permitAll()//设置哪些路径可以直接访问,不需要认证 .anyRequest().authenticated() //需要认证 .and().csrf().disable(); //关闭csrf防护 from input token } }- 1
- 2
- 3
- 4
- 5
- 6
- 7
- 8
- 9
- 10
- 11
- 12
- 13
- 14
- 15
- 16
- 17
- 18
- 19
- 20
- 21
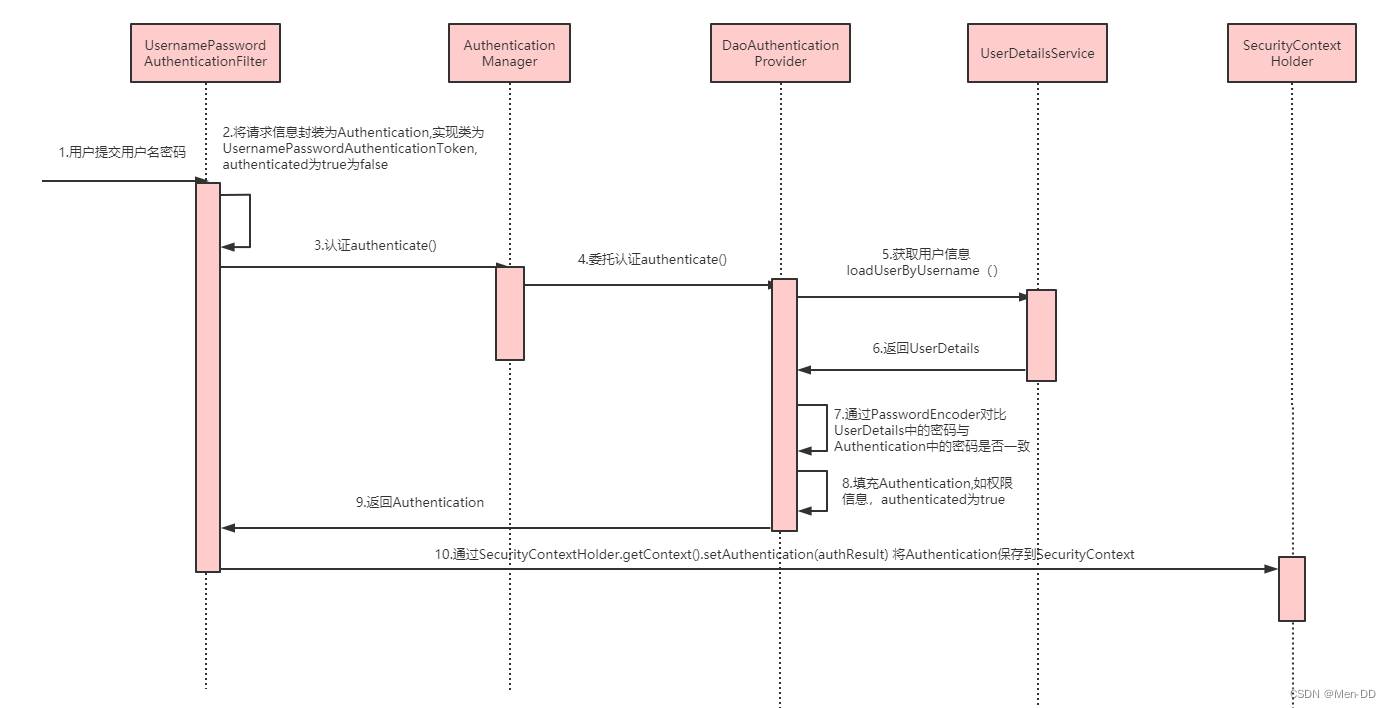
登录认证流程
UsernamePasswordAuthenticationFilter#doFilter
认证
ProviderManager#authenticate
AbstractUserDetailsAuthenticationProvider#authenticate => 获取UserDetails & check password
DaoAuthenticationProvider#retrieveUser
UserDetails loadedUser = this.getUserDetailsService().loadUserByUsername(username);
认证异常(failureHandler)
认证成功(successHandler)自定义成功、自定义失败
@Override protected void configure(HttpSecurity http) throws Exception { http.formLogin() //POST .usernameParameter("username1") .passwordParameter("password1") .loginPage("/login.html") .loginProcessingUrl("/user/login") // .defaultSuccessUrl("/main.html") // SavedRequestAwareAuthenticationSuccessHandler AuthenticationSuccessHandler // .successForwardUrl("/tomain") //ForwardAuthenticationSuccessHandler AuthenticationSuccessHandler // .failureForwardUrl("/toerror"); //ForwardAuthenticationFailureHandler AuthenticationFailureHandler .successHandler(new MyAuthenticationSuccessHandler("/main.html")) .failureHandler(new MyAuthenticationFailureHandler("/error.html")); http.authorizeRequests() .antMatchers("/login.html","/user/login").permitAll()//设置哪些路径可以直接访问,不需要认证 .anyRequest().authenticated() //需要认证 .and().csrf().disable(); //关闭csrf防护 from input token }- 1
- 2
- 3
- 4
- 5
- 6
- 7
- 8
- 9
- 10
- 11
- 12
- 13
- 14
- 15
- 16
- 17
- 18
public class MyAuthenticationSuccessHandler implements AuthenticationSuccessHandler { private String redirectUrl; public MyAuthenticationSuccessHandler(String redirectUrl) { this.redirectUrl = redirectUrl; } @Override public void onAuthenticationSuccess(HttpServletRequest request, HttpServletResponse response, Authentication authentication) throws IOException, ServletException { response.sendRedirect(redirectUrl); } } public class MyAuthenticationFailureHandler implements AuthenticationFailureHandler { private String redirectUrl; public MyAuthenticationFailureHandler(String redirectUrl) { this.redirectUrl = redirectUrl; } @Override public void onAuthenticationFailure(HttpServletRequest request, HttpServletResponse response, AuthenticationException exception) throws IOException, ServletException { response.sendRedirect(redirectUrl); } }- 1
- 2
- 3
- 4
- 5
- 6
- 7
- 8
- 9
- 10
- 11
- 12
- 13
- 14
- 15
- 16
- 17
- 18
- 19
- 20
- 21
- 22
- 23
- 24
- 25
- 26
- 27
会话管理(Session)
用户认证通过后,为了避免用户的每次操作都进行认证可将用户的信息保存在会话中。spring security提供会话管理,认证通过后将身份信息放入SecurityContextHolder上下文,SecurityContext与当前线程进行绑定,方便获取用户身份。


Session 持久化的过滤器 SecurityContextPersistenceFilter
放在当前线程上下文中ThreadLocalHttpRequestResponseHolder holder = new HttpRequestResponseHolder(request, response); SecurityContext contextBeforeChainExecution = repo.loadContext(holder); try { SecurityContextHolder.setContext(contextBeforeChainExecution); //private static final ThreadLocalcontextHolder = new ThreadLocal<>(); chain.doFilter(holder.getRequest(), holder.getResponse()); } finally { SecurityContext contextAfterChainExecution = SecurityContextHolder .getContext(); // Crucial removal of SecurityContextHolder contents - do this before anything // else. SecurityContextHolder.clearContext(); repo.saveContext(contextAfterChainExecution, holder.getRequest(), holder.getResponse()); request.removeAttribute(FILTER_APPLIED); if (debug) { logger.debug("SecurityContextHolder now cleared, as request processing completed"); } }- 1
- 2
- 3
- 4
- 5
- 6
- 7
- 8
- 9
- 10
- 11
- 12
- 13
- 14
- 15
- 16
- 17
- 18
- 19
- 20
- 21
- 22
- 23
- 24
- 25
AbstractAuthenticationProcessingFilter#successfulAuthentication
SecurityContextHolder.getContext().setAuthentication(authResult);- 1
@RestController @RequestMapping("/admin") public class AdminController { @RequestMapping("/demo") public String demo() { return "spring security demo"; } @RequestMapping("/currentUser") public Object currentUser() { return SecurityContextHolder.getContext().getAuthentication(); } }- 1
- 2
- 3
- 4
- 5
- 6
- 7
- 8
- 9
- 10
- 11
- 12
- 13
- 14
{ authorities: [ .... { authority: "SystemUserView" }, ... ], details: { remoteAddress: "0:0:0:0:0:0:0:1", sessionId: "56BC3C1CD1776003C8E5CA08FF204469", }, authenticated: true, principal: { password: null, username: "mendd", authorities: [ .... { authority: "SystemUserView" }, ... ], accountNonExpired: true, accountNonLocked: true, credentialsNonExpired: true, enabled: true, }, credentials: null, name: "mendd", }- 1
- 2
- 3
- 4
- 5
- 6
- 7
- 8
- 9
- 10
- 11
- 12
- 13
- 14
- 15
- 16
- 17
- 18
- 19
- 20
- 21
- 22
- 23
- 24
- 25
- 26
- 27
- 28
- 29
- 30
- 31
会话控制
SessionManagementFilter session 可以放在redis中, 现在是存放在内存中
机制 描述 always 如果session不存在总是需要创建 ifRequired 如果需要就创建一个session(默认)登录时 never Spring Security 将不会创建session,但是如果应用中其他地方创建了session,那么Spring Security将会使用它 stateless Spring Security将绝对不会创建session,也不使用session。并且它会暗示不使用cookie,所以每个请求都需要重新进行身份验证。这种无状态架构适用于REST API及其无状态认证机制。 @Override protected void configure(HttpSecurity http) throws Exception { http.sessionManagement() .sessionCreationPolicy(SessionCreationPolicy.IF_REQUIRED) }- 1
- 2
- 3
- 4
- 5
会话超时
可以在sevlet容器中设置Session的超时时间,如下设置Session有效期为600s; spring boot 配置文件:
server: servlet: session: timeout: 60s #default 30m- 1
- 2
- 3
- 4
注意:session最低60s,参考源码TomcatServletWebServerFactory#configureSession:
private long getSessionTimeoutInMinutes() { Duration sessionTimeout = getSession().getTimeout(); if (isZeroOrLess(sessionTimeout)) { return 0; } return Math.max(sessionTimeout.toMinutes(), 1); }- 1
- 2
- 3
- 4
- 5
- 6
- 7
@RestController @RequestMapping("/session") public class SessionController { @GetMapping("/invalid") @ResponseStatus(code = HttpStatus.UNAUTHORIZED) public String sessionInvalid() { return "session失效"; } }- 1
- 2
- 3
- 4
- 5
- 6
- 7
- 8
- 9
- 10
会话并发控制
用户在这个手机登录后,他又在另一个手机登录相同账户,对于之前登录的账户是否需要被挤兑,或者说在第二次登录时限制它登录,更或者像腾讯视频VIP账号一样,最多只能五个人同时登录,第六个人限制登录。
ConcurrentSessionFilter 存储
ConcurrentSessionControlAuthenticationStrategy 策略- maximumSessions:最大会话数量,设置为1表示一个用户只能有一个会话
- expiredSessionStrategy:会话过期策略
http.sessionManagement().invalidSessionUrl("/session/invalid") .maximumSessions(1) .expiredSessionStrategy(new MySessionInformationExpiredStrategy());- 1
- 2
- 3
自定义session策略SessionInformationExpiredStrategy
public class MySessionInformationExpiredStrategy implements SessionInformationExpiredStrategy { @Override public void onExpiredSessionDetected(SessionInformationExpiredEvent event) throws IOException, ServletException { HttpServletResponse response = event.getResponse(); response.setContentType("application/json;charset=UTF-8"); response.getWriter().write("您已被挤兑下线!"); } }- 1
- 2
- 3
- 4
- 5
- 6
- 7
- 8
阻止用户第二次登录
sessionManagement也可以配置 maxSessionsPreventsLogin:boolean值,当达到maximumSessions设置的最大会话个数时阻止登录。
http.sessionManagement().invalidSessionUrl("/session/invalid") .maximumSessions(1) .expiredSessionStrategy(new MySessionInformationExpiredStrategy()) .maxSessionsPreventsLogin(true);- 1
- 2
- 3
- 4

session 过期之后之前的无法登陆了, 正式不建议使用默认的需要自己实现
要想使用需要配置maxSessionsPreventsLogin = falsehttp.sessionManagement().invalidSessionUrl("/session/invalid") .maximumSessions(1) .expiredSessionStrategy(new MySessionInformationExpiredStrategy()) .maxSessionsPreventsLogin(false);- 1
- 2
- 3
- 4
集群session

<dependency> <groupId>org.springframework.sessiongroupId> <artifactId>spring-session-data-redisartifactId> dependency> <dependency> <groupId>redis.clientsgroupId> <artifactId>jedisartifactId> <version>3.1.0version> dependency>- 1
- 2
- 3
- 4
- 5
- 6
- 7
- 8
- 9
- 10
spring: session: store-type: redis redis: host: redis.localhost.com database: 5 password: pwd- 1
- 2
- 3
- 4
- 5
- 6
- 7
SessionManagementFilter
SecurityContextPersistenceFilter
SessionRepositoryFilter#doFilterInternaltry { filterChain.doFilter(wrappedRequest, wrappedResponse); } finally { wrappedRequest.commitSession(); //SessionRepositoryFilter.this.sessionRepository.save(session); }- 1
- 2
- 3
- 4
- 5
- 6
- 7


SessionId 是写在cookie 里面的
缺点:
Spring Session + Redis实现分布式Session共享 有个非常大的缺陷, 无法实现跨域名共享session , 只能在单台服务器上共享session , 因为是依赖cookie做的 , cookie 无法跨域。 Spring Session一般是用于多台服务器负载均衡时共享Session的,都是同一个域名,不会跨域。
真正使用还是需要时
oauth2安全会话cookie
我们可以使用httpOnly和secure标签来保护我们的会话cookie:
- httpOnly:如果为true,那么浏览器脚本将无法访问cookie
- secure:如果为true,则cookie将仅通过HTTPS连接发送
spring boot配置文件:
server: servlet: session: timeout: 60s #default 30m cookie: http-only: true #httpOnly:如果为true,那么浏览器脚本将无法访问cookie secure: true #如果为true,则cookie将仅通过HTTPS连接发送- 1
- 2
- 3
- 4
- 5
- 6
- 7
RememberMe = RememberMeAuthenticationFilter
create table persistent_logins ( username varchar(64) not null, series varchar(64) primary key, token varchar(64) not null, last_used timestamp not null )- 1
- 2
- 3
- 4
- 5
- 6
@Autowired public DataSource dataSource; public PersistentTokenRepository persistentTokenRepository(){ JdbcTokenRepositoryImpl jdbcTokenRepository = new JdbcTokenRepositoryImpl(); //设置数据源 jdbcTokenRepository.setDataSource(dataSource); return jdbcTokenRepository; } @Override protected void configure(HttpSecurity http) throws Exception { //记住我 http.rememberMe() .tokenRepository(persistentTokenRepository())//设置持久化仓库 .tokenValiditySeconds(3600) //超时时间,单位s 默认两周 .userDetailsService(userService); //设置自定义登录逻辑 }- 1
- 2
- 3
- 4
- 5
- 6
- 7
- 8
- 9
- 10
- 11
- 12
- 13
- 14
- 15
- 16
- 17
- 18
- 19
<input type="checkbox" name="remember-me" value="true"/><br/>- 1
退出登录 LogoutFilter
Spring security默认实现了logout退出,用户只需要向 Spring Security 项目中发送 /logout 退出请求即可。
自定义退出逻辑
http.logout() .logoutUrl("/logout") .logoutSuccessUrl("/login.html");- 1
- 2
- 3
SecurityContextLogoutHandler
当退出操作出发时,将发生:- 销毁HTTPSession 对象
- 清除认证状态
- 跳转到 /login.html
LogoutSuccessHandler
退出成功处理器,实现 LogoutSuccessHandler 接口 ,可以自定义退出成功处理逻辑。CSRF CsrfFilter
CSRF(Cross-site request forgery)跨站请求伪造,也被称为“OneClick Attack” 或者 Session Riding。通过伪造用户请求访问受信任站点的非法请求访问。
跨域:只要网络协议,ip 地址,端口中任何一个不相同就是跨域请求。
客户端与服务进行交互时,由于 http 协议本身是无状态协议,所以引入了cookie进行记录客户端身份。在cookie中会存放session id用来识别客户端身份的。在跨域的情况下,session id 可能被第三方恶意劫持,通过这个 session id 向服务端发起请求时,服务端会认为这个请求是合法的,可能发生很多意想不到的事情。
防御CSRF攻击策略
- 验证 HTTP Referer 字段
- 在请求地址中添加 token 并验证
- 在 HTTP 头中自定义属性并验证
从 Spring Security4开始CSRF防护默认开启,默认会拦截请求,进行CSRF处理。CSRF为了保证不是其他第三方网站访问,要求访问时携带参数名为 _csrf 值为token(token 在服务端产生,在渲染请求页面时埋入页面)的内容,如果token和服务端的token匹配成功,则正常访问。
@Configuration public class CSRFWebSecurityConfig extends WebSecurityConfigurerAdapter { @Bean public PasswordEncoder passwordEncoder() { // return NoOpPasswordEncoder.getInstance(); return new BCryptPasswordEncoder(); } @Override protected void configure(AuthenticationManagerBuilder auth) throws Exception { auth.inMemoryAuthentication() .withUser("mendd") .password(passwordEncoder().encode("123456")) .authorities("admin"); } @Override protected void configure(HttpSecurity http) throws Exception { http.formLogin() .loginPage("/showLogin") .loginProcessingUrl("/login") .defaultSuccessUrl("/main.html"); http.authorizeRequests() .antMatchers("/showLogin").permitAll() .anyRequest().authenticated(); // http.csrf().disable(); } }- 1
- 2
- 3
- 4
- 5
- 6
- 7
- 8
- 9
- 10
- 11
- 12
- 13
- 14
- 15
- 16
- 17
- 18
- 19
- 20
- 21
- 22
- 23
- 24
- 25
- 26
- 27
- 28
@Controller public class LoginController { @RequestMapping("/showLogin") public String showLogin() { return "login"; } }- 1
- 2
- 3
- 4
- 5
- 6
- 7
DOCTYPE html> <html xmlns="http://www.w3.org/1999/xhtml" xmlns:th="http://www.thymeleaf.org"> <head> <meta charset="UTF-8"> <title>Logintitle> head> <body> <form action="/login" method="post"> <input type="hidden" th:value="${_csrf.token}" name="_csrf" th:if="${_csrf}"/> 用户名: <input type="text" name="username1"/><br/> 密码: <input type="password" name="password1"/><br/> 记住我: <input type="checkbox" name="remember-me" value="true"/><br/> <input type="submit" value="提交"/> form> body> html>- 1
- 2
- 3
- 4
- 5
- 6
- 7
- 8
- 9
- 10
- 11
- 12
- 13
- 14
- 15
- 16
- 17

修改配置类
http.csrf().disable(); //关闭csrf防护- 1
原理
Spring Security是如何完成身份认证的?- 用户名和密码被过滤器获取到,封装成Authentication,通常情况下是UsernamePasswordAuthenticationToken这个实现类
- AuthenticationManager 身份管理器负责验证这个Authentication
- 认证成功后,AuthenticationManager身份管理器返回一个被填充满了信息的(包括上面提到的权限信息,身份信息,细节信息,但密码通常会被移除)Authentication实例
- SecurityContextHolder安全上下文容器将第3步填充了信息的Authentication,通过SecurityContextHolder.getContext().setAuthentication(…)方法,设置到其中
相关接口
- AuthenticationManager 认证管理器,用于处理一个认证请求,提供了认证方法的入口
public interface AuthenticationManager { Authentication authenticate(Authentication authentication) throws AuthenticationException; }- 1
- 2
- 3
-
ProviderManager是 AuthenticationManager 的一个实现类,提供了基本的认证逻辑和方法;它包含了一个List属性,通过 AuthenticationProvider 接口来扩展出多种认证方式,实际上这是委托者模式的应用(Delegate)
-
Authentication在spring security中是最高级别的身份/认证的抽象,由这个顶级接口,我们可以得到用户拥有的权限信息列表,密码,用户细节信息,用户身份信息,认证信息
-
UsernamePasswordAuthenticationToken实现了 Authentication主要是将用户输入的用户名和密码进行封装,并供给 AuthenticationManager 进行验证;验证完成以后将返回一个认证成功的 Authentication 对象
public interface Authentication extends Principal, Serializable { //1.权限信息列表,可使用AuthorityUtils.commaSeparatedStringToAuthorityList("admin,ROLE_ADMIN")返回字符串权限集合 Collection<? extends GrantedAuthority> getAuthorities(); //2.密码信息,用户输入的密码字符串,在认证过后通常会被移除,用于保障安全。 Object getCredentials(); //3.认证时包含的一些信息,web应用中的实现接口通常为 WebAuthenticationDetails,它记录了访问者的ip地址和sessionId的值。 Object getDetails(); //4.身份信息,大部分情况下返回的是UserDetails接口的实现类 Object getPrincipal(); //5.是否被认证,认证为true boolean isAuthenticated(); //6.设置是否能被认证 void setAuthenticated(boolean isAuthenticated) throws IllegalArgumentException; }- 1
- 2
- 3
- 4
- 5
- 6
- 7
- 8
- 9
- 10
- 11
- 12
- 13
- 14
-
SecurityContextHolder 用于存储安全上下文(security context)的信息,SecurityContextHolder默认使用ThreadLocal 策略来存储认证信息
SecurityContextHolder.getContext().getAuthentication() -
UserDetailsService
public interface UserDetailsService { // 根据用户名加载用户信息 UserDetails loadUserByUsername(String username) throws UsernameNotFoundException; }- 1
- 2
- 3
- 4
-
UserDetails 用户信息核心接口,默认实现类org.springframework.security.core.userdetails.User
-
PasswordEncoder BCryptPasswordEncoder 是 Spring Security 官方推荐的密码解析器 。BCryptPasswordEncoder 是对 bcrypt 强散列方法的具体实现,是基于Hash算法实现的单向加密,可以通过strength控制加密强度,默认 10。
String passwd = BCrypt.hashpw("123",BCrypt.gensalt()); boolean checkpw = BCrypt.checkpw("123", passwd);- 1
- 2
用户授权(访问控制)
- web授权: url拦截进行授权 FilterSecurityInterceptor
- 方法授权: 方法拦截进行授权 MethodSecurityInterceptor

未登录匿名用户: anonymousUser AnonymousAuthenticationFilter
web授权: url拦截进行授权 FilterSecurityInterceptor
http.authorizeRequests() //设置哪些路径可以直接访问,不需要认证 .antMatchers("/user/login","/login.html").permitAll() .anyRequest().authenticated(); //需要认证才能访问- 1
- 2
- 3
- 4
访问控制的url匹配
- anyRequest() 表示匹配所有的请求
.anyRequest().authenticated() - antMatchers(String… antPatterns)
.antMatchers("/js/**","/css/**").permitAll()
通配符 说明 ? 匹配任何单字符 * 匹配0或者任意数量的字符 ** 匹配0或者更多的目录 - regexMatchers() 使用正则表达式进行匹配
.regexMatchers( ".+[.]js").permitAll() - mvcMatchers() 适用于配置了 servletPath 的情况
spring.mvc.servlet.path=/web&.mvcMatchers("/admin/demo").servletPath("/web").permitAll()
RequestMatcher接口
实现类 介绍 AnyRequestMatcher匹配任何请求 AntPathRequestMatcher使用 ant风格的路径匹配模板匹配请求ELRequestMatcher使用 EL表达式匹配请求IpAddressMatcher基于 IP地址匹配请求,支持IPv4和IPv6MediaTypeRequestMatcher基于 MediaType匹配请求RegexRequestMatcher基于正则表达式匹配请求 RequestHeaderRequestMatcher基于头部值比较匹配请求 AndRequestMatcherand组合多个RequestMatcherOrRequestMatcheror组合多个RequestMatcherNegatedRequestMatchernot操作一个RequestMatcherMvcRequestMatcher使用 Spring MVC的HandlerMappingIntrospector匹配请求内置的访问控制
-
【常用】
#permitAll()方法,所有用户可访问。 -
【常用】
#denyAll()方法,所有用户不可访问。 -
【常用】
#authenticated()方法,登录用户可访问。 -
#anonymous()方法,无需登录,即匿名用户可访问。 -
#rememberMe()方法,通过 remember me登录的用户可访问。 -
#fullyAuthenticated()方法,非 remember me 登录的用户可访问。 -
#hasIpAddress(String ipaddressExpression)方法,来自指定 IP 表达式的用户可访问。 -
【常用】
#hasRole(String role)方法, 拥有指定角色的用户可访问,角色将被增加“ROLE_”前缀。 -
【常用】
#hasAnyRole(String... roles)方法,拥有指定任一角色的用户可访问。 -
【常用】
#hasAuthority(String authority)方法,拥有指定权限(authority)的用户可访问。 -
【常用】
#hasAuthority(String... authorities)方法,拥有指定任一权限(authority)的用户可访问。 -
【最牛】
#access(String attribute)方法,当 Spring EL 表达式的执行结果为true时,可以访问。
自定义403处理方案

使用 Spring Security 时经常会看见 403(无权限)。Spring Security 支持自定义权限受限处理,需要实现 AccessDeniedHandler接口
public class MyAccessDeniedHandler implements AccessDeniedHandler { @Override public void handle(HttpServletRequest request, HttpServletResponse response, AccessDeniedException accessDeniedException) throws IOException, ServletException { response.setStatus(HttpServletResponse.SC_FORBIDDEN); response.setHeader("Content-Type", "application/json;charset=utf-8"); PrintWriter out = response.getWriter(); out.write("{\"status\":\"error\",\"msg\":\"权限不足,请联系管理员!\"}"); out.flush(); out.close(); } }- 1
- 2
- 3
- 4
- 5
- 6
- 7
- 8
- 9
- 10
- 11
- 12
http.exceptionHandling().accessDeniedHandler(new MyAccessDeniedHandler());{ status: "error", msg: "权限不足,请联系管理员!", }- 1
- 2
- 3
- 4
基于表达式的访问控制
access 表达式根对象的基类是SecurityExpressionRoot,提供了一些在web和方法安全性中都可用的通用表达式。
https://docs.spring.io/spring-security/site/docs/5.2.7.RELEASE/reference/htmlsingle/#tech-intro-access-control
可以通过 access() 实现和之前学习的权限控制完成相同的功能。
.antMatchers("/user/login","/login.html").access("permitAll") .antMatchers("/admin/demo").access("hasAuthority('System')")- 1
- 2
自定义方法 ExceptionTranslationFilter
认证异常 AuthenticationException login
授权异常 AccessDeniedException 403accessDeniedHandler.handle(request, response,(AccessDeniedException) exception);判断登录用户是否具有访问当前 URL 的权限。
在 access 中通过bean的beanName.方法(参数)的形式进行调用:
.anyRequest().access("@mySecurityExpression.hasPermission(request,authentication)")@Component public class MySecurityExpression { public boolean hasPermission(HttpServletRequest request, Authentication authentication) { // 获取主体 Object obj = authentication.getPrincipal(); if (obj instanceof UserDetails){ UserDetails userDetails = (UserDetails) obj; // String name = request.getParameter("name"); //获取权限 Collection<? extends GrantedAuthority> authorities = userDetails.getAuthorities(); //判断name值是否在权限中 return authorities.contains(new SimpleGrantedAuthority(name)); } return false; } }- 1
- 2
- 3
- 4
- 5
- 6
- 7
- 8
- 9
- 10
- 11
- 12
- 13
- 14
- 15
- 16
- 17
- 18
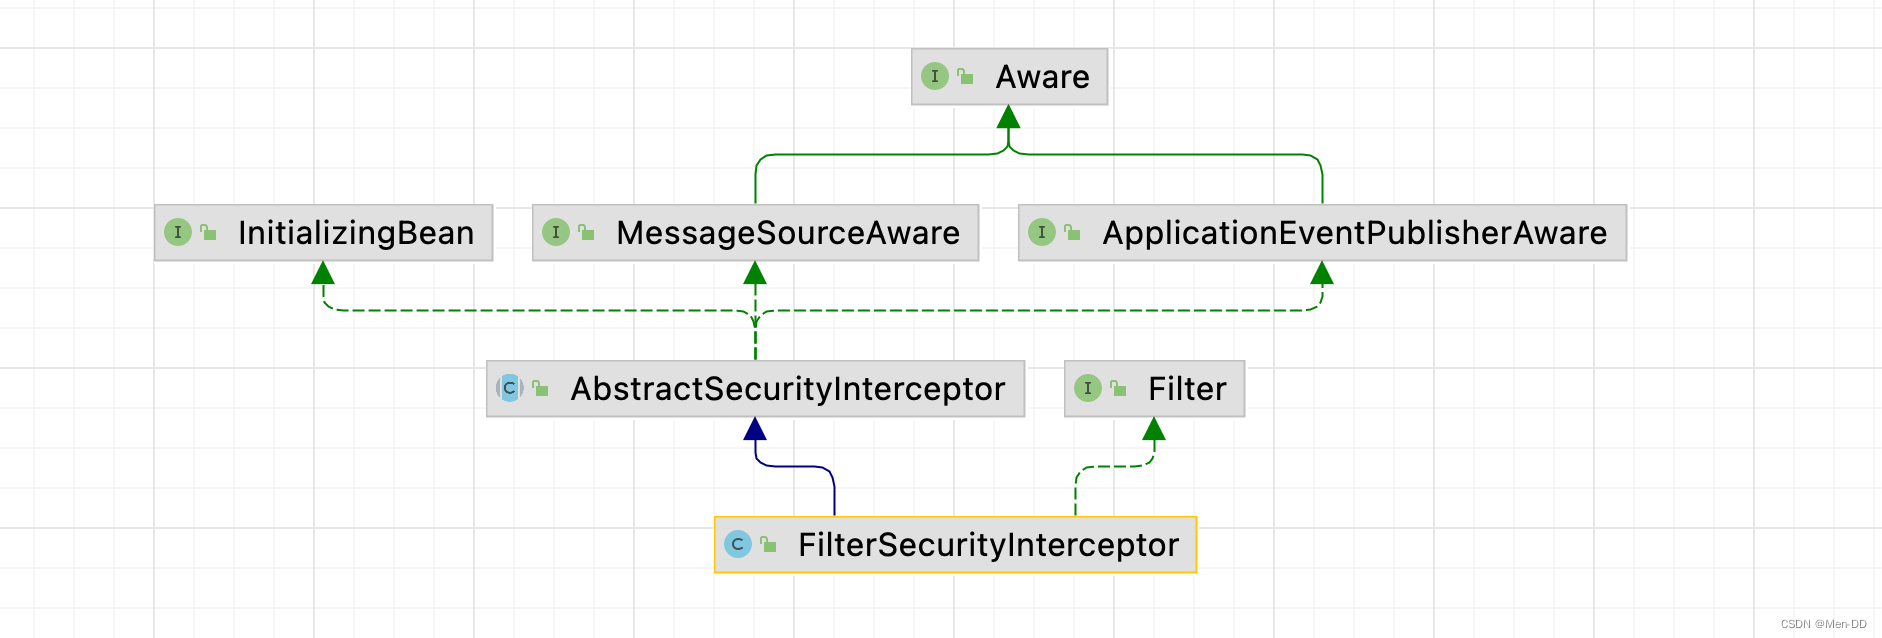
方法授权: 方法拦截进行授权 MethodSecurityInterceptor
基于注解的访问控制: Spring Security在方法的权限控制上支持三种类型的注解
- JSR-250注解
- @Secured注解
- 支持表达式的注解
启用:@EnableGlobalMethodSecurity 默认没有启用
- Service 接口或方法上
- Controller或 Controller 的方法
JSR-250注解
角色- @RolesAllowed 表示访问对应方法时所应该具有的角色
- @PermitAll 表示允许所有的角色进行访问,也就是说不进行权限控制
- @DenyAll 是和PermitAll相反的,表示无论什么角色都不能访问
只能定义在方法上
开启注解
@EnableGlobalMethodSecurity(jsr250Enabled = true)@EnableGlobalMethodSecurity(jsr250Enabled = true) public class SecurityConfig extends WebSecurityConfigurerAdapter {- 1
- 2
@RolesAllowed({"ROLE_USER", "ROLE_ADMIN"}) //@PermitAll @GetMapping("/demo") public String demo() { return "spring security demo"; }- 1
- 2
- 3
- 4
- 5
- 6
@Secured注解
角色@Secured 是专门用于判断是否具有角色的,能写在方法或类上。参数要以
ROLE_开头。开启注解
@EnableGlobalMethodSecurity(securedEnabled = true)@EnableGlobalMethodSecurity(securedEnabled = true) public class SecurityConfig extends WebSecurityConfigurerAdapter {- 1
- 2
@Secured("ROLE_ADMIN") @GetMapping("/demo") public String demo() { return "spring security demo"; }- 1
- 2
- 3
- 4
- 5
支持表达式的注解
权限Spring Security中定义了四个支持使用表达式的注解,分别是
- @PreAuthorize 方法调用前
- @PostAuthorize 方法调用后
- @PreFilter 集合类型的参数过滤
- @PostFilter 返回值进行过滤
@EnableGlobalMethodSecurity(prePostEnabled = true) public class SecurityConfig extends WebSecurityConfigurerAdapter {- 1
- 2
- 使用@PreAuthorize进行访问控制
//@PreAuthorize("hasRole('ROLE_ADMIN')") //@PreAuthorize("hasRole('ROLE_USER') or hasRole('ROLE_ADMIN')") //限制只能查询Id小于10的用户 @PreAuthorize("#id<10") @RequestMapping("/findById") public User findById(long id) { User user = new User(); user.setId(id); return user; } // 限制只能查询自己的信息 @PreAuthorize("principal.username.equals(#username)") @RequestMapping("/findByName") public User findByName(String username) { User user = new User(); user.setUsername(username); return user; } //限制只能新增用户名称为abc的用户 @PreAuthorize("#user.username.equals('abc')") @RequestMapping("/add") public User add(User user) { return user; }- 1
- 2
- 3
- 4
- 5
- 6
- 7
- 8
- 9
- 10
- 11
- 12
- 13
- 14
- 15
- 16
- 17
- 18
- 19
- 20
- 21
- 22
- 23
- 24
- 25
- 26
- 27
- @PostAuthorize可以在方法调用完之后进行权限检查
// 在方法find()调用完成后进行权限检查,如果返回值的id是偶数则表示校验通过,否则表示校验失败,将抛出AccessDeniedException @PostAuthorize("returnObject.id%2==0") public User find(int id) { User user = new User(); user.setId(id); return user; }- 1
- 2
- 3
- 4
- 5
- 6
- 7
- 使用@PreFilter和@PostFilter进行过滤
使用@PreFilter和@PostFilter可以对集合类型的参数或返回值进行过滤。使用@PreFilter和@PostFilter时,Spring Security将移除使对应表达式的结果为false的元素。
@PostFilter("filterObject.id%2==0") public List<User> findAll() { List<User> userList = new ArrayList<User>(); User user; for (int i=0; i<10; i++) { user = new User(); user.setId(i); userList.add(user); } return userList; } @PreFilter(filterTarget="ids", value="filterObject%2==0") public void delete(List<Integer> ids, List<String> usernames) { }- 1
- 2
- 3
- 4
- 5
- 6
- 7
- 8
- 9
- 10
- 11
- 12
- 13
- 14
- 15
- 16
授权原理
重写 #configure(HttpSecurity http) 方法,主要配置 URL 的权限控制
调用 HttpSecurity#authorizeRequests() 方法,开始配置 URL 的权限控制。
@Override protected void configure(HttpSecurity http) throws Exception { http // 配置请求地址的权限 .authorizeRequests() .antMatchers("/test/echo").permitAll() // 所有用户可访问 .antMatchers("/test/admin").hasRole("ADMIN") // 需要 ADMIN 角色 .antMatchers("/test/normal").access("hasRole('ROLE_NORMAL')") // 需要 NORMAL 角色。 // 任何请求,访问的用户都需要经过认证 .anyRequest().authenticated() .and() // 设置 Form 表单登录 //自定义登录页面,可以通过 #loginPage(String loginPage) 设置 .formLogin() //.loginPage("/login") // 登录 URL 地址 .permitAll() // 所有用户可访问 .and() // 配置退出相关 .logout() //.logoutUrl("/logout") // 退出 URL 地址 .permitAll(); // 所有用户可访问 }- 1
- 2
- 3
- 4
- 5
- 6
- 7
- 8
- 9
- 10
- 11
- 12
- 13
- 14
- 15
- 16
- 17
- 18
- 19
- 20
- 21
- 22
@Configuration @EnableGlobalMethodSecurity(prePostEnabled = true) public class SecurityConfig extends WebSecurityConfigurerAdapter {- 1
- 2
- 3
@RestController @RequestMapping("/demo") public class DemoController { @PermitAll @GetMapping("/echo") public String demo() { return "示例返回"; } @GetMapping("/home") public String home() { return "我是首页"; } @PreAuthorize("hasRole('ROLE_ADMIN')") @GetMapping("/admin") public String admin() { return "我是管理员"; } @PreAuthorize("hasRole('ROLE_NORMAL')") @GetMapping("/normal") public String normal() { return "我是普通用户"; } }- 1
- 2
- 3
- 4
- 5
- 6
- 7
- 8
- 9
- 10
- 11
- 12
- 13
- 14
- 15
- 16
- 17
- 18
- 19
- 20
- 21
- 22
- 23
- 24
- 25
- 26
- 27
- 28
授权流程. 基于Filter
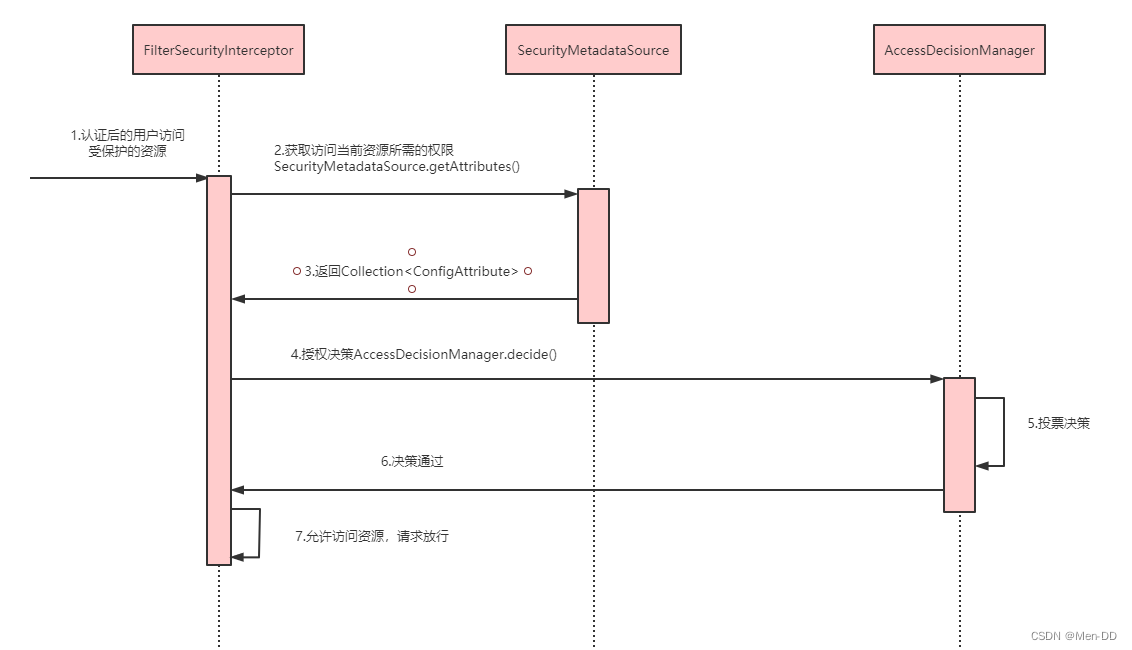
- 拦截请求,已认证用户访问受保护的web资源将被SecurityFilterChain中的 FilterSecurityInterceptor 的子 类拦截
- 获取资源访问策略,FilterSecurityInterceptor会从 SecurityMetadataSource 的子类 DefaultFilterInvocationSecurityMetadataSource 获取要访问当前资源所需要的权限Collection 。SecurityMetadataSource其实就是读取访问策略的抽象,而读取的内容,其实就是我们配置的访问规则
- 最后,FilterSecurityInterceptor会调用 AccessDecisionManager 进行授权决策,若决策通过,则允许访问资 源,否则将禁止访问
基于AOP MethodSecurityInterceptor#invoke
public Object invoke(MethodInvocation mi) throws Throwable { InterceptorStatusToken token = super.beforeInvocation(mi); Object result; try { result = mi.proceed(); } finally { super.finallyInvocation(token); } return super.afterInvocation(token, result); }- 1
- 2
- 3
- 4
- 5
- 6
- 7
- 8
- 9
- 10
- 11
- 12
相关接口
- AccessDecisionManager 采用投票的方式来确定是否能够访问受保护资源。 AccessDecisionManager中包含的一系列AccessDecisionVoter将会被用来对Authentication是否有权访问受保护对象进行投票,AccessDecisionManager根据投票结果,做出最终决策 。
Spring Security实现原理
核心配置 @EnableWebSecurity
https://www.processon.com/view/link/5fa53783637689653d8af2f7
@Retention(value = java.lang.annotation.RetentionPolicy.RUNTIME) @Target(value = { java.lang.annotation.ElementType.TYPE }) @Documented @Import({ WebSecurityConfiguration.class, SpringWebMvcImportSelector.class, OAuth2ImportSelector.class }) @EnableGlobalAuthentication @Configuration public @interface EnableWebSecurity { /** * Controls debugging support for Spring Security. Default is false. * @return if true, enables debug support with Spring Security */ boolean debug() default false; }- 1
- 2
- 3
- 4
- 5
- 6
- 7
- 8
- 9
- 10
- 11
- 12
- 13
- 14
- 15
- 16

过滤器

SecurityFilterChain- SecurityContextPersistenceFilter 两个主要职责:请求来临时,创建
SecurityContext安全上下文信息,请求结束时清空SecurityContextHolder。过滤器负责核心的处理流程,存储安全上下文和读取安全上下文的工作完全委托给了HttpSessionSecurityContextRepository去处理 - UsernamePasswordAuthenticationFilter 表单提交了username和password,被封装成token进行一系列的认证,便是主要通过这个过滤器完成的,在表单认证的方法中,这是最最关键的过滤器。
- ExceptionTranslationFilter 异常转换过滤器位于整个springSecurityFilterChain的后方,用来转换整个链路中出现的异常。此过滤器本身不处理异常,而是将认证过程中出现的异常交给内部维护的一些类去处理,一般处理两大类异常:AccessDeniedException访问异常和AuthenticationException认证异常。
- FilterSecurityInterceptor 从SecurityContextHolder中获取Authentication对象,然后比对用户拥有的权限和资源所需的权限。这是一个方法级的权限过滤器, 基本位于过滤链的最底部 。这个过滤器决定了访问特定路径应该具备的权限,访问的用户的角色,权限是什么?访问的路径需要什么样的角色和权限?这些判断和处理都是由该类进行的。
- HeaderWriterFilter 用来给http响应添加一些Header,比如X-Frame-Options, X-XSS-Protection*,X-Content-Type-Options
- CsrfFilter 在spring4中被默认开启的一个过滤器,用于防止csrf攻击(跨站点请求伪造(Cross-site request forgery))
- LogoutFilter 处理注销的过滤器
- RequestCacheAwareFilter 内部维护了一个RequestCache,用于缓存request请求
- SecurityContextHolderAwareRequestFilter :对ServletRequest进行了一次包装,使得request具有更加丰富的API
- SessionManagementFilter 和session相关的过滤器,内部维护了一个SessionAuthenticationStrategy,两者组合使用,常用来防止会话固定攻击保护(
session-fixation protection attack),以及限制同一用户开启多个会话的数量 - AnonymousAuthenticationFilter 匿名身份过滤器,spring security为了兼容未登录的访问,也走了一套认证流程,只不过是一个匿名的身份
链路
public abstract class AbstractSecurityWebApplicationInitializer implements WebApplicationInitializer {- 1
- 2

主线源码分析https://www.processon.com/view/link/5fa3ae25e401fd45d10296e1
扩展知识 — Spring Authorization Server
扩展知识:
Spring官方已经不在维护Spring Security OAuth,官方单独启动一个授权服务器项目Spring Authorization Server
Spring Authorization Server 是 Spring 团队最新开发适配 OAuth 协议的授权服务器项目,旨在替代原有的 Spring Security OAuth Server
-
已支持授权码、客户端、刷新、注销等 OAuth 协议
-
SAS 项目已经迁移至官方正式仓库维护,成为官方的正式子项目
官方主页:https://spring.io/projects/spring-authorization-server -
Spring 团队正式宣布 Spring Security OAuth 停止维护,该项目将不会再进行任何的迭代;
-
作为 SpringBoot 3.0 的过渡版本 SpringBoot 2.7.0 过期了大量关于 SpringSecurity 的配置类,如沿用旧版本过期配置无法向上升级;
-
Spring团队原计划只提供 OAuth2 中的 Client 和 Resource Server功能。无奈广大人民强烈请求提供Authorization Server 功能,所以Spring团队便单独启动了一个项目做支持,名为Spring Authorization Server。官方说明:Announcing the Spring Authorization Server

https://docs.spring.io/spring-authorization-server/docs/current/reference/html/getting-started.html#system-requirements
-
相关阅读:
js 之reduce 方法实现数组去重原理分布解析
华为摄像头通过stm32叠加字符串
ELK下载(Elasticsearch、Logstash、Kibana)
NumPy 中的排序方法(sort, argsort, lexsort, partition, argpartition, searchsorted)
仅需一个依赖给Swagger换上新皮肤,既简单又炫酷~
多平台比较,三代扩增子高度还原微生物群落结构
vim常用命令
大根堆的创建(视频讲解)
领域驱动设计——MDD
Cadence Allegro DXF结构图的导入详细教程
- 原文地址:https://blog.csdn.net/menxu_work/article/details/127960953