-
Spring Security多种用户定义方式
本文内容来自王松老师的《深入浅出Spring Security》,自己在学习的时候为了加深理解顺手抄录的,有时候还会写一些自己的想法。
Spring Security中存在两种类型的AutnenticationManager,一种是全局的AuthenticationManager,一种是局部的AuthenticationManager。局部的AuthenticationManager由HttpSecurity进行配置,而全局的AuthenticaitonManager可以不用配置,系统会提供一个默认的全局的AuthenticationManager对象。
当进行用户身份认证时,首先会通过局部的AuthenticationManager对象进行验证,如果验证失败则会调用parent也就是全局的AuthenticaitonManager进行再次校验。ProviderManager类的authenticate方法中会判断如果没有AuthenticationProvider可以进行验证的话,就会调用parent的authenticate方法,也就是全局的AuthenticationManager进行身份验证。
所以开发者在定义用户时,也分为两种情况:
- 针对局部AuthenticationManager定义用户
- 针对全局AuthenticationManager定义用户
针对局部AuthenticationManager定义用户
为了演示方便,接下来我们使用InMemoryUserDetailsManager来构建用户对象,如果有小伙伴想把用户信息存在数据库可以参考之前的用MyBatis加载用户信息。
正对局部AuthenticationManager定义用户:
- /**
- * @author tlh
- * @date 2022/11/21 21:50
- */
- @Configuration
- public class SecurityConfig extends WebSecurityConfigurerAdapter {
- @Override
- protected void configure(HttpSecurity http) throws Exception {
- InMemoryUserDetailsManager manager = new InMemoryUserDetailsManager();
- manager.createUser(User.withUsername("test1").password("{noop}123").authorities("test").build());
- manager.createUser(User.withUsername("test").password("{noop}456").authorities("test").build());
- http.authorizeRequests((requests) -> ((ExpressionUrlAuthorizationConfigurer.AuthorizedUrl) requests.anyRequest()).authenticated());
- http.formLogin().successForwardUrl("/hello").permitAll();
- http.userDetailsService(manager);
- http.httpBasic();
- }
- }
在上面的代码中,我们基于内存来管理用户,并向manager中添加了两个用户,将配置好manager对象添加到了HttpSecurity中,也就是配置到了了局部的AuthenticaitonManager中。
配置完成之后,启动项目我们使用test1和test输入我们设置的密码就可以正常登陆系统了。但是,小伙伴们注意下我们在启动项目时,IDEA控制台的日志中看到如下内容:
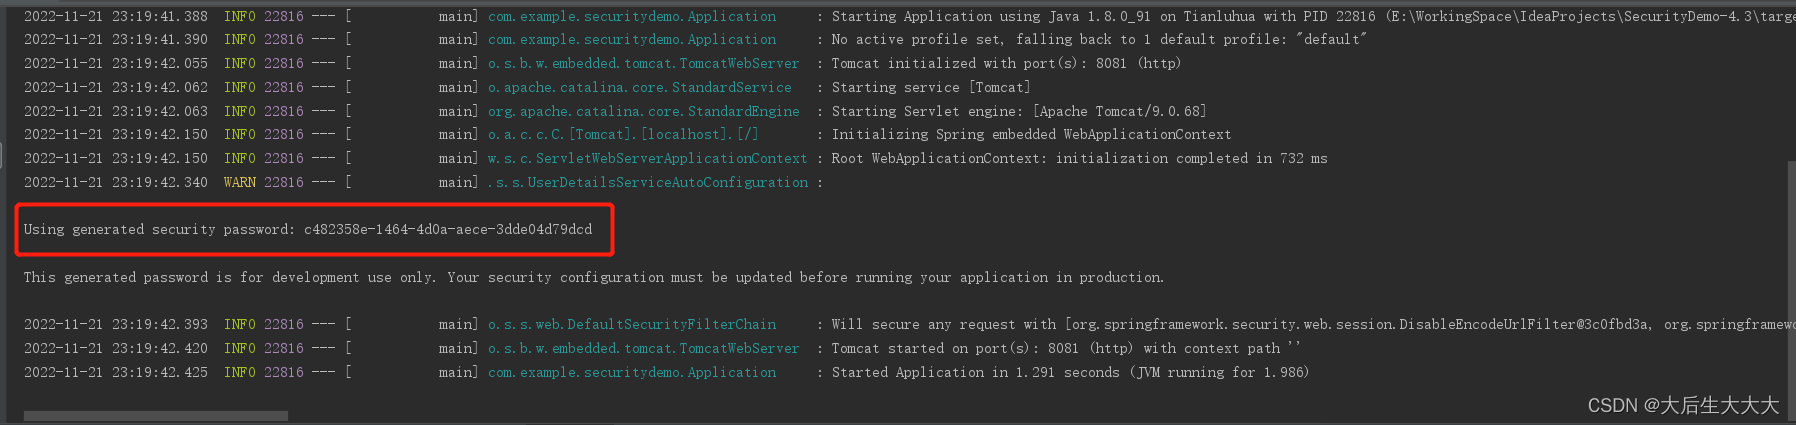
通过前面的学习我们知道这个是系统自动为我们生成的用户。当然我们通过系统自动生成的用户信息来登录也是可以正常登录的。系统自动提供的用户对象实际上是往Spring IOC容器汇总注册了一个InMemoryUserDetailsManager对象来实现。实际上,系统提供的用户相关于全局AuthenticationManager对应的用户。
以上面的代码为例,当我们执行登录后,Spring Security首先会调用局部的AuthenticationManager去进行登录校验,如果用户名和密码是test1/123或者test/456那就直接登录成功,否则登录失败。当登录失败后系统会调用局部的AuthenticationManager的parent也就是全局的AuthenticationManager继续校验,此时登录用户和密码是user/c482358e-1464-4d0a-aece-3dde04d79dcd,则登录成功,否则登录失败。
针对全局AuthenticationManager定义用户
下来来我们就正对全局的AuthenticationManager来设置用户信息。由于默认全局的AuthenticationManager在配置的时候会从Spring的IOC容器中查找UserDetailsService实例,所以我们如果想要在针对全局AuthenticationManager配置用户,只需要往Spring IOC容器中注入一个UserDetailsService实例即可:
- /**
- * @author tlh
- * @date 2022/11/21 21:50
- */
- @Configuration
- public class SecurityConfig extends WebSecurityConfigurerAdapter {
- //全局
- @Bean
- @Primary
- UserDetailsService users1() {
- return new InMemoryUserDetailsManager(User.builder().username("javaBody").password("{noop}123").roles("admin").build());
- }
- @Override
- protected void configure(HttpSecurity http) throws Exception {
- //局部
- InMemoryUserDetailsManager manager = new InMemoryUserDetailsManager();
- manager.createUser(User.withUsername("test1").password("{noop}123").authorities("test").build());
- manager.createUser(User.withUsername("test").password("{noop}456").authorities("test").build());
- http.authorizeRequests((requests) -> ((ExpressionUrlAuthorizationConfigurer.AuthorizedUrl) requests.anyRequest()).authenticated());
- http.formLogin().successForwardUrl("/hello").permitAll();
- http.userDetailsService(manager);
- http.httpBasic();
- }
- }
配置完成后,当我们启动项目时,全局的AuthenticationManager在配置时会去Spring容器中查找UserDetailsService实例,找到的就是我们定义的UserDetailsService。接着不仅可以使用test1和test登录了,还可以使用javaBody登录。
当然,小伙伴们也可以通过从写WebSecurityConfigurerAdapter的configure(AuthenticationManagerBuilder auth)方法来自定义全局AuthenticaitonManager对象:
- /**
- * @author tlh
- * @date 2022/11/21 21:50
- */
- @Configuration
- public class SecurityConfig extends WebSecurityConfigurerAdapter {
- // //全局
- // @Bean
- // @Primary
- // UserDetailsService users1() {
- // return new InMemoryUserDetailsManager(User.builder().username("javaBody").password("{noop}123").roles("admin").build());
- // }
- @Override
- protected void configure(AuthenticationManagerBuilder auth)
- throws Exception {
- auth.inMemoryAuthentication().withUser("javagirl")
- .password("{noop}123")
- .roles("admin");
- }
- @Override
- protected void configure(HttpSecurity http) throws Exception {
- //局部
- InMemoryUserDetailsManager manager = new InMemoryUserDetailsManager();
- manager.createUser(User.withUsername("test1").password("{noop}123").authorities("test").build());
- manager.createUser(User.withUsername("test").password("{noop}456").authorities("test").build());
- http.authorizeRequests((requests) -> ((ExpressionUrlAuthorizationConfigurer.AuthorizedUrl) requests.anyRequest()).authenticated());
- http.formLogin().successForwardUrl("/hello").permitAll();
- http.userDetailsService(manager);
- http.httpBasic();
- }
- }
还有,如果我们重写了WebSecurityConfigurerAdapter的configure(AuthenticationManagerBuilder auth)方法,那么全局的AuthenticationManager对象将以configure(AuthenticationManagerBuilder auth)方法中定义的用户为准。此时如果我们向Spring的IOC容器中注入另外一个UserDetailsService实例也不会生效。
小结
Spring Security中几种不同的用户定义方式,通过这个几个案例,小伙伴们对全局的AuthenticationManager和局部的AuthenticationManager对象会有更加深刻的认识了。
-
相关阅读:
【Elasticsearch】Elasticsearch环境搭建
腾讯云AI超级底座新升级:训练效率提升幅度达到3倍
PiL测试实战(上)| 模型生成代码的单元级PiL测试
吐血整理python数据分析利器pandas的八个生命周期!
C语言之回调函数(非常重要)附带回调函数版本实现整型的加减乘除四则运算
Go 基础之基本数据类型
中国大模型语料数据联盟迎来9家新成员,开源第二批语料数据
抽象工厂设计模式是什么?什么是 Abstract Factory 抽象工厂设计模式?Python 抽象工厂设计模式示例代码
不用编程实现USB或串口条码枪对接PLC,将数据写入到寄存器
安装pygame报错
- 原文地址:https://blog.csdn.net/qq_27062249/article/details/127974137

- 最新文章
-
【FHE】我们如何实现同态加密推理(八):SiLU 的密文化——两条路径,和一个 8 字节的开关
SQLcl 中 c/old/new 替换变量为何失效?先定位再替换
不让模型写作文,直接从它脑子里读答案:Jev 决策在 .NET 的两条路线
Halo插件:支持GitHub的图床附件策略
电视投屏界的“一股清流”!SimpleTVCast 6.0.0-beta 抢先体验:无需TV端App,界面大换血!✨
华三VXLAN集中式网关实战指南:Spine多活网关 + 双活接入(M-LAG)
软件更好写之后口碑会更重要
大 O、大 Omega、大 Theta 的区别,O(n) 复杂度是什么意思
Java标签跳转:一个鲜为人知但却很实用的小技巧
多智能体系统论文速读