-
Canal1.1.6安装部署
什么是Canal
阿里巴巴 B2B 公司,因为业务的特性,卖家主要集中在国内,买家主要集中在国外,所以衍生出了同步杭州和美国异地机房的需求,从 2010 年开始,阿里系公司开始逐步的尝试基于数据库的日志解析,获取增量变更进行同步,由此衍生出了增量订阅&消费的业务。Canal 是用 Java 开发的基于数据库增量日志解析,提供增量数据订阅&消费的中间件。目前。Canal 主要支持了 MySQL 的 Binlog 解析,解析完成后才利用 Canal Client 来处理获得的相关数据。(数据库同步需要阿里的 Otter 中间件,基于 Canal)。
MySQL 的 Binlog
什么是 Binlog
MySQL 的二进制日志可以说 MySQL 最重要的日志了,它记录了所有的 DDL 和 DML(除了数据查询语句)语句,以事件形式记录,还包含语句所执行的消耗的时间,MySQL 的二进制日志是事务安全型的。
一般来说开启二进制日志大概会有 1%的性能损耗。二进制有两个最重要的使用场景:
其一:MySQL Replication 在 Master 端开启 Binlog,Master 把它的二进制日志传递给 Slaves
来达到 Master-Slave 数据一致的目的。
其二:自然就是数据恢复了,通过使用 MySQL Binlog 工具来使恢复数据。
二进制日志包括两类文件:二进制日志索引文件(文件名后缀为.index)用于记录所有的二进制文件,二进制日志文件(文件名后缀为.00000*)记录数据库所有的 DDL 和 DML(除了数据查询语句)语句事件。Binlog 的分类
MySQL Binlog 的格式有三种,分别是 STATEMENT,MIXED,ROW。在配置文件中可以选择配置 binlog_format= statement|mixed|row。三种格式的区别:
1)statement:语句级,binlog 会记录每次一执行写操作的语句。相对 row 模式节省空间,但是可能产生不一致性,比如“update tt set create_date=now()”,如果用 binlog 日志进行恢复,由于执行时间不同可能产生的数据就不同。
优点:节省空间。
缺点:有可能造成数据不一致。2)row:行级, binlog 会记录每次操作后每行记录的变化。
优点:保持数据的绝对一致性。因为不管 sql 是什么,引用了什么函数,他只记录执行后的效果。
缺点:占用较大空间3)mixed:statement 的升级版,一定程度上解决了,因为一些情况而造成的 statement模式不一致问题,默认还是 statement,在某些情况下譬如:当函数中包含 UUID() 时;包含AUTO_INCREMENT 字段的表被更新时;执行 INSERT DELAYED 语句时;用 UDF 时;会按照ROW 的方式进行处理
优点:节省空间,同时兼顾了一定的一致性。
缺点:还有些极个别情况依旧会造成不一致,另外 statement 和 mixed 对于需要对binlog 的监控的情况都不方便。综合上面对比,Canal 想做监控分析,选择 row 格式比较合适。
Canal 的工作原理
MySQL 主从复制过程
1)Master 主库将改变记录,写到二进制日志(Binary Log)中;
2)Slave 从库向 MySQL Master 发送 dump 协议,将 Master 主库的 binary log events 拷贝到它的中继日志(relay log);
3)Slave 从库读取并重做中继日志中的事件,将改变的数据同步到自己的数据库。Canal 的工作原理
很简单,就是把自己伪装成 Slave,假装从 Master 复制数据。
使用场景
1)原始场景: 阿里 Otter 中间件的一部分
Otter 是阿里用于进行异地数据库之间的同步框架,Canal 是其中一部分。

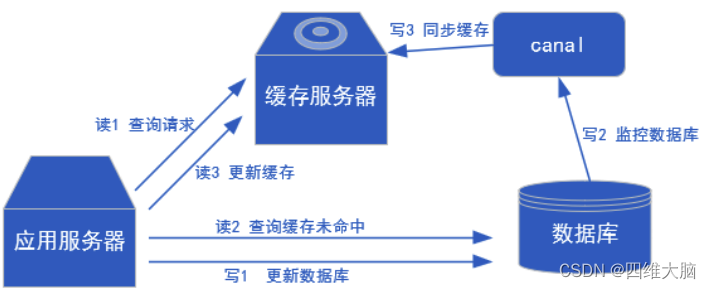
2)常见场景 1:更新缓存

3)常见场景 2:抓取业务表的新增变化数据,用于制作实时统计(我们就是这种场景)Canal 的下载和安装
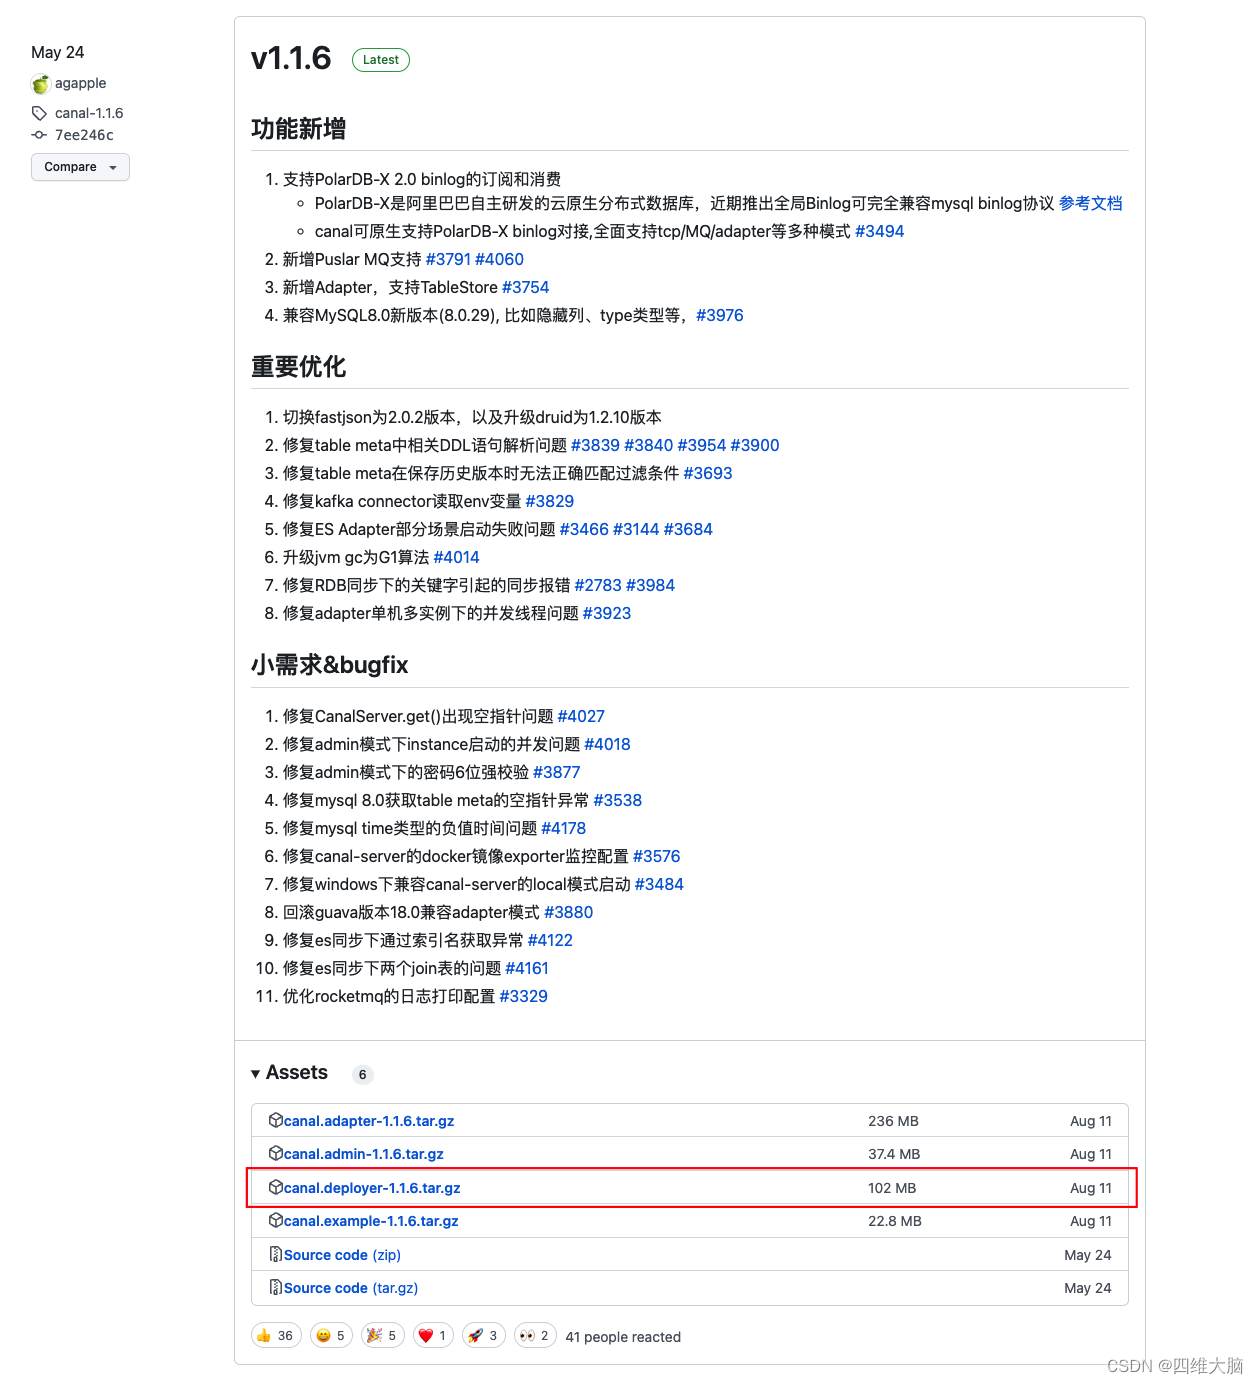
https://github.com/alibaba/canal/releases

这里我们下载1.1.6版本,上传至/opt/software
先创建canal文件夹,然后解压到该文件夹cd /opt/module mkdir canal cd /opt/software tar -zxvf canal.deployer-1.1.6.tar.gz -C /opt/module/canal/- 1
- 2
- 3
- 4
canal.properties
vim /opt/module/canal/conf/canal.properties- 1
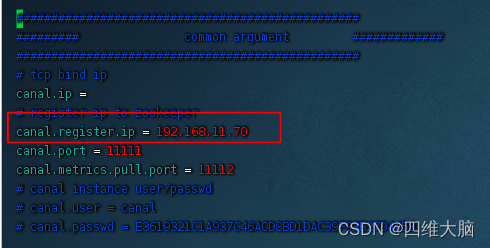
说明:这个文件是 canal 的基本通用配置,canal 端口号默认就是 11111
多实例配置如果创建多个实例,通过前面 canal 架构,我们可以知道,一个 canal 服务中可以有多个 instance,conf/下的每一个 example 即是一个实例,每个实例下面都有独立的配置文件。默认只有一个实例 example,如果需要多个实例处理不同的 MySQL 数据的话,直接拷贝出多个 example,并对其重新命名,命名和配置文件中指定的名称一致,然后修改canal.properties 中的 canal.destinations=实例 1,实例 2,实例 3

当服务器多网卡的时候,要配置指定网络,否则无法访问到canal这里我们只监视一个mysql,所以该配置文件可以不动
instance.properties
vim /opt/module/canal/conf/example/instance.properties- 1

更改以上三点就可以了启动 ```java cd /opt/module/canal/bin/ ./startup.sh- 1
- 2
- 3
- 4
- 5
确保mysql开启binlog
show variables like ‘%log_bin%’;

java代码连接
创建springboot项目,pom文件
<dependency> <groupId>org.springframework.boot</groupId> <artifactId>spring-boot-starter</artifactId> </dependency> <dependency> <groupId>org.springframework.boot</groupId> <artifactId>spring-boot-starter-test</artifactId> <scope>test</scope> </dependency> <dependency> <groupId>com.alibaba.otter</groupId> <artifactId>canal.client</artifactId> <version>1.1.6</version> </dependency> <dependency> <groupId>com.alibaba.otter</groupId> <artifactId>canal.protocol</artifactId> <version>1.1.6</version> </dependency> <dependency> <groupId>com.alibaba</groupId> <artifactId>fastjson</artifactId> <version>2.0.7</version> </dependency>- 1
- 2
- 3
- 4
- 5
- 6
- 7
- 8
- 9
- 10
- 11
- 12
- 13
- 14
- 15
- 16
- 17
- 18
- 19
- 20
- 21
- 22
- 23
- 24
- 25
- 26
- 27
package com.example.cannal_demo.util; import com.alibaba.otter.canal.client.CanalConnector; import com.alibaba.otter.canal.client.CanalConnectors; import com.alibaba.otter.canal.protocol.Message; import lombok.extern.slf4j.Slf4j; import org.springframework.beans.factory.annotation.Value; import org.springframework.boot.ApplicationArguments; import org.springframework.boot.ApplicationRunner; import org.springframework.stereotype.Component; import javax.annotation.Resource; import java.net.InetSocketAddress; @Component @Slf4j public class CanalClient implements ApplicationRunner { @Value("${canal.ip}") private String ip; @Value("${canal.port}") private Integer port; @Value("${canal.username}") private String username; @Value("${canal.password}") private String password; @Value("${canal.destination}") private String destination; @Value("${canal.batch-size}") private Integer batchSize; @Value("${canal.subscribe}") private String subscribe; @Resource MessageHandler messageHandler; @Override public void run(ApplicationArguments args) throws Exception { log.info("----->>>>>>>>启动canal"); startCanal(); } private void startCanal() { // 创建链接 CanalConnector connector = CanalConnectors.newSingleConnector(new InetSocketAddress(ip, port), destination, "", ""); try { //打开连接 connector.connect(); //订阅数据库表,全部表 connector.subscribe(subscribe); //回滚到未进行ack的地方,下次fetch的时候,可以从最后一个没有ack的地方开始 connector.rollback(); while (true) { //获取指定数量的数据 Message message = connector.getWithoutAck(batchSize); //获取批量ID long batchId = message.getId(); //获取批量的数量 int size = message.getEntries().size(); //如果没有数据 if (batchId == -1 || size == 0) { try { //现成休眠1s Thread.sleep(500); } catch (InterruptedException e) { e.printStackTrace(); } } else { //如果有数据,处理数据 messageHandler.handler(message); } connector.ack(batchId); // 提交确认 // connector.rollback(batchId); // 处理失败, 回滚数据 } } finally { connector.disconnect(); } } }- 1
- 2
- 3
- 4
- 5
- 6
- 7
- 8
- 9
- 10
- 11
- 12
- 13
- 14
- 15
- 16
- 17
- 18
- 19
- 20
- 21
- 22
- 23
- 24
- 25
- 26
- 27
- 28
- 29
- 30
- 31
- 32
- 33
- 34
- 35
- 36
- 37
- 38
- 39
- 40
- 41
- 42
- 43
- 44
- 45
- 46
- 47
- 48
- 49
- 50
- 51
- 52
- 53
- 54
- 55
- 56
- 57
- 58
- 59
- 60
- 61
- 62
- 63
- 64
- 65
- 66
- 67
- 68
- 69
- 70
- 71
- 72
- 73
- 74
- 75
- 76
- 77
- 78
- 79
- 80
- 81
- 82
- 83
- 84
- 85
- 86
- 87
- 88
- 89
- 90
- 91
package com.example.cannal_demo.util; import com.alibaba.otter.canal.protocol.CanalEntry; import com.alibaba.otter.canal.protocol.Message; import lombok.extern.slf4j.Slf4j; import org.springframework.stereotype.Service; import javax.annotation.Resource; import java.util.List; @Service @Slf4j public class MessageHandler { @Resource private AbstractEntryHandler abstractEntryHandler; public void handler(Message message) { List<CanalEntry.Entry> entries = message.getEntries(); for (CanalEntry.Entry entry : entries) { if (entry.getEntryType().equals(CanalEntry.EntryType.ROWDATA)) { log.info("----->>>>>>>开始处理CanalEntry"); abstractEntryHandler.handler(entry); } } } }- 1
- 2
- 3
- 4
- 5
- 6
- 7
- 8
- 9
- 10
- 11
- 12
- 13
- 14
- 15
- 16
- 17
- 18
- 19
- 20
- 21
- 22
- 23
- 24
- 25
- 26
- 27
package com.example.cannal_demo.util; import com.alibaba.otter.canal.protocol.CanalEntry; import com.google.protobuf.ByteString; import lombok.extern.slf4j.Slf4j; import org.springframework.stereotype.Service; import java.util.HashMap; import java.util.List; import java.util.Map; /** * @Description: 获取到数据后进行相应的处理 * @Author: yyl * @Date: 2022/7/13 */ @Service @Slf4j public class AbstractEntryHandler { public final void handler(CanalEntry.Entry entry) { CanalEntry.RowChange rowChage = null; try { rowChage = CanalEntry.RowChange.parseFrom(entry.getStoreValue()); } catch (Exception e) { throw new RuntimeException("ERROR ## parser of eromanga-event has an error , data:" + entry.toString(), e); } CanalEntry.EventType eventType = rowChage.getEventType(); boolean isDdl = rowChage.getIsDdl(); log.info("----------库名:{}--------表名:{}--------", entry.getHeader().getSchemaName(), entry.getHeader().getTableName()); String operation = null; Map<String, String> map = new HashMap<>(); switch (eventType) { case INSERT: rowChage.getRowDatasList().forEach(rowData -> { List<CanalEntry.Column> columns = rowData.getAfterColumnsList(); for (CanalEntry.Column column : columns) { //byte[] bytes = column.getValueBytes().toByteArray(); map.put(camelName(column.getName()), column.getValue()); } }); operation = "添加"; break; case UPDATE: rowChage.getRowDatasList().forEach(rowData -> { List<CanalEntry.Column> columns = rowData.getAfterColumnsList(); for (CanalEntry.Column column : columns) { map.put(camelName(column.getName()), column.getValue()); } Map<String, String> map1 = new HashMap<>(); List<CanalEntry.Column> columns1 = rowData.getBeforeColumnsList(); for (CanalEntry.Column column : columns1) { map1.put(camelName(column.getName()), column.getValue()); } log.info("---------更新之前map={}----------", map1); }); operation = "更新"; break; case DELETE: rowChage.getRowDatasList().forEach(rowData -> { List<CanalEntry.Column> columns = rowData.getBeforeColumnsList(); for (CanalEntry.Column column : columns) { map.put(camelName(column.getName()), column.getValue()); } }); operation = "删除"; break; default: break; } log.info("---------操作:{},数据={}----------", operation, map); } /** * 将下划线大写方式命名的字符串转换为驼峰式。如果转换前的下划线大写方式命名的字符串为空,则返回空字符串。 * 例如:HELLO_WORLD->HelloWorld * * @param name 转换前的下划线大写方式命名的字符串 * @return 转换后的驼峰式命名的字符串 */ public static String camelName(String name) { StringBuilder result = new StringBuilder(); // 快速检查 if (name == null || name.isEmpty()) { // 没必要转换 return ""; } else if (!name.contains("_")) { // 不含下划线,仅将首字母小写 return name.substring(0, 1).toLowerCase() + name.substring(1); } // 用下划线将原始字符串分割 String camels[] = name.split("_"); for (String camel : camels) { // 跳过原始字符串中开头、结尾的下换线或双重下划线 if (camel.isEmpty()) { continue; } // 处理真正的驼峰片段 if (result.length() == 0) { // 第一个驼峰片段,全部字母都小写 result.append(camel.toLowerCase()); } else { // 其他的驼峰片段,首字母大写 result.append(camel.substring(0, 1).toUpperCase()); result.append(camel.substring(1).toLowerCase()); } } return result.toString(); } }- 1
- 2
- 3
- 4
- 5
- 6
- 7
- 8
- 9
- 10
- 11
- 12
- 13
- 14
- 15
- 16
- 17
- 18
- 19
- 20
- 21
- 22
- 23
- 24
- 25
- 26
- 27
- 28
- 29
- 30
- 31
- 32
- 33
- 34
- 35
- 36
- 37
- 38
- 39
- 40
- 41
- 42
- 43
- 44
- 45
- 46
- 47
- 48
- 49
- 50
- 51
- 52
- 53
- 54
- 55
- 56
- 57
- 58
- 59
- 60
- 61
- 62
- 63
- 64
- 65
- 66
- 67
- 68
- 69
- 70
- 71
- 72
- 73
- 74
- 75
- 76
- 77
- 78
- 79
- 80
- 81
- 82
- 83
- 84
- 85
- 86
- 87
- 88
- 89
- 90
- 91
- 92
- 93
- 94
- 95
- 96
- 97
- 98
- 99
- 100
- 101
- 102
- 103
- 104
- 105
- 106
- 107
- 108
- 109
- 110
- 111
- 112
- 113
- 114
- 115
-
相关阅读:
程序员可以做哪些副业?我整理的千字副业指南。
心动(GDI+)
什么是AIoT?
13.2测试用例
这几个方法让你实现EXCEL文件翻译成中文
【计算机毕业设计】Node.js商城APP-97200,免费送源码,【开题选题+程序定制+论文书写+答辩ppt书写-原创定制程序】
Bash 4关联数组:错误“声明:-A:无效选项”
回收站不见了怎么恢复?一招把回收站的图标找回来!
洛谷P4683 [IOI2008] Type Printer 题解
人工智能在电气中的应用,电力电子与人工智能
- 原文地址:https://blog.csdn.net/weixin_47491957/article/details/127967141