-
驱动开发基础
1、Hello驱动
我们应用程序使用open函数的时候,会调用内核的sys_open函数,然后接下来
1、然后打开普通文件的话会使用文件系统操作硬件,
2、要是打开驱动文件,会使用驱动程序对应的drv_open函数
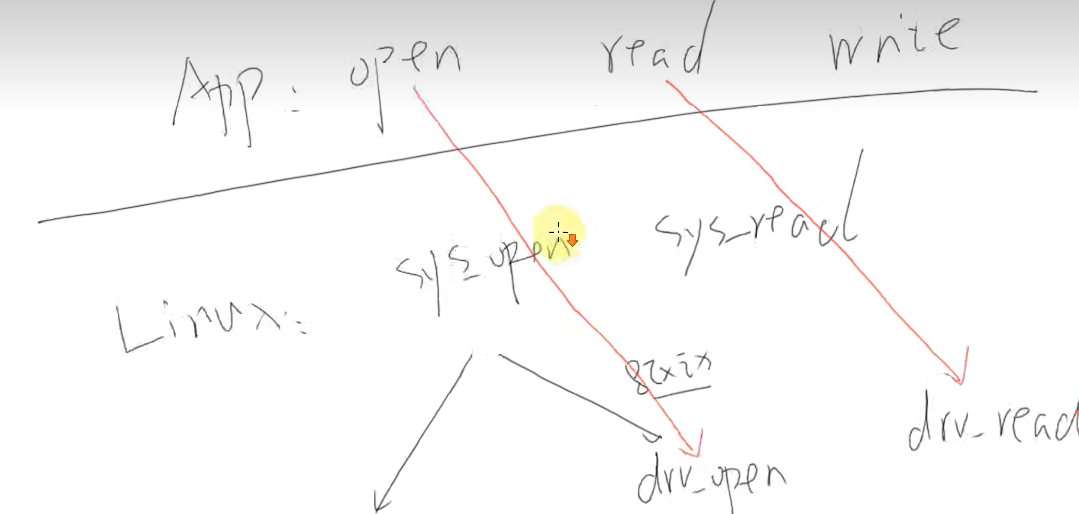
怎么写驱动程序
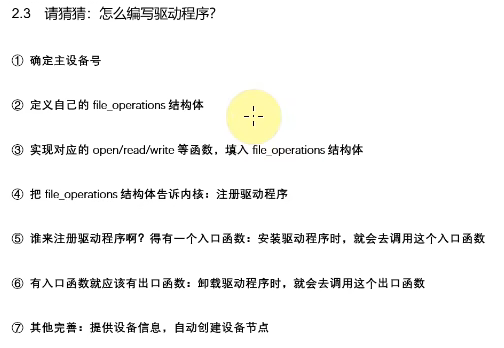
我们驱动对应的drv_open等函数写好了,存放在file_operation结构体中
将结构体告诉内核,也就是将结构体通过一个函数注册到内核中(注册的时候会设定主设备号,可自己设定也可以系统分配)
将结构体存放到一个对应的数组中,这就叫做注册到内核中,内核会根据主设备号在这个数组中存放查找我们结构体
Linux内核允许多个驱动共享一个主设备号,但更多的设备都遵循一个驱动对一个主设备号的原则
内核维护这一个以主设备号为key的全局哈希表,而哈希表中的数据部分为与该主设备号对应的驱动程序(只有一个次设备)
app打开一个文件,会获得一个整数,这个整数对应一个结构体struct_file.
应用根据主设备号,在数组中找到一个file_operation结构体,这个结构体提供驱动的各种读写函数

- struct file {
- union {
- struct llist_node fu_llist;
- struct rcu_head fu_rcuhead;
- } f_u;
- struct path f_path;
- struct inode *f_inode; /* cached value */
- const struct file_operations *f_op; //各种操作选项
- /*
- * Protects f_ep_links, f_flags.
- * Must not be taken from IRQ context.
- */
- spinlock_t f_lock;
- atomic_long_t f_count;
- unsigned int f_flags; //open函数传入的参数
- fmode_t f_mode; //open函数传入的参数
- struct mutex f_pos_lock;
- loff_t f_pos;
- struct fown_struct f_owner;
- const struct cred *f_cred;
- struct file_ra_state f_ra;
- u64 f_version;
- struct address_space *f_mapping;
- } __attribute__((aligned(4))); /* lest something weird decides that 2 is OK */
struct file_opwerations
- struct file_operations {
- struct module *owner;
- loff_t (*llseek) (struct file *, loff_t, int);
- ssize_t (*read) (struct file *, char __user *, size_t, loff_t *);
- ssize_t (*write) (struct file *, const char __user *, size_t, loff_t *);
- ssize_t (*read_iter) (struct kiocb *, struct iov_iter *);
- ssize_t (*write_iter) (struct kiocb *, struct iov_iter *);
- int (*iterate) (struct file *, struct dir_context *);
- int (*iterate_shared) (struct file *, struct dir_context *);
- unsigned int (*poll) (struct file *, struct poll_table_struct *);
- long (*unlocked_ioctl) (struct file *, unsigned int, unsigned long);
- long (*compat_ioctl) (struct file *, unsigned int, unsigned long);
- int (*mmap) (struct file *, struct vm_area_struct *);
- int (*open) (struct inode *, struct file *);
- int (*flush) (struct file *, fl_owner_t id);
- int (*release) (struct inode *, struct file *);
- int (*fsync) (struct file *, loff_t, loff_t, int datasync);
- int (*fasync) (int, struct file *, int);
- int (*lock) (struct file *, int, struct file_lock *);
实验手动写一个驱动程序
1、驱动程序

- #include <linux/module.h>
- #include <linux/fs.h>
- #include <linux/errno.h>
- #include <linux/miscdevice.h>
- #include <linux/kernel.h>
- #include <linux/major.h>
- #include <linux/mutex.h>
- #include <linux/proc_fs.h>
- #include <linux/seq_file.h>
- #include <linux/stat.h>
- #include <linux/init.h>
- #include <linux/device.h>
- #include <linux/tty.h>
- #include <linux/kmod.h>
- #include <linux/gfp.h>
- /* 1. 确定主设备号 */
- static int major = 0; //表示内核自动分配主设备号
- static char kernel_buf[1024];//保存app下发的字符串,也就是将用户空间的buf数据传递到这个里面
- static struct class *hello_class; //定义一个类,用来自动创建设备节点
- #define MIN(a, b) (a < b ? a : b)//取二者最小
- /* 3. 实现对应的open/read/write等函数,填入file_operations结构体 */
- /*
- 加入static 免得污染命名空间
- _usr 表示来着用户空间,buf用户空间指针,
- size 读多长的数据
- struct file *:文件结构体
- loff_t *:读取数据的偏移量
- */
- static ssize_t hello_drv_read (struct file *file, char __user *buf, size_t size, loff_t *offset)
- {
- int err;
- printk("%s %s line %d\n", __FILE__, __FUNCTION__, __LINE__);
- err = copy_to_user(buf, kernel_buf, MIN(1024, size));//拷贝数据从内核空间到用户空间大小不得超过1024
- return MIN(1024, size);//返回处理的数据的长度
- }
- static ssize_t hello_drv_write (struct file *file, const char __user *buf, size_t size, loff_t *offset)
- {
- int err;
- printk("%s %s line %d\n", __FILE__, __FUNCTION__, __LINE__);
- err = copy_from_user(kernel_buf, buf, MIN(1024, size));//将用户空间的数据拷贝到内核空间大小不得超过1024字节
- return MIN(1024, size);
- }
- //struct inode文件的数据结构
- static int hello_drv_open (struct inode *node, struct file *file)
- {
- printk("%s %s line %d\n", __FILE__, __FUNCTION__, __LINE__);
- return 0;
- }
- //struct inode文件的数据结构
- static int hello_drv_close (struct inode *node, struct file *file)
- {
- printk("%s %s line %d\n", __FILE__, __FUNCTION__, __LINE__);
- return 0;
- }
- /* 2. 定义自己的file_operations结构体 */
- static struct file_operations hello_drv = {
- .owner = THIS_MODULE,//给结构体成员中的owner赋值
- .open = hello_drv_open,//将结构体hello_drv_open赋给open属性
- .read = hello_drv_read,
- .write = hello_drv_write,
- .release = hello_drv_close,
- };
- /* 4. 把file_operations结构体告诉内核:注册驱动程序 */
- /* 5. 谁来注册驱动程序啊?得有一个入口函数:安装驱动程序时,就会去调用这个入口函数 */
- //这就相当于主函数
- static int __init hello_init(void)
- {
- int err;
- printk("%s %s line %d\n", __FILE__, __FUNCTION__, __LINE__);
- //注册file_operation结构体,返回值就是主设备号
- major = register_chrdev(0, "hello", &hello_drv); /* /dev/hello *///传入操作函数的结构体
- hello_class = class_create(THIS_MODULE, "hello_class");
- err = PTR_ERR(hello_class);
- if (IS_ERR(hello_class)) {
- printk("%s %s line %d\n", __FILE__, __FUNCTION__, __LINE__);
- unregister_chrdev(major, "hello");
- return -1;
- }
- //创建出设备节点
- device_create(hello_class, NULL, MKDEV(major, 0), NULL, "hello"); /* /dev/hello */
- return 0;
- }
- /* 6. 有入口函数就应该有出口函数:卸载驱动程序时,就会去调用这个出口函数 */
- static void __exit hello_exit(void)
- {
- printk("%s %s line %d\n", __FILE__, __FUNCTION__, __LINE__);
- device_destroy(hello_class, MKDEV(major, 0));//销毁设备节点
- class_destroy(hello_class);
- unregister_chrdev(major, "hello");
- }
- /* 7. 其他完善:提供设备信息,自动创建设备节点 */
- module_init(hello_init);//将hello_init修饰成入口函数
- module_exit(hello_exit);//将hello_init修饰成出口函数
- MODULE_LICENSE("GPL");//该驱动程序遵守GPL协议
2、应用程序

- #include <sys/types.h>
- #include <sys/stat.h>
- #include <fcntl.h>
- #include <unistd.h>
- #include <stdio.h>
- #include <string.h>
- /*
- * ./hello_drv_test -w abc
- * ./hello_drv_test -r
- */
- int main(int argc, char **argv)
- {
- int fd;
- char buf[1024];
- int len;
- /* 1. 判断参数 */
- //要是参数不对就打印出用法
- if (argc < 2)
- {
- printf("Usage: %s -w
\n" , argv[0]); - printf(" %s -r\n", argv[0]);
- return -1;
- }
- /* 2. 打开文件 */
- fd = open("/dev/hello", O_RDWR);//打开设备节点hello,这个名字是根据我们的驱动程序给命名的,以读方式打开
- if (fd == -1)
- {
- printf("can not open file /dev/hello\n");
- return -1;
- }
- /* 3. 写文件或读文件 */
- //strcmp函数,要是第一个字符等于第二个字符的话,就会返回0
- if ((0 == strcmp(argv[1], "-w")) && (argc == 3))//输入的第二个参数是-w,并且还存放第三个参数
- {
- len = strlen(argv[2]) + 1;
- len = len < 1024 ? len : 1024;
- write(fd, argv[2], len);//将argv[2]写入到fd中
- else
- {
- len = read(fd, buf, 1024); //将fd中的数据读到buf
- buf[1023] = '\0';
- printf("APP read : %s\n", buf);
- }
- close(fd);
- return 0;
- }
查看开发板中的所有的驱动程序
cat /proc/devices查看加载的驱动
lsmod加载设备驱动
insmod 100ask_led.ko // 装载驱动程序卸载设备驱动
rmmod drv.ko查看是否存放hello设备节点
ls /dev/hello2、LED硬件原理
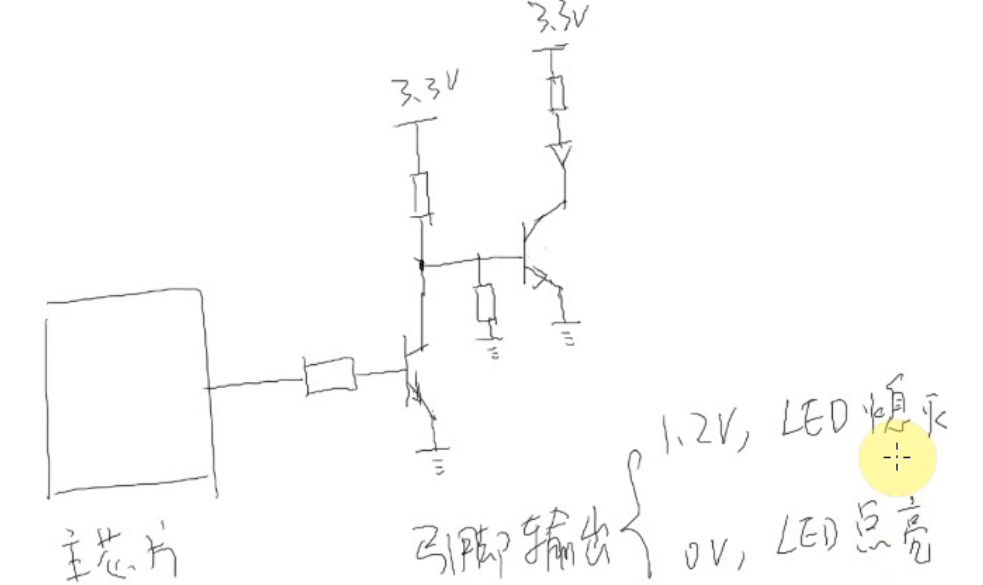
环型电路演变,只要有高电位出发,到低电位停止就可以

当引脚电力不足,使用三极管

只要主芯片1.2v就可以将三极管下面导通,然后上面的3.3v就可以与地面产生电路,要是0v就无法导通三极管
另外一种接法
当左边第一个3.3导通,那个黑点电位就是0
三极管基础
当左边电压大于右边电压就是想当与导通,电流就可以从上面流到下面

当右边电位大于左边电位,三极管导通,电流可以从下流到上

4、普适GPIO引脚的操作方法
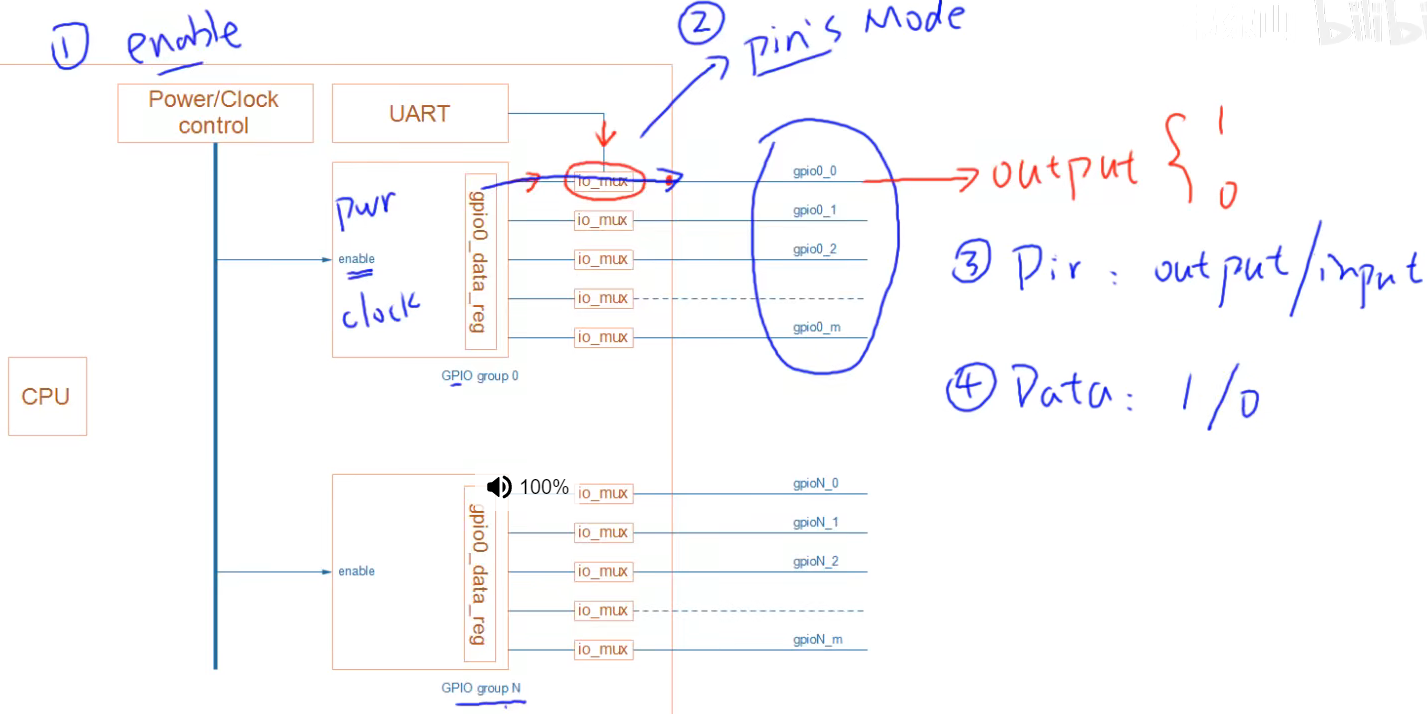
1、使能
2、设置为gpio口
3、设置为输出功能
4、设置电位为高还是地
操作寄存器注意不要影响到其他位
1、读出寄存器的值

2、修改bit0的值为1

3、写回去

要是直接设置data_reg = 1的话,会设置bit0、bit1、bit2的值
使用set_reg函数简单方便

使用clr_reg函数

这两个函数,只有设置为1的位才可以使得实际位生效
p7 GPIO操作方法
CCM时钟控制模块
1、通过设置其中的寄存器使能某个gpio口
IOMUXC IO复用控制器
2、设置其中的某个寄存器来设置某个引脚(gpio)列如:引脚功能(gpio就是其中一种功能)、是输入还是输出、是否使用上拉电阻之类

P12 最简单的LED驱动程序
驱动程序的框架
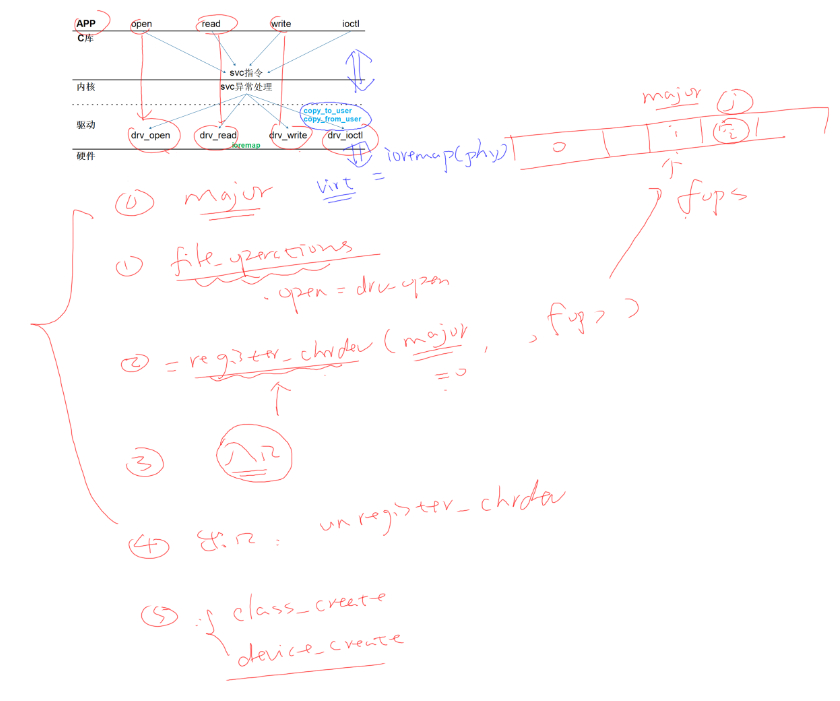
我们应用程序要read函数通过内核来调用对应驱动程序的read函数,那我们怎么让内核调动对应的驱动程序呢?
内部存放一个数组regsiter_chrdrv,数组中存放对应驱动程序的file_operation函数,数组中的位置就是是主设备号(数组下标)
在我们装载驱动程序的时候,内核会自动调用入口函数,入口函数就会创建将operation函数填充到上面的数组中
在我们入口函数中在填充chrdev数组的时候,调用下面两个函数去自动创建设备节点

在卸载驱动程序的时候,内核会自动调用出口函数,该函数会将operation函数对应的位置给删除
细节
应用程序无法直接访问到驱动程序中的数据,必须使用辅助函数
- copy_to_usr
- copy_from_user
驱动程序怎么操作硬件
驱动程序无法直接使用硬件寄存器的物理地址,必须使用ioctl映射成一个虚拟地址,然后使用虚拟地址访问寄存器
怎么查看芯片手册来看引脚
0、查看芯片看LED原理图

1、使能

2、设置为GPIO5_3为GPIO

也就是要使得这个寄存器最后三位变成101
3、设置为输出功能

gpio_3 设置为输出,就是在将改寄存器的引脚3设置为1(芯片引脚从0开始的)
4、设置电位为高还是低(低就是点亮,高是熄灭)

o 表示高电位,1表示地电位
代码
- #include <linux/kernel.h>
- #include <linux/module.h>
- #include <linux/slab.h>
- #include <linux/init.h>
- #include <linux/fs.h>
- #include <linux/delay.h>
- #include <linux/poll.h>
- #include <linux/mutex.h>
- #include <linux/wait.h>
- #include <linux/uaccess.h>
- #include <linux/device.h>
- #include <asm/io.h>
- static int major;//主设备号
- static struct class *led_class; //类可以自动创建设备节点
- /* registers 定义指向硬件寄存器的指针,通过操作指针控制寄存器*/
- //volation 表示不进行优化
- /*
- 引脚设置
- 1、使能
- 2、配置成gpio
- */
- // IOMUXC_SNVS_SW_MUX_CTL_PAD_SNVS_TAMPER3 地址:0x02290000 + 0x14
- static volatile unsigned int *IOMUXC_SNVS_SW_MUX_CTL_PAD_SNVS_TAMPER3;//将GPIO5_3设置为GOIO模式
- // GPIO5_GDIR 地址:0x020AC004
- static volatile unsigned int *GPIO5_GDIR;//设置引脚是输入还是输出方向
- //GPIO5_DR 地址:0x020AC000
- static volatile unsigned int *GPIO5_DR;//控制引脚输出高电平还是低电平
- static ssize_t led_write(struct file *filp, const char __user *buf,
- size_t count, loff_t *ppos)
- {
- char val;
- int ret;
- /* copy_from_user : get data from app */
- ret = copy_from_user(&val, buf, 1);
- /* to set gpio register: out 1/0 */
- if (val)
- {
- /* set gpio to let led on */
- *GPIO5_DR &= ~(1<<3); //让bit3等于0
- }
- else
- {
- /* set gpio to let led off */
- *GPIO5_DR |= (1<<3); //让bit3等于1
- }
- return 1;
- }
- static int led_open(struct inode *inode, struct file *filp)
- {
- /* enable gpio5
- * configure gpio5_io3 as gpio
- * configure gpio5_io3 as output
- */
- *IOMUXC_SNVS_SW_MUX_CTL_PAD_SNVS_TAMPER3 &= ~0xf;
- //0xf = 1111 ~0xf = 0000
- //*IOMUXC_SNVS_SW_MUX_CTL_PAD_SNVS_TAMPER3 = *IOMUXC_SNVS_SW_MUX_CTL_PAD_SNVS_TAMPER3 & ~0xf;
- //清掉后四位就是将后四位与0&
- *IOMUXC_SNVS_SW_MUX_CTL_PAD_SNVS_TAMPER3 |= 0x5; //后三位101
- *GPIO5_GDIR |= (1<<3); //设置GPIO5引脚3为1表示输出,也就是芯片的第四个引脚
- return 0;
- }
- static struct file_operations led_fops = {
- .owner = THIS_MODULE,
- .write = led_write,
- .open = led_open,
- };
- /* 入口函数 */
- static int __init led_init(void)
- {
- printk("%s %s %d\n", __FILE__, __FUNCTION__, __LINE__);
- major = register_chrdev(0, "100ask_led", &led_fops);
- /* ioremap 将寄存器的物理地址转换成虚拟地址*/
- // IOMUXC_SNVS_SW_MUX_CTL_PAD_SNVS_TAMPER3 地址:0x02290000 + 0x14
- IOMUXC_SNVS_SW_MUX_CTL_PAD_SNVS_TAMPER3 = ioremap(0x02290000 + 0x14, 4);
- // GPIO5_GDIR 地址:0x020AC004
- GPIO5_GDIR = ioremap(0x020AC004, 4);
- //GPIO5_DR 地址:0x020AC000
- GPIO5_DR = ioremap(0x020AC000, 4);
- led_class = class_create(THIS_MODULE, "myled");
- device_create(led_class, NULL, MKDEV(major, 0), NULL, "myled"); /* /dev/myled */
- return 0;
- }
- static void __exit led_exit(void)
- {
- //清楚掉地址转换的结果
- iounmap(IOMUXC_SNVS_SW_MUX_CTL_PAD_SNVS_TAMPER3);
- iounmap(GPIO5_GDIR);
- iounmap(GPIO5_DR);
- device_destroy(led_class, MKDEV(major, 0));
- class_destroy(led_class);
- unregister_chrdev(major, "100ask_led");
- }
- module_init(led_init);
- module_exit(led_exit);
- MODULE_LICENSE("GPL");
P13 LED驱动程序框架
将共同的部分写成一个leddrv.c,然后其他不同部分就写不同文件里面
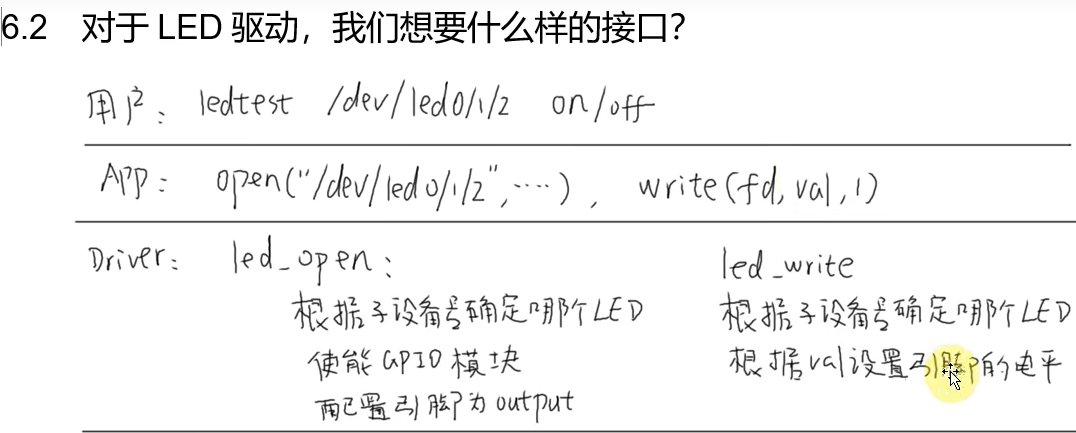
分层思想实现支持多个板子
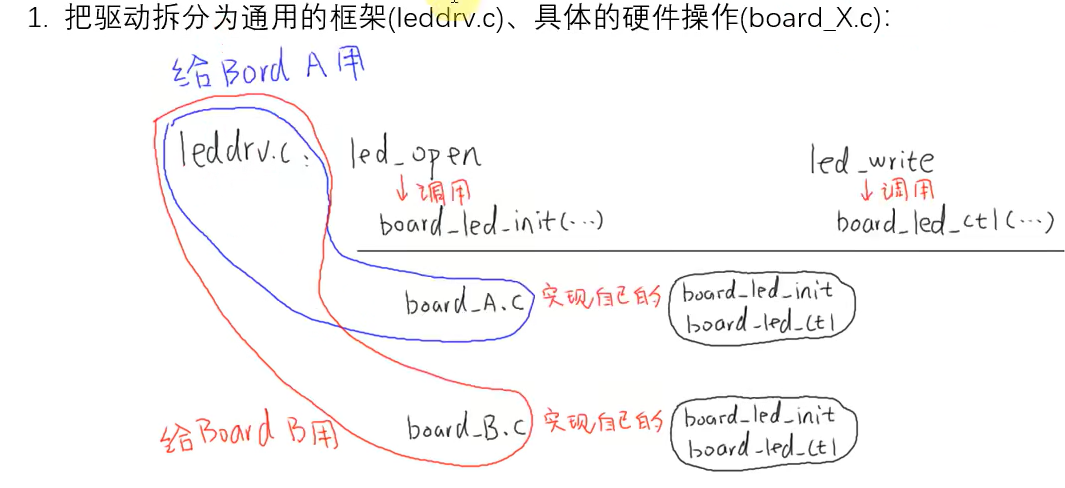
1、leddrv.c(通用部分)
- #include <linux/module.h>
- #include <linux/fs.h>
- #include <linux/errno.h>
- #include <linux/miscdevice.h>
- #include <linux/kernel.h>
- #include <linux/major.h>
- #include <linux/mutex.h>
- #include <linux/proc_fs.h>
- #include <linux/seq_file.h>
- #include <linux/stat.h>
- #include <linux/init.h>
- #include <linux/device.h>
- #include <linux/tty.h>
- #include <linux/kmod.h>
- #include <linux/gfp.h>
- #include "led_opr.h"
- #define LED_NUM 2
- /* 1. 确定主设备号 */
- static int major = 0;
- static struct class *led_class; //这个类自动创建出设备节点
- struct led_operations *p_led_opr; //创建指向led_operations结构体的指针
- #define MIN(a, b) (a < b ? a : b) //取最小值
- /* 3. 实现对应的open/read/write等函数,填入file_operations结构体 */
- static ssize_t led_drv_read (struct file *file, char __user *buf, size_t size, loff_t *offset)
- {
- printk("%s %s line %d\n", __FILE__, __FUNCTION__, __LINE__);
- return 0;
- }
- /* write(fd, &val, 1); */
- static ssize_t led_drv_write (struct file *file, const char __user *buf, size_t size, loff_t *offset)
- {
- int err;
- char status; //状态变量
- struct inode *inode = file_inode(file);
- int minor = iminor(inode); //获得次设备号
- printk("%s %s line %d\n", __FILE__, __FUNCTION__, __LINE__);
- err = copy_from_user(&status, buf, 1);//将数据从buf中拷贝到status中
- /* 根据次设备号和status控制LED */
- p_led_opr->ctl(minor, status);
- return 1;
- }
- static int led_drv_open (struct inode *node, struct file *file)
- {
- int minor = iminor(node);
- printk("%s %s line %d\n", __FILE__, __FUNCTION__, __LINE__);
- /* 根据次设备号初始化LED */
- p_led_opr->init(minor);
- return 0;
- }
- static int led_drv_close (struct inode *node, struct file *file)
- {
- printk("%s %s line %d\n", __FILE__, __FUNCTION__, __LINE__);
- return 0;
- }
- /* 2. 定义自己的file_operations结构体 */
- static struct file_operations led_drv = {
- .owner = THIS_MODULE,
- .open = led_drv_open,
- .read = led_drv_read,
- .write = led_drv_write,
- .release = led_drv_close,
- };
- /* 4. 把file_operations结构体告诉内核:注册驱动程序 */
- /* 5. 谁来注册驱动程序啊?得有一个入口函数:安装驱动程序时,就会去调用这个入口函数 */
- static int __init led_init(void)
- {
- int err;
- int i;
- printk("%s %s line %d\n", __FILE__, __FUNCTION__, __LINE__);
- major = register_chrdev(0, "100ask_led", &led_drv); /* /dev/led *///驱动程序的名字叫做100ask_led
- led_class = class_create(THIS_MODULE, "100ask_led_class");//创建一个生成设置节点的类名字叫做100ask_led_class
- err = PTR_ERR(led_class);
- if (IS_ERR(led_class)) {
- printk("%s %s line %d\n", __FILE__, __FUNCTION__, __LINE__);
- unregister_chrdev(major, "100ask_led");
- return -1;
- }
- //创建出多个设备节点
- for (i = 0; i < LED_NUM; i++)
- device_create(led_class, NULL, MKDEV(major, i), NULL, "100ask_led%d", i); /* /dev/100ask_led0,1,... */
- p_led_opr = get_board_led_opr();//获得单板结构体
- return 0;
- }
- /* 6. 有入口函数就应该有出口函数:卸载驱动程序时,就会去调用这个出口函数 */
- static void __exit led_exit(void)
- {
- int i;
- printk("%s %s line %d\n", __FILE__, __FUNCTION__, __LINE__);
- // 销毁设备节点
- for (i = 0; i < LED_NUM; i++)
- device_destroy(led_class, MKDEV(major, i)); /* /dev/100ask_led0,1,... */
- device_destroy(led_class, MKDEV(major, 0));
- class_destroy(led_class);
- unregister_chrdev(major, "100ask_led");
- }
- /* 7. 其他完善:提供设备信息,自动创建设备节点 */
- module_init(led_init);
- module_exit(led_exit);
- MODULE_LICENSE("GPL");
2、board.c(单板不同部分)
各种硬件操作函数的定义+操作函数的整合+提供操作函数整合后的指针
- #include <linux/module.h>
- #include <linux/fs.h>
- #include <linux/errno.h>
- #include <linux/miscdevice.h>
- #include <linux/kernel.h>
- #include <linux/major.h>
- #include <linux/mutex.h>
- #include <linux/proc_fs.h>
- #include <linux/seq_file.h>
- #include <linux/stat.h>
- #include <linux/init.h>
- #include <linux/device.h>
- #include <linux/tty.h>
- #include <linux/kmod.h>
- #include <linux/gfp.h>
- #include "led_opr.h"
- static int board_demo_led_init (int which) /* 初始化LED, which-哪个LED */
- {
- printk("%s %s line %d, led %d\n", __FILE__, __FUNCTION__, __LINE__, which);
- return 0;
- }
- static int board_demo_led_ctl (int which, char status) /* 控制LED, which-哪个LED, status:1-亮,0-灭 */
- {
- printk("%s %s line %d, led %d, %s\n", __FILE__, __FUNCTION__, __LINE__, which, status ? "on" : "off");
- return 0;
- }
- //填充操作函数
- static struct led_operations board_demo_led_opr = {
- .init = board_demo_led_init,
- .ctl = board_demo_led_ctl,
- };
- //获得操作函数的结构体指针
- struct led_operations *get_board_led_opr(void)
- {
- return &board_demo_led_opr;
- }
- #ifndef _LED_OPR_H //只有后面的存在,就不再往下执行
- #define _LED_OPR_H
- //创建操作函数的结构体
- struct led_operations {
- int (*init) (int which); /* 初始化LED, which-哪个LED */
- int (*ctl) (int which, char status); /* 控制LED, which-哪个LED, status:1-亮,0-灭 */
- };
- //声明一个函数
- struct led_operations *get_board_led_opr(void);//定义一个指针指向结构体Lled_operations
- #endif
P 19 驱动设计的思想:面向对象/分层/分离

用结构体来表示某个对象
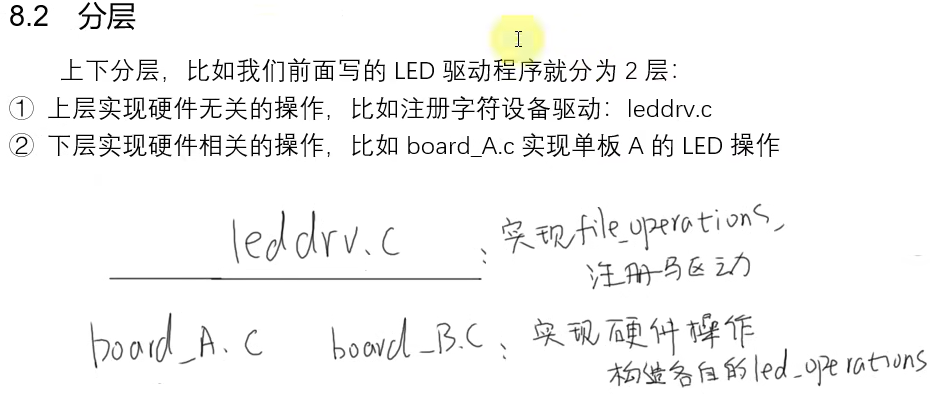
分离思想
将硬件怎么做?、用那个硬件分开

1、上下分层
将设计硬件的比如
初始化gpio、设置GPIO写成board.c
同用的就写在drv.c里面
2、左右分离
将board.c分成两部分
1、数据配置(资源)
2、硬件操作
P 20 驱动进化之路-总线设备驱动
为了使得兼容多个驱动,扩展了分离思想

硬件操作都在platform_driver 、资源分配都在platform_device上
platform_device(资源分配)使用那个LED灯
核心就是资源选择结构体
- #include "led_resource.h"
- //选择第三组第一个引脚
- static struct led_resource board_A_led = {
- .pin = GROUP_PIN(3,1),
- };
- //获得资源结构体的指针
- struct led_resource *get_led_resouce(void)
- {
- return &board_A_led;
- }
platform_device结构体中的struct resource结构体(各种各样的LED灯)
- ifndef _LED_RESOURCE_H
- #define _LED_RESOURCE_H
- /* GPIO3_0 */
- /* bit[31:16] = group */
- /* bit[15:0] = which pin */
- #define GROUP(x) (x>>16) //操作哪个GPIO组(16~31)
- #define PIN(x) (x&0xFFFF) //操作具体哪个引脚(0~15)
- #define GROUP_PIN(g,p) ((g<<16) | (p))//操作哪个GPIO组的哪个引脚
- //创建资源分配函数
- struct led_resource {
- int pin;
- };
- //定义一个函数获得资源分配函数指针
- struct led_resource *get_led_resouce(void);
- #endif
platform_driver(硬件操作)
核心就是硬件操作函数结构体
- static int board_demo_led_init (int which) /* 初始化LED, which-哪个LED */
- static int board_demo_led_ctl (int which, char status) /* 控制LED, which-哪个LED, status:1-亮,0-灭 */
设备树
将各种引脚配置参数存放在内核之外,配置文件dts(指定使用那个引脚),
然后将dts编译成dtb传给内核
内核解析dtb文件,构造出一系列的strcut platform_device 这类的
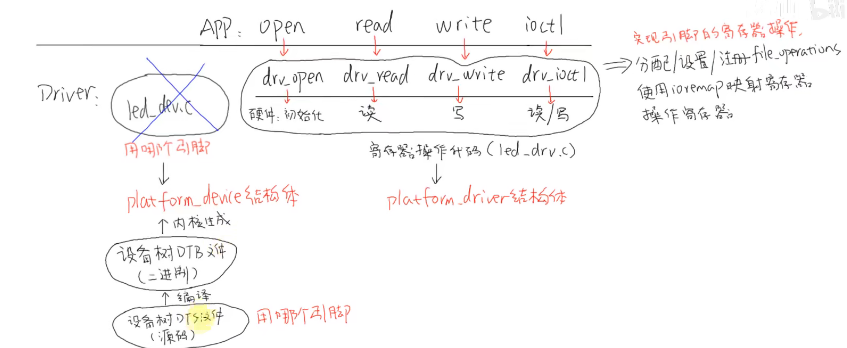
devicr 与drv怎么挂钩的

1、当我们注册一个平台设备,设备就会放在左边链表,注册一个平台drv就会放在右边链表
2、当注册设备或者驱动的时候,都会在对面查找是否有匹配的,匹配成功调用drv函数
3、怎么查找是否匹配成功?
bus结构体

1、先比较左边override非她不嫁,是否与右边的名字一样


2、比较左边的名字是否在右边id_table支持的范围内


3、比较左边的名字是否与右边的driver名字一样


代码有删减
- static int platform_match(struct device *dev, struct device_driver *drv)
- {
- /* When driver_override is set, only bind to the matching driver */
- if (pdev->driver_override)
- return !strcmp(pdev->driver_override, drv->name);
- /* Then try to match against the id table */
- if (pdrv->id_table)
- return platform_match_id(pdrv->id_table, pdev) != NULL;
- /* fall-back to driver name match */
- return (strcmp(pdev->name, drv->name) == 0);
- }
P 21 LED模板驱动程序的改造-总线设备驱动模型

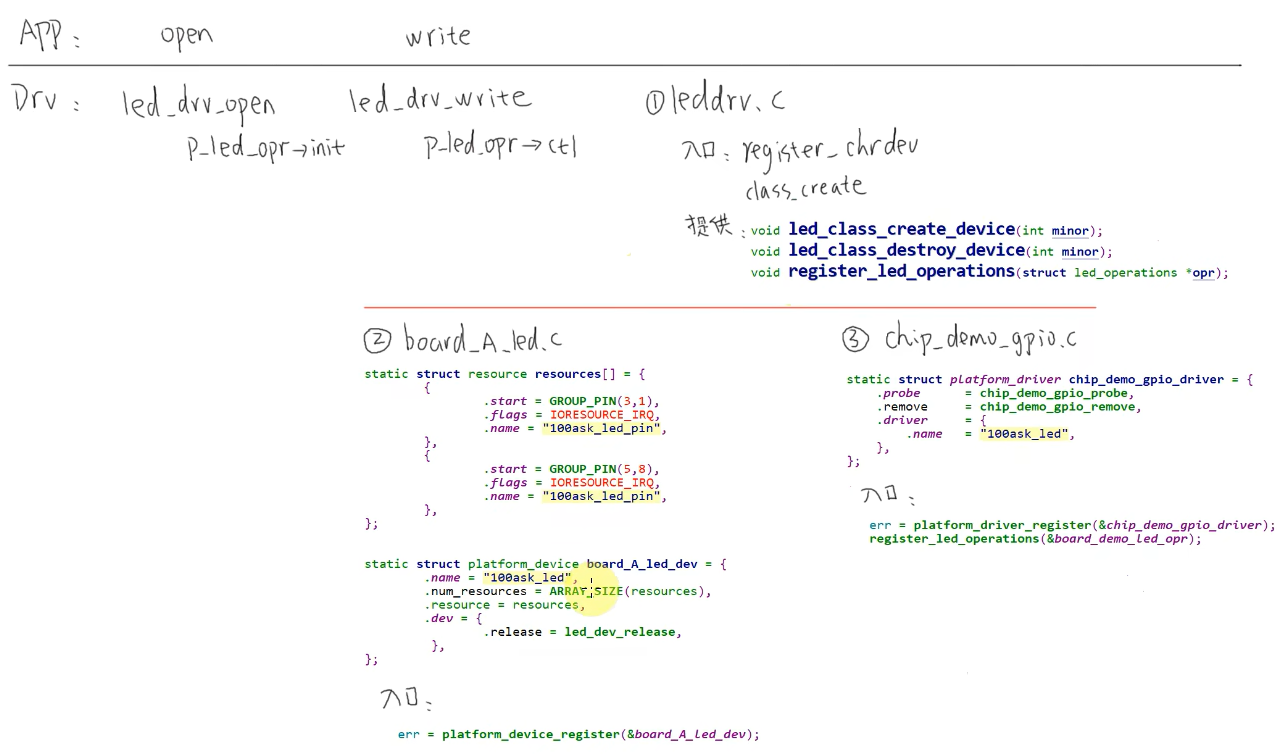
调用流程
1、应用层调用open函数,相应的驱动程序就会调用file_operations结构体成员变量里面的驱动led_drv_open函数,该函数调用底层提供的p_led_opr ->init去设置硬件
2、p_led_opr函数指针是底层芯片代码提供的,到底操作那个引脚是board.c来完成
新的框架

p 22 设备树的语法

将资源配置文件存放内核之外,我们只需要传入配置文件,内核就可以解析资源分配信息
配置文件是设备树写的
指定引脚资源就是给控制引脚的寄存器,赋给一个32位或16位的数,这个就可以选择使用某个引脚
基本语法
[label:] node-name[@unit-address] {
[properties [= value] ]
[child nodes]
}
A.[]——表示可选项
B.label:——标签,方便dts文件的引用,通过符号‘&’进行引用
C.node-name——节点名字
D.@unit-addresss——如果node没有reg属性,不需要该选项;如果有就必须和reg第 一个地址相等(The unit-address must match the first address specified in the
设备树文件在内核源码中,只要进入内核源码目录,直接make dtbs 就可以然后板子会自动加载设备树文件(实际上是uboot传给内核的)
常用属性
1、#address_cells、 #size_cells
address-cells:address 要用多少个 32 位数来表示地址
size-cells:size 要用多少个 32 位数来表示大小
2、compatible
板子可以兼容的模块
3、model
板子实际的型号
4、status
dtsi 文件中定义了很多设备,但是在你的板子上某些设备是没有的。这时 你可以给这个设备节点添加一个 status 属性,设置为“disabled,取消这个设备树的设备
5、reg
它可以用来描述一段空间
p23 内核对设备树的处理与使用

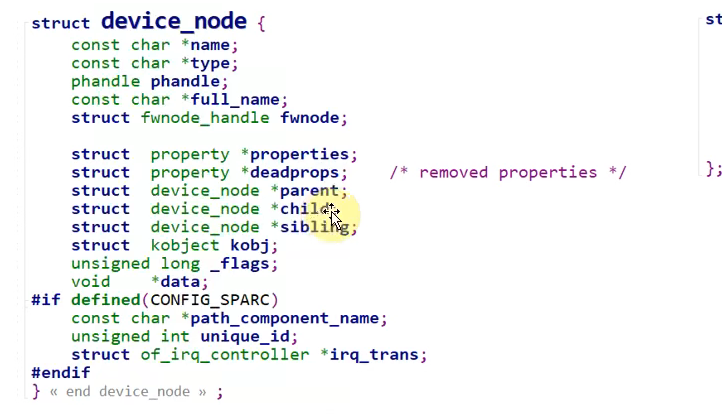
我们可以通过该节点找到它的父亲节点和孩子节点
可以转换成结构体的节点
哪些不能转换成节点的node不是说没作用,而是他们被父节点操控吗,都会有作用的

1、也就是说根节点下的子节点要是有compatile就可以转换成结构体
2、一个节点有compatile并且它的值是simple_bus、simple-mfd、isa、arm、amba-bus,它的子节点也可以生成结构体
platform_device 与 platform_driver匹配
在设备树的添加之后的匹配
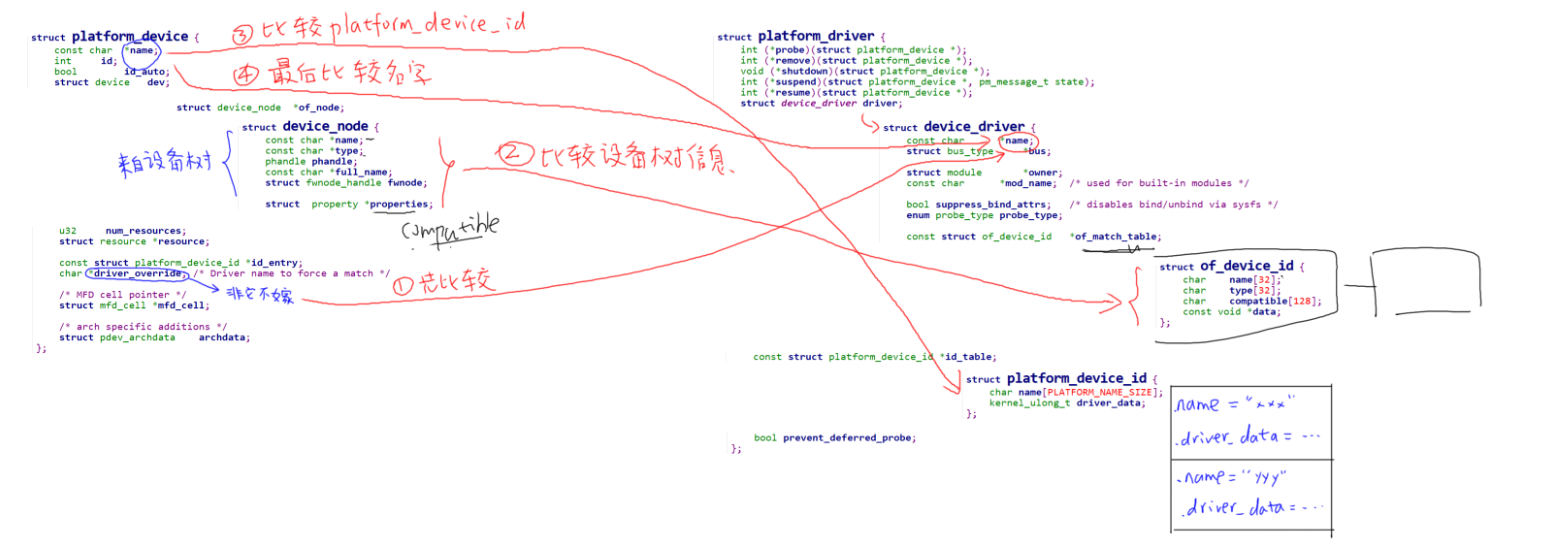
在node节点中name、type、和properties链表下的compstible属性三项找对应的platform_driver
在match_table中也有上面三个属性,三个只要有一个相同就可以,三个属性的匹配优先级不同下面是最高的
内核里面函数操作设备树的device_node资源转换成platform_device的资源
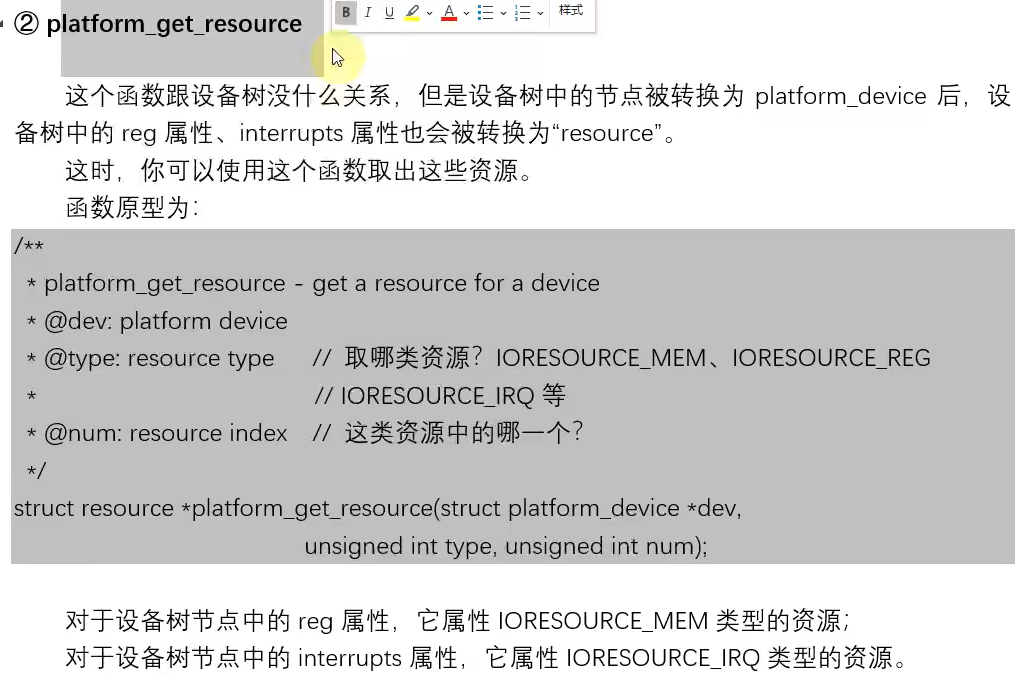
platform_device 中含有resoure数组,它来自device_node的reg、interrupters属性
内核提供很多函数, 可以通过它获得其他属性
将设备树转换的platform_device 的信息传输到驱动设备platform_drv中
真正负责底层硬件的读写函数
- struct led_operations {
- int (*init) (int which); /* 初始化LED, which-哪个LED */
- int (*ctl) (int which, char status); /* 控制LED, which-哪个LED, status:1-亮,0-灭 */
- };
怎么写一个好的设备树文件
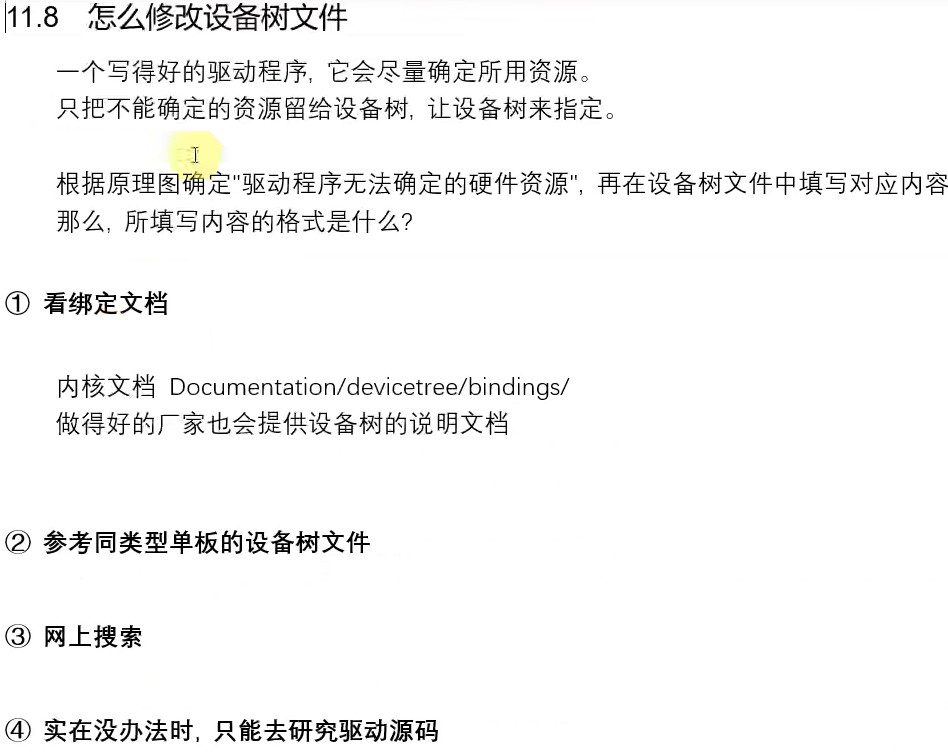
P24 LED模板驱动程序的改造-设备树
加载流程
1、先将驱动文件写好编译好
2、在内核中修改好设备树文件,然后再内核主目录编译,然后放到共享文件夹中
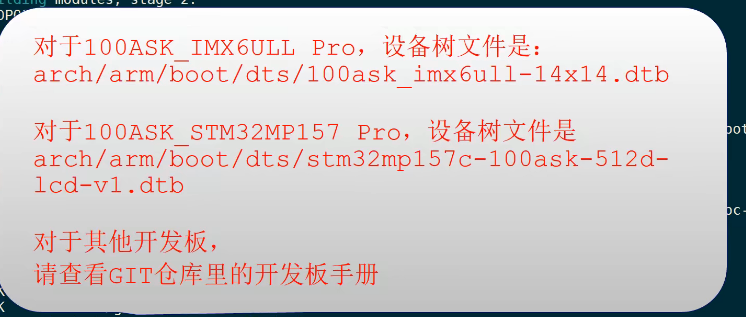
3、将设备树文件存放到/boot下面
4、重启之后就会加载设备树文件
5、可以看到


实际我的platform在是下面那个
编写设备树核心-设备树节点指定资源,platform_driver获得资源
- static int chip_demo_gpio_probe(struct platform_device *pdev)//传入资源设备指针
- {
- struct device_node *np;//创建一个指向node的指针
- int err = 0;
- int led_pin;
- np = pdev->dev.of_node; //取出node节点
- if (!np) //节点不存在
- return -1;
- err = of_property_read_u32(np, "pin", &led_pin);//读取节点属性值
- g_ledpins[g_ledcnt] = led_pin;//将读出的数据存放到数组g_ledpins[]中
- led_class_create_device(g_ledcnt);//创建出设备节点
- g_ledcnt++;
- return 0;
APP怎么获得按键值

除了第一种其他的都涉及到了中断服务程序
1、
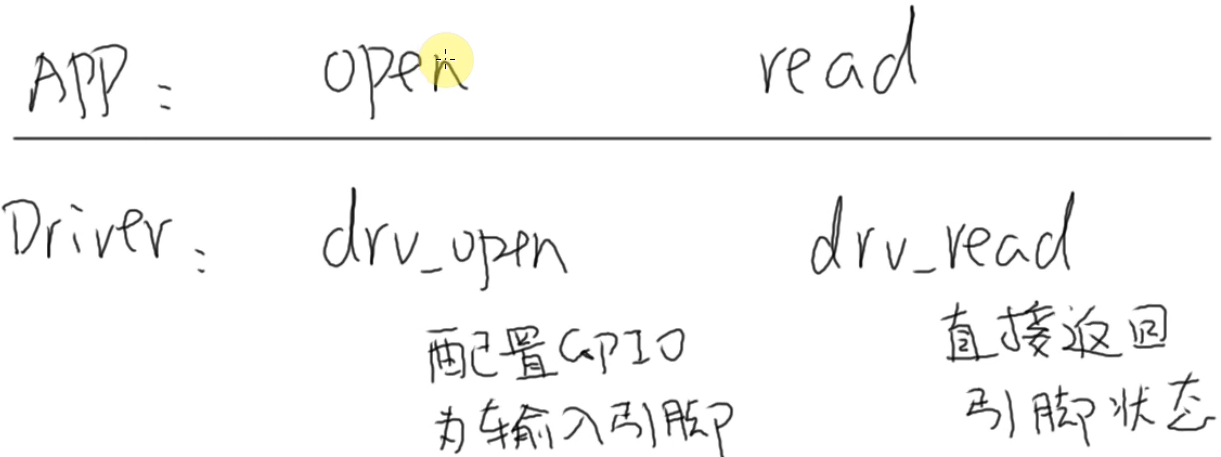
APP打开文件,调用驱动的drv_open函数来配置GPIO引脚为输入模式
然后app使用read函数,驱动调用drv_read获得引脚的状态
while(1) 里面循环执行
2、
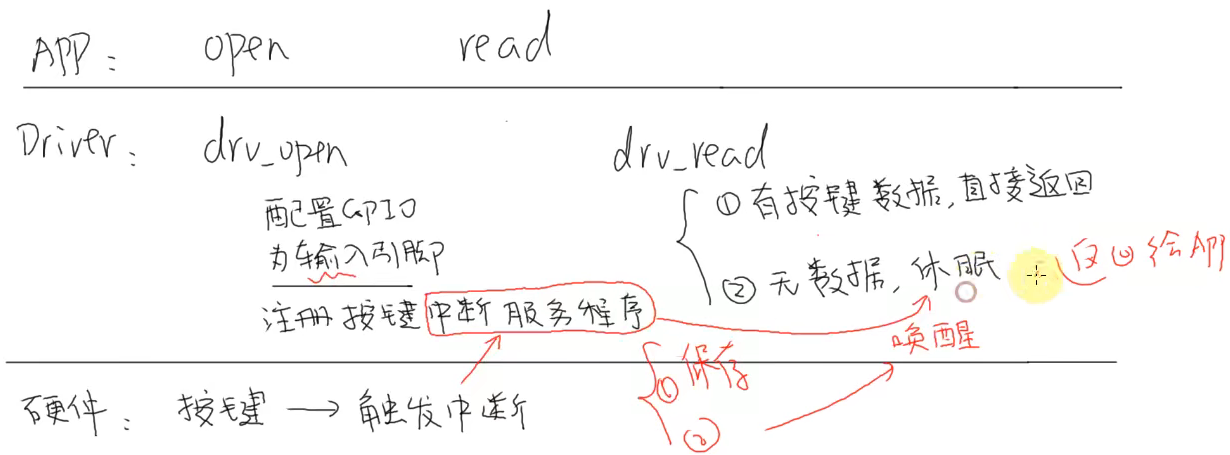
这个与上一个差不多,驱动的open函数还会注册一个中断服务程序,驱动的read函数要是可以读到数据就直接返回,没有就等待
当我们按下按键,就会触发中断,中断就会保存按键数据,然后唤醒等待
3、

在上面基础上增加一个drv_poll,要是有数据poll函数就会返回一个状态给read函数,表示有按键
要是没有数据,poll函数机会休眠,这个休眠时间是用户自己指定的,到了就会自动唤醒返回一个状态表示没有数据。
4、异步通知(发信号)
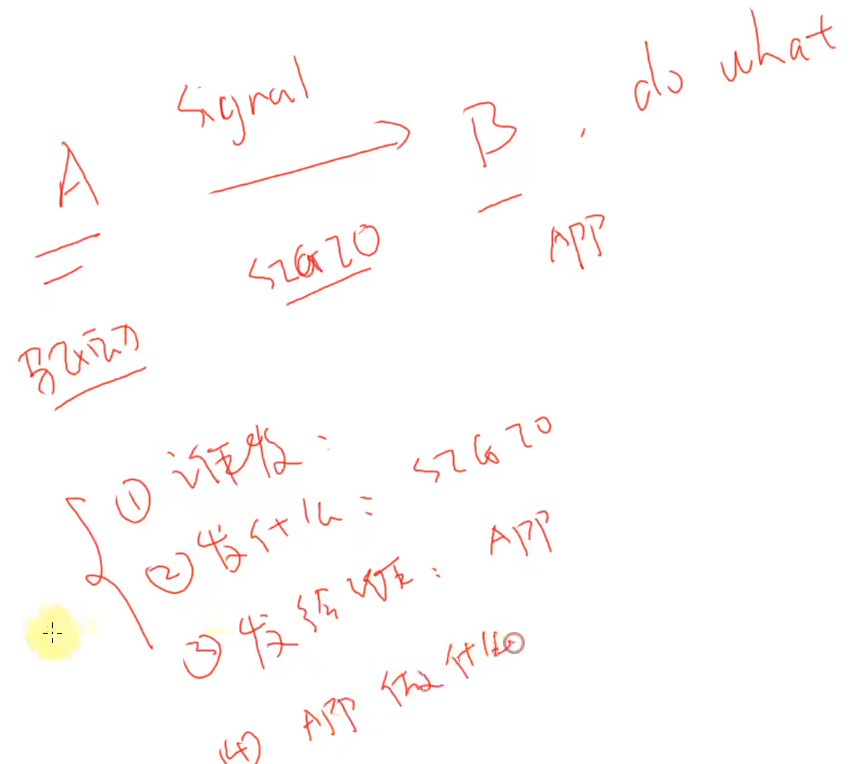
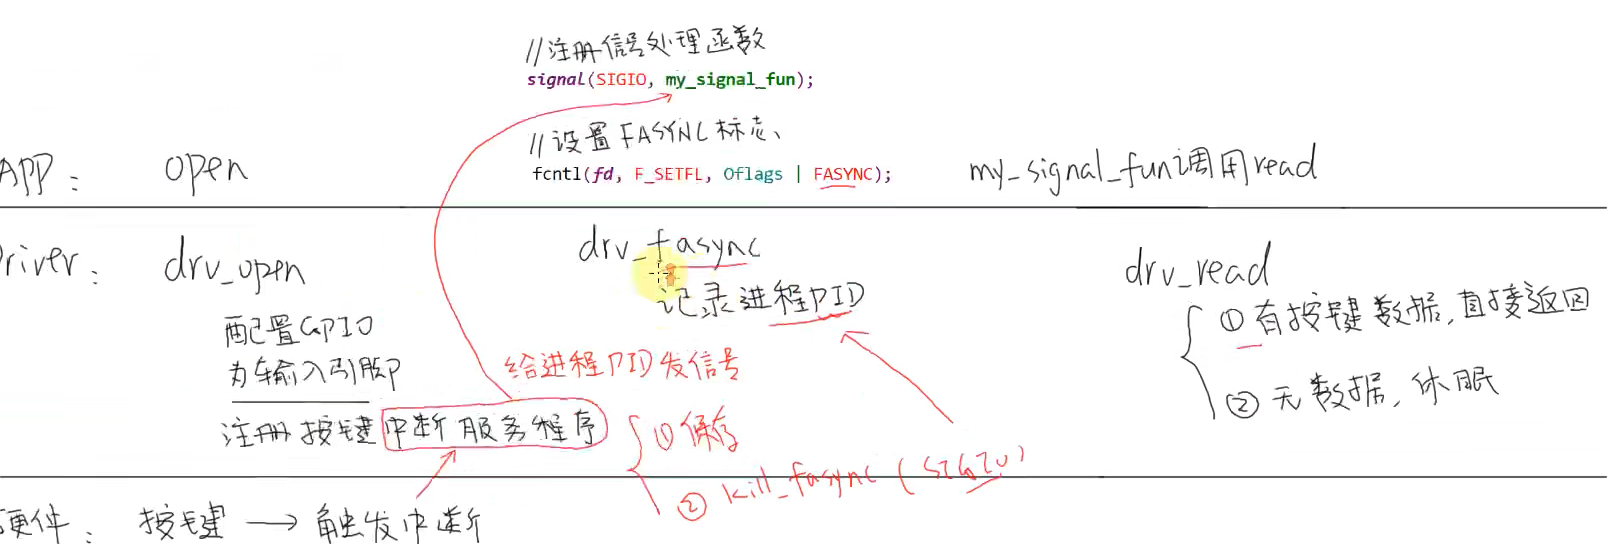

中断程序会记录按键数据,然后给进程发送信号,app收到信号会先执行信号处理函数,在信号处理函数中使用read去读取按键值
核心:驱动给app发信号,然后app执行中断处理函数
Princtrl 与GPIO
要操作 GPIO 引脚,先把所用引脚配置为 GPIO 功能,这通过 Pinctrl 子系 统来实现。
然后就可以根据设置引脚方向(输入还是输出)、读值──获得电平状态,写 值──输出高低电平
以前我们通过寄存器来操作 GPIO 引脚,即使 LED 驱动程序,对于不同的板 子它的代码也完全不同。
当 BSP 工程师实现了 GPIO 子系统后,我们就可以:
在设备树里指定 GPIO 引脚
在驱动代码中:使用 GPIO 子系统的标准函数获得 GPIO、设置 GPIO 方向、读 取/设置 GPIO 值。
这样的驱动代码,将是单板无关的。
Princtrl 子系统
设置每个引脚的作用,需要设置某些寄存器,为了便于操作我们引入了Printcrl子系统,我们直接调用函数来设置某个引脚的作用
Pinctrl子系统来选择引脚的功能(mux function)、配置引脚
bsp工程师就是把自己芯片的支持加入到Princtrl系统中去
Princtrl子系统是服务端,client是客户端会调用子系统中的节点
在设备树文件中添加一个UATR节点,叫做一个client,子系统的一个客户,会使用print子系统
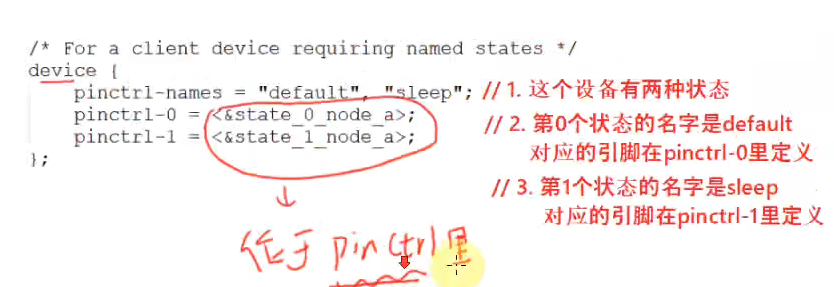
通过pinctrl-name 定义引脚的两个状态,后面通过pinctrl-0、pinctrl-1来设置(这些节点是预先设置好了的)
复用引脚 :在gpio口的作用上,还可以实现其他作用
设置引脚:
具体的pinctrl函数

GPIO 子系统
通过gpio子系统我们可以直接在设备树中)(也就是对gpio口进行操作)
当一个引脚被复用为GPIO功能时,我们可以去设置它的方向、设置/读取它的值
管理GPIO,技能支持芯片本身的GPIO,也能支持扩展的GPIO
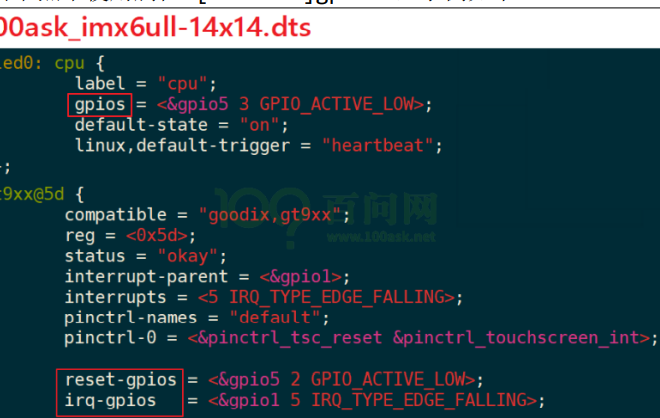
提供统一的、便捷的访问接口,实现:输入、输出、中断1、在设备树下指定使用那组的哪个引脚
gpio-controller
每一组gpio都有一个gpio-controller//表示这个节点是一个 GPIO Controller,它下面有很 多引脚r; #gpio-cells =
表示这个控制器下每一个引脚要用 2 个 32 位的数 (cell)来描述。
普遍的用法是,用第 1 个 cell 来表示哪一个引脚,用第 2 个 cell 来表示 有效电平:
GPIO_ACTIVE_HIGH : 高电平有效 GPIO_ACTIVE_LOW : 低电平有效
2、 在驱动代码中调用 GPIO 子系统
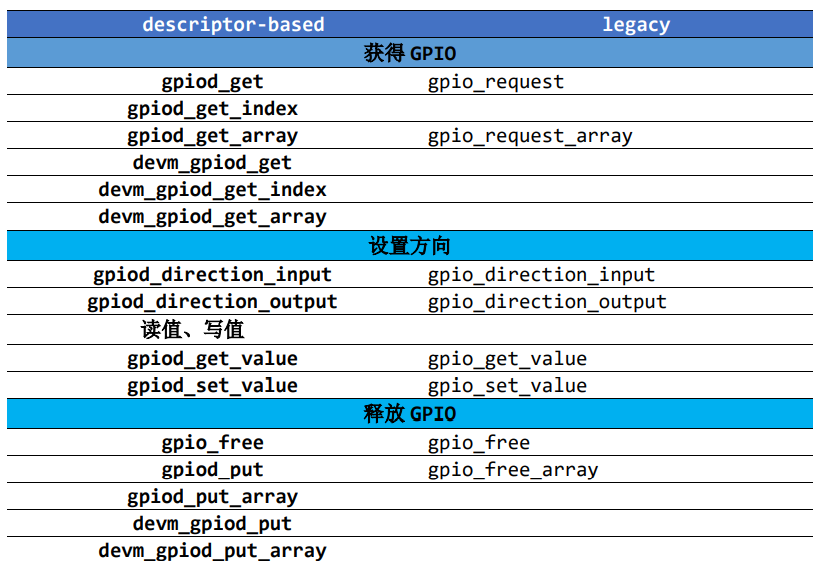
驱动程序中要包含头文件
下表列出常用的函数
基于 GPIO 子系统的 LED 驱动程序
驱动代码的修改
1、与设备树中的节点complatile对应
- static const struct of_device_id ask100_leds[] = {
- { .compatible = "100ask,leddrv" },
- { },
2、在 probe 函数中获得 GPIO
3、在 open 函数中调用 GPIO 函数设置引脚方向
4、在 write 函数中调用 GPIO 函数设置引脚值
5、释放 GPIO
设备树文件的修改
1、Pinctrl 信息
- &iomuxc_snvs {
- ……
- myled_for_gpio_subsys: myled_for_gpio_subsys{
- fsl,pins = <
- MX6ULL_PAD_SNVS_TAMPER3__GPIO5_IO03 0x000110A0
- >;
- };
2、 设备节点信息(放在根节点下):
- myled {
- compatible = "100ask,leddrv";
- pinctrl-names = "default";
- pinctrl-0 = <&myled_for_gpio_subsys>;
- led-gpios = <&gpio5 3 GPIO_ACTIVE_LOW>;
- };
异常与中断的概念及处理流程

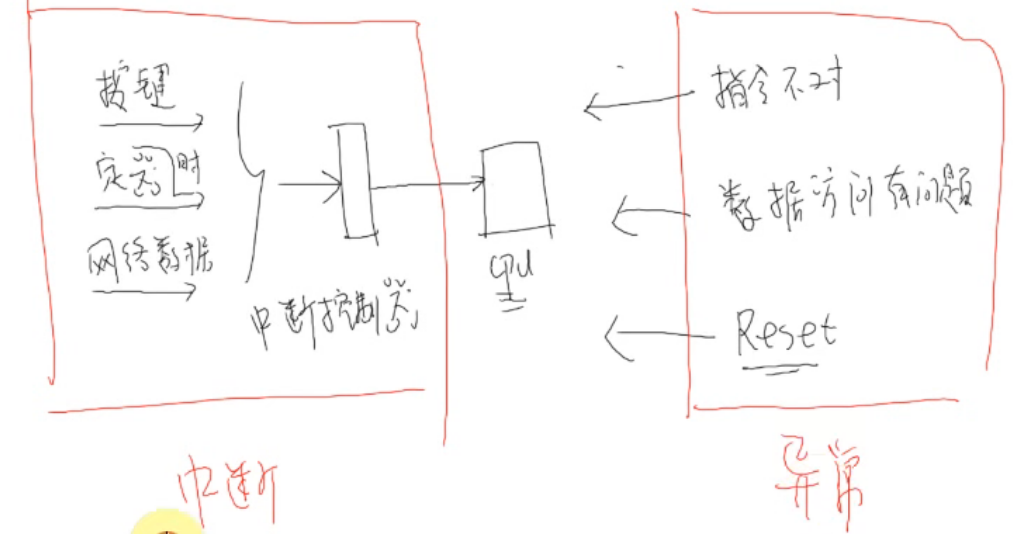
中断的处理
1、保存现场(各类寄存器)
2、去处理(中断)
3、恢复现场
ARM对异常(中断)的使用过程

0、中断也是一种异常
1、cpu总开关可以屏蔽所有的中断
2、cpu每执行完一条指令都会检查一下是否有中断
3、对于不同的异常,跳去不同的地址执行程序,这些地址上只是一条跳转指令,跳出执行其他函数
异常向量表
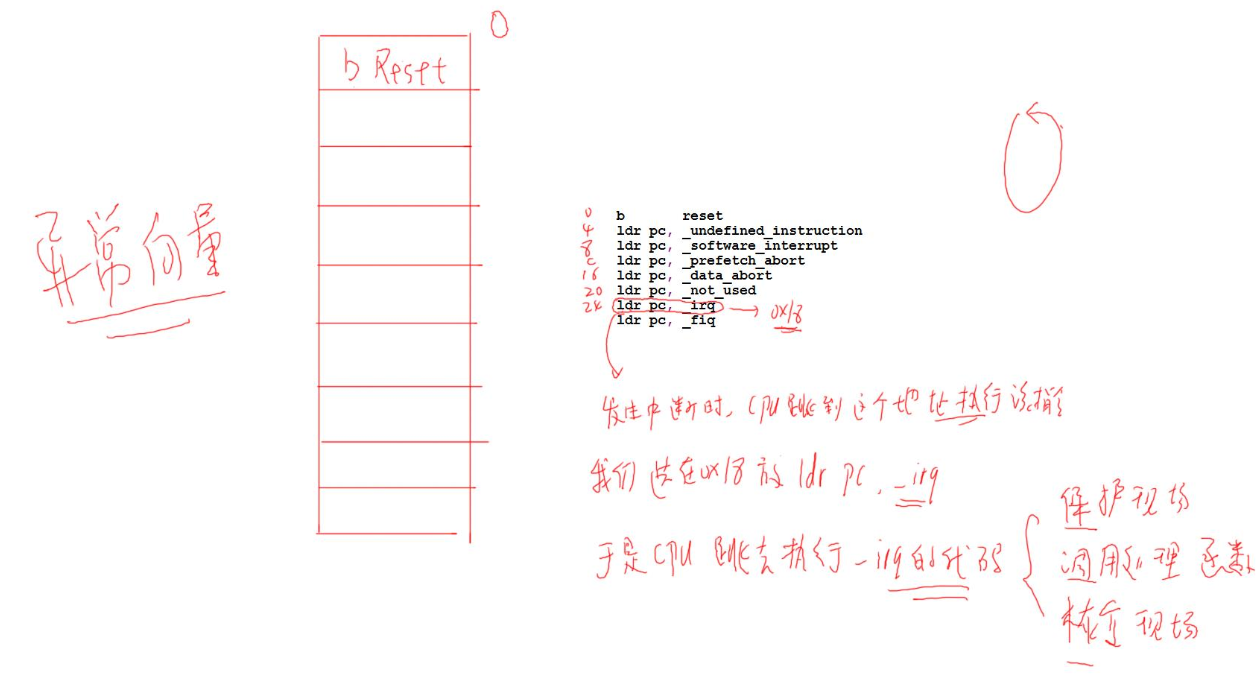
总结中断处理过程

进程线程中断的核心-栈
cpu对内存只有读写两种指令

cpu内部有很多寄存器,执行 a = a + b,先是将a读到内存的寄存器中,然后将b读到寄存器中,然后内部执行a + b 结果存放在a中,最后将a存放到内存中
在切出去的时候,间cpu中的寄存器数据存放在栈里面,等继续执行的时候就会将栈中寄存器的数据存放到cpu中
进程调度核心

进程共享数据和代码,但是每个线程都有自己的栈空间
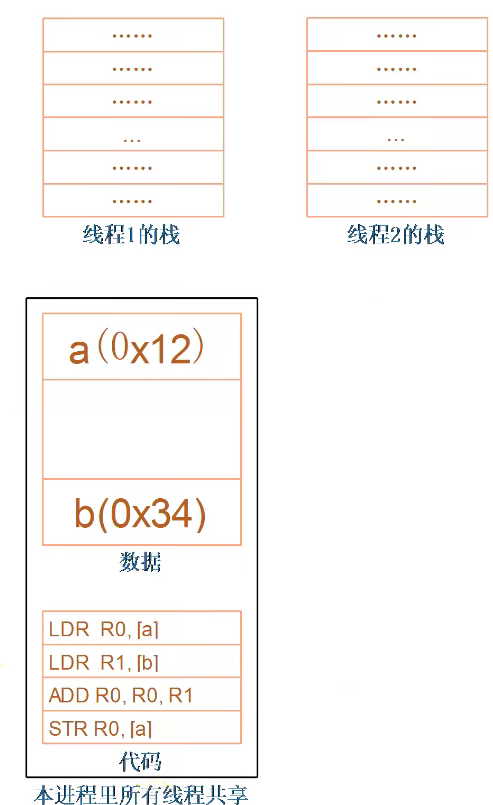
对中断处理的演进
中断的上下部
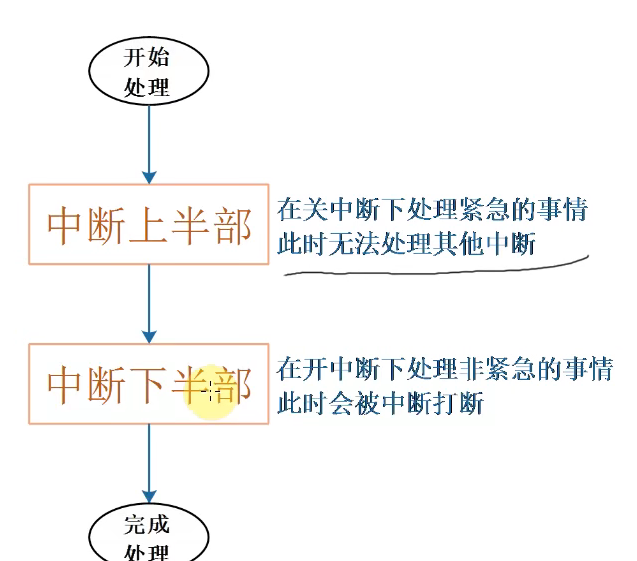

中断就像是有一个中断数组,每一个中断项就对应一个位置里面存放了中断函数。
cpu一旦发生了硬件中断就会跳到硬件中断数组中,然后寻找对应的执行函数,
软件中断一旦发生先设置中断标志位为1,等硬件中断都执行完了,就会执行软件中断
硬件中断由硬件产生,软件中断是人为设置的,核心函数raise_softirq,设置标志位为1,代表了发生中断
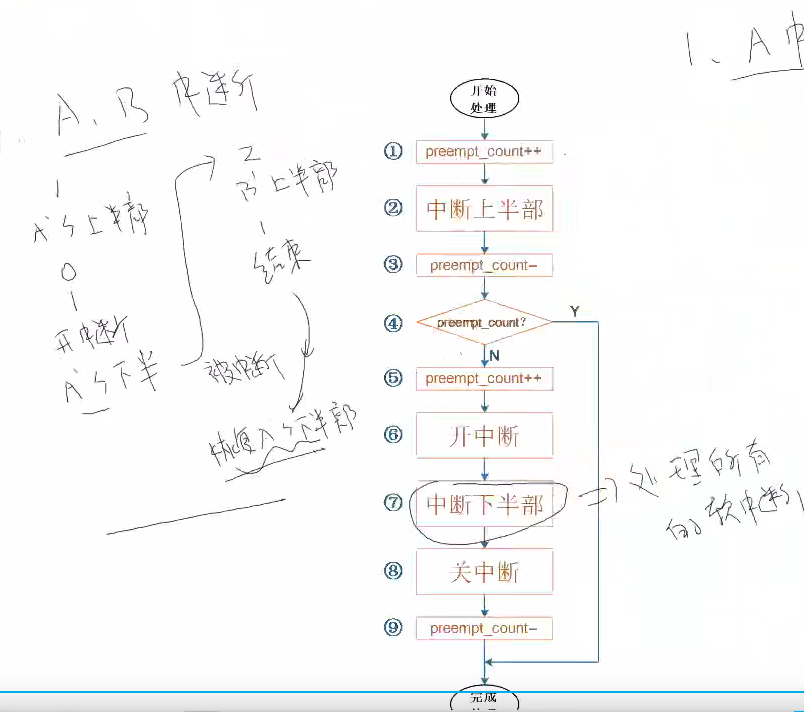
preempt_count 为零表示没有中断在进行,为1表示有一个中断在进行中
中断下半部是处理所有中断的下半部
工作队列
将下半部耗时间的中断变成一个线程与应用线程一起运行

等处理完上半部就把work放进队列里面,后面会和其他线程一起参与调度
新技术:线程化的中断
对每一个中断都创建一个内核线程

给中断创建一个线程,等上半部分函数执行结束也就是中断上半部分,就会调用线程函数执行下半部中断
中断中的重要的数据结构
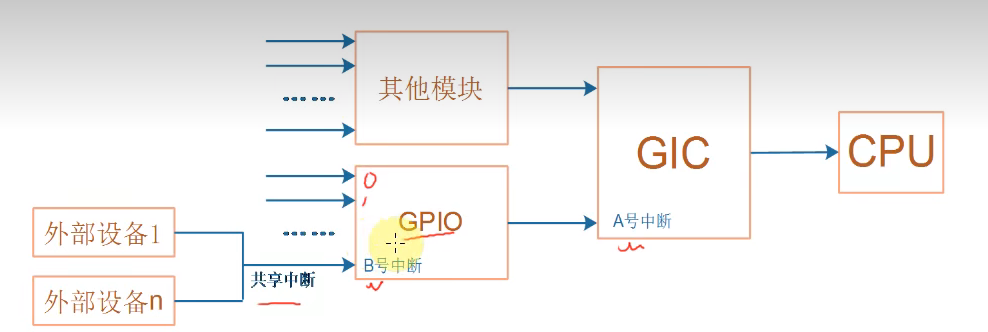
cpu先读取A中断控制器的寄存器来判断是B发出的中断还是其他模块发出的中断
1、在A中有一个中断数组irq_desc[A].handle_irq去细分是那个中断产生的
2、A中有一个中断处理函数链表irq action
要是发现是发生的是B号中断,就会读取B中断控制器中的寄存器来判断是具体那个设备发出的中断
1、在B中有一个中断数组irq_desc[B].handle_irq去细分是那个中断产生的
2、B中有一个中断处理函数链表irq action
GIC送中断给CPU,然后GPIO送中断给GIC
两个中断,一个是gpio的中断另一个是GIC的中断
1、A会调用直接的irg来确定,中断是那个部分产生的,然后去左边执行对应的函数。
2、B也会调用handle函数来确定是左边哪个外设产生的中断信号,然后去action链表中找到执行对应的函数
irq_handler_t hander 上半部中断
irq_handler_t thread_fn 下半部中断
在设备树中添加指定中断
1、中断控制器节点
在设备树中描述一个中断控制器
找到对应的驱动程序 加上compatible
表示是一个中断控制器 加上 interrupt-controller
用多少位来描述一个中断控制器 cell

2、设备节点
compliation 表示需要那个驱动通过这个找到驱动
gpios 表明该节点需要使用那几个gpio
pinctrl 配置引脚为gpio功能
代码中可以直接将gpio名字转换成中断号
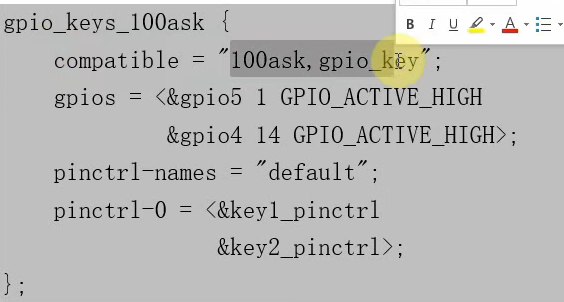
一般使用中断需要在设备树节点指定中断,但是对于gpio内核中有一个函数,就不需要指定使用什么中断,我们可以直接把gpio号转换为中断号
1、修改驱动程序
1、获得中断号
2、编写中断处理函数
3、request_irq
- //该结构体接受了node节点中gpio口的信息
- struct gpio_key{
- int gpio;
- struct gpio_desc *gpiod;
- int flag;
- int irq;
- } ;
- static struct gpio_key *gpio_keys_100ask;
- //中断实现函数
- static irqreturn_t gpio_key_isr(int irq, void *dev_id)
- {
- struct gpio_key *gpio_key = dev_id;
- int val;
- val = gpiod_get_value(gpio_key->gpiod);
- printk("key %d %d\n", gpio_key->gpio, val);
- return IRQ_HANDLED;
- }
- /* 1. 从platform_device获得GPIO
- * 2. gpio=>irq
- * 3. request_irq
- */
- static int gpio_key_probe(struct platform_device *pdev)
- {
- int err;
- struct device_node *node = pdev->dev.of_node;//device_node 是platform-device结构体里面的
- int count;
- int i;
- enum of_gpio_flags flag;
- unsigned flags = GPIOF_IN;
- printk("%s %s line %d\n", __FILE__, __FUNCTION__, __LINE__);
- count = of_gpio_count(node);
- if (!count)
- {
- printk("%s %s line %d, there isn't any gpio available\n", __FILE__, __FUNCTION__, __LINE__);
- return -1;
- }
- //1、从设备树获得GPIO信息存放到gpio_keys_100ask数组中去
- gpio_keys_100ask = kzalloc(sizeof(struct gpio_key) * count, GFP_KERNEL);
- for (i = 0; i < count; i++)
- {
- gpio_keys_100ask[i].gpio = of_get_gpio_flags(node, i, &flag);//获得节点node的第i个节点并且把flag保存下来
- if (gpio_keys_100ask[i].gpio < 0)
- {
- printk("%s %s line %d, of_get_gpio_flags fail\n", __FILE__, __FUNCTION__, __LINE__);
- return -1;
- }
- gpio_keys_100ask[i].gpiod = gpio_to_desc(gpio_keys_100ask[i].gpio);
- gpio_keys_100ask[i].flag = flag & OF_GPIO_ACTIVE_LOW;
- if (flag & OF_GPIO_ACTIVE_LOW)
- flags |= GPIOF_ACTIVE_LOW;
- err = devm_gpio_request_one(&pdev->dev, gpio_keys_100ask[i].gpio, flags, NULL);
- //2、利用函数将gpio转换成中断号
- gpio_keys_100ask[i].irq = gpio_to_irq(gpio_keys_100ask[i].gpio);
- }
- for (i = 0; i < count; i++)
- {
- //申请中断,调用中断函数
- err = request_irq(gpio_keys_100ask[i].irq, gpio_key_isr, IRQF_TRIGGER_RISING | IRQF_TRIGGER_FALLING, "100ask_gpio_key", &gpio_keys_100ask[i]);
- }
- return 0;
- }
- static int gpio_key_remove(struct platform_device *pdev)
- {
- //int err;
- struct device_node *node = pdev->dev.of_node;
- int count;
- int i;
- count = of_gpio_count(node);//获得引脚个数
- for (i = 0; i < count; i++)
- {
- free_irq(gpio_keys_100ask[i].irq, &gpio_keys_100ask[i]);
- }
- kfree(gpio_keys_100ask);
- return 0;
- }
- //该结构体保存与设备树节点匹配的名字
- static const struct of_device_id ask100_keys[] = {
- { .compatible = "100ask,gpio_key" },
- { },
- };
- /* 1. 定义platform_driver */
- static struct platform_driver gpio_keys_driver = {
- .probe = gpio_key_probe,
- .remove = gpio_key_remove,
- .driver = {
- .name = "100ask_gpio_key",
- .of_match_table = ask100_keys,//跳转到上面的结构体 struct of_device_id ,获取.compatible属性,这个是与设备树节点compatible的值是相同的
- },
- };
- /* 2. 在入口函数注册platform_driver */
- static int __init gpio_key_init(void)
- {
- int err;
- printk("%s %s line %d\n", __FILE__, __FUNCTION__, __LINE__);
- err = platform_driver_register(&gpio_keys_driver);
- return err;
- }
- /* 3. 有入口函数就应该有出口函数:卸载驱动程序时,就会去调用这个出口函数
- * 卸载platform_driver
- */
- static void __exit gpio_key_exit(void)
- {
- printk("%s %s line %d\n", __FILE__, __FUNCTION__, __LINE__);
- platform_driver_unregister(&gpio_keys_driver);
- }
- /* 7. 其他完善:提供设备信息,自动创建设备节点 */
- module_init(gpio_key_init);
- module_exit(gpio_key_exit);
- MODULE_LICENSE("GPL");
2、修改设备树文件
1、pinctrl
2、设备节点
十九、驱动程序的基石
1、休眠与唤醒

上层的应用read函数会调用底层的read函数
底层read函数当有按键值就会返回,没有就会应用就会休眠
 判断是否有按键值,有就会继续向下走,没有就会休眠
将自己存放到等待队列,event等于true就会休眠
 将按键值保存到用户空间
 返回给应用程序
触发硬件中断之后,就会保存下按键值,然后唤醒应用程序,底层read函数将保存的按键值传给应用程序
 在等待队列里面唤醒线程
在执行驱动在执行read函数的的时候,就会陷入休眠
- 中断休眠函数
- * 实现对应的open/read/write等函数,填入file_operations结构体 */
- static ssize_t gpio_key_drv_read (struct file *file, char __user *buf, size_t size, loff_t *offset)
- {
- //printk("%s %s line %d\n", __FILE__, __FUNCTION__, __LINE__);
- int err;
- wait_event_interruptible(gpio_key_wait, g_key);//要是g_key等于0,就会陷入休眠
- err = copy_to_user(buf, &g_key, 4);
- g_key = 0;
- return 4;
- }
- //中断唤醒函数
- static irqreturn_t gpio_key_isr(int irq, void *dev_id)
- {
- struct gpio_key *gpio_key = dev_id;
- int val;
- val = gpiod_get_value(gpio_key->gpiod);
- printk("key %d %d\n", gpio_key->gpio, val);
- g_key = (gpio_key->gpio << 8) | val;
- wake_up_interruptible(&gpio_key_wait);//唤醒休眠队列
- return IRQ_HANDLED;
- }
等待中断唤醒函数被调用,就会触发中断唤醒函数
2、POLL机制
闹钟闹醒
设置闹钟时间

内核中的poll
第一次进入for循环,发现没有数据就陷入修眠,等时间到了再次进入for循环发现没有数据但是已经超时间了,就会return返回
内核中的poll的作用
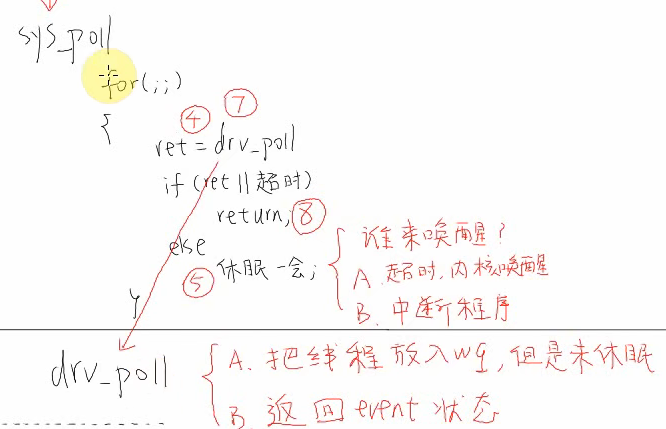
先poll检测事件,然后再调用read函数
3、异步通知(软件中断)
不休眠,等别人(中断)通知再去执行要做的事情
核心就是发信号
也就是驱动程序主动通知APP,然后app去处理这个信号
用户程序:
- 1、signal(SIGIO, input_handler); //安装信号处理函数
- 2、打开驱动
- 3、将进程pid告诉驱动
- 4、打开驱动的异步通知功能
驱动支持
当驱动中有数据,驱动就会调用这个函数给应用发出一个信号 kill_fasync(PID,SIGIO)
4、阻塞与非阻塞
阻塞:调用read函数读取按键的时候要是没有获得数据,read函数就会休眠等待
非阻塞:调用read函数读取按键的时候不管有没有获得数据,read函数都会直接返回
5、定时器
1、时间
2、做事情
等到了指定的时间,就会执行指定的函数
6、中断下半部(tasklet)
将一些麻烦的一起·都存放在下半部执行
7、工作队列
将下半部存放在一个线程队列中,这样中断也可以参与线程调度
8、中断的线程化处理
给每一中断都创建一个线程,都可以参与线程调度
9、mmap基础知识
将内核中的数据映射到用户态,app可以直接读取内核中的数据,加快了数据传输
-
相关阅读:
数组模拟队列进阶版本——环形队列(真正意义上的排队)
程序环境和预处理
java-php-python-宠物救助网站的设计与实现计算机毕业设计
java计算机毕业设计水果销售管理网站源码+系统+数据库+lw文档
Django2.2序列化 ‘str‘ object has no attribute ‘decode‘
【数据库】Navicate运行数据区sql文件 1046 no database selected
惊!这么好用的纯html网页模板可还行?偷偷拿去做作业真是绝绝子!!
MySQL是如何保证数据不丢失的
数据结构 2 第二章 线性结构 代码实现
Nginx proxy_pass 详解
- 原文地址:https://blog.csdn.net/qq_43448818/article/details/127905885
