-
mybatis
mybatis
[01-MyBatis简介_哔哩哔哩_bilibili]()
1 Mybatis概述
1.1 Mybatis概念
-
MyBatis 是一款优秀的持久层框架,用于简化 JDBC 开发
-
MyBatis 本是 Apache 的一个开源项目iBatis, 2010年这个项目由apache software foundation 迁移到了google code,并且改名为MyBatis 。2013年11月迁移到Github
-
官网:https://mybatis.org/mybatis-3/zh/index.html
持久层:
-
负责将数据到保存到数据库的那一层代码。
以后开发我们会将操作数据库的Java代码作为持久层。而Mybatis就是对jdbc代码进行了封装。
-
JavaEE三层架构:表现层、业务层、持久层
三层架构在后期会给大家进行讲解,今天先简单的了解下即可。
框架:
- 框架就是一个半成品软件,是一套可重用的、通用的、软件基础代码模型
- 在框架的基础之上构建软件编写更加高效、规范、通用、可扩展
举例给大家简单的解释一下什么是半成品软件。大家小时候应该在公园见过给石膏娃娃涂鸦

如下图所示有一个石膏娃娃,这个就是一个半成品。你可以在这个半成品的基础上进行不同颜色的涂鸦
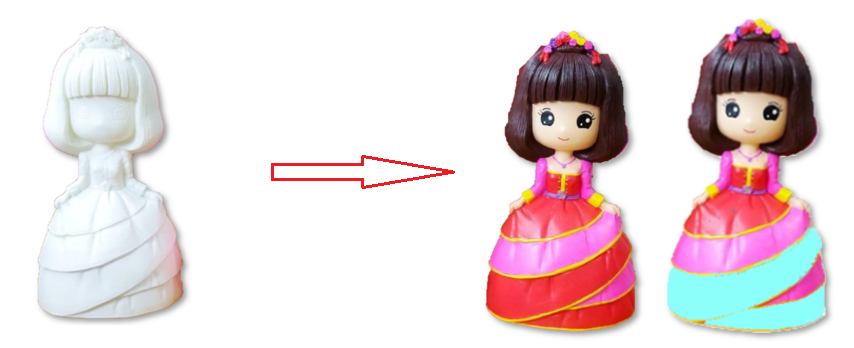
了解了什么是Mybatis后,接下来说说以前
JDBC代码的缺点以及Mybatis又是如何解决的。1.2 JDBC 缺点
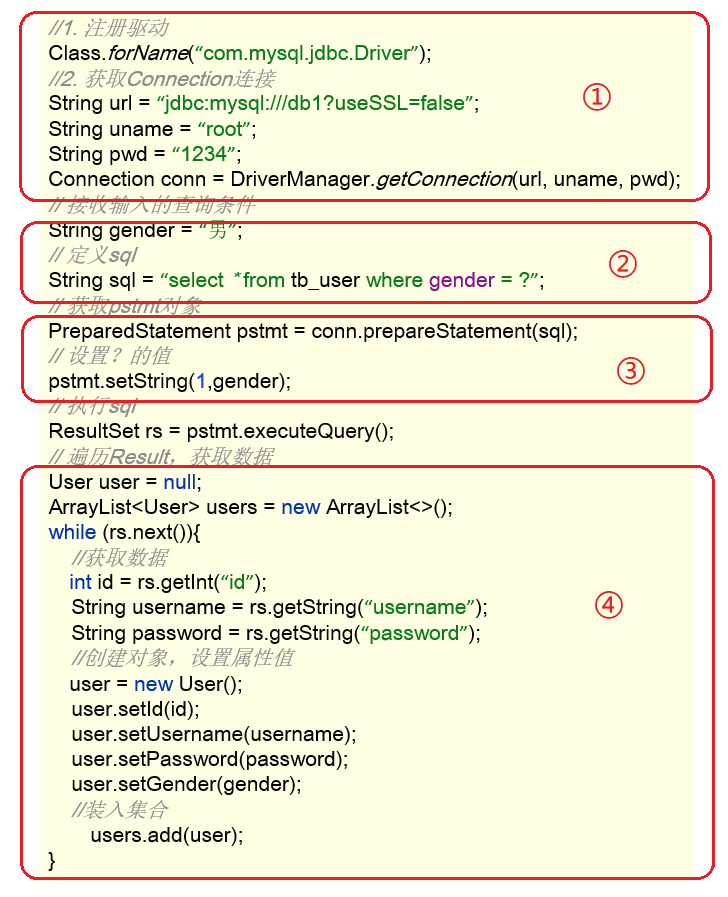
下面是 JDBC 代码,我们通过该代码分析都存在什么缺点:
-
硬编码
-
注册驱动、获取连接
上图标1的代码有很多字符串,而这些是连接数据库的四个基本信息,以后如果要将Mysql数据库换成其他的关系型数据库的话,这四个地方都需要修改,如果放在此处就意味着要修改我们的源代码。
-
SQL语句
上图标2的代码。如果表结构发生变化,SQL语句就要进行更改。这也不方便后期的维护。
-
-
操作繁琐
-
手动设置参数
-
手动封装结果集
上图标4的代码是对查询到的数据进行封装,而这部分代码是没有什么技术含量,而且特别耗费时间的。
-
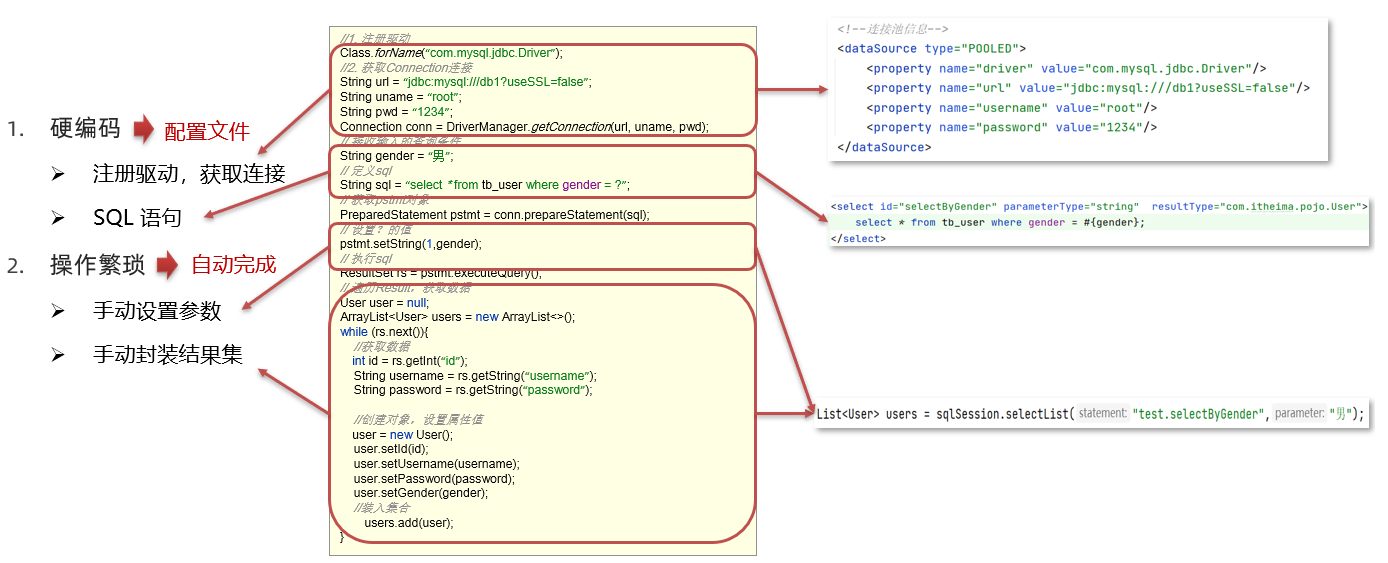
1.3 Mybatis 优化
- 硬编码可以配置到配置文件
- 操作繁琐的地方mybatis都自动完成
如图所示
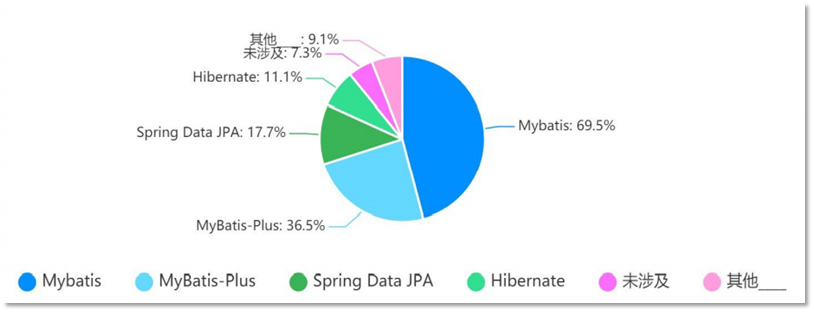
下图是持久层框架的使用占比。
2 Mybatis快速入门
需求:查询user表中所有的数据
-
创建user表,添加数据
create database mybatis; use mybatis; drop table if exists tb_user; create table tb_user( id int primary key auto_increment, username varchar(20), password varchar(20), gender char(1), addr varchar(30) ); INSERT INTO tb_user VALUES (1, 'wbx', '123', '男', '北京'); INSERT INTO tb_user VALUES (2, '李四', '234', '女', '天津'); INSERT INTO tb_user VALUES (3, '王五', '11', '男', '西安');- 1
- 2
- 3
- 4
- 5
- 6
- 7
- 8
- 9
- 10
- 11
- 12
- 13
- 14
- 15
- 16
-
创建模块,导入坐标
在创建好的模块中的 pom.xml 配置文件中添加依赖的坐标
<dependencies> <dependency> <groupId>org.mybatisgroupId> <artifactId>mybatisartifactId> <version>3.5.5version> dependency> <dependency> <groupId>mysqlgroupId> <artifactId>mysql-connector-javaartifactId> <version>5.1.46version> dependency> <dependency> <groupId>junitgroupId> <artifactId>junitartifactId> <version>4.13version> <scope>testscope> dependency> <dependency> <groupId>org.slf4jgroupId> <artifactId>slf4j-apiartifactId> <version>1.7.20version> dependency> <dependency> <groupId>ch.qos.logbackgroupId> <artifactId>logback-classicartifactId> <version>1.2.3version> dependency> <dependency> <groupId>ch.qos.logbackgroupId> <artifactId>logback-coreartifactId> <version>1.2.3version> dependency> dependencies>- 1
- 2
- 3
- 4
- 5
- 6
- 7
- 8
- 9
- 10
- 11
- 12
- 13
- 14
- 15
- 16
- 17
- 18
- 19
- 20
- 21
- 22
- 23
- 24
- 25
- 26
- 27
- 28
- 29
- 30
- 31
- 32
- 33
- 34
- 35
- 36
- 37
- 38
- 39
- 40
- 41
- 42
注意:需要在项目的 resources 目录下创建logback的配置文件
随后将logback需要的XML配置文件存放在
src/main/resource目录下<configuration> <appender name="Console" class="ch.qos.logback.core.ConsoleAppender"> <encoder> <pattern>[%level] %cyan([%thread]) %boldGreen(%logger{15}) - %msg %npattern> encoder> appender> <logger name="com.itheima" level="DEBUG" additivity="false"> <appender-ref ref="Console"/> logger> <root level="DEBUG"> <appender-ref ref="Console"/> root> configuration>- 1
- 2
- 3
- 4
- 5
- 6
- 7
- 8
- 9
- 10
- 11
- 12
- 13
- 14
- 15
- 16
- 17
- 18
- 19
- 20
- 21
- 22
- 23
- 24
- 25
- 26
-
编写 MyBatis 核心配置文件 – > 替换连接信息 解决硬编码问题
在模块下的 resources 目录下创建mybatis的配置文件
mybatis-config.xml,内容如下:DOCTYPE configuration PUBLIC "-//mybatis.org//DTD Config 3.0//EN" "http://mybatis.org/dtd/mybatis-3-config.dtd"> <configuration> <typeAliases> <package name="com.ynny.rj212.pojo"/> typeAliases> <environments default="development"> <environment id="development"> <transactionManager type="JDBC"/> <dataSource type="POOLED"> <property name="driver" value="com.mysql.jdbc.Driver"/> <property name="url" value="jdbc:mysql://localhost:3306/mybatis"/> <property name="username" value="root"/> <property name="password" value="root"/> dataSource> environment> <environment id="test"> <transactionManager type="JDBC"/> <dataSource type="POOLED"> <property name="driver" value="com.mysql.jdbc.Driver"/> <property name="url" value="jdbc:mysql://localhost:3306/mybatis"/> <property name="username" value="root"/> <property name="password" value="root"/> dataSource> environment> environments> <mappers> <package name="com.ynny.rj212.mapper"/> mappers> configuration>- 1
- 2
- 3
- 4
- 5
- 6
- 7
- 8
- 9
- 10
- 11
- 12
- 13
- 14
- 15
- 16
- 17
- 18
- 19
- 20
- 21
- 22
- 23
- 24
- 25
- 26
- 27
- 28
- 29
- 30
- 31
- 32
- 33
- 34
- 35
- 36
- 37
- 38
- 39
- 40
- 41
- 42
- 43
-
编写 SQL 映射文件 --> 统一管理sql语句,解决硬编码问题
在模块的
resources目录下创建映射配置文件UserMapper.xml,内容如下:DOCTYPE mapper PUBLIC "-//mybatis.org//DTD Mapper 3.0//EN" "http://mybatis.org/dtd/mybatis-3-mapper.dtd"> <mapper namespace="com.ynny.rj212.mapper.UserMapper"> <select id="selectAll" resultType="user"> select * from tb_user; select> mapper>- 1
- 2
- 3
- 4
- 5
- 6
- 7
- 8
- 9
- 10
- 11
- 12
- 13
-
编码
-
在
com.ynny.rj212.pojo包下创建 User类package com.ynny.rj212.pojo; /** * @author wbx * @create 2022-11-18 15:19 * pojo类 */ // 属性名一一对应 ALT+鼠标左键可整列编辑 public class User { private Integer id; private String username; private String PASSWORD; private String gender; private String addr; public Integer getId() { return id; } public void setId(Integer id) { this.id = id; } public String getUsername() { return username; } public void setUsername(String username) { this.username = username; } public String getPASSWORD() { return PASSWORD; } public void setPASSWORD(String PASSWORD) { this.PASSWORD = PASSWORD; } public String getGender() { return gender; } public void setGender(String gender) { this.gender = gender; } public String getAddr() { return addr; } public void setAddr(String addr) { this.addr = addr; } @Override public String toString() { return "\n User{" + "id=" + id + ", username='" + username + '\'' + ", PASSWORD='" + PASSWORD + '\'' + ", gender='" + gender + '\'' + ", addr='" + addr + '\'' + '}'; } }- 1
- 2
- 3
- 4
- 5
- 6
- 7
- 8
- 9
- 10
- 11
- 12
- 13
- 14
- 15
- 16
- 17
- 18
- 19
- 20
- 21
- 22
- 23
- 24
- 25
- 26
- 27
- 28
- 29
- 30
- 31
- 32
- 33
- 34
- 35
- 36
- 37
- 38
- 39
- 40
- 41
- 42
- 43
- 44
- 45
- 46
- 47
- 48
- 49
- 50
- 51
- 52
- 53
- 54
- 55
- 56
- 57
- 58
- 59
- 60
- 61
- 62
- 63
- 64
- 65
- 66
- 67
- 68
- 69
- 70
- 71
- 72
- 73
- 74
- 75
- 76
- 77
- 78
- 79
- 80
-
在
com.ynny.rj212包下编写 MybatisDemo 测试类package com.ynny.rj212; import com.ynny.rj212.pojo.User; import org.apache.ibatis.io.Resources; import org.apache.ibatis.session.SqlSession; import org.apache.ibatis.session.SqlSessionFactory; import org.apache.ibatis.session.SqlSessionFactoryBuilder; import java.io.IOException; import java.io.InputStream; import java.util.List; /** * @author wbx * @create 2022-11-18 15:29 * mybatis入门代码 */ public class mybatis_demo { public static void main(String[] args) throws IOException { //1. 加载mybatis的核心配置文件,获取 SqlSessionFactory String resource = "mybatis-config.xml"; InputStream inputStream = Resources.getResourceAsStream(resource); SqlSessionFactory sqlSessionFactory = new SqlSessionFactoryBuilder().build(inputStream); //2. 获取SqlSession对象,用它来执行sql SqlSession sqlSession = sqlSessionFactory.openSession(); //3. 执行sql List<User> users = sqlSession.selectList("test.selectAll"); System.out.println(users); //4. 释放资源 sqlSession.close(); } }- 1
- 2
- 3
- 4
- 5
- 6
- 7
- 8
- 9
- 10
- 11
- 12
- 13
- 14
- 15
- 16
- 17
- 18
- 19
- 20
- 21
- 22
- 23
- 24
- 25
- 26
- 27
- 28
- 29
- 30
- 31
- 32
- 33
- 34
- 35
- 36
-
2.1 解决SQL映射文件的警告提示:(新版本不报红)
在入门案例映射配置文件中存在报红的情况。问题如下:

- 产生的原因:Idea和数据库没有建立连接,不识别表信息。但是大家一定要记住,它并不影响程序的执行。
- 解决方式:在Idea中配置MySQL数据库连接。
IDEA中配置MySQL数据库连接
-
点击IDEA右边框的
Database,在展开的界面点击+选择Data Source,再选择MySQL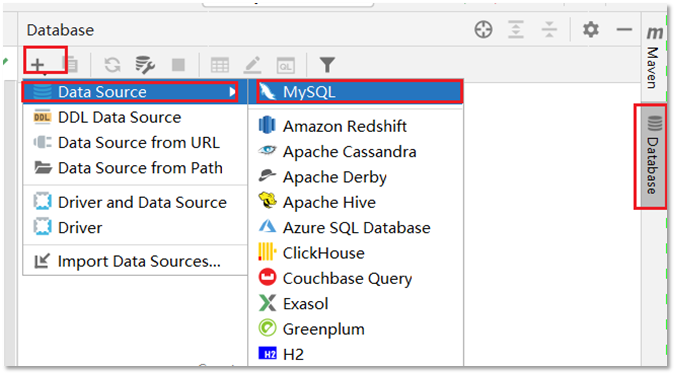
-
在弹出的界面进行基本信息的填写
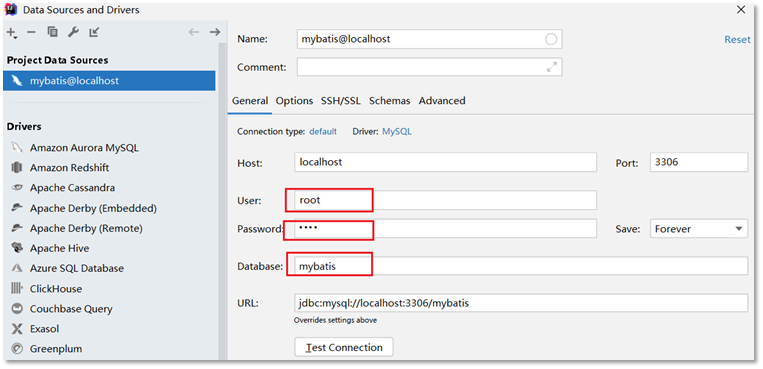
-
点击完成后就能看到如下界面
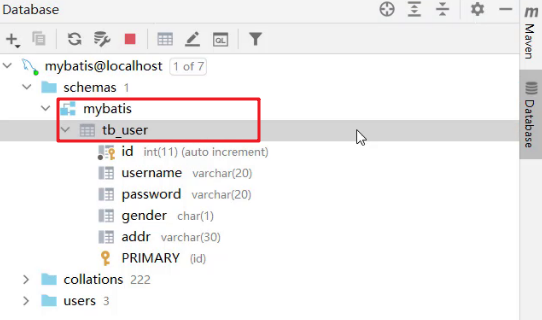
而此界面就和
navicat工具一样可以进行数据库的操作。也可以编写SQL语句

3 Mapper代理开发
3.1 Mapper代理开发概述
之前我们写的代码是基本使用方式,它也存在硬编码的问题,如下:

这里调用
selectList()方法传递的参数是映射配置文件中的 namespace.id值。这样写也不便于后期的维护。如果使用 Mapper 代理方式(如下图)则不存在硬编码问题。
通过上面的描述可以看出 Mapper 代理方式的目的:
- 解决原生方式中的硬编码
- 简化后期执行SQL
Mybatis 官网也是推荐使用 Mapper 代理的方式。下图是截止官网的图片

3.2 使用Mapper代理要求
使用Mapper代理方式,必须满足以下要求:
-
定义与SQL映射文件同名的Mapper接口,并且将Mapper接口和SQL映射文件放置在同一目录下。如下图:
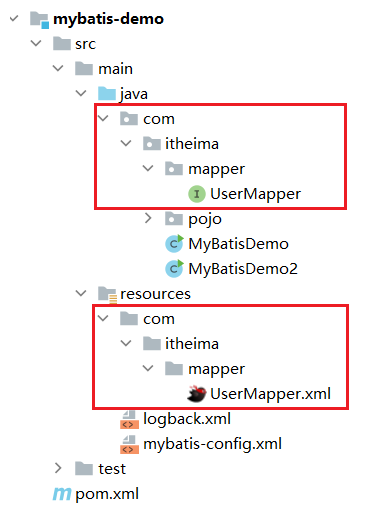
解析
使用编译命令,可发现两者会在同一路径下
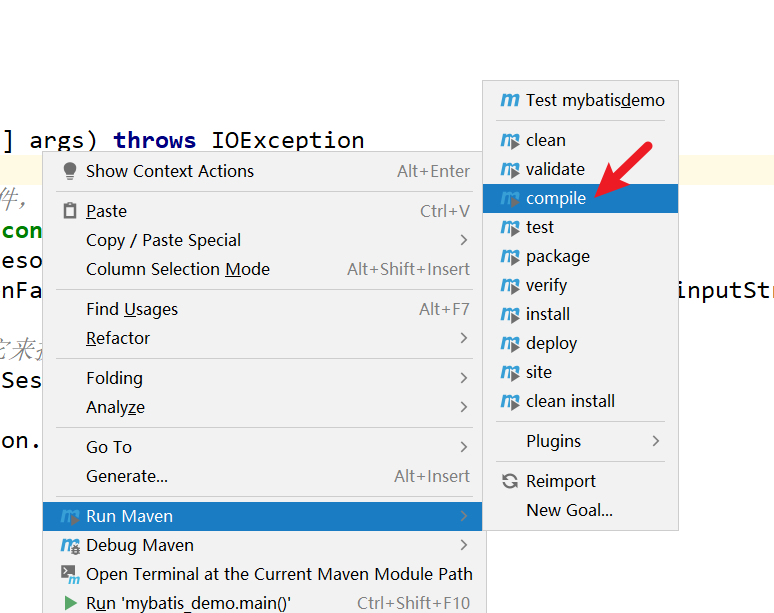
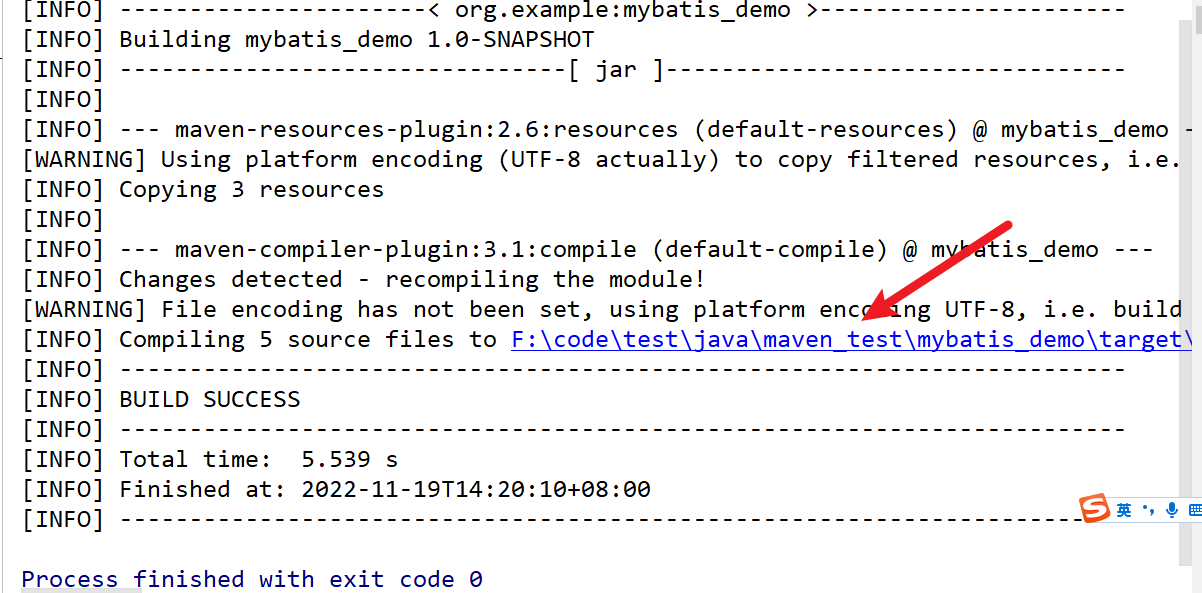

-
设置SQL映射文件的namespace属性为Mapper接口全限定名

-
在 Mapper 接口中定义方法,方法名就是SQL映射文件中sql语句的id,并保持参数类型和返回值类型一致
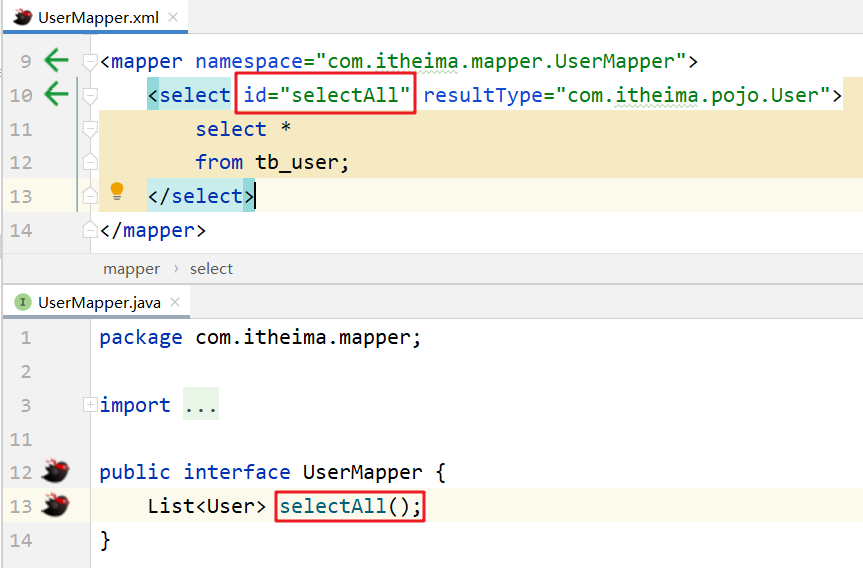
3.3 小鸟插件
- 安装插件

可以通过点击小鸟进行跳转,也可以方便xml文件的编写
3.4 案例代码实现
-
在
com.ynny.rj212.mapper包下创建 UserMapper接口,代码如下:public interface UserMapper { List<User> selectAll(); User selectById(int id); }- 1
- 2
- 3
- 4
-
在
resources下创建com/ynny/rj212/mapper(此处必须用/,用点的话会把整体当成文件名) 目录,并在该目录下创建 UserMapper.xml 映射配置文件<mapper namespace="com.itheima.mapper.UserMapper"> <select id="selectAll" resultType="com.itheima.pojo.User"> select * from tb_user; select> mapper>- 1
- 2
- 3
- 4
- 5
- 6
- 7
- 8
- 9
-
在
com.ynny.rj212包下创建 MybatisDemo2 测试类,代码如下:package com.ynny.rj212; import com.ynny.rj212.mapper.UserMapper; import com.ynny.rj212.pojo.User; import org.apache.ibatis.io.Resources; import org.apache.ibatis.session.SqlSession; import org.apache.ibatis.session.SqlSessionFactory; import org.apache.ibatis.session.SqlSessionFactoryBuilder; import java.io.IOException; import java.io.InputStream; import java.util.List; /** * @author wbx * @create 2022-11-18 16:16 mybatis代理开发 */ public class MyBatisDemo2 { public static void main(String[] args) throws IOException { //1. 加载mybatis的核心配置文件,获取 SqlSessionFactory String resource = "mybatis-config.xml"; InputStream inputStream = Resources.getResourceAsStream(resource); SqlSessionFactory sqlSessionFactory = new SqlSessionFactoryBuilder().build(inputStream); //2. 获取SqlSession对象,用它来执行sql SqlSession sqlSession = sqlSessionFactory.openSession(); //3. 执行sql //Listusers = sqlSession.selectList("test.selectAll"); //3.1 获取UserMapper接口的代理对象 UserMapper userMapper = sqlSession.getMapper(UserMapper.class); List<User> users = userMapper.selectAll(); System.out.println(users); //4. 释放资源 sqlSession.close(); } }- 1
- 2
- 3
- 4
- 5
- 6
- 7
- 8
- 9
- 10
- 11
- 12
- 13
- 14
- 15
- 16
- 17
- 18
- 19
- 20
- 21
- 22
- 23
- 24
- 25
- 26
- 27
- 28
- 29
- 30
- 31
- 32
- 33
- 34
- 35
- 36
- 37
- 38
- 39
- 40
注意:
如果Mapper接口名称和SQL映射文件名称相同,并在同一目录下,则可以使用包扫描的方式简化SQL映射文件的加载。也就是将核心配置文件的加载映射配置文件的配置修改为
如果要在这里写好多映射文件,一个一个手写,也太麻烦了,如果你遵循了Mapper代理方式,就可以用包扫描的方式来简化操作 <mappers> <package name="com.itheima.mapper"/> mappers>- 1
- 2
- 3
- 4
- 5
- 6
- 7
4 核心配置文件
核心配置文件中现有的配置之前已经给大家进行了解释,而核心配置文件中还可以配置很多内容。我们可以通过查询官网看可以配置的内容
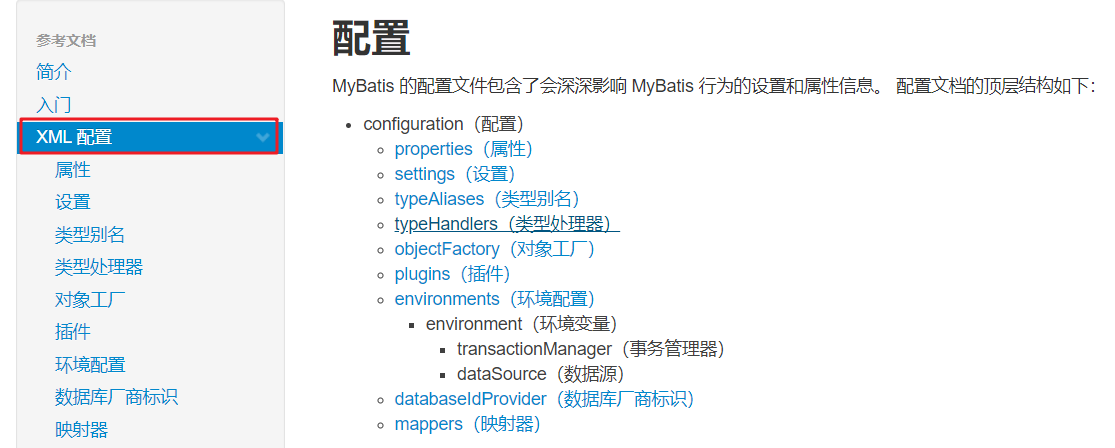
接下来我们先对里面的一些配置进行讲解。
4.1 多环境配置
在核心配置文件的
environments标签中其实是可以配置多个environment,使用id给每段环境起名,在environments中使用default='环境id'来指定使用哪儿段配置。我们一般就配置一个environment即可。<environments default="development"> <environment id="development"> <transactionManager type="JDBC"/> <dataSource type="POOLED"> <property name="driver" value="com.mysql.jdbc.Driver"/> <property name="url" value="jdbc:mysql:///mybatis?useSSL=false"/> <property name="username" value="root"/> <property name="password" value="1234"/> dataSource> environment> <environment id="test"> <transactionManager type="JDBC"/> <dataSource type="POOLED"> <property name="driver" value="com.mysql.jdbc.Driver"/> <property name="url" value="jdbc:mysql:///mybatis?useSSL=false"/> <property name="username" value="root"/> <property name="password" value="1234"/> dataSource> environment> environments>=- 1
- 2
- 3
- 4
- 5
- 6
- 7
- 8
- 9
- 10
- 11
- 12
- 13
- 14
- 15
- 16
- 17
- 18
- 19
- 20
- 21
- 22
- 23
4.2 类型别名
在映射配置文件中的
resultType属性需要配置数据封装的类型(类的全限定名)。而每次这样写是特别麻烦的,Mybatis 提供了类型别名(typeAliases) 可以简化这部分的书写。首先需要现在核心配置文件中配置类型别名,也就意味着给pojo包下所有的类起了别名(别名就是类名),不区分大小写。内容如下:
<typeAliases> <package name="com.itheima.pojo"/> typeAliases>- 1
- 2
- 3
- 4
通过上述的配置,我们就可以简化映射配置文件中
resultType属性值的编写<mapper namespace="com.itheima.mapper.UserMapper"> <select id="selectAll" resultType="user"> select * from tb_user; select> mapper>- 1
- 2
- 3
- 4
- 5
5 mybatis案例
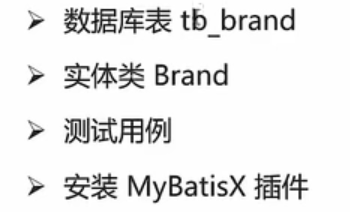
5.1 环境准备
- 需要完成的功能

- 准备环境
5.1.1创建tb_brand表
-- 删除tb_brand表 drop table if exists tb_brand; -- 创建tb_brand表 create table tb_brand ( -- id 主键 id int primary key auto_increment, -- 品牌名称 brand_name varchar(20), -- 企业名称 company_name varchar(20), -- 排序字段 ordered int, -- 描述信息 description varchar(100), -- 状态:0:禁用 1:启用 status int ); -- 添加数据 insert into tb_brand (brand_name, company_name, ordered, description, status) values ('三只松鼠', '三只松鼠股份有限公司', 5, '好吃不上火', 0), ('华为', '华为技术有限公司', 100, '华为致力于把数字世界带入每个人、每个家庭、每个组织,构建万物互联的智能世界', 1), ('小米', '小米科技有限公司', 50, 'are you ok', 1); SELECT * FROM tb_brand;- 1
- 2
- 3
- 4
- 5
- 6
- 7
- 8
- 9
- 10
- 11
- 12
- 13
- 14
- 15
- 16
- 17
- 18
- 19
- 20
- 21
- 22
- 23
- 24
- 25
- 26
5.1.2 创建实体类(pojo)brand
package com.ynny.rj212.pojo; /** * 品牌 * * alt + 鼠标左键:整列编辑 * * 在实体类中,基本数据类型建议使用其对应的包装类型 */ public class Brand { // id 主键 private Integer id; // 品牌名称 private String brandName; // 企业名称 private String companyName; // 排序字段 private Integer ordered; // 描述信息 private String description; // 状态:0:禁用 1:启用 private Integer status; public Integer getId() { return id; } public void setId(Integer id) { this.id = id; } public String getBrandName() { return brandName; } public void setBrandName(String brandName) { this.brandName = brandName; } public String getCompanyName() { return companyName; } public void setCompanyName(String companyName) { this.companyName = companyName; } public Integer getOrdered() { return ordered; } public void setOrdered(Integer ordered) { this.ordered = ordered; } public String getDescription() { return description; } public void setDescription(String description) { this.description = description; } public Integer getStatus() { return status; } public void setStatus(Integer status) { this.status = status; } @Override public String toString() { return "\n Brand{" + "id=" + id + ", brandName='" + brandName + '\'' + ", companyName='" + companyName + '\'' + ", ordered=" + ordered + ", description='" + description + '\'' + ", status=" + status + '}'; } }- 1
- 2
- 3
- 4
- 5
- 6
- 7
- 8
- 9
- 10
- 11
- 12
- 13
- 14
- 15
- 16
- 17
- 18
- 19
- 20
- 21
- 22
- 23
- 24
- 25
- 26
- 27
- 28
- 29
- 30
- 31
- 32
- 33
- 34
- 35
- 36
- 37
- 38
- 39
- 40
- 41
- 42
- 43
- 44
- 45
- 46
- 47
- 48
- 49
- 50
- 51
- 52
- 53
- 54
- 55
- 56
- 57
- 58
- 59
- 60
- 61
- 62
- 63
- 64
- 65
- 66
- 67
- 68
- 69
- 70
- 71
- 72
- 73
- 74
- 75
- 76
- 77
- 78
- 79
- 80
- 81
- 82
- 83
- 84
- 85
- 86
5.1.3 在test下创建测试类

5.1.4 安装mybatisx插件(前边安装过)
方便文件切换,防止id出错,方便xml文件的编写(写代码测试)

自动生成

5.2 案例实现
5.2.1 查询所有和结果映射(简单,有需要注意的细节)
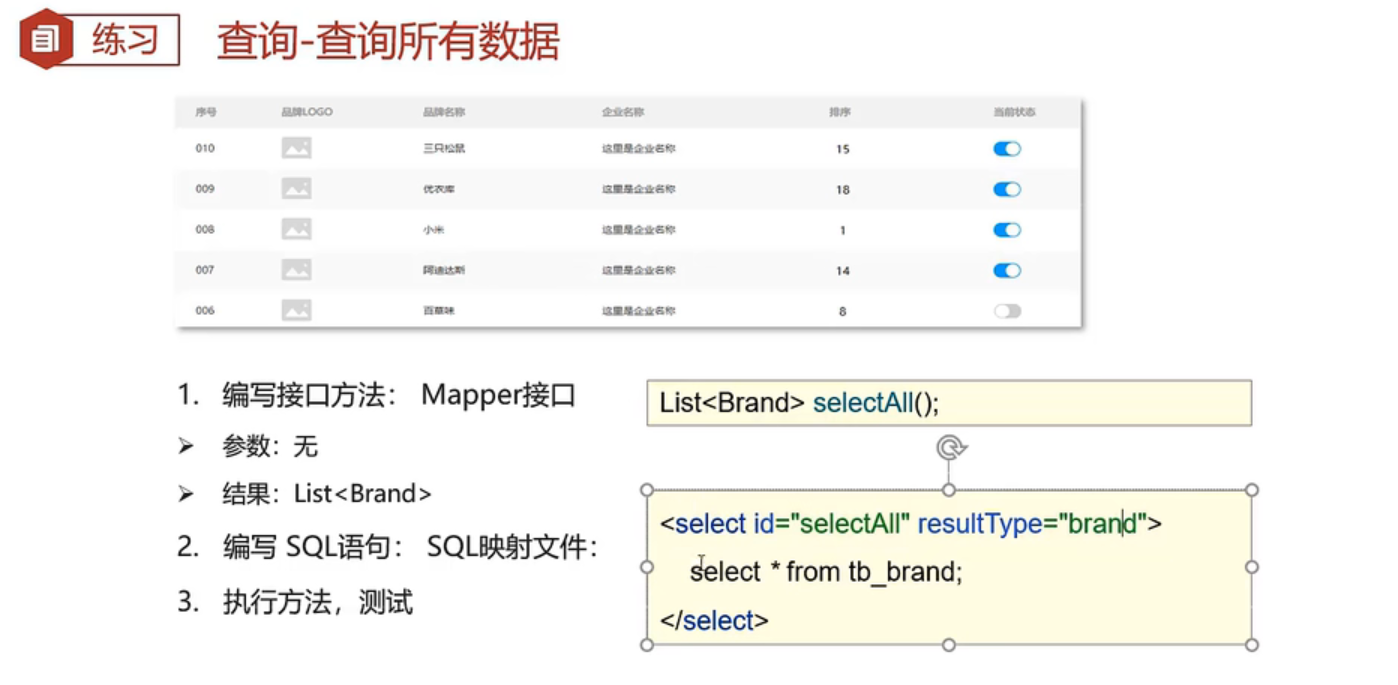
根据业务的不同需要分析出三件事
- SQL怎么写
- 需不需要参数
- 返回的结果是什么,是一条还是多条?
1 创建对应的mapper接口
注:放在mapper包下,顺便创建对应路径下的xml配置文件(使用mybatisx插件可一键生成对应的配置语句)
package com.ynny.rj212.mapper; import com.ynny.rj212.pojo.Brand; import java.util.List; /** * @author wbx * @create 2022-11-18 16:06 */ public interface BrandMapper { public List<Brand> selectAll(); }- 1
- 2
- 3
- 4
- 5
- 6
- 7
- 8
- 9
- 10
- 11
- 12
- 13
- 14
对应的xml配置文件
DOCTYPE mapper PUBLIC "-//mybatis.org//DTD Mapper 3.0//EN" "http://mybatis.org/dtd/mybatis-3-mapper.dtd"> <mapper namespace="com.ynny.rj212.mapper.BrandMapper"> <select id="selectAll" resultType="brand"> select> mapper>- 1
- 2
- 3
- 4
- 5
- 6
- 7
- 8
- 9
- 10
- 11
- 12
- 13
- 14
- 15
- 16
2 在配置文件中书写SQL语句
select * from mybatis.tb_brand;- 1
- 若写SQL不提示则需要设置ideaSQL方言为mysql
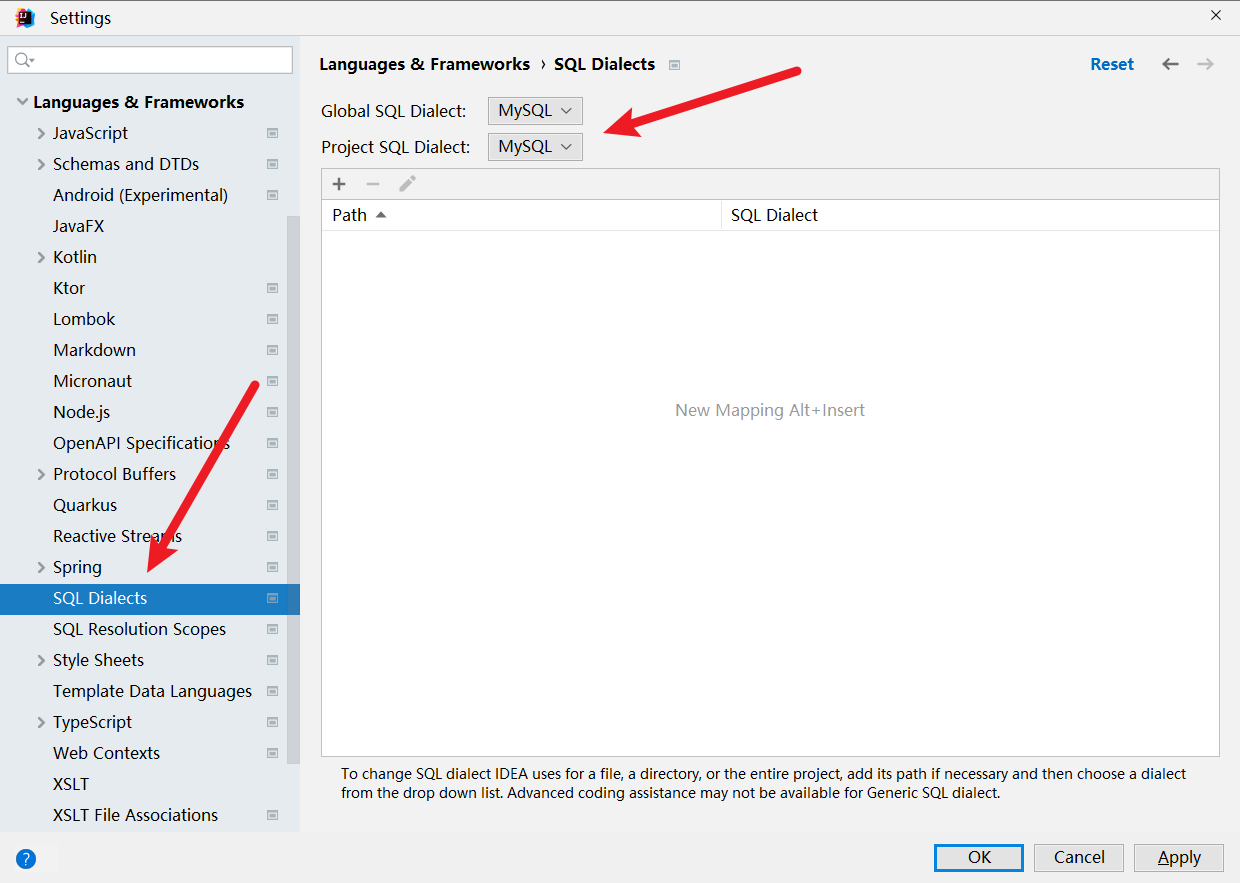
- 若SQL找不到对应的表,可能没连接数据库,或者是需要刷新数据库
- 注:需要只留下一个数据库,或者设置默认,要不找不到对应的表

3 书写测试用例
@Test public void testSelectAll() throws IOException{ //1. 加载MyBatis核心配置文件,获取SqlSessionFactory对象 String resource = "mybatis-config.xml"; InputStream inputStream = Resources.getResourceAsStream(resource); SqlSessionFactory sqlSessionFactory = new SqlSessionFactoryBuilder().build(inputStream); //2. 获取SqlSession对象 SqlSession sqlSession = sqlSessionFactory.openSession(); //3. 获取Mapper接口的代理对象 BrandMapper brandMapper = sqlSession.getMapper(BrandMapper.class); //4. 执行方法 List<Brand> brands = brandMapper.selectAll(); System.out.println(brands); //5. 资源关闭 sqlSession.close(); }- 1
- 2
- 3
- 4
- 5
- 6
- 7
- 8
- 9
- 10
- 11
- 12
- 13
- 14
- 15
- 16


4 细节问题发现与解决

- 起别名解决上述问题
我们可以在写sql语句时给这两个字段起别名,将别名定义成和属性名一致即可。
XML 复制成功<select id="selectAll" resultType="brand"> select id, brand_name as brandName, company_name as companyName, ordered, description, status from tb_brand; select>- 1
- 2
- 3
- 4
- 5
- 6
而上面的SQL语句中的字段列表书写麻烦,如果表中还有更多的字段,同时其他的功能也需要查询这些字段时就显得我们的代码不够精炼。Mybatis提供了
sql片段可以提高sql的复用性。- 使用resultMap解决上述问题
起别名 + sql片段的方式可以解决上述问题,但是它也存在问题。如果还有功能只需要查询部分字段,而不是查询所有字段,那么我们就需要再定义一个 SQL 片段,这就显得不是那么灵活。
那么我们也可以使用resultMap来定义字段和属性的映射关系的方式解决上述问题。
-
在映射配置文件中使用resultMap定义字段和属性的映射关系
XML <resultMap id="brandResultMap" type="brand"> <result column="brand_name" property="brandName"/> <result column="company_name" property="companyName"/> resultMap>- 1
- 2
- 3
- 4
- 5
- 6
- 7
- 8
- 9
- 10
- 11
- 12
- 13
- 14
注意:在上面只需要定义 字段名 和 属性名 不一样的映射,而一样的则不需要专门定义出来。
-
SQL语句正常编写
XML <select id="selectAll" resultMap="brandResultMap"> select * from tb_brand; select>- 1
- 2
- 3
- 4
- 5
- 6

5.2.2 查看详情
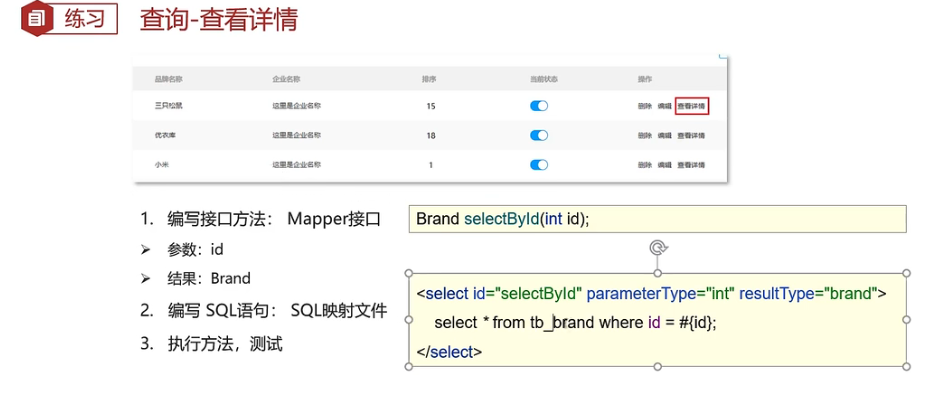
分析思路,思考如何接收参数?
查看详情功能实现步骤:
- 编写接口方法:Mapper接口
- 参数:id
查看详情就是查询某一行数据,所以需要根据id进行查询。而id以后是由页面传递过来。 - 结果:Brand
根据id查询出来的数据只要一条,而将一条数据封装成一个Brand对象即可
- 参数:id
- 编写SQL语句:SQL映射文件
- 执行方法、进行测试
1 编写接口方法
在
BrandMapper接口中定义根据id查询数据的方法Brand selectById(int id);- 1
- 2
2 编写SQL语句
在
BrandMapper.xml映射配置文件中编写statement,使用resultMap而不是使用resultTypeXML <select id="selectById" resultMap="brandResultMapper"> select * from tb_brand where id = #{id}; select>- 1
- 2
- 3
- 4
- 5
- 6
3 编写测试方法
在
test/java下的com.itheima.mapper包下的MybatisTest类中定义测试方法JAVA @Test public void testSelectById() throws IOException { //接收参数,该id以后需要传递过来 int id = 1; //1. 加载MyBatis核心配置文件,获取SqlSessionFactory对象 String resource = "mybatis-config.xml"; InputStream inputStream = Resources.getResourceAsStream(resource); SqlSessionFactory sqlSessionFactory = new SqlSessionFactoryBuilder().build(inputStream); //2. 获取SqlSession对象 SqlSession sqlSession = sqlSessionFactory.openSession(); //3. 获取Mapper接口的代理对象 BrandMapper brandMapper = sqlSession.getMapper(BrandMapper.class); //4. 执行方法 Brand brand = brandMapper.selectById(id); System.out.println(brand); //5. 资源关闭 sqlSession.close(); }- 1
- 2
- 3
- 4
- 5
- 6
- 7
- 8
- 9
- 10
- 11
- 12
- 13
- 14
- 15
- 16
- 17
- 18
- 19
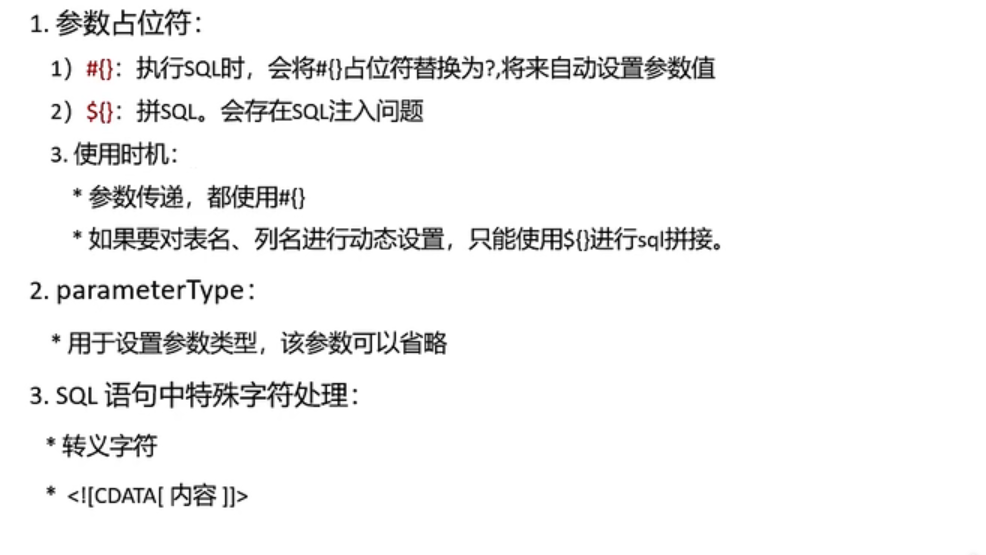
- 参数占位符
mybatis提供了两种参数占位符:
-
#{}:执行SQL时,会将 #{} 占位符替换为?,将来自动设置参数值。#{}底层使用的是PreparedStatement -
${}:拼接SQL。底层使用的是Statement,会存在SQL注入问题。关于SQL注入的问题我在上篇JDBC文章中做过详细的说明。
以后开发我们使用 #{} 参数占位符。
- parameterType使用
对于有参数的mapper接口方法,我们在映射配置文件中应该配置
ParameterType来指定参数类型。只不过该属性都可以省略。XML- 1
- 2
- 3
- 4
- 5
- SQL语句中特殊字段处理
在xml中,”<”、”>”、”&”等字符是不能直接存入的,否则xml语法检查时会报错,如果想在xml中使用这些符号,必须将其转义为实体,如
<、>、&,这样才能保存进xml文档。或者使用,被这个标记所包含的内容将表示为纯文本但是严格来说,在XML中只有”<”和”&”是非法的,其它三个都是可以合法存在的,但是,把它们都进行转义是一个好的习惯。
不管怎么样,转义前的字符也好,转义后的字符也好,都会被xml解析器解析,为了方便起见,使用
来包含不被xml解析器解析的内容。但要注意的是:- 此部分不能再包含
]]>; - 不允许嵌套使用;
]]>这部分不能包含空格或者换行。
最后,说说
和xml转移字符的关系,它们两个看起来是不是感觉功能重复了?-
是的,它们的功能就是一样的,只是应用场景和需求有些不同:
不能适用所有情况,转义字符可以;- 对于短字符串
写起来啰嗦,对于长字符串转义字符写起来可读性差; 表示xml解析器忽略解析,所以更快。
-
转义字符
-
CDATA
XML- 1
- 2
- 3
- 4
- 5
- 6
总结
5.2.3 多条件查询
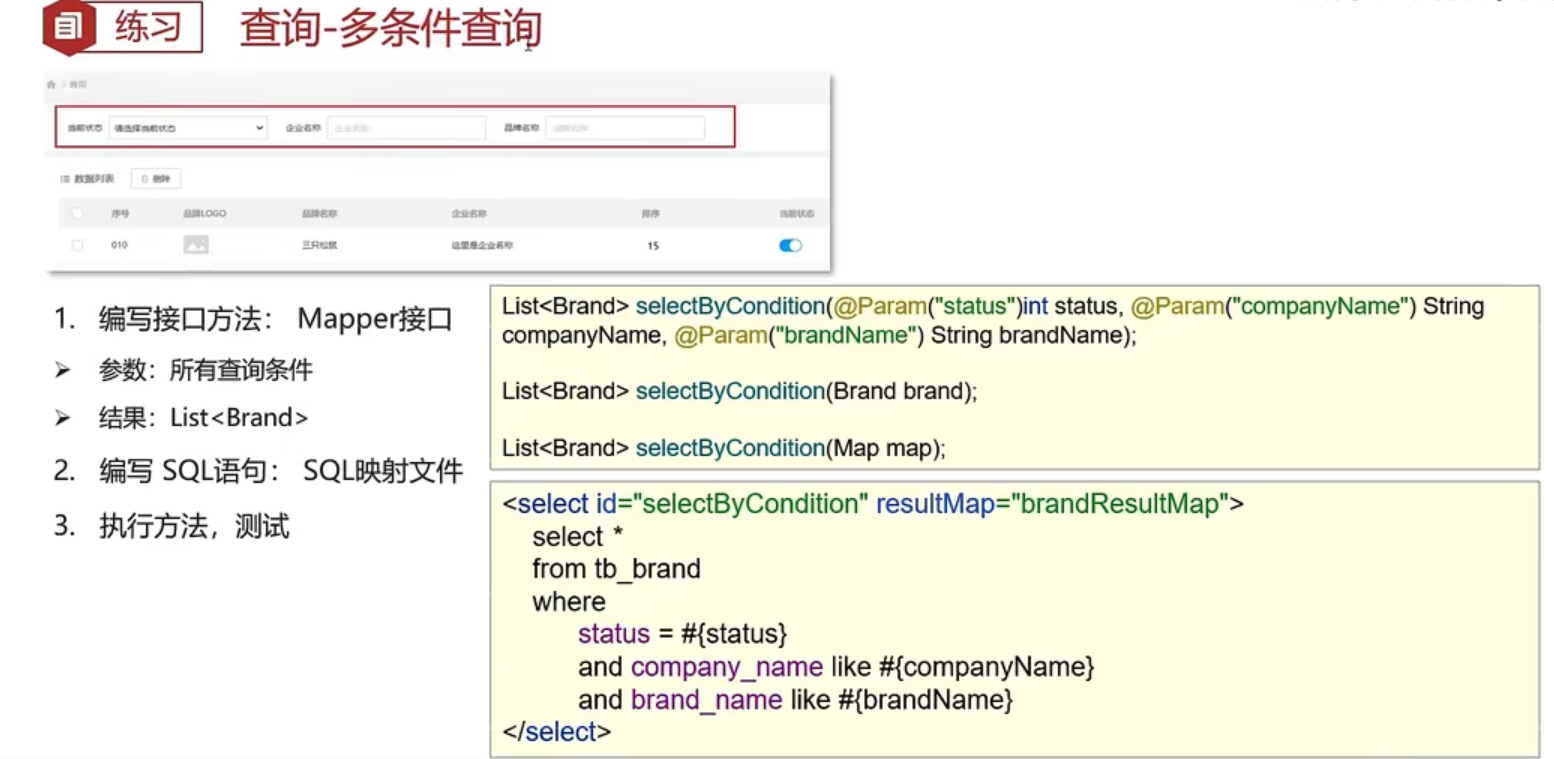
在实际问题中,我们经常会遇到如上图所示的多条件查询,将多条件查询的结果展示在下方的数据列表中。而我们做这个功能需要分析最终的SQL语句应该是什么样,思考两个问题
- 条件表达式
- 如何连接
当前状态使用
status字段表示,企业名称使用company_name表示,品牌名称使用brand_name表示
条件字段企业名称和品牌名称需要进行模糊查询,所以条件应该是:select * from tb_brand where `status` = #{status} and company_name like #{companyName} and brand_name like #{brandName};- 1
- 2
- 3
- 4
- 5
- 6
简单的分析后,我们来看功能实现的步骤:
- 编写接口方法
- 参数:所有查询条件
- 结果:
List
- 在映射配置文件中编写SQL语句
- 编写测试方法并执行
1 编写接口方法
在
BrandMapper接口中定义多条件查询的方法。而该功能有三个参数,我们就需要考虑定义接口时,参数应该如何定义。Mybatis针对多参数有多种实现(实际开发中三种情况都可能遇到,我们需要逐一测试)
-
使用**@Param( “SQL参数占位符名称”)标记每一个参数,在映射配置文件中就需要使用#{参数名称}**进行占位
List<Brand> selectByCondition(@Param("status") int status, @Param("companyName") String companyName, @Param("brandName") String brandName);- 1
- 2
-
将多个参数封装成一个实体对象,将该实体对象作为接口的方法参数。该方式要求在映射配置文件的SQL中使用**#{内容}**时,里面的内容必须和实体类属性名保持一致。
List<Brand> selectByCondition(Brand brand);- 1
- 2
-
将多个参数封装到map集合中,将map集合作为接口的方法参数。该方式要求在映射配置文件的SQL中使用#{内容}时,里面的内容必须和map集合中键的名称一致。map.put(“SQL参数占位符名称”,数值);
List<Brand> selectByCondition(Map map);- 1
- 2
2 编写SQL语句
在
BrandMapper.xml映射配置文件中编写statement,注意使用resultMap替换resultTypeXML <select id="selectByCondition" resultMap="brandResultMap"> select * from tb_brand where status = #{status} and company_name like #{companyName} and brand_name like #{brandName} select>- 1
- 2
- 3
- 4
- 5
- 6
- 7
- 8
3 编写测试方法
在
test/java下的com.blog.mapper包下的MybatisTest类中定义测试方法- Param注解
- 封装成对象
- 封装到map集合
@Test //多条件查询情况一 public void testSelectByCondition1() throws IOException { // 接收参数 int status = 1; String companyName = "华为"; String brandName = "华为"; // 处理参数 companyName = "%" + companyName + "%"; brandName = "%" + brandName + "%"; //1. 加载MyBatis核心配置文件,获取SqlSessionFactory对象 String resource = "mybatis-config.xml"; InputStream inputStream = Resources.getResourceAsStream(resource); SqlSessionFactory sqlSessionFactory = new SqlSessionFactoryBuilder().build(inputStream); //2. 获取SqlSession对象 SqlSession sqlSession = sqlSessionFactory.openSession(); //3. 获取Mapper接口的代理对象 BrandMapper brandMapper = sqlSession.getMapper(BrandMapper.class); //4. 执行方法 List<Brand> brands = brandMapper.selectByCondition(status, companyName, brandName); System.out.println(brands); //5. 资源关闭 sqlSession.close(); }- 1
- 2
- 3
- 4
- 5
- 6
- 7
- 8
- 9
- 10
- 11
- 12
- 13
- 14
- 15
- 16
- 17
- 18
- 19
- 20
- 21
- 22
- 23
- 24
- 25
结果:

第二种方式(注意修改
BrandMapper接口中定义多条件查询的方法)//多条件查询 public void testSelectByCondition() throws IOException { // 接收参数 int status = 1; String companyName = "华为"; String brandName = "华为"; // 处理参数 companyName = "%" + companyName + "%"; brandName = "%" + brandName + "%"; //封装对象 Brand brand = new Brand(); brand.setStatus(status); brand.setCompanyName(companyName); brand.setBrandName(brandName); //1. 加载MyBatis核心配置文件,获取SqlSessionFactory对象 String resource = "mybatis-config.xml"; InputStream inputStream = Resources.getResourceAsStream(resource); SqlSessionFactory sqlSessionFactory = new SqlSessionFactoryBuilder().build(inputStream); //2. 获取SqlSession对象 SqlSession sqlSession = sqlSessionFactory.openSession(); //3. 获取Mapper接口的代理对象 BrandMapper brandMapper = sqlSession.getMapper(BrandMapper.class); //4. 执行方法 // Listbrands = brandMapper.selectByCondition(status, companyName, brandName); List<Brand> brands = brandMapper.selectByCondition(brand); System.out.println(brands); //5. 资源关闭 sqlSession.close(); }- 1
- 2
- 3
- 4
- 5
- 6
- 7
- 8
- 9
- 10
- 11
- 12
- 13
- 14
- 15
- 16
- 17
- 18
- 19
- 20
- 21
- 22
- 23
- 24
- 25
- 26
- 27
- 28
- 29
- 30
- 31
- 32

第三种方式(注意修改
BrandMapper接口中定义多条件查询的方法)public void testSelectByCondition() throws IOException { // 接收参数 int status = 1; String companyName = "华为"; String brandName = "华为"; // 处理参数 companyName = "%" + companyName + "%"; brandName = "%" + brandName + "%"; //封装对象 /* Brand brand = new Brand(); brand.setStatus(status); brand.setCompanyName(companyName); brand.setBrandName(brandName);*/ //第三种方式 Map map = new HashMap(); map.put("status",status); map.put("companyName",companyName); map.put("brandName",brandName); //1. 加载MyBatis核心配置文件,获取SqlSessionFactory对象 String resource = "mybatis-config.xml"; InputStream inputStream = Resources.getResourceAsStream(resource); SqlSessionFactory sqlSessionFactory = new SqlSessionFactoryBuilder().build(inputStream); //2. 获取SqlSession对象 SqlSession sqlSession = sqlSessionFactory.openSession(); //3. 获取Mapper接口的代理对象 BrandMapper brandMapper = sqlSession.getMapper(BrandMapper.class); //4. 执行方法 // Listbrands = brandMapper.selectByCondition(status, companyName, brandName); // Listbrands = brandMapper.selectByCondition(brand); List<Brand> brands = brandMapper.selectByCondition(map); System.out.println(brands); //5. 资源关闭 sqlSession.close(); }- 1
- 2
- 3
- 4
- 5
- 6
- 7
- 8
- 9
- 10
- 11
- 12
- 13
- 14
- 15
- 16
- 17
- 18
- 19
- 20
- 21
- 22
- 23
- 24
- 25
- 26
- 27
- 28
- 29
- 30
- 31
- 32
- 33
- 34
- 35
- 36
- 37
- 38
现在的这种查询方式,只有当用户把三个参数都填上的时候才能查询出来,如果另外两个参数没有填
//多条件查询 public void testSelectByCondition() throws IOException { // 接收参数 int status = 1; String companyName = "华为"; String brandName = "华为"; // 处理参数 companyName = "%" + companyName + "%"; brandName = "%" + brandName + "%"; //封装对象 /* Brand brand = new Brand(); brand.setStatus(status); brand.setCompanyName(companyName); brand.setBrandName(brandName);*/ //第三种方式 Map map = new HashMap(); // map.put("status",status); // map.put("companyName",companyName); map.put("brandName",brandName); //1. 加载MyBatis核心配置文件,获取SqlSessionFactory对象 String resource = "mybatis-config.xml"; InputStream inputStream = Resources.getResourceAsStream(resource); SqlSessionFactory sqlSessionFactory = new SqlSessionFactoryBuilder().build(inputStream); //2. 获取SqlSession对象 SqlSession sqlSession = sqlSessionFactory.openSession(); //3. 获取Mapper接口的代理对象 BrandMapper brandMapper = sqlSession.getMapper(BrandMapper.class); //4. 执行方法 // Listbrands = brandMapper.selectByCondition(status, companyName, brandName); // Listbrands = brandMapper.selectByCondition(brand); List<Brand> brands = brandMapper.selectByCondition(map); System.out.println(brands); //5. 资源关闭 sqlSession.close(); }- 1
- 2
- 3
- 4
- 5
- 6
- 7
- 8
- 9
- 10
- 11
- 12
- 13
- 14
- 15
- 16
- 17
- 18
- 19
- 20
- 21
- 22
- 23
- 24
- 25
- 26
- 27
- 28
- 29
- 30
- 31
- 32
- 33
- 34
- 35
- 36
- 37
- 38
- 39

那么SQL语句就会变成
where status = null and company_name = null and brand_name = "%华为%"- 1
- 2
这样显然是不会查询成功的,下面我们来进行优化,即动态查询,本质是动态SQL
5.2.4 动态查询
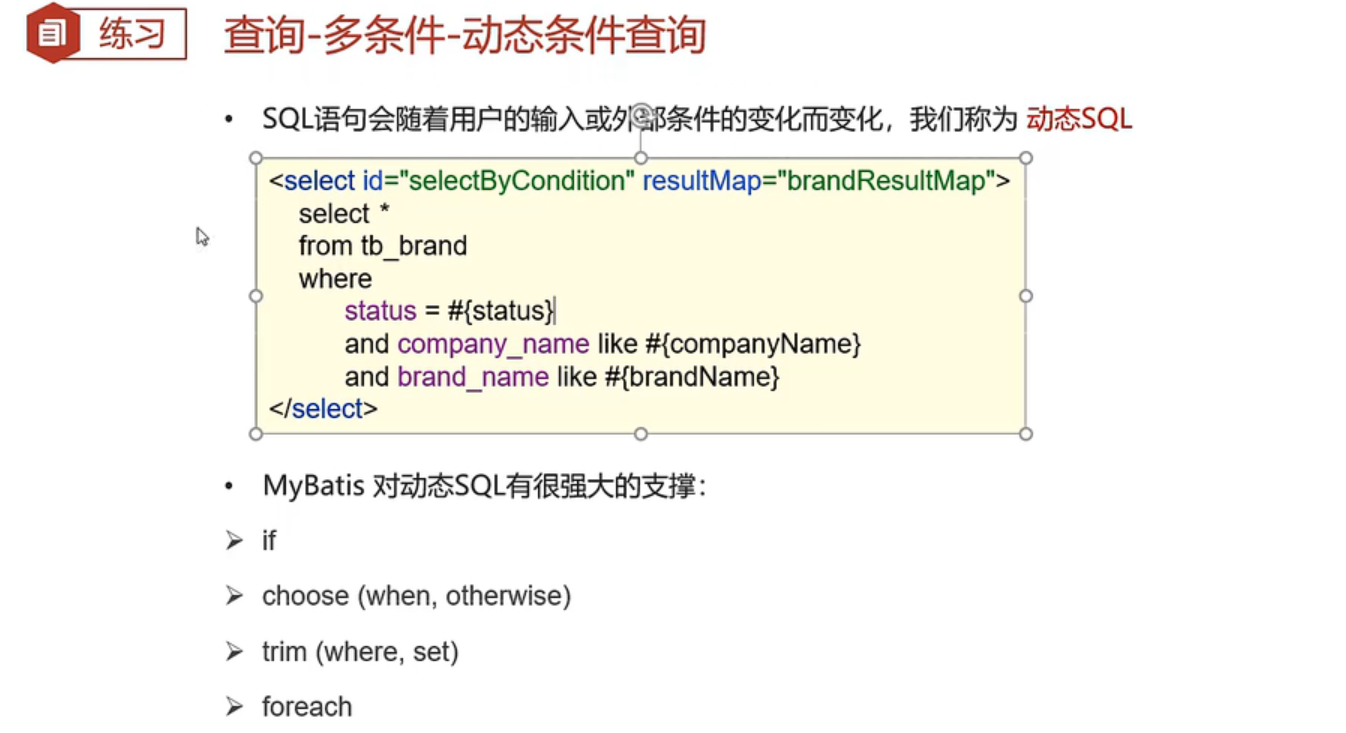
动态SQL(多条件)
上述功能实现存在很大的问题。用户在输入条件时,肯定不会所有的条件都填写,这个时候我们的SQL语句就不能那样写的
例如用户只输入 当前状态 时,SQL语句就是
SQL select * from tb_brand where status = #{status}- 1
- 2
而用户如果只输入企业名称时,SQL语句就是
SQL select * from tb_brand where company_name like #{companName}- 1
- 2
而用户如果输入了
当前状态和企业名称时,SQL语句又不一样SQL select * from tb_brand where status = #{status} and company_name like #{companName}- 1
- 2
针对上述的需要,Mybatis对动态SQL有很强大的支撑:
- if
- choose (when, otherwise)
- trim (where, set)
- foreach
我们先学习 if 标签:
-
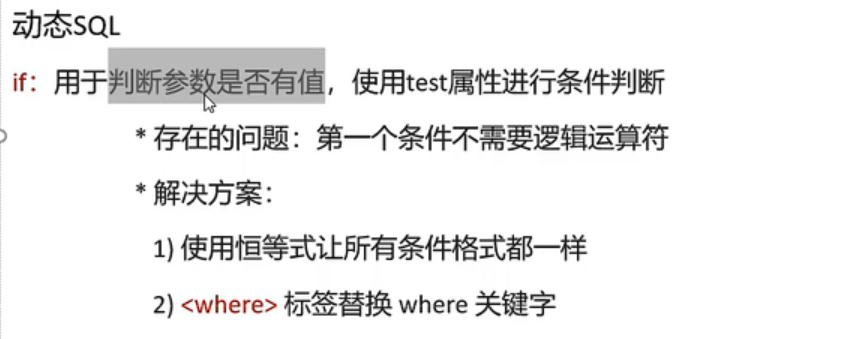
if 标签:条件判断
-
test 属性:逻辑表达式
XML <select id="selectByCondition" resultMap="brandResultMapper"> select * from tb_brand where <if test="status != null"> `status` = #{status} if> <if test="companyName != null and companyName != ''"> and company_name like #{companyName} if> <if test="brandName != null and brandName != ''"> and brand_name like #{brandName}; if> select>- 1
- 2
- 3
- 4
- 5
- 6
- 7
- 8
- 9
- 10
- 11
- 12
- 13
- 14
- 15
-
如上的这种SQL语句就会根据传递的参数值进行动态的拼接。如果此时status和companyName有值那么就会值拼接这两个条件。SQL语句将变成
SQL select * from tb_brand where status = ? and company_name like ?- 1
- 2
但如果我们只给companyName这一个参数,那么SQL语句会变成下面这样
SQL select * from tb_brand where and company_name like ?- 1
- 2
WHERE关键字后面直接跟了个AND,变成了一条错误的SQL语句,那么最笨的一个解决方案就是在where后面先接一个恒等式
SQL select * from tb_brand where 1 = 1 and company_name like ?- 1
- 2
但MyBatis也料想到了这种情况,所以MyBatis又提供了一个where标签
-
where 标签
-
作用:
-
替换where关键字
-
会动态的去掉第一个条件前的 and 或 or
-
如果所有的参数没有值则不加where关键字
- 1
- 2
- 3
- 4
- 5
- 6
- 7
- 8
- 9
- 10
- 11
- 12
- 13
- 14
- 15
- 16
测试类不变,结果如下:
[外链图片转存失败,源站可能有防盗链机制,建议将图片保存下来直接上传(img-z5Cetiq6-1668929813313)(./mybatis.assets/image-20221120134053585.png)]
-
总结
-
单个条件(动态SQL)
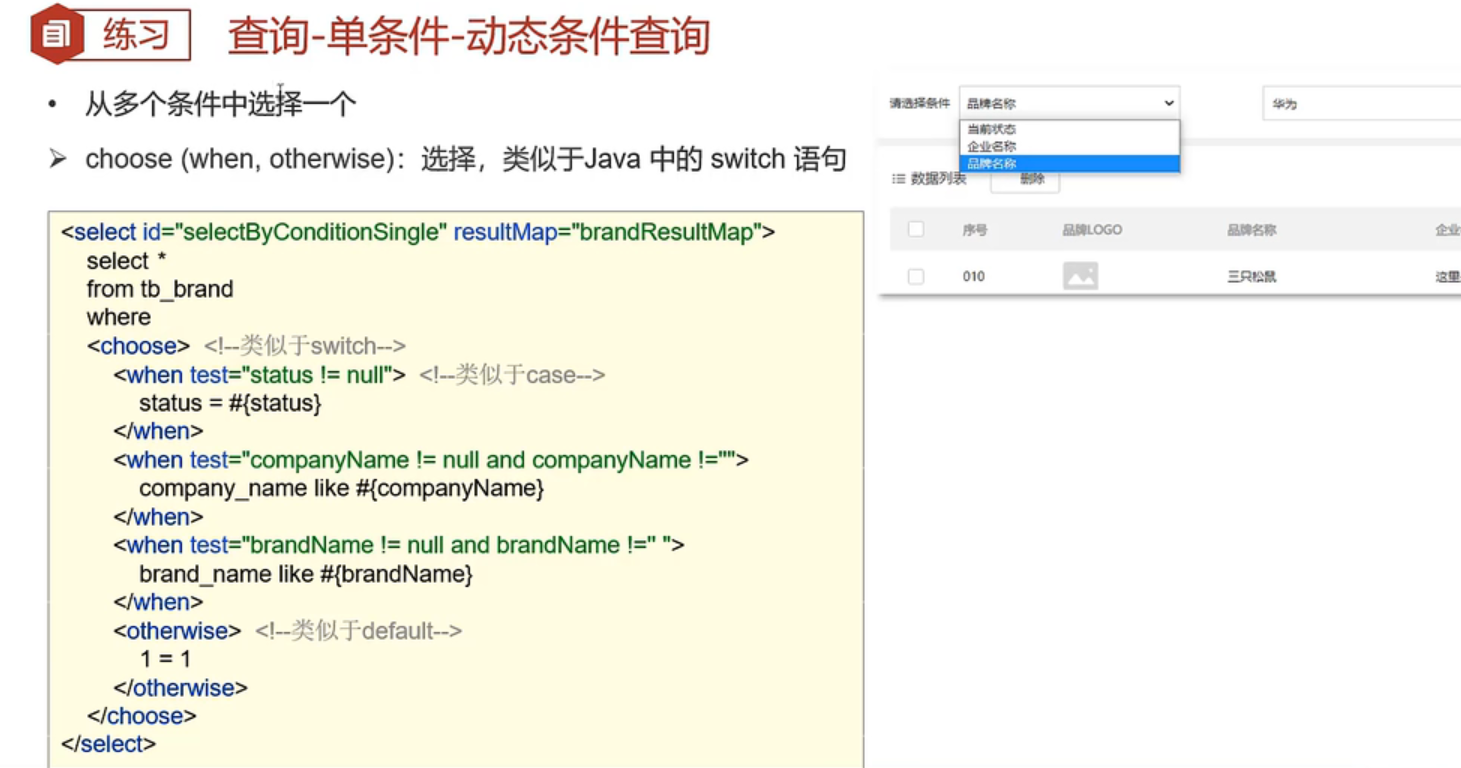

如上图所示,在查询时只能选择品牌名称、当前状态、企业名称这三个条件中的一个,但是用户到底选择哪儿一个,我们并不能确定。这种就属于单个条件的动态SQL语句。这种需求需要使用到
choose(when,otherwise)标签实现,分别对应Java中的swtich,case,default- 编写接口方法
在
BrandMapper接口中定义单条件查询的方法。ListselectByConditionSingle(Brand brand); - 1
- 2
- 编写SQL语句
在
BrandMapper.xml映射配置文件中编写statement,使用resultMap替换resultType
将where替换成
或者保持where不变,在choose中添加select * from tb_brand where true,同样实现查询所有数据的效果,但还是推荐前者的方式- 1
- 2
- 3
- 4
- 5
- 6
- 7
- 8
- 9
- 10
- 11
- 12
- 13
- 14
- 15
- 16
- 17
- 18
- 19
- 20
- 编写测试方法
在
test/java下的com.blog.mapper包下的MybatisTest类中定义测试方法JAVA @Test public void testSelectByConditionSingle() throws IOException { //接收参数 int status = 1; String companyName = "华为"; String brandName = "华为"; // 处理参数 companyName = "%" + companyName + "%"; brandName = "%" + brandName + "%"; //封装对象 Brand brand = new Brand(); //brand.setStatus(status); brand.setCompanyName(companyName); //brand.setBrandName(brandName); //1. 获取SqlSessionFactory String resource = "mybatis-config.xml"; InputStream inputStream = Resources.getResourceAsStream(resource); SqlSessionFactory sqlSessionFactory = new SqlSessionFactoryBuilder().build(inputStream); //2. 获取SqlSession对象 SqlSession sqlSession = sqlSessionFactory.openSession(); //3. 获取Mapper接口的代理对象 BrandMapper brandMapper = sqlSession.getMapper(BrandMapper.class); //4. 执行方法 Listbrands = brandMapper.selectByConditionSingle(brand); System.out.println(brands); //5. 释放资源 sqlSession.close(); } - 1
- 2
- 3
- 4
- 5
- 6
- 7
- 8
- 9
- 10
- 11
- 12
- 13
- 14
- 15
- 16
- 17
- 18
- 19
- 20
- 21
- 22
- 23
- 24
- 25
- 26
- 27
- 28
- 29
- 30
- 31
- 32
- 33

注:
其实在测试的时候,一直出现
Preparing: select * from tb_brand WHERE status = ?,也就是这个status有值啊,哪儿来的值呢?
想了半天发现可能是构造器的status默认值为0吧,因为我那会儿吧status设为的int类型,所以默认值为0,随后恍然大悟,把status的类型改为Integer就行了,以前还真没注意过这个5.2.5 添加
基础添加
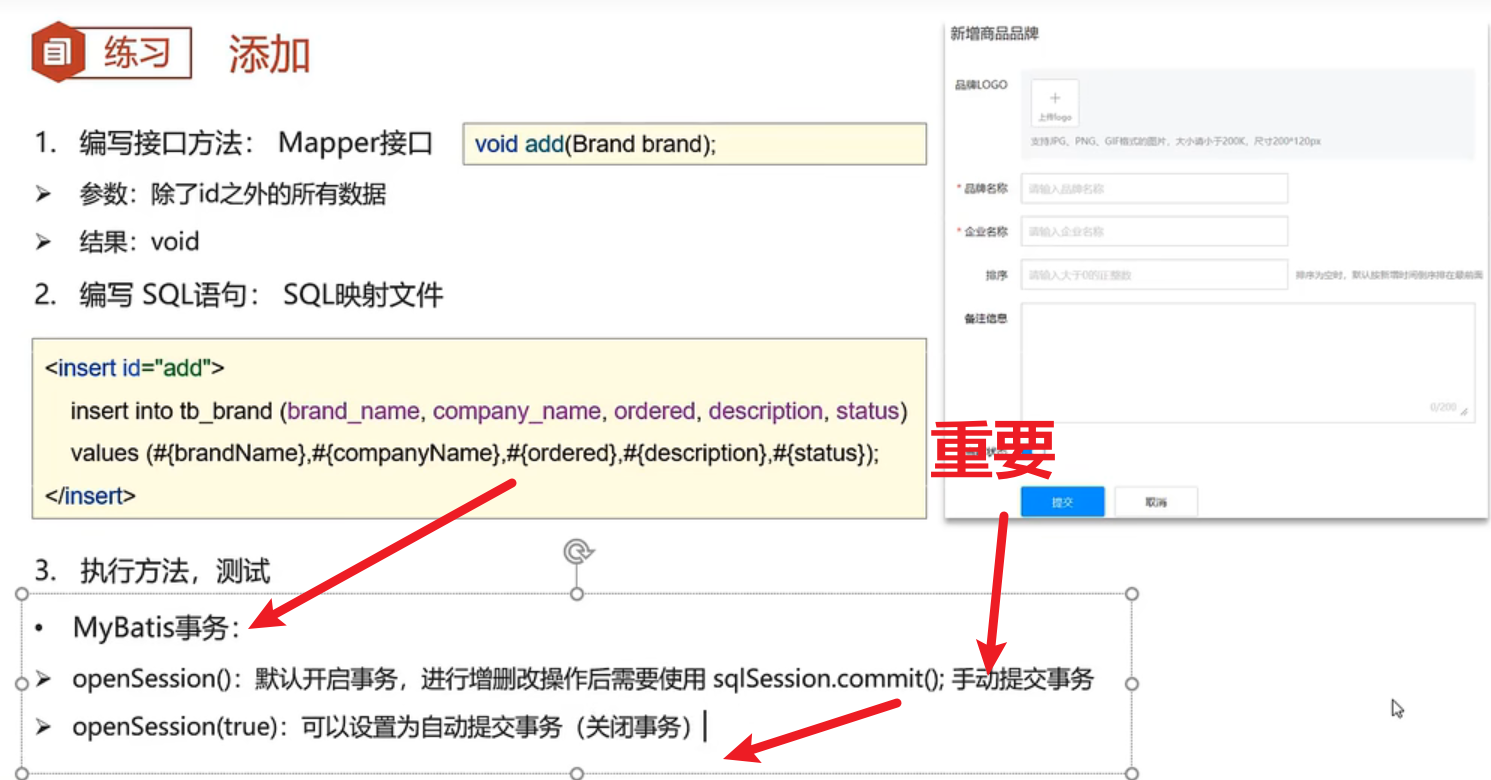
添加数据
实际开发中,添加数据时会有一个图形化界面,而我们在该页面输入想要的数据后添加
提交按钮,就会将这些数据添加到数据库中。接下来我们就来实现添加数据的操作。- 编写接口方法
- 参数:除了id之外的所有的数据。id对应的是表中主键值,而主键我们是 自动增长 生成的。
- 编写SQL语句
- 编写测试方法并执行
1 编写接口方法
在
BrandMapper接口中定义添加方法void add(Brand brand);- 1
- 2
2 编写SQL语句
在
BrandMapper.xml映射配置文件中编写添加数据的statementinsert into tb_brand(brand_name, company_name, ordered, description, status) VALUES (#{brandName},#{companyName},#{ordered},#{description},#{status}) - 1
- 2
- 3
- 4
- 5
3 编写测试方法
在
test/java下的com.ynny.rj212.mapper包下的MybatisTest类中定义测试方法@Test public void testAdd() throws IOException { //接收参数 String brandName = "波导"; String companyName = "波导手机"; Integer ordered = 100; String description = "手机中的战斗机"; int status = 1; //封装对象 Brand brand = new Brand(); brand.setBrandName(brandName); brand.setCompanyName(companyName); brand.setOrdered(ordered); brand.setDescription(description); brand.setStatus(status); //1. 获取SqlSessionFactory String resource = "mybatis-config.xml"; InputStream inputStream = Resources.getResourceAsStream(resource); SqlSessionFactory sqlSessionFactory = new SqlSessionFactoryBuilder().build(inputStream); //2. 获取SqlSession对象 SqlSession sqlSession = sqlSessionFactory.openSession(); //3. 获取Mapper接口的代理对象 BrandMapper brandMapper = sqlSession.getMapper(BrandMapper.class); //4. 执行方法 brandMapper.add(brand); //提交事务 sqlSession.commit(); //5. 释放资源 sqlSession.close(); }- 1
- 2
- 3
- 4
- 5
- 6
- 7
- 8
- 9
- 10
- 11
- 12
- 13
- 14
- 15
- 16
- 17
- 18
- 19
- 20
- 21
- 22
- 23
- 24
- 25
- 26
- 27
- 28
- 29
- 30
- 31

在第2步获取SqlSession对象时,默认是不会自动提交事务的,我们可以在openSession方法中加上true,这样就能自动提交事务了,不用手动调用commit方法(即上述代码的倒数第四行)
//SqlSession sqlSession = sqlSessionFactory.openSession(true); //设置自动提交事务,这种情况不需要手动提交事务了- 1
- 2
主键返回
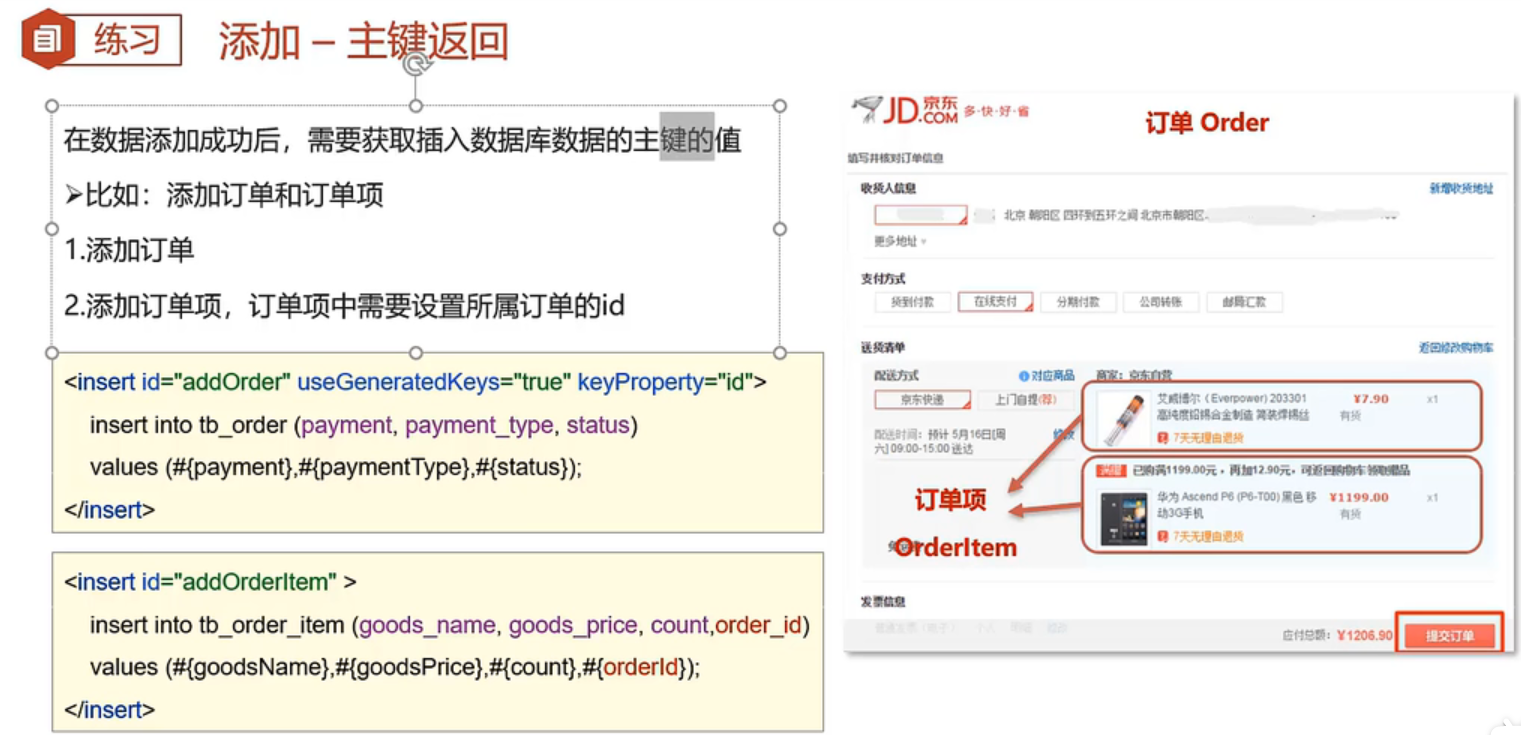
在接收参数的时候,我们没有接收id的参数,而是利用数据库主键自增长来自动赋值,但有时候我们又需要获取这个自增长的id。
解决方案
-
在 insert 标签上添加如下属性:
-
useGeneratedKeys:是够获取自动增长的主键值。true表示获取
-
keyProperty :指定将获取到的主键值封装到哪儿个属性里
insert into tb_brand(brand_name, company_name, ordered, description, status) VALUES (#{brandName},#{companyName},#{ordered},#{description},#{status}) - 1
- 2
- 3
- 4
- 5
添加主键返回之后,我们再来测试一下
@Test public void testAdd() throws IOException { //接收参数 String brandName = "波导"; String companyName = "波导手机"; Integer ordered = 100; String description = "手机中的战斗机"; int status = 1; //封装对象 Brand brand = new Brand(); brand.setBrandName(brandName); brand.setCompanyName(companyName); brand.setOrdered(ordered); brand.setDescription(description); brand.setStatus(status); //1. 获取SqlSessionFactory String resource = "mybatis-config.xml"; InputStream inputStream = Resources.getResourceAsStream(resource); SqlSessionFactory sqlSessionFactory = new SqlSessionFactoryBuilder().build(inputStream); //2. 获取SqlSession对象 SqlSession sqlSession = sqlSessionFactory.openSession(); //3. 获取Mapper接口的代理对象 BrandMapper brandMapper = sqlSession.getMapper(BrandMapper.class); //4. 执行方法 brandMapper.add(brand); System.out.println(brand.getId()); //在这里输出一下id,看看有没有值输出,我这里是有的 //提交事务 sqlSession.commit(); //5. 释放资源 sqlSession.close(); }- 1
- 2
- 3
- 4
- 5
- 6
- 7
- 8
- 9
- 10
- 11
- 12
- 13
- 14
- 15
- 16
- 17
- 18
- 19
- 20
- 21
- 22
- 23
- 24
- 25
- 26
- 27
- 28
- 29
- 30
- 31
-

5.2.6 修改
修改全部字段
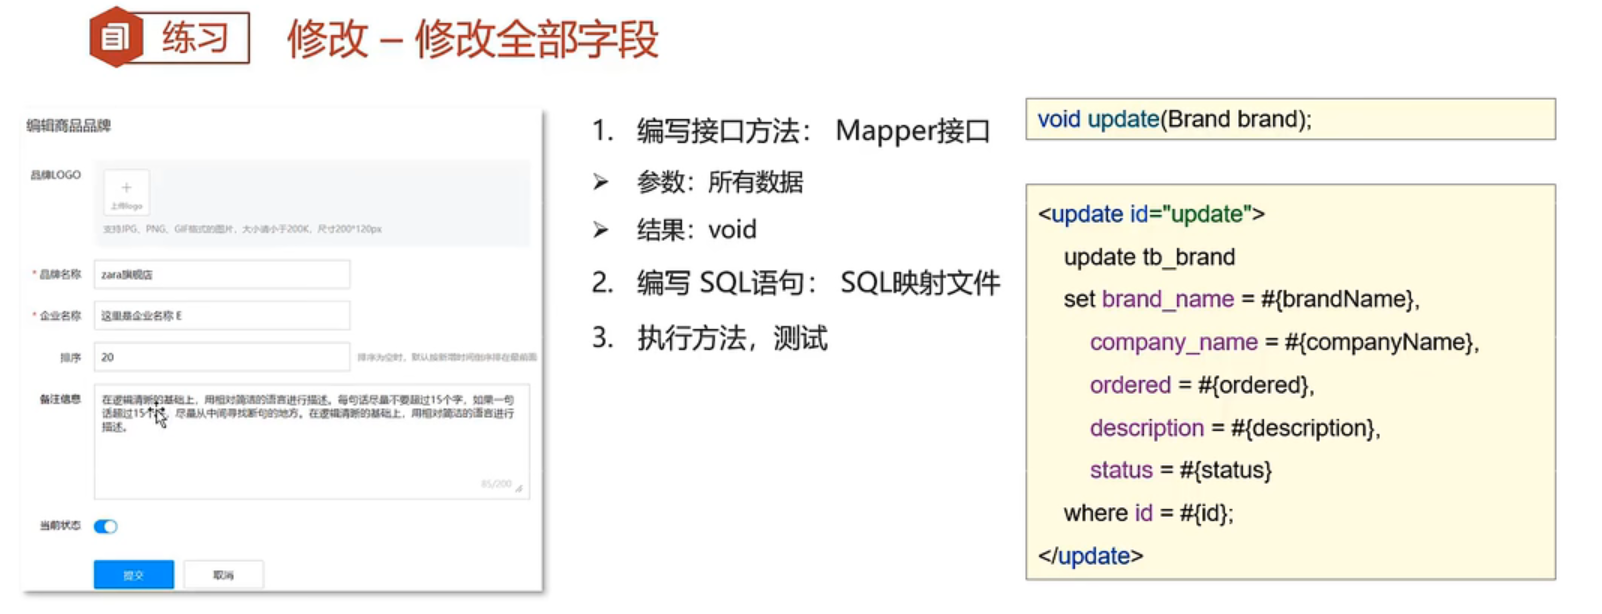
1 编写接口方法
在
BrandMapper接口中定义修改方法。int获取修改的行数int update(Brand brand);- 1
- 2
2 编写SQL语句
在
BrandMapper.xml映射配置文件中编写修改数据的statement。update tb_brand set brand_name = #{brandName}, company_name = #{companyName}, ordered = #{ordered}, `description` = #{description}, `status` = #{status} where id = #{id} - 1
- 2
- 3
- 4
- 5
- 6
- 7
- 8
- 9
- 10
3 编写测试方法
在
test/java下的com.ynny.rj212.mapper包下的MybatisTest类中定义测试方法@Test public void testUpdate() throws IOException { //接收参数 int id = 5; String brandName = "波导"; String companyName = "波导手机"; Integer ordered = 200; String description = "波导手机,手机中的战斗机"; int status = 5; //封装对象 Brand brand = new Brand(); brand.setBrandName(brandName); brand.setCompanyName(companyName); brand.setOrdered(ordered); brand.setDescription(description); brand.setStatus(status); brand.setId(id); //1. 获取SqlSessionFactory String resource = "mybatis-config.xml"; InputStream inputStream = Resources.getResourceAsStream(resource); SqlSessionFactory sqlSessionFactory = new SqlSessionFactoryBuilder().build(inputStream); //2. 获取SqlSession对象,并设置自动提交事务 SqlSession sqlSession = sqlSessionFactory.openSession(true); //3. 获取Mapper接口的代理对象 BrandMapper brandMapper = sqlSession.getMapper(BrandMapper.class); //4. 执行方法 int updateCount = brandMapper.update(brand); System.out.println(updateCount); //5. 释放资源 sqlSession.close(); }- 1
- 2
- 3
- 4
- 5
- 6
- 7
- 8
- 9
- 10
- 11
- 12
- 13
- 14
- 15
- 16
- 17
- 18
- 19
- 20
- 21
- 22
- 23
- 24
- 25
- 26
- 27
- 28
- 29
- 30
- 31
- 32
此种修改方式要改只能全部改,如果没有给某一个字段赋值,那么修改之后的值就是null,十分的不方便,所以我们要将其优化成动态的修改字段
修改动态字段

解决方案跟上面的类似,也是用if标签来判断用户的输入,然后用set标签来删除额外的逗号(上面是用where标签去除and或or),防止出现SQL语法错误
update tb_brand brand_name = #{brandName}, company_name = #{companyName}, ordered = #{ordered}, `description` = #{description}, `status` = #{status} - 1
- 2
- 3
- 4
- 5
- 6
- 7
- 8
- 9
- 10
- 11
- 12
- 13
- 14
- 15
- 16
- 17
- 18
- 19
- 20
- 21
- 22
@Test public void testUpdate() throws IOException { //接收参数 int id = 3; String brandName = "波导"; // String companyName = "波导手机"; // Integer ordered = 200; // String description = "波导手机,手机中的战斗机"; int status = 5; //封装对象 Brand brand = new Brand(); brand.setBrandName(brandName); // brand.setCompanyName(companyName); // brand.setOrdered(ordered); // brand.setDescription(description); brand.setStatus(status); brand.setId(id); //1. 获取SqlSessionFactory String resource = "mybatis-config.xml"; InputStream inputStream = Resources.getResourceAsStream(resource); SqlSessionFactory sqlSessionFactory = new SqlSessionFactoryBuilder().build(inputStream); //2. 获取SqlSession对象,并设置自动提交事务 SqlSession sqlSession = sqlSessionFactory.openSession(true); //3. 获取Mapper接口的代理对象 BrandMapper brandMapper = sqlSession.getMapper(BrandMapper.class); //4. 执行方法 int updateCount = brandMapper.update(brand); System.out.println(updateCount); //5. 释放资源 sqlSession.close(); }- 1
- 2
- 3
- 4
- 5
- 6
- 7
- 8
- 9
- 10
- 11
- 12
- 13
- 14
- 15
- 16
- 17
- 18
- 19
- 20
- 21
- 22
- 23
- 24
- 25
- 26
- 27
- 28
- 29
- 30
- 31

5.2.7 删除
删除一行数据
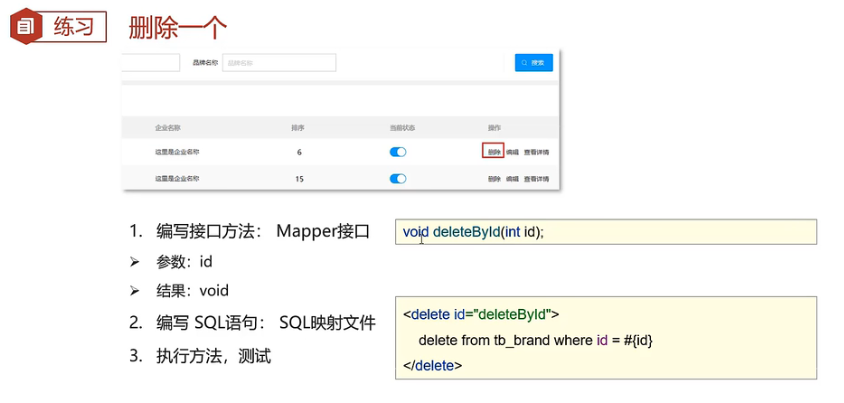
我们在App网购的时候,购物车里都会有
删除按钮,,当用户点击了该按钮,就会将改行数据删除掉。那我们就需要思考,这种删除是根据什么进行删除呢?是通过主键id删除,因为id是表中数据的唯一标识。
接下来就来实现该功能。1 编写接口方法
在
BrandMapper接口中定义根据id删除方法。void deleteById(int id);- 1
- 2
2 编写SQL语句
在
BrandMapper.xml映射配置文件中编写删除一行数据的statementdelete from tb_brand where id = #{id}; - 1
- 2
- 3
- 4
- 5
- 6
3 编写测试方法
在
test/java下的com.ynny.rj212mapper包下的MybatisTest类中定义测试方法@Test public void testDeleteById() throws IOException { //接收参数 int id = 6; //1. 获取SqlSessionFactory String resource = "mybatis-config.xml"; InputStream inputStream = Resources.getResourceAsStream(resource); SqlSessionFactory sqlSessionFactory = new SqlSessionFactoryBuilder().build(inputStream); //2. 获取SqlSession对象 SqlSession sqlSession = sqlSessionFactory.openSession(true); //3. 获取Mapper接口的代理对象 BrandMapper brandMapper = sqlSession.getMapper(BrandMapper.class); //4. 执行方法 brandMapper.deleteById(id); //5. 释放资源 sqlSession.close(); }- 1
- 2
- 3
- 4
- 5
- 6
- 7
- 8
- 9
- 10
- 11
- 12
- 13
- 14
- 15
- 16
- 17
- 18

批量删除
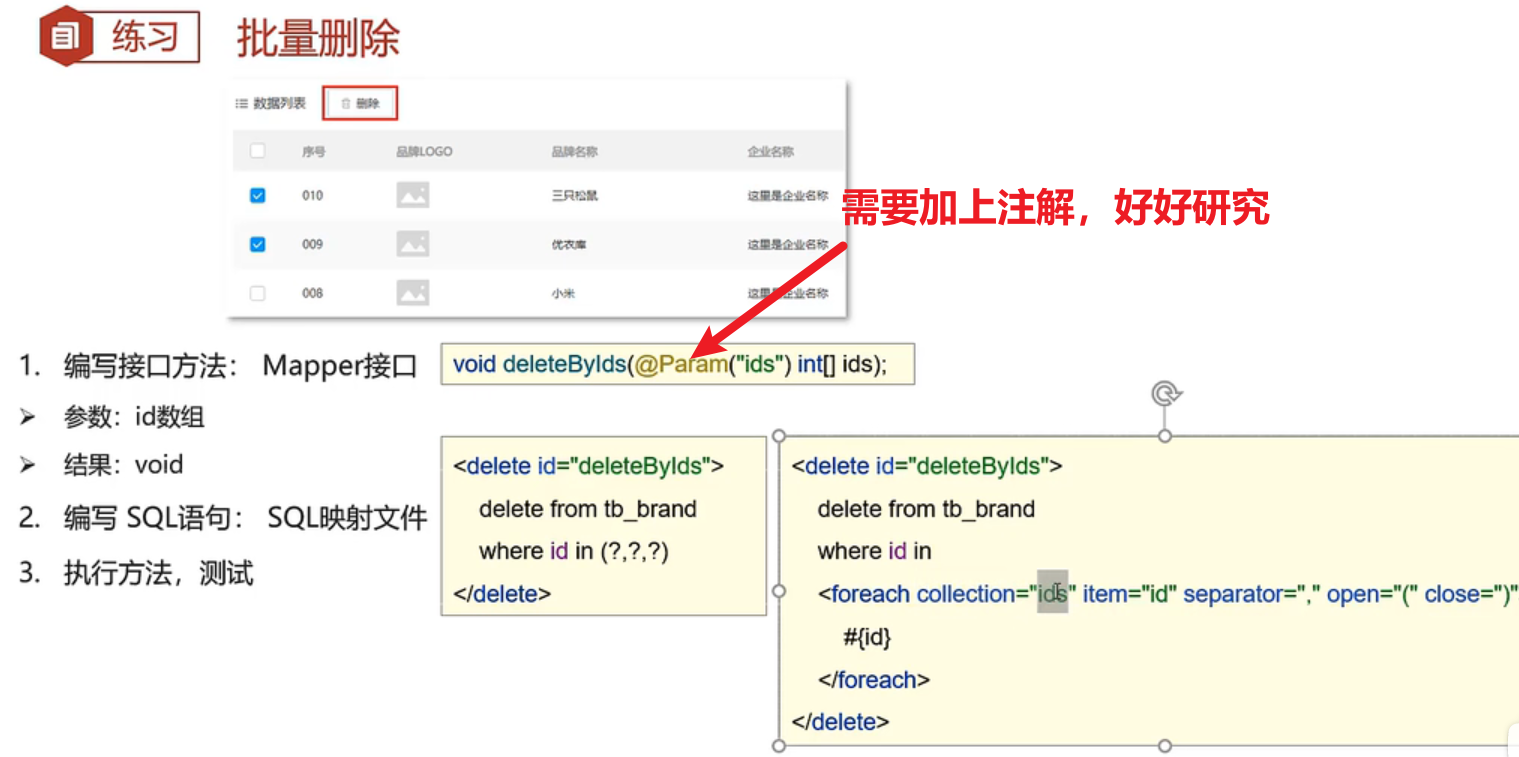
我们在删除购物车订单的时候,都会有个多选按钮,可以选中多条记录进行删除,下面我们来实现这个功能
1 编写接口方法
在
BrandMapper接口中定义删除多行数据的方法。// 参数是一个数组,数组中存储的是多条数据的id void deleteByIds(int[] ids);- 1
- 2
- 3
2 编写SQL语句
在
BrandMapper.xml映射配置文件中编写删除多条数据的statement。编写SQL时需要遍历数组来拼接SQL语句。Mybatis 提供了
foreach标签供我们使用
foreach 标签用来迭代任何可迭代的对象(如数组,集合)。
-
collection 属性:
- mybatis会将数组参数,封装为一个Map集合。
- 默认:array = 数组
- 使用@Param注解改变map集合的默认key的名称
- mybatis会将数组参数,封装为一个Map集合。
-
item 属性:本次迭代获取到的元素。
-
separator 属性:集合项迭代之间的分隔符。
foreach标签不会错误地添加多余的分隔符。也就是最后一次迭代不会加分隔符。 -
open 属性:该属性值是在拼接SQL语句之前拼接的语句,只会拼接一次
-
close 属性:该属性值是在拼接SQL语句拼接后拼接的语句,只会拼接一次
<delete id="deleteByIds"> delete from tb_brand where id in <foreach collection="ids" item="id" separator="," open="(" close=")"> #{id} foreach> delete>- 1
- 2
- 3
- 4
- 5
- 6
- 7
- 8
假如数组中的id数据是{1,2,3},那么拼接后的sql语句就是:
delete from tb_brand where id in (1,2,3);- 1
3 编写测试方法
在
test/java下的com.ynny.rj212.mapper包下的MybatisTest类中定义测试方法@Test public void testDeleteByIds() throws IOException { //接收参数 int[] ids = {4,6}; //1. 获取SqlSessionFactory String resource = "mybatis-config.xml"; InputStream inputStream = Resources.getResourceAsStream(resource); SqlSessionFactory sqlSessionFactory = new SqlSessionFactoryBuilder().build(inputStream); //2. 获取SqlSession对象 SqlSession sqlSession = sqlSessionFactory.openSession(true); //3. 获取Mapper接口的代理对象 BrandMapper brandMapper = sqlSession.getMapper(BrandMapper.class); //4. 执行方法 brandMapper.deleteByIds(ids); //5. 释放资源 sqlSession.close(); }- 1
- 2
- 3
- 4
- 5
- 6
- 7
- 8
- 9
- 10
- 11
- 12
- 13
- 14
- 15
- 16
- 17
- 18

5.3 参数传递

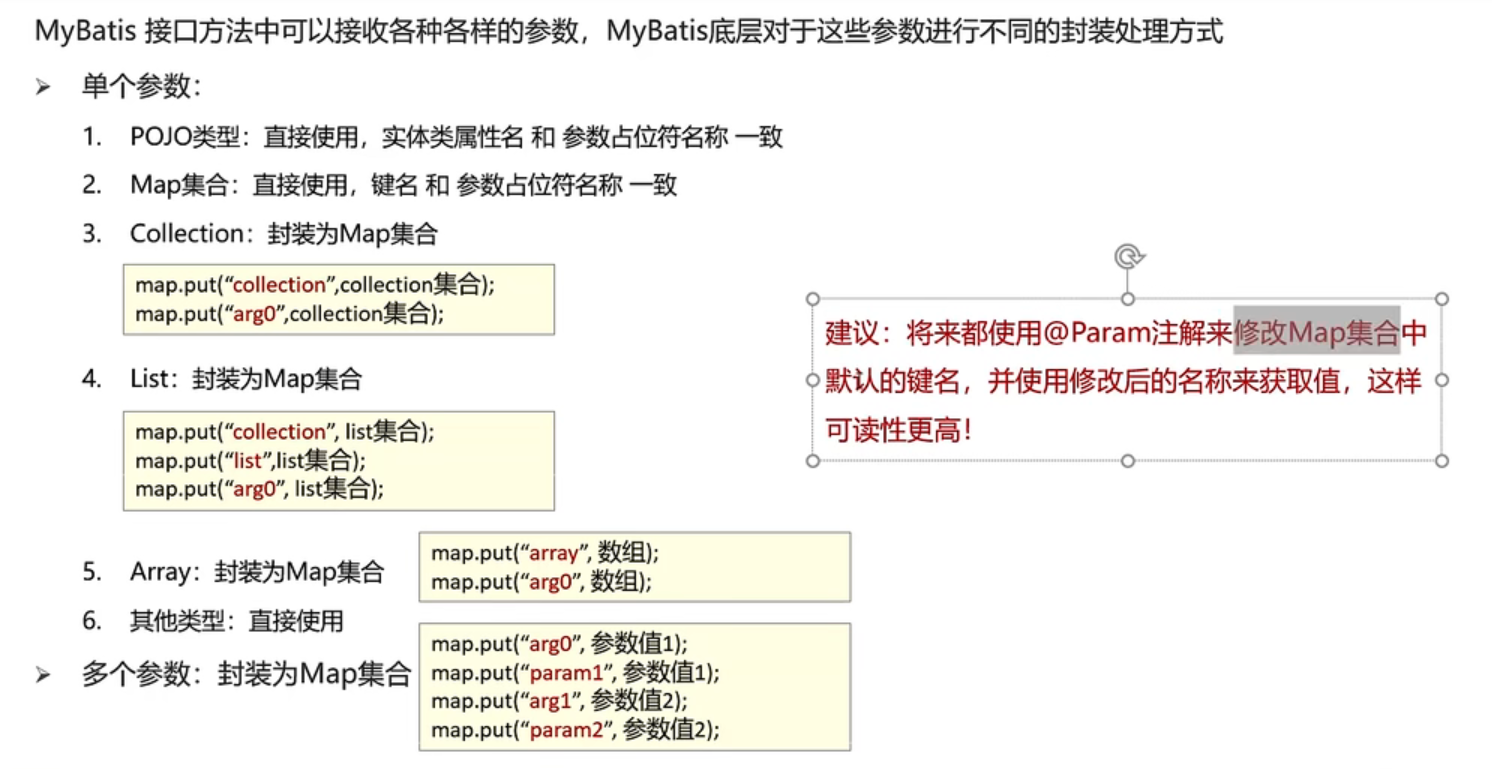
Mybatis 接口方法中可以接收各种各样的参数,如下:
- 多个参数
- 单个参数:单个参数又可以是如下类型
- POJO 类型
- Map 集合类型
- Collection 集合类型
- List 集合类型
- Array 类型
- 其他类型
多个参数
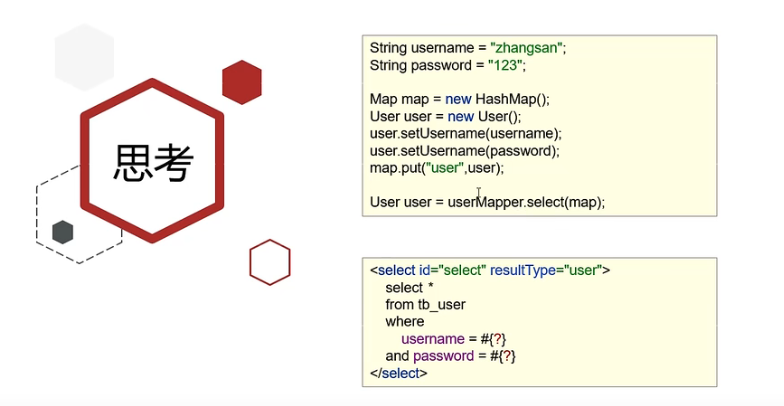
如下面的代码,就是接收两个参数,而接收多个参数需要使用
@Param注解,那么为什么要加该注解呢?这个问题要弄明白就必须来研究Mybatis的底层对于这些参数是如何处理的。JAVA User select(@Param("username") String username,@Param("password") String password);- 1
- 2
- 1
- 2
- 3
- 4
- 5
- 6
- 7
- 8
我们在接口方法中定义多个参数,Mybatis 会将这些参数封装成 Map 集合对象,值就是参数值,而键在没有使用
@Param注解时有以下命名规则:- 以 arg 开头 :第一个参数就叫 arg0,第二个参数就叫 arg1,以此类推。如:
- map.put(“arg0”,参数值1);
- map.put(“arg1”,参数值2);
- 以 param 开头 : 第一个参数就叫 param1,第二个参数就叫 param2,依次类推。如:
- map.put(“param1”,参数值1);
- map.put(“param2”,参数值2);
下面我们来验证一下
-
在UserMapper接口中定义如下方法
User select(String username,String password);- 1
- 2
-
在UserMapper.xml映射配置文件中定义SQL
- 1
- 2
- 3
- 4
- 5
- 6
- 7
- 8
运行代码结果如下
PLAINTEXT [DEBU6][main] c.i.m.0.select- ==> Preparing: SELECT * FROM tb_user WHERE username = ? AND PASSWORD = ? [DEBU6] [main] c.i.m.U.select- ==> Parameters: zhangsan(STRING),123(STRING)- 1
- 2
- 3
在映射配合文件的SQL语句中使用用arg开头的和param书写,代码的可读性会变的特别差,此时可以使用 @Param注解。
在接口方法参数上使用
@Param注解,Mybatis 会将arg开头的键名替换为对应注解的属性值。
以后接口参数是多个时,在每个参数上都使用@Param注解。这样代码的可读性更高。单个参数
-
POJO 类型
直接使用。要求
属性名和参数占位符名称一致 -
Map 集合类型
直接使用。要求
map集合的键名和参数占位符名称一致 -
Collection 集合类型
Mybatis 会将集合封装到 map 集合中,如下:
map.put(“arg0”,collection集合);
map.put(“collection”,collection集合;
可以使用
@Param注解替换map集合中默认的 arg 键名。 -
List 集合类型
Mybatis 会将集合封装到 map 集合中,如下:
map.put(“arg0”,list集合);
map.put(“collection”,list集合);
map.put(“list”,list集合);
可以使用
@Param注解替换map集合中默认的 arg 键名。 -
Array 类型
Mybatis 会将集合封装到 map 集合中,如下:
map.put(“arg0”,数组);
map.put(“array”,数组);
可以使用
@Param注解替换map集合中默认的 arg 键名。 -
其他类型
比如int类型,
参数占位符名称叫什么都可以。尽量做到见名知意
总结
思考
5.4 注解开发(自己去试试)
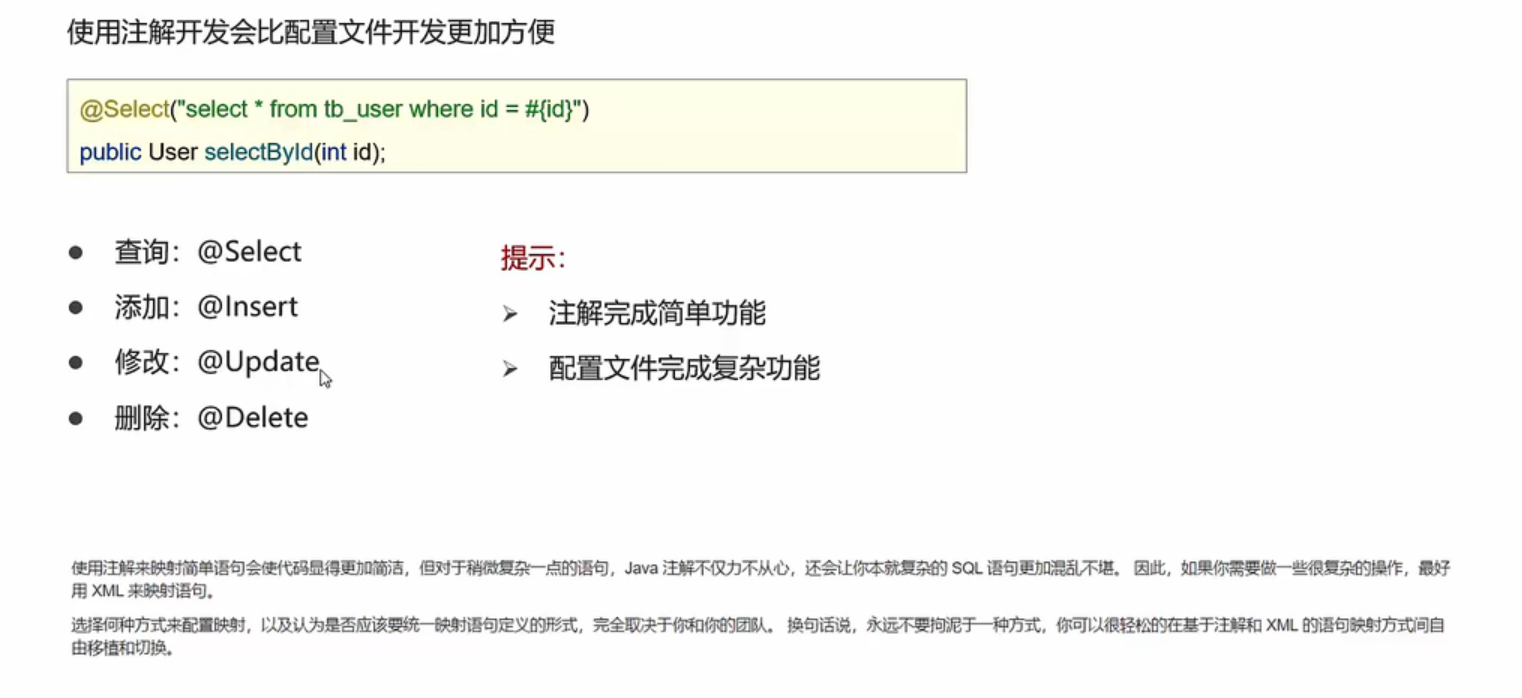
注解实现CURD
使用注解开发会比配置文件开发更加方便。如下就是使用注解进行开发
@Select(value = "select * from tb_user where id = #{id}") public User select(int id);- 1
- 2
- 3
注解是用来替换映射配置文件方式配置的,所以使用了注解,就不需要再映射配置文件中书写对应的
statementMybatis 针对 CURD 操作都提供了对应的注解,已经做到见名知意。如下:
- 查询 :@Select
- 添加 :@Insert
- 修改 :@Update
- 删除 :@Delete
接下来我们做一个案例来使用 Mybatis 的注解开发
-
代码实现:
-
将之前案例中
UserMapper.xml中的 根据id查询数据 的statement删掉 -
在UserMapper接口的selectById方法上添加注解
@Select("select * from tb_user where id = #{id}") User selectById(int id);- 1
- 2
- 3
-
测试
@Test public void testSelect() throws IOException { //接收参数 int id = 2; //1. 获取SqlSessionFactory String resource = "mybatis-config.xml"; InputStream inputStream = Resources.getResourceAsStream(resource); SqlSessionFactory sqlSessionFactory = new SqlSessionFactoryBuilder().build(inputStream); //2. 获取SqlSession对象 SqlSession sqlSession = sqlSessionFactory.openSession(true); //3. 获取Mapper接口的代理对象 UserMapper userMapper = sqlSession.getMapper(UserMapper.class); //4. 执行方法 User user = userMapper.selectById(id); System.out.println(user); //5. 释放资源 sqlSession.close(); }- 1
- 2
- 3
- 4
- 5
- 6
- 7
- 8
- 9
- 10
- 11
- 12
- 13
- 14
- 15
- 16
- 17
- 18
- 19
-
注意在官方文档中
入门中有这样的一段话:使用注解来映射简单语句会使代码显得更加简洁,但对于稍微复杂一点的语句,Java 注解不仅力不从心,还会让本就复杂的 SQL 语句更加混乱不堪。 因此,如果你需要做一些很复杂的操作,最好用 XML 来映射语句。
结论:注解完成简单功能,配置文件完成复杂功能。
=可以使用@Param注解替换map集合中默认的 arg 键名。==-
List 集合类型
Mybatis 会将集合封装到 map 集合中,如下:
map.put(“arg0”,list集合);
map.put(“collection”,list集合);
map.put(“list”,list集合);
可以使用
@Param注解替换map集合中默认的 arg 键名。 -
Array 类型
Mybatis 会将集合封装到 map 集合中,如下:
map.put(“arg0”,数组);
map.put(“array”,数组);
可以使用
@Param注解替换map集合中默认的 arg 键名。 -
其他类型
比如int类型,
参数占位符名称叫什么都可以。尽量做到见名知意
总结
[外链图片转存中…(img-PcsB9eWC-1668929813324)]
思考
[外链图片转存中…(img-9TaA4EPP-1668929813324)]
5.4 注解开发(自己去试试)
[外链图片转存中…(img-wespicFW-1668929813325)]
注解实现CURD
使用注解开发会比配置文件开发更加方便。如下就是使用注解进行开发
@Select(value = "select * from tb_user where id = #{id}") public User select(int id);- 1
- 2
- 3
注解是用来替换映射配置文件方式配置的,所以使用了注解,就不需要再映射配置文件中书写对应的
statementMybatis 针对 CURD 操作都提供了对应的注解,已经做到见名知意。如下:
- 查询 :@Select
- 添加 :@Insert
- 修改 :@Update
- 删除 :@Delete
接下来我们做一个案例来使用 Mybatis 的注解开发
-
代码实现:
-
将之前案例中
UserMapper.xml中的 根据id查询数据 的statement删掉 -
在UserMapper接口的selectById方法上添加注解
@Select("select * from tb_user where id = #{id}") User selectById(int id);- 1
- 2
- 3
-
测试
@Test public void testSelect() throws IOException { //接收参数 int id = 2; //1. 获取SqlSessionFactory String resource = "mybatis-config.xml"; InputStream inputStream = Resources.getResourceAsStream(resource); SqlSessionFactory sqlSessionFactory = new SqlSessionFactoryBuilder().build(inputStream); //2. 获取SqlSession对象 SqlSession sqlSession = sqlSessionFactory.openSession(true); //3. 获取Mapper接口的代理对象 UserMapper userMapper = sqlSession.getMapper(UserMapper.class); //4. 执行方法 User user = userMapper.selectById(id); System.out.println(user); //5. 释放资源 sqlSession.close(); }- 1
- 2
- 3
- 4
- 5
- 6
- 7
- 8
- 9
- 10
- 11
- 12
- 13
- 14
- 15
- 16
- 17
- 18
- 19
-
注意在官方文档中
入门中有这样的一段话:使用注解来映射简单语句会使代码显得更加简洁,但对于稍微复杂一点的语句,Java 注解不仅力不从心,还会让本就复杂的 SQL 语句更加混乱不堪。 因此,如果你需要做一些很复杂的操作,最好用 XML 来映射语句。
结论:注解完成简单功能,配置文件完成复杂功能。
-
-
相关阅读:
自动驾驶算法岗笔试题 | 一道有意思的数学题 | 解析及代码实现
深度学习基础网络整理----AlexNet
云原生路由架构探索
做接口测试的流程一般是怎么样的?UI功能6大流程、接口测试8大流程这些你真的全会了吗?
使用LibreOffice pdf批量转换为jpg
独家巨献!阿里专家兼Github贡献者,整理的SpringBoot入门到成神
字节前端面试被问到的react问题
【MySQL基础】-【数据处理之增删改】
volatile关键字的可见性_java培训
【C语言】模拟实现内存函数
- 原文地址:https://blog.csdn.net/pillow233/article/details/127949752
