-
【数据结构】线性表 _顺序表 &链表的增删查改 _[细节分析+代码实现]
快速导航
2.3.1 SeqList(初始化) &SeqListPrint(依次打印表中数据)
2.3.4 SeqListPopBack(尾删) & SeqListPopFront(头删)
2.3.5 SeqListInsert(任意位置pos的插入)
2.3.6 SeqListErase(任意位置pos的删除)
2.3.7 SeqListFind(查找) &SeqListModify(修改)
3.2.2 DLLPushBack(尾插) &DLLPushFront(头插)
3.2.3 DLLPopBack(尾删) &DLLPopFront(头删)
1.线性表
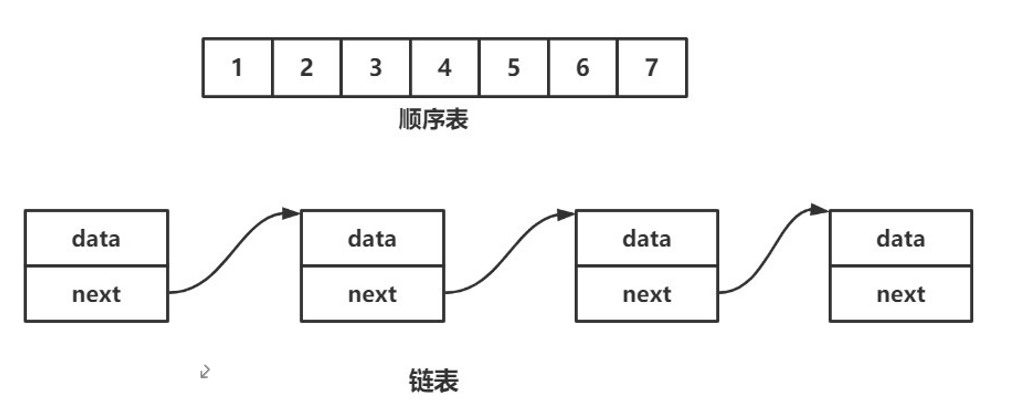
线性表是N个具有相同特性的数据元素的有限序列; 常见的线性表有:顺序表、链表、栈和队列等。
线性表在逻辑上是线性结构,也就是说是在逻辑上可以看做是一条连续的直线;但在物理上结构并不一定是连续的,比如链表;
线性表在物理上存储时,通常以数组和链式结构的形式。
2.顺序表
2.1 概念及结构
顺序表是用一段物理地址连续的存储单元依次存储数据元素的线性结构,采用数组存储。
注意:顺序表中的数据是从第一个位置开始,连续存储的;这和数组是不同的,数组中的数据可以在任意位置存放。

2.2 静态结构和动态结构的比较
1.静态结构(数组元素大小是固定的)
- #define N 10
- typedef int SLDataType;
- typedef struct SeqList
- {
- SLDataType a[N];
- int size;
- }SeqList;

2.动态开辟数组(空间动态开辟)
- typedef struct SeqList
- {
- SLDataType* a;//指向动态数组的指针
- int size; //元素个数
- int capacity; //容量
- }SeqList;
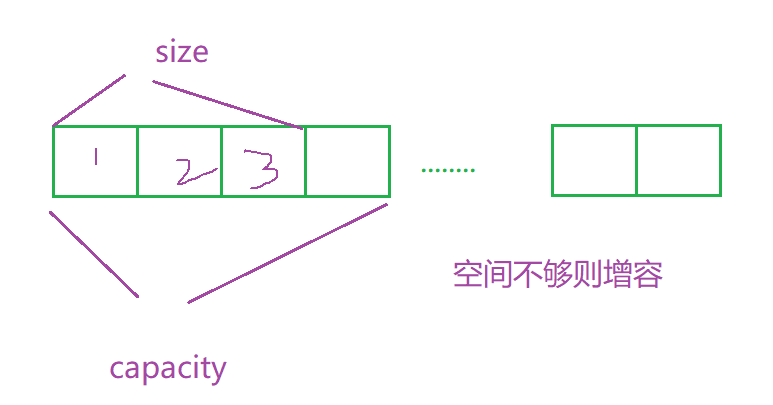
对比两种结构,静态的结构有着一个致命的缺点:空间一次性开辟,若空间过大容易造成空间的浪费; 若空间过小不够用。
而动态开辟的数组就没有这种烦恼了,可以先把空间开小一点;若空间不够可以进行扩容。
考虑到静态结构的缺陷,我们在实现顺序表的时候使用的是动态开辟的数组。
2.3 接口实现(重点)
2.3.1 SeqList(初始化) &SeqListPrint(依次打印表中数据)
初始化的过程中首先要避免一个常见的问题:在传参的时候不能传结构体,而要传结构体指针;
如果传的是结构体,那么形参是实参的一份临时拷贝,形参的改变不会影响实参。
- void SeqListInit(SeqList* psl)
- {
- assert(psl);
- SL->a = NULL;//数组先初始化为空,后面用动态内存开辟函数开辟空间
- SL->capacity = SL->size = 0;//容量和元素数量都初始化为0
- }
打印的过程就很简单了,就把顺序表当做数组进行遍历就好了。
- //这里使用指针不使用指针都可以进行打印,但是使用指针的话减少了拷贝的消耗
- void SeqListPrint(SeqList* psl)
- {
- assert(psl);
- int i = 0;
- for (i = 0; i < psl->size; i++)
- {
- printf("%d ", psl->a[i]);
- }
- printf("\n");
- }
2.3.2 SeqListPushBack(尾插)
在很多人看来尾插很简单,直接插入数据,++size就行了。但是很容易忽略一个点,那就是插入数据之前顺序表是否已经满了,如果满了,就需要进行扩容。无论是尾插、头插、还是随机位置的插入,都需要检查是否需要扩容,所以在这里就直接封装成一个函数CheckCapacity:
两种扩容的情况:
1.顺序表为空时插入数据
2.顺序表已满
这两种情况可以归结为一种情况:psl->size == psl->capacity
思路:借助一个变量newcapacity进行扩容,如果psl->capacity == 0那么把capacity的值初始化为4,如果不是这种情况,那么
把容量扩为原来容量的二倍,也就是newcapacity = psl->capacity * 2;
- void Checkcapacity(SeqList* psl)
- {
- assert(psl);
- if (psl->capacity == psl->size)
- {
- int newcapacity = psl->capacity == 0 ? 4 : psl->capacity * 2;
- SLDataType* tmp = (SLDataType*)realloc(psl->a, newcapacity * sizeof(SLDataType));
- if (tmp == NULL)
- {
- perror("Checkcapacity::realloc");
- exit(-1);
- }
- psl->a = tmp;
- psl->capacity = newcapacity;
- }
- }
这里有一个函数需要注意:realloc, 如果传入的指针不为空,就根据传入的空间大小进行扩容;若果传入的指针为空,realloc就相当于malloc开辟空间。
下面给出SeqListPushBack函数的完整实现:
- void SeqListPushBack(SeqList* psl, SLDataType x)
- {
- assert(psl);
- Checkcapacity(psl);
- psl->a[psl->size] = x;
- psl->size++;
- }
2.3.3 SeqListPushFront(头插)

头插的话需要移动数据,而且只能从后往前移动,否则会导致数据的覆盖;其次因为是插入操作,还是要检查扩容。
- void SeqListPushFront(SeqList* psl, SLDataType x)
- {
- assert(psl);
- Checkcapacity(psl);
- int end = psl->size - 1;
- while (end >= 0)
- {
- psl->a[end + 1] = psl->a[end];
- end--;
- }
- psl->a[0] = x;
- psl->size++;
- }
2.3.4 SeqListPopBack(尾删) & SeqListPopFront(头删)
尾删和尾插在进行之前都需要检查顺序表中是否有元素,判断size是否为0;
尾删的话直接 --size的个数就可以了,但是头删还需要挪动元素;挪动数据只能从前往后,否则也是会造成数据的覆盖。

- void SeqListPopBack(SeqList* psl)
- {
- assert(psl);
- assert(psl->size);
- psl->size--;
- }
- void SeqListPopFront(SeqList* psl)
- {
- assert(psl);
- assert(psl->size);
- int begin = 1;
- while (begin < psl->size)
- {
- psl->a[begin - 1] = psl->a[begin];//注意数组越界的问题
- begin++;
- }
- psl->size--;
- }
2.3.5 SeqListInsert(任意位置pos的插入)
pos是顺序表中数组的下标,在任意位置进行插入难免的是挪动数据,插入的时需要从后往前挪动,以避免数据的覆盖;
还有一个需要去注意的点是pos是数组下标,是有范围的,一定要注意数组的越界问题。
- void SeqListInsert(SeqList* psl, int pos, SLDataType x)
- {
- assert(psl);
- assert(pos >= 0 && pos <= psl->size);//==的情况是尾插
- Checkcapacity(psl);
- int end = psl->size - 1;
- while (end >= pos)
- {
- psl->a[end + 1] = psl->a[end];
- end--;
- }
- psl->a[pos] = x;
- psl->size++;
- }
既然是任意位置的插入,那么头插和尾插是可以复用的:
- void SeqListPushBack(SeqList* psl, SLDataType x)
- {
- SeqListInsert(psl, psl->size, x);
- }
- void SeqListPushFront(SeqList* psl, SLDataType x)
- {
- SeqListInsert(psl, 0, x);
- }
2.3.6 SeqListErase(任意位置pos的删除)
任意位置的删除同样是需要挪动数据的,和插入不同的是需要删除需要从前往后挪数据。
- void SeqListErase(SeqList* psl, int pos)
- {
- assert(psl);
- assert(pos >= 0 && pos < psl->size);//同时检查了size的数目大于0
- int begin = pos + 1;
- while (begin < psl->size)
- {
- psl->a[begin - 1] = psl->a[begin];
- begin++;
- }
- psl->size--;
- }
同样的,头删和尾删可以复用:
- void SeqListPopBack(SeqList* psl)
- {
- SeqListErase(psl, psl->size - 1);
- }
- void SeqListPopFront(SeqList* psl)
- {
- SeqListErase(psl, 0);
- }
2.3.7 SeqListFind(查找) &SeqListModify(修改)
- //直接遍历即可,返回的是整型的下标
- int SeqListFind(SeqList* psl, SLDataType x)
- {
- assert(psl);
- assert(psl->size);
- for (int i = 0; i < psl->size; i++)
- {
- if (psl->a[i] == x)
- return i;
- }
- return -1;
- }
修改可以配合查找使用,查找到的下标传给SeqListModify可以直接完成修改:
- void SeqListModify(SeqList* ps, int pos, SLDataType x)
- {
- assert(ps);
- assert(pos >= 0 && pos < ps->size);
- ps->a[pos] = x;
- }
2.3.8 SeqListDestory(销毁)
注意顺序表sl中动态开辟的数组有可能还没有开空间(psl->a=NULL),直接psl->a会报错。
- void SeqListDestory(SeqList* psl)
- {
- assert(psl);
- if (psl->a)
- {
- psl->a = NULL;
- psl->capacity = psl->size = 0;
- }
- }
2.4 顺序表的问题及改善
问题:
- 中间/头部的插入和删除,需要挪动数据,时间复杂度为O(N)
- 增容需要重新申请空间,可能需要拷贝数据,释放旧的空间,会有不小的损耗
- 增容一般呈现二倍增长,势必会有一定的空间浪费
当容量为100时,满了之后扩容为200,但是我们只需要再插入5个数据,后面就没有数据插入了,就浪费了95个数据空间。
思考:如何根据上述问题进行优化?
改善方案:1.按需申请空间 2.头部或者中间的插入删除,不需要挪动数据
这种改善的方案是可以实现的,也就是另一种线性存储——链表。
3.链表
3.1 链表的概念及结构
概念:链表是一种物理存储结构上非连续,而逻辑上连续的存储结构。

注意:
- 链式结构在逻辑上是连续的,但是在物理上不一定是连续的
- 现实中的结点一般都是从堆上申请出来的
- 从堆上申请空间,是按照一定的策略来分配的,两次申请的空间可能连续,也可能不连续
3.2 带头双向循环链表的实现
链表有很多分类,带头或不带头;单向或双向;循环或非循环;三种组合有9种情况。
我们在这里主要学习的是带头双向循环链表,虽然它看起来复杂,但是实现起来并不复杂,而且相比于其他类型有很大的优势。

链表是按需申请空间的,申请的每个结点是一个结构体类型,所以要先定义出一个结构体类型。
- typedef int DLLDataType;
- typedef struct DLListNode
- {
- DLLDataType val;
- struct DLListNode* next;
- struct DLListNode* prev;
- }DLLNode;
我们实现的链表存储的数据是int类型,所以对int进行重命名,如果存储的数据不是int类型,把int改成其他的类型即可。
3.2.1 DDLInit(初始化)
链表的初始化和顺序表的初始化有所差别:

链表的初始化需要创建一个结点,让它的prev和next都指向自己(循环),然后再返回这个结点的指针即可。
由于申请结点需要动态开辟,而且要频繁的使用,所以封装成了一个函数BuyNode()。
带头结点存储的值并不是固定的,这里给了一个-1。
- DLLNode* BuyNode(DLLDataType x)
- {
- DLLNode* newnode = (DLLNode*)malloc(sizeof(DLLNode));
- if (newnode == NULL)
- {
- perror("malloc fail");
- exit(-1);
- }
- newnode->val = x;
- newnode->next = NULL;
- newnode->prev = NULL;
- return newnode;
- }
- DLLNode* DLLInit()
- {
- DLLNode* phead = BuyNode(-1);
- phead->next = phead;
- phead->prev = phead;
- return phead;
- }
3.2.2 DLLPushBack(尾插) &DLLPushFront(头插)
学习数据结构和我们学习语言有很大的不同,学习语言的时候很少借助画图,但是学习数据结构的话一定要画图,借助画图来转化为代码,不然很容易出现一些常见错误。
像尾插就需要先画图:

插入需要改变四个指针的指向:tail->next、newnode->prev、newnode->next、phead->prev。
- void DLLPushBack(DLLNode* phead, DLLDataType x)
- {
- assert(phead);
- DLLNode* newnode = BuyNode(x);
- DLLNode* tail = phead->prev;
- tail->next = newnode;
- newnode->prev = tail;
- phead->prev = newnode;
- newnode->next = phead;
- }
头插也是一样的,下面先画图:

- void DLLPushFront(DLLNode* phead, DLLDataType x)
- {
- assert(phead);
- DLLNode* newnode = BuyNode(x);
- DLLNode* next = phead->next;
- newnode->next = next;
- next->prev = newnode;
- phead->next = newnode;
- newnode->prev = phead;
- }
3.2.3 DLLPopBack(尾删) &DLLPopFront(头删)
链表的删除,需要先进行判空,判断链表除了头结点之外是否有其它结点;
- bool DLLEmpty(DLLNode* phead)
- {
- assert(phead);
- return phead->next == phead;
- }
DLLPopBack:
删除注意free结点,删除只需要修改两个指针。

- void DLLPopBack(DLLNode* phead)
- {
- assert(phead);
- assert(!DLLEmpty(phead));
- DLLNode* tail = phead->prev;
- DLLNode* tailPrev = tail->prev;
- free(tail);
- tail = NULL;
- tailPrev->next = phead;
- phead->prev = tailPrev;
- }
DLLPopFront:

- void DLLPopFront(DLLNode* phead)
- {
- assert(phead);
- assert(!DLLEmpty(phead));
- DLLNode* head = phead->next;
- DLLNode* headnext = head->next;
- free(head);
- head = NULL;
- phead->next = headnext;
- headnext->prev = phead;
- }
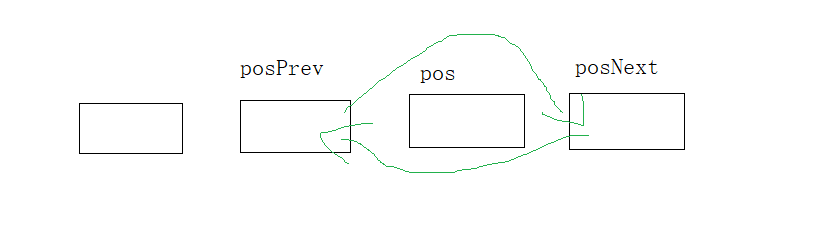
3.2.4 DLLPushInsert(任意位置之前的插入)

- void DLLPushInsert(DLLNode* pos, DLLDataType x)
- {
- assert(pos);
- DLLNode* posprev = pos->prev;
- DLLNode* newnode = BuyNode(x);
- posprev->next = newnode;
- newnode->prev = posprev;
- newnode->next = pos;
- pos->prev = newnode;
- }
既然是任意位置的插入删除,那么头插和尾插自然而然的就可以复用:
- void DLLPushBack(DLLNode* phead, DLLDataType x)
- {
- assert(phead);
- DLLPushInsert(phead, x);
- }
- void DLLPushFront(DLLNode* phead, DLLDataType x)
- {
- assert(phead);
- DLLPushInsert(phead->next, x);
- }
3.2.5 DLLErase(任意位置的删除)
- void DLLPopErase(DLLNode* pos)
- {
- assert(pos);
- DLLNode* posprev = pos->prev;
- DLLNode* posnext = pos->next;
- posprev->next = posnext;
- posnext->prev = posprev;
- free(pos);
- pos = NULL;
- }
头删和尾删的复用:
- void DLLPopBack(DLLNode* phead)
- {
- assert(phead);
- assert(!DLLEmpty(phead));
- DLLPopErase(phead->prev);
- }
- void DLLPopFront(DLLNode* phead)
- {
- assert(phead);
- assert(!DLLEmpty(phead));
- DLLPopErase(phead->next);
- }
3.2.6 DLLFind(查找) & DLLModify(修改)
- DLLNode* DLLFind(DLLNode* phead, DLLDataType x)//返回第一个值为val的节点
- {
- assert(phead);
- assert(!DLLEmpty(phead));
- DLLNode* cur = phead->next;
- while (cur != phead)
- {
- if (cur->val == x)
- return cur;
- }
- return NULL;
- }
- void DLLModify(DLLNode* pos, DLLDataType x)
- {
- assert(pos);
- pos->val = x;
- }
3.2.7 DLLDestory(销毁)
- void DLLDestory(DLLNode* phead)
- {
- assert(phead);
- assert(!DLLEmpty(phead));
- DLLNode* cur = phead->next;
- while (cur != phead)
- {
- DLLNode* next = cur->next;
- free(cur);
- cur = next;
- }
- free(phead);
- }
顺序表和链表的实现到这里就结束了,阅读之后感觉有所收获的话可以给博主点个关注,后续会继续更新数据结构相关内容。
-
相关阅读:
后端学习 -gRPC
了解条码软件中的图形工具
重新认识交叉编译
【科学文献计量】外文文献及中文文献关键词的挖掘与可视化
JEPG Encoder IP verilog设计及实现
Java项目:基于jsp+servlet在线药店管理系统(含PPT)
dubbo和feign的区别
线性表的顺序实现【C语言版的真代码】
【超好懂的比赛题解】HNCPC Multi-university Training Round2 比赛题解(AHBGIK)
揭秘报表新玩法!标配插件不再单调,如何用柱形图插件让你的报表瞬间高大上!
- 原文地址:https://blog.csdn.net/qq_63179783/article/details/125632575
